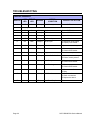
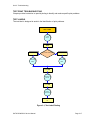
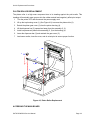
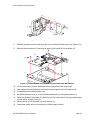
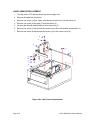
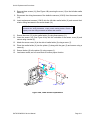
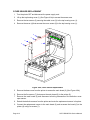
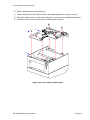
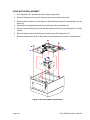
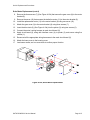
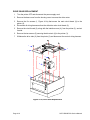
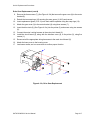
1
D508/D512
PRINTER
SERVICE MANUAL
PN: 9001178
SATO America, Inc.
10350A Nations Ford Road
Charlotte, NC 28273
Main Phone: (704) 644.1650
Technical Support: (704) 644.1660
Technical Support Fax: (704) 644.1661
E-Mail: [email protected]
[email protected]
www.satoamerica.com
PN: 9001178
Table of Contents
Overview
Introduction ........................................................................................................................................... 1-3
Unpacking ............................................................................................................................................. 1-4
Printer Part Names ............................................................................................................................... 1-5
Setting Up The Printer .......................................................................................................................... 1-6
Loading Media ...................................................................................................................................... 1-7
Label Sensing ....................................................................................................................................... 1-9
3.1 Operating Panel ............................................................................................................................ 1-10
Configuration: The Rear Panel ........................................................................................................... 1-11
The Configuration Panel ..................................................................................................................... 1-12
Switch 4: Unused ................................................................................................................................ 1-13
Switch 5: Head Check ........................................................................................................................ 1-13
Switch 6: VR1 Potentiometer Adjustment mode ................................................................................. 1-13
Offsets ................................................................................................................................................ 1-15
Potentiometer Adjustments ................................................................................................................. 1-16
Data Dump Diagnostic Label .............................................................................................................. 1-18
Printing Test Labels ............................................................................................................................ 1-19
Printing Factory/Service Test Prints ................................................................................................... 1-20
Basic and Interface Specifications
1.1 Basic Printer Specifications .......................................................................................................... 2-2
1.1 General Specifications (cont’d) ...................................................................................................... 2-3
Interface types ...................................................................................................................................... 2-6
The Receive Buffer ............................................................................................................................... 2-7
IEEE1284 Parallel Interface .................................................................................................................. 2-9
RS-232C Interface .............................................................................................................................. 2-10
RS-232C Interface Signals ................................................................................................................. 2-11
Universal Serial Bus Interface ............................................................................................................ 2-12
Local Area Network Interface ............................................................................................................. 2-13
Wireless 802.11 LAN Interface ........................................................................................................... 2-13
Troubleshooting
Interface Troubleshooting ..................................................................................................................... 3-5
Troubleshooting Flowcharts .................................................................................................................. 3-7
Problem: Printer Does Not Power Up ................................................................................................... 3-7
Problem: Label Does Not Feed Outward In A Straight Path ................................................................. 3-8
Problem: Printer Does Not Print ........................................................................................................... 3-8
Problem: Printer Does Not Print ........................................................................................................... 3-9
Problem: Printer Does Not Feed Labels ............................................................................................. 3-10
Problem: Printer Does Not Stop At The Correct Position ................................................................... 3-11
Problem: Wireless LAN Printer Is Not Printing ................................................................................... 3-11
Problem: Printing Is Too Dark ............................................................................................................. 3-12
Problem: Printing is Too Light On One Side ....................................................................................... 3-12
PN: 9001178
Problem: Print Start Position Is Incorrect Vertically ............................................................................ 3-13
Problem: Print Start Position Is Incorrect Horizontally ........................................................................ 3-14
Problem: White Lines Appear In Printed Labels ................................................................................ 3-14
Problem: Labels are Not Being Dispensed Properly By The Optional Dispenser Unit ...................... 3-15
Problem: The Cutter Is Not Working ................................................................................................... 3-16
Problem: The Cutter Is Not Working ................................................................................................... 3-16
Test Print Troubleshooting .................................................................................................................. 3-17
Test Labels ......................................................................................................................................... 3-17
Data Dump Diagnostic Label .............................................................................................................. 3-19
Printing Factory/Service Test Labels .................................................................................................. 3-20
Replacement Procedures
Print Head Replacement ....................................................................................................................... 4-2
Platen Roller Replacement ................................................................................................................... 4-3
Accessing the Main Board .................................................................................................................... 4-4
Fuse Replacement ................................................................................................................................ 4-5
Main Circuit Board Replacement .......................................................................................................... 4-6
Panel Board Replacement .................................................................................................................... 4-7
Relay Board (Label Sensor Board) Replacement ................................................................................. 4-8
Label Sensor Replacement ................................................................................................................ 4-10
Cover Sensor Replacement ................................................................................................................ 4-12
Drive Motor Replacement ................................................................................................................... 4-14
Drive Gear Replacement .................................................................................................................... 4-16
Cutter Assembly ................................................................................................................................. 4-18
Checks/Adjustment Procedures
Top of Forms Offset .............................................................................................................................. 5-2
Factory Clear ........................................................................................................................................ 5-3
Print Darkness ...................................................................................................................................... 5-4
Printer Counter Clear ............................................................................................................................ 5-6
Cutter Counter Clear (If Cutter Is Installed) .......................................................................................... 5-6
Test Print Counter Clear ....................................................................................................................... 5-7
Cut Position (If Cutter Is Installed) ........................................................................................................ 5-7
Eye Mark / Paper End Sensor Sensitivity ............................................................................................. 5-8
Paper End Sensor Sensitivity (Alternate) ............................................................................................. 5-8
Gap Sensor Sensitivity ......................................................................................................................... 5-9
Gap Sensor Sensitivity (Alternate) ........................................................................................................ 5-9
Power Supply Checks ......................................................................................................................... 5-10
Unit 1: Overview
OVERVIEW
SATO D508/D512 Service Manual
Page 1-1
OVERVIEW
Thank you for your investment in this SATO printer product.
This Service Manual contains information about the specifications, replacement procedures,
checking/calibration procedures, and troubleshooting of common problems associate with the
D508/D512. A total of four topics are covered herein, and they are organized as follows:
Section 1: Overview
Section 2: Basic and Interface Specifications
Section 3: Troubleshooting
Section 4: Replacement Procedures
Section 5: Checks and Adjustment Procedures
The Overview section provides a description of the printer, information on how to access the
main board, how to unpack the printer, how to identify the printer parts, how to set up the printer,
how to load media, information on label sensing and configuration, adjustments, and test labels.
The Basic and Interface Specifications section serves as a guide to personnel who need to
understand the communication protocols needed to control the printer using third party software,
and for troubleshooting interface problems.
The Troubleshooting section aids in the process of diagnosing and correcting common problems. After troubleshooting, the service personnel can then determine whether any repairs, parts
replacements and/or adjustments are necessary,
The Replacement Procedures section covers the main components of the product, and how the
service personnel can dismantle and reassemble the parts in order to maintain, clean, repair or
replace them.
Finally, the Checks and Adjustment Procedures are needed after certain maintenance or
repair work involving certain precision components.
It is recommended that you become familiar with each section before attempting to service the
product. Refer to the Table Of Contents at the front of this manual to search for the relevant
information needed. All page numbers in this manual consist of a section number followed by the
page number within the stated section.
Note:
All information herein was correct and current at the time of publication. The contents of this document are subject to revision and change without prior notification to users. To obtain the most
current version of this document, refer to the SATO website at www.SATOAmerica.com.
Page 1-2
SATO D508/D512 Service Manual
Unit 1: Overview
INTRODUCTION
The SATO D508/D512 Printer Service Manual provides information for installing and maintaining
D508/D512 Direct Thermal printers. Step-by-step maintenance instructions are included in this
manual with typical problems and solutions. It is recommended that you become familiar with
each section in this manual before installing and maintaining the printer.
The major difference in the D508 and the D512 printers is the resolution of the print head. The
D508 with its 203 dpi head provides an economical labeling solution for most applications. It can
print labels up to four inches wide. The D512's higher 305 dpi resolution provides greater detail
for graphics and small point size text.
The D5 Series printers use a subset of the standard SATO Command Language. The D508 and
D512 share the same command set, the only differences are the allowable values representing
the print positions on the label. These values are specified in "dots" and will vary depending upon
the resolution of the printer and the amount of memory available for imaging the label. The allowable range for each printer is specified in a table for those command codes. In addition, users
can choose an interface—such as parallel (IEEE1284), serial (RS-232C), Ethernet (10/100BaseT), USB 1.1and Wireless LAN IEEE 802.11b.
SATO D508/D512 Service Manual
Page 1-3
Unit 1: Overview
UNPACKING
When unpacking the printer, take note of the following:
1 The box should stay right-side up.
Lift the printer out of the box carefully.
4 If the printer has been stored in the
cold, allow it to reach room
temperature before turning it on.
2 Remove the plastic covering from the
printer.
5 Set the printer on a solid, flat surface.
Inspect the shipping container and
printer for any sign of damage that
may have occurred during shipping.
3 Remove the accessory items from their
protective containers.
Note:
The following parts shown here are representative only. Due to regional requirements and our policy of
continual improvement, your printer may not be packed with the exact parts as shown here, but the
unpacking steps are similar.
Printer
AC adaptor and cable
User documentation and software
package (where applicable)
SATO D508/D512 Service Manual
Page 1-4
PRINTER PART NAMES
Clear window and
fanfold-label Loading
Top Cover
Label Outlet
Release latch for Top Cover
LINE/FEED/
Power
buttons and
LEDs
7-segment
Error Status LED
Front cover
(allows access to optional cutter unit, DIP switches
and potentiometers)
Thermal Print
Head assembly
Label Holders
Label Sensor
Mini
Screwdriver
Label Holder Release Knob
Platen Assembly
Optional Cutter
Page 1-5
SATO D508/D512 Service Manual
Unit 1: Overview
SETTING UP THE PRINTER
Consider the following when setting up the printer:
Locate a solid flat surface with adequate room to set the printer. Make sure the AC
adaptor can be located so that the AC power cable can be attached to the printer and
an AC power outlet. The location should be near the host or computer terminal. The
maximum distance recommended is:
- 10 feet for a Parallel interface cable. Make sure it meets IEEE1284 specifications
- 18 feet for the optional Serial RS232 Interface
- 10 feet for the optional USB interface without hub
- the optional 10baseT Ethernet Interface depends upon the LAN cabling
- Up to 100m for the Wireless LAN, depending on structural conditions
Follow these steps to set up your printer:
1. Make sure the power switch on the Operator
Panel is in the OFF (0) position and place the
AC adaptor in a safe and secure location.
2. Connect the Input Power connector to the
printer. This connector is buttoned and must
be turned approximately 3/4 turn clockwise to
secure it to the printer.
3. Connect the AC Power Cable to an AC Outlet
supply of an appropriate voltage.
4. Connect the interface cable to the host system.
If you are using the Parallel Port connection, a
parallel IEEE1284 interface cable must be
used to realize the high data transfer rate of
the printer's parallel port. If another interface is
installed, the appropriate cable should be
used.
5. Load the label media following the instructions
in this section.
6. Configure the printer for label width and operating mode using the instructions in this section.
7. Press the printer power button to the ON (I) position.
8. Print a test label to verify the printer is set up and operating correctly.
SATO D508/D512 Service Manual
Page 1-6
LOADING MEDIA
The SATO D508/D512 printer can print to direct thermal die-cut labels, tags or continuous media.
The media supply can be either in Roll or Fanfold format.
Roll Media
Roll media should be between 0.98" (25 mm) and 4.3" (110 mm) in width and wound face-out on
a core with a minimum internal diameter of 1.6" (40 mm).
1.
Make sure the printer is turned OFF.
2. Open the Top Cover by pressing on cover
release points located on the right-hand
side of the printer. This releases the Top
Cover and allows it to swing upward on the
rear mounted hinge points.
3. With the Top Cover in the upright position,
press the Paper Guide Release while
adjusting the Paper Guides until they allow
a media roll to fit between them. A millimeter scale is molded into the case to provide
a guide when making the adjustment. The
Paper Guides are center justified and interact with each other so that each moves an
equal distance.
Paper
Sensor
Cover/Print Head
Release Latch
Roll Holders
4. Make sure the Roll Holders are in the
released position. If they are not, lift up on
each one and they will snap to the open
position.
5. Unwind approximately 12" of label material
from the roll. The labels should be wound
face-out (printing side to the outside of the
roll). Drop the roll in-between the Paper
Guides so that the labels come off the top
of the roll. The Paper Guides will automatically position the Roll Holders to suspend
the roll.
Page 1-7
Millimeter
scale
Paper Guide
Release
Label path
SATO D508/D512 Service Manual
Unit 1: Overview
6. Route the label material through the Paper
Sensor Assembly and over the Platen. Note
that the Sensor is part of the left Label Roll
Guide so that the Paper Sensor is always
positioned in the same location relative to
the left edge of the label.
Platen
7. Close the Top Cover.
8. Press the LINE button so that the printer is
in the OFF LINE mode and then press the
FEED button. The label should advance to
the next index (label gap) position.
Paper Sensor Paper Guide
Fanfold media
1. Place the fanfold media behind the printer
with the printing surface up.
2. Open the Top Cover by pressing on the cover
release latch located on the right-hand side
of the printer. This releases the cover and
allows it to swing upward on the rear
mounted hinge points.
3. Carefully pull up the Fanfold-label Loading
Slot from the back of the Top Cover.
4. With the Top Cover in the upright position,
press the Paper Guide Release while adjusting the Paper Guides until they allow a media
to fit between them. A millimeter scale is
molded into the case to provide a guide when
making the adjustment. The Paper Guides
are center-justified and interact with each
other so that each moves an equal distance
apart from each other.
5. Route the label material through the Sensor
Assembly and over the Platen.
SATO D508/D512 Service Manual
Pull up
the
loading
slot
Pull
open
the Top
Cover
Load
the
fanfold
paper
Page 1-8
6. Close the Top Cover.
7. After loading the label media, it is
recommended that you run a Test
Print to make sure the labels are
correctly loaded and printed.
LABEL SENSING
Roll-label path
Fanfold-label path
Overview of the fanfold-paper loading path
The SATO D508/D512 uses label Gap (see-through) or Eye-Mark (reflective) sensing. The
Sensor Assembly is located on the left edge of the media and is automatically positioned by the
Paper Guides.
Page 1-9
SATO D508/D512 Service Manual
Unit 1: Overview
CONFIGURATION
Before using the printer, it is best to read this manual thoroughly first. Otherwise, you may disturb
default settings around which the instructional procedures in this manual are based upon.
3.1 OPERATING PANEL
The Operator Panel consists of three LED indicators and three switches.
POWER
The green LED lights up when the printer is ON.
ERROR
The red LED lights up when there is a system fault
such as an unlatched print head.
ON LINE
The green LED lights up when the printer is ON LINE
and ready to receive data. The ON LINE button
takes the printer ONLINE or OFFLINE.
LINE Button
If the ONLINE LED is lit, pressing it will take the printer
OFFLINE. Pressing the button again then takes the printer
back ONLINE. When ONLINE, the printer is ready to
receive data from the host. When OFFLINE, the printer
will not print or accept data from the host. While the
printer is printing, press this button to suspend the
printing. To resume printing, press this button again.
FEED BUTTON
Press this button to eject one label in OFFLINE mode.
Hold this button down while power is applied, to print a printer
status label.
POWER SWITCH
A two position switch for turning the printer ON (I) or OFF (0).
SATO D508/D512 Service Manual
Page 1-10
CONFIGURATION: THE REAR PANEL
All of the printer cable connectors are located on the Rear Panel, as follows.
Fanfold-label Loading Slot
Remove this panel to route fanfold paper into the printer
Interface
Slot
(IEEE1284
Parallel
Interface
Connector
shown)
Page 1-11
Power
Connector
for DC power
input from the
supplied AC
Adapter
SATO D508/D512 Service Manual
Unit 1: Overview
THE CONFIGURATION PANEL
The Configuration Panel is accessible when you lift up the top cover.
The panel consists of an eight-position DIP switch, four adjustment potentiometers and a sevensegment LED Error Status display. Receptacles for connecting the optional Cutter (factory
installed) are also located on this panel.
VR4
Label Pitch
Offset
VR1
Offset or
Darkness
DIP switch for
Configuration
VR2
EYE MARK
VR3
GAP
Error
Status
LED
DIP SWITCH SETTINGS
This is an eight-position switch used for setting the operating conditions of the printer. Switches 1
to 3 act as control for both paper handling and the loading of programs or fonts into the printer.
Switches 1–3: Paper Handling settings
These three switches select the method used for
controlling paper handling:
Continuous mode - (default mode) Does not
use the sensor for paper indexing. The paper
movement will stop after all the label data has
been printed.
Tear Off mode - Paper is fed out to the cut/tear
off position after printing is complete. Before the
next label is printed, the paper is pulled back in
to the first print line position.
DSW1 DSW2 DSW3
Mode
Off
Off
Off
Continuous
On
Off
Off
Tear Off
Off
On
Off
Cutter
On
Off
On
Reserved
Off
On
On
Load Font
Configuration Switch
ON
OFF
1
2
3
4
5
6
7
8
Cutter mode - Enables the Cutter option if
installed.
SATO D508/D512 Service Manual
Page 1-12
DIP SWITCH SETTINGS (CONT’D)
Switches 1–3: Font/Graphic loading settings
Enables the loading of fonts and/or graphics into
printer memory for faster retrieval.
DSW1 DSW2 DSW3
Off
On
Mode
On
Load Font
Configuration Switch
ON
OFF
1
Switch 4: Unused
2
3
DSW4
This switch is reserved for future use.
4
5
6
7
8
7
8
7
8
7
8
Mode
Off
DT
On
Reserved
Configuration Switch
ON
OFF
1
Switch 5: Head Check
Enables or Disables the printer function that checks
the print head automatically.
2
3
4
5
6
DSW5
Mode
Off
Disabled
On
Enabled
Configuration Switch
ON
OFF
1
Switch 6: VR1 Potentiometer Adjustment mode
2
3
DSW6
Selects the function adjusted by VR1. When placed
in the OFF position, VR1 will adjust the media tearoff / cut (backfeed distance) offset value over a
range of +/- 3.75 mm. When placed in the ON
position, VR1 will adjust the print darkness range.
4
5
6
Mode
Off
Media Tear-Off
On
Print Darkness
Configuration Switch
ON
OFF
1
Page 1-13
2
3
4
5
6
SATO D508/D512 Service Manual
Unit 1: Overview
DIP SWITCH SETTINGS (CONT’D)
Switch 7: DATA Dump
When ON, the printer will print out the hex value for
each character received. When OFF, the printer will
accept and process the data stream in a normal
fashion.
DSW7
Mode
Off
Disabled
On
Enabled
Configuration Switch
ON
OFF
1
Switch 8: Unused
This switch is reserved for future use.
2
3
4
5
DSW8
Mode
-
-
-
-
6
7
8
7
8
Configuration Switch
ON
OFF
1
SATO D508/D512 Service Manual
2
3
4
5
6
Page 1-14
OFFSETS
There are two offset settings stored in the printer; one for the Cut mode and one for the Tear-Off
mode.
These two offsets can be set independently and will remain in the printer until a new command is
received changing the setting or until power is turned off.
The default settings can be determined by printing a User Test Label.
The following should be used as starting points for establishing the three Offset values:
Mode
Length of Offset (mm) Length of Offset (in) Print head resolution
CUTTER
17.9
0.70
143/215
TEAR-OFF
29.2
1.15
234/350
Page 1-15
SATO D508/D512 Service Manual
Unit 1: Overview
POTENTIOMETER ADJUSTMENTS
PITCH OFFSET
This can be done using the VR4 potentiometer on the Configuration Panel. This potentiometer is
set at the factory so that it has a range of +/-3.75 mm. The midpoint setting should have no effect
on the label pitch. Turning the potentiometer all the way clockwise should move the print position
3.75 mm upwards towards the leading edge of the label. Turning the it all the way
counterclockwise should move the print position down 3.75mm away from the leading edge of
the label.
1.
Place DSW6 on the Configuration Switch in
the OFF position.
Must be moved with Minus (-)
Offset to print on leading edge of
label
2. Turn the power OFF.
3. While pressing the FEED button on the
Operator Panel, turn the power ON.
ABCDEFG
4. When you hear one beep from the printer,
release the FEED button.
6. Adjust potentiometer VR4 until the first
print position is at the desired location on
the label.
7. Press the FEED button to stop printing.
ABCDEFG
label movement direction
5. Press the LINE button to begin printing
large Test Labels (press the FEED button
if you are using labels smaller than 4.1"
(104 mm) in width).
Original First Line
Print Position
ABCDEFG
Note:
Adjusting the Label Pitch with VR4 will
affect the stop position of the label and the
cut/tear-off positions.
Moved with
Positive (+) Offset
to print on trailing
edge of label
SATO D508/D512 Service Manual
Leading Edge of
Label as detected
by the sensor
Page 1-16
Print Darkness
A fine adjustment for PRINT DARKNESS can be made using potentiometer VR1 on the Front
Operator Panel. It provides a continuous range of adjustment, allowing you to make precise
changes. Turning VR1 clockwise will make the print darker, and counterclockwise will make it
lighter.
1. Place DSW6 on the Configuration Switch in the ON position.
2. Turn the Power Switch OFF.
3. While pressing the FEED button on the Operator Panel, turn the Power Switch ON.
4. When you hear one beep from the printer, release the FEED button.
5. Press the LINE button to begin printing large Test Labels (press the FEED button if you are
using labels smaller than 4.1" (104 mm) in width).
6. Adjust potentiometer VR1 until the desired print darkness is obtained.
7. Press the FEED button to stop the printing.
Adjustment of the Print Darkness using VR1 will affect the darkness in all the <ESC>#E
command code ranges; that is, if the print darkness is adjusted with VR1 for lighter print, the
darkness will be lighter in all the Print Darkness ranges selected by the command code.
Page 1-17
SATO D508/D512 Service Manual
Unit 1: Overview
DATA DUMP DIAGNOSTIC LABEL
The contents of the printer buffer can be examined using the DATA Dump mode. This printout
labels each line of the received data in the left hand column, the data in the middle column
followed by the same data in ASCII format in the right-hand column.
1. Turn the printer OFF.
2. Place DSW7 on the configuration Switch in the ON position.
3. Turn the printer ON.
4. Transmit data to the printer.
5. The data received is printed on the label.
6. Place DSW7 in the OFF position.
7. Turn the printer OFF and then back ON to place it back in the normal print mode.
SATO D508/D512 Service Manual
Page 1-18
PRINTING TEST LABELS
1. The User Test Label prints the current default settings of the printer.
2. Press the FEED button while turning the power ON.
3. When the printer beeps, release the FEED button.
4. To print a large (4" wide) test label, press the LINE button. To print a small (2" wide) test label,
press the FEED button.
5. The printer will continuously print the USER TEST LABEL until the FEED button is pressed. If
the FEED button is pressed another time, printing will resume.
6. To remove the printer from the Test Label mode, power the printer OFF.
Note:
Depending on the version of your printer’s onboard software, the appearance of your test
printout may be different from that shown here.
Page 1-19
SATO D508/D512 Service Manual
Unit 1: Overview
PRINTING FACTORY/SERVICE TEST PRINTS
The Factory/Service Test Label prints the internal operating parameters of the printer.
1. Open the top cover to open print head.
2. Press the LINE and FEED buttons while turning the printer ON.
3. When the printer beeps, release the LINE and FEED buttons. The printer will then beep 3
times, indicating that the print head/cover is open.
4. Close top cover to latch print head in closed position
5. Press the LINE button to print a large (4" wide") Factory/Service Test Label. Press the FEED
button to print a small (2" wide) Factory/Service Test Label.
6. The printer will begin printing a series of test labels, the first containing the operational
parameters of the printer followed by one containing the internal printer settings. These two
label formats will alternate until the FEED button is pressed, suspending the print operation. If
the FEED button is pressed again, the printing will resume.
To remove the printer from the Factory/Service Print Test mode, remove power by placing the
POWER switch in the OFF position.
Note:
Depending on the version of your printer’s onboard software, the appearance of your test
printout may be different from that shown here.
SATO D508/D512 Service Manual
Page 1-20
Unit 2: Interface Specifications
BASIC AND INTERFACE
SPECIFICATIONS
•
•
D508/D512 Service Manual
Basic Printer Specs
Interface Specs
Page 2-1
1.1 BASIC PRINTER SPECIFICATIONS
Attribute
PRINT
Print Method
CPU
Printer Command Language
Resident Fonts
Font Memory
Print Head Resolution
Print Speed
Max. Print Area
MEDIA
Label Thickness
(Label + backing paper)
Label Form
Label Size (adhesive labels)
Direct Thermal
32-bit RISC processor
SBPL
U
S
M
XU
XS
SM
WB
WL
XB
XL
CG Times
CG Triumvirate
OCR-A
OCR-B
4 MB
8 dots per mm for 203 dpi | 12 dots per mm for 305 dpi
6 ips
104 mm (width) by 400 mm (pitch)
0.06 mm* ~ 0.19 mm
(*Check with your dealer regarding conditions
for using thin 0.06 mm labels)
Roll Label : Maximum outer diameter of 110mm (face out),
Core Inner Diameter of 40mm
Fan-fold label : Max foldable height 100 mm (loaded externally)
For continuous feed:
Width: 25~115 mm (including liner 28~118 mm)
Pitch: 15~397mm (including liner 18~400 mm)
For Cutter usage (optional):
Width: 25~115 mm (including liner 28~118 mm)
Pitch: 20~397mm (including liner 23~400 mm)
For Tear Off mode:
Width: 25~115 mm (including liner 28~118 mm)
Pitch: 15~397mm (including liner 18~400 mm)
Label Size (non-adhesive labels)
For continuous feed or tear off mode:
Width: 25~118mm
Pitch: 15~400 mm
With cutter installed:
Width: 25~118mm
Pitch: 20~400 mm
SENSING
See-Through for labels or tags
Continuous Form
Eye Mark
0.012” (3 mm)
Sensor not used
Fixed, 0.25" (6.3 mm) from left label edge. 0.12” (3 mm) wide x minimum 0.5” (12 mm) in length from left label edge.
*All specifications subject to change without notice.
Page 2-2
D508/D512 Service Manual
Unit 2: Interface Specifications
1.1 GENERAL SPECIFICATIONS (CONT’D)
Attributes
CONTROLS AND SIGNALS
On-Line LED
Power LED
Error LED
LED Display Panel
On/Off-Line Button
Label Feed Button
Power On/Off Button
Self Diagnostics
POTENTIOMETER ADJUSTMENTS
Adjustment Potentiometers
DIP switches
INTERFACE CONNECTIONS
Parallel (Option)
Serial (Option)
USB (Option)
LAN (Option)
RFID (Option)
Wireless LAN (Option)
Green
Green
Red
7-Segment Single Character
Front Panel
Front Panel
Front Panel
Head check
Paper end
Cover open
Test print
VR1: Offset level (DIPSW6 = OFF)
VR1: Print darkness (DIPSW6 = ON)
VR2: Eye Mark / Paper End (to adjust the threshold)
VR3: Gap sensor (to adjust the threshold)
VR4: Label pitch offset
DIP-SW -1,2,3 : Operation mode(Print mode/Download mode)
DIP-SW -4 : Reserved (constantly OFF)
DIP-SW -5 : Head check (ON-Enabled / OFF-Disabled)
DIP-SW -6 : VR1 function switch
(ON-Print darkness level / OFF-Offset)
DIP-SW -7 : DATA dump (ON-HEX dump print / OFF-Normal print)
DIP-SW -8 : Reserved (constantly OFF)
IEEE1284
RS232C (9600 to 57.6K bps) Hardware Flow Control (Ready/Busy)
Software Flow Control (X-On/X-Off)
Bi-directional Status
USB Specification Version 1.1
10/100 Base-T
13.56 MHz band, TBA
TBA
*All specifications subject to change without notice.
D508/D512 Service Manual
Page 2-3
1.1 GENERAL SPECIFICATIONS (CONT’D
Barcodes
SYMBOLOGIES
Supported 1D formats
(excluding customized barcode
addressing in firmware)
Supported 2D formats
Ratios
Bar Height
Rotation
UPC-A/E
EAN-8/EAN-13
CODABAR
CODE39
CODE93
CODE128
UCC/EAN128
Interleaved 2 of 5
Industrial 2 of 5
Matrix 2of5
RSS Composite
MSI
POSTNET
Bookland
PDF 417
Micro PDF 417
Truncated PDF 417
Maxicode
Data Matrix
QR Code
1:2, 1:3, 2:5 User definable bar widths (depending on software)
4 to 600 dots (depending on software)
0°, 90°, 180° and 270° (depending on software)
*All specifications subject to change without notice.
Physical Attributes
DIMENSIONS
Width
Depth
Height
Weight
POWER REQUIREMENTS
Voltage
Power Consumption
ENVIRONMENTAL
Operating Temperature
REGULATORY APPROVALS
Safety
EMC/EMS
Page 2-4
7.8 in. (198 mm)
9.1 in. (230 mm)
6.6 in. (167 mm)
5.5 lbs (2.5 Kg) excluding AC adaptor
USA: AC 115 V (+/- 10 %)
Europe: AC 230V (+/- 10 %)
50/60 Hz (+/-1%)
67W nominal
Operation environment 0~35°/30~80%
(without condensation)
Storage environment -5~45°/20~80%
(without condensation)
USA : UL(UL60950-1)
CANADA : C-UL(CSA C22.2 No.60950-1-3)
Europe : TUV(EN60950-1), CE
USA : FCC15B (ClassB)
Europe : EN55022 ClassB, EN61000-3-2, EN610003-3,EN55024
D508/D512 Service Manual
Unit 2: Interface Specifications
1.1 GENERAL SPECIFICATIONS (CONT’D
Optional Accessories
Internal Cutter
IEEE1284 Interface
Serial Interface
LAN Interface
USB Interface
RFID
Wireless LAN Interface
User or factory installed Internal option allowing
labels to be cut at specified intervals.
Parallel interface. Factory or User installable
High Speed RS232 Interface option, 9600 bps to
57.6 Kbps. Factory or User installable.
TCP/IP Protocol Interface option. Factory or User
installable.
Universal Serial Bus Interface option. Factory or
User installable.
To be announced
802.11 b/g
*All specifications subject to change without notice.
D508/D512 Service Manual
Page 2-5
INTERFACE SPECIFICATIONS
INTERFACE TYPES
The SATO D508/D512 printer can be ordered with any of the interfaces described in this section.
The user can specify the desired interface at the time of placing an order. Thereafter, if the user
needs to change the interface, it is a simple matter of purchasing a suitable interface card from a
SATO dealer.
The following are the different types of interface boards available:
1) RS232C Interface Board
2) IEEE1284 Parallel Interface Board
4) USB Interface Board
5) LAN Interface Board (standard 10Base-T/100Base-T interface with RJ-45 connector)
6) Wireless LAN (802.11 b/g)
For programmers and technical personnel to fully utilize the printer, the following
information is presented in this section:
• The Receive Buffer
• IEEE1284 Parallel Interface
• Universal Serial Bus (USB) Interface
• Local Area Network (LAN) Interface
• RS232C Serial Interface
General Specifications
Electrical Specifications
Pin Assignments
Ready/Busy Flow Control
X-On/X-Off Flow Control
Page 2-6
D508/D512 Service Manual
Unit 2: Interface Specifications
THE RECEIVE BUFFER
This printer has the ability to receive a data stream from the host in one of two ways. The receive
buffer may be configured to accept one print job at a time or multiple print jobs. The single job
print buffer is generally used by software programs that wish to maintain control of the job print
queue so that it can move a high priority job in front of ones of lesser importance. The multiple
job buffer, on the other hand prints all jobs in the order they are received by the printer, and the
order of printing cannot be changed.
Single Job Buffer
The printer receives and prints one job at a time. Each job must not exceed 2.95MB.
D508/D512 Service Manual
Page 2-7
THE RECEIVE BUFFER (CONT’D)
Multi Job Buffer
The printer is able to continuously receive print jobs, compiling and printing other jobs at the
same time. It acts much like a "print buffer" to maximize the performance of the host and the
printer.
When you are using the RS232 Serial interface, the Multi Job Buffer uses either the Ready/Busy
with DTR (pin 20) or X-On/X-Off flow control protocols. With an empty receiving buffer, the status
of DTR is "high" (or an X-On status if using X-On/X-Off), meaning the printer is ready to receive
data. When the receive buffer is holding 1.95MB of data (1MB from being full), DTR will go "low"
(or an X-Off is sent) indicating the printer can no longer receive data. This condition is called
"Buffer Near Full."
The receiving buffer will not be able to receive more data again until a "Buffer Available"
condition occurs. This takes place when the receiving buffer has emptied so that only 1MB bytes
of data are being held (1.95MB bytes from being full). At this time, DTR will go "high" or an X-On
is sent to tell the host that it can again receive data.
All printer error conditions (i.e., label out, Time-out Error, etc) will cause the printer to go busy
(DTR "low" or X-Off) until the problem is corrected and the printer is placed on-line. The printer
will also be busy if taken off-line from the front panel.
Page 2-8
D508/D512 Service Manual
Unit 2: Interface Specifications
IEEE1284 PARALLEL INTERFACE
The parallel interface for this printer conforms to the IEEE1284 specification. It will automatically
detect the IEEE1284 signals and operate in the high speed mode. If it does not detect the
IEEE1284 signals, it will operate in the standard Centronics mode, which is significantly slower.
For this reason, an interface cable and host interface conforming to the IEEE1284 specification
must be present to fully utilize the speed capabilities. This interface also operates bidirectionally
and can report the status of the printer back to the host.
Electrical Specifications
Printer Connector
Cable Connector
Cable Length
Signal Level
PIN
SIGNAL
AMP 57-40360 (DDK) or equivalent
AMP 57-30360 (DDK) or equivalent
10 ft. (3 m) or less
High = +2.4V to +5.0V Low = 0V to -0.4V
DIRECTION
PIN
SIGNAL
DIRECTION
1
STROBE
To Printer
19
STROBE Return
Reference
2
DATA 1
To Printer
20
DATA 1 Return
Reference
3
DATA 2
To Printer
21
DATA 2 Return
Reference
4
DATA 3
To Printer
22
DATA 3 Return
Reference
5
DATA 4
To Printer
23
DATA 4 Return
Reference
6
DATA 5
To Printer
24
DATA 5 Return
Reference
7
DATA 6
To Printer
25
DATA 6 Return
Reference
8
DATA 7
To Printer
26
DATA 7 Return
Reference
9
DATA 8
To Printer
27
DATA 8 Return
Reference
10
ACK
To Host
28
ACK Return
Reference
11
BUSY
To Host
29
BUSY Return
Reference
12
PTR ERROR
To Host
30
PE Return
Reference
13
SELECT
To Host
31
INIT
From Host
14
AUTOFD (1)
To Host
32
FAULT
To Host
15
Not Used
33
Not Used
16
Logic Gnd
34
Not Used
17
FG
Frame Ground
35
Not Used
18
+5V(Z=24Kohm)
To Host
36
SELECTIN (1)
(1)
From Host
Signals required for IEEE1284 mode
D508/D512 Service Manual
Page 2-9
RS-232C INTERFACE
The High Speed Serial Interface is an factory installed option that must be installed in the printer
at the time of order. The D500 recognizes the RS-232 interface automatically.
General Specifications
Asynchronous ASCII
Half-duplex communication
Ready/Busy Hardware Flow Control
Pin 20, DTR Control
Pin 4, RTS Error Condition
X-On/X-Off Software Flow Control
Bi-Directional Communication
Data Transmission Rate
9600, 19200, 38400, 57600 bps
Character Format
1 Start Bit (fixed)
7 or 8 data bits (selectable)
Odd, Even or No Parity (selectable)
1 or 2 Stop bits (selectable)
Electrical Specifications
Connector
DB-25S (Female)
Cable
DB-25P (Male), 50 ft. maximum length. For cable
configuration, refer to Cable Requirements appropriate to
the RS232C protocol chosen.
Signal Levels
High = +5V to +12V
Low = -5V to -12V
Page 2-10
D508/D512 Service Manual
Unit 2: Interface Specifications
Pin Assignments
Pin 13
Pin 1
Pin 25
Pin 14
RS-232C INTERFACE SIGNALS
Pin
Direction
Signal Definition
1
Reference
FG (Frame Ground)
2
To Host
TD (Transmit Data) -Data from the printer to the host computer. Sends X-On/X-Off
characters or status data (Bi-Directional protocols).
3
To Printer
4
To Host
RTS (Request to Send) -Used with Ready/Busy flow control to indicate an error
condition. RTS is high and remains high unless the print head is open (in this case,
RTS would return to the high state after the print head is closed and the printer is
placed back on-line) or an error condition occurs during printing (e.g. Time Out
error, label out).
5
To Printer
CTS (Clear to Send) -When this line is high, the printer assumes that data is ready
to be transmitted. The printer will not receive data when this line is low. If this line is
not being used, it should be tied high (to pin 4).
6
To Printer
DSR (Data Set Ready) -When this line is high, the printer will be ready to receive
data. This line must be high before data is transmitted. If this line is not being used,
it should be tied high (to pin 20).
7
Reference
SG (Signal Ground)
20
To Host
RD (Receive Data) -Data to the printer from the host computer.
DTR (Data Terminal Ready) -This signal applies to Ready/Busy flow control. The
printer is ready to receive data when this pin is high. It goes low when the printer is
off-line, either manually or due to an error condition, and while printing in the Single Job Buffer mode. It will also go low when the data in the buffer reaches the Buffer Near Full level.
Cable Requirements
D508/D512 Service Manual
Page 2-11
DB9
DB2
5
HOST
INTERCONNECTION
PRINTER
1
1
FG
1
FG (Frame Ground)
2
3
RD
2
TD (Transmit Data)
3
2
TD
3
RD (Receive Data)
8
5
CTS
4
RTS (Request to Send)
7
4
RTS
5
CTS (Clear to Send)
4
20
DTR
6
DSR (Data Set Ready)
6
6
DSR*
20 DTR (Data Terminal Ready)
5
7
SG
7
SG (Signal Ground)
* This connection at the host side of the interface would depend upon the pin that is being used as
the Ready/Busy signal by the driving software. Typically, on a PC, it would be either CTS (pin 5)
or DSR (pin 6) on a DB-25 connector.
READY/BUSY FLOW CONTROL
Ready/Busy is the hardware flow control method for the serial interface on the printer. By raising/
lowering the voltage level on Pin 20 of the RS232 port, the printer notifies the host when it is
ready to receive data. Pin 4 (RTS) and pin 20 (DTR) are the important signals on the printer for
this method of flow control. The host must be capable of supporting this flow control method for it
to function properly.
X-ON/X-OFF FLOW CONTROL
X-On/X-Off flow control is used whenever hardware (Ready/Busy) flow control is not available or
desirable. Instead of a voltage going high/low at pin 20, control characters representing "Printer
Ready" (X-On =11 hexadecimal) or "Printer Busy" (X-Off = 13 hexadecimal) are transmitted by
the printer on pin 2 (Transmit Data) to the host. In order for this method of flow control to function
correctly, the host must be capable of supporting it. X-On/X-Off operates in a manner similar to
the function of pin 20 (DTR) as previously explained. When the printer is first powered on it sends
an X-Off when the "Buffer Near Full" level is reached and a X-On when the data level of the
buffer drops below the "Buffer Available" mark. When the printer is taken off-line manually, it
transmits an X-Off indicating it cannot accept data. When it is placed back on line manually, it
sends an X-On, indicating it is again available for receipt of data. If an error occurs during printing
(paper out, Time Out), the printer sends an X-Off as soon as an error condition is detected. When
the error is cleared and the printer is placed back on-line, it transmits an X-On indicating it is
again ready to accept data.
Upon power up if no error conditions are present, the printer will continually send X-On
characters at five millisecond intervals until it receives a transmission from the host.
UNIVERSAL SERIAL BUS INTERFACE
Page 2-12
D508/D512 Service Manual
Unit 2: Interface Specifications
The Universal Serial Bus (USB) interface is a factory installed option that must be specified at the
time of order. It requires a driver (shipped with each printer that has the interface installed) that
must be loaded on your PC and the PC must be configured to support USB peripherals using
Microsoft Windows. Details for loading the USB driver are contained in the USB Interface Manual
that is shipped with each printer with a USB Optional interface installed. Up to 127 devices may
be connected to a USB port.
LOCAL AREA NETWORK INTERFACE
A Local Area Network (LAN) interface is a factory installed interface option that must be specified
at the time of order. It requires a driver (shipped with each printer that has the interface installed)
that must be loaded on your PC and the PC must be configured to support the TCP/IP network
protocol using a 10BaseT LAN connection. Details for loading the LAN driver are contained in the
LAN Interface Manual that is shipped with each printer with a LAN Optional interface installed.
WIRELESS 802.11 LAN INTERFACE
The wireless print server provides easy printer interface with 802.11G Wi-Fi compliant networks
free of wired connections. Each printer is shipped with an integrated driver and interface
installed. The driver must be loaded onto the host computer and configured to run one of the
supported protocols. Details for setting up the Wireless 802.11 LAN Interface are contained in
the documentation that is supplied with the interface card.
D508/D512 Service Manual
Page 2-13
Unit 2: Interface Specifications
This page is left blank intentionally
D508/D512 Service Manual
Page 2-14
Unit 3: Troubleshooting
TROUBLESHOOTING
•
•
•
•
SATO D508/D512 Service Manual
Error Signals
Troubleshooting Table
Interface Troubleshooting
Test Print Troubleshooting
Page 3-1
TROUBLESHOOTING
ERROR SIGNALS
DISPLAY
LINE
LED
0
Off
1
ERROR
BUZZER
LED
ERROR
CONDITION
CORRECTIVE ACTION
On
1 Beep
Flash Memory error
Consult SATO dealer
Not Assigned
2
Off
On
1 Beep
Machine error
Consult SATO dealer
3
Off
On
1 Beep
EEPROM error
Replace EEPROM
4
Off
On
1 Beep
Head error
Replace Print Head
5
Off
Blink
3 Beeps
Top Cover Open
Close and latch cover
6
Off
Blink
3 Beeps
Out of Paper
1) Replenish media supply
2) Properly route media
7
Off
Blink
3 Beeps
Sensor error
Adjust sensor sensitivity
8
Off
Blink
3 Beeps
Cutter error
1) Reconnect cutter
2) Consult SATO dealer
8.
On
On
0 Beeps
Program error
Resend data to printer
A
On
1 Beep
Receive Buffer Overflow
1) Restart printer and retry
2) Ensure correct protocol
B
On
1 Beep
Serial Parity error
1) Ensure correct parity.
2) Consult SATO dealer
C
On
1 Beep
Serial Framing error
1) Ensure correct data bit
2) Consult SATO dealer
D
On
1 Beep
Serial Overrun error
1) Ensure correct flow control
2) Retry
E
On
1 Beep
LAN Time Out error
1) Check Interface card
2) Check connections
3) Replace the above
3 Beeps
Serial Font/Graphic error Ensure correct data stream
F
Page 3-2
SATO D508/D512 Service Manual
Unit 3: Troubleshooting
TROUBLESHOOTING TABLE
IMAGE VOIDS
Damaged print head
Replace print head
Damaged electronics
Replace circuit board
Damaged or worn platen roller
Replace platen roller
Vertical line in printed image
Dirty or defective print head
LIGHT PRINT IMAGES
Low print head energy/darkness
Adjust darkness control
Low print head pressure
Ensure top cover is securely closed.
Foreign material on print head
Clean print head and platen roller
Excessive print speed
Reduce print speed setting
UNEVEN PRINT DARKNESS
Worn platen roller
Replace platen roller as required
Dirty print head
Clean as necessary
SMEARED PRINT IMAGES
Poor label quality
Use high quality label stock
Foreign material on print head and platen Clean print head and platen roller
roller
Foreign material on labels
Use high quality label stock
Excessive print head energy
Adjust darkness control
Excessive print speed
Adjust speed as required. Remove excessive head pressure.
NO LABEL MOVEMENT
Incorrect label pitch sensor selected
Select the correct label sensor type
No voltage output
Replace fuse on main circuit board. Test power supply and
replace as required
Drive motor not operating
Ensure wiring harness connection. Replace as necessary
Defective main board
Troubleshoot board and replace as necessary
NO PRINTED IMAGE
Print head is disconnected
Ensure print head wiring harness is connected on each end
No voltage output
Test power supply and replace as necessary
Damaged print head
Replace print head
Damaged electronics
Replace circuit board
Interface problems
Check. Refer to relative instructions below
SATO D508/D512 Service Manual
Page 3-3
NO PRINTED IMAGE
Data input error
Ensure correct data stream
MEANDERING MEDIA
Incorrectly loaded media
Ensure correct loading
Improperly adjusted media guides
Adjust as required
Worn or improperly adjusted platen roller Adjust. Replace as required
PRINTER CREATES A BLANK LABEL
Data input error
Ensure correct data stream
Improper media selected
Ensure correct media is in use
Disconnected print head
Cycle off power and ensure proper connection
Defective print head
Replace print head as required
Defective main board
Replace main board as required
INCORRECT LABEL POSITIONING
Incorrect sensor selection
Ensure the correct sensor is selected
Improper sensor adjustment
Adjust as required
Incorrect media in use
Ensure the correct media is being used
Data input error
Ensure correct data stream
Page 3-4
SATO D508/D512 Service Manual
Unit 3: Troubleshooting
INTERFACE TROUBLESHOOTING
This unit provides a checklist for the various interface types. Locate the checklist relative to the
interface used and perform each of the troubleshooting tasks until the problem has been isolated.
PARALLEL INTERFACE
CHK
TROUBLESHOOTING STEP
Ensure the interface card is correctly installed. Run self-test to verify.
Ensure the printer cable is connected to the appropriate LPT port on the host computer. If using a
Windows printer driver, ensure the correct port is selected.
Ensure a IEEE1284 printer cable is being used.
Ensure the host’s peripheral settings are set to ECP for faster throughput. Refer to the computer
manufacturer’s documentation for details.
Ensure the printer is receiving information from the computer using the Receive Buffer Data Dump
mode. Refer to that procedure within this manual for instructions. The command stream should be
continuous and possess 0Dhex and/or 0Ahex (carriage return and line feed) characters
throughout.
Replace the interface board with another to isolate the problem.
Replace the interface board permanently if determined to be the problem.
RS-232 SERIAL INTERFACE
CHK
TROUBLESHOOTING STEP
Ensure the correct interface card is correctly installed. Run self-test to verify.
Ensure the serial cable (Null Modem) meets specifications and is correctly connected at each end.
Ensure the serial cable is not defective.
Ensure the communication parameters for the baud rate, parity, data bits and stop bits are consistent with those being sent from the host computer.
Ensure the printer is receiving information from the computer using the Receive Buffer Data Dump
mode. Refer to that procedure within this manual for instructions. The command stream should be
continuous and possess 0Dhex and/or 0Ahex (carriage return and line feed) characters throughout.
Replace the interface board with another to isolate the problem.
Replace the interface board permanently if determined to be the problem.
SATO D508/D512 Service Manual
Page 3-5
LAN ETHERNET INTERFACE
CHK
TROUBLESHOOTING STEP
Ensure the interface has been correctly configured. Wait two minutes and run self-test to verify. If a
test label does not print, there may be a hardware problem.
Ensure the serial cable meets specifications and is correctly connected at each end.
Ensure the cable and its ports are not defective.
Ensure that a faulty print server or other protocol related scenarios are not creating a queue setup
issue. Systematically perform checks and tests to isolate the cause.
If using TCP/IP, ensure a valid IP address is specified and that all parameters are correct (subnet
mask, gateway, etc.). Attempt to PING the IP address assigned to the network interface.
Install the IPX/SPX protocol on a workstation to determine if the network device can be discovered
via the MAC address. If able, configure the appropriate protocols and retest connectivity.
Use a crossover cable to isolate the printer from the network by connecting from the interface and
workstation. Verify that the parameters match on each. Test connectivity.
WIRELESS LAN INTERFACE
CHK
TROUBLESHOOTING STEP
Ensure the interface has been correctly configured. Wait two minutes and run self-test to verify. If a
test label does not print, there may be a hardware problem.
Check the Wireless LAN connection by using the Ping command. If the Ping fails, double-check all
WLAN hardware and connection settings. Print test labels to verify that the new settings can work.
If the Ping test is OK, check the printer’s location to adequate signal strength. For weak signals, try
relocating the printer close to the access point. If the signal strength is high, replace the WLAN
interface card.
UNIVERSAL SERIAL BUS (USB) INTERFACE
If nothing prints during a test print, verify the device drivers have been successively
installed by performing the following:
Click on Start, Settings, and then Control Panel.
Click on System within the new window.
Click on the Device Manager tab.
Ensure that the View Device By Type is checked.
Scroll to printer driver for your SATO device. Ensure that errors do not exist. Reinstall the driver as
required.
Reboot the PC and the printer.
Contact Microsoft technical support for further assistance as required.
Page 3-6
SATO D508/D512 Service Manual
Unit 3: Troubleshooting
TROUBLESHOOTING FLOWCHARTS
PROBLEM: PRINTER DOES NOT POWER UP
See Pg 5-10
See Pg 4-5
SATO D508/D512 Service Manual
Page 3-7
PROBLEM: LABEL DOES NOT FEED OUTWARD IN A STRAIGHT PATH
See Pg 4-3
PROBLEM: PRINTER DOES NOT PRINT
Page 3-8
SATO D508/D512 Service Manual
Unit 3: Troubleshooting
PROBLEM: PRINTER DOES NOT PRINT
See
Pg 4-2
See
Pg 4-5
SATO D508/D512 Service Manual
Page 3-9
PROBLEM: PRINTER DOES NOT FEED LABELS
See Pg 1-13
to 1-15
See Pg 4-3
See Pg 4-13
See Pg 4-5
Page 3-10
SATO D508/D512 Service Manual
Unit 3: Troubleshooting
PROBLEM: PRINTER DOES NOT STOP AT THE CORRECT POSITION
See Pg 1-13
to 1-15
See Pg 5-8 - 5-9
See Pg 4-5
PROBLEM: WIRELESS LAN PRINTER IS NOT PRINTING
SATO D508/D512 Service Manual
Page 3-11
PROBLEM: PRINTING IS TOO DARK
See Pg 5-4
See
Pg 5-4
See
Pg 4-2
See
Pg 4-5
PROBLEM: PRINTING IS TOO LIGHT ON ONE SIDE
See Pg 4-3
See Pg 4-2
Page 3-12
SATO D508/D512 Service Manual
Unit 3: Troubleshooting
PROBLEM: PRINT START POSITION IS INCORRECT VERTICALLY
See Pg 5-8 - 5-9
See Pg 5-2
SATO D508/D512 Service Manual
Page 3-13
PROBLEM: PRINT START POSITION IS INCORRECT HORIZONTALLY
See Pg 4-3
PROBLEM: WHITE LINES APPEAR IN PRINTED LABELS
See Pg 4-2
Page 3-14
SATO D508/D512 Service Manual
Unit 3: Troubleshooting
PROBLEM: LABELS ARE NOT BEING DISPENSED PROPERLY BY THE OPTIONAL DISPENSER UNIT
SATO D508/D512 Service Manual
Page 3-15
PROBLEM: THE CUTTER IS NOT WORKING
See Pg 1-13
to 1-15
See Pg 4-17
PROBLEM: THE CUTTER IS NOT WORKING
See Pg 4-17
Page 3-16
SATO D508/D512 Service Manual
Unit 3: Troubleshooting
TEST PRINT TROUBLESHOOTING
Chapter provides instruction on special printing to identify and resolve specific print problems.
TEST LABELS
The test label is designed to assist in the identification of print problems.
FEED + POWER
Printer
Beeps
Release
FEED
Press LINE
Large Label / Small Label
Prints large
labels.
Press FEED
Prints small
labels.
Press FEED
Printing is
paused.
Press FEED
Printing
commences.
Switch POWER off to
exit
Figure 3-1, Test Label Printing
SATO D508/D512 Service Manual
Page 3-17
NOTE: The only print problem that the following sample test label does not
display is fading of print image from one side of the label to the other. This is
the result of improper print head balance.
Figure 3-2, Sample Test Label
Page 3-18
SATO D508/D512 Service Manual
Unit 3: Troubleshooting
DATA DUMP DIAGNOSTIC LABEL
The contents of the print buffer can be examined using the Data Dump Mode. In the left column,
each line of data received is numbered. The center column provides the data in hexadecimal
format. And in the right column, same data is provided in the ASCll format. Follow the flow chart
provided below to perform this activity.
POWER = OFF
DSW7 = ON
Power = ON
Printer
receives
data and
prints.
DSW7 = OFF
Switch POWER off and
the on again to return to
normal mode.
Figure 3-3, Data Dump Diagnostic Mode
SATO D508/D512 Service Manual
Page 3-19
PRINTING FACTORY/SERVICE TEST LABELS
The Factory/Service Test Labels prints the internal operating parameters of the printer.
Open top housing cover
LINE + FEED + POWER
Printer
Beeps
Release
LINE + FEED
Printer beeps
3 times.
Close top housing cover
Press LINE
Large Label / Small Label
Prints large
labels.
Press FEED
Prints small
labels.
Press FEED
Printing is
paused.
Press FEED
Printing
commences.
Switch POWER off to exit
Figure 3-4, Factory/Service Test Label Printing
Page 3-20
SATO D508/D512 Service Manual
Unit 3: Troubleshooting
This page is left blank intentionally
SATO D508/D512 Service Manual
Page 3-21
Unit 3: Troubleshooting
SATO D508/D512 Service Manual
Page 3-22
Unit 4: Replacement Procedures
REPLACEMENT
PROCEDURES
•
•
•
•
•
•
•
•
•
•
•
SATO D508/D512 Service Manual
Print Head
Platen Roller
Fuse
Main Circuit Board
Panel Board
Label Sensor Board
Label Sensor
Cover Open Sensor
Drive Motor
Drive Gear
Cutter Replacement
Page 4-1
REPLACEMENT PROCEDURES
This unit contains step-by-step instructions for the removal and replacement of all primary
components and sub-assemblies.
PRINT HEAD REPLACEMENT
If the print head becomes damaged or worn, it can be easily removed and replaced without
having to make critical adjustments.
1 Turn the printer OFF and disconnect the power supply cord.
2
Lift up the top housing cover (1) (See Figure 4-1) to access the print head assembly.
3
Press the central release latch (2) to release the print head (3) from the bracket (4).
NOTE: To detach the print head, press the release latch (2), then
simultaneously tilt the print head downwards.Tilt it at an angle and pull it out.
4
Disconnect the wiring harness from worn print head (3).
5
Connect the print head wiring harness to the replacement print head (3).
6
Latch the replacement print head (3) into the head bracket (2).
NOTE: Insert the lower portion of the print head first, sliding it into the pivot
pins at each end of the bracket. Press inward and raise upward, the upper
portion of the print head until it locks into position.
7
Load some media, close the cover, and do a test print to confirm proper function.
2
1
4
3
Figure 4-1, Print Head Replacement
Page 4-2
SATO D508/D512 Service Manual
Unit 4: Replacement Procedures
PLATEN ROLLER REPLACEMENT
The platen roller is a high wear component due to its treading against the print media. This
treading will eventually wear grooves into the rubber material and negatively affect print output.
1
Turn the printer OFF and disconnect the power supply cord.
2
Lift up the top housing cover (1) (See Figure 4-2) to access the platen roller (2).
3
Detach the platen gear cover (3) from the printer housing (4).
4
Lift the dispenser bar (5) upward and away from the assembly (2, 5).
5
Install a replacement platen roller assembly (5, 2) to the housing (4).
6
Lower the dispenser bar (5) and reattach the gear cover (3).
7
Load some media, close the cover, and do a test print to ensure proper function.
1
3
2
5
4
Figure 4-2, Platen Roller Replacement
ACCESSING THE MAIN BOARD
SATO D508/D512 Service Manual
Page 4-3
Throughout the rest of this Service Manual, reference will be made to the main board of the
printer. To access the main board, follow the instructions below.
1
Turn the printer OFF and disconnect the power supply cord.
2
Place the printer with its underside facing upward.
3
Remove the bottom housing cover (See Figure below) by removing four screws.
4
Put the screws in a safe place so that they can be used to re-secure the bottom housing
cover when servicing is complete.
Screw x4
Figure 4-3, Removing Bottom Cover
Page 4-4
SATO D508/D512 Service Manual
Unit 4: Replacement Procedures
FUSE REPLACEMENT
1
Turn the printer OFF and disconnect the power supply cord.
2
Remove the base cover from the housing cover to access the fuse.
3
Locate fuse (1), (See Figure 4-4) on the main circuit board (2).
4
Detach the defective fuse (1) from the metal holders (3).
5
Attach a replacement fuse (1) to the metal holders (3) on the main circuit board (2).
6
Attach base cover to the housing cover.
7
Load some media, and run some tests to confirm proper function.
1
2
3
Figure 4-4, Fuse Replacement
SATO D508/D512 Service Manual
Page 4-5
MAIN CIRCUIT BOARD REPLACEMENT
1
Turn the printer OFF and disconnect the power supply cord.
2
Remove the base cover from the housing cover to access the main circuit board.
3
Remove the five screws (1) (See Figure 4-5) that secure the main circuit board (2) to the
printer (3).
4
Disconnect all wiring harnesses from the defective main circuit board (2).
5
Remove the defective main circuit board (2), along with the interface cover (4), from the
printer (3).
6
Detach the interface cover (4) from the defective board (2) and attach it to the replacement
board (2).
7
Insert the replacement main circuit board (2) into the printer (3) and secure it using the five
screws (1) previously removed from the old board.
8
Reconnect all the appropriate wiring harnesses to the replacement circuit board (2).
NOTE: Each wiring harness connector is different from the others. To
reconnect the wiring harnesses, simply match mating halves.
9
10
Attach the base cover to the housing cover.
Load some media, and run some tests to confirm proper function.
4
2
1
3
Figure 4-5, Main Circuit Board Replacement
Page 4-6
SATO D508/D512 Service Manual
Unit 4: Replacement Procedures
PANEL BOARD REPLACEMENT
1
Turn the printer OFF and disconnect the power supply cord.
2
Remove the base cover from the housing cover to access the panel board.
3
Remove the two screws (1) (See Figure 4-6) that secure the panel board bracket (2) to the
printer (3).
4
Disconnect the wiring harness for the defective panel board (4) from the main circuit board (5).
5
Detach the lens unit (6), button unit (7), and panel board (4), from the bracket, in this order (2).
6
Insert the wiring harness of the replacement panel board (4) through bracket (2) and
connect to main circuit board (5).
7
Reattach the replacement panel board (4), button unit (7), and lens unit (6) consecutively to
bracket (2).
8
Insert the assembly (7, 6, 4, 2) into the printer (3) and secure using two screws (1).
NOTE: When properly installed, the lens, buttons, and power switch should
protrude through their respective slots on the printer’s front panel.
9
10
Attach the base cover to the housing cover.
Load some media, and run some tests to confirm proper function.
2
1
4
7
6
5
3
Figure 4-6, Panel Board Replacement
SATO D508/D512 Service Manual
Page 4-7
RELAY BOARD (LABEL SENSOR BOARD) REPLACEMENT
1
Turn off the printer and disconnect the power supply cord.
2
Remove all media from the printer.
3
Remove one screw (1) (See Figure 4-7a) that secures the bar (2) to the printer (3).
4
Remove one screw (4) and gear (5) from the printer (3).
5
Lift away the left-side media holder (6) from the printer (3).
4
5
6
1
2
3
Figure 4-7a, Label Sensor Board Replacement
6
Remove the three screws (7) (See Figure 4-7b) securing the cover (8) to the left-side media
holder (6).
7
As the main signal cable of the relay board (9) is soldered on, you need to disconnect the
other end of the cable from the main board by the following steps.
NOTE: Each wiring harness connector is different from the others. To
reconnect the wiring harnesses, simply match mating halves.
Page 4-8
SATO D508/D512 Service Manual
Unit 4: Replacement Procedures
6
9
8
7
Figure 4-7b, Relay Board Replacement
8
Remove the base cover from the housing cover to access the main board (10) (Figure 4-7c).
9
Remove the five screws (11) securing the main circuit board (10) to the printer (3).
10
11
3
Figure 4-7c, Detachment of Relay Board signal cable from Main Board
10
Lift the main board (10) and disconnect the wiring harness of the relay board.
11
Now replace the relay board and reconnect the main signal wire to the main board.
12
Reinstall the main board and the cover.
13
Re-attach the base cover (8) to the left-side media holder (6) using three screws (7).
14
Place the left-side media holder (6) (See Figure 4-7a) into the printer (3) along with the gear
(5) and secure using a screw (4).
15
Secure the bar (2) to the printer (3) using a screw (1).
16
Load some media, and run some tests to confirm proper function.
SATO D508/D512 Service Manual
Page 4-9
LABEL SENSOR REPLACEMENT
1
Turn the printer OFF and disconnect the power supply cord.
2
Remove all media from the printer.
3
Remove one screw (1) (See Figure 4-8a) that secures the bar (2) to the printer (3).
4
Remove one screw (4) and gear (5) from the printer (3).
5
Lift away the left-side media holder (6) from the printer (3).
6
Remove one screw (7) that secures the sensor cover (8) to the left-side media holder (6).
7
Remove one screw (9) that secures the sensor (10) to the sensor cover (8).
4
5
6
1
2
8
10
9
7
3
Figure 4-8a, Label Sensor Replacement
Page 4-10
SATO D508/D512 Service Manual
Unit 4: Replacement Procedures
8
Remove three screws (11) (See Figure 4-8b) securing the cover (12) to the left-side media
holder (6).
9
Disconnect the wiring harnesses of the defective sensors (10&13) from the sensor board
(14).
10
Insert replacement sensors (13&10) into the left-side media holder (6) and connect their
relative wiring harnesses to the sensor board (14).
NOTE: Each wiring harness connector is different from the others. To
reconnect the wiring harnesses, simply match mating halves. Ensure to
properly route the wiring harnesses as before their removal.
11
Secure the cover (12) to the media holder (6) using three screws (11).
12
Insert the sensor (10) (See Figure 4-8a) into the underside of the sensor cover (8) and
secure using a screw (9).
13
Attach the sensor cover (8) to the side of media holder (6) using a screw (7).
14
Place the media holder (6) into the printer (3) along with the gear (5) and secure using a
screw (4).
15
Secure the bar (2) to the printer (3) using a screw (1).
16
Load some media, and run some tests to confirm proper function.
10
13
14
6
12
11
Figure 4-8b, Label Sensor Replacement
SATO D508/D512 Service Manual
Page 4-11
COVER SENSOR REPLACEMENT
1
Turn the printer OFF and disconnect the power supply cord.
2
Lift up the top housing cover (1) (See Figure 4-9a) to access the sensor area.
3
Remove the two screws (2) securing the cable cover (3) to the top housing cover (1).
4
Remove the screw (4) that secures the cover sensor (5) to the top housing cover (1).
5
4
3
2
1
Figure 4-9a, Cover Sensor Replacement
5
Remove the base cover from the printer to access the main board (6) (See Figure 4-9b).
6
Remove the five screws (7) that secure the main board (6) to the printer (8).
7
Remove the main board (6) and disconnect all wiring harnesses of the defective coveropen sensor.
8
Detach the defective sensor from the printer and route the replacement sensor in its place.
9
Connect the replacement sensor to the main board (6) and re-secure the board (6) to the
printer (8) using five screws (7).
Page 4-12
SATO D508/D512 Service Manual
Unit 4: Replacement Procedures
10
Secure the base cover to the printer (8).
11
Secure the sensor (5) (See Figure 4-9a) to the top housing cover (1) using screw (4).
12 Return the cable cover (3) to the top housing cover (1) and secure it using two screws (2).
13 Load some media, and run some tests to confirm proper function.
6
7
8
Figure 4-9b, Cover Sensor Replacement
SATO D508/D512 Service Manual
Page 4-13
DRIVE MOTOR REPLACEMENT
1
Turn the printer OFF and disconnect the power supply cord.
2
Remove the base cover from the housing cover to access the drive motor.
3
Remove the five screws (1) (See Figure 4-10a) that secure the main circuit board (2) to the
printer (3).
4
Disconnect all wiring harnesses from the defective main circuit board (2).
5
Remove the circuit board (2), along with the interface cover (4), from the printer (3), and set
it aside.
6
Remove the two screws (5) that secure the drive train (6) to the printer (3).
7
Remove the drive train (6) from the printer (3) and disconnect the motor’s wiring harness.
1
4
2
5
6
3
Figure 4-10a, Drive Motor Replacement
Page 4-14
SATO D508/D512 Service Manual
Unit 4: Replacement Procedures
Drive Motor Replacement (cont’d)
8
Remove the three screws (7) (See Figure 4-10b) that secure the gear cover (8) to the motor
bracket (9).
9
Remove the screw (10) that secures the defective motor (11) to the motor bracket (9).
10
Install the replacement motor (11) to the motor bracket (9) using one screw (10).
11
Attach the gear cover (8) to the motor bracket (9) using three screws (7).
12
Insert the drive train (6) (See Figure 4-10a) into the printer (3) using two screws (5).
13
Connect the motor’s wiring harness to main circuit board (2).
14
Apply circuit board (2), along with interface cover (4), to printer (3), and secure using five
screws (1).
15
Reconnect all the appropriate wiring harnesses to the main circuit board (2).
16
Attach the base cover to the housing cover.
17
Load some media, and run some tests to confirm proper function.
11
9
10
8
7
Figure 4-10b, Drive Motor Replacement
SATO D508/D512 Service Manual
Page 4-15
DRIVE GEAR REPLACEMENT
1
Turn the printer OFF and disconnect the power supply cord.
2
Remove the base cover from the housing cover to access the drive motor.
3
Remove the five screws (1, Figure 4-11a) that secure the main circuit board (2) to the
printer (3).
4
Disconnect all wiring harnesses from the defective main circuit board (2).
5
Remove the circuit board (2), along with the interface cover (4), from the printer (3), and set
it aside.
6
Remove the two screws (5) securing the drive train (6) to the printer (3).
7
Withdraw the drive train (6) from the printer (3) and disconnect the motor’s wiring harness.
1
4
2
5
6
3
Figure 4-11a, Drive Gear Replacement
Page 4-16
SATO D508/D512 Service Manual
Unit 4: Replacement Procedures
Drive Gear Replacement (cont’d)
8
Remove the three screws (7) (See Figure 4-11b) that secure the gear cover (8) to the motor
bracket (9).
9
Detach the two snap rings (10) securing the worn gears (11 &12) and remove.
10
Insert replacement gears (12 & 11) onto their relative spindles using the snap rings (10).
11
Attach the gear cover (8) to the motor bracket (9) using three screws (7).
12
Insert the drive train (6) (See Figure 4-11a) into the printer (3) and secure using two screws
(5).
13
Connect the motor’s wiring harness to the main circuit board (2).
14
Install the circuit board (2), along with the interface cover (4), to the printer (3), using five
screws (1).
15
Reconnect all the appropriate wiring harnesses to the main circuit board (2).
16
Attach the base cover to the housing cover.
17
Load some media, and run some tests to confirm proper function.
9
11
12
10
8
7
Figure 4-11b, Drive Gear Replacement
SATO D508/D512 Service Manual
Page 4-17
CUTTER ASSEMBLY
The cutter assembly is an optional unit typically preinstalled at the factory. To retrofit a X700
printer that was not originally delivered with a cutter, follow the procedures here but make sure to
order the complete set of components that also includes the cutter alignment assembly that
mounts near the print head.
1 Turn off the printer and disconnect the power supply cord.
2
Open top housing cover (1) and remove front cover (2) from printer base (3).
3
Connect the cutter unit’s wiring harness to the accessory connector.
NOTE: If unsure which connector is the accessories connector, refer to the
Introduction unit of this manual for identification.
4
Pivot the dispenser bar (4) upward (Figure 4-12a) to permit cutter assembly (5) installation.
2
4
3
5
6
Figure 4-12a, Cutter Installation
5
Apply cutter assembly (5) to the front of printer base (3) and secure using two screws (6).
NOTE: When mantling the cutter unit, ensure the hangers on the back side of
the assembly insert into their respecitve slots on the printer base so as to
suspend the assembly. If this is performed correctly, the two mounting holes
will be properly aligned for the attaching hardware.
6
Lower the dispenser bar (4) and apply the front cover (2).
7
Perform steps 7 through 13 to install/replace the cutter blade as the situation requires.
Page 4-18
SATO D508/D512 Service Manual
Unit 4: Replacement Procedures
NOTE: If the cutter assembly was pre-existing on this particular printer and
this is a replacement operation, the cutter blade may not require installation
nor replacement. Perform step 6 only if deemed necessary.
8
Press latch (7, Figure 4-12b) to release print head (8) from mounting bracket (9). Lift away
print head (8).
NOTE: Press on the latch while manually lowering the print head to remove.
9
10
Remove two screws (10) securing alignment assembly (11) to mounting bracket (9). Lift
away (11).
Remove two screws (12) securing upper plate (13) to lower plate (14) and separate.
13
12
15
14
7
11
1
10
9
8
3
11
Figure 4-12b, Cutter Blade Installation
Install the cutter blade (15) between the plates (14) and (13), secure it using two screws
(12).
SATO D508/D512 Service Manual
Page 4-19
Unit 4: Replacement Procedures
This page is left blank intentionally
SATO D508/D512 Service Manual
Page 4-20
1CHECKS/ADJUSTMENT
PROCEDURES
•
•
•
•
•
•
•
•
•
•
•
SATO D508/D512 Service Manual
Top of Form Position
Factory Clear
Print Darkness
Printer Counter Clear
Cutter Counter Clear
Test Print Counter Clear
Cut Position
Paper Sensor Sensitivity
Gap Sensor Sensitivity
Eye-Mark Sensor Adjustment
Power Supply Checks
Page 5-1
Unit 5: Adjustment Procedures
ADJUSTMENT PROCEDURES
This unit covers all of the printer adjustment procedures that may occur following the initial
configuration.
TOP OF FORMS OFFSET
This can be done using the VR4 potentiometer on the Configuration Panel. This potentiometer is
set at the factory so that it has a range of +/-3.75 mm. The midpoint setting should have no effect
on the label top of form. Turning the potentiometer all the way clockwise should move the print
position 3.75 mm upwards towards the leading edge of the label. Turning the it all the way
counterclockwise should move the print position down 3.75mm away from the leading edge of
the label.
Place DSW6 on the Configuration
Switch in the OFF position.
2
Turn the power OFF.
3
While pressing the FEED button on the
Operator Panel, turn the power ON.
4
When you hear one beep from the
printer, release the FEED button.
5
Press the LINE button to begin printing
large Test Labels (press the FEED
button if you are using labels smaller
than 4.1" (104 mm) in width).
6
Adjust potentiometer VR4 until the first
print position is at the desired location
on the label.
7
Press the FEED button to stop printing.
Must be moved with Minus (-)
Offset to print on leading edge of
label
ABCDEFG
ABCDEFG
label movement direction
1
Original First Line
Print Position
ABCDEFG
Note:
Adjusting the Label Top Of Form with
VR4 will affect the stop position of the
label and the cut/tear-off positions.
Moved with
Positive (+) Offset
to print on trailing
edge of label
Page 5-2
Leading Edge of
Label as detected
by the sensor
SATO D508/D512 Service Manual
Unit 5: Adjustment Procedures
FACTORY CLEAR
This procedure clears all data from the EEPROM. Once initialized and completed, the process
cannot be reversed.
1
Open the Top Cover and remove the front cover.
2
Switch ON the DSW5 and DSW6 dip switches.
NOTE: Refer to Figure 5-1 for visual assistance in performing this procedure.
3
Press and hold the LINE and FEED buttons while switching on the printer.
4
Release the LINE and FEED buttons when a beep sounds.
5
Switch OFF the DSW5 and DSW6 dip switches and latch the Top Cover closed.
NOTE: When the Top Cover is closed, the clear process will automatically be
initialized. During the clear process, the printer will be in an offline
state.Press the LINE button to test print a large label and the FEED button to
test print a small label.
NOTE: Press the LINE button to test print a large label and the FEED button
to test print a small label. Pressing the FEED button terminates printing
activity. Print at least two labels to ensure the clear process was successful.
SATO D508/D512 Service Manual
Page 5-3
Unit 5: Adjustment Procedures
PRINT DARKNESS
A fine adjustment for PRINT DARKNESS can be made using potentiometer VR1 on the Front
Operator Panel. It provides a continuous range of adjustment, allowing you to make precise
changes. Turning VR1 clockwise will make the print darker, and counterclockwise will make it
lighter.
1
Place DSW6 on the Configuration Switch in the ON position.
2
Turn the Power Switch OFF.
3
While pressing the FEED button on the Operator Panel, turn the Power Switch ON.
4
When you hear one beep from the printer, release the FEED button.
5
Press the LINE button to begin printing large Test Labels (press the FEED button if you are
using labels smaller than 4.1" (104 mm) in width).
6
Adjust potentiometer VR1 until the desired print darkness is obtained.
7
Press the FEED button to stop the printing.
Adjustment of the Print Darkness using VR1 will affect the darkness in all the <ESC>#E
command code ranges; that is, if the print darkness is adjusted with VR1 for lighter print, the
darkness will be lighter in all the Print Darkness ranges selected by the command code.
Figure 5-1, Test Panel
Page 5-4
SATO D508/D512 Service Manual
Unit 5: Adjustment Procedures
Label
Pitch
Offset
Eye
Offset
or
Darkness
VR1
VR2
VR3
Identification
VR4
Gap
Printer Test Panel
Dip Switch Complex
8
Test Connector
Potentiometers
1A
2A
3A
Set the dial to the
correct pin number
8
0
4A
1
5A
7
2
Test Module Dial
1B
6
3
5
4
2B
3B
4B
Connect ground probe here
Connect positive probe here
6A
GND
SIG
5B
6B
Figure 5-2, Test Module Usage
SATO D508/D512 Service Manual
Page 5-5
Unit 5: Adjustment Procedures
PRINTER COUNTER CLEAR
This procedure clears the internal cycle counters of various components and returns their values
to zero.
1
Open the Top Cover and remove the front cover.
2
Set the DSW5 dip switch to the ON position.
NOTE: Refer to Figure 5-1 for visual assistance in performing this procedure.
3
Press and hold the LINE and FEED buttons while switching ON the printer.
4
Release the LINE and FEED buttons when a beep sounds.
5
Switch OFF the DSW5 dip switch and latch the Top Cover closed.
NOTE: When the Top Cover is closed, the clear process will automatically be
initialized. During the clear process, the printer will be in an offline state.
Press the LINE button to test print a large label and the FEED button to
test print a small label.
NOTE: Pressing the FEED button pauses test printing activity. Allow a
minimum of two labels to be printed before terminating to ensure the clear
process was successful.
CUTTER COUNTER CLEAR (IF CUTTER IS INSTALLED)
1
Open the Top Cover and remove the front cover.
2
Switch the DSW6 dip switch to the ON position.
NOTE: Refer to Figure 5-2 for visual assistance in performing this procedure.
3
Press and hold the LINE and FEED buttons while switching ON the printer.
4
Release the LINE and FEED buttons when a beep sounds.
5
Switch OFF the DSW6 dip switch and latch the Top Cover closed.
NOTE: When the Top Cover is closed, the clear process will automatically be
initialized. During the clear process, the printer will be in an offline state.
Press the LINE button to test print a large label and the FEED button to
test print a small label.
NOTE: Pressing the FEED button pauses test printing activity. Allow a
minimum of two labels to be printed before terminating to ensure the clear
process was successful.
Page 5-6
SATO D508/D512 Service Manual
Unit 5: Adjustment Procedures
TEST PRINT COUNTER CLEAR
1
Open the Top Cover.
2
Press and hold the LINE and FEED buttons while switching ON the printer.
3
Release the LINE and FEED buttons when a beep sounds.
4
Latch the Top Cover closed.
NOTE: When the Top Cover is closed, the clear process will automatically be
initialized. During the clear process, the printer will be in an offline state.
Press the LINE button to test print a large label and the FEED button to
test print a small label.
NOTE: Pressing the FEED button pauses test printing activity. Allow a
minimum of two labels to be printed before terminating to ensure the clear
process was successful.
CUT POSITION (IF CUTTER IS INSTALLED)
1
Open the Top Cover and remove the front cover.
2
Switch the DSW6 dip switch to the OFF position and adjust the VR1 potentiometer to its
center position.
NOTE: Refer to Figure 5-2 for visual assistance in performing this procedure.
3
Press and hold the FEED button while switching ON the printer.
4
Release the LINE and FEED buttons when a beep sounds.
5
Press either the LINE or FEED button to print a test label.
NOTE: Press the LINE button to test print a large label and the FEED button
to test print a small label. Pressing the FEED button pauses test printing
activity.
6
Use the printed test label to determine the required direction for the desired adjustment.
7
Adjust the VR1 potentiometer accordingly and repeat the test print process.
8
Repeat steps 3 through 5 until a proper offset adjustment is achieved.
SATO D508/D512 Service Manual
Page 5-7
Unit 5: Adjustment Procedures
EYE MARK / PAPER END SENSOR SENSITIVITY
1
Open the Top Cover and remove the front cover.
2
Turn the VR2 potentiometer fully counter-clockwise.
3
Connect the Test Module to the test connector on the printer’s test panel.
NOTE: Refer to Figure 5-2 for visual assistance in performing this procedure.
NOTE: Use of the Test Module on this printer also requires the use of a
connector adapter cable that should also be purchased with the module.
4
Connect the multimeter ground probe to the pin identified as GND on the test module.
5
Connect the multimeter positive probe to the pin identified as SIG on the test module.
6
Set the multimeter to DC Voltage mode and turn the test module dial to position 4.
7
Physically place the media’s reference point into the sensor.
8
Adjust the VR2 potentiometer until the multimeter displays a value of +0.5 V ± 0.2 V.
9
Remove the label from the sensor and confirm that the voltage displayed is now 0.9 volts
above the previous reading.
10 Repeat steps 7 through 9 until a acceptable sensitivity level is established.
PAPER END SENSOR SENSITIVITY (ALTERNATE)
CAUTION: Care should be taken not to short the pins on the test connector. Damage to
the PCB board could occur if the pins are shorted.
1
Open the Top Cover and remove the front cover.
2
Turn the VR2 potentiometer fully counter-clockwise.
3
Connect an insulated multimeter ground probe to pin 3 (GND) on the test connector.
4
Connect an insulated multimeter positive probe to pin 2 on the test connector.
5
Set the multimeter to DC Voltage mode.
6
Physically place the media into the sensor.
7
Adjust the VR2 potentiometer until the multimeter displays a value of +0.5 V ± 0.2 V.
8
Remove the label from the sensor and confirm that the voltage displayed is now 0.9 volts
above the previous reading.
9
Repeat steps 7 through 9 until an acceptable sensitivity level is established.
Page 5-8
SATO D508/D512 Service Manual
Unit 5: Adjustment Procedures
GAP SENSOR SENSITIVITY
1
Open the Top Cover and remove the front cover.
2
Turn the VR3 potentiometer fully counter-clockwise.
NOTE: Refer to Figure 5-2 for visual assistance in performing this procedure.
3
Connect the Test Module to the test connector on the printer’s test panel.
NOTE: Use of the Test Module on this printer also requires the use of a
connector adapter cable that should also be purchased with the module.
4
Connect the negative multimeter ground probe to the pin identified as GND on the test
module.
5
Connect the multimeter positive probe to the pin identified as SIG on the test module.
6
Set the multimeter to DC Voltage mode and turn the test module dial to position 3.
7
Physically place the media’s reference point into the sensor.
8
Adjust the VR3 potentiometer until the multimeter displays a value of +0.5 volts or less.
9
Physically move the media so that its printable surface is over the sensor.
10 Confirm the voltage displayed on the multimeter is now +1.0 volts or greater.
11 Repeat steps 7 through 10 until a acceptable sensitivity level is established.
GAP SENSOR SENSITIVITY (ALTERNATE)
CAUTION: Care should be taken not to short the pins on the test connector damage to the
PCB board could occur if the pins are shorted.
1
Open the Top Cover and remove the front cover.
2
Turn the VR3 potentiometer fully counter-clockwise.
3
Connect an insulated negative multimeter ground probe to pin 3 (GND) on the test
connector.
4
Connect an insulated positive multimeter positive probe to pin 1 on the test connector.
5
Set the multimeter to DC Voltage mode.
6
Physically place the media's reference point or gap into the sensor.
7
Adjust the VR3 potentiometer until the multimeter displays a value of +0.5 volts or less.
8
Physically move the media so that its printable surface is over the sensor.
9
Confirm the voltage displayed on the multimeter is now +1.0 volts or greater.
10 Repeat steps 7 through 10 until an acceptable sensitivity level is established.
11 Repeat steps 7 through 10 until a acceptable sensitivity level is established.
SATO D508/D512 Service Manual
Page 5-9
Unit 5: Adjustment Procedures
POWER SUPPLY CHECKS
Obtain a DC Multimeter and Number 2 Phillips screwdriver for this check. To check voltage
levels, first check the Main PCB fuse (see next page) and replace it if necessary. Then follow the
steps below:
1
Turn the printer OFF.
2
Set the multimeter to DC mode.
3
Attach the negative (-) lead from the multimeter to Pin 3 (GND) of CN3 on the configuration
panel.
4
Attach the positive (+) lead from the multimeter to Pin 4 of CN3 on the configuration panel.
5
Turn the printer ON.
6
Confirm that the voltages are correct. If not, remove the power connector from the rear of
the printer, connect the test probes to Pin 1 (+) and Pin 4 (-) and measure the voltages.
Ideal Voltage
Test Points
Voltage Range
+ 5.0 V
Pin 3 (GNC) of CN3
Pin 4 of CN3
+4.8 V to +5 V
7
Pin 3 GND
Pin 4 +5 V
CN3
Pin 1 GAP
Pin 2 Eye
Power Supply Connector
If the voltages are not correct, replace the power supply.
Page 5-10
SATO D508/D512 Service Manual