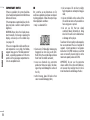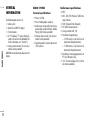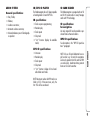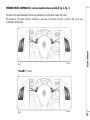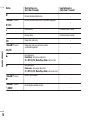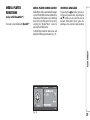
1
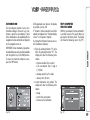
RADIONAV
The car is equipped with a Radionavigator designed according to the specific characteristics of the passenger compartment,
with a customised design that matches the style of dashboard.
The system is installed in an ergonomic position for the driver and passenger, and controls can be quickly located from
the graphical display on the front, making the device easy to use.
To increase protection against theft, the Radionavigator has a protection system that only allows it to be used on the vehicle in which it has originally been fitted.
The instructions for use are given below and we recommend you read them carefully and always keep them to hand
(for example, in the glove compartment).
Enjoy reading this manual. And enjoy driving your car.
The information in this publication is provided by way of example.
Fiat Group Automobiles can modify the specifications of the vehicle model
described in this publication at any time, for technical or marketing purposes.
For further information, contact Alfa Romeo Authorized Services.
INDEX
TIPS, CONTROLS AND GENERAL INFORMATION
TIPS .........................................................................
GENERAL INFORMATION ...............................................
CONTROLS ................................................................
Steering wheel controls ................................................
MAIN FUNCTIONS .......................................................
Switching the system on/off ........................................
Main menu ................................................................
Audio ........................................................................
Navigation .................................................................
Personal destinations ...................................................
Traffic Info (TMC/TMC Premium) ..................................
Driving mode information (DNA) ....................................
Configuration .............................................................
Audio ........................................................................
AUDIO
Volume adjustment .....................................................
Mute/Pause function ..................................................
“Audio adjustments” menu ..........................................
Audio source selection ..................................................
RADIO FUNCTIONS
Radio station tuning ....................................................
Favourite radio stations.................................................
TA function .................................................................
5
8
10
15
17
17
18
18
18
18
18
19
19
19
20
20
21
22
23
24
25
PTY function ...............................................................
AF function ................................................................
REG function ..............................................................
Specific radio menu .....................................................
CD - MP3 CD/SD FUNCTIONS
CD - MP3 CD/SD playback ...........................................
Stop/pause CD - MP3 CD/SD playback ..........................
Eject CD - MP3 CD/SD ................................................
Selecting a track from the list ......................................
Select previous/next track ...........................................
Track fast forward/rewind ...........................................
CD - MP3 CD/SD specific menu ....................................
MEDIA PLAYER FUNCTIONS (only with Blue&MeTM)
Launching Media Player mode ......................................
Available controls ........................................................
Specific Media Player menu .........................................
25
26
26
26
27
27
27
27
27
27
28
29
29
30
AUX (only with Blue&MeTM system)
(where provided) ........................................................ 31
NAVIGATION
Notices ...................................................................... 32
Map display ............................................................... 32
Information during navigation ...................................... 33
Main navigation menu ................................................
Entering destination ....................................................
Stops management .....................................................
Insert diversion ...........................................................
Map options ..............................................................
Navigation options .....................................................
Start navigation ..........................................................
Specific navigation menu ............................................
34
34
38
38
39
41
42
43
TRAFFIC INFO
Traffic information (TMC/TMC Premium) ......................... 44
Choose TMC/TMC Premium station ............................... 46
TMC/TMC Premium reception status ............................... 46
DNA DRIVING MODE AND
DYNAMIC FUNCTION
Activating driving mode information (DNA) ......................
Handling ..................................................................
Engine .......................................................................
Dynamic display screens................................................
TELEPHONE (only with Blue&MeTM system)
Telephone information display ....................................... 50
Specific telephone menu .............................................. 51
Spot messages menu .................................................. 52
CONFIGURATION
Display ......................................................................
Sounds .....................................................................
“My Car” options .......................................................
Date and time ............................................................
Language ..................................................................
SD Card management .................................................
53
54
55
57
57
57
OPERATING PROBLEMS
Operating faults .......................................................... 59
Problems due to overheating ....................................... 59
47
47
47
48
TRIP COMPUTER
General features ......................................................... 49
Specific Trip Computer menu ........................................ 49
TIPS
ROAD SAFETY
Learn how to use the various system functions before setting off.
Read the instructions for the Radionavigator
carefully before setting off.
If the volume is too loud this
can be dangerous. Adjust the
volume so that you can still hear
background noises (e.g. horns, ambulances, police vehicles, etc.).
RECEPTION CONDITIONS
Reception conditions change constantly
while driving. Reception may be interfered
with by the presence of mountains, buildings or bridges or when you are far from the
broadcaster.
IMPORTANT The volume may be increased
when receiving traffic bulletins.
CARE AND MAINTENANCE
Observe the following precautions to ensure
the system is fully operational:
❍ the monitor is sensitive to scratching, liquid detergents and UV rays;
❍ liquids that get inside could damage the
system irreparably.
Only clean the front panel and the display
with a soft, clean, dry, anti-static cloth.
Cleaning and polishing products may damage the surface.
RADIONAV
TIPS, CONTROLS AND GENERAL INFORMATION
Avoid pointed or rigid objects
coming into contact with the
display and do not touch it. Whilst
cleaning, do not exert pressure on
the display.
Do not use alcohol or similar
products to clean the Radionavigator display or surround.
5
RADIONAV
6
IMPORTANT NOTES
If there is a problem, the system should only be checked and repaired at an Alfa Romeo
Authorised Service.
If the temperature is particularly low, the display may take a while to reach optimum
brightness.
WARNING Never force the display movement manually. For closing or opening the
display, exclusively use the suitable keys
(see page 14).
If the car is stopped for a while and the outside temperature is very high, the Radionavigator may go into “thermal protection”
mode, suspending operation until the temperature in the passenger compartment returns to acceptable levels.
CD
Dirt, scratches or any distortions on CDs
could cause problems and poor sound quality during playback. Follow these tips for optimum playback conditions:
❍ only use branded CDs:
❍ clean every CD thoroughly removing any
fingerprints or dust using a soft cloth.
Hold CDs by the outside edge and clean
them from the middle outwards;
❍ never use chemicals (e.g. anti-static
products or thinners or sprays) for cleaning as they could damage the surface of
the CDs;
❍ after listening, place CDs back in their
cases to avoid damaging them;
❍ do not expose CDs to direct sunlight,
high temperatures or damp for long periods;
❍ do not stick labels on the surface of the
CD and do not write on the recorded surface using pens or pencils.
❍ do not use CDs that are clearly
scratched, flawed, distorted, etc. Using
discs like this will result in malfunctions
or damage to the player.
To achieve the best quality audio reproduction we recommend the use of original CD
supports. Correct operation is not guaranteed when CD-R/RW media are used that
were not correctly burned and/or with a
maximum capacity above 650 Mb.
IMPORTANT Do not use the protective
sleeves sold for CDs or discs with stabilizers,
etc. because they could get stuck in the internal mechanism and damage the disc.
IMPORTANT The CD player is able to read
most of the compression systems currently
on the market (e.g.: LAME, BLADE, XING,
FRAUNHOFER) but as these systems are
continually evolving, playback of all compression formats is not guaranteed.
IMPORTANT If a multi-session disk is loaded,
only the first session will be played.
RADIONAV
IMPORTANT If copy protected CDs are used,
it may take a few seconds before the system starts playing them. The CD player is
not guaranteed to play all copy-protected
discs. The presence of copy protection is often indicated in small letters or may be difficult to read on the cover of the CD; it may
say something like, for example, “COPY
CONTROL”, “COPY PROTECTED”, “THIS CD
CANNOT BE PLAYED ON A PC/MAC” or may
be identified through the use of symbols,
such as, for example:
7
RADIONAV
GENERAL
INFORMATION
8
The Radionavigator consists of:
❍ radio system;
❍ Audio CD and MP3 CD player;
❍ SD Card reader;
❍ 6.9” fold-away TFT colour display located in the centre of the dashboard (for
further information see “Controls”);
❍ steering wheel controls (for versions/
markets where provided).
WARNING Do not place heavy objects on the
display.
RADIO SYSTEM
Radio tuner specifications
General specifications
❍ RDS;
❍ RDS - TMC/TMC Premium (Traffic Message Channel);
❍ EON (Enhanced Other Network);
❍ TA (Traffic Announcements)
❍ Tuning on bands: AM, FM;
❍ Possibility of programming:
– 18 FM stations (6 of which can be
memorized through Autostore);
– 12 AM stations (6 of which can be
memorized through Autostore);
❍ Possibility of selecting programmes via
PTY (on FM bands only);
❍ “List” function (display of list of all radio stations available).
❍ Power: 4x25W;
❍ Preset 5-band graphic equalizer;
❍ Audio source settings adjustment menu
and possible outside interfaces (Media
Player)/AUX (where provided);
❍ Steering wheel controls (for versions/
markets where provided).
❍ Speed dependent volume adjustment
(SVC function).
General specifications
❍ Bass/Treble;
❍ Balance;
❍ Loudness correction;
❍ Automatic volume correction;
❍ Musical ambiance: preset 5 band graphic equalizer:
CD/MP3 CD PLAYER
The Radionavigator has a CD player capable
of reading Audio CDs and MP3 CDs.
CD specifications
❍ Track sequence programming
❍ Random play
❍ Track repeat
❍ Skip track
❍ “List” function (display of available
tracks)
MP3 CD specifications
❍ Introscan
❍ Random play
❍ Track repeat
❍ Skip track
❍ “List” function: display of list of available folders and tracks.
SD CARD READER
The Radionavigator is equipped with an SD
and SD-HC reader able to read/manage
cards with SPI technology.
SD specifications
for navigation
Use only original SD cards provided or purchased from authorized retailers.
MP3 SD specifications
See description in the “MP3 CD specifications” paragraph.
NOTE Only use SD cards dedicated to a single function (e.g. SD cards for navigation
exclusively separate from SD cards for MP3
use exclusively). Avoid transferring content
from one SD card to another.
RADIONAV
AUDIO SYSTEM
NOTE Maximum number of MP3 tracks in a
folder is 255, if there are more, only the
first 255 will be considered.
9
RADIONAV
CONTROLS
fig. 1
10
A0K0030m
RADIONAV
fig. 2
A0K0029m
11
Some controls have various functions that depend on the system application activated at the time.
Activation of the selected function is controlled, in some cases, by how long the button is pressed (short or long press) as described in the
table below:
Button
Short button press
(less than 2 seconds)
Long button press
(more than 2 seconds)
1 – g/DARK
Button press: system activation/DARK function activation
Button press:
switch system on/off
Knob rotation: volume level setting
RADIONAV
2 – RADIO
Radio Mode activated: radio band selection (FM1, FM2, FMAST, AM)
Radio Mode not activated: specific menu display and
radio band selection (FM1, FM2, FMAST, AM)
3 – MEDIA
Source selection: Media Player (only in presence of Blue&MeTM)/
CD/MP3 SD/AUX (only in presence of Blue&MeTM) (where provided)
4–h
Radio Mode: display of radio station names in the selected band
CD Mode: display of tracks available on the CD
Radio Mode:
AutoSTore function activation
–
Radio Mode: update station list
(press for over 5 seconds)
MP3 CD/SD mode: display of folder and track list
12
5 – TEL
Telephone data display (only with Blue&MeTM)
6 – PRESET
Access to the menu for selecting and storing favourite radio stations
–
–
Button
Short button press
(less than 2 seconds)
7 – NAV
Navigation Map displaying or, in Navigation Map mode, repetition of the last voice
message
–
8 – TRIP
Display TRIP data and Dynamic display screens
–
N
Long button press
(more than 2 seconds)
Radio mode: increase frequency (FM or AM mode)
MP3 CD/SD mode: select next folder
Map Mode: map scroll upwards
–
9
Radio Mode: scanning function to search for the first audible radio station with
frequency lower/higher than the present one (FM or AM mode)
CD - MP3 CD/SD, Media Player Mode:
select next/previous track
–
Map Mode: scroll map to the left/right
O
RADIONAV
Media Player mode: select next genre/author/album/folder/playlist
depending on the selection mode currently activated
Radio mode: frequency decease (FM or AM mode)
MP3 CD/SD mode: select previous folder
Map Mode: scroll map downwards
–
Media Player mode: select previous genre/author/album/folder/playlist
depending on the selection mode currently activated
10 – MUSIC
11 –
O
12 – ESC
Music information display
–
Audio Adjustment Menu Display
–
Exit selection
System reset
(if pressed for more than 8 seconds)
13
Button
Short button press
(less than 2 seconds)
Long button press
(more than 2 seconds)
13 – MENU
Main Menu Display
Access to navigation simulation function
14 – OK
Button press: open specific menu
Confirm selection
–
RADIONAV
Knob rotation: select menu items
–
15
Audio CD or MP3 CD housing
16 – &
Activation/deactivation of Audio function (Mute)
17
SD Card housing
–
18 – ˚
Eject audio CD or MP3 CD
–
Navigation message activation/deactivation
DASHBOARD CONTROLS fig. 2
14
Button
Short button press
(less than 2 seconds)
19 – Q
Z
Adjust display panel inclination
20 q
Open/close display panel
–
21
Display
–
Long button press
(more than 2 seconds)
–
STEERING WHEEL CONTROLS (for versions/markets where provided) fig. 3, fig. 4
fig. 3
A0K0118m
RADIONAV
The controls for the main Radionavigator functions are replicated on the steering wheel to make things easier.
The activation of the function selected is controlled, in some cases, by how long the button is pressed (short or long press),
as described in the table below.
If Blue&MeTM is present
fig. 4
A0K0195m
15
Button
Short button press
(less than 2 seconds)
&
Activates/deactivates Audio functions
If Blue&MeTM is present
Activates/deactivates Audio functions (see dedicated supplement)
+
Increase volume
Continuous increase in volume
–
Decrease volume
Continuous decrease in volume
SRC
If Blue&Me is present
TM
RADIONAV
–
–
&/ESC
Change active audio source
–
Change active audio source and confirm selection
(see dedicated supplement)
–
SRC/OK
N
Active audio source:
Radio Mode: select previous radio station
CD - MP3 CD/SD, Media Player Mode: select next track
–
O
Active audio source:
Radio mode: select previous radio station
CD - MP3 CD/SD, Media Player Mode: select previous track
–
If Blue&MeTM is present
Activate “Voice commands”
‘
If Blue&MeTM is present
ß/MENU
16
Long button press
(more than 2 seconds)
–
Activate Telephone and Menu functions
–
The Radionavigator features four applications
(Audio, Telephone, Trip Computer and Navigation) and provides a general Menu. The
four applications are activated by pressing
the MUSIC, TEL, TRIP, NAV buttons. Press
the MENU button to activate the Menu.
NOTE: The Telephone application is only present with the Blue&MeTM system.
All applications have a specific Menu that
can be activated by pressing the OK button/knob.
The system also signals the following by
means of messages in the display:
❍ the presence of any problems/
faults;
❍ information on the active application/
information on the status of the car.
To interact with the messages displayed, use
the OK button/knob or press the ESC button to remove the message from the display.
SWITCHING THE SYSTEM
ON/OFF
The system is switched on by turning the ignition key to the MAR position and switches off when the ignition key is turned to the
STOP position.
The system can always be turned on/off by
pressing the (ON/OFF) button 1 - fig. 1.
If the system is turned on with the engine
switched off, it will automatically switch off
after about 20 minutes.
Dark mode (dark display)
With the system on, if the (ON/OFF) button 1 - fig. 1 is pressed briefly, DARK mode
is activated: the display will go out, but the
system remains on and operational.
Display angle adjustment
Press the Q/Z buttons to adjust the display angle. This adjustment is maintained
at the next engine start-up.
Closing the display
With the system on, the display can be
closed by pressing button 20-fig. 2 the display will go out, but the system remains
on and operational.
NOTE The display can be adjusted for 15
minutes after rotating the ignition key to
STOP or whenever the doors are opened. After 15 minutes, the display can be adjusted again by rotating the ignition key to MAR.
RADIONAV
MAIN FUNCTIONS
17
MAIN MENU
Press the MENU button to display the Main
menu fig. 5.
Turn the OK button/knob to select the desired function. Then, press the knob to access the selected Menu.
RADIONAV
NOTE: For more details on each of the functions described below, refer to the relevant
chapter.
AUDIO
This Menu makes it possible to change the
audio source options (the only audio sources
that can be selected are those available for
the system):
❍ CD can only be selected if a music CD
is inserted (audio or MP3);
❍ USB is only available if the Blue&MeTM
system is present and a USB memory
stick with music tracks has been inserted;
❍ MP3 SD is only available if an MP3 SD
containing music tracks has been inserted instead of the SD card containing
the maps;
❍ AUX (where fitted) is only available if
the Blue&MeTM system is present.
NAVIGATION
This Menu allows a destination to be entered
and navigation and map display options to
be set.
PERSONAL DESTINATIONS
Personal destinations allows you to manage
a list of preferred personal destinations
which can be added to, modified or deleted from the system.
18
fig. 5
A0K5006g
TRAFFIC INFO
(TMC/TMC Premium)
This displays traffic information received in
real time via the TMC/TMC Premium service provided by several radio stations.
This Menu makes it possible to enable/disable the service and to set filters.
The filters are designed to define the area
of interest which the system will take into
consideration for traffic messages, filtering
those not considered important.
Note
The TMC Premium Service is available in
Italy, France, Germany and the UK. Only
map Navigators sold in these countries are
enabled to receive the service.
TMC Premium is provided by:
CONFIGURATION
After having activated this Menu, select the
desired item by turning the OK button/knob
and then press the knob to confirm.
If the button is pressed or if no selection is
made after about 30 seconds, the screen
will disappear from the display.
AUDIO
Press the MENU button to display the Audio
menu (fig. 6).
The Audio menu makes it possible to manage:
– the RDS radio with FM/AM reception;
– the Compact Disc player;
– the MP3 Media Player;
– the portable player (AUX) (where provided);
– the SD card reader;
– the audio adjustments.
RADIONAV
DRIVING MODE
INFORMATION (DNA)
Allows the display of the selected driving
mode (“Dynamic”, “Normal” or “All Weather”) using the “Alfa DNA” lever.
fig. 6
A0K5008g
19
RADIONAV
AUDIO
20
This Menu makes it possible to adjust the
audio settings for the radio, the CD, the
Media Player (if connected) and the audio
adjustments for the speakers.
Pressing the MUSIC button activates the display of information for the audio source being listened to. Pressing the OK button/knob
gives access to the specific audio source
menu being listened to. Pressing the & button briefly activates the “Mute” function.
VOLUME ADJUSTMENT
To adjust the volume, turn knob 1 - fig.1.
The volume can be adjusted to a maximum
level of 40. When the system is switched
off and then switched back on, the volume
will be set at the level set before switching
off or at a level of 20 if the volume was
set to above 20 before switching off.
Volume adjustment is specific to each
source.
With the MUTE function, when knob
1 - fig. 1 is turned, the MUTE function is
deactivated.
MUTE/PAUSE FUNCTION
Press the & button briefly to activate the
Mute/Pause function.
The Mute/Pause function is deactivated in
the following cases:
❍by pressing the MEDIA button;
❍ by pressing the RADIO button;
❍ by pressing the MEM button (in radio
mode only);
❍ by pressing the O button;
❍ by pressing the N/O// buttons;
❍ by pressing the SRC or N/O button on
the steering wheel;
❍ by opening the Audio adjustments Menu
in the main menu;
❍ by searching manually for a radio station frequency;
❍ by activating the PTY function;
❍ by selecting a radio station or music
track from a list;
❍ by selecting the SCM, RDM or RPT function (the latter is only available in MP3
CD/SD mode);
❍ by selecting the PRG function (in CD
mode only).
If there is no HI-FI system in the car, the
possible adjustments are (fig. 7):
❍ Treble/Bass
❍ Balance
❍ Loudness correction
❍ Automatic volume correction
❍ Graphic equalizer
If there is a HI-FI system in the car, the audio arrives at the speakers via the external
amplifier. In this configuration the only possible adjustments are Treble/Bass and
Balance.
Treble/Bass
(bass/treble adjustment)
Turn the OK button/knob to adjust the
bass/treble.
The adjustment is specific to each source.
Balance
(sound distribution)
Turn the OK button/knob to vary the distribution of the sound in the passenger compartment between the front/rear speakers
and the left/right speakers.
The adjustment applies to all sources.
Loudness
The Loudness function improves the level of
the sound whilst listening at low volumes,
increasing the bass and treble. Turn the OK
button/knob to activate/deactivate the
function.
The adjustment is specific to each source.
fig. 7
RADIONAV
“AUDIO ADJUSTMENTS” MENU
This Menu is displayed in the following
cases:
❍ by pressing the O button;
❍ by pressing the MENU button and selecting “Audio”;
❍ by selecting specific MENU for an audio source.
A0K5013g
21
RADIONAV
Volume-speed correction
(speed dependent volume
adjustment)
This function allows the volume level to
be adjusted depending on the speed of
the vehicle, to maintain the correct balance with the noise level inside the passenger compartment.
Turn the OK button/knob to activate/
deactivate the function.
The adjustment applies to all sources.
22
Graphic equalization
This function makes it possible to select one
of the following equalizer curves:
❍ None (predefined car curve)
❍ Pop/Rock
❍ Classical
❍ Techno
❍ Jazz
❍ Vocal
Turn the OK button/knob to select the desired adjustment.
The adjustment is specific to each source.
AUDIO SOURCE SELECTION
Alternatively, by pressing the MEDIA button
it is possible to select the CD source (only
if a CD is inserted) or Media Player (only if
the Blue&MeTM system is present and a
USB device with music files is inserted) or
AUX (where provided) (only if the
Blue&MeTM is present). Pressing the RADIO button selects the radio mode and subsequent presses give the possibility of selecting the preferred radio band. Pressing
the SRC button on the steering wheel selects
one of the available audio sources.
With the radio source activated, pressing the
RADIO button repeatedly selects one of the
following frequency bands: FM1, FM2,
FMAST, AM.
After having selected the desired frequency,
the display will show the following information fig. 8:
❍ radio symbol
❍ radio station name
❍ frequency of the station tuned into
❍ number corresponding to the stored position;
❍ frequency band activated (e.g.: FM1);
❍ programme name and type
fig. 8
RADIO STATION TUNING
Press the N/O// buttons on the
front panel of the Radionavigator or the
N/O buttons on the steering wheel to
search for a radio station. It is also possible to select a radio station from a list or
by entering the frequency in the specific
Menu.
Manual tuning
This allows the manual search for stations
on the desired band. Press the N/O button briefly and repeatedly to start the search
in the desired direction. If the N/O button
is pressed longer, the fast search will start
and then stop when the button is released.
Automatic tuning
Press the or button briefly to automatically tune into the next station in the
selected direction. If the or button is
pressed for longer, the rapid search is
launched. When the button is released, the
tuning will stop at the next station that can
be received.
Selecting the
radio station list
Two different lists of radio stations can be
selected: one for the FM band and one for
the AM band. The system continuously updates the list; it is possible to request a list
update by holding down button h.
If reception is not ideal, the automatic update is less frequent, therefore the list may
appear different after a manual update.
To access the list of radio stations, briefly
press button h.
The list of stations displays the name of the
station (if available) or the frequency. The
TMC indication is also displayed if the FM
station provides this service.
RADIONAV
RADIO FUNCTIONS
A0K5040g
23
FAVOURITE RADIO STATIONS
Up to 6 different radio stations can be
stored for each frequency band (FM1,
FM2, FMAST, AM). They can be recalled by
pressing the PRESET button.
RADIONAV
Radio station selection
After having pressed the PRESET button, the
display will show a list of the 6 radio stations stored (fig. 9). Select the desired station using the OK button/knob.
24
fig. 9
A0K5038g
Radio station manual
programming
After having selected the desired frequency,
press the PRESET button. The display will
show the list of 6 positions available for programming (fig. 9). Select “Store” and then
select the desired position using the OK button/knob.
AutoSTore function (automatic
radio station programming)
The AutoSTore function is only available on
the FM frequency band. To activate the function, hold down the RADIO button or access
the specific menu or the radio main menu.
The system will search for and programme
the 6 radio stations with the strongest signal.
When the programming is over, the radio
will tune into the first station stored on the
FMAST frequency band.
Each station is only stored once, except in
the case of regional programmes which, in
some cases, may be stored twice.
– The AF, TA and REG functions are not available with the AutoSTore function active.
– To interrupt the AutoSTore function, select
another source (CD or Media Player).
– The AutoSTore function may sometimes
not be able to find 6 stations with a strong
signal; in this case only the stations found
will be programmed.
– When the AutoSTore function is activated, the stations that were previously stored
on the FMAST band are deleted.
TA FUNCTION
(traffic information)
Some stations on the FM band can transmit
information about traffic conditions. To activate/deactivate the function, see the “Specific radio menu” paragraph.
With the TA function activated the volume
can be adjusted by turning the OK button/knob. When the volume is changed during a traffic bulletin, the new value will only be maintained whilst the bulletin is in
progress.
IMPORTANT In some countries there are radio stations that do not broadcast traffic information even with the TA function activated.
PTY FUNCTION
(programme type selection)
This function allows you to give priority to
radio stations that broadcast programmes
classified according to the type of PTY. The
PTY programmes may involve emergency
messages or various subjects (e.g. music,
news). To activate/deactivate the function,
see the Specific radio menu paragraph.
IMPORTANT To activate the PTY function you
must be on the FM band.
If you do not wish to set any programme,
select “None”.
The PTY function cannot be activated if a
PTY search has already been launched or if
the AutoSTore function is active.
The PTY search is interrupted in the following cases:
– when recalling a programmed radio station or programming a radio station;
– by pressing the RADIO, MEDIA, or N /O
buttons.
RADIONAV
IMPORTANT NOTES
– The AutoSTore function cannot be activated with the PTY function active.
25
RADIONAV
AF FUNCTION
(alternative frequency search)
Alternative frequencies are used for automatically changing frequency when the signal for the active radio station is not strong
enough. To activate/deactivate the function,
see the “Specific radio menu” paragraph.
26
REG FUNCTION
This function enables or disables a regional
RDS service. To activate/deactivate the function, see the Specific radio menu paragraph.
The function cannot be selected if the
AutoSTore function is active.
SPECIFIC RADIO MENU
With the radio function active it is possible
to access the Specific radio menu by pressing the OK button/knob. The display will
show the following screen (fig. 10).
Radio station list
See the description in the “Radio station selection” paragraph.
Insert frequency
By selecting this item it is possible to enter
the radio station frequency. The display will
show the field and the frequency value plus
the dimension (KHz for AM band, MHz for
FM band).
Radio options
By selecting this item it is possible to activate/deactivate the following functions: AF,
TA, REG, RADIOTEXT. It is also possible to select the PTY function and AutoSTore.
Audio settings
See the description in the Audio adjustments
menu paragraph available in the Audio
menu.
fig. 10
A0K5023g
STOP/PAUSE CD-MP3 CD/SD
PLAYBACK
Press button & to activate the function.
CD-MP3 CD/SD PLAYBACK
To start playback, insert an Audio CD in the
slot 8-fig. 1 or, if there is already a CD inserted, press the MEDIA button. Playback
will start immediately and the display will
show the following screen (fig. 11).
EJECT CD-MP3 CD/SD
Press button ˚.
NOTE MPEG LAYER-3 audio decoding technology licensed from Fraunhofer IIS and
Thomson multimedia.
WARNING Do not use Audio CD or MP3
CD 8cm format supports, even with a
dedicated adaptor; the use of this format
will damage the system.
fig. 11
SD PLAYBACK
To start playback insert an SD card into slot
17- fig. 1, or if there is already a card inserted, press the MEDIA button: playback
will start immediately.
NOTE Only use SD-HC cards that are compatible with SPI technology.
REMOVING AN MP3 SD
before manually removing the MP3 SD, following the instructions provided in the paragraph “SD card safe removal”.
SELECTING A TRACK FROM
THE LIST
First of all press the h button to display
the list of tracks (Audio CD) or the list of
folders (MP3 CD) and then press the OK button/knob to make the desired selection.
SELECT NEXT/PREVIOUS
TRACK
Whilst playing a CD it is possible to select
the previous/next track by pressing the
/ buttons briefly.
TRACK FAST
FORWARD/REWIND
Whilst playing an Audio CD or CD MP3 it is
possible to fast forward/rewind the track by
holding down the / buttons. When the
button is pressed after selecting the track
being listened to, the next track will be selected. If the track was the last one on the
CD, the first track will be selected when the
button is pressed.
RADIONAV
CD - MP3 CD/SD
FUNCTIONS
A0K5041g
27
RADIONAV
CD - MP3 CD/SD SPECIFIC MENU
With the Audio CD function activated it is
possible to access the CD or MP3 CD/SD
options menu by pressing the OK button/knob. The display will show the following screen (fig. 12).
Put introscan - SCN on/off
When this function is activated all the music tracks on the CD or MP3 CD/SD will be
played for the first 7 seconds. When the
function is deactivated, the system will stop
on the track currently being played. The SCN
function deactivates the RDM (Random) and
“Track programme” functions if they have
been activated previously.
Put shuffle on/off
(random track playback)
When this function is activated the music
tracks on the CD are played in random order. When the function is deactivated, the
system will stop on the track currently being played. The random function deactivates
the SCN (Introscan) and “Track programme” functions if they have been activated previously.
Put repeat on/off
(only for MP3 CD/SD)
Activating this function plays the tracks in
“Track repeat” mode: when the selected
track ends, it will be played again from the
beginning. When the function is deactivated, the system will stop on the track currently being played.
Programme tracks
(with Audio CD only)
By selecting this item it is possible to programme (fig. 13) a playlist of tracks.
❍ “Reset”: deletion of all the numbers entered;
❍ “Delete”: deletion of the last number
entered;
❍ “OK”: confirms the number sequence
entered.
After having confirmed the number sequence, playback of the selected music
tracks will begin.
Hide CD details
When this function is activated the information relating to the track being listened
to is not displayed.
Title/artist (ID3 tag information)
This information is read from the ID3 tag
file. In some cases this information may be
incorrect or missing (e.g. the ID3 tag file
may contain the correct name of the artist
but not the title of the song).
28
fig. 12
A0K5024g
fig. 13
A0K5042g
(only with Blue&MeTM)
This mode is only available with Blue&MeTM.
MEDIA PLAYER MODE LAUNCH
Media Player mode is automatically brought
up (with the AutoPlay function activated) by
connecting a USB memory stick containing
music files to the USB port of the car or by
selecting the “Media Player” source by
pressing the MEDIA button.
In Media Player mode the main screen will
display the following information (fig. 14).
CONTROLS AVAILABLE
By pressing the / buttons you can select the next/previous track. By pressing the
N/O buttons you can select the next or
previous folder/artist/music genre depending on the selection mode activated.
RADIONAV
MEDIA PLAYER
FUNCTIONS
fig. 14
A0K5043g
29
MEDIA PLAYER
SPECIFIC MENU
With the Media Player source activated it
is possible to access the specific Menu by
pressing the OK button/knob.
The display will show the following screen
(fig. 15).
Switch track loop on/off
Activating this function plays the tracks in
“Track repeat” mode: when the selected
track ends, it will be played again from the
beginning. When the function is deactivated, the system will stop on the track currently being played.
RADIONAV
Switch autoplay on/off
When this setting is activated, playback
starts automatically when a new USB device is inserted in the USB port on the car.
Put shuffle on/off
See description in the “CD-MP3 CD/SD
Functions” paragraph.
30
Select mode
Selecting this item allows you to choose the
playback mode for the tracks on the USB
device.
One of the following options can be chosen:
❍ “Play all”: all the tracks are played;
❍ “Folders”: all the tracks in a folder are
played;
❍ “Artists”: all tracks by an artist are
played;
❍ “Genres”: all tracks of a musical genre
are played;
❍ “Album”: all the tracks in an album are
played;
❍ “Playlist”: all the tracks in a playlist are
played.
Audio settings
See the description in the Audio adjustments
menu paragraph available in the Audio
menu.
fig. 15
A0K5044g
( o n l y w i t h B l u e & M e TM s y s t e m )
(where provided)
SPECIFIC AUX MENU
With the AUX source activated it is possible to access the specific Menu by pressing
the OK button/knob. The display will show
the following screen (fig. 15a).
By selecting "Audio settings" you can
change the audio settings of the AUX source.
fig. 15a
IMPORTANT NOTES
The functions of the device connected with
the AUX socket are directly managed by the
device itself; it is not possible to change
track/folder/ playlist with radio or steering
wheel controls.
Do not leave the cable of your portable player connected with the AUX socket after the
disconnection, to avoid possible hisses from
the speaker
RADIONAV
AUX
A0K5058g
31
N AV I G AT I O N
RADIONAV
The Navigator makes it possible to reach a
desired destination through visual and
acoustic directions. The Navigation system
is quick to use, easy and above all very flexible because you can recall preferred destinations and reference points such as hotels,
monuments, public buildings (e.g. hospitals,
airports, etc.) and filling stations.
32
IMPORTANT NOTES
The Navigation system provides assistance
whilst driving and is designed to give advice,
via voice and graphic information, on the
best route for reaching a desired destination.
The instructions given by the Radionavigator do not mean that the driver should abdicate responsibility for the manoeuvres they
make whilst driving the car in traffic and
they must still follow the highway code and
other traffic laws. The driver is always responsible for road safety.
GPS reception may be poor under trees, between tall buildings, in multi-storey car
parks, tunnels and anywhere where the
satellite aerial may have difficulty picking
up a signal.
If the battery is replaced or disconnected
or if the car is moved with the engine and
the Radionavigator off (e.g. whilst travelling
on a ferry), the GPS system needs a few
minutes to determine the new position of
the car.
The GPS satellite aerial should not be covered by metal or damp objects.
In conditions where wheel grip is continuously bad (e.g. when sliding on ice), the
Navigation system may temporarily show
an inaccurate position for the car.
When the system is turned on, when the
first navigation function selection is made,
the display will show a message with warnings for using the system. This message will
not be displayed until the next time it is started up.
INFORMATION DURING
NAVIGATION
The following information always appears
on the left side of the display during navigation:
Car location information: name of road
and area.
A map can be displayed on the right side
of the display (by pressing the NAV button)
showing:
“Pictograms and intersection zoom”: a pictogram explaining the next manoeuvre is displayed and then an enlargement of the junction with directions for the route to be followed;
Navigation information: the following
traffic information is provided during navigation:
❍ Icons on the map: the Radionavigator
can be configured to display symbols on
the map corresponding to traffic conditions. These are only displayed under
certain conditions.
❍ Explanatory text: an explanatory text is
associated with each event. Types of
event can be chosen from a list in the
menu; once the type is chosen, a list
of all corresponding events is displayed.
❍ Voice messages: voice messages giving
instructions about the manoeuvre to be
carried out are given during navigation.
❍ “Explore map” function: this makes it
possible to use digital maps like a regular road map (in this case the pictograms are not displayed).
RADIONAV
MAP DISPLAY
With the Navigation system activated it is
possible to choose to display the map of the
area with the following features:
❍ zoom with resolution up to 50 metres
(adjustable using OK button/knob);
❍ possibility of North up or direction of
travel up (for zoom below 20 km);
❍ BIRD VIEW function (bird’s eye view of
maps in 3D);
❍ Points of Interest (POI) symbol for the
following categories: restaurants, hotels,
service stations and car parks.
33
RADIONAV
MAIN MENU NAVIGATION
The following information is displayed (fig.
16):
❍ “Insert destination”;
❍ “Stops management”;
❍ “Insert diversion”;
❍ “Map options”;
❍ “Navigation options”;
❍ “Resume (or stop) navigation”.
34
fig. 16
A0K5000g
ENTERING DESTINATION
The destination can be entered in different
ways:
❍ Destination address: consists of entering the following details: Country,
Town (post code), Road, House number
or Intersection.
❍ Points of interest (POI): the navigation system makes it possible to set
a point of interest as a destination allowing it to then search for it:
– In the vicinity of your present location
– In the vicinity of the destination
– Near a normal address
The list of points found can be viewed by
distance or in alphabetical order.
After the destination has been entered, the
Navigator calculates the best route for reaching it.
There are three possible selection criteria:
“shortest time”, “shortest distance” or “best
distance/time ratio”.
A further choice can also be set from the following options:
❍ Toll roads
❍ Ferries
❍ RDS TMC/TMC Premium (Traffic Info)
The location can be memorized in an organizer in order to be easily recalled later on.
Radionav also allows you to link a name
with a destination.
It is also possible to set a Point of Interest
as a destination, allowing the user to find
it again later.
fig. 17
A0K5007g
Destination address
“Country” selection
After having selected the “Country” item,
the display will show a list of countries, in
English. Turn the OK button/knob to scroll
through the list and then press the button/knob to confirm the selection.
“Town” selection
After having selected the "City" item, the
display will show a keypad with numbers
and letters (fig. 18) for entering the name
of the city (or the corresponding postcode).
The following items are also present in the
lower section:
❍ Delete: this allows you to delete the last
character entered;
❍ Small: this allows you to change between Upper-case and Lower-case and
select special symbols;
❍ List XX: the list of towns in a country is
displayed (XX = number of the town).
If the complete postcode is entered, the
corresponding city will be displayed. If
an incomplete postcode is entered, a list
of the cities with the same numbers entered will be displayed.
❍ OK: this allows you to confirm the selection and return to the screen activated previously.
NOTE If the postcode of a specific area is entered, this is considered as a generic city
postcode.
RADIONAV
Insert address
By selecting this item it is possible to enter
the name of the Country, the town, the road
and the house number (fig. 17).
The system will then ask you to set the navigation criteria. Choose one of the following
three possibilities:
❍ “Shortest route”
❍ “Quickest route”
❍ Best “distance/time” ratio
To exit the screen, press ESC or insert the
SD card into the dedicated slot.
If the SD card has not been inserted or is not
recognised, the display will show a warning
message.
fig. 18
A0K5033g
35
RADIONAV
36
“Road” selection
After having selected the “Road” item, the
display will show a keypad with numbers
and letters for entering the name of the
road. The procedure for entering the road
is the same as described for the town.
After having entered the name of the road
the display will show a screen for entering
the house number or the crossroad (fig.
19). Select the desired choice using the OK
button/knob. When the “Civic No” is selected, the Radionavigator will display the
available house numbers in that road (fig.
19a). If, on the other hand, you select the
item “Junction”, the Radionavigator will display a list of roads that intersect the destination selected
fig. 19
A0K5059g
“Centre” selection
If you want to get to a town centre, select
the item Centre. If there is more than one
Centre present, the display will show a list
of available centres.
After entering all the information for the address, select “Save” to save the address under “Personal destinations”. The Radionavigator will display the position in the “Personal destinations” memory for a few
seconds.
fig. 19a
A0K5060g
POI (Points of Interest)
This function makes it possible to access a
list with information and the location of
places of general interest, such as, for example, restaurants, museums, stations, etc.,
divided by category. Select “POI”: the display will show the following screen (fig. 20).
The first 3 items are alternatives and are designed to specify whether the point of interest being searched for is located:
❍ “Near”: a destination entered or place
selected on the map
❍ “Along the route”: along the navigation
route
❍ “Near by”: in the vicinity of the current
position
❍ “Search by name”: since the list of POI
is normally displayed in order of increasing distance. By selecting this item,
the POI are displayed in alphabetical order.
fig. 20
A0K5034g
GPS coordinates
This allows you to enter the coordinates
(Longitude and Latitude) (fig. 22).
It is also possible to show the coordinates
on the display by selecting “Current location”.
Personal destinations
This allows you to display the list of “Personal destinations” saved previously and, if
necessary, choose the desired destination
and select it.
Last destinations
This allows you to display a list of the last
20 destinations set and, if necessary, choose
the desired destination and select it.
RADIONAV
When the choice has been made, the Radionavigator will display the list of main categories (fig. 21).
Turn the OK button/knob to select the desired item and then press the button/knob
to confirm the selection. There is a corresponding submenu for each item.
Select the desired item until the list of POI
corresponding to the selection criteria appears on the display.
fig. 21
A0K5025g
fig. 22
A0K5045g
37
RADIONAV
STOPS MANAGEMENT
This makes it possible to change the route
during navigation by inserting stop-overs.
The following items can be selected:
❍ “Add stop”
❍ “Organize stops”
❍ “Show destination”
38
Add stop
This makes it possible to add a stopover by
selecting one of the following items:
❍ “Insert address”
❍ “Personal destinations”
❍ “Last destinations”
Show destination
This allows you to display details of the destination set. By selecting “Modify” you return to the “Enter destination” menu.
By selecting “Map” the display will show
the map surrounding the current destination,
full screen, which can be moved by pressing the N/O/ / buttons.
INSERT DIVERSION
This allows a detour to be inserted into the
route set (fig. 23). In this case the system
will select an alternative route. The Radionavigator will search for the closest alternative route and will calculate a new route so
that you rejoin the previous route after X km
(X is the value that you can set on the
screen).
A message will be displayed if no alternative roads are available.
If, on the other hand, alternative roads are
available, the display will show the new distance from the destination. Select “Yes” or
“No” to confirm or cancel the new route.
Organize stops
This allows you to organize the stopovers
for the route: the order of stopovers can be
changed and/or removed.
fig. 23
A0K5046g
Map orientation
This allows the map to be orientated according to the following parameters:
❍ “Heading up”: the cursor (car) is displayed in the centre and the map is orientated according to the direction of the
car.
❍ “North up”: the map is orientated towards the north, the cursor (car) moves
on it;
❍ “Visualization 3D”: the map is displayed
in 3D mode and orientated according to
the direction of the car.
Show POI
(Points of Interest)
This allows you to choose the categories of
POI you want to be displayed on the map
(fig. 25).
Turn the OK button/knob to select one of
the “Points of Interest” categories from the
list:
Community services
– Towns, city centres
– Universities, specialised schools
– Hospitals
RADIONAV
MAP OPTIONS
This allows you to display the map using the
following items fig. 24:
❍ “Map orientation”
❍ “Show POI”
❍ “Map size”
❍ “Explore map”
fig. 24
A0K5047g
fig. 25
A0K5029g
39
RADIONAV
Hotels, restaurants, businesses
– Hotels
– Restaurants
– Wine producers, wineries
– Big companies
– Shopping, supermarkets
40
Culture, tourism, shows
– Tourism, historical monuments
– Culture, museums
– Casinos, night life
– Cinemas, theatres
– Shows, exhibitions
Sports centres, attractions
– Sports centres
– Golf courses
– Skating, bowling
– Winter sport resorts
– Parks, gardens
– Theme parks
Transport & vehicles
– Airports, ports
– Train stations, bus stations
– Car hire
– Car parking, parking areas
– Mechanics, assistance
Map size
This allows you to change the map display
mode. It is possible to choose between “Full
screen map” (full screen map display) and
“Navigation with info”.
Explore map
By selecting “Explore map” the full screen
map is displayed. When this screen is activated, press the N/O// buttons to
scroll through the map.
NOTE Pressing the OK button/knob in this
mode displays the specific menu for the map
(fig. 26).
fig. 26
A0K5020g
fig. 27
Set up calculation criteria
This allows you to select the following
navigation parameters:
❍ “Quickest route”: the quickest route for
reaching the destination is displayed.
❍ “Shortest route”: the shortest route for
reaching the destination is displayed.
❍ “Distance/time”: this is the “average”
of the two previous items.
❍ “With tools”: it is possible to define
whether or not the route should include
motorways.
❍ “With ferries”: it is possible to define
whether or not the route should include
ferry crossings.
❍ “Traffic Info (TMC)”: it is possible to define whether the route should take into
account traffic information received from
the radio via the RDS-TMC/TMC Premium service.
Voice message volume
The voice instructions given by the system
guide you to your destination recommending all the manoeuvres to be carried out: the
manoeuvre is announced first and then detailed instructions are given.
By selecting the “Voice messages volume”
item it is possible to adjust the volume of
these instructions.
Map information
This allows you to view the version of the
map on the display.
Delete last destinations
This allows you to delete the last destinations entered. Select “Yes” or “No”.
RADIONAV
NAVIGATION OPTIONS
This allows you to change the following
navigation parameters (fig. 27):
❍ “Set up calculation criteria”
❍ “Voice message volume”
❍ “Map information”
❍ “Delete last destinations”
A0K5057g
41
RADIONAV
LAUNCH NAVIGATION
After having selected and confirmed a destination, the display will show all the information needed for navigation.
42
Map display with navigation
information
The display fig. 28 is divided into 3 zones:
❍ left zone (A): if no destination is selected, a compass will be displayed. If
not, the navigation symbol will be displayed which can, for example, be a
road with an arrow or a junction detail.
The lower part of the left zone will display the altimeter and navigation information;
fig. 28
A0K5021g
❍ central zone(B): displays the navigation map and the scale;
❍ upper zone (C): displays information
relating to the Time, Audio and Temperature.
Full screen map display
The display fig. 29 is divided into 3 zones:
❍ upper zone: displays the destination;
❍ central zone: displays the map and
navigation information;
❍ lower zone: displays the altimeter,
the current location and the scale.
fig. 29
A0K5022g
fig. 30
Insert destination
See the description in the “Insert destination” paragraph.
Full screen map/map with
navigation information
This allows you to change from the full
screen display of the map to a partial display with navigation information and vice
versa.
Resume/stop navigation
This allows the navigation to be stopped/
resumed.
Traffic info
(TMC/TMC Premium)
See the description in the “Traffic info” chapter.
IMPORTANT Traffic information can only be
displayed if the radio station set broadcasts
messages near the point indicated or along
the route calculated, if a destination has
been entered.
Navigation options
See the description on the previous pages.
Explore map
See the description on the previous pages.
RADIONAV
SPECIFIC NAVIGATION MENU
You can access the specific menu from the
Navigation application (by pressing the NAV
button). The Menu displays the following information fig. 30:
❍ “Insert destination”;
❍ “Full screen map/map with pictograms”
❍ “Resume/stop navigation”
❍ “Traffic info (TMC)”
❍ “Navigation options”
❍ “Explore map”.
A0K5001g
43
RADIONAV
TRAFFIC INFO
TRAFFIC INFORMATION
(TMC/TMC Premium)
Some stations on the FM band (FM1, FM2
FM3 and FMAST) can transmit information
about traffic conditions. The information will
be shown on the display.
During navigation, information will be shown
through specific icons (see fig. 31).
Selecting “Explore Map” from the Navigation menu will bring up an overview of all
traffic events in the area of interest. For
more details on an individual event, move
the cursor over the desired icon, and press
OK.
If the station selected does not broadcast
traffic information, the display will show a
warning message and suggest the option of
moving to the automatic TMC/TMC Premium station selection mode.
IMPORTANT In some countries there are radio stations that do not broadcast traffic information even with the TMC/TMC Premium function activated.
Note
The TMC Premium Service is available in
Italy, France, Germany and the UK. Only
map Navigators sold in these countries are
enabled to receive the service.
TMC Premium is provided by:
44
fig. 31
A0K5056g
TMC/TMC Premium settings
Press the MENU button and select the corresponding icon.
The display will show the following items:
❍ “Read messages”
❍ “Set up filters”
❍ “Select TMC station”
❍ “Message display on/off”
Set up filters
This allows you to filter traffic messages by
area and type of interest. One of the following items can be selected: Geographical filter, Road information, Town information (fig. 32).
The “Geographic filter” makes it possible to
define the area of interest for TMC/TMC Premium messages to be displayed: by activating this filter the traffic messages outside
of the area defined will not be considered.
The “Road information” and “Urban information” filters on the other hand, make it possible to select which type of information to
consider.
fig. 32
Geographic filter
The filters may be:
❍ “Around vehicle”: the system displays
the TMC messages for the area surrounding the current position of the car
for the radius selected (this range can
vary between 3 and 200 km);
❍ “Around…”: the system displays the
TMC/TMC Premium messages for the
area surrounding the location selected.
It is possible to select the name of a City
and a Road
❍ “Along the route”: the system displays
the TMC/TMC Premium messages for
the route.
Turn the OK button/knob and press it to
select the desired filter and then click “OK”.
RADIONAV
Read messages
By selecting this item the display will show
the following categories:
❍ “Last messages received”
❍ “Nearest messages”
❍ “Traffic information”
❍ “Roads closed”
❍ “Size limits”
❍ “Road conditions”
❍ “Weather & visibility”
❍ “Parking”
❍ “Public transport”
❍ “Events”
The number of messages available is displayed for each category.
After having selected the desired category,
the display will show a list containing the
following items:
❍ a title (indicating the category selected)
❍ the number of messages available (in
the top right corner)
❍ the list of TMC/TMC Premium messages.
A0K5014g
45
RADIONAV
Road information
One or more of the following categories can
be selected:
❍ “Traffic info”
❍ “Roads closed”
❍ “Size limits”
❍ “Road conditions”
❍ “Weather & visibility”
46
Urban information
One or more of the following categories can
be selected:
❍ “Parking”
❍ “Public transport”
❍ “Demonstrations”
CHOOSE TMC/TMC Premium
STATION
This allows you to select the TMC/TMC Premium radio station manually or automatically. The display will show the name of the
TMC/TMC Premium radio station or a message indicating that the radio station selected does not broadcast TMC/TMC Premium messages.
By selecting the “Manual TMC management” item and then “TMC station list”, the
display will show the list of radio stations
broadcasting TMC/TMC Premium messages.
Then select the desired radio station.
NOTE By selecting “Automatic TMC management”, the system will tune into radio
stations providing the TMC Premium service
by preference. We recommend keeping this
setting enabled.
TMC/TMC Premium
RECEPTION STATUS
Press the MUSIC button to select the Music Information screen. The status of the
TMC/TMC Premium service is shown with
a specific icon on the lower bar (see fig.
33). This icon will change to indicate the following 3 possibilities:
– TMC icon missing: Traffic Info service currently unavailable;
– TMC icon grey: you are listening to a different radio station from that supplying the
TMC/TMC Premium service;
– TMC white: you are listening to the radio station supplying the TMC/TMC Premium service.
fig. 33
A0K5055g
DRIVING MODE AND
DYNAMIC FUNCTION
Automatic display of DNA
setting
To activate the “Driving Mode Information
(DNA)” function, press the MENU button
and then turn the OK button/ knob to select the “Driving Mode Information (DNA)”
item (fig. 34).
The display will highlight the (selectable)
item corresponding to the driving mode selected via the “Alfa DNA” lever (fig. 35).
When the DNA driving mode is changed, the
new DNA information appears briefly on the
display.
fig. 34
A0K5100g
DNA driving mode
information
Information referring to the DNA driving
mode is divided into a first area (“Handling”) dedicated to handling and suspension, and a second area (“Engine”) for engine power (fig. 35).
fig. 35
Handling
❍ “VDC mode”: display of active mode
(SPORT, SOFT or CONTROL)
❍ “Electronic Q2”: system ON/OFF display
❍ “Steering”: display of power steering
mode (SPORT or SOFT)
Engine
❍ “Overboost”: overboost ON/OFF display
❍ “Power”: display of active mode (SPORT
or SOFT)
RADIONAV
ACTIVATING DRIVING MODE
INFORMATION (DNA)
A0K5101g
47
When “Dynamic” mode is activated screen
D1 is displayed by default.
❍ Display screen “D1”: display of turbocharger pressure and power (as a percentage) (fig. 36).
❍ Display screen “D2”: display of acceleration value (frontal and lateral) experienced by the car, with gravity acceleration (G) as the unit of measurement (fig. 37).
RADIONAV
“Dynamic” SCREENS
(only with “Dynamic”
mode activated)
These provide instantaneous information on
vehicle status and are available in two different display screens.
To access these display screens press the
TRIP button, turn the OK button/knob and
select items “D1” or “D2”.
48
fig. 36
A0K5102g
fig. 37
A0K5103g
TRIP COMPUTER
All the parameters are shown in the display
by symbols (see fig. 38).
If “Dynamic” mode is activated, two further
options are displayed (see “Dynamic display
screens” in the previous chapter).
By turning the OK button/knob you can select information relating to:
IMPORTANT Some information/operations
described below are only possible/available
with the ignition key in the MAR position.
To access the main trip computer screen,
press the TRIP button.
❍ Trip A (by selecting the letter “A”) or for
Trip B (by selecting the letter “B”). The
display will show the following information:
– Distance travelled (km or miles)
– Fuel consumption (km/l, mpg or
l/100km)
– Average speed (km/h or mph)
– Journey time (hh:mm)
TRIP COMPUTER
SPECIFIC MENU
With the trip computer function activated it
is possible to access the specific Menu by
pressing the OK button/knob. The display
will show the following screen (fig. 39).
RADIONAV
INFORMATION
The trip computer provides a series of information relating to the route (e.g. time,
distance, speed, fuel consumption). Some
of this information is only available with the
navigation function activated and depends
on the navigation route set.
❍ Instant information (car symbol). The
display will show the following information:
– Range
– Instant fuel consumption
– Distance to the destination
fig. 38
A0K5028g
fig. 39
A0K5015g
49
RADIONAV
T E L E P H O N E ( o n l y w i t h B l u e & M e TM s y s t e m )
50
TELEPHONE INFORMATION
DISPLAY
To access the Telephone information, press
the TEL button. Depending on the mobile
phone Bluetooth® system, the display will
show a series of information depending on
the status of the telephone connected:
– no phone call in progress;
– phone call in progress;
– conference mode activated;
– outgoing phone call.
Depending on the mobile phone Bluetooth®
system, a series of information will be shown
on the top part of the display.
No phone call in progress
The display will only show the mobile phone
logo, the name of the service provider and
the privacy activation/deactivation (see
Blue&MeTM supplement).
Phone call in progress and
conference mode
With the privacy function deactivated, the
display will show the name/number of the
person calling or who is being called.
If there are two phone calls taking place simultaneously (conference) or alternately,
the display will show the corresponding symbol.
Outgoing phone call
The display will show the name/number of
the person being called. To remove the display of information from the display press
the ESC button. To interrupt the call, see the
description in the “Specific telephone menu”
paragraph.
Switch call
If there are two phone calls, one activated
and one on hold, it is possible to switch between the two phone calls by selecting this
item: the activated call will be put on hold
and vice versa.
If there is only one phone call, selecting the
“Another call” item will have no effect.
Switch to mobile/
switch to hands-free
By activating this item the phone call in
progress will be redirected from the car’s audio system to the mobile phone. On some
mobile phones the Bluetooth® connection
between the mobile phone and the car is
maintained and it is possible to return to the
car’s audio system by selecting “Switch to
hands-free”.
On some mobile phones the activation of
the “Switch to mobile phone” function ends
the Bluetooth® connection and the phone
call can only continue on the mobile device.
The item “Switch to mobile phone” is not
activated for every new incoming call.
Put on hold/cancel hold
This item is only activated if there is a phone
call in progress and makes it possible to deactivate the Blue&MeTM microphone. The
activation/deactivation is only possible at
the end of the phone call.
Close call
Selecting this item depends on the number
of phone calls present:
– if there is only one phone call: the current
phone call ends;
– if there are two phone calls: the active
phone call is ended and the one on hold
is activated;
– if a conference call is active: all phone
calls are ended.
RADIONAV
SPECIFIC TELEPHONE MENU
To access the specific Menu, press the TEL
button and then press the OK button/knob.
The display will show the following options
(only available with the call activated);
❍ “Switch call”
❍ “Switch to mobile/Switch to handsfree”
❍ “Put on hold/cancel hold”
❍ “Close call”
51
RADIONAV
SPOT MESSAGES MENU
(only with privacy function
deactivated)
There are four different types of spot messages that appear on the display when a situation occurs:
❍ Incoming calls;
❍ Outgoing calls;
❍ Signalling of new incoming messages;
❍ Option of reading new incoming messages.
52
Incoming calls
The display will show the following information:
❍ name/number of the caller;
❍ name of the person called (if stored in
the directory);
❍ option of accepting/refusing the call.
To accept/refuse the call, select the corresponding item and confirm by pressing the
OK button/knob.
Signalling of new incoming
messages
The display will show the following information:
❍ signalling of new incoming SMS text
message;
❍ name and phone number of the person
who has sent the message.
Press the ESC button to remove the
display.
Outgoing calls
Refer to the description in the “Outgoing
phone call” paragraph.
Option of reading new
incoming messages
The display will show the following information:
❍ signalling of new incoming SMS text
message;
❍ name and phone number of the person
who has sent the message;
❍ option of reading the new SMS text
message.
Select “Read messages” if you want to read
the message or “Ignore” not to read it.
Press the ESC button to remove the
display.
To access the Configurations menu
(fig. 40) select the “Configurations” item
from the main Menu.
After having activated the Configuration
Menu, select the desired item by turning the
OK button/knob and then press the knob
to confirm.
If the ESC button is pressed or if no selection is made after about 30 seconds, the
screen will disappear from the display.
DISPLAY
This allows you to make the following selections (fig. 41):
❍ “Display brightness” (brightness mode
setting - day/night/automatic);
❍ “Adjust brightness” (brightness adjustment);
❍ “Measures” (selection of unit of measurement - temperature/distance/consumption).
Display brightness
One of the following modes can be selected:
❍ “Day”: adapts the brightness of the display to the daytime setting;
❍ “Night”: adapts the brightness of the
display to the nighttime setting;
❍ “Automatic”: depending on the switching on/off of the exterior lights, the system automatically configures to “Day”
mode (lights off) or “Night” (lights on).
Adjust brightness
This makes it possible to adjust the brightness by turning the OK button/knob (in daytime conditions, for good visibility of the
screen, the minimum brightness setting is
11).
If the “Automatic” brightness mode is activated, the adjustment of the brightness depends on the status of the exterior lights.
fig. 40
A0K5002g
fig. 41
RADIONAV
C O N F I G U R AT I O N S
A0K5003g
53
RADIONAV
Measures
(temperature/distance/
consumption)
Select the item “Measures” by turning the
OK button/knob and then press the knob
to confirm.
The display will show the following screen
(fig. 42).
Select the desired unit of measurement. Turn
the OK button/knob, select OK and then
press the knob to confirm.
54
NOTE The selection of the unit of measurement for the temperature is only available
if the outside temperature sensor is present.
fig. 42
A0E5005g
SOUNDS
This allows you to adjust the volume of the
voice messages, the instrument panel
buzzer and the buttons buzzer in the car
(fig. 43).
“Voice message volume”
(Voice message volume
adjustment)
Select the item and adjust the volume by
turning the OK button/knob and then press
the knob to confirm.
There are 40 levels for the volume adjustment.
fig. 43
A0K5016g
“Warnings volume”
(Adjustment of instrument
panel buzzer volume)
Adjustment of the volume for signals for any
warnings supplied by the instrument panel.
This adjustment can only be made with the
ignition key in the MAR position.
There are 7 levels for the volume adjustment.
“Buttons volume”
(Adjustment of buttons
buzzer volume)
This adjustment can only be made with the
ignition key in the MAR position.
There are 7 levels for the volume adjustment.
Maintenance info
This provides information relating to the next
Service expressed as mileage remaining
(kilometres or miles).
The display will show the message “Service
due in: XXX km (or mi)”.
NOTE If the remaining kilometres (or corresponding value in miles) before the next
Service are between 35,000 and 32,767
dashes will appear on the display.
Speed warning
By selecting this item it is possible to set
the car’s speed limit (fig. 45).
Turn the OK button/knob to alter the speed
limit value set in steps of 5 km/h (or mph
depending on the unit of measurement for
the distance set).
If the ESC button is pressed or if no selection is made after about 30 seconds, the
screen will disappear from the display.
The “Signalling active” function activates/deactivates the signalling when the
set speed limit is exceeded.
RADIONAV
MY CAR OPTIONS
This allows a series of parameters and operating modes to be set for the car (fig. 44).
Select the desired item by turning the OK
button/knob and then press the knob to
confirm.
These adjustments can only be made with
the ignition key in the MAR position.
fig. 44
A0K5017g
fig. 45
A0K5048g
55
Key
Select this item to independently open the
driver’s door and/or the boot:
– OPEN DOORS: if this is activated, when
door release is activated all doors are unlocked with the exception of the luggage
compartment;
RADIONAV
– OPEN DRIVER: if this is activated, when
door release is activated, only the driver-side
door is unlocked;
56
– OPEN ALL: if this is activated, when door
release is activated all doors are unlocked
including the luggage compartment.
Select the desired item by turning the OK
button/knob and then press the knob to
confirm.
Autoclose
By selecting this item it is possible to activate/deactivate the central locking of the
doors.
The doors are automatically locked when
the function is active and the car reaches a
speed of 20 km/h.
Show info on dashboard
fig. 46
By selecting this item it is possible to set the
repetition of the information relating to the
audio (Radio) or Trip B.
By selecting the “Radio” item the following
information will appear on the display:
– Active audio source
– Frequency (only in Radio mode)
– Radio station search (only in Radio
mode);
– Track number (only Audio CD, MP3 or
Media Player);
– Disc number (only Audio CD, MP3 or
Media Player);
Selecting the item “Trip B” on the display
or pressing the TRIP 0.00 button on the right
steering wheel lever, will bring up the Trip B
information.
fig. 46
A0K5035g
Daytime running lights (DRL)
(for versions/markets
where provided)
By selecting this item it is possible to activate/deactivate the DRL (daytime running
lights) function.
This adjustment is only possible if the “Day
running lights” function has been activated
in the car Setup Menu (see description in
Owner Handbook).
Courtesy lights
(for versions/markets
where provided)
Select this item to switch the “Courtesy
lights” function on/off (see description in
Owner Handbook).
Headlamp sensor sensitivity
(for versions/markets
where provided)
By selecting this item you can adjust the
dusk sensor setting.
This adjustment is only possible if the vehicle is fitted with a dusk sensor (see description in Owner Handbook).
fig. 47
LANGUAGE
This allows you to change the language of
the messages shown on the display and the
voice messages.
Choose from the following languages:
French, English, Italian, Spanish, Polish, German, Dutch and Portuguese.
After having selected the language the following message will be displayed:
❍ by selecting “YES” the language will be
changed: in this case the display will
show the message “Reboot...” and then
when it is turned back on the messages/voice commands will be in the
new language;
❍ by selecting “NO” the language will not
be changed.
If, on the other hand, no selection is made,
the system will automatically return to the
configuration menu.
MEDIA AND MAPS - SD CARD
The system uses the SD Card support containing the navigation maps.
IMPORTANT Only original SD cards or ones
compatible with SPI technology can be used.
Inserting the SD Card
Insert the SD Card into the slot 9-fig. 1: the
display will show a warning message.
IMPORTANT If the SD Card is damaged or
cannot be read, the display will show a dedicated warning message. If the ESC button
is pressed or about 30 seconds elapse, the
message will disappear from the display.
RADIONAV
DATE & TIME
This allows the date and the time to be
changed (fig. 47).
Adjust the Day/Month/Year/Time by turning the OK button/knob and then press the
knob to confirm.
There are two modes for the display of the
time: 12 or 24 hour mode.
By selecting the item “GPS time” it is also
possible to activate/deactivate the automatic synchronisation of the GPS signal minutes. This adjustment is only possible if the
GPS signal is available.
A0K5004g
57
RADIONAV
Safe removal of the SD Card
fig. 48
To remove the SD Card, proceed as follows:
❍ press the MENU button and select “Configurations”;
❍ select the “SD Card management” item;
❍ select the “SD Card safe removal” item;
❍ turn the OK button/knob and select
“Yes” to confirm the choice;
❍ remove the SC Card by pressing it and
then pulling it out.
58
fig. 48
A0K5018g
Code to enable maps
Select the “Code to enable maps” item: the
display will show a screen with the Radionavigator serial number.
Map licence activation
To activate a map, select the item “Map licence activation”: the display will show a
screen for entering the security code. After
having entered the code, turn the OK button/knob and select OK to confirm.
NOTE For further information, refer to the
instructions enclosed with the SD Card.
The display will show the message “Licence
activated”. If the code entered is not correct, the display will show the message “Incorrect activation code - enter again”. If the
ESC button is pressed or about 15 seconds
elapse, the message will disappear from the
display.
Map licence status
The Radionavigator manages a map protection system: when the system recognises a new map SD, it enables it for a limited time. To activate it for an unlimited period an unlocking code must be entered.
It is possible to check the status of the licences via the SD Card management menu
accessible from the “configurations” menu.
Proceed as follows:
❍ press the MENU button and select “Configurations”;
❍ select the item “Map licence management”: the display will show the validity of the map which could be:
– “Limited”: in this case the number of
kilometres remaining will be displayed;
– “Unlimited”.
The Radionavigator is capable of detecting
and solving both operating faults within the
system and overheating problems.
OPERATING FAULTS
If an internal fault is detected, the system
“freezes” the last screen available and
launches a diagnostic search.
The system checks the module concerned
for a few moments to detect the type of
fault; if the preset time is exceeded and the
fault persists, the best solution is adopted
(for example, resetting the hardware for the
module involved).
If the Radionavigator no longer responds
to the commands, it is possible to restart it
manually by pressing the ESC button for
more than 8 seconds.
PROBLEMS DUE TO
OVERHEATING
If the temperature of a Radionavigator hardware module (audio, CD player, etc.) exceeds the maximum set limit, the module
signals that the temperature is too high; the
display will show a dedicated message.
The module involved is automatically limited or disabled. In extreme cases the system
is automatically turned off until normal operating temperature is resumed; the display
shows a dedicated message.
The system will only return to normal operation when the temperature operating conditions are normal once again.
RADIONAV
O P E R AT I N G P R O B L E M S
59
CUSTOMER SERVICES
TECHNICAL SERVICES - SERVICE ENGINEERING
Largo Senatore G. Agnelli, 5 -10040 Volvera - Torino (Italia)
Fiat Group Automobiles S.p.A.
Print no. 604.38.364 – 1 Edition – 09/2010
Copyright. Reproduction, even partial, without written authorisation
from Fiat Group Automobiles S.p.A. is prohibited.
SERVICE
ENGLISH
Alfa Services