1
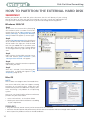
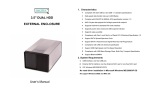
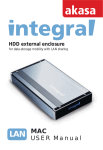
HDD external enclosure
for data-storage mobility with USB 2.0 and eSATA interface
USER Manual
English
AKASA Company notices
The information contained in this document is subject to change without notice.
All rights reserved. Reproduction, adaptation, or translation of this material is prohibited without prior written
permission of AKASA, except as allowed under copyright laws.
The only warranties for AKASA products and services are set forth in the express warranty statements accompanying
such products and services. Nothing herein should be construed as constituting an additional warranty. AKASA shall
not be liable for technical or editorial errors or omissions contained herein.
Copyright 2006 AKASA ASIA Corporation.
Acknowledgements
Microsoft, Windows, Windows NT and Windows XP are registered trademarks of Microsoft Corporation.
Mac and Apple are the registered trademarks of Apple Computer, Inc.
Adobe and Acrobat are trademarks of Adobe Systems Incorporation.
General Notice: Other product names used herein are for identification purposes only and may be trademarks of their
respective owners. AKASA disclaims any and all rights in those marks.
Copyright Statement
It is a criminal offence, under applicable copyright laws, to make unauthorized copies of copyright-protected material,
including computer programs, films, broadcasts and sound recordings. This equipment should not be used for such
purposes.
Notice: The manufacture makes no warranty of any kind with regards to this material, including, but not limited to,
the implied warranties of merchantability and fitness for a particular product. The manufacture shall not be liable for
errors contained herein or for incidental consequential damages in connection with the furnishing, performance, or use
of this material. Every effort has been made to ensure that the information in this manual is accurate. The manufacture
is not responsible for printing or clerical errors. Mention of third party products is for information purposes only and
constitutes neither an endorsement nor a recommendation. The manufacture assumes no responsibility with regards to
the loss of data of performance of these products. This document contains proprietary information, which is protected
by copyright (see below). The information contained in this document is subject to change without notice.
FCC Compliance Statement
This device complies with Part 15 of the FCC Rules. Operation is subject to the following two conditions:
1. This device may not cause harmful interference, and
2. This device must accept any interference received, including interference that may cause undesired operation.
FCC Warning Statement
This equipment has been tested and found to comply with the limits for a Class B digital device, pursuant to Part 15 of
the FCC Rules. These limits are designed to provide reasonable protection against harmful interference in a residential
installation. This equipment generates, uses and can emit radio frequency energy and, if not installed or used in
accordance with the instructions, may cause interference to radio communications. However, television reception
interference can be determined by turning the equipment off and on.
The user is encouraged to correct the interference by one or more of the following measures:
• Reorient or relocate the receiving antenna.
• Increase the separation between the equipment and the receiver.
• Connect the equipment into an outlet different from that to which the receiver is connected.
• Consult the dealer or an experienced technician for help.
CAUTION
Changes or modifications not expressly approved by the party responsible for compliance could void the user’s
authority to operate the equipment.
INTRODUCTION
Thank you for your purchase of the AKASA INTEGRAL eSATA external hard drive enclosure.
This Plug & Play enclosure enables you to use both types of 3.5” IDE hard drives (SATA and PATA)
and gives you a choice of connection between ultra high speed eSATA and Hi-speed USB 2.0.
PACKAGE CONTENTS
•
INTEGRAL eSATA quad interface enclosure
•
USB2.0 cable (900mm)
•
eSATA Cable (900mm)
•
USB driver for windows ME/98 SE
•
Footstand (Mounting )
•
DC adapter with power cord & adapter
•
User's Manual
•
Installation kit for installing hard drive (including screws & two types of HDD interface
cables-PATA/SATA)
FEATURES
• Ideal for .5" PATA and SATA HDD
• Fanless design
• One USB2.0 port, one eSATA port
• Converts .5" PATA/SATA hard disk drives into Hi-Speed USB 2.0 or SATA to eSATA
external hard drives
• Supports all .5" PATA/SATA hard disk drives of any capacity
• Hi-Speed USB 2.0 transfer rates up to 480M bits/sec.
• SATA transfer rates up to 1.5G bits/sec
• Plug & Play, hot-swappable in USB mode
• USB 2.0 and USB 1.1 compatible
• Power and hard drive activity light indication
SPECIFICATIONS
•
Interfaces: Serial ATA, USB 2.0/1.1
•
Compliance with Gen1i, and Gen1m of Serial ATA II Electrical Specification 1.0
•
Supports SATA II Asynchronous Signal Recovery (Hot Plug) feature
•
Support 480Mbps High Speed operation
•
LED indicator: Power and HDD activity (USB mode)
•
Case material: Aluminum
•
Weight: 510g (enclosure without HDD)
•
Dimensions: 219mm L x 12mm W x mm H
•
Environmental:
▎ Power Requirements: 110-220 VAC, 50-60 Hz, 12V/2A, 5V/2A
▎ Operating Temperature: 5 oC to 50 oC
▎ Storage Temperature: -40 oC to 70 oC
▎ Operating Humidity: 5 to 90%, non-condensing
•
Warranty: 1 year, limited
SYSTEM REQUIREMENT
PC Requirements
• Minimum Intel Processor Pentium II 50MHz, 64MB RAM
•
Windows ME / 2000 / XP / VISTA
•
Active USB or SATA port – for external front panel access please use AKASA “All in One”
MAC Requirements
•
Minimum Apple G processor, 64MB RAM
•
Mac OS 9.1, 9.2, 10.1.5, 10.2, 10.
•
Active USB or SATA port
Harddisk Installation
Harddisk Installation
1.
Open the back of the enclosure by undoing
the securing screws and sliding the tray out
of the aluminum housing.
NOTE: Disconnect the LED cable before
completely sliding the HDD tray out .
2.
Before installing the hard disk in the
enclosure, please check your hard disk
interface type. To install the SATA hard
disk you need to exchange the power and
data cables (included). PATA is the default
configuration.
NOTE: The installation steps show the IDE
interface but the procedure for SATA drives
follows the same steps.
SATA
3.
IDE
Place the HDD in the tray aligning the correct IDE and
power connectors. Then connect the IDE and power
connectors to the HDD.
NOTE: Make sure the jumper setting of the hard
drive is set to master mode, please consult the hard
drive guide for the jumper setting.
4.
5.
Position the HDD in the tray so that the mounting
holes on the HDD line up with the tray mounting
holes. Use the four screws supplied in the
mounting kit to secure the HDD in the tray.
Gently insert the tray into the enclosure aligning
the guide rail with the grooves of the enclosure
housing.
Harddisk Installation
6.
Before fully inserting the tray, connect the HDD activity LED to
the -pin connector. Make sure that the connector is inserted
as shown on
.
Ê
NOTE: The integral logo on the front bezel serves two
operational purposes: indicates power and hard drive activity
(in the USB mode).
Ê
Ë
7.
Insert the tray completely into the housing and secure the
enclosure face plate to the enclosure using the screws
provided.
8.
Connect the round end of the DC power cord to the back
of the enclosure, making sure it is correctly aligned. Plug
the AC cable into the power pack, and then connect the
supplied adapter into an available AC socket.
NOTE: Please ensure that you are using the supplied power
pack only.
9.
The eSATA back panel connector and switch arrangement.
NOTE: Please check the “USB2.0 or SERIAL ATA CONNECTION ” chapter for the USB 2.0/eSATA switch usage.
USB port
eSATA port
USB/eSATA
switch
DC input
Power
switch
USB Connection
USB CONNECTION
NOTE:
Regardless of the hard disk interface used in the enclosure (SATA or IDE), the
USB2.0/eSATA switch must be switched to USB mode.
Connecting the INTEGRAL eSATA (USB mode)
1. Connect one end (type B) of the USB cable into the USB Port of your INTEGRAL eSATA.
2. Connect the other end of the USB cable (type A) into any active USB port of the computer.
3. Make sure the switch on the INTEGRAL eSATA enclosure is in the USB 2.0 postition.
4. Connect the supplied power pack and switch on your enclosure.
5. Let Windows search and install the driver automatically.
5. Open “My Computer” to see your external hard drive ready to use.
NOTE:
In order to reach USB 2.0 speed, you must have a motherboard or host adapter card that has USB 2.0 support. This
device will auto sense the speed of your USB port and adjust between USB 1.0 and USB 2.0 speed.
If the external hard disk is a new disk drive which has not been partitioned, please refer to the Partition the External
Hard Disk chapter to prepare your USB2.0 external disk.
Drivers Installation
Windows XP/2000/Me & Server 2003
INTEGRAL eSATA drive is supported by Mass
Storage Device within WINDOWS Me/2000/XP
system directly. You do not need to install any
drivers.
When the USB External Drive is used for the first
time your PC system will detect a USB 2.0 Storage
Device and automatically install the drivers for
[USB Mass Storage Device] from the installed
system.
Mac OS
Mac OS 8.6
If you are using Mac OS 8.6, the software of Mass Storage Support 1..5 is required for
installation. You can download The USB Mass Storage Support 1..5 from the Apple Software
Updates web site Http://www.apple.com/support .
Mac OS9.0 or later
You don’t need to install this software if you have installed Mac OS 9.0 or above.
When you connect the INTEGRAL LAN into the USB port of the Mac computer, the mass storage
volume should appear on the desktop in a few seconds automatically
Windows 98SE
NOTE: For Windows 98 drivers look at the eSATA page at: www.akasa.co.uk.
e
USB Connection
Disconnecting the INTEGRAL eSATA (USB mode)
WARNING!
Do not switch off the enclosure or unplug the USB or power cable when using the INTEGRAL eSATA .DOING THIS
MAY RESULT IN LOSS OF DATA!
Windows XP/2000/ME/Server 2003
1.
Double-click on the [Unplug arrow icon or Eject
Hardware] icon in the system tray. Dialog box appears
as on the right.
2.
Highlight the [USB Mass Storage Device] in the
dialog box, click on [Stop], choose the USB2.0 External
Drive that you want to disconnect, then click on [Stop]
again on next screen.
.
Wait for few seconds, the system prompts “You may
safely remove this device”.
4.
You can now safely switch off the enclosure or unplug
the USB cable from the USB port of the computer.
Mac OS
When disconnecting your Integral eSATA drive from
the computer, close all windows and quit all running
applications that are stored on the USB2.0 External Drive
and drag USB2.0 External Drive’s icon into “Trash” this
dismounts it from the Desktop prior to unplugging the
USB2.0 External Drive from the USB port.
8
Serial ATA Connection
ESATA CONNECTION
NOTE:
The SATA connection of the enclosure is only avaliable with SATA HDD installed
and it is not supported under Windows 98.
Motherboard or adapter card with SATA interface is required. Make sure the SATA
interface driver is installed and SATA port enabled in BIOS.
Before using the external SATA connection the USB2.0 / eSATA switch must be in
the eSATA position.
Connecting the INTEGRAL eSATA (eSATA mode)
Windows OS XP/2003/2000/Me
1. Make sure the computer system is switched off.
2. Connect the INTEGRAL drive to the motherboard SATA port with the supplied SATA cable.
If the SATA port is not apparent consult the motherboard manual.
To avoid continues opening the case we recommend Akasa ALLINONE panel, which provides external SATA port.
3. Connect the supplied power pack and switch on your enclosure.
4. Make sure the slide switch on the INTEGRAL enclosure is in the ESATA postition.
5. Boot-up your computer into Windows O/S.
6. Open “My Computer” to see your INTEGRAL eSATA drive as a local disk rady to use.
Mac OS10.2 or higher
1. Make sure the computer system is switched off.
2. Connect the INTEGRAL drive to your motherboard SATA port with the supplied SATA cable.
3. Connect the supplied power pack and switch on your enclosure.
4. Make sure the slide switch on the INTEGRAL enclosure is in the ESATA postition.
5. Boot-up your computer into MAC O/S.
6. MAC system will automatically recognize and mount on your desktop ready to use.
Disconnecting the INTEGRAL eSATA (eSATA mode)
WARNING!
Do not switch off the enclosure or unplug the SATA or power cable when using the INTEGRAL eSATA .DOING
THIS MAY RESULT IN LOSS OF DATA!
1. Turn off the system
2. Switch off and unplug the enclosure
Drivers Installation
INTEGRAL eSATA drive is recognized as a local
drive and is supported by motherboard SATA
driver. You do not need to install any additional
drivers.
NOTE:
Do not connect both (USB and ESATA) cables at the same time.
9
Disk Partition/Formatting
HOW TO PARTITION THE EXTERNAL HARD DISK
WARNING!!
Before you partition your hard disk, please be aware that this will destroy all your existing
data on the drive, so make sure you have a backup! This step is usually only required the first
time you install a factory new hard drive or if you want to change the existing format.
Windows 2000/XP
Step1
To partition the eSATA drive please plug
the Hard Disk either via USB or eSATA connection then click on [My Computer] cand
choose [Manage]. A [Computer Management] window will appear (as on the right).
Step2
Click on [Disk Management] on the left part
of this window and all connected disk drives
will be listed in the right part. Find the Hard
Disk that you added with it's partition status
on the right. You can create a new or delete
an existing partition by right clicking on this
area.
Step3
Right-click on the hard disk partition status
area and choose [New Partition...].The
“New partition wizard” will appear.
Step4
Following the "wizard"instructions to partition
and format your HDD.
Step5
Wait until "wizzard" finish formating your
eSATA drive. It should now appear in [My
Computer] ready to use.
Mac OS
NOTE:
Mac OS does not recognize NTFS formatted drives.
Mac OS9.2 and earlier, does not support creating
partitions on an external drive. To do that, you
would need to purchase additional rd party software. Initializing is no problem on all Operating
Systems.
Mac OS X, use the Disk Utility to format and create
partitions on your external disk.
• Select “Disk Utilities” in the utilities folder.
• Choose your external drive and format it according
to your requirement.
REMARKS
• Only one interface (USB or eSATA) can be connected at the same time.
• For better heat dissipation and performance, do not cover the Enclosure and leave enough room around it.
• Never expose the product to water or humid conditions.
10