1
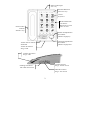
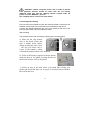
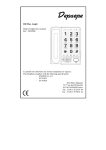
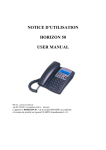
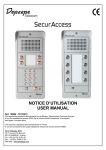
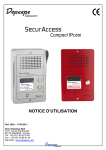
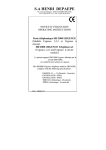
Depaepe
HD Max
Mode d’emploi/User manual
Ref : 14032008
Ce produit est conformes aux normes européenes en vigueur :
This telephone complies with the following specifications
- EN60950 A1 à 11
- EN 55022
- EN 55024
SAS Henri Depaepe
75-77 rue du Pré Brochet
95110 SANNOIS France
Tel : 33 (0) 1 30 25 81 60
Fax : 33 (0) 1 39 98 61 24
Entrée cordon ligne
Line entry
Boutons Mémoires
Memories keys
Clavier
Keyboard
Mode manuel/Auto
sous la base
Manual/Auto switch
under the base
Entrée cordon
combiné
Handset entry
Bouton d’amplification
du combiné
Handset amplify key
Témoin d’amplification
du combiné
Handset amplify LED
Témoin mise en Attente
Hold LED
Témoin de sonnerie
Ringer LED
Témoin de sonnerie
Ringer LED
R
100ms 300ms
1
2
Volume sonnerie
Ringer Volume Switch
Flashing 100-300 ms
100-300ms Time Flash
Mélodies sonnerie
Ringer Tone Switch
2
ATTENTION : Avant toute utilisation et, pour éviter le
risque de choc acoustique pour un utilisateur qui ne serait
pas malentendant, vérifier que l’interrupteur situé sous le
poste est en position « MANUEL ». Voir le paragraphe
« Interrupteur ampli » pour plus de précisions.
Raccordement et installation
Raccorder le cordon spiralé à l’extrémité du combiné et à la prise
située sur la gauche de l’appareil.
Raccorder le cordon de ligne plat à l’arrière du téléphone et brancher
l’autre extrémité à la prise murale.
Installation murale
Le HD MAX peut être installé en mural en procédant comme suit :
a) Retourner le clip
situé sur la base à
hauteur du crochet
commutateur et le
remettre en place
comme indiqué cicontre,
l’excroissance viendra se loger dans une fente située sur la
partie inférieure du combiné pour assurer le bon maintien du
combiné en position murale.
b) Fixer l’adaptateur mural sur le socle de
l’appareil en le clipsant dans les
logements prévus à cet effet (voir cicontre).
3
c) Choisir l’emplacement en veillant à éviter les zones du mur
ou de la cloison susceptibles de cacher des tuyaux ou des fils
électriques
d) Percer 2 trous à 10 cm d’intervalle vertical et y fixer les vis
en laissant dépasser suffisamment les têtes de vis pour
qu’elles puissent se loger dans les trous de l’adaptateur mural.
e) Aligner les trous de l’adaptateur mural fixé au socle du poste
avec les têtes de vis et faire glisser l’appareil vers le bas
jusqu’au blocage sur les têtes de vis. Au besoin régler le bon
maintien en vissant ou dévissant légèrement les vis.
Réglage sonnerie
Accessible sur le côté droit de l’appareil, le réglage du volume de la
sonnerie offre le choix de « FORT », « FAIBLE » ou « OFF ».
Un deuxième interrupteur permet de choisir entre 2 mélodies de
sonnerie différentes.
Nota : le HD MAX signale également les appels par des indicateurs
lumineux situés sur l’avant et le côté droit du poste y compris lorsque
la sonnerie est en position « OFF ».
Réglage du niveau d’écoute – Amplification et réglage « grave aigu »
RAPPEL :
ATTENTION : Avant toute utilisation et, pour
éviter le risque de choc acoustique pour un utilisateur qui ne
serait pas malentendant, vérifier que l’interrupteur situé sous le
poste est en position « MANUEL ». Voir le paragraphe
« Interrupteur ampli » pour plus de précisions.
L’écoute au combiné est réglable en volume et en tonalité pour la
meilleure correction possible à l’attention des personnes
malentendantes. Ces réglages sont contrôlés par les 2 curseurs situés
en face avant du poste. Pour activer ces réglages, il est nécessaire
4
d’appuyer sur la touche «
» ; une led rouge située en face avant
s’éclaire pour confirmer l’activation.
Fonctionnellement :
-Décrocher le combiné
» (la led rouge s’allume)
-Appuyer sur la touche «
-Régler le volume et la tonalité au niveau souhaité à l’aide des 2
curseurs de la face avant.
Nota : si l’interrupteur ampli situé sous le poste est positionné sur
« ON », il n’est pas nécessaire d’appuyer sur la touche «
».
Interrupteur ampli
Lorsque l’interrupteur ampli (situé sous la base de l’appareil) est en
position « MANUEL », l’amplification de l’écoute sera coupée à
chaque fin de communication, au raccroché du combiné.
La position « MANUEL » permet à différents utilisateurs, qu’ils
soient malentendants ou pas, de se servir du téléphone sans
risque de choc acoustique puisque l’amplification se fait
volontairement à la demande, en appuyant sur la touche «
».
En revanche, si le HD MAX est destiné à être utilisé en permanence
avec l’amplification, il est préférable de basculer l’interrupteur sur
« ON » ; de cette manière, l’amplification sera toujours active y
compris après chaque raccroché de combiné.
BIS/P (BIS/PAUSE)
Cette touche (BIS) permet de rappeler le dernier numéro composé
(capacité maximum de 32 digits).
L’appui sur cette touche permet aussi de créer une pause dans la
composition d’une série de numéros, par exemple lors d’une
programmation en touche mémoire (voir plus loin)
5
ATT
L’appui sur cette touche permet de mettre un correspondant en
attente (avec la diffusion d’un thème musical). Il suffit ensuite de
raccrocher le combiné. Une led en face avant s’allume pour
confirmer la mise en attente.
Pour reprendre le correspondant mis en attente, il suffit de décrocher
à nouveau le combiné.
Touches mémoires à accès direct
3 numéros peuvent être stockés en mémoire dans les touches M1, M2
et M3.
Pour appeler un numéro en mémoire, il suffit de décrocher le
combiné et d’appuyer sur la touche mémoire concernée. Chaque
touche peut stocker un numéro de 16 digits maximum.
Attention : le fait de débrancher le téléphone efface les numéros
stockés en mémoire.
Un numéro peut être changé simplement en enregistrant un nouveau
numéro dans la mémoire concernée. Pour effacer un numéro en
mémoire, suivre la procédure d’enregistrement (ci-dessous) en
omettant simplement de composer un numéro.
Enregistrement d’un numéro dans une touche mémoire à accès
direct
-Décrocher le combiné.
-Appuyer sur la touche PROG.
-Composer au clavier le numéro à enregistrer (maximum de 16
digits) en appuyant au besoin sur la touche Bis/P pour insérer une
pause dans la séquence de numérotation à mémoriser (utile pour des
attentes de tonalité derrière certains PABX ou pour certains
opérateurs).
-Appuyer sur la touche PROG à nouveau.
6
-Appuyer sur la touche mémoire M1, M2 ou M3, là ou le numéro
doit être enregistré.
-Raccrocher le combiné.
-Recommencer l’opération pour les autres touches mémoires.
Nota : un numéro enregistré sera automatiquement effacé et remplacé
par un nouvel enregistrement dans la même touche mémoire.
Appel d’un numéro en mémoire à accès direct
-Décrocher le combiné
-Appuyer sur la touche mémoire concernée, le numéro qui y est
enregistré sera automatiquement composé.
Touches mémoires à accès indirect
10 numéros peuvent être stockés en mémoire dans les touches 0 à 9.
Pour appeler un numéro en mémoire, il suffit de décrocher le
combiné et d’appuyer sur la touche « MEM. » puis sur une autre
touche de « 0 à 9 ». Chaque touche peut stocker un numéro de 16
digits maximum.
Attention : le fait de débrancher le téléphone efface les numéros
stockés en mémoire.
Un numéro peut être changé simplement en enregistrant un nouveau
numéro dans la mémoire concernée. Pour effacer un numéro en
mémoire, suivre la procédure d’enregistrement (ci-dessous) en
omettant simplement de composer un numéro.
Enregistrement d’un numéro dans une touche mémoire à accès
indirect
-Décrocher le combiné.
-Appuyer sur la touche PROG.
7
-Composer au clavier le numéro à enregistrer (maximum de 16
digits) en appuyant au besoin sur la touche Bis/P pour insérer une
pause dans la séquence de numérotation à mémoriser (utile pour des
attentes de tonalité derrière certains PABX ou pour certains
opérateurs).
-Appuyer sur la touche PROG à nouveau.
-Appuyer sur la touche du clavier « 0 à 9 », là ou le numéro doit être
enregistré.
-Raccrocher le combiné.
-Recommencer l’opération pour les autres touches mémoires.
Nota : un numéro enregistré sera automatiquement effacé et remplacé
par un nouvel enregistrement dans la même touche mémoire.
Appel d’un numéro en mémoire à accès indirect
-Décrocher le combiné
-Appuyer sur la touche « MEM. » puis sur la seconde autre touche de
« 0 à 9 » concernée, le numéro qui y est enregistré sera
automatiquement composé.
Touche R (Flashing)
Cette touche permet de transférer un appel vers un autre poste
lorsque le HD MAX est raccordé derrière un central privé (PABX).
Le réglage est accessible sur le côté droit du poste. En France, la
majorité des installations sont réglées à 300 ms. Dans la plupart des
autres pays d’Europe, c’est un réglage à 100 ms qu’il faut choisir.
8
CAUTION : Before using this phone, and, in order to prevent
from potential acoustic shocks all users who are not hearing
impaired, make sure that the “Amplify switch” located under the
phone is on the “MANUAL” position.
See “Amplify switch” section for more details.
Connecting and installing
Plug one end of the twisted cord into the socket provided on the end of the
handset, and the other end to the socket on the left side of the phone.
Connect the straight telephone line cord to the socket at the rear of the
phone and the other end to the telephone outlet.
Wall mounting
The HD Max can be wall mounted by following the procedure below:
a) Slide out the clip located
next to the hook switch and
turn it upside down before
sliding it back into place. Note
– the clip will locate into a
recess in the handset, which
will hold the handset when wall mounted.
b) Fit the wall bracket (supplied with the phone)
under the base of the phone, locating the tabs on
the bracket into the slots in the phone.
c) Select an area of the wall where you would like to hang your
phone and check that there are no pipes or electrical wires buried in
the wall in this area.
9
d) Drill 2 holes and fix 2 screws at 10cm intervals, leaving the heads
of the screws protruding.
e) Align the keyhole slots in the rear of the phone with the heads of
the screws and slide down slightly downwards so that the heads of
screws locate in the slots. If necessary, adjust the screws so that
the phone hangs flat and holds firmly on the wall.
Ringer settings
On the right side of the telephone, 2 switches allow a selection of
“HIGH”, “LOW” or “OFF” ringer setting and a choice 2 different
melodies.
Note : The HD Max will also alert visually all entering calls with
flashing leds located on the front and on the right side of the
telephone even when the ringer is in the “OFF” mode.
Adjusting Receive volume and Tone
REMINDER :
CAUTION : Before using this phone, and, in
order to prevent from potential acoustic shocks all users who are not
hearing impaired, make sure that the “Amplify switch” located under
the phone is on the “MANUAL” position.
See “Amplify switch” section for more details.
The volume and tone of the speech received through the handset can
be adjusted for a better understanding by hearing impaired people.
Those adjustments can me made using the 2 sliding switches located
on the front panel of the telephone.
To activate those sliding control switches, the “
” button must be
pressed; a red led on the front panel will confirm this activation.
-Pick up the handset
-Press “
” key (the red led will light)
-Adjust the sliding switches as needed.
10
Note : if the “amplify switch” located under the telephone is in the
“ON” position, pressing “
” key is not necessary.
Amplify switch
When the Amplify switch (located under the base) is in the
“MANUAL” position, the receive speech boost will be canceled at
the end of each conversation, when hanging up the handset.
The “MANUAL” mode is convenient when different users,
hearing impaired or not, use the same HD MAX telephone;
activating manually this feature, on demand, by pressing the
“
” key minimizes potential acoustic shocks.
However, if the HD MAX should always be used with the receive
boost on, then the Amplify switch should be in the “ON” mode ; this
way, the amplification boost will always be active even after each
hanging up of the handset.
BIS/P (LNR REDIAL/PAUSE)
This key allows the last number dialed to be automatically redialed
(maximum capacity is 32 digits).
Pressing this key when dialing enters a timed pause in the dialing
process: this may be useful when storing a number into a memory
key (see “Storing a Telephone number” section).
ATT
When pressing this key during a call, the other party will be put on
hold (with music while on hold). The handset can be hung up and a
red led will light to alert someone is on hold. To resume the
conversation, simply pick up the handset.
11
One touch memory keys
3 numbers can be stored into the memory keys M1, M2 and M3.
To call a number stored in one of these 3 locations, simply pick up
the handset and press the memory key. Each memory can store up to
16 digits numbers .
Note : disconnecting the phone from the line will erase the numbers
stored into the memory keys.
Storing a new number into a location where one number is already
stored will automatically erase the previous number stored.
To erase a memory without storing a new number, simply follow the
storing process (detailed here after) without entering any number.
Storing a number into a one touch memory key
-Pick up the handset
-Press PROG key
-Enter the number to store (maximum of 16 digits) and, if needed,
insert a timed pause (by pressing P key) each time a tone has to be
heard before continuing the dialing process (useful when dialing
behind a PABX or for long distance services access for instance).
-Press PROG key again.
-Press the memory key where this number should be stored (M1, M2
or M3).
-Hang up the handset
-Repeat this operation for the other one touch memory keys.
Calling a number stored in M1,M2 or M3
-Pick up the handset
-Press M1, M2 or M3, the number stored will be dialed
automatically.
2 Touch memory keys
12
10 numbers can be stored in the keypad keys 0 up to 9.
To call a number stored in one of these 2 touch memory keys, pick
up the handset, press “MEM” key and one of the 0 up to 9 keys.
Each key can store up to 16 digits.
Note : disconnecting the phone from the line will erase the numbers
stored into the memory keys.
Storing a new number into a location where one number is already
stored will automatically erase the previous number stored.
To erase a memory without storing a new number, simply follow the
storing process (detailed here after) without entering any number.
Storing a number in a 2 touch memory key
-Pick up the handset.
-Press “PROG” key.
-Enter the number to store (maximum of 16 digits) and, if needed,
insert a timed pause (by pressing P key) each time a tone has to be
heard before continuing the dialing process (useful when dialing
behind a PABX or for long distance services access for instance).
-Press “PROG” key again
-Press the keypad key location (0 up to 9) where this number should
be stored.
-Hang up the handset
-Repeat this operation for the other 2 touch memory keys.
Calling a number stored in a 2 touch memory key
-Pick up the handset.
-Press “MEM” key followed by the memory location (0 up to 9)
where the number has been stored; the number will be automatically
dialed out.
R key (Flashing)
13
This key is used to transfer a call to another extension when the HD
MAX is connected behind a PABX. Flashing time can be adjusted to
100 or 300ms, the setting switch is located on the right side of the
telephone. In France, most of the PABXs will use 300 ms flashing
time. In almost all other Europeans countries, 100 ms setting should
be used.
Ligne RTC
Niveau de sécurité TRT3
PSTN Line
TRT3 Security level
Ce terminal est conçu pour être raccordé sur un réseau téléphonique (Classé
TRT3 au sens de la norme EN 60950 amendements1 à 11.)
Ce symbole signifie que ce produit est conforme à la directive de l’Union
Européenne sur les déchets des équipements électriques et électroniques.
(WEEE), 2002/96/EC. IL ne doit pas être jeté en fin de vie comme un déchet
ménager afin de préserver l’environnement et la santé humaine.
Adressez-vous à votre fournisseur ou aux autorités locales pour le déposer
dans un point de collecte prévu à cet effet.
This marking indicates that this product complies with the European Union
Waste Electrical and Electronic Equipment directive (WEEE), 2002/96/EC. It
should not be disposed of with other household wastes at the end of its
working life to prevent possible harm to the environment or human health.
Please contact your supplier or your local government office to dispose of it in
an approved recycling centre.
14