1
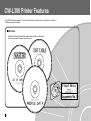
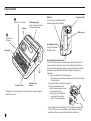
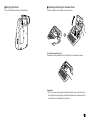
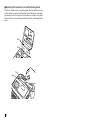
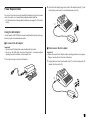
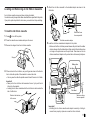
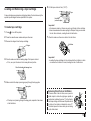
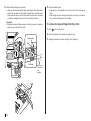
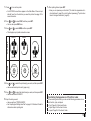
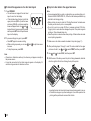
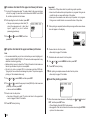
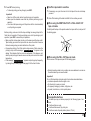
E
CW-L300
Startup Guide
• We recommend that you print on a disc* before you record anything
on it. Printing on a disc that already has data recorded on it can
cause the data to become corrupted.
• Note that CASIO COMPUTER CO., LTD. shall not be held liable for
any loss or corruption of data on discs arising through the use of this
printer.
* CD-R, CD-RW, DVD-R, etc.
Be sure to read the Safety Precautions contained in the User’s Guide before
trying to use the printer for the first time, and always keep this manual on hand
for future reference.
RJA514733-9
GUIDELINES LAID DOWN BY FCC RULES FOR USE OF THE
UNIT IN THE U.S.A. (not applicable to other areas).
NOTICE
This equipment has been tested and found to comply with the limits for a Class B digital
device, pursuant to Part 15 of the FCC Rules. These limits are designed to provide
reasonable protection against harmful interference in a residential installation. This
equipment generates, uses and can radiate radio frequency energy and, if not installed
and used in accordance with the instructions, may cause harmful interference to radio
communications. However, there is no guarantee that interference will not occur in a
particular installation. If this equipment does cause harmful interference to radio or
television reception, which can be determined by turning the equipment off and on, the
user is encouraged to try to correct the interference by one or more of the following
measures:
• Reorient or relocate the receiving antenna.
• Increase the separation between the equipment and receiver.
• Connect the equipment into an outlet on a circuit different from that to which the
receiver is connected.
• Consult the dealer or an experienced radio/TV technician for help.
Caution: Changes or modification to the product not expressly approved by CASIO
could void the user’s authority to operate the product.
FCC WARNING
Changes or modifications not expressly approved by the party responsible for
compliance could void the user’s authority to operate the equipment.
Proper connectors must be used for connection to host computer and/or
peripherals in order to meet FCC emission limits.
Cable specified for PC Windows® compatible PC to CW-L300
Declaration of Conformity
Model Number: CW-L300
Trade Name: CASIO COMPUTER CO., LTD.
Responsible party: CASIO, INC.
Address: 570 MT.PLEASANT AVENUE, DOVER, NEW JERSEY 07801
Telephone number: 201-361-5400
This device complies with Part 15 of the FCC Rules. Operation is subject to the
following two conditions: (1) This device may not cause harmful interference,
and (2) this device must accept any interference received, including interference
that may cause undesired operation.
Read This First!
• CASIO COMPUTER CO., LTD. shall not be held liable for any loss or
claims by you or any other person or entity that may arise through the use
of this printer.
• Reproduction of this manual in any form, either in part or its entirety, is
forbidden without the express permission of CASIO COMPUTER CO.,
LTD.
• The contents of the manual are subject to change without notice.
© Copyright 2004 CASIO COMPUTER CO., LTD. All rights reserved.
• Be sure to read this manual carefully before attempting to use the product
for the first time.
Contents
CW-L300 Printer Features .................................................... 2
General Guide ........................................................................ 4
Power Requirements ............................................................. 7
Using the AC Adaptor ....................................................... 7
Initializing Printer Memory ................................................... 8
To initialize printer memory ............................................... 8
Data Error ......................................................................... 8
Powering Up and Selecting a Printing Mode ...................... 9
To turn power on and off ................................................... 9
Auto Power Off .................................................................. 9
Mode Selection Basics .................................................... 10
Loading and Removing an Ink Ribbon Cassette .............. 11
To load the ink ribbon cassette ....................................... 11
To remove the ink ribbon cassette .................................. 12
Loading and Removing a Tape Cartridge .......................... 13
To load a tape cartridge .................................................. 13
To remove the tape cartridge from the printer ................. 14
Using the Printer’s Keys ..................................................... 15
Display Symbols and Indicators ........................................ 16
Label Printing Basics .......................................................... 18
DISC Mode .................................................................... 18
Disc Label Printing General Procedure ........................... 18
TAPE Mode .................................................................... 23
Tape Label Printing General Procedure .......................... 23
1E
CW-L300 Printer Features
The CW-L300 makes it possible to print on both discs and on tape without connecting to a computer or
installing any special software.
DISC Mode
A selection of illustrations and fonts makes labels stylish and informative.
You can even create labels for your disc cases.
E
2
TAPE Mode
Powerful features and functions simplify printing of cassette tape labels, name tags, and
just about any other type of label imaginable.
3E
General Guide
Press to turn on power.
Display
Positioning guide
Helps to ensure that discs
are inserted correctly.
USB port
For connection of a USB cable when
exchanging data with a computer.
Carrying handle
Battery cover
Press to turn
off power.
AC adaptor terminal
Connect the bundled
AC adaptor here.
Keyboard
Slit *
Cassette cover
Cassette cover
release
* The right end of the slit becomes a “tape outlet” when a tape cartridge is
loaded in the printer.
Print Head Release Button Hole
Perform the following steps to release the print head when you cannot
remove a disc from the printer due to printer malfunction. Normally, you
should not use the following procedure to release the print head. Use this
procedure only when the print head fails to release normally due to
malfunction.
1. Insert a thin object* into the hole and press.
• This will cause the print head to release the disc so you can remove
it from the printer.
2. Remove the disc from the printer (page 21).
3. Open the cassette cover and
press the release lever as shown
in the illustration nearby.
• Note that you will not be able
to print again if the release
lever is in the raised position.
* Use an object that is at least 30mm (1-3/16") long and no thicker than
1.5mm (1/16"). Do not use a toothpick or other object with an easily
breakable tip. Doing so creates the risk of printer malfunction.
E
4
■ Carrying the Printer
■ Opening and Closing the Cassette Cover
Pull out the handle as shown in the illustration.
Press the cassette cover release to open the cover.
To close the cassette cover
Press down on the cassette cover until you hear it click securely closed.
Important!
• Take care when opening and closing the cassette cover, and never try to
force it past its normal range of movement. Excessive force creates the risk
of malfunction of and damage to the printer.
5E
■ Replacing the Cassette Cover and Positioning Guide
Should the cassette cover or positioning guide become detached from the
printer, replace it as shown in the illustrations below. Take care to avoid applying excessive force to the hinges on the cassette cover and tabs on the guide.
Excessive force can cause hinges and tabs to break off, and damage the tab
holes.
Hole
Tab
Tab
Hole
E
6
Power Requirements
You can run the printer by using its bundled AC adaptor to plug it into a power
outlet. It can also run on commercially available alkaline batteries.
• For information about loading alkaline batteries, see page 57 of the User’s
Guide.
2. Connect the AC adaptor plug to the printer’s AC adaptor terminal (1), and
then plug the power cord into a household power outlet (2).
1
2
Using the AC Adaptor
Use AC adaptor (AD-2105S) that comes bundled with the printer when you
want to plug into a household power outlet.
■ To connect the AC adaptor
Important!
• Use only the AC adaptor that comes bundled with the printer.
• Do not use the USB cable to connect the printer to a computer without
installing the printer software on the computer first.
1. Connect the power cord to the AC adaptor.
■ To disconnect the AC adaptor
Important!
• Never disconnect the AC adaptor while a printing operation is in progress.
Doing so creates the risk of printer malfunction.
1. Unplug the power cord from the wall outlet (1), and then unplug the AC
adaptor from the printer (2).
2
1
7E
Memory Data Backup
•
•
The power to retain the data you input and store in printer memory is
provided by a built-in memory backup battery. When the replacement
date indicated on the sticker affixed to the back of the printer is reached,
the battery will start to weaken, creating the risk that memory data will
be corrupted or lost. Be sure to take the printer to your retailer or your
nearest CASIO service center to have the memory backup battery
replaced before the replacement date is reached. Note that you will be
charged for backup battery replacement.
Be sure to keep separate backup copies of all important data you have
stored in printer memory.
Initializing Printer Memory
You should initialize the memory of the printer before using it for the first time,
after you have not used it for a long time, or if it fails to operate normally when
you turn power on.
Important!
Initializing printer memory clears its memory of all input data.
To initialize printer memory
1. Make sure that the printer is turned off.
2. While holding down the PRINT and ESC keys, press
. Release
first, but keep PRINT and ESC depressed until power turns on and a confirmation message appears on the display.
3. In response to the confirmation message that appears, press SET to initialize the printer memory or ESC to abort.
Data Error
Whenever you turn on the printer, it performs an internal check of its memory
and functions. If it finds a serious data problem, it will display the following
message:
DATA ERROR! INITIALIZE THE PRINTER!
When this message appears, press any key. Next, in response to the “INITIALIZE? SET/ESC” message that appears, press SET to initialize printer
memory (which deletes everything in memory) or ESC to clear the message
without initializing.
E
8
Powering Up and Selecting a Printing Mode
Turning the printer on and off is as simple as pressing a button. After the
printer powers up, you will need to select the type of operation you want to
perform. Select the DISC mode to print on a disc. Select the TAPE mode when
you want to print tape labels.
2. What you should do after turning on power depends on the type of printing
operation you want to perform.
• See “Mode Selection Basics” on page 10 for more information.
3. To turn the printer off, press the
button.
Auto Power Off
The printer automatically turns off if you do not perform any key operation for
about six minutes. To restore power, press
.
To turn power on and off
1. Press the
button to turn the printer on.
• This turns on power and displays a main menu screen like the one shown
below.
• The selection boundary indicates the icon that is currently selected on
the main menu.
Note
Auto Power Off is disabled while the printer is being powered by the bundled
AC adaptor and is connected to a computer.
Important
• See page 55 of the User’s Guide for information about configuring
contrast, print density, and language (English, German, French, Italian,
Spanish) settings.
• All of the display examples in this Startup Guide and the User’s Guide
use English as the display language.
Last Data icon
DISC mode icon
TAPE mode icon
Selection boundary
Currently selected function (icon)
Shows the function of the
currently selected icon
9E
Mode Selection Basics
The illustration below shows the basic flow for mode selection after turning on
the printer. See the User’s Guide for details on how to use each mode.
Note
• The illustration below shows operation for the DISC mode only. Operation in
the TAPE mode is identical.
To input new label text
•••
To recall previously saved text into a label
To display text that was on the display when you last turned off the printer (LAST DATA)
Data that was displayed when printer was turned off
• Except when LAST DATA is selected on the Main Menu, producing a demo
print (User’s Guide, page 55) or initializing printer memory will delete any
data you were last working on.
E
10
Loading and Removing an Ink Ribbon Cassette
5. Attach
the ink ribbon cassette to the bundled adaptor as shown in the
illustration.
An ink ribbon cassette is required when printing disc labels.
You should use only the special ink ribbon cassettes that are specified for this printer.
If you plan to print a tape label for a disc case, you need to load a tape cartridge.
To load the ink ribbon cassette
1. Press
Make sure these
lines are parallel.
to turn off the printer.
2. Press the cassette cover release and open the cover.
3. Remove the stopper from the ink ribbon cassette.
Ink ribbon cassette adaptor
6. Load the ink ribbon cassette and adapter into the printer.
• Make sure that the ink ribbon passes between the print head the rubber
roller as shown in the illustration below. Take care that the ink ribbon does
not snag on the protrusion near the print head. Press down on the ink
ribbon cassette and adaptor until you hear them click securely into place.
Stopper
Rubber roller
Ink ribbon
4. If there is slack in the ink ribbon, use your fingers as shown in the illustration to rotate the spindle of the cassette to remove the slack.
• You may need to rotate the spindle several times if there is a lot of slack.
Important!
• Never pull on the ink ribbon with excessive force or try to push the ink
ribbon into the cassette.
• Loading the ink ribbon cassette while the ink ribbon is slack creates the
risk of malfunction.
Ink ribbon
Print head
Make sure these
lines are parallel.
Rotate in the direction
of the arrow.
Protrusion
Important!
• Installing the ink ribbon cassette and adaptor incorrectly or failing to
secure them properly in place can cause the ribbon to break.
11 E
7. Close the cassette cover.
• Press down on the cassette cover until you hear it click securely into
place.
To remove the ink ribbon cassette
1. Press
to turn off the printer.
2. Press the cassette cover release and open the cover.
3. Grasping both sides of the adaptor, lift it straight up.
4. Remove the ink ribbon cassette from the adaptor.
Storing a Partially Used Ink Ribbon Cassette
Remove the ink ribbon cassette from the adaptor and install a stopper on
it. Place the cassette into its plastic bag, and then into its box. Store it
where it will not be exposed to dirt and dust.
Insert the ink ribbon cassette adaptor into the storage space shown below.
Ink ribbon cassette
adaptor storage
space
Number of Prints Per Ink Ribbon Cassette
• Upper or Lower Area Only: Approximately 40 prints
• Upper and Lower Area: Approximately 20 prints
Upper area
Lower area
E
12
Loading and Removing a Tape Cartridge
6. Pull the tape out about 3cm (1 3/16").
Tape
A tape cartridge is required when printing tape labels. You should use only the
special tape cartridges that are specified for this printer.
Important!
• Once tape is pulled out, there is no way to get it back into the cartridge.
• Never use excessive force when pulling on the tape. Doing so can cause
the ink ribbon to break, creating the risk of malfunction.
To load a tape cartridge
1. Press
Ink ribbon
(under the tape)
to turn off the printer.
2. Press the cassette cover release and open the cover.
7. Check to make sure there is no slack in the ink ribbon.
3. Remove the stopper from the tape cartridge.
Stopper
4. Check to make sure that the leading edge of the tape is not bent.
• If it is, use a pair of scissors to trim away the bend portion.
Ink ribbon
Important!
• Loading the tape cartridge into the printer while the ink ribbon is slack
can cause the ink ribbon to break, creating the risk of malfunction.
Check for bends and damage here.
5. Make sure that the tape is passing properly through the tape guide.
Tape guide
Removing Slack from an Ink Ribbon
• If the tape is not passing through the tape guide, reposition it as shown
in the illustration.
If there is slack in the ink ribbon, use a pencil or
similar object to rotate the right upper spindle in
the direction indicated by arrow "a" in the illustration. Keep rotating until the lower left spindle starts
to rotate in the direction indicated by arrow "b".
The label tape will not move while you are taking
up ink ribbon slack.
a
b
13 E
8. Load the tape cartridge into the printer.
9. Close the cassette cover.
• Make sure that the tape and ink ribbon pass between the print head the
rubber roller as shown in the illustration below. Take care that the ink
ribbon does not snag on the protrusion near the print head. Press down
on the tape cartridge until you hear it click securely into place.
Important!
• Installing the tape cartridge improperly or failing to secure it properly in
place can cause the ribbon to break.
• Press down on the cassette cover until you hear it click securely into
place.
• After loading the tape cartridge in the printer, never pull on the tape or
try to push the tape back into the cartridge.
To remove the tape cartridge from the printer
1. Press
to turn off the printer.
2. Press the cassette cover release and open the cover.
Rubber roller
3. Grasping both sides of the tape cartridge, lift is straight up.
Tape
Ink ribbon
Tape
Protrusion
E
14
Print head
Make sure
these lines
are
parallel.
Using the Printer’s Keys
1 2 3 4 5 6 7
1
Press to print data created on a computer.
2
Press to enter the DISC mode.
3
Press to enter the TAPE mode.
8
4
COPY
t
r
e
w
9
0
q
• Pastes previously copied text.
• To copy, input the text to be copied. Next, press
and then this key. For more information, see page 47
of the User’s Guide.
5
Press to store and recall often-used words and
phrases.
6
Press to preview the label you are currently creating.
7
Press to print.
8
Use these keys to move the cursor on the display.
9
CLS
Press to delete the character to the left of the cursor.
and then this key to delete all of
• Press
the text you are currently inputting.
0
Press to delete the character at the current cursor
location.
q
Press to execute a command of operation.
w
Press to temporarily shift the keyboard between
uppercase and lowercase for input of one character
only. For details, see page 41 of the User’s Guide.
e
Press to shift the keyboard between uppercase and
lowercase. For details, see page 41 of the User’s
Guide.
r
Press to activate the functions marked above, below, or
next to keyboard keys in same color as “FUNCTION”.
t
Press to cancel the current operation and return to the
operation before it.
15 E
2 CAPS On/Off indicator/Insert/Overwrite indicator
“AB” indicates uppercase insert, while “ab” indicates lowercase insert. “
indicates uppercase overwrite, while “ ” indicates lowercase overwrite.
Display Symbols and Indicators
Before actually using the printer, you should first take some time to become
acquainted with the symbols and indicators used on the label printer display.
Note that display contents are different in the DISC mode and in the TAPE
mode, but some indicators are common to both modes.
■ Symbols and Indicators Common to Both Modes
2
3
SANS-SERIF
SANS-S ITC
SANS-S RND
ROMAN
ROMAN ITC
SMALL FONT
cursor
VERT
MIRROR
5 Font Indicators
A pointer appears next to the currently selected font.
5
6
6 Small font indicator
A pointer appears here when the SMALL FONT is selected automatically by
the printer.
7
8
7 Vertical printing indicator
This indicator appears when the printer is set up for vertical printing. Normal
(horizontal) printing is performed when this indicator is not shown.
4
1 Function/Shift/Code indicator
appears when you press the FUNCTION key. Pressing a key while this
indicator is on the display causes the function marked above, below, or next to
that key to be executed.
appears when you press the SHIFT key. While this indicator is on the display, the keyboard is shifted, so the letter keys input the opposite of their current uppercase/lowercase setting. The number keys input the punctuation symbols marked in the upper right corners of the keys. The keyboard automatically unshifts (and the shift indicator disappears) as soon as you input a character.
appears when you press the CODE key. While this indicator is on the display, number keys input the accents marked above them and the U, O, P, A, S,
J, K, L, Z, C, and N keys input the special characters marked in their lower
right corners. The keyboard automatically returns to normal (and the code
indicator disappears) as soon as you input an accent.
appears when both the SHIFT and CODE keys are pressed.
E
16
3 Character style indicators
A pointer appears under the currently selected character style. You can select
between normal (no indicator display), bold (A), outline ( ), shadow ( ), and
raised ( ).
4 Scroll indicators
These indicators appear when there is data above or below the currently displayed screen.
4
1
”
8 Mirror printing indicator
This indicator appears when the printer is set up for mirror image printing.
Normal (non-mirror) printing is performed when this indicator is not shown.
■ DISC Mode Symbols and Indicators
1 Label format
Shows the format of the label being created.
2 Auto format indicator
This indicator appears when Auto Format is enabled.
3 Text area
This is where text appears during input and editing.
4
5
3
4 Character count
These values indicate the character count as shown below
13/24 CHR
Maximum number of allowable characters
Number of characters input
cursor
2
1
6
5 Size indicator
This indicator appears when you are using Auto Format.
This indicator:
x1
x2
x3
x4
x5
Means this:
3 mm (1⁄8")
6 mm (1⁄4")
9 mm (3⁄8")
12 mm (1⁄2")
15 mm (5⁄8")
6 Upper/lower label indicator
This indicator shows the label (upper or lower) that is currently selected for
text input.
17 E
■ TAPE Mode Symbols and Indicators
2
3
Label Printing Basics
This section contains general procedures for laying out and printing disc labels and tape labels. For full details about creating labels, see the separate
User’s Guide.
4
5
DISC Mode
This section describes the general steps you need to perform to use the DISC
Mode to print on a disc.
1
cursor
1 Text area
This is where text appears during input and editing.
Disc Label Printing General Procedure
Connect the AC adaptor (Page 7).
Or load batteries into the printer. (Page 57 of the User’s Guide)
Load an ink ribbon cassette (Page 11).
If you plan to also print a disc case label, load a tape cartridge (Page 13).
Select the DISC Mode (Page 19).
Select the print pattern you want to use (Page 19).
Select the format and input its text.
Print the label (Page 20).
2 Tape length
This value shows the length that the tape will be printed.
■ To create a label for the upper print area of a disc
3 Block number
This value appears when there are multiple blocks in the text. It shows the
sequential number of the block where the cursor is currently located. See
page 22 of the User’s Guide.
Example
4 Label format
This indicator shows how many lines of text have been input. See page 23 of
the User’s Guide for important information about how various format conditions are indicated.
5 Character size indicator
This indicator shows the size of the character where the cursor is currently
located.
E
18
1. Press
7. After inputting the text press SET.
to turn on the printer.
• A LAST DATA icon will also appear on the Main Menu if there is input
data left over from the last time you used the printer. See page 10 for
more information.
• Now you can preview your disc label (“To check the appearance of a
disc label layout”, page 20) or print it without previewing (“To print a disc
label in the upper label area”, page 20).
2. Use
and
to select DISC, and then press SET.
• You can also press DISC here.
3. Use
and
to select NEW, and then press SET.
• This displays a print pattern selection screen.
AREA A
Print Pattern
AREA A
Example
AREA B
4. Use
PROFILE
AREA B
PROFILE DATA
DATA
and
PROFILE DATA
to select the print area(s) you want, and then press SET.
• Here we will select print area A (upper only).
5. Use
and
to select the label format you want, and then press SET.
• Here we will select FORMAT 1.
6. Input the text you want.
• Here we will input “PROFILE DATA”.
• See “Inputting and Editing Label Text” on page 41 of the User’s Guide for
information about inputting text.
Controlling the Appearance of Your Disc Label
When creating a disc label, you can use the following procedures to select the font, style, and layout.
• Font: Page 50 of the User’s Guide
• Style: Page 52 of the User’s Guide
• Layout: Page 29 of the User’s Guide
19 E
■ To check the appearance of a disc label layout
1. Press PREVIEW.
Note
• It is recommended that you print on a disc before you record anything on it.
Note that CASIO COMPUTER CO., LTD. will not be held responsible for any
data that is lost during printing.
• Before printing, be sure to check the “Printing Precautions” and make sure
the disc you are about to print on is acceptable.
• Do not try to print on a single CD-R or a business card size CD-R disc.
Trying to print on such discs can damage the printer. This printer supports
printing on 12cm diameter discs only.
• Place the printer on a level surface when printing. A tilted surface can make
normal printing impossible.
• This will cause an image of the disc label
layout to scroll on the display.
• If the disc label layout has text in both the
upper print area (AREA A) and the lower
print area (AREA B), a print area selection
screen will appear here. Use
and
to select the print area you want to preview
and then press SET to scroll the print area’s
layout on the display.
2. To pause scrolling at any point, press SET.
• Press SET again to resume scrolling.
• While scrolling is paused, you can use
to screen.
• To stop the preview, press ESC.
■ To print a disc label in the upper label area
1. Make sure an ink ribbon cassette is loaded in the printer (page 11).
and
to skip from screen
Note
• Characters or illustrations with very fine lines may not appear correctly on
the preview screen.
• It may take some time for the label image to appear on the display if it
contains a large number of characters or lines.
2. After performing steps 1 through 7 under “To create a label for the upper
print area of a disc”, use
3. Use
and
and
to select PRINT, and then press SET.
to select DISC, and then press SET.
4. With the area of the disc you want to print on facing downwards, slide the
disc from right to left into the slit along the top of the printer.
• Inserting the disc into the slot will cause the positioning guide to rise up.
• If the disc has a logo or any other markings on it, be sure to position it so
printing will be performed in an area that is blank.
E
20
Important!
• Handle the disc gently when sliding it into place. Rough handling can
damage the disc or the positioning guide.
• Check to make sure that there is no dirt, dust, or other foreign matter on
the disc. Dirt or dust can scratch the recording surface of the disc and
make it impossible to record data onto it.
• Sliding the disc onto the slit with the recording side facing you will result
in printing on the recording side of the disc, which will make the disc
unrecordable.
5. Slide the disc to the left as far as it will go.
• Make sure you slide the disc to the left as far as it will go. Normal printing
may not be possible if the disc is not positioned properly inside the printer.
7. Press SET to start printing.
Important!
• Never turn off the printer while it is performing a print operation.
• Make sure there is nothing to the right of the printer that can obstruct
movement of the disc when it exits the slit.
• Never touch the disc while a print operation is in progress. Doing so can
scratch the disc or cause malfunction of the printer.
• Never open the cassette cover while printing is in progress or while a
disc is inserted in the printer. Doing so can scratch the disc or cause
malfunction of the printer.
8. When printing is complete, the disc will stop moving and the screen shown
here will appear on the display.
9. Pull the disc to the right and remove it from the printer.
6. If the label of the disc already has a logo or other marking on it, perform
the operation illustrated below to align it for proper printing.
Printing will
appear here.
• Adjust the position of the disc so its logo or marking is parallel with the
positioning guide and slit.
• Note that the printer cannot print in an area of the disc that already has
a logo or other markings.
• You can skip this step if the disc you are using does not have a logo or
other markings on it.
Important!
• If you have trouble removing the disc from the printer, see page 4.
21 E
■ To create a disc label for the upper and lower print areas
Important!
• Never turn off the printer while it is performing a print operation.
• Never touch the disc while a print operation is in progress. Doing so can
scratch the disc or cause malfunction of the printer.
• Never open the cassette cover while a print operation is in progress.
Doing so can scratch the disc or cause malfunction of the printer.
1. In step 4 of the procedure under “To create a label for the upper print area
of a disc” on page 19, select the icon that shows both AREA A and AREA
B, and then input text into both areas.
2. After inputting the text for the label, press SET.
• Now you can preview your disc label (“To
check the appearance of a disc label
layout”, page 20) or print it without
previewing (see below).
3. Use
and
5.
When printing is complete, the disc will stop moving and the screen shown
here will appear on the display.
6.
Remove the disc from the printer.
• See step 9 on page 21 for details.
7.
Rotate the disc and reinsert it into the printer.
8.
Use
9.
Press SET to start printing.
to select PRINT, and then
press SET.
■ To print a disc label in the upper and lower print areas
Note
• It is recommended that you print on a disc before you record anything on it.
Note that CASIO COMPUTER CO., LTD. will not be held responsible for any
data that is lost during printing.
• Before printing, be sure to check the “Printing Precautions” and make sure
the disc you are about to print on is acceptable.
• Do not try to print on a single CD-R or a business card size CD-R disc.
Trying to print on such discs can damage the printer. This printer supports
printing on 12cm diameter discs only.
1. Use
and
to select DISC, and then press SET.
and
to select AREA B and then press SET.
10.After printing is complete remove the disc from the printer.
• See step 9 on page 21 for details.
■ To exit the printing operation
2. Use
and
to select the upper print area (AREA A) or the lower area
(AREA B), and then press SET.
• Here we will select AREA A.
3. Insert a disc into the printer.
• See steps 4 through 6 under “To print a disc label in the upper label
area” on pages 20 and 21 for details.
4. Press SET to start printing.
E
22
1. When the screen shown above is on the display, use
and
to select
EXIT, and then press SET twice.
• This will display the initial DISC mode screen.
• See page 54 of the User’s Guide for information about using the STORE
option on the above screen.
TAPE Mode
1. Press
Tape Label Printing General Procedure
Connect the AC adaptor (Page 7).
Or load batteries into the printer (Page 57 of the User’s Guide).
Load a tape cartridge (Page 13).
Select the TAPE Mode (Page 23).
Select the tape label mode you want to use (Page 23).
Layout the label and input its text.
Print the label (Page 24).
■ To create a tape label
Example
to turn on the printer.
• A LAST DATA icon will also appear on the Main Menu if there is input
data left over from the last time you used the printer.
This section describes the general steps you need to perform to use the TAPE
Mode to print on label tape.
2. Use
and
to select TAPE, and then press SET.
• You can also press TAPE here.
3.
Use
and
to select NEW, and then press SET.
4. Use
the cursor keys to select the tape label mode you want, and then
press SET.
• Here we will select FREE DESIGN.
5. Type in the text you want.
• Here we will input “Sales Results”.
• See “Inputting and Editing Label Text” on page 41 of the User’s Guide for
information about inputting text.
6. After inputting the text you want, press SET.
• This displays a screen like the one shown
here.
7. What you should do next depends on whether you want preview your label
contents or print right away.
• To preview the label contents first and then print, perform the procedure
under “To preview label contents before printing” on page 24.
• To print without previewing label contents, perform the procedure under
“To print a tape label” on page 24.
23 E
■ To preview label contents before printing
■ To print a tape label
1. After performing the procedure under “To create a tape label” above, press
1. After
PREVIEW.
• This causes the contents of the label to scroll on the display.
• Note that the above step cannot be performed if you do not have a tape
cartridge loaded in the printer.
2. To pause scrolling of the label contents at any point, press SET.
• Press SET again to resume scrolling.
• To stop the preview, press ESC.
Note
• Characters or illustrations with very fine lines may not appear correctly on
the preview screen.
performing the procedure under “To create a tape label” (and “To
preview label contents before printing”, if you want), check to make sure
that the tape cartridge is loaded properly and that nothing is blocking the
tape outlet.
2. Use
and
to select PRINT, and then press SET.
3. Use
(increase) and
(decrease) to specify the number of copies you
want to print, from 1 to 100.
• Here we will specify one copy.
• You can also use the number keys to input a value. Note that you cannot
specify 0 here.
4. Press
5. Use
.
and
to specify the tape cut mode.
When you want to do this:
Select this tape
cut mode:
Print without cutting the
backing paper between
labels
CONT HALF CUT
38
Cut between labels
FULL+HALF CUT
39
Print on iron transfer
tape
FULL CUT
39
UNCUT
39
Print on magnetic tape or
reflective tape
See this page of
the User’s Guide:
• Here we will select CONT HALF CUT.
• See page 38 of the User’s Guide for more information about tape cut
modes.
E
24
6. Press SET to start printing.
• To interrupt printing part way through, press ESC.
Important!
• Never turn off the printer while it is performing a print operation.
• Never open the cassette cover while the printer is performing a print
operation.
• Do not touch the tape coming out of the printer until it is cut automatically
or until printing is complete.
Before printing, make sure that the tape cartridge has enough tape left to
finish the print operation. If the tape cartridge runs out of tape during a print
operation, press ESC to cancel the print operation.
• Make sure that cut tape does not pile up in the area around the tape outlet.
Tape building up around the tape outlet can cause the outlet to become
blocked, causing a tape jam and malfunction of the printer.
• Consecutive printing of text that contains large areas of black cause the
printing to stop and the message “ NOW PRINTING ” to appear on the
display. This indicates that the printer is overheated. If this happens, just
stand by and printing will resume as soon as the printer returns to normal
temperature.
• If the message “ NOW PRINTING ” appears and printing stops frequently,
try making the print density lighter. See page 55 of the User’s Guide.
■ To affix a tape label to a surface
1. If necessary, use a pair of scissor to trim the tape to the size and shape
you want.
2. Peel off the backing of the label and affix it to the surface you want.
■ When using the CONT HALF CUT or FULL+HALF CUT
tape cut mode
Carefully twist the tape at the position where the tape is half-cut, and peel off
the backing paper.
Half cut
■ When using the FULL CUT tape cut mode
Bend a corner of the tape and peel off the backing paper.
• Note that pasting a label onto a surface can cause adhesive to remain on
the surface when you remove the label.
Important!
Do not affix tape labels to objects and in the locations described below.
• Locations exposed to direct sunlight or rain
• On the skin of a person or animal
• On property belonging to others, utility poles, etc.
• In parks, train stations, or other public places.
Incompatible Surfaces
The label tape may not adhere properly to the following types of surfaces.
• Surfaces that are rough
• Surfaces that are wet, oily, dusty, etc.
• Surfaces made of special plastics (silicon, PP, etc.)
25 E
■ To create margins to the left and right of label text
1. Before text is printed or after text printing is complete, press FUNCTION
FEED.
• This feeds the tape approximately 23.5 millimeters (15/16").
■ To cut a tape when “NONE” is selected for the “MARGINS” setting
Automatic tape cutting is not performed at the end of printing when NONE is
selected for the margins setting (User’s Guide, page 27). Perform the following
step to cut the tape manually.
1. After printing is complete, press FUNCTION CUT.
Important!
• Make sure that the printer is level when performing a tape cut operation.
Also, do not pull on the tape or open the cassette cover.
■ To exit the printing operation
1. When the screen shown above is on the display, use
and
to select
EXIT, and then press SET twice.
• This will display the initial TAPE mode screen.
• See page 54 of the User’s Guide for information about using the STORE
option on the above screen.
E
26
CASIO Europe GmbH
Bornbarch 10, 22848 Norderstedt,
Germany
CASIO COMPUTER CO., LTD.
6-2, Hon-machi 1-chome
Shibuya-ku, Tokyo 151-8543, Japan
MO0503-B Printed in China/Imprimé en Chine