1
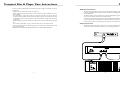
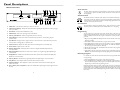
CD Player
Model CDC-3
Installation and Use Manual
50 Spring Street, Ramsey, NJ 07446, U.S.A.
Tel. 201-934-8500; Fax: 201-934-9832; www.bogen.com
© 2001 Bogen Communications, Inc.
All rights reserved. 54-2066-01R1 0109
Printed in Korea.
Specifications subject to change without notice.
Notice
IMPORTANT
Every effort was made to ensure that the information in this
guide was complete and accurate at the time of printing.
However, information is subject to change.
Important Safety Information
WARNING: To Reduce The Risk of Fire Or Electric Shock,
Do Not Expose This Apparatus To Rain Or Moisture.
Always follow these basic safety precautions when installing and
using the unit:
1.
2.
3.
4.
5.
6.
7.
8.
9.
10.
11.
12.
13.
Read these instructions.
Keep these instructions.
Heed all warnings.
Follow all instructions.
Do not use this apparatus near water.
Clean only with dry cloth.
DO NOT block any ventilation openings. Install in accordance with the manufacturer’s instructions.
Do not install near any heat sources such as radiators, heat
registers, stoves, or other apparatus (including amplifiers)
that produce heat.
Do not defeat the safety purpose of the polarized or
grounding-type plug. A polarized plug has two blades with
one wider than the other. A grounding-type plug has two
blades and a third grounding prong. The wide blade, or the
third prong, are provided for your safety. If the provided plug
does not fit into your outlet, consult an electrician for
replacement of the obsolete outlet.
Protect the power cord from being walked on or pinched,
particularly at plugs, convenience receptacles, and the point
where they exit from the apparatus.
Only use attachments/accessories specified by the manufacturer.
Unplug this apparatus during lightning storms or when
unused for long periods of time.
Refer all servicing to qualified service personnel. Servicing is
required when the apparatus has been damaged in any way,
such as power-supply cord or plug is damaged, liquid has
been spilled or objects have fallen into the apparatus, the
apparatus has been exposed to rain or moisture, does not
operate normally, or has been dropped.
CAUTION: TO PREVENT THE RISK OF ELECTRIC SHOCK, DO NOT REMOVE COVER (OR
BACK). NO USER-SERVICEABLE PARTS
INSIDE. REFER SERVICING TO QUALIFIED
PERSONNEL.
The lightning flash with arrowhead symbol, within an equilateral triangle, is intended to alert
the user to the presence of
uninsulated “dangerous voltage”
within the product’s enclosure
that may be of sufficient magnitude to constitute a risk of electric shock to persons.
The exclamation point within an
equilateral triangle is intended
to alert the user to the presence
of important operating and
maintenance (servicing) instructions in the literature accompanying the appliance.
CLASS I
LASER PRODUCT
LIMITED WARRANTY
The Bogen CDC-3 Player is warranted to be free from defects in material or workmanship provided that the
product has not been subjected to abuse or accident or altered in any way for two (2) years from the date of
sale to the original purchaser. Any part of the product covered by this warranty that, with normal installation
and use, becomes defective will be repaired or replaced by Bogen, at our option, provided the product is
shipped insured and prepaid to: Bogen Factory Service Department, 50 Spring Street, Ramsey, NJ 07446, USA.
The product will be returned to you freight prepaid.This warranty does not extend to any of our products that
have been subjected to misuse, improper storage, neglect, accident, improper installation or have been modified
or repaired in any manner that Bogen believes may affect the reliability of the product, or where the serial number or date code has been removed or defaced.
THE FOREGOING LIMITED WARRANTY IS BOGEN’S SOLE AND EXCLUSIVE WARRANTY
AND THE PURCHASER’S SOLE AND EXCLUSIVE REMEDY. BOGEN MAKES NO OTHER
WARRANTIES OF ANY KIND, EITHER EXPRESS OR IMPLIED, AND ALL IMPLIED WARRANTIES OF MERCHANTABILITY OR FITNESS FOR A PARTICULAR PURPOSE ARE HEREBY DISCLAIMED AND EXCLUDED. Bogen's liability arising out of the manufacture, sale or supplying of
products or their use or disposition, whether based upon warranty, contract, tort or otherwise, shall be limited to the price of the product. In no event shall Bogen be liable for special, incidental or consequential damages
(including, but not limited to, loss of profits, loss of data or loss of use damages) arising out of the manufacture,
sale or supplying of products, even if Bogen has been advised of the possibility of such damages or losses.
Products that are out of warranty will also be repaired by the Bogen Factory Service Department -- same
address as above or call 201-934-8500. The parts and labor involved in these repairs are warranted for 90 days
when repaired by the Bogen Factory Service Department. All shipping charges in addition to parts and labor
charges will be at the owner's expense.
This product produces invisible
laser radiation. Do not operate
product with any protective
covers removed.
Domestic and International Listings
UL and C-UL Listed.
13
Contents
Specifications
Page
Frequency Response ....................................................................................................20Hz - 20kHz
COMPACT DISC & PLAYER CARE INSTRUCTIONS....................................................2
INTRODUCTION................................................................................................................3
THD (20Hz - 1kHz) ....................................................................................................<.05%
(20Hz - 20kHz) ..............................................................................................................<.7%
Signal-to-Noise Ratio (1kHz) ....................................................................................>70dB
Audio Output Level ......................................................................................................1.5V (Stereo) / 3V (Mono)
Memory ..........................................................................................................................36 tracks
Channel Separation ......................................................................................................1kHz, 65dB; 10kHz, 55dB
Power Source ................................................................................................................120V AC, 60Hz
Power Consumption ....................................................................................................22 watts
Product Weight ..............................................................................................................14 lbs.
Dimensions ....................................................................................................................18-7/8"W x 3-3/8"H x 11"D
Package Contents ................................................................................................................................3
PANEL DESCRIPTIONS..................................................................................................4-5
CDC-3 Front Panel ............................................................................................................................4
CDC-3 Rear Panel ..............................................................................................................................5
LIQUID CRYSTAL DISPLAY DESCRIPTIONS ................................................................6
INSTALLATION ..................................................................................................................7
Rack Mounting......................................................................................................................................7
Table Mounting ....................................................................................................................................7
OPERATION ..................................................................................................................8-10
Loading and Removing Discs ............................................................................................................8
Play / Pause............................................................................................................................................8
Stop Play ................................................................................................................................................8
Selecting Discs......................................................................................................................................8
Modes of Operation ..........................................................................................................................8
Clear Function......................................................................................................................................9
Search Function....................................................................................................................................9
Scan Function........................................................................................................................................9
Programming ........................................................................................................................................9
Reviewing Programs ............................................................................................................................9
Clearing and Changing Programs ....................................................................................................9
Random Play Function......................................................................................................................10
Introduction Function ......................................................................................................................10
Display Time Readout ......................................................................................................................10
Repeat Function ................................................................................................................................10
CONNECTIONS................................................................................................................11
AUX Input Connections..................................................................................................................11
Output Connections ........................................................................................................................11
SPECIFICATIONS ............................................................................................................12
WARRANTY ......................................................................................................................13
12
1
Connections
Compact Disc & Player Care Instructions
In order to avoid sound degradation, the following instructions ought to be followed in caring for
compact discs.
• Always store discs in their cases when not being used.
• When storing, avoid locations with high or low temperatures or high humidity. Do not store in
direct sunlight.
• Keep discs clean by wiping them gently with a soft cloth from the inner edge to the outer
periphery. If necessary, dip a soft cloth in water, and after wringing it out well, wipe any dirt away
gently and then wipe dry with a soft cloth. Do not use any cleaners or liquids, other than water,
to clean discs.
• When handling a disc, grip the outside part of the the disc in order to avoid touching the signal
line.
• Do not affix gummed labels or tape to the surface of the disc or the label on the disc.
• Do not use compact discs with special shapes (such as heart-shaped or octagonal discs) as they
may damage the player.
Note:The CDC-3 will not play rewritable (CD-RW) discs, but will play recordable (CD-R) discs.
2
AUX Input Connections
The AUX input of the CDC-3 accepts a stereo cable with RCA plugs, thereby allowing the connection of an additional audio source.Whenever the CDC-3 is not playing a disc, the CDC-3 will
play the AUX source.
The CDC-3 volume control only affects the level of the CD playback signal. The CDC-3 volume
control will not affect the volume level of the AUX source.
To match the volume level of the AUX source with the CDC-3, set the AUX source’s volume control (if it has one) and the amplifier volume to the desired level.Then, start the CDC-3 and adjust
its volume control until it is approximately at the same level as the AUX source and amplifier.
Output Connections
The CDC-3 provides both a stereo output and a mono output. Select whichever output is suitable for the particular installation. Connections are made using RCA cables.
11
Operation
Introduction
Bogen's CDC-3 is an excellent choice as a background music source for a variety of installations
and for a variety of reasons.
Clearing and Changing Programs
To clear a particular program, follow the directions for Reviewing Programs. When the particular
program you wish to clear is displayed, press CLEAR. The program that follows it will then take
its place. For example, if clearing P-04, P-05 will become P-04 once the original P-04 is cleared.
It is also possible to change the program rather than clear it.When the particular program is displayed, follow steps 2 through 4 under Programming to change the program. Once the new program has been stored, press MEMO repeatedly to scroll through the rest of the program or press
PLAY to start the program.
Uninterrupted Play
The CDC-3 allows you to add or remove discs without having to stop play.The CD drawer holds
three discs at a time and discs can be added or removed while another disc continues to play.
Also, any background music source connected via the AUX input of the CDC-3, such as a tuner
or tape player, will automatically be routed through the CDC-3 when the CDC-3 is in the stop
mode or when turned off.
Multiple Modes and Features
Random Play Function
The CDC-3 has multiple operating modes for a variety of different features.
1. Begin by selecting the mode the CDC-3 is to operate in by pressing the MODE button.There
are two choices: 1 DISC or ALL. Note: Selecting 1 DISC INTRO or ALL INTRO will result in the
CDC-3 reverting to the 1 DISC or ALL mode since the Intro function is inoperable during Random Play.
Intro modes are operable only for the Introduction function.
2. Press the RANDOM button.The CD player will begin playing tracks randomly.
3.To cancel the random function, press the RANDOM button again.The CDC-3 will continue
playing the last track selected and go forward in numerical order to the next track on the disc.
Introduction Function
1. Begin by selecting the mode the CDC-3 is to operate in by pressing the MODE button.There
are two choices: 1 DISC INTRO and ALL INTRO.
2. Press PLAY.The CDC-3 will play each track for 10 seconds.
3.To cancel, press the STOP button.
Display Time Readout
Depending on which mode is chosen, the CDC-3 can randomly shuffle selections for a single disc
or for all discs loaded into the CD player.The CDC-3 can also scan each track from a single disc,
or for all discs loaded into the CD player, and play an excerpt from each track for 10 seconds.
Programming
The CDC-3 permits the user to program up to 36 tracks from 1, 2, or all 3 discs.
Other Features
The Liquid Crystal Display can show a variety of running times, the current disc and track selected, how many discs are currently installed, what mode the CD player is in, and many other important and informative features.
Package Contents
* CD Player (Model CDC-3)
* Instruction Manual
* Power Cord
* 4 Rubber Feet
* Stereo Cable with RCA Plugs
The Liquid Crystal Display can show three different running times: (1) the amount of time remaining on the track being played, (2) the amount of time elapsed on the track being played, or (3) the
remaining time left on the disc in its entirety.
Press the DISP button to change from one display to another.
The time displayed is indicated by an S or T symbol appearing on the display or the lack of either
symbol. When the S symbol appears, the amount of time remaining on the track being played is
displayed.When the T symbol appears, the total amount of time remaining on the disc in its entirety is displayed. And, when no symbol appears, the elapsed time of the track being played is displayed.
When in program mode, the display will only show the program number (ex., P-01) currently being
played or the time elapsed on the current track being played. You can switch back and forth
between the two displays by pressing the DISP button.
Repeat Function
The CDC-3 can repeat either a single track, an entire disc, or all of the discs installed.
1. Start by pressing the REPEAT button.
2. Press the MODE button to select ONE, 1 DISC, or ALL. ONE will repeat a single track. 1 DISC
will repeat the entire disc and ALL will repeat all of the discs currently installed.
3. Press the PLAY button. The repeat function can be terminated by either pressing the REPEAT
button or by pressing the STOP button.
10
3
Operation
Panel Descriptions
CDC-3 Front Panel
Clear Function
The Clear button only affects programming. After a track has been programmed into the memory, the program in question (ex. P-01), can be cleared from memory. For more on this function,
see Programming.
Search Function
The Search buttons are unlike the other buttons on the CDC-3 in that they must be held down
rather than pressed and released to operate properly. When pressed down, the search buttons
will fast forward or rewind the track that is currently being played. Once a button is released, the
track will continue play from that point.
Scan Function
1.
CD Drawer - The CD drawer holds up to 3 discs at one time.
2.
Liquid Crystal Display - Displays all related information regarding the play status of all discs (see page
6 for more detail).
3.
Disc Button - Selects which installed disc to play.
4.
Mode Button - Selects the operating mode of the CDC-3.
5.
Memory Clear Button - Deletes programmed tracks from memory.
6.
Search Buttons - Initiate a fast search in either direction (forward or reverse) during play on a
particular track.
The Scan buttons change the selected track in single increments in numerical order in either
direction (forward or backward) when the selected disc is or is not playing.
Programming
7.
Scan Buttons - Change tracks in single increments in numerical order in either direction (forward or
reverse) before or during play for a particular disc.
8.
Volume Control - Adjusts the audio output level of the CD player, but not the AUX input.
9.
Power Switch - Applies power to the unit.
10. Random Play Button - Randomly selects a track to be played. See Random Play Function for
more information.
11. Repeat Play Button - Repeats one track, one disc, all discs, or program being played, depending on
mode selected.
12. Display Button - Switches back and forth between three separate time sequences. See Display Time
Readout for more information.
13. Memory Button - Activates the programming feature. See Programming for more information.
14. Stop Button - Stops playback and/or pause and resets the disc to track 1.
15. Play/Pause Button - Starts playback. To pause, press button a second time.To resume play, press
button a third time.
16. Disc 1, Disc 2, Disc 3 Tray Button - Opens the selected disc tray. Pressing the button again will close
the tray.
4
You can program up to 36 tracks from three separate discs in the order you want them to be
played.The programmed sequence will remain in memory until the power is turned off or the CD
drawer is ejected, at which time the program is cleared from memory and the unit must be reprogrammed.
1. Begin by pressing MEMO.The display will show the disc number, track, and program number
(P-01, for example).
2. Press DISC to select from which disc to program your first track.
3. Press SCAN until the number of the track you wish to program is displayed.
4. Press MEMO.The disc, track, and program number are stored.The display will now show
the next program number (P-02, for example).
5. Repeat steps 2 through 4 for each additional disc and track to be programmed.
6. Once done, press STOP.
7. Press PLAY to start the program.To play the program continuously, press the REPEAT button. If
REPEAT is not selected, the program will stop playing after the last selection has played.
Reviewing Programs
It is possible to review the discs and tracks that have been programmed while still in the process
of programming.
1. Press the STOP button at any point in time while programming.
2. Press the MEMO button repeatedly to scroll through each program number one at a time. Once
you’ve scrolled through all of the programs you entered, repeat steps 2 through 4 under
Programming to continue the programming process.
Note: Programs will be stored in memory until the power to the unit is turned off or the CD drawer is
ejected, at which time all programming will be cleared from memory. The user should be careful not to
press the Disk 1, Disk 2, or Disk 3 eject buttons when selecting which disc to program from, but rather
press the Disc button instead. Accidentally pressing the Disk 1, Disk 2, or Disk 3 eject buttons will clear
the memory.
9
Operation
Panel Descriptions
CDC-3 Rear Panel
Loading and Removing Discs
You can load up to three discs at a time.To load, remove, or replace a disc, press the DISC 1, DISC
2, or DISC 3 button.This will open the CD drawer to the corresponding disc tray holder. Insert,
remove, or replace the disc and then press the button again and the CD drawer will close.
Note: Discs that are not currently being played may be removed during the operation of other dics. For
example, you can remove Disc 2 while Disc 1 is playing. However, doing so while running a program will
result in the program being erased.The CDC-3 will then continue playing only the disc that was playing at
the time the CD drawer was opened.
Play / Pause
To play a disc, press the PLAY / PAUSE button.To pause, press the PLAY / PAUSE button a second
time during playback.To return to regular playback, press the PLAY / PAUSE button a third time.
The pause symbol (two vertical bars) will light up in the upper righthand corner of the liquid crystal display if the CDC-3 is in pause operation.
1.
Line Voltage Input Connector with Fuse - Connects AC Cord from 120V AC, 60Hz source. Fuse is
located in cord receptacle.
2.
AUX Input - Provides stereo input for auxiliary audio source.
3.
Output Connectors - Provide both stereo and mono outputs.
Stop Play
To stop play, press the STOP button. Once the STOP button is pressed, the disc will return to the
first track on the disc.
Selecting Discs
Press the DISC button to switch from one disc to another.
Modes of Operation
There are five modes of operation: ONE, 1 DISC, 1 DISC INTRO, ALL, and ALL INTRO. Pressing the
MODE button will cycle the CDC-3 between these modes under certain circumstances. The
modes only affect regular playback operation, random playback, and intro playback. They have no
impact on programming.
ALL - When selected, this mode will result in the playback of every disc currently installed in the
CDC-3, beginning with whichever disc is currently selected and continuing through all discs
installed. If no disc is installed in a particular tray, the CDC-3 will skip that particular tray and continue onto the next one. Once all installed discs have played, the CDC-3 will stop playing unless
the REPEAT function is activated.
ALL INTRO - In this mode, the CDC-3 will play a 10-second preview of each track on every
disc installed.
1 DISC - This mode limits playback operation to only the disc currently selected. Once that particular disc is finished, the CDC-3 will stop playing. See Random Play Function, Introduction Function,
and Repeat Function for further information on how 1 DISC affects those functions.
1 DISC INTRO - In this mode, the CDC-3 will play a 10-second preview of each track on the
disc selected.
ONE - This mode is only applicable when using the REPEAT function. When REPEAT is selected
and the mode ONE is selected, the CDC-3 will repeat a single track over and over again.
8
5
Liquid Crystal Display Descriptions
Note: Not all indicators displayed below will be lit at all times.
Installation
Rack Mounting
The CDC-3 front panel is designed to allow mounting in 19" racks. If any feet have been attached
to the bottom of the CD player, remove them. Install the CD player into the rack and secure it to
the rack with appropriate hardware (not included).
Table Mounting
Feet are provided with the CD player to allow it to be placed on a tabletop. Attach the included
feet to the bottom of the CD player as shown.
A. Memory Operating Indicator - Indicates memory function is activated.
Random Indicator - Indicates random function is activated.
R
YE
LA
DP
CC
AN
DIS
SC
LTIMU
CH
SEAR
CLEA
MO
ON
MO
P
RAND
OFF
OM
ER
POW
/ STOP
PLAYE
PAUS
3
T
T
3
/ STOP
PLAYE
PAUS
R
MO
ER
POW
OFF
ON
DE
R
SEAR
MAX
MIN LUME
VO
R
YE
LA
DP
CC
AN
DIS
SC
LTIMU
CH
C3
CD
Disc Time Indicator - When displayed, the time display is showing the total time remaining for the disc
being played.
M. Time Indicator - Displays up to three different running time displays. See Display Time Readout for a
description of each possible time display.
N. Track Indicator - Shows which number track (up to 16) on disc is being played. Should the disc
contain more than 16 tracks, the word OVER will illuminate.
6
CLEA
Table Installation
K. Track Indicator - Indicates which track is selected or being played.
L.
OM
Disc Selection Indicator - Indicates which disc is selected or currently being played.
RAND
J.
REPT
Disc Install Indicator - Indicates the number of discs installed in the unit (maximum of 3 at one time).
P
Rack Installation
H. Play Indicator - When displayed, it shows that the unit is in PLAY status.
I.
DIS
G. INTRO Mode Indicator - Indicates unit is in INTRO mode.
MO
ALL Mode Indicator - Indicates unit is in ALL mode.
ME
F.
C
1 DISC Mode Indicator - Indicates unit is in 1 DISC mode.
DIS
E.
DISK
EJEC
GE
2
AN
DISK
CH
EJEC
ISC
7
1
3-D
DISK
DISK
ACT
MP
CO
2
disc
DISK
DIO
L AU
ITA
DIG
3
1 2
1
R
D. ONE Mode Indicator - Indicates unit is in ONE mode. Only available when using REPEAT function.
DISK
3
1 2
ACT
MP
CO
disc
DIO
L AU
ITA
DIG
GE
DIS
ME
AN
REPT
CH
C. Repeat Indicator - Indicates repeat function is activated.
R
DE
C
ISC
DIS
C3
CD
MAX
MIN LUME
VO
3-D
B.
Operation
Panel Descriptions
CDC-3 Rear Panel
Loading and Removing Discs
You can load up to three discs at a time.To load, remove, or replace a disc, press the DISC 1, DISC
2, or DISC 3 button.This will open the CD drawer to the corresponding disc tray holder. Insert,
remove, or replace the disc and then press the button again and the CD drawer will close.
Note: Discs that are not currently being played may be removed during the operation of other dics. For
example, you can remove Disc 2 while Disc 1 is playing. However, doing so while running a program will
result in the program being erased.The CDC-3 will then continue playing only the disc that was playing at
the time the CD drawer was opened.
Play / Pause
To play a disc, press the PLAY / PAUSE button.To pause, press the PLAY / PAUSE button a second
time during playback.To return to regular playback, press the PLAY / PAUSE button a third time.
The pause symbol (two vertical bars) will light up in the upper righthand corner of the liquid crystal display if the CDC-3 is in pause operation.
1.
Line Voltage Input Connector with Fuse - Connects AC Cord from 120V AC, 60Hz source. Fuse is
located in cord receptacle.
2.
AUX Input - Provides stereo input for auxiliary audio source.
3.
Output Connectors - Provide both stereo and mono outputs.
Stop Play
To stop play, press the STOP button. Once the STOP button is pressed, the disc will return to the
first track on the disc.
Selecting Discs
Press the DISC button to switch from one disc to another.
Modes of Operation
There are five modes of operation: ONE, 1 DISC, 1 DISC INTRO, ALL, and ALL INTRO. Pressing the
MODE button will cycle the CDC-3 between these modes under certain circumstances. The
modes only affect regular playback operation, random playback, and intro playback. They have no
impact on programming.
ALL - When selected, this mode will result in the playback of every disc currently installed in the
CDC-3, beginning with whichever disc is currently selected and continuing through all discs
installed. If no disc is installed in a particular tray, the CDC-3 will skip that particular tray and continue onto the next one. Once all installed discs have played, the CDC-3 will stop playing unless
the REPEAT function is activated.
ALL INTRO - In this mode, the CDC-3 will play a 10-second preview of each track on every
disc installed.
1 DISC - This mode limits playback operation to only the disc currently selected. Once that particular disc is finished, the CDC-3 will stop playing. See Random Play Function, Introduction Function,
and Repeat Function for further information on how 1 DISC affects those functions.
1 DISC INTRO - In this mode, the CDC-3 will play a 10-second preview of each track on the
disc selected.
ONE - This mode is only applicable when using the REPEAT function. When REPEAT is selected
and the mode ONE is selected, the CDC-3 will repeat a single track over and over again.
8
5
Operation
Panel Descriptions
CDC-3 Front Panel
Clear Function
The Clear button only affects programming. After a track has been programmed into the memory, the program in question (ex. P-01), can be cleared from memory. For more on this function,
see Programming.
Search Function
The Search buttons are unlike the other buttons on the CDC-3 in that they must be held down
rather than pressed and released to operate properly. When pressed down, the search buttons
will fast forward or rewind the track that is currently being played. Once a button is released, the
track will continue play from that point.
Scan Function
1.
CD Drawer - The CD drawer holds up to 3 discs at one time.
2.
Liquid Crystal Display - Displays all related information regarding the play status of all discs (see page
6 for more detail).
3.
Disc Button - Selects which installed disc to play.
4.
Mode Button - Selects the operating mode of the CDC-3.
5.
Memory Clear Button - Deletes programmed tracks from memory.
6.
Search Buttons - Initiate a fast search in either direction (forward or reverse) during play on a
particular track.
The Scan buttons change the selected track in single increments in numerical order in either
direction (forward or backward) when the selected disc is or is not playing.
Programming
7.
Scan Buttons - Change tracks in single increments in numerical order in either direction (forward or
reverse) before or during play for a particular disc.
8.
Volume Control - Adjusts the audio output level of the CD player, but not the AUX input.
9.
Power Switch - Applies power to the unit.
10. Random Play Button - Randomly selects a track to be played. See Random Play Function for
more information.
11. Repeat Play Button - Repeats one track, one disc, all discs, or program being played, depending on
mode selected.
12. Display Button - Switches back and forth between three separate time sequences. See Display Time
Readout for more information.
13. Memory Button - Activates the programming feature. See Programming for more information.
14. Stop Button - Stops playback and/or pause and resets the disc to track 1.
15. Play/Pause Button - Starts playback. To pause, press button a second time.To resume play, press
button a third time.
16. Disc 1, Disc 2, Disc 3 Tray Button - Opens the selected disc tray. Pressing the button again will close
the tray.
4
You can program up to 36 tracks from three separate discs in the order you want them to be
played.The programmed sequence will remain in memory until the power is turned off or the CD
drawer is ejected, at which time the program is cleared from memory and the unit must be reprogrammed.
1. Begin by pressing MEMO.The display will show the disc number, track, and program number
(P-01, for example).
2. Press DISC to select from which disc to program your first track.
3. Press SCAN until the number of the track you wish to program is displayed.
4. Press MEMO.The disc, track, and program number are stored.The display will now show
the next program number (P-02, for example).
5. Repeat steps 2 through 4 for each additional disc and track to be programmed.
6. Once done, press STOP.
7. Press PLAY to start the program.To play the program continuously, press the REPEAT button. If
REPEAT is not selected, the program will stop playing after the last selection has played.
Reviewing Programs
It is possible to review the discs and tracks that have been programmed while still in the process
of programming.
1. Press the STOP button at any point in time while programming.
2. Press the MEMO button repeatedly to scroll through each program number one at a time. Once
you’ve scrolled through all of the programs you entered, repeat steps 2 through 4 under
Programming to continue the programming process.
Note: Programs will be stored in memory until the power to the unit is turned off or the CD drawer is
ejected, at which time all programming will be cleared from memory. The user should be careful not to
press the Disk 1, Disk 2, or Disk 3 eject buttons when selecting which disc to program from, but rather
press the Disc button instead. Accidentally pressing the Disk 1, Disk 2, or Disk 3 eject buttons will clear
the memory.
9
Operation
Introduction
Bogen's CDC-3 is an excellent choice as a background music source for a variety of installations
and for a variety of reasons.
Clearing and Changing Programs
To clear a particular program, follow the directions for Reviewing Programs. When the particular
program you wish to clear is displayed, press CLEAR. The program that follows it will then take
its place. For example, if clearing P-04, P-05 will become P-04 once the original P-04 is cleared.
It is also possible to change the program rather than clear it.When the particular program is displayed, follow steps 2 through 4 under Programming to change the program. Once the new program has been stored, press MEMO repeatedly to scroll through the rest of the program or press
PLAY to start the program.
Uninterrupted Play
The CDC-3 allows you to add or remove discs without having to stop play.The CD drawer holds
three discs at a time and discs can be added or removed while another disc continues to play.
Also, any background music source connected via the AUX input of the CDC-3, such as a tuner
or tape player, will automatically be routed through the CDC-3 when the CDC-3 is in the stop
mode or when turned off.
Multiple Modes and Features
Random Play Function
The CDC-3 has multiple operating modes for a variety of different features.
1. Begin by selecting the mode the CDC-3 is to operate in by pressing the MODE button.There
are two choices: 1 DISC or ALL. Note: Selecting 1 DISC INTRO or ALL INTRO will result in the
CDC-3 reverting to the 1 DISC or ALL mode since the Intro function is inoperable during Random Play.
Intro modes are operable only for the Introduction function.
2. Press the RANDOM button.The CD player will begin playing tracks randomly.
3.To cancel the random function, press the RANDOM button again.The CDC-3 will continue
playing the last track selected and go forward in numerical order to the next track on the disc.
Introduction Function
1. Begin by selecting the mode the CDC-3 is to operate in by pressing the MODE button.There
are two choices: 1 DISC INTRO and ALL INTRO.
2. Press PLAY.The CDC-3 will play each track for 10 seconds.
3.To cancel, press the STOP button.
Display Time Readout
Depending on which mode is chosen, the CDC-3 can randomly shuffle selections for a single disc
or for all discs loaded into the CD player.The CDC-3 can also scan each track from a single disc,
or for all discs loaded into the CD player, and play an excerpt from each track for 10 seconds.
Programming
The CDC-3 permits the user to program up to 36 tracks from 1, 2, or all 3 discs.
Other Features
The Liquid Crystal Display can show a variety of running times, the current disc and track selected, how many discs are currently installed, what mode the CD player is in, and many other important and informative features.
Package Contents
* CD Player (Model CDC-3)
* Instruction Manual
* Power Cord
* 4 Rubber Feet
* Stereo Cable with RCA Plugs
The Liquid Crystal Display can show three different running times: (1) the amount of time remaining on the track being played, (2) the amount of time elapsed on the track being played, or (3) the
remaining time left on the disc in its entirety.
Press the DISP button to change from one display to another.
The time displayed is indicated by an S or T symbol appearing on the display or the lack of either
symbol. When the S symbol appears, the amount of time remaining on the track being played is
displayed.When the T symbol appears, the total amount of time remaining on the disc in its entirety is displayed. And, when no symbol appears, the elapsed time of the track being played is displayed.
When in program mode, the display will only show the program number (ex., P-01) currently being
played or the time elapsed on the current track being played. You can switch back and forth
between the two displays by pressing the DISP button.
Repeat Function
The CDC-3 can repeat either a single track, an entire disc, or all of the discs installed.
1. Start by pressing the REPEAT button.
2. Press the MODE button to select ONE, 1 DISC, or ALL. ONE will repeat a single track. 1 DISC
will repeat the entire disc and ALL will repeat all of the discs currently installed.
3. Press the PLAY button. The repeat function can be terminated by either pressing the REPEAT
button or by pressing the STOP button.
10
3
Connections
Compact Disc & Player Care Instructions
In order to avoid sound degradation, the following instructions ought to be followed in caring for
compact discs.
• Always store discs in their cases when not being used.
• When storing, avoid locations with high or low temperatures or high humidity. Do not store in
direct sunlight.
• Keep discs clean by wiping them gently with a soft cloth from the inner edge to the outer
periphery. If necessary, dip a soft cloth in water, and after wringing it out well, wipe any dirt away
gently and then wipe dry with a soft cloth. Do not use any cleaners or liquids, other than water,
to clean discs.
• When handling a disc, grip the outside part of the the disc in order to avoid touching the signal
line.
• Do not affix gummed labels or tape to the surface of the disc or the label on the disc.
• Do not use compact discs with special shapes (such as heart-shaped or octagonal discs) as they
may damage the player.
Note:The CDC-3 will not play rewritable (CD-RW) discs, but will play recordable (CD-R) discs.
2
AUX Input Connections
The AUX input of the CDC-3 accepts a stereo cable with RCA plugs, thereby allowing the connection of an additional audio source.Whenever the CDC-3 is not playing a disc, the CDC-3 will
play the AUX source.
The CDC-3 volume control only affects the level of the CD playback signal. The CDC-3 volume
control will not affect the volume level of the AUX source.
To match the volume level of the AUX source with the CDC-3, set the AUX source’s volume control (if it has one) and the amplifier volume to the desired level.Then, start the CDC-3 and adjust
its volume control until it is approximately at the same level as the AUX source and amplifier.
Output Connections
The CDC-3 provides both a stereo output and a mono output. Select whichever output is suitable for the particular installation. Connections are made using RCA cables.
11
Contents
Specifications
Page
Frequency Response ....................................................................................................20Hz - 20kHz
COMPACT DISC & PLAYER CARE INSTRUCTIONS....................................................2
INTRODUCTION................................................................................................................3
THD (20Hz - 1kHz) ....................................................................................................<.05%
(20Hz - 20kHz) ..............................................................................................................<.7%
Signal-to-Noise Ratio (1kHz) ....................................................................................>70dB
Audio Output Level ......................................................................................................1.5V (Stereo) / 3V (Mono)
Memory ..........................................................................................................................36 tracks
Channel Separation ......................................................................................................1kHz, 65dB; 10kHz, 55dB
Power Source ................................................................................................................120V AC, 60Hz
Power Consumption ....................................................................................................22 watts
Product Weight ..............................................................................................................14 lbs.
Dimensions ....................................................................................................................18-7/8"W x 3-3/8"H x 11"D
Package Contents ................................................................................................................................3
PANEL DESCRIPTIONS..................................................................................................4-5
CDC-3 Front Panel ............................................................................................................................4
CDC-3 Rear Panel ..............................................................................................................................5
LIQUID CRYSTAL DISPLAY DESCRIPTIONS ................................................................6
INSTALLATION ..................................................................................................................7
Rack Mounting......................................................................................................................................7
Table Mounting ....................................................................................................................................7
OPERATION ..................................................................................................................8-10
Loading and Removing Discs ............................................................................................................8
Play / Pause............................................................................................................................................8
Stop Play ................................................................................................................................................8
Selecting Discs......................................................................................................................................8
Modes of Operation ..........................................................................................................................8
Clear Function......................................................................................................................................9
Search Function....................................................................................................................................9
Scan Function........................................................................................................................................9
Programming ........................................................................................................................................9
Reviewing Programs ............................................................................................................................9
Clearing and Changing Programs ....................................................................................................9
Random Play Function......................................................................................................................10
Introduction Function ......................................................................................................................10
Display Time Readout ......................................................................................................................10
Repeat Function ................................................................................................................................10
CONNECTIONS................................................................................................................11
AUX Input Connections..................................................................................................................11
Output Connections ........................................................................................................................11
SPECIFICATIONS ............................................................................................................12
WARRANTY ......................................................................................................................13
12
1
Notice
IMPORTANT
Every effort was made to ensure that the information in this
guide was complete and accurate at the time of printing.
However, information is subject to change.
Important Safety Information
WARNING: To Reduce The Risk of Fire Or Electric Shock,
Do Not Expose This Apparatus To Rain Or Moisture.
Always follow these basic safety precautions when installing and
using the unit:
1.
2.
3.
4.
5.
6.
7.
8.
9.
10.
11.
12.
13.
Read these instructions.
Keep these instructions.
Heed all warnings.
Follow all instructions.
Do not use this apparatus near water.
Clean only with dry cloth.
DO NOT block any ventilation openings. Install in accordance with the manufacturer’s instructions.
Do not install near any heat sources such as radiators, heat
registers, stoves, or other apparatus (including amplifiers)
that produce heat.
Do not defeat the safety purpose of the polarized or
grounding-type plug. A polarized plug has two blades with
one wider than the other. A grounding-type plug has two
blades and a third grounding prong. The wide blade, or the
third prong, are provided for your safety. If the provided plug
does not fit into your outlet, consult an electrician for
replacement of the obsolete outlet.
Protect the power cord from being walked on or pinched,
particularly at plugs, convenience receptacles, and the point
where they exit from the apparatus.
Only use attachments/accessories specified by the manufacturer.
Unplug this apparatus during lightning storms or when
unused for long periods of time.
Refer all servicing to qualified service personnel. Servicing is
required when the apparatus has been damaged in any way,
such as power-supply cord or plug is damaged, liquid has
been spilled or objects have fallen into the apparatus, the
apparatus has been exposed to rain or moisture, does not
operate normally, or has been dropped.
CAUTION: TO PREVENT THE RISK OF ELECTRIC SHOCK, DO NOT REMOVE COVER (OR
BACK). NO USER-SERVICEABLE PARTS
INSIDE. REFER SERVICING TO QUALIFIED
PERSONNEL.
The lightning flash with arrowhead symbol, within an equilateral triangle, is intended to alert
the user to the presence of
uninsulated “dangerous voltage”
within the product’s enclosure
that may be of sufficient magnitude to constitute a risk of electric shock to persons.
The exclamation point within an
equilateral triangle is intended
to alert the user to the presence
of important operating and
maintenance (servicing) instructions in the literature accompanying the appliance.
LIMITED WARRANTY
The Bogen CDC-3 Player is warranted to be free from defects in material or workmanship provided that the
product has not been subjected to abuse or accident or altered in any way for two (2) years from the date of
sale to the original purchaser. Any part of the product covered by this warranty that, with normal installation
and use, becomes defective will be repaired or replaced by Bogen, at our option, provided the product is
shipped insured and prepaid to: Bogen Factory Service Department, 50 Spring Street, Ramsey, NJ 07446, USA.
The product will be returned to you freight prepaid.This warranty does not extend to any of our products that
have been subjected to misuse, improper storage, neglect, accident, improper installation or have been modified
or repaired in any manner that Bogen believes may affect the reliability of the product, or where the serial number or date code has been removed or defaced.
THE FOREGOING LIMITED WARRANTY IS BOGEN’S SOLE AND EXCLUSIVE WARRANTY
AND THE PURCHASER’S SOLE AND EXCLUSIVE REMEDY. BOGEN MAKES NO OTHER
WARRANTIES OF ANY KIND, EITHER EXPRESS OR IMPLIED, AND ALL IMPLIED WARRANTIES OF MERCHANTABILITY OR FITNESS FOR A PARTICULAR PURPOSE ARE HEREBY DISCLAIMED AND EXCLUDED. Bogen's liability arising out of the manufacture, sale or supplying of
products or their use or disposition, whether based upon warranty, contract, tort or otherwise, shall be limited to the price of the product. In no event shall Bogen be liable for special, incidental or consequential damages
(including, but not limited to, loss of profits, loss of data or loss of use damages) arising out of the manufacture,
sale or supplying of products, even if Bogen has been advised of the possibility of such damages or losses.
Products that are out of warranty will also be repaired by the Bogen Factory Service Department -- same
address as above or call 201-934-8500. The parts and labor involved in these repairs are warranted for 90 days
when repaired by the Bogen Factory Service Department. All shipping charges in addition to parts and labor
charges will be at the owner's expense.
Domestic and International Listings
UL and C-UL Listed.
13
CD Player
Model CDC-3
Installation and Use Manual
50 Spring Street, Ramsey, NJ 07446, U.S.A.
Tel. 201-934-8500; Fax: 201-934-9832; www.bogen.com
© 2001 Bogen Communications, Inc.
All rights reserved. 54-2066-01R1 0109
Printed in Korea.
Specifications subject to change without notice.