1
FOMA® M702iG
Manual for Data Communication
Data Communications .........................................................................................
Before Using.........................................................................................................
Preparing for Data Communication ...................................................................
Installing the Communication Configuration Files (Drivers) ...........................
Connecting the FOMA Handset and PC Using the FOMA USB Cable (Optional)
...............................................................................................................................
Checking the Communication Configuration Files (Drivers)...........................
Uninstalling the Communication Configuration Files (Drivers) ......................
Preparing for Communication via Bluetooth
................................................................................ <Dial-up Network Gateway>
1
2
3
4
5
6
7
7
Configuring Communication Settings Using FOMA PC
Configuration Software
FOMA PC Configuration Software .............................................................
Installing the FOMA PC Configuration Software ......................................
Configuring Communication Settings .......................................................
Start Communicating ..................................................................................
W-TCP Settings ............................................................................................
Setting APN ..................................................................................................
Uninstalling the FOMA PC Configuration Software .................................
9
9
11
15
16
17
18
Configuring Communication Settings without Using FOMA
PC Configuration Software
Configuring a Dial-up Network ...................................................................
Communicating............................................................................................
19
24
AT Commands......................................................................................................
AT Command List ................................................................................................
26
27
About Manual for Data communication
This manual explains the items required for making data communication on the FOMA M702iG as well as
how to install "M702iG 通信設定ファイル(ドライバ)(M702iG Communication Configuration Files
(Drivers))" and "FOMA PC 設定ソフト (FOMA PC configuration Software)" inside the CD-ROM.
About Windows XP Operation
This manual explains the contents compliant with Windows XP Service Pack 2. Some procedures and
displays in this manual may differ depending on your operating environment.
Connecting the FOMA Handset and
PC, etc.
Data Communications
The following connection methods are available
to connect the FOMA handset to a PC to perform
data communications:
Connecting the FOMA handset and a PC allows
you to use three types of data communications
(packet communication, 64K data
communication and data transfer (OBEX)).
■ Using the FOMA USB Cable (optional) (USB
Connection)
Connecting the FOMA handset to a PC with the
FOMA USB Cable allows you to use all
communication methods (packet communication,
64K data communication and data transfer
(OBEX)).
Available Data Communications from
the FOMA Handset
■ Packet Communication
Packet communication is a communication
method whose charges are based on the amount
of data exchanged. It allows data communication
at a maximum speed of 384Kbps for receiving
and 64Kbps for sending.
In order to perform packet communication,
connect the FOMA handset and a PC using a
FOMA USB Cable (optional) or via Bluetooth and
connect to an access point of DoCoMo's Internet
connection service "mopera U" or "mopera", that
handles the FOMA packet communication.
• The communication setup files (drivers) must be
installed before connecting with the FOMA USB
Cable. →P4
• When using the USB connection, set the USB
mode to "Communication mode". →P5
■ Using Bluetooth (Bluetooth Connection)
Using Bluetooth allows you to use all
communication methods (packet communication,
64K data communication and data transfer
(OBEX)).
• Use a standard Bluetooth modem or a Bluetooth
modem provided by a Bluetooth device
manufacturer to connect via Bluetooth. For
installation and configuration of a modem, contact
the manufacturer of your PC or Bluetooth device.
• Note that the communication fees may become
high if you use packet communication to send/
receive data.
■ 64K Data Communication
64K data communication is a communication
method whose charges are based on the time
connected to the network. It allows data
communication at a speed of 64Kbps.
In order to perform 64k data communication,
connect the FOMA handset and a PC using a
FOMA USB Cable (optional) or via Bluetooth and
connect to an access point of DoCoMo's Internet
connection service "mopera U" or "mopera", that
handles the FOMA 64K data communication or
an access point that handles ISDN synchronous
64K.
■ Using Infrared
Using infrared allows you to use the
communication method of data transfer (OBEX).
You can exchange data with a PC, etc. with
infrared capability.
Precautions before Use
■ Internet Service Provider Fees
Fees to an Internet service provider (ISP) may be
required to connect to the Internet. These fees
are in addition to the FOMA service fees and are
paid to your ISP directly. For detailed information
on connection fees, contact your ISP.
You can use "mopera U" or "mopera", DoCoMo's
Internet connection service. A separate
subscription (fee-based) is required to use
"mopera U". To use "mopera", no separate
subscription is required, and no monthly usage
fee applies.
• Note that the communication fees may become
high if you use 64K data communication to connect
for a long time.
■ Data Transfer (OBEX)
Data transfer is a communication method that
exchanges data using the FOMA USB Cable,
infrared, or Bluetooth.
In order to transfer data by connecting the FOMA
handset and a PC with the FOMA USB Cable,
data link software must be installed on the PC. In
order to transfer data using infrared or Bluetooth,
a communication device such as a PC must be
equipped with infrared or Bluetooth capability.
■ Setting the Internet Connection
(Internet service providers, etc.)
Packet communication and 64K data
communication use different access points. For
packet communication, use an access point
compatible with packet communication, and for
64K data communication, use the FOMA 64K
data communication or use an access point
compatible with ISDN synchronous 64K.
• DoPa access points cannot be connected.
1
Continued on the next page
• Access points for PHS 64K/32K data
communication for PIAFS, etc. cannot be
connected.
the communication capability of the FOMA
handset.
Administrator Privileges
Access rights that allow access to all functions on a
Windows XP or Windows 2000 system. A user
without administrator privileges cannot install or
uninstall drivers or FOMA PC Configuration
Software.
■ User Authentication to Access Networks
Depending on the access point, user
authentication (ID and password) may be
required to connect. If required, enter the ID and
password from the dial-up network. The ID and
password will be provided by the network
administrator of your ISP or access point. For
details, contact the network administrator of your
ISP or the access point.
Before Using
■ Required Conditions for Packet and 64K Data
Communications
The following conditions must be met to perform
communications using the FOMA handset (a
connection may not be established if traffic is
heavy at the base station or if radio signals are
weak).
Operating Environment
The following operating environment is required
for a PC to use data communication:
• The PC must have an interface for the FOMA USB
Cable.
• To connect via Bluetooth, the device such as a PC
must be compatible with Dial-Up Networking.
Profile of Bluetooth standard Version 1.2
• The FOMA handset must be in a FOMA service
area.
• The access point must support FOMA packet
communication for packet communication.
• The access point must support FOMA 64K data
communication or ISDN synchronous 64K for 64K
data communication.
Item
■ Data Communication Glossary
APN (Access Point Name)
Identifies an access point (ISP or LAN) for packet
communication. The Internet connection service for
DoCoMo, "mopera U" has "mopera.net" as its APN.
cid (Context Identifier)
A registration number of an APN of packet
communication to the FOMA handset. The FOMA
handset can contain up to 10 APNs using cid 1 - 10.
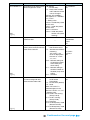
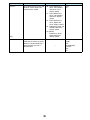
Requirement
PC Main
Unit
• PC-AT compatible machine with a CDROM capable drive
• USB port (in accord with Universal
Serial Bus Specification Rev1.1/2.0)
• Display resolution of 800x600 dots,
High Color (65,536 color) or higher
recommended
• For Bluetooth connection
- Dial-up Networking Profile compatible
device that complies with Bluetooth
Standard Version 1.2
OS*1
• Windows XP, Windows 2000
(Japanese version)
Required
Memory
• For windows XP, 128M bytes or more*2
• For windows 2000, 64M bytes or
more*2
Hard Disk
Space
• Available space of 5M bytes or more*2
*1: DoCoMo does not guarantee the operation under the
supported OS if it is changed through upgrade.
*2: Required memory or hard disk space may vary depending
on the PC system configuration.
DNS (Domain Name System)
The database system that translates a domain
name address such as "nttdocomo.co.jp" into a
numerical IP address for PCs.
OBEX (Object Exchange)
A protocol for file transfer defined by IrDA (Infrared
Data Association). Data such as Contacts,
Schedule events, or images can be exchanged with
devices that handle the OBEX protocol.
• Depending on the operating environment, data
communication may not be available. DoCoMo does
not respond to any inquiries about the use nor
guarantee proper operation under operating
environments other than those described in
"Operating Environment".
• The FOMA handset is not compatible with Remote
Wakeup.
• The FOMA handset does not support FAX
communication.
QoS (Quality of Service)
Indicates the network service quality. You can
specify conditions of data communication speed in
the FOMA handset configurations (actual
communication speed varies depending on the
communication conditions).
W-TCP
The TCP parameter is used to get the full utilization
of the TCP/IP transmission capability for packet
communications over the FOMA network. The TCP
parameter must be optimized to get the most out of
2
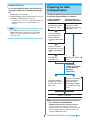
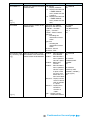
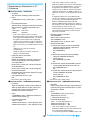
Required Devices
Preparing for Data
Communication
To use data communications, the following are
required in addition to the FOMA handset and a
PC:
The flow for preparing for packet communication
or 64K data communication is as follows:
• FOMA USB Cable (optional)*
• FOMA miniUSB Conversion Adapter M01 (accessory)*
Communication via
USB Connection
• CD-ROM for FOMA M702iG (accessory)
*: For a Bluetooth connection, the FOMA USB Cable and
FOMA mini USB Conversion Adapter M01 are not
required.
Install the
communication setup
files (drivers) →P4
• For a USB connection, purchase the exclusive
FOMA USB Cable. Commercially available USB
cables have the wrong shape connectors and
cannot be used.
Communication via
Bluetooth Connection
Connect the FOMA
handset and a PC using
a Bluetooth →P8
Checking the USB
mode setting of the
FOMA handset to
"Communication mode"
→P5
Connect the FOMA
handset and a PC using
a USB cable (optional)
→P5
Checking after
installation →P6
Checking the modem
→P8
The following
settings are common
for both USB and
Bluetooth
connections.
Install the FOMA PC
configuration software
and set up the access
point →P9
Set up the access point (for
packet communication)
and dial-up network
without using the FOMA
PC configuration software
→P19
Connect →P15, P24
■ Data Communication Software included on
the "CD-ROM for FOMA M702iG"
M702iG communication setup files (drivers)
These files must be installed on a PC so that
communication or file exchange can be performed
after the FOMA handset and PC are connected
using the FOMA USB Cable.
3
Continued on the next page
FOMA PC configuration software
This software is to be installed on a PC to quickly
configure settings of dial-up connections, etc. that
are required to perform data communication.
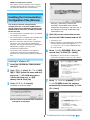
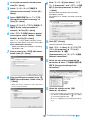
Installing the Communication
Configuration Files (Drivers)
Click [続行 (Continue)] to continue the
installation. The M702iG communication
configuration file operates in the same way as
the software has passed the Windows logo
authentication test.
You need to install the communication
configuration files so that the FOMA handset
can be used from the PC before connecting the
FOMA handset and the PC via USB connection
for the first time.
d
e
• The communication configuration file is not required
for a Bluetooth connection.
• The communication configuration files installing with
the FOMA handset not connected to a PC.
Click [OK] on the confirmation screen
Connect the FOMA handset and the PC
• Connecting →P5
• Be sure to install the communication configuration
files from a user account with the administrator
privileges. For settings and operations regarding PC
administrator privileges, contact your PC
manufacturer or Microsoft Inc.
• After the handset is connected properly, the taskbar
of the PC displays a popup message "新しいハード
ウェアが見つかりました (New hardware found)"
for a few seconds.
f
• Check that no other software is running before
installing the communication configuration files.
Terminate any running software before installing the
files.
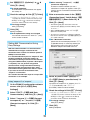
Select "いいえ、
今回は接続しません (No,
not this time)" y Click [次へ (Next)]
• Depending on your PC status or settings, this
screen may not appear. In this case, go to Step 7.
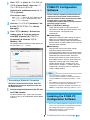
Installing to Windows XP
a
Insert the CD-ROM for FOMA M702iG
into a PC
b
Click "スタート (Start)" y "ファイル名を
指定して実行 (Select file name and run)"
then enter " "<CD-ROM drive letter>:
¥Drivers¥Setup.exe" in "名前
(Name)"field y Click [OK]
c
"ソフトウェアを自動的にインス
g Select
トールする(推奨) (Install the software
Click [インストール (Install)]
automatically (recommended))" y Click
Installation of the drivers begins.
[次へ (Next)]
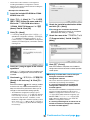
■ If the screen to recommend the installation
interruption is displayed
4
Continued on the next page
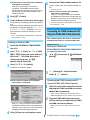
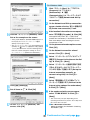
e
■ If the screen to recommend the installation
interruption is displayed
Click [続行 (Continue)] to continue the
installation. The M702iG communication
configuration file operates in the same way as
the software has passed the Windows logo
authentication test.
h
i
Connect the FOMA handset and the PC
4 types of drivers are automatically installed in a
row.
• Connecting →P5
■ If the screen to confirm the installation
continuation is displayed
Click [はい (Yes)] to continue the installation.
The M702iG communication configuration file
operates in the same way as the software has
verified the Microsoft digital signature.
Click [完了 (Finish)]
Install all drivers of the other three types
Install all drivers of three types performing Steps 6
to 9.
After the installation completes, the taskbar of the
PC displays a popup message "新しいハードウェ
アがインストールされ、使用準備ができました
(New hardware installed and ready)" for a few
seconds.
• Go to "Checking the Communication Configuration
Files (Drivers)". →P6
Connecting the FOMA Handset and PC
Using the FOMA USB Cable (Optional)
• Go to "Checking the Communication Configuration
Files (Drivers)". →P6
This section explains the steps to connect the
FOMA handset and a PC using the USB cable.
Installing to Windows 2000
USB Mode Setting
a
Insert the CD-ROM for FOMA M702iG
Setting the USB Mode
into a PC
b
Set the USB mode setting of the FOMA handset
to "Communication mode"
Click "スタート (Start)" y "ファイル名を
cy
a
指定して実行 (Select file name and run)"
(Connection) y
(USB Mode
Setting)
then enter " "<CD-ROM drive letter>:
¥Drivers¥Setup.exe" in "名前
(Name)"field y Click [OK]
c
Click [インストール (Install)]
Installation of the drivers begins.
b
■ If the screen to confirm the installation
continuation is displayed
h [Change] y "Communication
mode" y h [Select]
Connecting the FOMA Handset and PC
Using the FOMA USB Cable (Optional)
a
Open the cover of the external connector
and plug the FOMA miniUSB conversion
adapter M01 (Accessory)
• There is 2mm-gap between the handset and the
FOMA miniUSB conversion adapter. This is normal.
b
Plug the FOMA USB Cable connector,
with the label up, straight into the FOMA
miniUSB conversion adapter
Click [はい (Yes)] to continue the installation.
The M702iG communication configuration file
operates in the same way as the software has
verified the Microsoft digital signature.
d
• Slide in the connector until it securely clicks into
place.
Click [OK] on the confirmation screen
5
Continued on the next page
c
Plug the USB connector of the FOMA
USB Cable to a USB connector on the PC
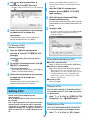
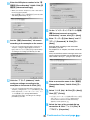
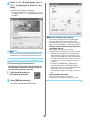
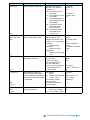
Checking the Communication
Configuration Files (Drivers)
Label side is faced up
Check that the M702iG communication
configuration file has been installed correctly.
<Example: For Windows XP>
Click "スタート (Start)" y "コントロール
a
パネル (Control Panel)" and click "パ
フォーマンスとメンテナンス
(Performance and Maintenance)" y
USB connector
"システム (System)"
■ For Windows 2000
Click "スタート (Start)" y "設定 (Settings)" y
"コントロールパネル (Control Panel)", and
click "システム (System)"
• Use the exclusive FOMA USB Cable to connect the
FOMA handset and PC. A commercially available
USB cable has a different connector shape and
cannot be connected to the FOMA miniUSB
conversion adapter M01.
• Do not use excessive force inserting the FOMA USB
Cable or FOMA miniUSB conversion adapter M01
connector. Connectors won't work unless they are
inserted at the appropriate direction and angle.
When connectors are inserted correctly, they can be
inserted smoothly without requiring force. If you
cannot insert a connector properly, do not use
excess force and check the shape and direction of
the connector.
b
Click the "ハードウェア (Hardware)" tab
y Click [デバイスマネージャ (Device
Manager)]
■ For Windows 2000
Click the [デバイスマネージャ (Device
Manager)] tab
c
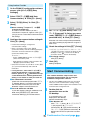
Click a device name to view the installed
driver name
Check that "ポート (Port) (COM/LPT)", "モデム
(Modem)" and "USB (Universal Serial Bus) コント
ローラ (Controller)" have drivers displayed.
■ Unplugging
a While pressing the release buttons of the external
connector of the FOMA USB Cable, pull the cable
in a horizontal position from the FOMA miniUSB
conversion adapter M01
• If you pull it forcibly, malfunction may result.
b Pull out the FOMA miniUSB conversion adapter
M01 in a horizontal position from the FOMA
handset
• If you pull it forcibly, malfunction may result.
Release
button
Release button
c Unplug the FOMA USB Cable from the PC
Windows XP
6
Continued on the next page
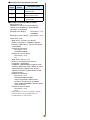
Device
Port (COM/LPT)
Driver
• FOMA M702iG
Command Port
• FOMA M702iG
OBEX Port
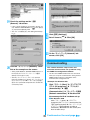
Uninstalling the Communication
Configuration Files (Drivers)
Modem
• FOMA M702iG
USB (Universal Serial Bus)
Controller
• FOMA M702iG
To uninstall the communication configuration
files (drivers), perform the following steps:
• Uninstall the files after disconnecting the FOMA
handset from the PC.
• Be sure to uninstall the communication configuration
files from a user account with the administrator
privileges. For settings and operations regarding PC
administrator privileges, contact your PC
manufacturer or Microsoft Inc.
• If the FOMA USB Cable (optional) was disconnected
or the installation was cancelled by pressing [キャン
セル (Cancel)] on the PC screen while the M702iG
communication configuration file was being installed,
the file was not installed successfully and the driver
names may not be verified on the "デバイスマネー
ジャ (Device Manager)" screen. In this case, uninstall
then reinstall the M702iG communication
configuration files.
• Verify that no other software is running before
uninstalling the communication configuration files.
Terminate any running software before uninstalling
the files.
<Example: For Windows XP>
a
Insert the CD-ROM for FOMA M702iG
into a PC
■ To view the FOMA handset COM port number
The modem name or COM port number of the
FOMA handset may be required if you set up
communication without using the FOMA PC
configuration software. This section describes how
to check the COM port number on the Device
Manager screen.
a Connect the FOMA handset and the PC
• Connecting →P5
b Perform Step 1 and 2 in "Checking the
Communication Configuration Files (Drivers)"
c Click "モデム (Modem)" y Select the "FOMA
M702iG" y From the menu bar, click [操作
(Operate)] y [プロパティ (Properties)] y Click
the "モデム (Modem)" tab
The FOMA handset COM port number appears on
the right side of "ポート (Port):".
b
Click "スタート (Start)" y "ファイル名を
指定して実行 (Select file name and run)"
then enter " "<CD-ROM drive letter>:
¥Drivers¥M702iGUn.exe" in "名前
(Name)"field y Click [OK]
c
Click [アンインストール (Uninstall)]
Un-installation of the driver begins.
d
e
Click [OK] on the confirmation screen
Click [はい (Yes)] to restart the PC
The PC reboots and un-installation completes.
Dial-up Network Gateway
Preparing for Communication
via Bluetooth
This section describes preparation for
communication by connecting the FOMA
handset and the PC via Bluetooth.
7
Checking the Registered Devices
Make the Device Registration of the
FOMA Handset and PC
Check the settings of the Bluetooth devices
registered to the FOMA handset and the PC to
make sure you are ready to perform data
communications via Bluetooth.
After the FOMA handset become search ready,
search for the FOMA handset from the PC,
register the device, and connect the FOMA
handset and the PC via Bluetooth.
• For the device name displayed on the FOMA handset
and the modem name displayed on the PC, refer to
the instruction manual of your PC or the device
connected the PC, such as the Bluetooth adapter.
• If you connect the FOMA handset and the PC after
registering the device, registering the device (Steps 1
to 4) are not necessary. For connecting the devices
after they are registered, refer to the instruction
manual that came with the PC or a device such as the
Bluetooth adapter that is connected to the PC.
a
(Connection) y
Checking the Settings of Devices
Registered to the FOMA Handset
(Bluetooth Link)
Verify the connection method between the
FOMA handset and the device. Change if
necessary.
y "Find Me"
• This screen does not open
when Bluetooth on the FOMA
handset is turned on. In this
case, go to Step 3.
b
cy
a
h [Yes]
• While the device become serch ready, if no
searching operations were performed from the PC
for about three minutes, the search ready state will
be cancelled automatically.
d
(Bluetooth
Bluetooth devices registered
to the FOMA handset are
displayed.
Bluetooth on the FOMA handset turns on and
becomes search ready.
blinks at the top of the
screen.
c
(Connection) y
Link) y "Device History"
b
Select a device ycy select "Access
Search and register the Bluetooth device
Settings" ycy check the settings in
on the PC
"Dialup Networking Gateway"
Select "FOMA M702iG" <checking the
specifications> from the found device and perform
steps to register it. The Device registration screen
opens on the FOMA handset when you start the
registering process.
For searching and registering devices, refer to the
instruction manual that came with the PC or the
device such as a Bluetooth adapter that is
connected to the PC.
Select from the following as
necessary:
Always Ask
The confirmation is displayed each time you connect.
• It is recommended that you turn off Bluetooth
devices around the PC other than the FOMA
handset before searching and registering devices.
Automatic
• Some instruction manuals may use "Find" for
"Search" and "Pairing" for "Register".
Never
Connection is always permitted.
The connection is denied and communication cannot be
performed.
h [Yes] y Enter the passkey
The Passkey authentication completion screen
opens on the FOMA handset after the Bluetooth
connection between the FOMA handset and the
PC is established.
Go to "Checking the Registered Devices". →P8
Just Once
The confirmation is displayed for the first connection. Later
attempts will be rejected.
Checking the Modem
Check the COM port number assigned to the
modem to set up data communication.
<Example: For Windows XP>
8
Continued on the next page
Click "スタート (Start)" y "コントロール
a
パネル (Control Panel)" then click "パ
FOMA PC Configuration
Software
フォーマンスとメンテナンス
(Performance and Maintenance)" y "シ
ステム (System)"
Various settings regarding communication are
required to perform packet communication or
64K data communication connecting the FOMA
handset and PC. Using the FOMA PC
configuration software allows you to perform the
following settings quickly:
■ For Windows 2000
Click "スタート (Start)" y "設定 (Settings)" y
"コントロールパネル (Control Panel)", and
click "システム (System)"
b
Click the "ハードウェア (Hardware)" tab
y Click [デバイスマネージャ (Device
■ かんたん設定 (Easy Settings)
Follow the instructions to "Set up the dial-up
connection for FOMA data communication" and
at the same time "Configure W-TCP"
automatically.
Manager)]
c
Click "モデム (Modem)" y Select the
modem name y From the menu bar,
■ W-TCP Settings
Optimize the communication settings on the PC
before using "FOMA packet communication".
Communication settings need to be optimized by
W-TCP settings in order to get the most out of the
communication capability.
click [操作 (Operate)] y [プロパティ
(Properties)] y Click the "モデム
(Modem)" tab
The FOMA handset COM port number appears on
the right side of "ポート (Port):".
■ APN Settings
Configure the access point (APN) settings
required for packet communication.
The regular phone number is not used to connect
to the FOMA packet communication access point,
unlike 64K data communication. Save APN
(Access Point Name) for each access point on
the FOMA handset in advance, then specify the
registration number (cid) in the access point
number field to connect. "mopera.ne.jp" ,the
access point of "mopera", is saved in cid1 and
"mopera.net", the access point of "moperaU" is
saved in cid3 by default.
• You can configure settings for packet
communication or 64K data communication without
using the FOMA PC configuration software. →P19,
P24
• If the FOMA PC configuration software version 3.0.1
or its older version (hereafter old FOMA PC
configuration software) is installed, uninstall the old
FOMA PC configuration software in advance. →P11
Terminating a Bluetooth Connection
After data communication finished, terminate
the Bluetooth connection between the PC and
the FOMA handset.
a
Perform steps to disconnect the PC and
the FOMA handset
For disconnection steps, refer to the instruction
manual of your PC or the Bluetooth device added
to the PC.
Installing the FOMA PC
Configuration Software
• Be sure to install the FOMA PC configuration software
from a user account with the administrator privileges.
For settings and operations regarding PC
administrator privileges, contact your PC
manufacturer or Microsoft Inc.
9
Continued on the next page
• Check that no other software is running before
installing the FOMA PC configuration software.
Terminate any running software before installing the
configuration software.
<Example: For Windows XP>
a
Insert the included CD-ROM for FOMA
M702iG into a PC
b
Click "スタート (Start)" y "ファイル名を
指定して実行 (Select file name and run)"
f
then enter " "<CD-ROM drive letter>:
¥FOMA_PCSET¥Setup.exe" in "名前
and click [次へ (Next)]
(Name)"field y Click [OK]
c
■ To change the installation destination
Click [参照 (Browse)] to specify an installation
destination then click [次へ (Next)].
Click [次へ (Next)]
• If a message indicating that "旧W-TCP設定ソフト
(Old W-TCP configuration software)", "旧APN設定
ソフト(Old APN configuration software)", or "旧
FOMA PC設定ソフト(Old FOMA PC configuration
software)" is installed appears, uninstall the software
referring to P9.
d
the name of the "プログラムフォル
g Check
ダ (Program folder)" field y Click [次へ
(Next)]
h
Click [はい (Yes)] to agree to the license
Clicking [いいえ (No)] cancels the installation and
the FOMA PC configuration software will not be
available.
e
Click [完了 (Finish)]
After the installation completes, the FOMA PC
configuration software launches and the operation
screen opens.
agreement
Checkmark
Check the installation destination folder
■ Warning or confirmation screens that open
during the installation of FOMA PC
configuration software
"タスクトレイに常駐する
(Reside in the task tray)" y Click [次へ
This section describes operations if a warning or
confirmation opens during the installation.
(Next)]
If a warning indicating that the FOMA PC
configuration software has already been
installed appears
After the installation,
(W-TCP settings) resides
in the PC task tray. It is recommended that you
keep it in the task tray because it allows you to
change or view the W-TCP settings quickly.
The old version of FOMA PC configuration software
has been installed. Uninstall the old version of
FOMA PC configuration software from the "プログ
ラム追加と削除 (Add or Remove Programs)" (for
Windows 2000, "アプリケーションの追加と削除
(Add or Remove Applications)", then install the
FOMA PC configuration software.
• The FOMA PC configuration software can be
installed even if "タスクトレイに常駐する (Reside
in the task tray)" is set to
. To place the icon in
the task tray after the initial installation, on the
FOMA PC configuration software operation screen
(P11), click "メニュー (Menu)" y "WTCP設定をタ
スクトレイに常駐させる (Place W-TCP settings in
the task tray)".
If a warning indicating that an old version of
W-TCP environment configuration software
has been installed appears
10
Continued on the next page
■ 64K data communication settings using "かん
たん設定 (Easy Settings)" →P14
Uninstall the old version of W-TCP environment
configuration software from the "プログラム追加と
削除 (Add or Remove Programs)" (for Windows
2000, "アプリケーションの追加と削除 (Add or
Remove Applications)", then install the FOMA PC
configuration software.
■ Optimizing and changing the transmission
capability of data communication using "WTCP Settings" →P16
■ APN settings for packet communication using
"APN Settings" →P17
If a warning indicating that an old version of
FOMA data communication configuration
software has been installed appears
<Example: For Windows XP>
Click [OK] to uninstall the FOMA data
communication configuration software
automatically. After the un-installation, the FOMA
PC configuration software installation resumes.
Click "スタート (Start)" y "すべてのプロ
a
グラム (All Programs)" y "FOMA PC設定
ソフト (FOMA PC configuration
If a confirmation indicating to cancel the
wizard appears when clicking [キャンセル
(Cancel)] or [いいえ (No)]
Software)" y "FOMA PC設定ソフト
(FOMA PC configuration Software)"
Click [完了 (Finish)] to finish the installation. If reinstalling, perform the installation steps from the
beginning.
The FOMA PC configuration software launches
and the operation screen opens.
■ Checking the FOMA PC Configuration
Software Version
On the FOMA PC configuration software operation
screen, click "メニュー (Menu)" y "バージョン情報
(Version)" to open the version information screen.
■ For Windows 2000
Click "スタート (Start)" y "プログラム
(Programs)" y "FOMA PC設定ソフト (FOMA
PC configuration Software)" y "FOMA PC設定
ソフト (FOMA PC configuration Software)"
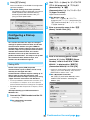
Configuring
Communication Settings
Specifying a COM Port
This section describes steps to set up packet
communication/64K data communication using
the FOMA PC configuration software.
When performing data communication via
Bluetooth connection, you need to specify the
COM port number of the PC under "通信設定
(Communication Settings)" of the FOMA PC
configuration software.
• Check that the FOMA handset and the PC are
connected properly before configuring the settings.
→P5
• This operation is usually not required for USB
connection. Perform this operation if you want to
specify the COM port.
a
Check the COM port assigned to the
FOMA handset
Launching the FOMA PC Configuration
Software
Checking the COM port →P7, P8
b
Launch the FOMA PC configuration software
installed on the PC. The following can be
configured from the operation screen when the
FOMA PC configuration software is launched:
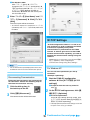
From the FOMA PC configuration
software operation screen, click
"メニュー (Menu)" y "通信設定
(Communication Settings)"
■ Packet communication settings using "かんた
ん設定 (Easy Settings)" →P12
11
Continued on the next page
c
d
Select "COMポート指定 (Specify COM
port)" y Click the "COM:" field to set the
Click [OK]
The APN settings will be downloaded from the
FOMA handset. Please wait.
COM port number assigned to the FOMA
■ For a Bluetooth Connection
The confirmation may be displayed depending
on the FOMA handset connection settings.
Press h [Accept] to connect.
handset
• A COM port number can be specified between 1
and 99.
e
Enter a connection name in the "接続名
(Connection Name)" field y Select [接続
方式 (Connection Method)] ("PPP接続
(PPP Connection)"/"IP接続 (IP
Connection)" y Select "発信者番号通知
を行う (Show Caller ID)" y Click [次へ
d
(Next)]
Click [OK]
• The following half-pitch characters cannot be
entered in the "接続名 (Connection Name)" field.
¥/:*?!<>│"
Setting completes.
• To connect to "mopera U", select "接続方式
(Connection Method)" to "IP接続 (IP Connection)".
When using in Japan, you can select any "接続方式
(Connection Method)".
To connect to "mopera", select "PPP接続 (PPP
Connection)".
Setting Packet Communication Using
Easy Settings
Packet communication is a communication
method whose charges are based on the amount
of data exchanged. It allows data communication
at a maximum speed of 384Kbps for receiving
and 64Kbps for sending. It is recommended that
you use "mopera U" that handles broadband
connection options or international roaming to
connect to the Internet using the FOMA handset
(separate subscription is required). You can
perform only packet communication using
international roaming. Note that packet
communication fees under international roaming
differ from those in Japan. If you want to connect
to the Internet now, "mopera" is convenient.
This section describes the steps to set up a USB
connection as an example.
• To connect to "mopera U" or "mopera", Caller ID
must be sent. Do not select "発信者番号通知を行わ
ない (Hide Caller ID)".
• If using overseas, select "NW サービスに従う
(Follow the NW Service)" and on the FOMA
handset, operate c y
(Network Services) y
"Caller ID Notification" y "Change Notification
Setting" to set whether to show your Caller ID.
■ For a Bluetooth Connection
Check that the name displayed under "モデム
名 (Modem Name)" is correct by referring to
the instruction manual for your PC or the
Bluetooth adapter connected to the PC.
Using "mopera U" or "mopera"
a
On the FOMA PC configuration software
screen, click [かんたん設定 (Easy
Settings)]
b
Select "パケット通信 (Packet
Communication)" and click [次へ (Next)]
c
Select 『
" mopera U』への接続 (Connect
to mopera U)" or 『
" mopera』への接続
(Connect to mopera)" y Click [次へ
(Next)]
■ If you select 『
" mopera U』への接続
(Connect to mopera U)", a screen to inquire
whether you are a subscriber to "mopera U"
appears. Click [はい (Yes)] if you are a
subscriber and continue with the settings.
12
Continued on the next page
f
• If using overseas, select "NW サービスに従う
(Follow the NW Service)" and on the FOMA
handset, operate c y
(Network Services) y
"Caller ID Notification" y "Change Notification
Setting" to set whether to show your Caller ID.
Select any users under "使用可能ユー
ザーの選択 (Select a permitted user)" and
click [次へ (Next)]
To connect to "mopera U" or "mopera", the "ユー
ザー名 (User Name)" and "パスワード
(Password)" fields can be left unfilled.
"最適化を行う (Optimize)" to
g Set
click [次へ (Next)]
■ For a Bluetooth Connection
Check that the name displayed under "モデム
名 (Modem Name)" is correct by referring to
the instruction manual for your PC or the
Bluetooth adapter connected to the PC.
y
■ To set the IP address and DNS
If your ISP requires setting IP addresses and
DNS, click [詳細情報の設定 (Advanced
Information Settings)] and set these items.
■ If already optimized
A conformation to optimize does not appear.
Go to Step 8.
h
Check the settings y Click [完了 (Finish)]
• If "デスクトップにダイヤルアップのショートカッ
トを作成する (Create a shortcut to dial-up on the
desktop)" is set to
, a shortcut to the dial-up
connection will be created on the desktop.
■ To change settings
Click [戻る (Back)].
i
Click [OK]
Setting completes.
■ If the optimization setting was changed
You need to restart the PC. Click "はい (Yes)"
on the screen to reboot.
f
Using Another Provider
a
Click [接続先(APN)
設定 (APN Settings)]
On the FOMA PC configuration software
screen, click [かんたん設定 (Easy
Settings)]
b
Select "パケット通信 (Packet
Communication)" and click [次へ (Next)]
c
Select "その他 (Other)" and click [次へ
(Next)]
d
[追加 (Add)] y Set up the APN y
g Click
Click [OK]
Click [OK]
The APN settings will be downloaded from the
FOMA handset. Please wait.
Set "番号 (cid)" to 2 or 4-10.
■ For a Bluetooth Connection
The confirmation may be displayed depending
on the FOMA handset connection settings.
Press h [Accept] to connect.
e
h
Click [OK]
The "接続先(APN)設定 (APN Setting)" screen
closes.
i Click [次へ (Next)]
"ユーザー名 (User Name)" and "パス
j Set
ワード (Password)" y Select any users
Enter a connection name in the "接続名
(Connection Name)" field
• The following half-pitch characters cannot be
entered in the "接続名 (Connection Name)" field.
¥/:*?!<>│"
under "使用可能ユーザーの選択 (Select a
permitted user)" y Click [次へ (Next)]
• Follow the instructions from your ISP to set the "接
続方式 (Connection Method)" and Caller ID
notification.
Enter the user name and password provided by
your ISP accurately paying attention to upper or
lower case.
13
Continued on the next page
"最適化を行う (Optimize)" to
k Set
Click [次へ (Next)]
y
■ When selecting 『mopera
"
U』への接続
(Connect to mopera U)"
A screen to confirm whether you are a
subscriber to "mopera U" appears. Click [はい
(Yes)] if you are a subscriber and continue with
the settings.
■ If already optimized
A conformation to optimize does not appear.
Go to Step 12.
l Check the settings y Click [完了 (Finish)] d
• If "デスクトップにダイヤルアップのショートカッ
トを作成する (Create a shortcut to dial-up on the
desktop)" is set to
, a shortcut to the dial-up
connection will be created on the desktop.
者番号通知を行う (Show Caller ID)" y
Click [次へ (Next)]
■ To change settings
Click [戻る(Back)].
• The following half-pitch characters cannot be
entered in the "接続名 (Connection Name)" field.
¥/:*?!<>│"
m Click [OK]
Setting completes.
• Select "FOMA M702iG" for the "モデムの選択
(Select the modem)" field.
■ If the optimization setting was changed
You need to restart the PC. Click "はい (Yes)"
on the screen to reboot.
• To connect to "mopera U" or "mopera", Caller ID
must be sent. Do not select "発信者番号通知を行わ
ない (Hide Caller ID)".
■ For a Bluetooth Connection
Check that the name displayed under "モデム
名 (Modem Name)" is correct by referring to
the instruction manual for your PC or the
Bluetooth adapter connected to the PC.
Setting 64K Communication Using
Easy Settings
64K data communication is a communication
method whose charges are based on the
connection time. It allows a maximum speed of
64Kbps to transfer data.
It is recommended that you use "mopera U" that
handles broadband connection options or
international roaming to connect to the Internet
using the FOMA handset (separate subscription
is required). You can perform only packet
communication using international roaming.
Note that packet communication fees under
international roaming differ from those in Japan.
If you want to connect to the Internet now,
"mopera" is convenient.
This section describes the steps to set up a USB
connection as an example.
e
Using "mopera U" or "mopera"
a
ザーの選択 (Select a permitted user)" y
To connect to "mopera U" or "mopera", the "ユー
ザー名 (User Name)" and "パスワード
(Password)" fields can be left unfilled.
On the FOMA PC configuration software
Settings)]
f
Select "64Kデータ通信 (64K Data
Check the settings y Click [完了 (Finish)]
• If "デスクトップにダイヤルアップのショートカッ
トを作成する (Create a shortcut to dial-up on the
desktop)" is set to
, a shortcut to the dial-up
connection will be created on the desktop.
Communication)" and click [次へ (Next)]
c
Select any users under "使用可能ユー
Click [次へ (Next)]
screen, click [かんたん設定 (Easy
b
Enter a connection name in the "接続名
(Connection Name)" field y Select "発信
Select 『
" mopera U』への接続 (Connect
■ To change settings
Click [戻る (Back)].
to mopera U)" or 『
" mopera』への接続
(Connect to mopera)" y Click [次へ
g Click [OK]
(Next)]
Setting completes.
14
Using Another Provider
a
On the FOMA PC configuration software
screen, click [かんたん設定 (Easy
Settings)]
b
c
Select "64Kデータ通信 (64K Data
Communication)" y Click [次へ (Next)]
Select "その他 (Other)" y Click [次へ
(Next)]
■ When selecting 『mopera
"
U』への接続
(Connect to mopera U)"
A screen to confirm whether you are a
subscriber to "mopera U" appears. Click [はい
(Yes)] if you are a subscriber and continue with
the settings.
d
e
Set "ユーザー名 (User Name)" and "パス
ワード (Password)" y Select any users
under "使用可能ユーザーの選択 (Select a
permitted user)" y Click [次へ (Next)]
Configure the communication settings y
Enter the user name and password provided by
your ISP accurately paying attention to upper or
lower case.
Click [次へ (Next)]
• Perform the following to configure the
communication settings:
f
• Enter a connection name in the "接続名
(Connection Name)" field. The following half-pitch
characters cannot be entered in the "接続名
(Connection Name)" field.
¥/:*?!<>│"
Check the settings y Click [完了 (Finish)]
• If "デスクトップにダイヤルアップのショートカッ
トを作成する (Create a shortcut to dial-up on the
desktop)" is set to
, a shortcut to the dial-up
connection will be created on the desktop.
■ To change settings
Click [戻る (Back)].
- Select "FOMA M702iG" for the "モデムの選択
(Select the modem)" field.
g Click [OK]
- Enter the phone number to dial your ISP in the
"電話番号 (Phone Number)" field.
Setting completes.
• Follow the instructions of your ISP to set the "接続
方式 (Connection Method)" and Caller ID
notification.
• If using overseas, select "NW サービスに従う
(Follow the NW Service)" and on the FOMA
handset, operate c y
(Network Services) y
"Caller ID Notification" y "Change Notification
Setting" to set whether to show your Caller ID.
Start Communicating
This section describes steps to start and
terminate communication set up using the
FOMA PC configuration software.
■ For a Bluetooth Connection
Check that the name displayed under "モデム
名 (Modem Name)" is correct by referring to
the instruction manual for your PC or the
Bluetooth adapter connected to the PC.
• Use the same FOMA handset that was connected
when you set the communication settings. Using
another FOMA handset requires the installation of the
communication configuration file.
a
■ To set IP addresses and DNS
If your ISP requires setting IP addresses and
DNS, click [詳細情報の設定 (Advanced
Information Settings)] and set these items.
Double click the
connection icon on the
PC desktop
If a connection icon is not
displayed on the desktop,
perform the following steps:
■ For Windows XP
Click "スタート (Start)" y "すべてのプログラ
ム (All programs)" y "アクセサリ
(Accessories)" y "通信 (Communication)" y
"ネットワーク接続 (Network connection)" y
Double-click the access point that has been
set up
15
Continued on the next page
■ For Windows 2000
Click "スタート (Start)" y "プログラム
(Programs)" y "アクセサリ (Accessories)" y
"通信 (Communication)" y "ネットワークとダ
イヤルアップ接続 (Network and dial-up
connection)" y Double-click the access point
that has been set up
b
Enter "ユーザー名 (User Name)" and "パ
スワード (Password)" y Click [ダイヤル
(Dial)]
The access point will be connected.
• To connect to "mopera U" or "mopera", the "ユーザー名
(User Name)" and "パスワード (Password)" fields can be
left unfilled.
W-TCP Settings
"W-TCP configuration software" is a tool to set
TCP parameters in order to optimize the TCP/IP
transmission capability when packet
communication is performed over the FOMA
network. In order to get most out of the FOMA
handset communication capability, you need to
optimize the communication settings using this
software.
• Optimization is not necessary if you selected "最適化
を行う (Optimize)" when configuring the
communication settings using "Easy Settings".
• The communication speed displayed on the PC may
be different from the actual communication speed.
For Windows XP
You can set/cancel optimization per dial-up
connection.
<Example: Optimizing>
Disconnecting Communication
a
Exiting the Internet browser may not terminate
the connection. Perform the following steps to
terminate the connection securely.
a
software y Click [W-TCP設定 (W-TCP
settings)]
■ To operate from the task tray of the PC
Click
.
Click the dial-up icon in
the task tray of the PC
b
Start the FOMA PC configuration
b
On the W-TCP settings screen, click [最
適化を行う (Optimize)]
Click [切断 (Disconnect)]
■ To cancel optimization
On the W-TCP settings (dial-up) screen, click
[システム設定 (System Settings)] y [最適化を
解除する (Cancel Optimizing)]
The communication will be terminated.
• If already optimized, the W-TCP settings screen will
not open. In this case, go to Step 3.
16
Continued on the next page
c
Set
to a dial-up connection to
• Check that the FOMA handset and the PC are
connected properly before configuring the settings.
→P5, P8
optimize y Click [実行 (Execute)]
• Set
to a dial-up connection to cancel optimizing.
a
Start the FOMA PC configuration
software y Click [接続先 (APN) 設定
(APN settings)]
b
Click [OK] on the Download FOMA
handset settings screen
The information on the APN that has been accessed
and registered by the connected FOMA handset will
be read.
d
c
Follow the instructions on the message
to reboot the PC to enable the
optimization
Configure APN
• To set the connection method, click [編集 (Edit)] y
[詳細設定 (Advanced Settings)] and select a
connection method.
The optimization of the system settings will
become enabled after the PC reboots.
For Windows 2000
<Example: Optimizing>
a
Start the FOMA PC configuration
software y Click [W-TCP設定 (W-TCP
settings)]
b
■ To operate from the task tray of the PC
Click .
Editing/Deleting/Adding an APN
On the W-TCP settings screen, click [最
■ To edit a registered APN
Select an APN from the list y Click [編集 (Edit)]
適化を行う (Optimize)]
■ To delete a registered APN
Select APN from the list y Click [削除 (Delete)]
■ To cancel optimization
On the W-TCP settings screen, click [最適化を
解除する (Cancel Optimization)]
c
• APN's registered for cid 1 and cid 3 cannot be
deleted (Even if you select number (cid) 1 or 3 and
click [削除 (Delete)], it will not be deleted, and
number (cid) 1 reverts to "mopera.ne.jp" and 3
reverts to "mopera.net").
Follow the instructions on the message
to reboot the PC to enable the
■ To add an APN
Click [追加 (Add)]
optimization
The optimization of the system settings will
become enabled after the PC reboots.
Saving to a File
You can make a backup of saved APN settings
on the FOMA handset or save APN settings that
are being edited.
Setting APN
Set the access point (APN) for packet
communication.
Up to 10 APN can be set, and a cid of 1 to 10 can
be assigned.
Use a cid to specify the access point for packet
communication. The default cid1 is registered
"mopera.ne.jp" for APN of "mopera" and cid3 is
registered "mopera.net" for APN of "mopera U",
when you set cid, 2 or a number between 4 and
10.
a
Click "ファイル (File)" y "名前を付けて保
存 (Save as)" or "上書き保存 (Save)"
Reading from a File
You can re-edit the APN settings saved on the
PC or write the settings to the FOMA handset.
a
17
Click "ファイル (File)" y "開く (Open)"
• If your ISP provided IP and DNS information, click [ (Set
detailed information)] on the Dial-up for packet
communication creation screen, entered any
necessary information, and click [OK].
Writing APN Information to the FOMA
Handset
You can write the APN settings that have been
written to the FOMA handset, to the FOMA
handset.
a
• APN information is saved on the FOMA handset. If
you connect a different FOMA handset, save the
APN information again.
• If you want to use the APN information saved on the
PC, register the same APN to the same cid on the
FOMA handset.
Click [FOMA端末へ設定を書き込む
(Write settings to FOMA handset)]
The confirmation to overwrite appears.
b
Click [はい (Yes)]
Reading APN Information from the
FOMA Handset
Uninstalling the FOMA PC
Configuration Software
You can read the registered APN from the FOMA
handset on demand.
• Be sure to uninstall the FOMA PC configuration
software from a user account with the administrator
privileges. For settings and operations regarding PC
administrator privileges, contact your PC
manufacturer or Microsoft Inc.
Click "ファイル (file)" y "FOMA端末から
a
設定を取得 (Download settings from
FOMA handset)"
The Download FOMA handset setting screen is
displayed.
b
<Example: For Windows XP>
a
Click [OK]
Terminate any running software
a Terminate "W-TCP設定ソフト (W-TCP
configuration software)"
Right click
in the task tray of the PC and click
"終了 (Exit)".
b Exit the FOMA PC Configuration Software
Click [終了 (Exit)] at the lower right corner of the
screen.
c Terminate any running software
Creating a Dial-up Connection
Write the added or edited APN to the FOMA
handset and set up a dial-up connection.
a
Select the added or edited APN y Click
b
[ダイヤルアップ作成 (Create a dial-up
connection)]
加と削除 (Add or Remove Programs)]
A confirmation to write to the FOMA handset
appears.
b
■ For Windows 2000
Click [スタート (Start)] y [設定 (Settings)] y
[コントロールパネル (Control Panel)] y [アプ
リケーションの追加と削除 (Add or Remove
Applications)]
Click [はい (Yes)]
After the APN information was written to the
FOMA handset, clicking [OK] opens the "パケット
通信用ダイヤルアップの作成 (Create a dial-up
connection for packet communication)" screen.
c
c
Select "NTT DoCoMo FOMA PC設定ソフ
ト (NTT DoCoMo FOMA PC configuration
Enter a connection name y Click [アカウ
Software)" y Click [削除 (Delete)]
ント・パスワードの設定 (Account/
■ For Windows 2000
Select "NTT DoCoMo FOMA PC設定ソフト
(NTT DoCoMo FOMA PC configuration
Software)" y Click "変更/削除 (Change /
Delete)"
password setting)]
• For "mopera U" or "mopera", the fields can be left
unfilled.
d
Click [スタート (Start)] y [コントロールパ
ネル (Control Panel)] y [プログラムの追
Set "ユーザー (User)" and "パスワード
(Password)" y Select any users under
d
Check the program name to remove and
click [はい (Yes)]
"使用可能ユーザーの選択 (Select a
permitted user)" y Click [OK]
A dial-up connection is created.
18
Continued on the next page
e
b
Click [完了(Finish)]
Click "スタート (Start)" y "すべてのプロ
The un-installation of the FOMA PC configuration
software completes.
グラム (All programs)" y "アクセサリ
■ If W-TCP settings have been optimized
The following screen is displayed. If you do not
intend to perform data communication by
connecting the FOMA handset, click [はい
(Yes)] to cancel optimization.
(Communication)" y "ハイパーターミナ
(Accessories)" y "通信
ル (Hyper Terminal)"
Hyper Terminal launches.
■ For Windows 2000
Click "スタート (Start)" y "プログラム
(Programs)" y "アクセサリ (Accessories)" y
"通信 (Communication)" y "ハイパーターミナ
ル (Hyper Terminal)"
c
Enter a connection name in the "名前
(Name)" field y Click [OK]
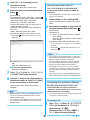
Configuring a Dial-up
Network
This section describes the steps to configure
settings for packet communication or 64K data
communication without using the FOMA PC
configuration software. Because there are many
common steps to set up packet communication
and 64K data communication, this section
describes how to set up the connection for
packet communication. The steps to set up 64K
data communication, different steps, and
cautions are described on Page 25.
d
Enter a non-existing phone number
(such as "0") in the "電話番号 (Phone
Number)" field y Check that "FOMA
M702iG " is displayed for "接続方法
Setting APN
(Connection Method)" y Click [OK]
Set the access point (APN) for packet
communication. Up to 10 APN's can be set up
and they are managed with cid's.
Communication software requires setting up an
APN in order to enter AT commands. This
section describes the steps necessary for using
"Hyper Terminal" that comes with Windows.
• If there are similar modem names displayed in the
"接続方法 (Connection Method)" field, check the
FOMA handset modem name. →P8
■ For a Bluetooth Connection
Set "接続方法 (Connection Method)" to the
modem name verified in "Checking the
Modem" (P8).
• To set up a 64K data communication connection, or to
use "mopera U" or "mopera" as an access point for
packet communication, these settings are not required.
• For APN's other than "mopoera U" or "mopera", contact
your ISP.
<Example: Setting up a USB connection in
Windows XP>
a
Connect the FOMA handset and the PC
• Connecting →P5
■ For a Bluetooth Connection
• Connecting →P7
19
Continued on the next page
e
Click [キャンセル (Cancel)] on the
Connection screen
Setting Display/Hide Caller ID
The Hyper Terminal entry screen opens.
f
You can set to display or hide Caller ID for
packet communication using the *DGPIR AT
command.
Enter the APN in the following format y
Press
• To set up 64K data communication connection, this
setting is not required.
[Entry Format]
AT+CGDCONT=<cid>,"<PDP type>","<APN>"
<cid>: Enter the registration number (cid) of the
access point (APN). Cid1 is registered
"mopera.ne.jp" and cid3 is registered
"mopera.net" already, when you set cid, 2 or a
number between 4 and 10.
<PDP type>: Enter the PDP type of the APN in
PPP or IP.
<APN>: Enter the access point (APN).
[OK] appears after the access point is set up.
• Enter ATE1
displayed.
a
Perform Step 1 to 5 in "Setting APN"
Hyper Terminal launches and the entry screen
opens.
b
Set whether to display or hide Caller ID
using the following format yPress
[Entry Format]
AT*DGPIR=<n>
<n> : Set to 1 to hide Caller ID ("184" is added
when dialing).
Set to 2 to display Caller ID ("186" is added
when dialing).
[OK] appears after Caller ID notification is set.
if the entered characters are not
• To use "mopera U" or "mopera", set to 2 (display
Caller ID).
• Enter ATE1
displayed.
• You can also enter the leading "184" or "186" to the
phone number of an APN for a dial-up connection to
display or hide the Caller ID. →P20, P22
If you set Caller ID notification using the *DGPIR
command and the dial-up connection setting, the
dial-up connection setting takes precedence.
For example, even if you set <n> of the *DGPIR
command to 2, entering the leading "184" (hide) to
the APN number in the dial-up network hides the
Caller ID.
• When using overseas, set AT*DGPIR=0 (Default).
Calls will be made according to the registered APN.
■ To reset the APN settings of the specified
cid
Enter AT+CGDCONT=<cid>.
■ To view the registered APN
Enter AT+CGDCONT? .
"ファイル (File)" y "ハイパーターミ
g Click
ナルの終了 (Exit Hyper Terminal)"
h
if the entered characters are not
Click [はい (Yes)] on the conformation to
disconnect screen y Click [いいえ (No)]
on the confirmation to save screen
Configuring Dial-up Network Settings
Hyper Terminal exits and the APN settings
complete.
Set up the dial-up network on the PC. This
section describes the steps to connect to
"mopera U" that has been set to <cid>=3 in the
USB connection as an example.
• For setting up connections to other than "mopoera U"
or "mopera", contact your ISP.
• APN information is saved on the FOMA handset. If
you connect a different FOMA handset, save the
APN information again.
• If you want to use the APN information saved on the
PC, register the same APN to the same cid on the
FOMA handset.
For Windows XP
a
Click "スタート (Start)" y "すべてのプロ
グラム (All Programs)" y "アクセサリ
(Accessories)" y "通信
(Communication)" y "新しい接続ウィ
ザード (New Connection Wizard)"
20
Continued on the next page
b
i
On the New connection wizard screen,
c
認入力 (Confirm password)" y Click [次
Select "インターネットに接続する
へ (Next)]
(Connect to the Internet)" y Click [次へ
Enter the fields according to the information
provided by your ISP.
For "mopera U" or "mopera", the fields can be left
unfilled.
(Next)]
d
Enter "ユーザー名 (User Name)", "パス
ワード (Password)", and "パスワードの確
click [次へ (Next)]
Select "接続を手動でセットアップする
(Set up the connection manually)" y
Click [次へ (Next)]
e
Select "ダイヤルアップモデムを使用して
接続する (Use a dial-up modem to
connect)" y Click [次へ (Next)]
f
If the "デバイスの選択 (Select a device)"
screen opens, select "Modem - FOMA
M702iG" y Click [次へ (Next)]
The "デバイスの選択 (Select a device)" screen
opens only when there is more than one modem.
j Click [完了 (Finish)]
"スタート (Start)" y "すべてのプロ
k Click
グラム (All programs)" y "アクセサリ
The new connection wizard appears.
■ For a Bluetooth Connection
Select the modem you checked in "Checking
the Modem" (P8).
a name in the "ISP名 (ISP Name)"
g Enter
field y Click [次へ (Next)]
(Accessories)" y "通信
(Communication)" y "ネットワーク接続
(Network connection)"
the icon of the created dial-up
l Select
connection y Click "この接続の設定を変
更する (Change the setting of this
connection)"
h
Enter the APN phone number in the "電
話番号 (Phone Number)" field y Click [次
へ (Next)]
• When you connect "mopera U", enter "*99***3#" to
the access point number.
the settings on the "全般
m Check
(General)" tab screen
• If two or more models are connected to the PC, set
only "Modem -FOMA M702iG" to
in the "接続方
法 (Connection Method)" field.
• Set "ダイヤル情報を使う (Use dialing information)"
to
.
21
Continued on the next page
For Windows 2000
Click "スタート (Start)" y "プログラム
a
(Programs)" y "アクセサリ
(Accessories)" y "通信
(Communication)" y "ネットワークとダ
イヤルアップ接続 (Network and dial-up
connection)"
b
On the Network and Dial-up connection
screen, double-click the "新しい接続の作
成 (Create new connection)" icon.
c
Click the "ネットワーク (Network)" tab y
n Set
as the example on the screen
If the location information screen opens,
enter "市外局番 (City code)" y Click [OK]
This appears only when "新しい接続の作成
(Create new connection)" is launched for the first
time. Go to Step 5 when launching this for the
second time or later.
• Select "PPP:Windows 95/98/NT4/2000,Internet" in
the "呼び出すダイヤルアップサーバーの種類
(Dial-up server type to call)".
d
• Set "インターネットプロトコル (Internet Protocol)
(TCP/IP)" to
in the "この接続は次の項目を使用
します (This connection uses the following items)"
field. You cannot change the settings of "Qosパ
ケットスケジューラ (QoS Packet Scheduler)".
On the phone and modem option screen,
Click [OK]
e
On the Network connection wizard
screen, Click [次へ (Next)]
f
Select "インターネットにダイヤルアップ
接続する (Connect to the Internet via dialup)" y Click [次へ (Next)]
"インターネット接続を手動で設定
g Select
するか、
またはローカルエリアネットワー
ク
(LAN)を使って接続します (Set up the
Internet connection manually, or
connect using LAN)" y Click [次へ
(Next)]
h
Select "電話回線とモデムを使ってイン
ターネットに接続します (Connect to the
Internet using a phone line and modem)"
o Click [設定 (Settings)]
p Set all items to y Click [OK]
y Click [次へ (Next)]
i
If the modem selection screen opens,
select "FOMA M702iG" y Click [次へ
(Next)]
• This screen may not open depending on the
operating environment of your PC. Go to Step 10 if
this screen does not open.
the "ネットワーク (Network)" tab
q On
screen, click [OK]
■ For a Bluetooth Connection
Select the modem you checked in "Checking
the Modem" (P8).
22
Continued on the next page
the APN phone number in the "電
j Enter
話番号 (Phone Number)" field y Click [詳
細設定 (Advanced settings)]
• When you connect "mopera U", enter "*99***3#" to
the access point number.
• Set "市外局番とダイヤル情報を使う (Use city code
and dialing information)" to
.
the "インターネットアカウントの接続
m On
情報 (Internet account connection
information)" screen, click [次へ (Next)]
"ユーザー名 (User Name)" and "パ
n Enter
スワード (Password)" y Click [次へ
k according to the example on the screen
Set the "接続 (Connection)" tab screen
(Next)]
Enter the fields according to the information
provided by your ISP.
For "mopera U" or "mopera", the fields can be left
unfilled.
If they are not filled, screens warning that the user
name and password fields are not filled open one
after another. Click [はい (Yes)] on each screen.
• If you are connecting to other than "mopera U" or
"mopera", configure "接続の種類 (Connection
type)" and "ログオンの手続き (Log on procedures)"
according to the settings provided by your ISP.
Click the "アドレス (Address)" tab y
l configure
settings according to the
Enter a connection name in the "接続名
o (Connection
Name)" field y Click [次へ
examples on the screen y Click [OK]
(Next)]
• If you are connecting to other than "mopera U" or
"mopera", configure "IPアドレス (IP address)" and
ISPによるDNS(ドメインネームサービス)アド
レスの自動割り当て (Assign DNS address
automatically by ISP)" according to the settings
provided by your ISP.
p Select "いいえ (No)" y Click [次へ (Next)]
q Click [完了 (Finish)]
• If "今すぐインターネットに接続するにはここを選
び完了をクリックしてください (Select this to
connect to the Internet now and click Finish)"
appears, set the option to
.
the icon of the created dial-up
r Select
connection y Click "ファイル (File)" y
"プロパティ (Properties)"
23
Continued on the next page
the settings on the "全般
s Check
(General)" tab screen
• If two or more models are connected to the PC, set
only "Modem -FOMA M702iG" to
in the "接続方
法 (Connection Method)" field.
• Set "ダイヤル情報を使う (Use dialing information)"
to
.
u Click [設定 (Settings)]
v Set all items to y Click [OK]
On the "ネットワーク (Network)" tab
w screen,
click [OK]
Communicating
Click the "ネットワーク (Network)" tab y
t Set
as the example on the screen
This section describes steps to start and
terminate communication set up without using
the FOMA PC configuration software.
• Select "PPP:Windows 95/98/NT4/2000,Internet" in
the "呼び出すダイヤルアップサーバーの種類
(Dial-up server type to call)".
• Use the same FOMA handset that was connected
when you set up the communication. Using another
FOMA handset requires re-installation of the
communication configuration file.
• Set only "インターネットプロトコル (Internet
protocol) (TCP/IP)" to
in the "チェックボックス
がオンになっているコンポーネントはこの接続で
使われます (Checked components are used for this
connection)" field.
<Example: For Windows XP>
a
Click "スタート (Start)" y "すべてのプロ
グラム (All programs)" y "アクセサリ
(Accessories)" y "通信
(Communication)" y "ネットワーク接続
(Network connection)" y Double-click
the access point that has been set up
■ For Windows 2000
Click "スタート (Start)" y "プログラム
(Programs)" y "アクセサリ (Accessories)" y
"通信 (Communication)" y "ネットワークとダ
イヤルアップ接続 (Network and dial-up
connection)" y Double-click the access point
that has been set up
24
Continued on the next page
b
Enter "ユーザー名 (User Name)" and "パ
スワード (Password)" y Click [ダイヤル
(Dial)]
The access point will be connected.
• To connect to "mopera U" or "mopera", the "ユーザー名
(User Name)" and "パスワード (Password)" fields can be
left unfilled.
■ 64K Data communication settings
This section describes precautions and different
steps from the packet communication settings
when 64K data communication connection is set up
without using the FOMA PC configuration software.
64K Data communication dial-up connection
and TCP/IP settings
The settings are the same as for packet
communication (P19), however, note the following:
• The APN is not required to set up for 64K data
communication. Enter the phone number of the
access point provided by your ISP for the dial-up
connection destination (enter "*8701" to connect
to "mopera U", and enter "*9601" to connect to
"mopera").
• Configure "発信者番号通知/非通知の設定
(Caller ID notification)" and settings using AT
commands of your own choice (Caller ID must be
displayed to connect to "mopera U").
• For detailed information on settings, contact your
ISP.
• The communication speed displayed on the PC may
be different from the actual communication speed.
Disconnecting Communication
Exiting the Internet browser may not terminate
the connection. Perform the following steps to
terminate the connection securely.
a
Click the dial-up icon in
Connecting/Disconnecting
the task tray of the PC
b
Use the same operations as for packet
communication. Perform the operations on P25.
Click [切断 (Disconnect)]
The communication will be terminated.
25
■ Saving the Settings
AT Commands
Settings by AT commands are initialized when the
FOMA handset power is turned off and back on
except: APN settings set by the AT+CGDCONT
command, QoS settings by AT+CGEQMIN/
AT+CGEQREQ command, setting to show or hide
the packet communication number by AT* DGPIR
command, and settings to restrict notifying the
Caller ID by AT+CLIR command.
AT commands are used to check the FOMA
handset function settings or status using a PC.
Usually the communication software issues AT
commands so that you do not have to be
concerned about them. Use AT commands if you
want to control the FOMA handset in your own
way.
Format of AT Commands
AT commands should be input on the Terminal
Mode screen of the communication software.
Use only single-byte alphanumeric characters.
<Example of Entry Format>
ATD*99***1#
Hard Return
Parameter: Content of the
command.
Command Name
• An AT command must be entered on a single line
including parameters (numbers and symbols)
following the command. On the Terminal Mode screen
of the communication software, one line is from the
first character to the previous character of
.
• In the Terminal mode, a PC functions as if it were a
communication terminal. Characters entered from
the keyboard are sent to a line connected to a
communication port.
Switching between On-line Data Mode
and On-line Command Mode
The following two methods are available to
switch between on-line data mode and on-line
command mode on the FOMA handset:
• Enter the "+++" command or the code set to the "S2"
register.
• When "AT&D1" is set, set the ER signal of the serial
(COM) port to OFF.
• The packet communication is available to switch to
on-line command mode.
Enter "ATO " to switch from the on-line
command mode to the on-line data mode.
26
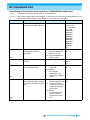
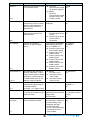
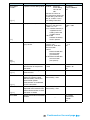
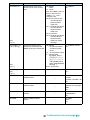
AT Command List
The following AT commands can be used on the "FOMA M702iG" modem port.
• [&F]
: A command to initialize settings used as AT&F command.
• [?] [=?] : The current settings appear when adding “?” at the end of the command, and the effective range
of the current settings appear when adding “=?” at the end of the command.
AT Command
AT¥S
Overview
Parameters/Description
Display the setting contents of
set commands and S registers.
ー
AT¥V<n>
n=0 (default)
: The extended result
code is not used.
n=1 : The extended result
code is used.
Select whether to use the
extended result code at
connection.
[&F]
AT%V
AT&C<n>
[&F]
AT&D<n>
[&F]
Display the version of the FOMA
handset.
Set the operating conditions of
the circuit CD for DTE.
ー
Command Examples
AT¥S
E1 Q0 V1 X4
&C1 &D2 &S0
&E1 ¥V0
S000=000
S002=043
S003=013
S004=010
S005=008
S006=005
S007=060
S008=003
S010=001
OK
AT¥V0
OK
AT%V
XXXX
OK
n=0 : Always keeps line CD AT&C1
signal ON.
OK
n=1 (default)
: CD changes
depending on the
other party’s modem
status.
Set the operation performed
n=0 : Ignore ER signals
AT&D1
when circuit ER signal received
(Always regard as ON) OK
from DTE is switched from ON to n=1 : On-line command
OFF.
mode starts when ER
signals change from
ON to OFF.
n=2 (default)
: Off-line mode starts
when ER signals
change from ON to
OFF.
27
Continued on the next page
AT Command
AT&E<n>
[&F]
Overview
Parameters/Description
Command Examples
Select the specification to show n=0 : Show the
AT&E0
the connection speed.
communication speed OK
for wireless segment.
n=1 (default)
: Show the
communication speed
between the PC and
FOMA handset.
AT&F<n>
Reset the FOMA handset AT
command set values to factory
defaults. If executed during a
communication, the line is
disconnected.
Only n=0 can be set
(skippable)
AT&S<n>
Set the control of DR (data set
ready) signals output by the
FOMA handset.
AT&S0
n=0 (default)
: Set DR signals always OK
to ON.
n=1 : Set DR signals to ON
when the line is
connected.
Displays the number of
antennas of signal strength.
(0 to 5)
If you execute "AT*DANTE", AT*DANTE
*DANTE: 5
it will be displayed in the
OK
form of "*DANTE: <n>".
n=0 : Out of the service area
of the FOMA handset
n=1 : 1 antenna bar of the
FOMA handset
n=2 : 2 antenna bars of the
FOMA handset
n=3 : 3 antenna bars of the
FOMA handset
n=4 : 4 antenna bars of the
FOMA handset
n=5 : 5 antenna bars of the
FOMA handset
[&F]
AT*DANTE
[=?]
AT*DGPIR=<n>
[?] [=?]
AT*DRPW
[=?]
The setting of this command
n=0 (default)
becomes valid when a call for
: Use APN as it is.
packet communication is dialed. n=1 : Add “184” to APN
184/186 can also be added to
(always hide).
the APN number even for the
n=2 : Add “186” to APN
setting of a dial-up network.
(always show).
AT*DGPIR=0
OK
Show an indicator of the
received radio signal power at
the FOMA handset.
(0 : lowest - 75 : highest value)
AT*DRPW
*DRPW : 0
OK
ー
+++
Switch the FOMA handset from This command is not
the on-line data mode to on-line applicable to the connection
command mode.
using packet
communication.
AT+CACM=
<passwd>
Reset the cumulative billing
value recorded on the UIM.
[?]
AT&F
OK
(Online Data Mode)
+++ (Unable to see the
display)
OK
If the password meets with AT+CACM=“0123”
this command, it resets the OK
cumulative billing value
recorded on the UIM.
Passwd=PIN2 code
* This is a string parameter,
and should be put in “”
when entered.
28
Continued on the next page
AT Command
AT+CAOC=
<mode>
Overview
Parameters/Description
Command Examples
AT+CAOC
+CAOC:“00001E”
OK
[?] [=?]
Inquire the current billing value. mode=0 : Check the
current billing
value for the
calls.
Execute AT+CAOC or
AT+CAOC=0 to display the
current billing value in the
form of +CAOC:“<ccm>”.
ccm: billing information
AT+CBC
Display the battery level.
Executing "AT+CBC"
displays in the format of
"+CBC:<m>,<n>".
m=0 : Indicate electricity is
supplied from the
battery pack to the
FOMA handset.
n=0 to 100
: Indicate the battery
level in percent.
AT+CBC
+CBC : 0,60
OK
Set the bearer (communication
type) service.
AT+CBST=<speed>,
<name>,<ce>
speed=116 : 64K data
communication
name=1
: Default of 64K data
communication
(synchronous)
ce=0: Default of 64K data
communication
(transparent)
AT+CBST=11
6, 1, 0
OK
AT+CEER
Display the reason for
disconnection of the previous
connection.
“Reasons for Disconnection” AT+CEER
→P38
+CEER : 36
OK
AT+CGDCONT
[?] [=?]
Set APN when sending Packet
communication.
→P37
→P37
AT+CGEQMIN
Save the judgment criteria
whether to permit the QoS
(Service Quality) sent by the
network when packet
communication is established
via PPP connection.
AT+CGEQMIN=
[Parameters] →P37
→P37
Set the QoS (Service Quality)
requested to the network when
packet communication via PPP
connection is dialed.
AT+CGEQREQ=
[Parameters] →P37
→P37
[=?]
AT+CBST
[&F]
[?] [=?]
[?] [=?]
AT+CGEQREQ
[?] [=?]
AT+CGMR
Display the version of the FOMA
handset.
29
ー
AT+CGMR
1234512345
123456
OK
Continued on the next page
AT Command
AT+CGREG=<n>
[&F]
[?] [=?]
AT+CGSN
AT+CLIP=<n>
[&F]
[?] [=?]
AT+CLIR=<n>
[?] [=?]
Overview
Parameters/Description
Command Examples
AT+CGREG=1
Set whether to be notified of the n=0 (default)
OK
network registration status.
: Do not notify.
n=1 : Notify when outside
and inside the service
area is changed.
Execute “AT+CGREG?”
then appears as “+CGREG :
<n>,<start>”.
n : Setting value.
start=0 : Outside the packet
service area.
start=1 : Inside the packet
service area.
start=4 : Unknown.
start=5 : Inside the packet
service area (while
roaming).
Display the serial number of the
FOMA handset.
ー
Set whether to display the
n=0 (default)
: Not send the result.
caller's phone number when the
caller sends Caller ID.
n=1 : Send the result. When
executing
“AT+CLIP?”, the
result is displayed in
the form of “+CLIP :
<n>,<m>”.
m=0 : Network setting not
to send the number
to the other party
when calling
m=1 : Network setting to
send the number to
the other party when
calling
m=2 : Unknown
Set whether to send the Caller
ID when making 64K data
communication/video calls.
AT+CGSN
1234567890
12345
OK
AT+CLIP=0
OK
AT+CLIP?
CLIP=0,1
OK
AT+CLIR=0
n=0 : In accord with the
OK
CLIR service
subscription.
n=1 : Do not send. (default)
n=2 : Send.
When “AT+CLIR?” is
executed appear in the
format of “+CLIR : <n>,<m>”.
n: Setting value.
m=0: CLIR is not running.
(Always send).
m=1: CLIR is running.
(Always hide).
m=2: Unknown.
m=3: CLIR temporary mode
(Default for hide).
m=4: CLIR temporary mode
(Default for show).
30
Continued on the next page
AT Command
AT+CMEE=<n>
[&F]
[?] [=?]
AT+CNUM
Overview
Parameters/Description
Command Examples
Set the error report format of the n=0 (default)
AT+CMEE=0
FOMA handset.
: Display “ERROR”.
OK
n=1 : Display in the format of
“+CMEE ERROR :
xxxx” (where xxxx are
numbers).
n=2 : Display in the format of
“+CMEE ERROR :
xxxx” (where xxxx are
text).
Display the own number of the
FOMA handset.
Executing “AT+CNUM”
displays in the format of
“+CNUM :, <number>,
<type>,, <service>”
number : Phone number
type=129
: Excluding the
international access
code+
type=145
: Including the
international access
code+
service=4 : Sound
service=5 : FAX
AT+COPS=[<mod Select and set carrier’s name/
mode=0 : Plmn Number is
e>[,<format>[,<ope Plmn Number. This command is
auto selected.
r>]]]
used to unlock the locked UIM. mode=1 : Plmn Number is
set as specified
value for <oper>.
mode=3 : Setting only
<format>.
mode=4 : Plmn Number is
set as specified
value for <oper>.
If <oper> which
you set is not a
correct one, it is
set to auto select.
format=0 : Display carrier’s
name in 16 halfpitch characters
in <oper>.
format=2 : Display Plmn
Number in
numerics in
<oper>.
oper : Display carrier’s
name/Plmn Number
[?] [=?]
31
AT+CNUM
+CNUM;,
“+8190XXXXXXXX”,
145,, 4
OK
AT+COPS=0
OK
AT+COPS?
+COPS:0,0,“NTT
DoCoMo”
OK
AT+COPS=?
+COPS:(2,“NTT
DoCoMo”,,“44F001”),,
(0,1,3,4),(0,2)
OK
Continued on the next page
AT Command
AT+CPAS
Overview
Command to enter the PIN1
code or PUK code for UIM.
Enter the SIM PIN for "pin"
and the PUK for "puk".
Execute “AT+CPIN?” then
“+CPIN : <n>” is displayed.
n=READY
: Authenticated.
n=SIM PIN
: Waiting for input.
n=SIM PUK
: Waiting for PUK code
entry.
(+CPIN : SIM PIN
status)
AT+CPIN=“1234”
OK
(+CPIN : SIM PUK
status)
AT+CPIN=“12345678”,
“1234”
OK
Overwrite the currency table
registered in the UIM.
AT+CPUC=<Currency>,<pp
u>[,<passwd>]
Currency: Currency
ppu: Packet piece unit
Passwd: PIN2 code
* This is a string parameter,
and should be put in ""
when entered.
AT+CPUC="YEN","0.2",
"0000"
OK
[?]
AT+CPUC
[=?]
AT+CR=<n>
Command Examples
AT+CPAS
+CPAS : 0
OK
[=?]
AT+CPIN=“pin”/
AT+CPIN=“puk”,
“pin”
Parameters/Description
Executing “AT+CPAS”
displays in the format of
“+CPAS : <n>”.
n=0 : Available to set AT
commands.
n=1 : Unavailable to set AT
commands.
n=2 : Unknown (Response
to AT commands is not
guaranteed).
n=3 : Available to set AT
commands even
during incoming.
n=4 : Available to set AT
commands even
during a call.
Display FOMA handset state.
AT+CPAS=?
+CPAS : (0-4)
OK
AT+CPUC?
+CPUC : "YEN","0.2"
OK
[&F]
[?] [=?]
Set whether to display the
n=0 (default)
bearer (communication type)
: Hide.
before “CONNECT” is displayed n=1 : Display in the format of
when 64K data communication
“+CR : <serv>”.
is connected.
serv=GPRS : Packet
communication.
serv=SYNC : 64K data
communication.
AT+CRC=<n>
[&F]
[?] [=?]
Set to use extend result code for n=0 (default)
AT+CRC=0
incoming connection.
: Not to use +CRING.
OK
n=1 : Use +CRING: <type>.
32
AT+CR=1
OK
ATD*99***1#
+CR : GPRS
CONNECT
Continued on the next page
AT Command
AT+CREG=<n>
Overview
Parameters/Description
[&F]
[?] [=?]
AT+CUSD=[<n>[,
<str>[,<dcs>]]]
[&F]
[?] [=?]
AT+CUSD=0,“xxxxxx”
Change the settings of the
n=0 (default)
OK
network, concerned with the
: Answer OK without
additional services and the like.
answering interim
result.
n=1 : Answer interim result.
str : Service code
For details, refer to
“ご利用ガイドブック
(ネットワークサービ
ス編)(Mobile Phone
User's Guide【Network
services】)”.
dcs=0 : Fixed value
AT+FCLASS=<n>
[&F]
[?] [=?]
Perform mode setting.
AT+GCAP
Display the capability list of the
FOMA terminal.
AT+GMI
AT+GMM
AT+GMR
Command Examples
AT+CREG=1
n=0 (default)
OK
: Hide
n=1 : Show
Enter “AT+CREG?” then it is
shown in the format of
“+CERG : <n>, <stat>”
n: Setting value.
stat=0 :Out of the service
area of 64K data.
communication/
video calls
stat=1 :Inside of the service
area of 64K data.
communication/
video calls
stat=4 :Unknown.
stat=5 :Inside of the service
area of 64K data
communication/
video calls (while
roaming).
Set whether to show Out of
service area or in the service
area.
n=0 (default) : data
AT+FCLASS=0
OK
ー
AT+GCAP
+GCAP:
+CGSM, +FCLASS, +W
OK
ー
AT+GMI
Motorola CE, Copyright
2006
OK
Display the name of the FOMA
handset.
ー
AT+GMM
FOMA M702iG
OK
Display FOMA handset’s
version.
ー
AT+GMR
XXXX
OK
Display the manufacturer of the
FOMA handset.
33
Continued on the next page
AT Command
AT+IFC=<n>,
<m>
Overview
Parameters/Description
Command Examples
Set the local flow control method n : DCE by DTE control
between the PC and the FOMA n=0 : No flow control.
handset.
n=1 : XON/XOFF control.
n=2 (default)
: RS/CS (RTS/CTS)
flow control.
m : DTE by DCE control.
m=0: No flow control.
m=1: XON/XOFF control.
m=2 (default)
: RS/CS (RTS/CTS)
flow control.
AT+IFC=2,2
OK
AT+WS46
[&F]
[?]
Display the network settings of
the FOMA handset.
AT+WS46?
25
OK
ATA
The FOMA handset processes
the incoming according to the
receiving mode.
[&F]
[?] [=?]
12 : GSM
22 : 3G (WCDMA)
25 : Auto switch (default)
ー
RING
ATA
CONNECT
A/
Retry a command just before
performing.
does not have to be
entered.
A/
OK
ATD
Start packet communication or
64K data communication.
Packet communication
: ATD*99***
<cid>#<cid> 1 to 10:
+CGDCONT
64K data communication
: ATD <phone number>
Packet communication :
ATD*99***1#
CONNECT
64K data
communication : ATD
XXXXXXXXXX
CONNECT
ATE <n>
Set whether to echo back the
text sent from a PC.
n=0 : Not to echo back.
n=1 (default)
: Echo back.
ATE1
OK
ATH <n>
Disconnect 64K data
communication.
n=0 : Disconnect line (can
be skipped).
(In communication)
+++
ATH
OK
ATI <n>
Display the confirmation
code.
n=0 : Display “NTT
ATI0
DoCoMo”.
NTT DoCoMo
n=1 : Display the name of
OK
the FOMA handset
(same as +GMN).
n=2 : Display the FOMA
handset version
(same as +GMR).
n=3 : Display “OK”.
n=4 : Display the details of
communication
functions of the FOMA
handset.
ATO
Switch from On-line command
mode to Off-line command
mode during communication.
[&F]
ATQ <n>
ー
Set whether to display the result n=0 (default)
code on a PC.
: Show result codes.
n=1 : Hide result codes.
[&F]
34
ATO
CONNECT
ATQ0
OK
ATQ1
(OK is not displayed)
Continued on the next page
AT Command
ATS0=<n>
Overview
Parameters/Description
Command Examples
ATS0=0
OK
[&F]
[?]
Set number of rings until FOMA n=0 (default)
handset receives connection
: No auto receive is
automatically.
performed.
n=1 to 255
: Number of rings.
ATS2=<n>
Set the escape character.
ATS2=43
OK
Only n=43 (default) can be
specified.
ATS2=043
OK
ATS2?
043
OK
[&F]
[?]
ATS3=<n>
[&F]
[?]
Set the return character (CR) to Only n=13 (default) can be
recognize the end of AT
specified.
command text string.
ATS3=13
OK
ATS4=<n>
Set the line feed character. It is
positioned next to the return
character (CR) if displaying the
result code in alphanumeric
characters.
ATS4=10
OK
[&F]
[?]
ATS5=<n>
[&F]
[?]
ATS6=<n>
[&F]
[?]
ATS7=<n>
[&F]
[?]
ATS8=<n>
[&F]
[?]
ATS10=<n>
[&F]
[?]
ATV<n>
[&F]
Only n=10 (default) can be
specified.
Set the back space character
Only n=8 (default) can be
(BS) to delete the last character specified.
in the input buffer while AT
commands are entered.
ATS5=8
OK
Set the pause time (in seconds) n=2 to 10 (Default n=5)
until dialing. When this
command is used, the register is
set but does not operate.
ATS6=5
OK
Disconnect the line if the
n=1 to 120 (Default n=60)
connection is unavailable within
: Regard the
the set time (in seconds) when
specifications
dialing.
between 121 and 255
as 120.
ATS7=60
OK
ATS7?
060
OK
Set the pause time (in seconds) n=0 : Does not pause
until comma dialing. When this n=1 to 255 (Default n=3)
command is used, the register is
: Pause time (in
set, but the pause time remains
seconds) until the
3 seconds.
comma is dialed.
ATS8=3
OK
Set the delay time (1/10
n=1 to 255 (Default n=1)
seconds) of auto disconnect.
When this command is used, the
register is set, but does not
operate.
ATS10=1
OK
Set the display method of the
result code.
n=0 : Display in numeric
characters.
n=1 (default)
: Display in text.
35
ATV1
OK
Continued on the next page
AT Command
ATX<n>
[&F]
ATZ
Overview
Parameters/Description
Command Examples
ATX1
Set to detect the busy tone and n=0 : Not to detect busy
OK
dial tone, and to display the
tones, not to detect
communication speed.
dial tones, not to
display speed.
n=1 : Not to detect busy
tones, not to detect
dial tones, display
speed.
n=2 : Not to detect busy
tones, detect dial
tones, display speed.
n=3 : Detect busy tones, not
to detect dial tones,
display speed.
n=4 (default)
: Detect busy tones,
detect dial tones,
display speed.
Reset the FOMA handset AT
command set values to factory
defaults. If performed during a
communication, the line is
disconnected.
36
ー
(On-line command
mode)
ATZ
NO CARRIER
(Off-line)
ATZ
OK
*: <cid> is the number used to control the
destination (APN) for the Packet communication
to be registered in FOMA handset. 1 to 10 can
be registered. The default cid1 is registered
"mopera.ne.jp" for APN of "mopera" and cid3 is
registered "mopera.net" for APN of "mopera U",
when you set cid, 2 or a number between 4 and
10.
In <Maximum bitrate UL> and <Maximum bit
rate DL>, the minimum connection speed [Kbps]
is set for both upload and download traffic
between FOMA handset download traffic
between FOMA handset and the base station. If
the parameter is set to None (default), all speeds
are permissible. If values are set, any
communication at a speed under the set value is
not permitted, and the Packet communication
will not be connected.
Supplementary Explanation of AT
Commands
■ Command name : +CGDCONT
• Overview
Set APN when sending packet connection.
• Form
+CGDCONT=[<cid>[,“<PDP type>” [ ,“<APN>”]
]]
• Parameter descriptions
Set APN when sending Packet communication.
See examples in command operation lists
<cid>*
: 1 to 10
<PDP type>* : PPP or IP
<APN>*
: Optional
• Operation without parameter
AT+CGEQMIN= :
Set all <cid> as default value
AT+CGEQMIN=<cid> :
Set specified <cid> as default value
*: <cid> is the number used to control the
destination (APN) for the Packet communication
to be registered in FOMA handset. 1 to 10 can
be registered. The default cid1 is registered
"mopera.ne.jp" for APN of "mopera" and cid3 is
registered "mopera.net" for APN of "mopera U",
when you set cid, 2 or a number between 4 and
10.
<PDP type> is a protocol for packet
communication.
<APN> is optional connection name that
indicates each destination.
• Command examples
(1) Command used to permit all speed both
upload and download both upload and
download (when<cid>=2)
AT+CGEQMIN=2
OK
(2) Command used to permit only 64Kbps
upload and 384Kbps download
(when<cid>=2)
AT+CGEQMIN=2,,64,384
OK
(3) Command used to permit 64Kbps upload
and all speed download (when<cid>=3)
AT+CGEQMIN=3,,64
OK
(4) Command used to permit all speed upload
and only 384Kbps download
(when<cid>=3)
AT+CGEQMIN=3,,,384
OK
• Operation without parameter
AT+CGDCONT= :
Delete all cid settings. However, settings for
cid1 and cid3 will be reset to their defaults.
AT+CGDCONT=? :
Display list of values that can be configured
AT+CGDCONT=? :
Display list of values that can be configured
• Command examples
Registered APN named abc (When PDP type
is “PPP” and cid=3)
AT+CGDCONT=3,“PPP”,“abc”
OK
* Not reset by [&F] and [Z], either.
* Not reset by [&F] and [Z], either.
■ Command name : +CGEQMIN=[Parameter]
■ Command name : +CGEQREQ=[Parameter]
• Overview
Save the judgment criteria values whether to
allow the QoS (Service Quality) sent by the
network when packet communication is
established via PPP connection.
• Overview
Set the QoS (Service Quality) requested to the
network when packet communication via PPP
connection is dialed.
• Form
+CGEQMIN=[<cid>[,,<Maximum bitrate UL>[,
<Maximum bitrate DL>] ] ]
• Form
+CGEQREQ=[<cid>[,<traffic class>,
<Maximum bit rate UL>
[ ,<Maximum bitrate DL>] ] ]
• Parameter description
<cid>* : 1 to 10
<Maximum bitrate UL>* : None (default) or 64
<Maximum bitrate DL>* : Non (default) or 384
• Parameter Description
<cid>* : 1 to 10 <traffic class> : 2
<Maximum bitrate UL>* : 64
<Maximum bitrate DL>* : 384
*: <cid> is the number used to control the
destination (APN) for the Packet communication
to be registered in FOMA handset.
1 to 10 can be registered to FOMA handset. The
37
Continued on the next page
default cid1 is registered "mopera.ne.jp" for APN
of "mopera" and cid3 is registered "mopera.net"
for APN of "mopera U", when you set cid, 2 or a
number between 4 and 10.
In <Maximum bitrate UL> and <Maximum bitrate
DL>, the minimum connection speed [in Kbps] is
set for both upload and download traffic between
FOMA handset and the base station. If the
parameter is set to None (default), all speeds
are permissible. If values are set, any
connection at a speed over the set value is not
permitted, and the Packet communication will
not be connected.
Result Codes
■ List of Result Codes
Numeric
display
0
1
• Operation without parameter
AT+CGEQREQ=<cid> :
Set all <cid> as default.
AT+CGEQREQ=<cid> :
Set specified <cid> as default.
30
Disconnected by the network.
33
No subscription for packet communication.
36
Disconnected properly.
Specified number does not exist.
16
Disconnected properly.
17
Cannot communicate as the other party is
busy.
18
19
ERROR
Unable to accept
command.
Numeric
display
NO DIAL TONE Unable to detect dial
tone.
BUSY
Detect busy tone.
(Applied only when
dialing by 64K data
communication.)
NO ANSWER
Completed connection
timeout.
DELAYED
Within restricted redialing
time.
Text display
Connection speed
122
CONNECT 64000
64000bps
125
CONNECT 384000
384000bps
When &E1
Reason
1
Incoming call.
Line disconnected.
■ Extended Result Codes
When &E0
Show the connection speed between the FOMA
terminal and the base.
■ 64K data communication
Value
Connected to the other
party.
RING
101
Reason
APN does not exist, or is not valid.
CONNECT
NO CARRIER
8
■ Packet communication
27
Operation performed
properly.
7
List of Reasons of Disconnection
Value
OK
3
6
* Not reset by [&F] and [Z], either.
Description
2
4
• Command examples
Command used to require 64Kbps upload and
384Kbps download (when<cid>=3)
AT+CGEQREQ=3,2,64,384
OK
Text display
Numeric
display
Although sent, there was no response within
the specified time.
Cannot communicate as the other party is
being called.
Text display
Connection speed
5
CONNECT 1200
1200bps
10
CONNECT 2400
2400bps
11
CONNECT 4800
4800bps
13
CONNECT 7200
7200bps
12
CONNECT 9600
9600bps
15
CONNECT 14400
14400bps
16
CONNECT 19200
19200bps
17
CONNECT 38400
38400bps
21
The other party rejected the communication.
63
The network service and the option are not
valid.
65
Unsupported processing speed was specified.
18
CONNECT 57600
57600bps
88
Called to or received a call from a terminal with
different terminal attributes.
19
CONNECT 115200
115200bps
20
CONNECT 230400
230400bps
21
CONNECT 460800
460800bps
38
Continued on the next page
■ Communication Protocol Result Codes
Numeric
display
1
3
5
Text
display
Connection speed
PPPoverUD
Connection with 64K data
communication
AV64K
Connection with video call
(64K) communication
PACKET
Connection with packet
communication
■ Examples of Displayed Result Codes
When ATX0 is set
Regardless of the AT¥V command (P27)
settings, only CONNECT is displayed after
connection is established.
Example of text display
: ATD*99***1#
CONNECT
Example of numeric display : ATD*99***1#
1
When ATX1 is set
• When ATX1, AT¥V0 is set (default)
Display in the form of CONNECT <Speed
between FOMA and PC> after the connection
is established.
Example of text display
: ATD*99***1#
CONNECT 460800
Example of numeric display
: ATD*99***1#
121
• When ATX1, AT¥V1 is set
Display in the following form after the
connection is established.
CONNECT <Speed between FOMA and PC>
PACKET <Destination APN>/<Maximum uplink
speed (between FOMA terminal→Base)> /
<Maximum downlink speed (between FOMA
handset←Base)>
Example of text display
: ATD*99***1#
CONNECT 46080 PACKET
mopera.ne.jp/64/384 (Which means
connect to “mopera.ne.jp” by 64Kbps
uplink speed and 384Kbps downlink speed
at the maximum.)
Example of numeric display
: ATD*99***1#
1215
* If ATX1 and AT¥V1 are set concurrently, a dial-up
connection may not be executed properly. It is
recommended to use only AT¥V0.
39