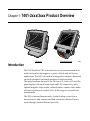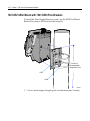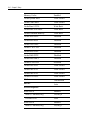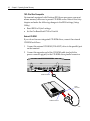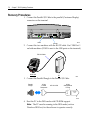
1
 NCR EasyPoint 7401 Release 2.5 Hardware Userʹs Guide NCR
1979
B005‐0000‐1254 Issue H The product described in this book is a licensed product of NCR Corporation. NCR is a registered trademark of NCR Corporation. NCR RealPOS, NCR RealPrice, NCR RealScan, NCR EasyPoint and NCR FastLane are either registered trademarks or trademarks of NCR Corporation in the United States and/or other countries. MicroTouch is a registered trademark of MicroTouch. NCR and EasyPoint are registered trademarks of NCR Corporation. Novell and Netware are registered trademarks of Novell, Inc. Pentium is a registered trademark of Intel Corporation. Power Mon II is a registered trademark of Systems Enhancement Corporation. Sound Blaster is a registered trademark of Creative Technology, Ltd. SoundFusion is a registered trademark of Cirrus Logic, Inc. Microsoft, Windows, and Windows NT are registered trademarks of Microsoft Corporation. Symantic and Ghost are registered trademarks of Symantec Corporation in the United States and other countries. It is the policy of NCR Corporation (NCR) to improve products as new technology, components, software, and firmware become available. NCR, therefore, reserves the right to change specifications without prior notice. All features, functions, and operations described herein may not be marketed by NCR in all parts of the world. In some instances, photographs are of equipment prototypes. Therefore, before using this document, consult with your NCR representative or NCR office for information that is applicable and current. To maintain the quality of our publications, we need your comments on the accuracy, clarity, organization, and value of this book. Address correspondence to: Manager, Information Products NCR Corporation 2651 Satellite Blvd. Duluth, GA 30096 Copyright © 2003 By NCR Corporation Dayton, Ohio U.S.A. All Rights Reserved i
Preface
Audience
This book is written for hardware installer/service personnel, system integrators, and field engineers. Notice: This document is NCR proprietary information and is not to be disclosed or reproduced without consent. Safety Warnings
Servicing
This product does not contain user serviceable parts. Servicing should only be performed by a qualified service technician. Fuse Replacement
Caution: For continued protection against risk of fire, replace only with the same type and ratings of fuse. Attention: Pour prévenir et vous protéger contre un risque de feu, remplacer la fusible avec une autre fusible de même type, seulement. Power Supply Cord Used as Disconnect Means
Caution: The power supply cord is used as the main disconnect device. Ensure that the socket outlet is located/installed near the equipment and is easily accessible. Attention: Le cordon dʹalimentation est utilisé comme interrupteur général. La prise de courant doit être située ou installée å proximité du matériel et être facile dʹaccés. Lithium Battery Warning
Caution: Danger of explosion if battery is incorrectly replaced. Replace only with the same or equivalent type as recommended by the manufacturer. Discard used batteries according to the manufacturerʹs instructions. ii
Attention: Il y a danger dʹexplosion sʹil y a remplacement incorrect de la batterie. Remplacer uniquement avec une batterie du même type ou dʹun type recommandé par le constructeur. Mettre au rébut les batteries usagées conformément aux instructions du fabricant. Battery Disposal (Switzerland)
Refer to Annex 4.10 of SR814.013 for battery disposal. IT Power System
This product is suitable for connection to an IT power system with a phase‐to‐phase voltage not exceeding 240 V. Peripheral Usage
This terminal should only be used with peripheral devices that are certified by the appropriate safety agency for the country of installation (UL, CSA, TUV, VDE) or those which are recommended by NCR Corporation. DO NOT connect or disconnect a printer, keyboard, or any other terminal‐powered peripheral while the terminal is powered on. Doing so may result in peripheral or system damage. System Weight Considerations
Warning: The NCR 7401‐1xxx and 7401‐2xxx terminals must be mounted securely to prevent a hazard. They must be installed in accordance with local building codes. The post or wall on which the unit is mounted should be able to withstand four times the weight of the unit, which is approximately 20 lbs. (9 kg). The NCR 7401‐4xxx is a desk‐top unit that has an assembled weight of approximately 90 lbs. (40.8 kg). Environmental Consciousness
NCR is demonstrating its concern for the environment by designing an intelligent power management system into this terminal that operates efficiently whether the system is in a stand‐alone or network environment. iii
Grounding Instructions
In the event of a malfunction or breakdown, grounding provides a path of least resistance for electric current to reduce the risk of electric shock. This product is equipped with an electric cord having an equipment‐grounding conductor and a grounding plug. The plug must be plugged into a matching outlet that is properly installed and grounded in accordance with all local codes and ordinances. Do not modify the plug provided – if it will not fit the outlet, have the proper outlet installed by a qualified electrician. Improper connection of the equipment‐grounding conductor can result in a risk of electric shock. The conductor with insulation having an outer surface that is green with or without yellow stripes is the equipment‐grounding conductor. If repair or replacement of the electric cord or plug is necessary, do not connect the equipment‐grounding conductor to a live terminal. Check with a qualified electrician or service personnel if the grounding instructions are not completely understood, or if in doubt as to whether the product is properly grounded. Use only 3‐wire extension cords that have 3‐prong grounding plugs and 3‐pole receptacles that accept the product’s plug. Repair or replace damaged or worn cords immediately. iv
References
•
NCR EasyPoint 7401 Hardware Service Guide (B005‐0000‐1341) •
NCR EasyPoint 7401 Site Preparation Guide (B005‐0000‐1255) •
NCR EasyPoint 7401 Interface Guide (B005‐0000‐01405) •
NCR EasyPoint 7401 ATX 38 Printer User’s Manual (B005‐0000‐1454) •
NCR EasyPoint 7401/7454 Retail Terminal Parts Identification Manual (B005‐0000‐1072) •
NCR FitClient Software Userʹs Guide (B005‐0000‐1235) •
NCR EasyPoint 7401 Migration Guide (B005‐0000‐1500) •
NCR Retail Platform Software Terminal Utilities Guide (B005‐0000‐1503) v
Table of Contents
Chapter 1: 7401‐2xxx/3xxx Product Overview
Introduction ........................................................................................... 1‐1
Serial Number/Model Number Label ................................................ 1‐2
Fixed‐Angle Mount Label ............................................................. 1‐2
Tilt‐Mount Label............................................................................. 1‐3
Model Numbers.............................................................................. 1‐4
Hardware Modules............................................................................... 1‐5
Base Unit .......................................................................................... 1‐5
Hardware Options.......................................................................... 1‐6
Terminal Components not Supported .................................... 1‐8
System Configuration Diagram .......................................................... 1‐9
Kit Configuration Diagram ............................................................... 1‐10
Hardware Module Descriptions ....................................................... 1‐11
Processor Board ............................................................................ 1‐11
Processor/Chip Set ................................................................... 1‐11
Video Subsystem...................................................................... 1‐12
Ethernet 10/100Base‐T LAN Communications .................... 1‐13
Wireless LAN Communications ............................................ 1‐15
Universal Serial Bus ................................................................. 1‐16
Serial Ports ................................................................................ 1‐16
Hardware Monitor................................................................... 1‐17
PCI Expansion Header ............................................................ 1‐17
IDE Header ............................................................................... 1‐17
Audio ......................................................................................... 1‐18
Magnetic Stripe Reader ........................................................... 1‐18
vi
Touch Screen Controller.......................................................... 1‐18
Processor Board Connectors................................................... 1‐19
NCR Retail Specific Hardware............................................... 1‐20
Board BIOS................................................................................ 1‐25
Operator Display .......................................................................... 1‐29
LCD Adapter Board................................................................. 1‐29
LCD Backlight Inverter Module............................................. 1‐29
Touch Screen............................................................................. 1‐30
Features ................................................................................................ 1‐31
Magnetic Stripe Reader ............................................................... 1‐31
Printer Options ............................................................................. 1‐32
7401‐K590 Self‐Service Printer................................................ 1‐32
7158 Printer ............................................................................... 1‐33
7167 Printer ............................................................................... 1‐33
7194 Printer ............................................................................... 1‐34
7197 Printer ............................................................................... 1‐34
Other Integrated Devices and Indicators .................................. 1‐35
Hard Disk Drive ....................................................................... 1‐35
Reset Switch .............................................................................. 1‐35
Internal Speaker ....................................................................... 1‐36
POS Connector Board.............................................................. 1‐36
Motion Sensor........................................................................... 1‐36
Power/Status LED .................................................................... 1‐37
Power OK LED ......................................................................... 1‐37
LAN Status LEDs ..................................................................... 1‐38
Power Supply ........................................................................... 1‐38
Uninterruptible Power System (Optional) ........................... 1‐39
Integrated Scanner Module (Optional) ................................. 1‐39
Integrated Speaker Module (Optional) ................................. 1‐39
vii
Compact Flash (Optional)....................................................... 1‐39
USB RS‐232 Port Server ........................................................... 1‐40
Integrated CD‐ROM Drive (Tilt Mount Model) .................. 1‐41
Additional Connectors (Pentium III Board) ............................. 1‐42
Compatibility....................................................................................... 1‐43
LAN Communications................................................................. 1‐43
Application Programmability..................................................... 1‐43
Operating System Information................................................... 1‐43
Migration.............................................................................................. 1‐44
Retail Applications ....................................................................... 1‐44
Retail Peripherals.......................................................................... 1‐44
Retail Systems ............................................................................... 1‐45
Platform ..................................................................................... 1‐45
Networks ................................................................................... 1‐45
Platform Load ........................................................................... 1‐45
Chapter 2: 7401‐4xxx Product Overview
Introduction ........................................................................................... 2‐1
Serial Number/Model Number Label ................................................ 2‐2
7401‐4xxx Model Numbers ........................................................... 2‐2
Hardware Modules............................................................................... 2‐3
Base Unit .......................................................................................... 2‐3
Hardware Options.......................................................................... 2‐4
Terminal Components not Supported .................................... 2‐5
System Configuration Diagram .......................................................... 2‐6
Hardware Module Descriptions ......................................................... 2‐7
Processor Board .............................................................................. 2‐7
Processor/Chip Set ..................................................................... 2‐7
Video Subsystem........................................................................ 2‐8
viii
Ethernet 10/100Base‐T LAN Communications ...................... 2‐8
Wireless LAN Communications ............................................ 2‐10
Universal Serial Bus ................................................................. 2‐11
Serial Ports ................................................................................ 2‐11
Hardware Monitor................................................................... 2‐12
PCI Expansion Header ............................................................ 2‐12
IDE Header ............................................................................... 2‐12
Audio ......................................................................................... 2‐13
Magnetic Stripe Reader ........................................................... 2‐13
Touch Screen Controller.......................................................... 2‐13
Processor Board Connectors................................................... 2‐14
NCR Retail Specific Hardware............................................... 2‐15
Board BIOS................................................................................ 2‐18
Operator Display .......................................................................... 2‐22
LCD Adapter Board................................................................. 2‐22
LCD Backlight Inverter Module............................................. 2‐23
Touch Screen............................................................................. 2‐23
Features ................................................................................................ 2‐24
Secure Cabinet with Integrated Speakers ................................. 2‐24
Ruggedized Keyboard with Trackball ...................................... 2‐25
Pin Pad ........................................................................................... 2‐25
Motorized Card Reader ............................................................... 2‐26
Magnetic Stripe Reader ............................................................... 2‐26
Full Page Printer ........................................................................... 2‐27
Other Integrated Devices and Indicators .................................. 2‐28
Hard Disk Drive ....................................................................... 2‐28
Integrated CD‐ROM ................................................................ 2‐28
Reset Switch .............................................................................. 2‐28
Compact Flash .......................................................................... 2‐29
ix
Internal Speaker ....................................................................... 2‐29
POS Connector Board.............................................................. 2‐29
USB Camera .............................................................................. 2‐29
Motion Sensor........................................................................... 2‐30
Power/Status LED .................................................................... 2‐30
Power OK LED ......................................................................... 2‐31
LAN Status LEDs ..................................................................... 2‐31
Power Supply ........................................................................... 2‐31
Motorized Card Reader Power Supply................................. 2‐32
Full Page Printer Power Supply............................................. 2‐32
Integrated Speakers ................................................................. 2‐32
EasyPoint 45 Pedestal .............................................................. 2‐33
Chapter 3: 7401‐2xxx/3xxx Hardware Installation
Introduction ........................................................................................... 3‐1
Installation Summary..................................................................... 3‐1
Installation Restrictions........................................................................ 3‐2
Connecting the Cables.......................................................................... 3‐3
Fixed‐Angle Mount (F504) ............................................................ 3‐3
Fixed‐Angle Mount (F503) ............................................................ 3‐5
Cable Routing ............................................................................. 3‐7
Cable Connector Identification ................................................ 3‐9
Tilt Mount...................................................................................... 3‐10
Cable Routing ........................................................................... 3‐11
Cable Connector Identification .............................................. 3‐12
Installing Peripherals.......................................................................... 3‐13
Installing a Transaction Printer .................................................. 3‐13
RS‐232 Installation.................................................................... 3‐13
USB Installation ........................................................................ 3‐14
x
7401‐K590 Self‐Service Printer................................................ 3‐15
Installing a Cash Drawer............................................................. 3‐16
Installing a Second Cash Drawer........................................... 3‐17
Installing PC Cards ...................................................................... 3‐18
Mounting a Fixed‐Angle Mount Terminal...................................... 3‐21
7401‐K522 Pedestal Mount.......................................................... 3‐22
7401‐K521 Wall Mount ................................................................ 3‐24
7401‐K521 Wall Mount with 7401‐K530 Pole Brackets............ 3‐26
Installing a K501 Tilt Mount Terminal............................................. 3‐33
7401‐K533 Wall Mount ................................................................ 3‐34
Wall Mounting a 7401‐K502 Core Module ...................................... 3‐35
7401‐9212 LCD No‐Cabinet (12.1‐inch)............................................ 3‐37
Installation Guidelines................................................................. 3‐38
Mounting Specification Illustrations ......................................... 3‐39
7401‐9512 LCD No‐Cabinet (15‐inch)............................................... 3‐40
Installation Guidelines................................................................. 3‐40
Mounting Specification Illustrations ......................................... 3‐41
4055 Uninterruptible Power System (UPS) ..................................... 3‐43
Installing the UPS ......................................................................... 3‐44
Installing the Power Mon II® Software .................................... 3‐44
Configuring the Power Mon II® Software ............................... 3‐45
Finalizing the Installation .................................................................. 3‐46
Completing the OS Installation (Win2000)........................... 3‐46
Completing the OS Installation (WinXPe)............................ 3‐46
Completing the OS Installation (WinNT) ............................. 3‐47
Completing the OS Installation (Win98) ‐ (Discontinued) . 3‐48
Setting Auto‐Logon (WinNT Terminal) .......................................... 3‐49
Installing a Serial Mouse.................................................................... 3‐54
Calibrating the Touch Screen ............................................................ 3‐55
xi
Calibration Using MicroTouch (Windows) .............................. 3‐56
Calibration Using Microcal (DOS) ............................................. 3‐58
Calibration From the BIOS .......................................................... 3‐59
Summary ................................................................................... 3‐60
Out‐of‐Box Failures ...................................................................... 3‐60
Chapter 4: 7401‐4xxx Hardware Installation
Introduction ........................................................................................... 4‐1
Installation Summary..................................................................... 4‐1
U.K. Keyboard Configuration ...................................................... 4‐1
Windows 2000 ............................................................................ 4‐1
Windows XPe ............................................................................. 4‐2
Windows NT............................................................................... 4‐3
Installation Restrictions........................................................................ 4‐4
Connecting the Cables.......................................................................... 4‐5
Cable Routing ............................................................................. 4‐5
Cable Connector Identification ................................................ 4‐5
Installing Peripherals............................................................................ 4‐6
Installing the Angled Magnetic Stripe Reader (MSR) ............... 4‐7
Installing Country Keyboards ...................................................... 4‐8
Using the Full Page Printer................................................................ 4‐13
Loading the Paper ........................................................................ 4‐13
Removing Paper from the Printer Feed Rolls........................... 4‐14
Removing Power from the Printer............................................. 4‐14
Using the Printer Test and Display Panel ................................. 4‐15
Display LED Indicators ........................................................... 4‐15
Panel Switches .......................................................................... 4‐16
Full Page Printer Diagnostics and Setup................................... 4‐17
Installing a 7401‐4xxx on a Table Top Mount ................................. 4‐18
xii
Mounting Procedures .................................................................. 4‐18
Accessing the Mounting Screws ............................................ 4‐20
Installing a 7401‐4xxx on the EasyPoint 45 Pedestal...................... 4‐21
4055 Uninterruptible Power System (UPS) ..................................... 4‐22
Installing the UPS ......................................................................... 4‐22
Installing the Power Mon II® Software .................................... 4‐23
Configuring the Power Mon II® Software ............................... 4‐23
Finalizing the Installation .................................................................. 4‐24
Completing the OS Installation (Win2000)........................... 4‐24
Completing the OS Installation (WinXPe)............................ 4‐24
Completing the OS Installation (WinNT) ............................. 4‐25
Completing the OS Installation (Win98) ‐ (Discontinued) . 4‐26
Calibrating the Touch Screen ............................................................ 4‐27
Calibration Using MicroTouch (Windows) .............................. 4‐27
Calibration Using Microcal (DOS) ............................................. 4‐29
Calibration from the BIOS........................................................... 4‐30
Summary ................................................................................... 4‐31
Out‐of‐Box Failures ...................................................................... 4‐31
Chapter 5: Setup
Introduction ........................................................................................... 5‐1
Entering Setup without a Keyboard ............................................ 5‐1
Entering Setup Using a Keyboard................................................ 5‐2
How to Select Menu Options........................................................ 5‐3
Setting the Date and Time ............................................................. 5‐3
Setting Passwords........................................................................... 5‐4
Configuring a Hard Drive............................................................. 5‐5
Setting Memory Cache................................................................... 5‐5
Setting Memory Shadow ............................................................... 5‐6
xiii
Setting Boot Options ...................................................................... 5‐6
Allocating Interrupts...................................................................... 5‐7
Restoring Factory Settings............................................................. 5‐7
BIOS Default CMOS Values (7401‐22xx/35xx/45xx BIOS Version 2.2.1.x)................................................................................ 5‐8
Main Values ................................................................................ 5‐8
Advanced Values ....................................................................... 5‐9
Security Values ......................................................................... 5‐14
Power Values ............................................................................ 5‐14
Boot Values ............................................................................... 5‐14
Exit Values ................................................................................ 5‐15
Interrupts (7401‐22xx/35xx/45xx BIOS Version 2.2.1.x) .......... 5‐16
Memory Map (7401‐22xx/35xx/45xx BIOS Version 2.2.1.x) .... 5‐17
BIOS Default CMOS Values (7401‐26xx/46xx BIOS Version 2.3.x.x) ............................................................................................ 5‐18
Main Values .............................................................................. 5‐18
Advanced Values ..................................................................... 5‐19
Security Values ......................................................................... 5‐24
Power Values ............................................................................ 5‐24
Boot Values ............................................................................... 5‐25
Exit Values ................................................................................ 5‐25
Interrupts (7401‐26xx/46xx BIOS Version 2.3.x.x).................... 5‐26
Memory Map (7401‐26xx/46xx BIOS Version 2.3.x.x) ............. 5‐27
BIOS Default CMOS Values (7401‐21xx/31xx BIOS Version 1.5.0.4 ‐ Discontinued) ................................................................. 5‐28
Main Values .............................................................................. 5‐28
Advanced Values ..................................................................... 5‐30
I/O Device Configuration........................................................ 5‐30
PCI Configuration .................................................................... 5‐30
xiv
Interrupts (7401‐21xx/31xx BIOS Version 1.5.0.4 ‐ Discontinued)................................................................................ 5‐31
Memory Map (7401‐21xx/31xx BIOS Version 1.5.0.4 ‐ Discontinued)................................................................................ 5‐32
Chapter 6: Operating System Recovery
Introduction ........................................................................................... 6‐1
Prerequisites .................................................................................... 6‐1
Updating Procedures ..................................................................... 6‐3
Completing the OS Installation (Win2000)............................. 6‐5
Completing the OS Installation (WinXPe).............................. 6‐5
Completing the OS Installation (WinNT) ............................... 6‐6
Completing the OS Installation (Win98) – (Discontinued) ............................................................................ 6‐6
Gold Disk Contents............................................................................... 6‐8
Microsoft Operating System License Agreements..................... 6‐8
Operating System Restrictions ..................................................... 6‐9
Standby and Hibernate Mode Restriction .............................. 6‐9
NCR 7401‐22xx/25xx/32xx/35xx Win2000 Operating System Recovery Software (Version 02.03.00.01) ........................ 6‐9
NCR 7401‐26xx/46xx Win2000 Operating System Recovery Software (Version 02.05.00.02) .................................................... 6‐11
NCR 7401‐45xx Win2000 Operating System Recovery Software (Version 02.04.00.02) .................................................... 6‐14
NCR 7401‐22xx/25xx/32xx/35xx WinXPe Operating System Recovery Software (Version 02.05.00.01).................................... 6‐16
NCR 7401‐26xx/46xx WinXPe Operating System Recovery Software (Version 02.05.00.01) ..................................................... 6‐18
NCR 7401‐/22xx/25xx/26xx/32xx/35xx NT Operating System Recovery Software (Version 02.05.00.02) ...................... 6‐20
xv
NCR 7401‐21xx/31xx NT Operating System Recovery Software (Version 01.04.01.00) ..................................................... 6‐22
NCR 7401‐4xxx NT Operating System Recovery Software (Version 02.05.00.02)...................................................................... 6‐24
NCR 7401‐22xx/25xx/32xx/35xx Win98 Operating System Recovery Software (Version 02.03.00.01).................................... 6‐26
NCR 7401‐21xx/31xx Win98 Operating System Recovery Software (Version 01.01.00.00) ..................................................... 6‐28
OS Recovery from a Larger Disk Image .......................................... 6‐29
Chapter 7: BIOS Updating Procedures
Introduction ........................................................................................... 7‐1
Prerequisites .................................................................................... 7‐1
Updating Procedures ..................................................................... 7‐2
BIOS Crisis Recovery............................................................................ 7‐5
Recovery Procedures...................................................................... 7‐6
Cable/Connector Pin‐Out Information .............................................. 7‐8
Chapter 8: NCR 7401 7890/7892 Scanner Differences
Introduction ........................................................................................... 8‐1
Starting the 7401 Scanner Motor and Laser ................................ 8‐2
Programming the 7401 Scanner Using Programming Tags ..... 8‐4
Programming the 7401 Scanner Through the RS‐232 Interface ........................................................................................... 8‐5
7401 Scanner Default Settings....................................................... 8‐6
Appendix A: Cables
7401 Cables .....................................................................................A‐1
xvi
Appendix B: Feature Kits
7401 Kits.......................................................................................... B‐1
xvii
Revision Record
Issue
Date
Remarks
A Aug 00 First issue (separated 7401 and 7454 sections out of B005‐0000‐1069) B Feb 01 Updated to Release 2.2 Removed hardware service information from this document which was previously called the 7401 Web Kiosk Hardware Installation and Service Guide (B005‐
0000‐1254) and renamed it the 7401 Web Kiosk Hardware Userʹs Guide (B005‐0000‐1254). The hardware service information was placed in a new document, the 7401 Web Kiosk Hardware Service Guide (B005‐0000‐1341). C June 01 Updated to Release 2.3 D Sept 01 Updated BIOS screens. Added PC Card installation. E Dec 01 Additional updates for Release 2.3 F May 02 Updated to Release 2.4. Changed Web Kiosk to EasyPoint 7401. Added EasyPoint 7401‐45xx terminal F Aug 02 Add EasyPoint 45 Pedestal G Sep 02 Add Country Keyboards to 7401‐45xx H Dec 02 Updated to Release 2.5 Added 7401‐26xx and 7401‐46xx models Changed 7401‐45xx references to 7401‐4xxx xviii
Radio Frequency Interference Statements
Federal Communications Commission (FCC)
Information to User This equipment has been tested and found to comply with the limits for a Class A digital device, pursuant to Part 15 of FCC Rules. These limits are designed to provide reasonable protection against harmful interference when the equipment is operated in a commercial environment. This equipment generates, uses, and can radiate radio frequency energy and, if not installed and used in accordance with the instruction manual, may cause harmful interference to radio communications. Operation of this equipment in a residential area is likely to cause interference in which case the user will be required to correct the interference at his own expense. NCR is not responsible for any radio or television interference caused by unauthorized modification of this equipment or the substitution or attachment of connecting cables and equipment other than those specified by NCR. The correction of interference caused by such unauthorized modification, substitution or attachment will be the responsibility of the user. The user is cautioned that changes or modifications not expressly approved by NCR may void the userʹs authority to operate the equipment. Canadian Department of Communications
This Class A digital apparatus complies with Canadian ICES‐003. This digital apparatus does not exceed the Class A limits for radio noise emissions from digital apparatus set out in the Radio Interference Regulations of the Canadian Department of Communications. Cet appareil numérique de la classe A est conforme à la norme NMB‐003 du Canada. Le présent appareil numérique nʹémet pas de bruits radioélectriques dépassant les limites applicables aux appareils numériques de la classe A prescrites dans le règlement sur le brouillage radioélectriques édicté par le ministrère des Communications du Canada. Voluntary Control Council for Interference (VCCI)
xix
IEC & EN Laser Product Label
CAUTION: Laser
radiation when
open and interlock
defeated.
DO NOT STARE
INTO BEAM.
This laser module
does not comply
with 21CFR1040.
USE ONLY AS A
Component.
(Label is attached to laser
module inside the cabinet.)
Class IIa Producto Laser. Tratè
Class IIa Laser Product. Appareil à Laser de classe IIa
Avoid Long-term Viewing Eviter Toute Exposition Prolongèe De no ver directamente èl Rayo
of Direct Laser Light.
de la vue à la lumiè re laser directe. Laser por mucho tiempò.
IEC & EN 60825-1 CLASS 1 LASER PRODUCT
17325
Laser Power
The NCR 7401 Scanner is not intended for long‐term viewing of direct laser light. However, the unit is safe if used as intended. This scanner meets the following laser/LED power requirements. •
Class IIa CDRH (Center for Devices and Radiological Health) •
Class IIa Laser—Avoid long‐term viewing of direct laser light •
Class 1 EN60‐825 (Europäische Norm) Following is the radiant energy of the laser/LED light as applied to each of the specified requirements. Accessible Emission Limit (CDRH Calculation) 0.99 Milliwatts Accessible Emission Limit EN60 825‐1:1994+AII:1996 0.81 Milliwatts Caution: Use of controls or adjustments or performance of procedures other than specified herein may result in hazardous radiation exposure. xx
Declaration of Conformity
Manufacturer's Name
NCR Corporation Manufacturer's Address
NCR Corporation Retail Solutions Division – Atlanta 2651 Satellite Boulevard Duluth, GA 30096‐5810 Type of Equipment
Information Technology Equipment Model Number
Class 7401‐2xxx and 7401‐3xxx Electrical Ratings (Input)
100‐120 V/200‐240 V, 2.0 A/1.0 A, 50‐60 Hz NCR Corporation, 1700 South Patterson Boulevard, Dayton, OH 45459, USA, declares that the equipment specified above conforms to the referenced EU Directives and Harmonized Standards. EU Directive
Harmonized Standard(s)
89/336/EEC (EMC) EN 55022 EN 55024 EN61003‐2 EN61003‐3 73/23/EEC (Low Voltage) EN 60 950: A1 + A2 + A3 + A4 + All NCR Corporation Retail Solutions Division — Atlanta 2651 Satellite Boulevard Duluth, GA 30096‐5810 European Contact:
International IP Counsel 206 Marylebone Road London, NW1 6LY, England Chapter 1: 7401-2xxx/3xxx Product Overview
NCR
Tilt Mount
Fixed-Angle Mount
18289
Introduction
The NCR EasyPoint 7401 is an interactive touch screen terminal with retail functionality that supports a variety of kiosk and self‐service applications. The 7401 is housed in an integrated, compact cabinet and can be tilt mounted, fixed‐angle mounted or flush mounted. The major hardware features of the 7401 are a 12.1‐inch or 15‐inch flat panel display with touch screen input and LAN connectivity, plus optional magnetic stripe reader, infrared reader, scanner, stereo audio, self service printer and wireless LAN. It also supports custom kiosk environments. The 7401 is Internet/Intranet ready. System loading occurs from a network server, and software and data content are delivered from a server through standard Internet protocols. 1-2
Chapter 1: 7401-2xxx/3xxx Product Overview
Serial Number/Model Number Label
The unitʹs serial number, model number, tracer number, and date of manufacture are included on a label on the back of the Core Module. Refer to following sections for additional information. The serial number is repeated on the non‐MSR side of the Core Module. Fixed-Angle Mount Label
To view the label: • For non‐hinged mounts, remove the Core Module from the mount. •
For hinged mounts, the Core Module does not have to be removed. NCR
7401-3000-8000
50-12345678
Class/Model
Serial Number
Mfg
Date: 11/15/01
Date Manufactured
F000,F005,F024,F031,F050,F101,F200,F422,F503
Feature Number(s)
19476
Chapter 1: 7401-2xxx/3xxx Product Overview
1-3
Tilt-Mount Label
To view the label, tilt the Core Module and remove the cable cover. NCR
7401-2000-8000
50-12345678
Class/Model
Serial Number
Mfg
Date: 11/15/01
F000,F005,F024,F031,F050,F101,F200,F422,F503
Date Manufactured
Feature Number(s)
19477
1-4
Chapter 1: 7401-2xxx/3xxx Product Overview
Model Numbers
The following table identifies 7401 terminal models. Model
Description
7401‐2212 Standard Model ‐ 12.1‐inch Capacitive Touch LCD, Ethernet Cable 7401‐3212 Scanner Model ‐ 12.1‐inch Capacitive Touch LCD, Integrated Fixed Angle Mount, and Ethernet Cable (Uses 1 RS‐232 Port for Scanner) 7401‐2622 Bundled Model ‐ 12.1‐inch Capacitive Touch LCD, Celeron 700 MHz, 128 MB SDRAM, 10 GB Hard Drive, Adapter Board (F031), and Ethernet Cable 7401‐2512 Standard Model ‐ 15‐inch Capacitive Touch LCD, Ethernet Cable 7401‐2518 Standard Model ‐ 15‐inch Resistive Touch LCD, Ethernet Cable 7401‐2625 Bundled Model ‐ 15‐inch Capacitive Touch LCD, Celeron 700 MHz, 128 MB SDRAM, 10 GB Hard Drive, Adapter Board (F031), and Ethernet Cable 7401‐2630 Bundled Model ‐ 15‐inch Capacitive Touch LCD, PIII 700 MHz, 128 MB SDRAM, 20 GB Hard Drive, Adapter Board (F031), and Ethernet Cable 7401‐2635 Bundled Model ‐ 15‐inch Capacitive Touch LCD, PIII 1 GHz, 128 MB SDRAM, 20 GB Hard Drive, Adapter Board (F031), and Ethernet Cable 7401‐2655 Bundled Model ‐ 15‐inch Capacitive Touch LCD, Celeron 700 MHz, 128 MB SDRAM, 256 MB Flash Disk, Adapter Board (F031), and Ethernet Cable 7401‐9512 No Bezel/Cabinet Model ‐ 15‐inch Capacitive LCD, Ethernet Cable Chapter 1: 7401-2xxx/3xxx Product Overview
1-5
Hardware Modules
Base Unit
•
Processor Board −
Pentium III/Celeron processor −
SVGA chipset (12‐inch monitor) −
XGA chipset (15‐inch monitor) −
MPEGII chipset −
1 MB Flash BIOS (not CMOS) −
Four RS‐232 ports (two optionally powered) −
10/100BaseT Ethernet LAN chipset, Wake‐on‐LAN support, and RJ‐45 port −
PC Audio with an internal mono speaker −
SoundBlaster 16 compatible audio chipset −
Two USB type A ports −
PS/2 keyboard port −
External VGA display port −
Dual display support −
External stereo speaker port −
Internal PS/2 mouse (dedicated to the touch screen) −
One SODIMM (Small Outline DIMM) RAM socket −
64 MB memory on board −
IDE support for a hard disk, a CD ROM, and an optional Compact Flash disk in place of the hard disk ®
1-6
Chapter 1: 7401-2xxx/3xxx Product Overview
•
POS Connector Board −
Cash drawer port (supports two drawers via a Y‐cable) −
Internal parallel port (dedicated to the optional customer display) −
Microphone •
12.1‐inch Operator Display – active capacitive touch LCD •
15‐inch Operator Display – active LCD with capacitive or resistive touch •
2.5‐inch low or high capacity hard disk •
Integrated Motion Sensor, capable of waking up the terminal from a low power state •
Integrated Power Supply •
Reset switch which can be used to recover from a lock‐up condition •
3‐meter Ethernet cable •
U.S. power cord Hardware Options
•
Intel Pentium III Processor •
Integrated 3‐track ISO MSR •
Integrated Scanner Module •
Integrated Stereo Module •
Integrated CD‐ROM •
Integrated Infrared Sensor •
PCMCIA (for wireless LAN) •
Mounting options: Table‐top, Pedestal, Pole, Wall, Tilt/Swivel •
256 MB Compact Flash Chapter 1: 7401-2xxx/3xxx Product Overview
•
64/128/256 MB memory •
Cash drawers •
−
2113 Cash Drawer (modular) −
2189 Cash Drawer (modular) −
2260 Cash Drawer (modular) −
Dual cash drawer cable Printers: −
7158 Thermal Receipt/Impact Printer −
7167 Thermal Receipt/Impact Printer −
7194 Thermal Receipt Printer −
7197 Thermal Receipt Printer −
Remote printer cables −
Signal extenders for remote printers •
7401‐K590 Self‐Service Printer •
7401‐K580 Self‐Service Printer (Discontinued) •
PC keyboard −
Keyboard Shelf •
USB RS‐232 Port Server •
− USB Serial Converter 4055 Uninterruptible Power System (UPS) 1-7
1-8
Chapter 1: 7401-2xxx/3xxx Product Overview
Terminal Components not Supported
It is important to note that the terminal does not support the following components. Not Supported
Alternative Implementation
CMOS for hard totals, logs, and Hard disk, flash disk, or server tallies storage Removable media, e.g., a flex disk LAN communication to an NT server via standard protocols SLP terminal loading Local storage, TCP/IP networking and PXE loading Keylock for security (X, L, R, S) Reset switch based security ISA and PCI Expansion slots USB and LAN based devices (future) DVD ROM Internal UPS External UPS Manual Video and audio controls Software controlled DOS, Windows 3.1, Windows NT 3.51, Windows 9x, OS/2 Windows NT 4.0, Windows 2000, Windows XPe 133 MHz/266 MHz Pentium Processor Intel Pentium III 500/700 MHz and 1 GHz , and Celeron 450/550/600/700 MHz processors Chapter 1: 7401-2xxx/3xxx Product Overview
1-9
System Configuration Diagram
7892
7837
2010 Coin
Dispenser
7401
Keyboard
2336-K008
7194
RS232 (4)
2 Optionally
Powered
7158
Note: 7194 and 7158 are
available in both RS-232
and USB.
7401-K580/K590
PS/2 KBD
VGA
Processor Board
USB
POS Connector Bd.
Ethernet
Parallel
Cash Dwr
Audio
SVideo
2336-K007
2260/2189
2nd Cash Drawer
(Y-Cable)
2113
18319b
1-10
Chapter 1: 7401-2xxx/3xxx Product Overview
Kit Configuration Diagram
7401 w/K590
7401-2xxx
7401-3xxx
2336-K037
2336-K052
K542
F501
F502
K533
F/K059
F521
F511
F512
F101
F504
F505
F200
K540
F201
K536
K543
K530
K535
K523
K525
F/K590
K534
18318d-P
Chapter 1: 7401-2xxx/3xxx Product Overview
1-11
Hardware Module Descriptions
Processor Board
Processor/Chip Set
The terminal uses an Intel architecture processor, which permits it to leverage existing software drivers and applications, as well as provide the greatest flexibility in choosing an operating system. This provides several other advantages: •
Capable of SW MPEG‐1 or MPEG‐2 playback at 30 frames per second with 22 kHz stereo audio (may be limited by OS constraints). •
SoundBlaster®‐compatible audio •
Expansion capabilities for optional features and future requirements (ISA/PCI bus and USB) The following sections identify processors, system bus speed, and on‐
board memory available on 7401 processor boards: Release 1.0
• Intel Mobile Pentium 166 MHz or 266 MHz Processor (PGA package) used with the Intel 430TX PC chipset. The 430TX chipset consists of the 82439TX System Controller (North Bridge chip), also called the MTXC, and the 82371AB (South Bridge chip), also called the PIIX4. •
A 66 MHz system bus These Intel Mobile Pentium Processors have been discontinued. 1-12
Chapter 1: 7401-2xxx/3xxx Product Overview
Release 2.0 – 2.4
• Intel Pentium III 500 MHz or 700 MHz Processor, or Intel Celeron 450 MHz, 550 MHz, or 600 MHz Processor (µPGA package) used with the Intel 440BX PC chipset. The 440BX chipset consists of the 82440BX System Controller (North Bridge chip), also called the MTXC, and the 82371AB (South Bridge chip), also called the PIIX4. •
A 100 MHz system bus •
64 MB memory with ability to add SODIMMS to increase the memory capacity of the terminal Release 2.5
• Intel 700 MHz Celeron Processor or Intel 1 GHz Pentium III Processor (BGA package) on board, removing the µPGA processor socket. Intel 440BX chipset same as in Release 2.0 – 2.5. •
100 MHz system bus and memory support, 64‐bit bus width, and AGP video interface. •
128 MB memory with ability to add SODIMMS to increase the memory capacity of the terminal Video Subsystem
The video subsystem supports the following LCD types: •
12.1‐inch active matrix (TFT [thin film transistor]) 800x600 with 64 k colors •
15‐inch active matrix (TFT) 1024x760 with 64 k colors Support for the LCD integrated display is provided internally. External support for SVGA monitors (800x600 [or better] resolution and 64 k [or better] colors) is provided by a CRT 15‐Pin D‐shell connector. Chapter 1: 7401-2xxx/3xxx Product Overview
1-13
The LCD back lighting is also software controlled. In addition to OFF and ON modes, a dimmed mode is supported in the hardware to allow increased tube life. If appropriate software drivers are loaded, full brightness is restored when touched, motion detection (Motion Sensor section), or an application request (i.e., to play promotional material on a preset schedule). Ethernet 10/100Base-T LAN Communications
The 7401 terminal has an Intel 82559 LAN Controller that supports 10/100Base‐T Ethernet. Ethernet 100Base‐T is also known as ʺFast Ethernet.ʺ The Boot ROM for diskless boot functionality is included in the 1 MB system ROM. The hardware is compatible with the TCP/IP, DHCP, and TFTP protocols required for remote boot of the platform. Appropriate software must be used to enable each protocol used over the Ethernet link. The terminal may be connected to either a 10 MB/s or 100 MB/s Ethernet connection. The hardware automatically selects the correct speed (if enabled by software to do so). The LAN hardware supports wakeup packet capability as defined in the Device Class Power Management Specification, Network Device Class (available from Microsoftʹs web site). When the platform is in the Soft OFF state (refer to the Advanced Power Management section that follows), receipt of a Wakeup Packet on the LAN can return the system to the ON state, if this feature is enabled by software. Due to limitations of the LAN controller and the OS, all features described in the Network Device Class specification may not be available. 1-14
Chapter 1: 7401-2xxx/3xxx Product Overview
100Base‐T is wired identically to 10Base‐T, except that the twisted pair cable must be Category 5 and the hubs must permit 100 or 10/100 MB/s operation. Although 10Base‐T will operate on Category 3 twisted pair, or NCR ʺ747ʺ cable, an upgrade to Category 5 is required for 100Base‐T. A customer desiring to use the terminal in an existing 10Base‐T environment can do so and simply run at 10 MB. In order to upgrade to 100MB/s, Category 5 cable and 100 or 10/100 hubs must be installed. NCR strongly recommends the use of Category 5 for all new cabling, even if the customer initially intends to run only 10Base‐T. LED Indicators for Link Integrity (verifies cable and hub connection are good) and LAN speed is provided on the Processor Board near the row of connectors at the bottom of the e‐box. The LED is ON (yellow) when the speed is running at 100 MB/s. Link Integrity is provided to the PC chipset to permit boot‐up software to verify the presence of the LAN connection. Software must allow 2 seconds after power‐up in order for the Link Integrity signal to become valid. Chapter 1: 7401-2xxx/3xxx Product Overview
1-15
Wireless LAN Communications
When a wired Ethernet connection is not desired, a wireless LAN adapter may be installed in the PCMCIA socket. This requires that the PCMCIA daughter‐card feature be installed. A wireless LAN used in the terminal must meet the following requirements: •
Integrated antenna that meets the requirements of PCMCIA (PC Card) Extended Type 2 card definition (a maximum of 5‐cm additional length). •
Power consumption within the capabilities of the PCMCIA daughter‐card. •
Signaling requirements within the capabilities of the terminal PCMCIA interface. The main restriction is that DMA transactions are not supported over the PCMCIA interface. •
Device drivers for the targeted operating system must exist. •
Appropriate infrastructure (server support, Base Stations, Ceiling Antennas, etc) must be present in the installation site, and the maximum RF range of the wireless system must not be exceeded. Interoperability ‐ While the 802.11 standard provides an interoperable protocol definition, there are vendor‐specific extensions to the protocol that encourage users to stay with one supplierʹs equipment. This also applies to wireless infrastructure and access points, 802.11 does not govern this operation. Mixing of RF suppliers on a site is not recommended until the RF suppliers have demonstrated interoperability. The wireless networks operate at speeds of 1‐2 MB/s with 2 percent packet loss typical. The application developer must be aware of the performance limitations and design applications that are acceptable to the customer when run over the slower network. Remote Wakeup over the wireless network is not possible because the cards do not support it. An alternative is to use the system real‐time clock wake up at a scheduled time. 1-16
Chapter 1: 7401-2xxx/3xxx Product Overview
The wired Ethernet connection is not certified for use in configurations where a wireless adapter is installed. Universal Serial Bus
Two USB Type‐A ports are provided on the terminal. USB Host Controller support is provided in hardware on the Processor Board. Note: Third party USB peripherals require support from the operating system, which is currently limited to Windows 2000 and Windows Xpe. The terminal must use the I/O Networks drivers to support the NCR USB printer and scanner products. These drives are available under Windows NT, Windows 2000, and Windows XPe. Serial Ports
The 7401 Release 2.x processor boards provide two RS‐232 ports (9‐pin D‐shell connectors, Ports 1 and 2) directly on the board and support two additional RS‐232 ports. Ports 3 and 4 require an optional harness connection to the processor board. Ports 1 and 3 can be supplied with +12 V DC on Pin 9 when properly set up in the BIOS. The total power drawn by Ports 1 and/or 3 must be no greater than 1 amp at 12 V+ DC. Refer to the following table for RS‐232 pin‐out information. The BIOS permits flexibility in mapping resources. However, a fully‐
loaded system (2 PCMCIA cards that require IRQs, four serial ports in use, USB in use, parallel port in use, and MSR) may not have enough available IRQs to support all serial ports. Use a USB serial port expander to overcome this PC architecture limitation. Chapter 1: 7401-2xxx/3xxx Product Overview
1-17
Port 2 shares hardware resources with the IRDA connection; if IRDA is in use, Port 3 is not available. RS-232 DB-9 Male Connector Pinout
Pin
1
2 3 4 5 6 7 8 9 Port A
Port B
DCD RXD TXD DTR GND DSR RTS CTS RI or +12* DCD
RXD TXD DTR GND DSR RTS CTS RI * If Port 1 or 3 are powered, pin 9 will be +12 V. Hardware Monitor
The hardware monitor generates an interrupt to the system whenever any of the internal voltages used by the system processor goes above or below the acceptable operating range. An interrupt is also generated when the temperature of the Processor exceeds safe levels. Software can use this indication to slow or stop the system and/or force a reset. PCI Expansion Header
A single expansion header is provided to support optional features, such as the PCMCIA for Wireless LAN Board. This board supports two Type 2 or one Type 3 PCMCIA type cards. IDE Header
A standard IDE header is provided to support the 2.5‐inch hard disk drive and integrated CD‐ROM. This header al supports the optional 256 MB IDE compact flash available in place of the hard disk. 1-18
Chapter 1: 7401-2xxx/3xxx Product Overview
Audio
The base unit has SoundBlaster‐compatible audio. Wave table synthesis is not supported. FM synthesis and MIDI are supported in the hardware, but requires software driver support to function. Higher quality integrated stereo speakers may be added as an option to the terminal. The amplifier is located on the Processor Board; the speaker output is provided on a header that receives the harness from the speaker module. In addition, a Line Out is provided on a 3.5 mm stereo jack that permits connection of external amplified speakers. The integrated stereo speakers, or an amplifier connected to Line Out, must be used in order to play SoundBlaster (audio subsystem) audio. However, an internal EUI speaker provides PC speaker functionality (beeps and tones) for all configurations. The volume control can be set during system configuration. The PC speaker sounds (such as beeps and touch clicks) are directed into the audio subsystem and are audible if speakers are connected. •
Release 2.0 – 2.4 processor boards use a Cirrus/Crystal CS4614 (PCI‐
based) sound controller that supports DirectX 6 sound. •
Release 2.5 processor boards use an ESS Allegro ES1989 sound controller that supports DirectX 8 sound. Magnetic Stripe Reader
A 3‐track MSR head is available as an option. The ISO card format is supported. When card data is read, an interrupt is generated. A software device driver for the MSR must be loaded to enable the application to process the data. Touch Screen Controller
The MicroTouch ʺExcaliburʺ chip is used to interface the touch panel. This controller supports MicroTouch capacitive panels. Chapter 1: 7401-2xxx/3xxx Product Overview
1-19
In order to save an RS‐232 port, the touch data is delivered to the system through the mouse interface. This requires a mouse‐aware touch device driver for the appropriate OS. When the system is operating in the dimmed display mode, touch activity can restore full brightness if instructed by software to do so. When system is in low power mode, touch activity can generate the mouse port interrupt (IRQ12). Processor Board Connectors
All connectors are either keyed or impossible to plug incorrectly due to mechanical design of the product. External Connectors
Internal Connectors
VGA CRT RGB 15 pin D Shell LCD Ethernet RJ45 Back light Inverter Dual USB Type A Integrated Speaker Module External Stereo speaker (3.5mm jack) MSR Power supply Touch screen (PS/2) RS‐232 9 pin D shell (two, one with +12 V power option) Integrated Scanner (7401) PS/2 Keyboard Motion Sensor / Power Indicator Customer Display PCI Expansion header Cash Drawer IDE IRDA Parallel port (POS Board header) 20‐pin high density RS‐232 Conversion connector Cash Drawer port (POS Board header) Microphone S‐Video 1-20
Chapter 1: 7401-2xxx/3xxx Product Overview
Flash Disk Interface (Discontinued)
The Release 2.0 – 2.5 processor boards provide support for a flash disk array in the form of an M‐Systems DiskOnChip. A 32‐pin socket is provided for this feature. The flash disk must be installed and enabled in BIOS Setup. This feature is not available on Release 2.5 processor boards. NCR Retail Specific Hardware
The Processor Board contains logic that provides support for the custom retail interface. The logic controls the following features: •
Dual Cash Drawer Support •
Cash Drawer Diagnostic Support •
Magnetic Stripe Reader Interface •
Motion Detector •
Touch Screen Interface Cash Drawer Support
An integrated retail specific feature of the processor is the cash drawer circuitry. The onboard circuitry internal to the board provides the control for two external cash drawers. A portion of the POS Board header (J6) is provided on the board to interface to the dual cash drawer connector. Header J6 only contains the control signals; it does not provide power. Software controls the cash drawer(s) through I/O port 00Exh. This means it can be I/O ports E0/E1h, E2/E3h, E4/E5h, or EA/EBh depending on the configuration of the SMC I/O controllerʹs GPIO port(s). Default setting is E0/E1h. Chapter 1: 7401-2xxx/3xxx Product Overview
1-21
Cash Drawer I/O Port Bit Definition: Bit # Description
Bit = 1
Bit = 0
7 Solenoid B Control Turns off solenoid output Activates solenoid output 6 Solenoid A Control Turns off solenoid output Activates solenoid output 5 Reserved Reserved Reserved 4 Reserved Reserved Reserved 3 Solenoid B Status Solenoid B output active Solenoid B output inactive 2 Solenoid A Status Solenoid A output active Solenoid A output inactive 1 Reserved Reserved Reserved 0 Cash Drawer(s) Status Drawer(s) open Drawer(s) closed Note: Bits 2 and 3 are set to ʹ1ʹ by each device reset. The cash drawer interface can be diagnosed remotely. For security reasons, the cash drawer diagnostics mode must first be activated by pressing an external momentary switch (SW2). The intention is for authorized personnel to be present when the cash drawer diagnostic tests take place. There is only one cash drawer status signal; therefore, bit 0 is the status of either cash drawer or both cash drawers. 1-22
Chapter 1: 7401-2xxx/3xxx Product Overview
Power LED
The Processor Board provides support for an external power LED through the onboard Motion/Power LED connector. This LED is controlled through the SMC 37C935 GPIO pins. Once the SMC chip is programmed to support the Power LED function on GPIO pin 13, the LED will be turned ʺonʺ anytime all power to the Processor Board is good. The systemʹs power management software has the option to turn the LED off indicating the system is in a power‐managed mode. MSR
The MSR interface supports a maximum of 3 tracks of magnetic stripe information for support of ISO format cards. Activate the MSR interface by enabling it in BIOS Setup under IO Configuration. The MSR interface controller is a memory‐mapped device, which can reside at system memory addresses CA000, CC000, or D0000. If MSR capability is not desired, it may be disabled through BIOS Setup. Graphics Subsystem
The Release 2.0 – 2.4 processor boards are equipped with an SMI Lynx SVGA LCD/CRT 3DM graphics controller with 8 MB of integrated synchronous graphics DRAM. The Release 2.5 processor board has an SMI Lynx 3DM/3DM+ graphics controller. The Processor Boards support linear addressing by creating a ʺholeʺ in the memory address space at the 63 MB boundary. When the system is configured for 64 MB and linear addressing is enabled, the last 1 MB of system memory is unusable; therefore, the board will report that total available system memory is 63 MB. Because a hole in memory creates a non‐contiguous address space, enabling linear addressing when total system DRAM is greater than 64 MB is not recommended. Video linear addressing is enabled through PC Setup under the Integrated Peripherals menu. Chapter 1: 7401-2xxx/3xxx Product Overview
1-23
The processor also supports VESA standards such as the VESA DPMS protocol to place a DPMS compliant monitor into power savings modes. Release 2.5 processor boards with the Lynx 3DM/3DM+ chip support the following DirectX 6 Direct Draw and Direct 3D graphics functions. •
Rasterization acceleration •
Z buffer •
Alpha comparison •
Texture filtering •
Texture blending •
Mimap support •
Vertex and Global fogs •
Diffuse and specular color •
Alpha blending •
Triangle and line drawing The following DirectX 8 functions are not supported: •
TnL •
Vertex shader •
Pixel shader •
Bump mapping •
Box mapping The Release 1.0 Pentium processor board was equipped with a C&T 69000/65555 SVGA LCD/CRT graphics controller with 2 MB of integrated synchronous graphics DRAM. The 69000/65555 is a 32‐bit graphics controller that combines a VGA controller, 32‐bit graphics engine, dual‐frequency clock synthesizer, and true‐color DAC in a single package. This processor board has been discontinued. 1-24
Chapter 1: 7401-2xxx/3xxx Product Overview
Resolutions Supported
Resolution
Colors
Max Vfreq
800x600x8bpp 256 85 Hz 800x600x16bpp 64 k 85 Hz 800x600x24bpp 16 M 85 Hz Colors Supported
Resolution
256 Colors
(8-Bit)
65,000 Colors
(16-Bit)
16.7 M Colors
(24-Bit)
800x600 512 k 1 MB 2 MB Dual Displays
The Summa II Motherboard (Release 2.5) is dual display (LCD and CRT) capable. In a dual display environment the 7401 terminal supports 16‐bit color when both displays are connected to the motherboard. Both displays must have the same maximum resolution capability. Refer to the following information for details about the implementation of a dual display configuration. •
Lynx Family Control Panel Specification 1.2 on the NCR 74xx Base System and Client Third party Drivers CD‐ROM (Product ID: D370‐0111‐0100) or in the video.exe self‐extracting Video Drivers file on the Retail Solutions Specific Third Party Products Drivers and Patches web site at: http://www.ncr..com/support/support_drivers_patches.asp?Class=retail_TPP. •
Retail Customer Information Display User’s Guide (BD20‐1431‐B) on the NCR Information Products web site at: http://www.info.ncr.com/eHome.cfm Chapter 1: 7401-2xxx/3xxx Product Overview
1-25
Board BIOS
Processor boards use a Phoenix BIOS, which is stored in Flash ROM and easily upgraded through the network connection or serial port. The Flash EEPROM also contains the Setup utility, Power‐On Self Tests (POST), and APM 1.2 (Release 2.0‐2.4) or ACPI 2.0 (Release 2.5). The boards also supports system BIOS shadowing, permitting the BIOS to execute from onboard write‐protected DRAM. The BIOS displays a sign‐on message during POST identifying the type of BIOS and a four‐digit revision code. FLASH memory Implementation
The Intel E28F800B5‐T70 Flash component is organized onboard as 1024 k x 8 (1 MB). While a typical PC BIOS image including video and LAN boot ROM code normally fits in 256 kB on the Pentium board and 512 kB on the Pentium III/Celeron board, the boards support a 1 MB flash ROM. The current Phoenix BIOS release only requires 256 kB of this 1 MB total. The Flash device contains the PC System BIOS along with the Video BIOS and LAN boot ROM which compresses the ROM images into a single binary image. The Flash device is divided into four areas, as described below. System Address
FLASH Memory Area
F0000H FFFFFH 64 kB Main BIOS EE000H EFFFFH 8 kB System BIOS Reserved during boot ED000H EDFFFH 4 kB Plug and Play ESCD Storage Area E0000H ECFFFH 52 kB System/VGA BIOS Reserved during boot 1-26
Chapter 1: 7401-2xxx/3xxx Product Overview
BIOS Upgrades
Flash memory makes distributing BIOS upgrades easy. A new version of the BIOS can be installed from the hard disk, network or through a serial port. The disk‐based Flash upgrade utilities, Phlash.exe and WinPhlash,exe, ensure the upgrade BIOS extension matches the target system to prevent accidentally installing a BIOS for a different type of system. Setup Utility
The ROM‐based Setup utility allows the system configuration to be modified without opening the system for most basic changes. The Setup utility is accessible only during the Power‐On Self Test (POST) by pressing the <F2> key after the POST memory test has begun and before boot begins. A prompt may be enabled that informs users to press the <F2> key to access Setup. An external alphanumeric keyboard is recommended for running the BIOS CMOS Setup Utility. Otherwise, a Touch Screen can be used. Plug and Play
The Processor BIOS also has a setup option to support the Windows runtime plug and play utilities. When this option is selected, only devices critical to boot are assigned resources by the BIOS. Device Node information is available for all devices to ensure compatibility with Windows 95. System configuration information is stored in ESCD format. The ESCD data will be cleared upon loss of the CMOS voltage. Advanced Power Management
The 7401 Release 2.0 – 2.4 Processor BIOS has support for both 1.1 and 1.2 Advanced Power Management (APM). The version of APM drivers loaded in the operating system determines to which specification the BIOS adheres. In either case, the energy saving Standby mode can be initiated by a time‐out period set by the user. Chapter 1: 7401-2xxx/3xxx Product Overview
1-27
When in Stand By mode, the Processor Board reduces power consumption by using the processor System Management Mode (SMM) capabilities and also spinning down hard drives and turning off VESA DPMS compliant monitors. During setup, the user may select which DPMS mode (Stand By, Suspend, Auto, or Off) is sent to the monitor. The ability to respond to external interrupts is fully maintained while in Stand By mode permitting the system to service requests such as in‐coming data or network messages while unattended. Keyboard or mouse activity may also be used to take the system out of the energy saving Stand By mode. When this occurs, the monitor and IDE drives are turned back on immediately. Advanced Power Management is achieved by the following: •
DOS requires a driver (FS‐APM.dos) •
NT requires a driver (NCRSYSM.SYS) •
Windows 2000 must enable the operating system APM setting. The OS APM setting is disabled by default. NCR Gold Drivers are enabled in this setting by selecting: Start, Control Panel, Power Options, APM tab and check the box Enable Advance Power Management Support Click Ok to finish. ACPI
The Release 2.5 terminal BIOS supports Advance Configuration Power Interface (ACPI) 2.0 power management. Primary differences between APM and ACPI are as follows: •
On an APM‐ managed terminal, the BIOS determines when to switch between power states and also performs the switch. When using ACPI, the operating system determines when to switch and informs the BIOS to perform the switch. •
APM must be enabled in the BIOS. ACPI is automatically active with the operating system. •
ACPI Setup options are available in the OS Control Panel. 1-28
Chapter 1: 7401-2xxx/3xxx Product Overview
ACPI provides similar modes of operation as APM. The 7401 hardware supports four Power Management States. State
Characteristics
OFF AC power is not present. All RAM contents are lost. ON Power is on and fully supplied to all 7401 components. The display and touch panel are active. The CPU may be fully on or be in chip standby mode. This is transparent to the user and the application. Standby mode reduces power requirements and is controlled by the chip set and is entered/exited depending on the CPU’s utilization level. Transitioning between fully on and standby causes no delay. •
APM Auto state •
ACPI G0/S0 Working state CONSERVE •
APM Standby state •
ACPI G1/S1 Sleeping state SOFT OFF •
APM Suspend State •
ACPI G2/S5 Soft Off state Power is on, but consumption is reduced by throttling back or completely stopping the system clock. Throttling is fully programmable. This is the primary means of reducing system power consumption and is used to help correct a high temperature warning level detected by the temperature monitor. Temperature may also be reduced by dimming the LCD. There is no user or application action required for this mode. When a Safe Temperature is detected, the system switches back to the ON state. Transitioning between ON and CONSERVE takes less than 10 milliseconds. Temperature has reached a critically high level, a LAN‐based Powerdown was received, or a system Shutdown occurred. Power consumption is reduced to its lowest level. All voltages are still present, but BIOS places each peripheral and chip into its lowest available power state. The chip set enters the Suspend‐to‐RAM mode. The LCD back light is turned off, blanking the display. RAM contents are preserved upon return to ON state unless software issues a reset. If this state was entered because of a LAN‐based Powerdown or system Shutdown, transitioning to the ON state can occur via LAN‐based reset or wakeup, Timer wake‐up, Touch activity, Motion Sensor, or keyboard. If SOFT OFF was entered because of a Critical Temperature, the ON state can be automatically transitioned to when a Safe Temperature is reached. Chapter 1: 7401-2xxx/3xxx Product Overview
1-29
Operator Display
NCR
Tilt Mount
Fixed-Angle Mount
18289
The 7401‐2xxx and 3xxx have either a 12.1‐inch TFT (active matrix) or a 15‐inch TFT. LCD Adapter Board
The signals from the LCD header on the Processor Board are brought to the LCD on a harness. Since there are multiple pin configurations and connector types being used on the LCD, a small adapter board is used to receive the LCD harness and map the signals into the correct pin‐out for the LCD panel. This board has a connector that plugs directly into the LCD panel. LCD Backlight Inverter Module
An Inverter Board supplies power for the LCD Backlight, which is a separate module in the terminal. The inverter has a connector that receives power, ground, and a Backlight dimming signal from the Processor Board. The inverter generates the high voltage necessary to start and run dual CCFL (cold‐cathode fluorescent lamps) Backlights. 1-30
Chapter 1: 7401-2xxx/3xxx Product Overview
A fuse located on the Inverter Board protects power to the inverter. This fuse protects the system from damage in the event of a Backlight or Inverter Board fault. The fuse is not field replaceable; if it blows, the safety characteristics of one or more components on the Inverter Board may have been compromised and the Inverter Board should be replaced. If one or both Backlight tubes become disconnected or otherwise open‐
circuited, protection circuitry shuts down the inverter. This avoids over‐powering a single tube and also protects against high voltage shorting. The Backlight tubes for the Active displays (TFT) can be replaced. Touch Screen
The Touch Screen completely covers the LCD and is mounted directly in front of the LCD, behind the front plastic bezel of the terminal. The touch controller on the Processor Board supports capacitive and resistive touch glass. The touch glass has an integrated harness that is routed into the Processor Board enclosure and is connected to a header on the Processor Board. The touch glass has a glare‐reducing texture that also helps hide fingerprints. Chapter 1: 7401-2xxx/3xxx Product Overview
1-31
Features
Magnetic Stripe Reader
A single 3‐track analog MSR is available as a feature, supporting ISO format cards. When the MSR is not desired, a filler piece for the MSR section is included to make the unit appear uniform. NCR
MSR
MSR
18291
1-32
Chapter 1: 7401-2xxx/3xxx Product Overview
Printer Options
The sections that follow provide an illustration and brief description of the available printer options. 7401-K590 Self-Service Printer
The K590 Printer is a self‐service, fast, silent, thermal printer that provides ʺunattended printing.ʺ The printer is housed in a secure cabinet that does not allow customer access to the paper while it is printing. It can print text, graphics and bar codes. It prints on paper that is 80 mm, 82.5 mm, or 114 mm wide. When printing is complete, a receipt presenter provides the cut receipt. The printer receives its power from an external power supply and has a serial interface. 19055
Chapter 1: 7401-2xxx/3xxx Product Overview
1-33
7158 Printer
The 7158 Printer is extremely fast, quiet, and reliable point‐of‐sale device. It consists of two specialized printers in one compact package: a thermal printer on top that prints receipts, and an impact slip printer in front to print on forms and checks that you insert. It receives its power from an external power supply, can be connected through a USB or serial port, and has a connector for cash drawers. 17304
7167 Printer
The NCR 7167 Printer is a fast, quiet, relatively small and very reliable multi‐function printer. It prints receipts, validates and prints checks, and prints on a variety of single or multiple part forms. There is no journal as it is kept electronically by the host terminal. The printer features a dual interface, so it can connect to the host terminal either through a USB interface or RS‐232. It receives its power from an external power supply, and has a connector for cash drawers. 19711e
1-34
Chapter 1: 7401-2xxx/3xxx Product Overview
7194 Printer
The 7194 Printer is a high speed, high‐resolution printer, capable of both text and graphics printing. It offers direct thermal printing in a receipt station. It receives its power from an external power supply, can be connected through a USB or serial port, and has a connector for cash drawers. 16437
7197 Printer
The NCR 7197 Printer is a fast, quiet, relatively small and very reliable multi‐function printer. It prints receipts and two‐color printing. The printer features a dual interface, so it can connect to the host terminal either through a USB interface or RS‐232. It receives its power from an external power supply, and has a connector for cash drawers. 19712e
Chapter 1: 7401-2xxx/3xxx Product Overview
1-35
Other Integrated Devices and Indicators
Hard Disk Drive
A 2.5‐inch IDE hard disk is available to support Windows NT. The drive is the standard type that is used by notebook PCs. Reset Switch
As a last resort, the Reset Switch can be used to reboot the system if the software reset port mechanisms fail. The switch is on the connector row at the bottom of the enclosure. Intentionally, it is not easily accessible, but can be operated without removing covers or using special tools. Reset Switch
16454
Except when testing software in a lab environment, always disconnect the AC power cord. Reset Procedure
1. Gently press the Reset Switch and hold it in for at least four seconds. The screen goes blank. 2. Release the Reset Switch and then gently press it again. The system reboots. 1-36
Chapter 1: 7401-2xxx/3xxx Product Overview
Internal Speaker
The Internal Speaker is connected to the PC speaker output of the system chipset, not to the audio subsystem. It is connected to the Processor Board via a harness and mounted inside the Processor Board enclosure. POS Connector Board
The POS Connector Board is a small daughter board that mounts directly on the Cash Drawer and Parallel Port header. Connectors on the edge of this board form a second connector row above the Processor Board connectors. Connectors are available for two cash drawers, a customer display and a microphone. Power for the cash drawers (24 V) and VFD customer display (5 V and 12 V) is supplied by the Enhanced Power Supply through the parallel connector. Motion Sensor
The terminal hardware can detect movement near the terminal and enables software to prompt system operation from a low‐power state. Application software may also be able to make use of motion detection when in the ON state if it is enabled by lower‐level software. NCR
Motion Sensor
Power/Status LED
18290
Chapter 1: 7401-2xxx/3xxx Product Overview
1-37
Motion is detected as a change in ambient light level that is greater than a software‐controlled threshold. A photodiode mounted behind the front bezel of the unit senses ambient light levels. The photodiode resides on a small circuit board (the Motion Sensor Board). A harness connects the Motion Sensor Board to the amplifier and motion sensing logic on the Processor Board. The user Power/Status LED indicator shares this board. Power/Status LED
The LED power indicator indicates that power is present. The LED is green when the processor and BIOS are operating properly. The LED is mounted behind the front bezel on the same board as the motion sensor. Power OK LED
The Power OK LED is located behind the Cable Cover, between the Customer Display and Cash Drawer connectors. Power OK LED
(5V and 24V)
16453
1-38
Chapter 1: 7401-2xxx/3xxx Product Overview
LAN Status LEDs
LAN Integrity
(Green)
LAN Speed:
Yellow = 100 MB
OFF = 10 MB
16455
Power Supply
The terminal uses an AC adapter for its power supply, concealed in the terminal mounting. The supply is inaccessible when the terminal is in the normal operation and mounting position to prevent tampering, and sealed to help protect against spills or other environmental hazards. Note: The power supply automatically senses the proper AC voltage; therefore only normal servicing access is required. All power required to operate the base unit, PCMCIA option and PCMCIA cards, speaker option, scanner option, and bus‐powered USB peripherals is provided by the power supply. The Processor Board serves as the hub to distribute power to all terminal functions. Cash drawers, VFD customer display, PS/2 keyboard, PCMCIA daughter board and slots, scanner (through RS‐232 port), USB, hard disk, and the LCD all receive power through their respective Processor Board connectors. Chapter 1: 7401-2xxx/3xxx Product Overview
1-39
Uninterruptible Power System (Optional)
The 4055 Uninterruptible Power System (UPS) protects your equipment from various power related problems, providing visual and audible indicators which alert you to utility‐line failures. The 4055 is installed inside the pedestal mount, and includes a data line/LAN connection which ensures both the AC and data paths are protected from surges and noise transmitted through the power lines. Integrated Scanner Module (Optional)
The scanner, power supply, and Scanner Controller Board are located inside the Fixed‐Angle Mount. The scanner interface is serial, and is connected to RS‐232/1, which is a powered serial port. Note: The Integrated Scanner feature includes the Fixed‐Angle Mount and cannot be used with the Table Top Mount. The 7401 Scanner is a modified NCR 7890 or NCR 7892 Scanner, however, there are a few differences. Refer to the NCR 7401/7890 or 7892 Scanner Differences chapter for additional information. Integrated Speaker Module (Optional)
The Integrated Speaker feature provides two stereo speakers that attach to the bottom of the Core Module. The maximum output of the speakers is approximately 6 watts per channel. Compact Flash (Optional)
The 256MB compact flash can be used in a Windows XP embedded environment. When using the Windows XP embedded OS, an additional 128MB SDRAM SODIMM is required to support the necessary virtual memory requirements. The 256MB compact flash replaces the hard drive in the unit. 1-40
Chapter 1: 7401-2xxx/3xxx Product Overview
USB RS-232 Port Server
The USB RS‐232 Port Server is an intelligent, stackable expansion module that connects to the terminal Universal Serial Bus (USB) port, providing high‐speed RS‐232 serial ports. 7454/7401
USB Port
RS-232 Ports
16944
Chapter 1: 7401-2xxx/3xxx Product Overview
1-41
Integrated CD-ROM Drive (Tilt Mount Model)
The Integrated CD‐ROM Drive is located behind a cover on the Back Panel. To access the drive, loosen the spring‐loaded CD Cover Screw and remove the CD Cover by sliding it up as shown. CD Cover Screw
CD Cover
19230
1-42
Chapter 1: 7401-2xxx/3xxx Product Overview
Additional Connectors (Pentium III Board)
The Pentium III Boards have three connectors that are not on the other Pentium Boards. Also available is a fourth connector for a microphone when a POS Connector Board is mounted to the Processor Board. The following illustration identifies these connectors. S-Video
RS-232 Connector
(COM 3 and COM 4)
Microphone
(optional)
IRDA
17999
The following is a brief description of each connector. S-Video
This connector provides a video connection to an S‐video monitor. RS-232 Connector
This connector provides two additional RS‐232 ports. To add the ports, install the Dual RS‐232 Port Kit (7454‐F072) as described in the Feature Kits appendix. The Dual RS‐232 Cable provides two additional serial ports. 18002
Microphone
This connector provides for audio input. IRDA
This connector permits infrared communication between devices. Chapter 1: 7401-2xxx/3xxx Product Overview
Compatibility
LAN Communications
The software associated with the terminal systems conform to the following standards: •
Network Driver Interface Specification (NDIS 4) •
IEEE 802.3 & 802.3u CSMA/CD (10/100 MB/s Ethernet) •
IEEE 802.2 Link Level Control (LLC) •
TCP/IP Application Programmability
The software associated with the terminal systems conform to the following standards: •
OLE for Retail POS 1.4 •
JavaPOS for Retail 1.4 •
HTML 4.0 •
ECMA Script •
Java Development Kit 1.1.3 Operating System Information
The software associated with the terminal systems conform to the following standards: •
Microsoft Windows NT •
Microsoft Windows 2000 •
Windows Xpe 1-43
1-44
Chapter 1: 7401-2xxx/3xxx Product Overview
Migration
Retail Applications
•
Existing TAPS‐based applications are not supported. These applications must be migrated to Windows NT. •
Existing Windows 3.11‐based NICE applications are not supported. These applications must be migrated to Windows NT. •
Existing OPOS‐based applications can be supported on terminals running Windows NT. •
Windows NT, Windows 2000, and Windows XPe are the only supported operating systems. Retail Peripherals
Since the system is a dedicated platform with limited expansion capability, a limited subset of the retail peripherals is supported. No support is provided for the following peripheral types: •
OCIA Peripherals •
RS‐485 Peripherals •
Wedge Keyboard •
Operator Line Display Chapter 1: 7401-2xxx/3xxx Product Overview
1-45
Retail Systems
This release of software does not support the following features found in previous retail systems: Platform
•
ISA Cards •
Standard PCI Cards •
Multi‐port Serial •
Memory Dump Networks
•
M‐11 •
StarLAN •
10base2 Ethernet •
Token Ring •
NetBEUI /Net BIOS •
NetWare Platform Load
•
SLP, SLF, RPL •
PCMCIA Disk, PCMCIA Flash Disk Chapter 2: 7401-4xxx Product Overview
19889d
Introduction
The 7401‐4xxx model is a ruggedized version ideal for unattended use in financial environments. The major hardware features of this model are a 15 inch flat panel display with touch screen input, LAN connectivity, stereo audio, an integrated secure cabinet, an 80‐column printer, a motorized MSR or card‐swipe MSR, an integrated Pin Pad, and the integrated rugged keyboard with trackball. 2-2
Chapter 2: 7401-4xxx Product Overview
Serial Number/Model Number Label
The unitʹs serial number, model number, tracer number, and date of manufacture are included on a label located inside the cabinet on the left side above the printer module. NCR
7401-4512-8001
50-12345678
Class/Model
Serial Number
Mfg
Date: 03/15/02
F015,F026,F105,F122,F202,F431,F595
Date Manufactured
Feature Number(s)
19890
7401-4xxx Model Numbers
7401‐4512 15‐in. Capacitive LCD, CD‐ROM, 4 Serial Ports, Parallel Port, Ethernet Cable 7401‐4665 15‐in. Capacitive LCD, CD‐ROM, 4 Serial Ports, Parallel Port, Ethernet Cable, Celeron 700 MHz, and 10 GB HDD 7401‐4675 15‐in. Capacitive LCD, CD‐ROM, 4 Serial Ports, Parallel Port, Ethernet Cable, PIII 1 GHz, and 20 GB HDD Chapter 2: 7401-4xxx Product Overview
2-3
Hardware Modules
Base Unit
•
•
•
Processor Board −
Pentium III/Celeron processor −
XGA chipset (15‐inch monitor) −
MPEGII chipset −
1 MB Flash BIOS (not CMOS) −
Four RS‐232 ports (two optionally powered) −
10/100BaseT Ethernet LAN chipset, Wake‐on‐LAN support, and RJ‐45 port −
PC Audio with an internal mono speaker −
SoundBlaster 16 compatible audio chipset −
Two USB type A ports −
PS/2 keyboard port −
External VGA display port −
Dual display support −
External stereo speaker port −
Internal PS/2 mouse (dedicated to the touch screen) −
One SODIMM (Small Outline DIMM) RAM socket −
64 MB memory on board −
IDE support for a hard disk, a CD ROM, and an optional flash disk ®
POS Connector Board −
Internal parallel port (dedicated to the optional customer display) −
Microphone 15‐inch Operator Display – active LCD with capacitive or resistive touch 2-4
Chapter 2: 7401-4xxx Product Overview
•
2.5‐inch low or high capacity hard disk •
Integrated Motion Sensor, capable of waking up the terminal from a low power state •
Integrated CD‐ROM •
Integrated Infrared Sensor •
Integrated Power Supply •
Full Page Printer •
Reset switch which can be used to recover from a lock‐up condition •
Table‐top mount •
3‐meter Ethernet cable •
U.S. power cord Hardware Options
•
Integrated 3‐track ISO MSR •
Motorized Card Reader •
64/128 MB or 256 MB memory •
256 MB Compact Flash •
Ruggedized Keyboard •
Pin Pad •
Trackball Chapter 2: 7401-4xxx Product Overview
2-5
Terminal Components not Supported
It is important to note that the terminal does not support the following components. Not Supported
Alternative Implementation
CMOS for hard totals, logs, Hard disk, compact flash, or server and tallies storage Removable media, e.g., a flex disk LAN communication to an NT server via standard protocols SLP terminal loading Local storage, TCP/IP networking and PXE loading Keylock for security (X, L, R, S) Reset switch based security ISA and PCI Expansion slots USB and LAN based devices (future) DVD ROM Internal UPS External UPS Manual Video and audio controls Software controlled DOS, Windows 3.1, Windows NT 3.51, Windows 9x, OS/2 Windows NT 4.0, Windows 2000, Windows XPe 133/266 MHz Pentium Processors Intel Pentium III 500/700 MHz, 1 GHz, and Celeron 450/550/600/700 MHz processors 2-6
Chapter 2: 7401-4xxx Product Overview
System Configuration Diagram
Power
LAN
Full Page
Printer
Power
Supply
Parallel
Speaker
Speakers
IRDA
IRDA
Receiver
MSR
Swipe
MSR
USB 1
USB
Camera
(Kit)
Processor Board
S-Video
USB 2
(Powered)
COM1
RS-232 Ports
(Powered)
COM2
COM3
Trackball
Pin Pad
COM4
Motorized
Card
Reader
Power
Supply
19794b
Chapter 2: 7401-4xxx Product Overview
2-7
Hardware Module Descriptions
Processor Board
Processor/Chip Set
The terminal uses an Intel architecture processor, which permits it to leverage existing software drivers and applications, as well as provide the greatest flexibility in choosing an operating system. This provides several other advantages: •
Capable of SW MPEG‐1 or MPEG‐2 playback at 30 frames per second with 22 kHz stereo audio (may be limited by OS constraints). •
SoundBlaster®‐compatible audio •
Expansion capabilities for optional features and future requirements (ISA/PCI bus and USB) Release 2.4
• Intel Pentium III 500 MHz or 700 MHz Processor, or Intel Celeron 550 MHz or 600 MHz Processor (µPGA package) used with the Intel 440BX PC chipset. The 440BX chipset consists of the 82440BX System Controller (North Bridge chip), also called the MTXC, and the 82371AB (South Bridge chip), also called the PIIX4. •
A 100 MHz system bus •
64 MB memory with ability to add SODIMMS to increase the memory capacity of the terminal 2-8
Chapter 2: 7401-4xxx Product Overview
Release 2.5
• Intel 700 MHz Celeron Processor or Intel 1 GHz Pentium III Processor (BGA package) on board, removing the µPGA processor socket. Intel 440BX chipset same as in Release 2.4 •
100 MHz system bus and memory support, 64‐bit bus width, and AGP video interface. •
128 MB memory with ability to expand like Release 2.4. Video Subsystem
The video subsystem supports the following LCD types: •
15‐inch active matrix (TFT) 768x1024 with 64 k colors Support for the LCD integrated display is provided internally. External support for SVGA monitors (800x600 [or better] resolution and 64 k [or better] colors) is provided by a CRT 15‐Pin D‐shell connector. The LCD back lighting is also software controlled. In addition to OFF and ON modes, a dimmed mode is supported in the hardware to allow increased tube life. If appropriate software drivers are loaded, full brightness is restored when touched, motion detection (Motion Sensor section), or an application request (i.e., to play promotional material on a preset schedule). Ethernet 10/100Base-T LAN Communications
The 7401‐4xxx terminal has an Intel 82559 LAN Controller that supports 10/100Base‐T Ethernet. Ethernet 100Base‐T is also known as ʺFast Ethernet.ʺ The Boot ROM for diskless boot functionality is included in the 1 MB system ROM. The hardware is compatible with the TCP/IP, DHCP, and TFTP protocols required for remote boot of the platform. Appropriate software must be used to enable each protocol used over the Ethernet link. The terminal may be connected to either a 10 MB/s or 100 MB/s Ethernet connection. The hardware automatically selects the correct speed (if enabled by software to do so). Chapter 2: 7401-4xxx Product Overview
2-9
The LAN hardware supports wakeup packet capability as defined in the Device Class Power Management Specification, Network Device Class (available from Microsoftʹs web site). When the platform is in the Soft OFF state (refer to the Advanced Power Management section that follows), receipt of a Wakeup Packet on the LAN can return the system to the ON state, if this feature is enabled by software. Due to limitations of the LAN controller and the OS, all features described in the Network Device Class specification may not be available. 100Base‐T is wired identically to 10Base‐T, except that the twisted pair cable must be Category 5 and the hubs must permit 100 or 10/100 MB/s operation. Although 10Base‐T will operate on Category 3 twisted pair, or NCR ʺ747ʺ cable, an upgrade to Category 5 is required for 100Base‐
T. A customer desiring to use the terminal in an existing 10Base‐T environment can do so and simply run at 10 MB. In order to upgrade to 100MB/s, Category 5 cable and 100 or 10/100 hubs must be installed. NCR strongly recommends the use of Category 5 for all new cabling, even if the customer initially intends to run only 10Base‐T. LED Indicators for Link Integrity (verifies cable and hub connection are good) and LAN speed is provided on the Processor Board near the row of connectors at the bottom of the e‐box. The LED is ON (yellow) when the speed is running at 100 MB/s. Link Integrity is provided to the PC chipset to permit boot‐up software to verify the presence of the LAN connection. Software must allow 2 seconds after power‐up in order for the Link Integrity signal to become valid. 2-10
Chapter 2: 7401-4xxx Product Overview
Wireless LAN Communications
When a wired Ethernet connection is not desired, a wireless LAN adapter may be installed in the PCMCIA socket. This requires that the PCMCIA daughter‐card feature be installed. A wireless LAN used in the terminal must meet the following requirements: •
Integrated antenna that meets the requirements of PCMCIA (PC Card) Extended Type 2 card definition (a maximum of 5‐cm additional length). •
Power consumption within the capabilities of the PCMCIA daughter‐card. •
Signaling requirements within the capabilities of the terminal PCMCIA interface. The main restriction is that DMA transactions are not supported over the PCMCIA interface. •
Device drivers for the targeted operating system must exist. •
Appropriate infrastructure (server support, Base Stations, Ceiling Antennas, etc) must be present in the installation site, and the maximum RF range of the wireless system must not be exceeded. Interoperability ‐ While the 802.11 standard provides an interoperable protocol definition, there are vendor‐specific extensions to the protocol that encourage users to stay with one supplierʹs equipment. This also applies to wireless infrastructure and access points, 802.11 does not govern this operation. Mixing of RF suppliers on a site is not recommended until the RF suppliers have demonstrated interoperability. The wireless networks operate at speeds of 1‐2 MB/s with 2 percent packet loss typical. The application developer must be aware of the performance limitations and design applications that are acceptable to the customer when run over the slower network. Remote Wakeup over the wireless network is not possible because the cards do not support it. An alternative is to use the system real‐time clock wake up at a scheduled time. Chapter 2: 7401-4xxx Product Overview
2-11
Depending on the OS environment, Remote Boot may be supported, but due to the slow network speed a large boot image may take an unacceptably long time to load. The application developer needs to ensure that the load is of reasonable size. The wired Ethernet connection is not certified for use in configurations where a wireless adapter is installed. Universal Serial Bus
Two USB Type‐A ports are provided on the terminal. USB Host Controller support is provided in hardware on the Processor Board. Note: Third party USB peripherals require support from the operating system, which is currently limited to Windows 2000 and Windows Xpe. The terminal must use the I/O Networks drivers to support the NCR USB printer and scanner products. These drives are available under Windows NT, Windows 2000, and Windows XPe. Serial Ports
The 7401‐4xxx Celeron/Pentium III processor board provides two RS‐
232 ports (9‐pin D‐shell connectors, Ports 1 and 2) directly on the board and supports two additional RS‐232 ports. Ports 3 and 4 require an optional harness connection to the board. Ports 1 and 3 can be supplied with +12 V DC on Pin 9 when properly set up in the BIOS. The total power drawn by Ports 1 and/or 3 must be within the limits of the capabilities of the power supply. Refer to the following table for RS‐232 pin‐out information. The BIOS permits flexibility in mapping resources. However, a fully‐
loaded system (2 PCMCIA cards that require IRQs, four serial ports in use, USB in use, parallel port in use, and MSR) may not have enough available IRQs to support all serial ports. Use a USB serial port expander to overcome this PC architecture limitation. 2-12
Chapter 2: 7401-4xxx Product Overview
Port 2 shares hardware resources with the IRDA connection; if IRDA is in use, Port 3 is not available. RS-232 DB-9 Male Connector Pinout
Pin
1
2 3 4 5 6 7 8 9 Port A
Port B
DCD RXD TXD DTR GND DSR RTS CTS RI or +12* DCD
RXD TXD DTR GND DSR RTS CTS RI * If Port 1 or 3 are powered, pin 9 will be +12 V. Hardware Monitor
The hardware monitor generates an interrupt to the system whenever any of the internal voltages used by the system processor goes above or below the acceptable operating range. An interrupt is also generated when the temperature of the Processor exceeds safe levels. Software can use this indication to slow or stop the system and/or force a reset. PCI Expansion Header
A single expansion header is provided to support optional features, such as the PCMCIA for Wireless LAN Board. This board supports two Type 2 or one Type 3 PCMCIA type cards. IDE Header
A standard IDE header is provided to support a 2.5‐inch hard disk drive and an integrated CD‐ROM. This header al supports the optional 256 MB IDE compact flash available in place of the hard disk. Chapter 2: 7401-4xxx Product Overview
2-13
Audio
The base unit has SoundBlaster‐compatible audio. Wave table synthesis is not supported. FM synthesis and MIDI are supported in the hardware, but requires software driver support to function. Higher quality integrated stereo speakers may be added as an option to the terminal. The amplifier is located on the Processor Board; the speaker output is provided on a header that receives the harness from the speaker module. In addition, a Line Out is provided on a 3.5 mm stereo jack that permits connection of external amplified speakers. The integrated stereo speakers, or an amplifier connected to Line Out, must be used in order to play SoundBlaster (audio subsystem) audio. However, an internal EUI speaker provides PC speaker functionality (beeps and tones) for all configurations. The volume control can be set during system configuration. The PC speaker sounds (such as beeps and touch clicks) are directed into the audio subsystem and are audible if speakers are connected. •
Release 2.0 – 2.4 processor boards use a Cirrus/Crystal CS4614 (PCI‐
based) sound controller that supports DirectX 6 sound. •
Release 2.5 processor boards use an ESS Allegro ES1989 sound controller that supports DirectX 8 sound. Magnetic Stripe Reader
A 3‐track MSR head is available as an option. The ISO card format is supported. When card data is read, an interrupt is generated. A software device driver for the MSR must be loaded to enable the application to process the data. Touch Screen Controller
The MicroTouch ʺExcaliburʺ chip is used to interface the touch panel. This controller supports MicroTouch capacitive panels. 2-14
Chapter 2: 7401-4xxx Product Overview
In order to save an RS‐232 port, the touch data is delivered to the system through the mouse interface. This requires a mouse‐aware touch device driver for the appropriate OS. When the system is operating in the dimmed display mode, touch activity can restore full brightness if instructed by software to do so. When system is in low power mode, touch activity can generate the mouse port interrupt (IRQ12). Processor Board Connectors
All connectors are either keyed or impossible to plug incorrectly due to mechanical design of the product. External Connectors
Internal Connectors
VGA CRT RGB 15 pin D Shell LCD Ethernet RJ45 Back light Inverter Dual USB Type A Integrated Speaker Module External Stereo speaker (3.5mm jack) MSR Power supply Touch screen (PS/2) RS‐232 9 pin D shell (two, one with +12 V power option) Integrated Scanner (7401) PS/2 Keyboard Motion Sensor / Power Indicator Customer Display PCI Expansion header Cash Drawer IDE IRDA Parallel port (POS Board header) 20‐pin high density RS‐232 Conversion connector Cash Drawer port (POS Board header) Microphone S‐Video Chapter 2: 7401-4xxx Product Overview
2-15
Flash Disk Interface (Discontinued)
The 7401‐45xx processor board provides support for a flash disk array in the form of an M‐Systems DiskOnChip. A 32‐pin socket is provided for this feature. The flash disk must be installed and enabled in BIOS Setup. This feature is not available on the 7401‐46xx processor boards. NCR Retail Specific Hardware
The 7401‐4xxx Processor Board contains logic that provides support for the custom retail interface. The logic controls the following features: •
Magnetic Stripe Reader Interface •
Motion Detector •
Touch Screen Interface MSR
The MSR interface supports a maximum of 3 tracks of magnetic stripe information for support of ISO format cards. Activate the MSR interface by enabling it in BIOS Setup under IO Configuration. The MSR interface controller is a memory‐mapped device, which can reside at system memory addresses CA000, CC000, or D0000. If MSR capability is not desired, it may be disabled through BIOS Setup. Power LED
The Processor Board provides support for an external power LED through the onboard Motion/Power LED connector. This LED is controlled through the SMC 37C935 GPIO pins. Once the SMC chip is programmed to support the Power LED function on GPIO pin 13, the LED will be turned ʺonʺ anytime all power to the Processor Board is good. The systemʹs power management software has the option to turn the LED off indicating the system is in a power‐managed mode. 2-16
Chapter 2: 7401-4xxx Product Overview
Graphics Subsystem
The 7401‐45xx processor boards are equipped with a SMI Lynx SVGA LCD/CRT 3DM graphics controller with 8 MB of integrated synchronous graphics DRAM. The 7401‐46xx processor boards have an SMI Lynx 3DM/3DM+ graphics controller. The processor boards support linear addressing by creating a ʺholeʺ in the memory address space at the 63 MB boundary. When the system is configured for 64 MB and linear addressing is enabled, the last 1 MB of system memory is unusable; therefore, the board will report that total available system memory is 63 MB. Because a hole in memory creates a non‐contiguous address space, enabling linear addressing when total system DRAM is greater than 64 MB is not recommended. Video linear addressing is enabled through PC Setup under the Integrated Peripherals menu. The processor also supports VESA standards such as the VESA DPMS protocol to place a DPMS compliant monitor into power savings modes. Resolutions Supported
Resolution
Colors
Max Vfreq
800x600x8bpp 256 85 Hz 800x600x16bpp 64 k 85 Hz 800x600x24bpp 16 M 85 Hz Colors Supported
Resolution
256 Colors
(8-Bit)
65,000 Colors
(16-Bit)
16.7 M Colors
(24-Bit)
800x600 512 k 1 MB 2 MB Chapter 2: 7401-4xxx Product Overview
2-17
DirectX Support
7401‐46xx processor boards with the Lynx 3DM/3DM+ chip support the following DirectX 6 Direct Draw and Direct 3D graphics functions. •
Rasterization acceleration •
Z buffer •
Alpha comparison •
Texture filtering •
Texture blending •
Mimap support •
Vertex and Global fogs •
Diffuse and specular color •
Alpha blending •
Triangle and line drawing The following DirectX 8 functions are not supported: •
TnL •
Vertex shader •
Pixel shader •
Bump mapping •
Box mapping 2-18
Chapter 2: 7401-4xxx Product Overview
Dual Displays
The 7401‐46xx processor boards are dual display (LCD and CRT) capable. In a dual display environment the 7401 terminal supports 16‐bit color when both displays are connected to the motherboard. Both displays must have the same maximum resolution capability. Refer to the following information for details about the implementation of a dual display configuration. •
Lynx Family Control Panel Specification 1.2 on the NCR 74xx Base System and Client Third party Drivers CD‐ROM (Product ID: D370‐0111‐0100) or in the video.exe self‐extracting Video Drivers file on the Retail Solutions Specific Third Party Products Drivers and Patches web site at: http://www.ncr..com/support/support_drivers_patches.asp?Class=retail_TPP. •
Retail Customer Information Display User’s Guide (BD20‐1431‐B) on the NCR Information Products web site at: http://www.info.ncr.com/eHome.cfm Board BIOS
Processor boards use a Phoenix BIOS, which is stored in Flash ROM and easily upgraded through the network connection or serial port. The Flash EEPROM also contains the Setup utility, Power‐On Self Tests (POST), and APM 1.2 (7401‐45xx) or ACPI 2.0 (7401‐46xx). The boards also supports system BIOS shadowing, permitting the BIOS to execute from onboard write‐protected DRAM. The BIOS displays a sign‐on message during POST identifying the type of BIOS and a four‐digit revision code. Chapter 2: 7401-4xxx Product Overview
2-19
FLASH memory Implementation
The Intel E28F800B5‐T70 Flash component is organized onboard as 1024 k x 8 (1 MB). While a typical PC BIOS image including video and LAN boot ROM code normally fits in 256 kB on the Pentium board and 512 kB on the Pentium III/Celeron board, the boards support a 1 MB flash ROM. The current Phoenix BIOS release only requires 256 kB of this 1 MB total. The Flash device contains the PC System BIOS along with the Video BIOS and LAN boot ROM which compresses the ROM images into a single binary image. The Flash device is divided into four areas, as described below. System Address
FLASH Memory Area
F0000H FFFFFH 64 kB Main BIOS EE000H EFFFFH 8 kB System BIOS Reserved during boot ED000H EDFFFH 4 kB Plug and Play ESCD Storage Area E0000H ECFFFH 52 kB System/VGA BIOS Reserved during boot BIOS Upgrades
Flash memory makes distributing BIOS upgrades easy. A new version of the BIOS can be installed from the hard disk, network or through a serial port. The disk‐based Flash upgrade utilities, Phlash.exe and WinPhlash.exe, ensure the upgrade BIOS extension matches the target system to prevent accidentally installing a BIOS for a different type of system. 2-20
Chapter 2: 7401-4xxx Product Overview
Setup Utility
The ROM‐based Setup utility allows the system configuration to be modified without opening the system for most basic changes. The Setup utility is accessible only during the Power‐On Self Test (POST) by pressing the <F2> key after the POST memory test has begun and before boot begins. A prompt may be enabled that informs users to press the <F2> key to access Setup. An external alphanumeric keyboard is recommended for running the BIOS CMOS Setup Utility. Otherwise, a Touch Screen can be used. Plug and Play
The Processor BIOS also has a setup option to support the Windows runtime plug and play utilities. When this option is selected, only devices critical to boot are assigned resources by the BIOS. Device Node information is available for all devices to ensure compatibility with Windows 95. System configuration information is stored in ESCD format. The ESCD data will be cleared upon loss of the CMOS voltage. Advanced Power Management
The 7401‐45xx processor BIOS has support for 1.2 Advanced Power Management (APM). The version of APM drivers loaded in the operating system by the user will determine to which specification the BIOS will adhere. In either case, the energy saving Standby mode can be initiated by a time‐out period set by the user. When in Stand By mode, the Processor Board reduces power consumption by utilizing the processor System Management Mode (SMM) capabilities and also spinning down hard drives and turning off VESA DPMS compliant monitors. During setup, the user may select which DPMS mode (Stand By, Suspend, Auto, or Off) is sent to the monitor. Chapter 2: 7401-4xxx Product Overview
2-21
The ability to respond to external interrupts is fully maintained while in Stand By mode allowing the system to service requests such as in‐
coming data or network messages while unattended. The user may also make any keyboard or mouse activity to take the system out of the energy saving Stand By mode. When this occurs, the monitor and IDE drives are turned back on immediately. Advanced Power Management (APM) is achieved by the following: •
DOS requires a driver (FS‐APM.dos) •
NT requires a driver (NCRSYSM.SYS) •
Windows 2000 must enable the operating system APM setting. The OS APM setting is disabled by default. NCR Gold Drivers are enabled in this setting by selecting: Start, Control Panel, Power Options, APM tab and check the box Enable Advance Power Management Support Click Ok to finish. ACPI
The 7401‐46xx terminal BIOS supports Advance Configuration Power Interface (ACPI) 2.0 power management. Primary differences between APM and ACPI are as follows: •
On an APM‐ managed terminal, the BIOS determines when to switch between power states and also performs the switch. When using ACPI, the operating system determines when to switch and informs the BIOS to perform the switch. •
APM must be enabled in the BIOS. ACPI is automatically active with the operating system. •
ACPI Setup options are available in the OS Control Panel. Refer to the table in the ACPI section of “Chapter 2: 7401‐2xxx and 3xxx Product Overview” for a comparison of the operation modes (states) supported by APM and ACPI power management. 2-22
Chapter 2: 7401-4xxx Product Overview
Operator Display
19889d
The 7401‐4xxx has a 15‐inch TFT (thin film transistor) 1024x760 with 65 K colors display. LCD Adapter Board
The signals from the LCD header on the Processor Board are brought to the LCD on a harness. Since there are multiple pin configurations and connector types being used on the LCD, a small adapter board is used to receive the LCD harness and map the signals into the correct pin‐out for the LCD panel. This board has a connector that plugs directly into the LCD panel. Chapter 2: 7401-4xxx Product Overview
2-23
LCD Backlight Inverter Module
An Inverter Board supplies power for the LCD Backlight, which is a separate module in the terminal. The inverter has a connector that receives power, ground, and a Backlight dimming signal from the Processor Board. The inverter generates the high voltage necessary to start and run dual CCFL (cold‐cathode fluorescent lamps) Backlights. A fuse located on the Inverter Board protects power to the inverter. This fuse protects the system from damage in the event of a Backlight or Inverter Board fault. The fuse is not field replaceable; if it blows, the safety characteristics of one or more components on the Inverter Board may have been compromised and the Inverter Board should be replaced. If one or both Backlight tubes become disconnected or otherwise open‐
circuited, protection circuitry shuts down the inverter. This avoids over‐powering a single tube and also protects against high voltage shorting. The Backlight tubes for the Active displays (TFT) can be replaced. Touch Screen
The Touch Screen completely covers the LCD and is mounted directly in front of the LCD, behind the front plastic bezel of the terminal. The touch controller on the Processor Board supports capacitive and resistive touch glass. The touch glass has an integrated harness that is routed into the Processor Board enclosure and is connected to a header on the Processor Board. The touch glass has a glare‐reducing texture that also helps hide fingerprints. 2-24
Chapter 2: 7401-4xxx Product Overview
Features
Integrated Speakers
LCD
Touchscreen
MSR
Keylock
Keyboard
Motorized
Card Reader
Trackball
Pin Pad
19889a
Secure Cabinet with Integrated Speakers
The 7401‐4xxx cabinet has an anti‐vandal keylock that secures the cabinet in a closed position. The cabinet has no exposed screws, however, the rear of the cabinet is designed to accept brackets for signage and branding. Supervisory and service personnel can unlock the cabinet to replace the paper roll or perform maintenance on the terminal. Integrated stereo speakers are included in the top of the 7401‐
4xxx Bezel that surrounds the LCD Touch Screen module. Chapter 2: 7401-4xxx Product Overview
2-25
Ruggedized Keyboard with Trackball
The 7401‐4xxx terminal has an anti‐vandal, spill resistant keyboard with trackball. The keyboard cover and keys, and the trackball are constructed of heavy duty, non‐destructive metal to withstand the extra use that occurs in unattended environments. U.S. and U.K. keyboard layouts are available as features. Other country‐specific keyboard layouts are available as kits. The Keyboard and Trackball are mounted in a keyboard tray that slides forward when the cabinet is open to permit easier access to the inside of the terminal for service personnel. For 7401‐4xxx terminals with a U.K. keyboard (F130, F131, or F132), changes are required to the Regional Settings in the Control Panel. Refer to Chapter 4 for details. Pin Pad
A secure anti‐vandal pin pad, constructed of non‐destructive metal is available as a feature. The Pin Pad with 10 numeric and 6 function keys is integrated into the keyboard tray next to the keyboard and trackball. The Pin Pad has a 64 KB memory for application use and 64 KB for data storage. It has programmable protocols and speeds (1200‐19200 bps). When the personal identification number (PIN) is entered, the Pin Pad combines the PIN with the card data, encrypts this information, and sends it to the host for verification. This device has a serial interface and is powered by a COM Port C. The Port C Powered Port option must be set in the BIOS. The Pin Pad is pre‐configured for encryption by an authorized encryption facility before it is integrated into the keyboard. OPOS support is not available with the Pin Pad 2-26
Chapter 2: 7401-4xxx Product Overview
Motorized Card Reader
An optional Motorized Card Reader is available to provide MSR card‐
reading functionality similar to an ATM. When inserted, the card is fed into the reader and is retained there until the transaction is complete. The Motorized Card Reader has on‐board intelligence to process Magstripe Cards, Smart Cards, and Memory Cards: •
Supports bi‐directional read of magnetic stripe data (3‐track) •
Reads and writes all ISO 7816 T=0, T=1 micro‐processor Smart Cards •
Accepts cards with CP8 and ISO positions •
The card reader uses a vendor‐provided Windows Driver. OPOS support is not available with the motorized card reader. •
This device is powered by a 12 VDC power supply. Magnetic Stripe Reader
A single 3‐track analog MSR is available as a feature, supporting ISO format cards. When the MSR is not desired, a filler piece for the MSR section is included to make the unit appears uniform. Chapter 2: 7401-4xxx Product Overview
2-27
Full Page Printer
The 7401‐4xxx has a full page thermal sheet printer that provides high resolution 300 dpi (11.81 dots per mm) printing with a loop presenter and cutter. Paper Roll
Printhead
Lever
Paper
Presenter
19798e
•
The printer uses a large 6 in. diameter paper roll (650 ft. at 3.2 Mil thickness) with selectable paper widths from 165 mm to 216 mm (6.5 in. to 8.5 in.). •
A Registration Mark sensor is supported for setting paper lengths. •
Printer sensors provide alerts for paper out, paper low, paper in presenter, Printhead temperature, Printhead level position, and paper jam. •
The Printer uses a vendor‐provided Windows Driver. OPOS support is not available with the full page printer. •
This device is powered by a 24 VDC power supply. 2-28
Chapter 2: 7401-4xxx Product Overview
Other Integrated Devices and Indicators
Hard Disk Drive
A 2.5‐inch IDE hard disk is available to support Windows NT. The drive is the standard type that is used by notebook PCs. Integrated CD-ROM
An integrated CD‐ROM is mounted to the back of the core module behind the LCD Touch Screen inside the cabinet. The CD‐ROM is used to install terminal software and can be used for other functions requiring a CD‐ROM. Reset Switch
As a last resort, the Reset Switch can be used to reboot the system if the software reset port mechanisms fail. The switch is on the connector row at the bottom of the enclosure. Intentionally, it is not easily accessible, but can be operated without removing covers or using special tools. Reset Switch
19901a
Except when testing software in a lab environment, always disconnect the AC power cord. Reset Procedure
1. Gently press the Reset Switch and hold it in for at least four seconds. The screen goes blank. 2. Release the Reset Switch and then gently press it again. The system reboots. Chapter 2: 7401-4xxx Product Overview
2-29
Compact Flash
The 256MB compact flash can be used in a Windows XP embedded environment. When using the Windows XP embedded OS, an additional 128MB SDRAM SODIMM is required to support the necessary virtual memory requirements. The 256MB compact flash replaces the hard drive in the unit. Internal Speaker
The Internal Speaker is connected to the PC speaker output of the system chipset, not to the audio subsystem. It is connected to the Processor Board via a harness and mounted inside the Processor Board enclosure. POS Connector Board
The POS Connector Board is a small daughter board that mounts directly on the Cash Drawer and Parallel Port header. Connectors on the edge of this board form a second connector row above the Processor Board connectors. Connectors are available for two cash drawers, a customer display and a microphone. Power for the cash drawers (24 V) and VFD customer display (5 V and 12 V) is supplied by the Enhanced Power Supply through the parallel connector. USB Camera
The integrated USB Camera (available as a kit) supports the capture of a video image of individuals operating the EasyPoint 7401‐46xx terminal. 2-30
Chapter 2: 7401-4xxx Product Overview
Motion Sensor
The terminal hardware can detect movement near the terminal and enables software to prompt system operation from a low‐power state. Application software may also be able to make use of motion detection when in the ON state if it is enabled by lower‐level software. USB
Camera
IRDA
Motion Sensor
Power/Status LED
19889f
Motion is detected as a change in ambient light level that is greater than a software‐controlled threshold. A photodiode mounted behind the front bezel of the unit senses ambient light levels. The photodiode resides on a small circuit board (the Motion Sensor Board). A harness connects the Motion Sensor Board to the amplifier and motion sensing logic on the Processor Board. The user Power/Status LED indicator shares this board. Power/Status LED
The LED power indicator indicates that power is present. The LED is green when the processor and BIOS are operating properly. The LED is mounted behind the front bezel on the same board as the motion sensor. Chapter 2: 7401-4xxx Product Overview
2-31
Power OK LED
The Power OK LED is located behind the Cable Cover, between the Customer Display and Cash Drawer connectors. Power OK
(5V and 24 V)
19901d
LAN Status LEDs
LAN Integrity
(Green)
LAN Speed
Yellow = 100 MB
OFF = 10 MB
19901c
Power Supply
The terminal uses an AC adapter for its power supply, mounted inside the cabinet. The supply is inaccessible when the terminal is in the normal operation with the cabinet closed. The mounting position to prevent tampering, and sealed to help protect against spills or other environmental hazards. Note: The power supply automatically senses the proper AC voltage; therefore only normal servicing access is required. 2-32
Chapter 2: 7401-4xxx Product Overview
All power required to operate the base unit, PCMCIA option and PCMCIA cards, speaker option, scanner option, and bus‐powered USB peripherals is provided by the power supply. The Processor Board serves as the hub to distribute power to all terminal functions. Cash drawers, VFD customer display, PS/2 keyboard, PCMCIA daughter board and slots, scanner (through RS‐232 port), USB, hard disk, and the LCD all receive power through their respective Processor Board connectors. Motorized Card Reader Power Supply
The Motorized Card Reader uses an AC adapter for its power supply, mounted on the inside of the cabinet. Full Page Printer Power Supply
The Full Page Printer uses an AC adapter for its power supply, mounted inside the cabinet under the printer. Integrated Speakers
The 7401‐4xxx includes two stereo speakers in the top of the Bezel above the LCD Touch Screen. The maximum output of the speakers is approximately 6 watts per channel. Chapter 2: 7401-4xxx Product Overview
2-33
EasyPoint 45 Pedestal
A cone‐shaped, basic pedestal for the 7401‐4xxx terminal. The pedestal is black and is metal and wood construction. The base of the pedestal has the following features: •
Mounting holes to secure the unit to the floor •
Adjustable feet •
Cable access door •
Space for an NCR 4055 UPS •
Cable routing hole and channel 20047a
Chapter 3: 7401-2xxx/3xxx Hardware Installation
Introduction
The 7401‐2xxx and 3xxx terminals are fully assembled at the factory. This chapter explains the mounting options and how to connect optional hardware components to these terminals. Installation Summary
The terminal should be removed from the shipping packaging and visual checks made to verify the correct hardware configuration. The system is then configured and any communication cables are connected. Only after inspection should the power cord be attached to the system and then connected to the AC power source. Power‐up self‐tests will run to verify basic functionality. ROM‐based setup should be used to configure network options. Full configuration depends upon the system server and the management web site. 3-2
Chapter 3: 7401-2xxx/3xxx Hardware Installation
Installation Restrictions
•
Before installing the terminal, read and follow the guidelines in the NCR EasyPoint 7401 Site Preparation Guide and the NCR Workstation and Peripheral AC Wiring Guide. •
Install the terminal near an electrical outlet that is easily accessible. Use the power cord as a power‐disconnect device. •
Do not permit any object to rest on the power cord. Do not locate the terminal where the power cord can be walked on. •
Use a grounding strap or touch a grounded metal object to discharge any static electricity from your body before servicing the terminal. •
If the power cord is replaced, it must be replaced with the same type of cord with the protective shroud. •
Do not route the power cord through openings with sharp edges. Caution: This unit contains hazardous voltages and should only be serviced by qualified service personnel. Caution: DO NOT connect or disconnect the transaction printer while the terminal is connected to AC power. This can result in system or printer damage. Warning: The 7401 must be mounted securely to prevent a hazard. It must be installed in accordance with local building codes. The post or wall on which the unit is mounted should be able to withstand four times the weight of the unit, which is approximately 20 lbs. (9 kg). Chapter 3: 7401-2xxx/3xxx Hardware Installation
3-3
Connecting the Cables
The cable connectors are located behind the Core Module. The procedure for accessing the connectors is different for Fixed‐Angle Mounts and Tilt Mounts. Fixed-Angle Mount (F504)
1. Remove the screws that secure the Core Module to the Fixed‐Angle Mount. Core Module
Fixed Angle Mount
Remove Screws
(One on each side)
17339
3-4
Chapter 3: 7401-2xxx/3xxx Hardware Installation
2. Raise the bottom of the Core Module, pull out the Core Module Support and rest the Core Module on the Core Module Support. Core Module
Metal Locking
Tabs
Keyboard Port
Core Module
Support
17340
3. Route the cables as described in the following section, Cable Routing. Chapter 3: 7401-2xxx/3xxx Hardware Installation
3-5
Fixed-Angle Mount (F503)
1. Remove the screw that secures the Core Module to the Fixed‐Angle Mount. Core Module
Remove Screws
(one on each side)
Pedestal Mount
16396
3-6
Chapter 3: 7401-2xxx/3xxx Hardware Installation
2. Remove the Core Module from the Fixed‐Angle Mount. 16397
3. Route the cables as described in the following section, Cable Routing. Chapter 3: 7401-2xxx/3xxx Hardware Installation
3-7
Cable Routing
The cables can be routed either out the bottom or rear of the Fixed‐
Angle Mount. The Power Cord is shipped from the factory routed through the bottom exit hole in the Fixed‐Angle Mount. To route the cables out the rear exit, you must move the grommet from the bottom exit to the rear exit hole. Since these openings have different shapes, you must trim the grommet to length. 1. Remove the grommet from the bottom exit hole. Grommet
Rear Exit
Bottom Exit
16481
3-8
Chapter 3: 7401-2xxx/3xxx Hardware Installation
2. Press the grommet along the bottom edge of the rear exit and cut it to length. Measure
and Cut
16482
3. Install the remainder of the grommet to the other three sides of the opening. Trim the
Excess
16483
4. Trim the excess length. Chapter 3: 7401-2xxx/3xxx Hardware Installation
3-9
Cable Connector Identification
The cable connectors are located on the back of the Core Module. CRT
LAN
S-Video
USB 1
USB 2
COM 1
Keyboard
PS/2
COM 2
RS-232
(COM 3 & 4)
Speaker
Power
Microphone
(optional)
Audio Out
Cash Drawer
IRDA
Parallel
18011
Note: COM1 and COM3 can be powered ports. They are enabled in the BIOS. Note: The COM3 & COM4 RS‐232 ports require the Dual RS‐232 Port Kit (7454‐F072) feature After connecting the cables, reassemble the terminal. 3-10
Chapter 3: 7401-2xxx/3xxx Hardware Installation
Tilt Mount
Tilt Mount cable connectors are located on the underside of the Core Module, under a cable cover. 1. Tilt the display to access the cable connectors. Cable Cover
Thumb Screw
15968
2. Loosen the thumbscrew that secures the Cable Cover and remove the cover. Chapter 3: 7401-2xxx/3xxx Hardware Installation
3-11
Cable Routing
The Tilt Mount has three places to secure cables to the base of the unit by using a cable tie wrap. Remove the power supply cover or customer display from the base of the unit, two thumb screws on bottom rear, and use a tie wrap to secure the Ethernet cable to one of the provided molded cable tie holders on the base. This should provide sufficient strain relief to prevent the cable from becoming tight and damaging the connector on the Processor Board. The peripheral cables are routed down through the Mount Assembly and out the rear of the unit. Bottom View
16413a
3-12
Chapter 3: 7401-2xxx/3xxx Hardware Installation
Cable Connector Identification
1. Connect the peripheral and LAN cables. The illustration below can be used to identify the connectors on the terminal. See the sections that follow for specific installation instructions for each of the peripherals. Audio Out
Speaker
CRT
COM 1
LAN
Keyboard
PS/2
S-Video
COM 2
USB 1
USB 2
RS-232
(COM 3 & 4)
Cash Drawer
Power
IRDA
Microphone
(optional)
Parallel
18010
Note: COM1 and COM3 can be powered ports. They are enabled in the BIOS. Note: The COM3 & COM4 RS‐232 ports require the Dual RS‐232 Port Kit (7454‐F072) feature 2. After installing the peripheral and LAN cables replace the cable cover and re‐tighten the thumbscrew. Chapter 3: 7401-2xxx/3xxx Hardware Installation
3-13
Installing Peripherals
This section describes how to install transaction printers and other peripherals on the 7401‐2xxx and 3xxx terminals. Installing a Transaction Printer
The following printers can connect through a non‐powered RS‐232 or USB connector. They all require an external power supply. The illustrations show how to connect to the 7194 printer. Connecting to the other three printers is done in the same manner. Refer to the corresponding printer owner’s guide for illustrations of the connector locations. •
7158 •
7167 •
7194 •
7197 RS-232 Installation
1. Connect the Printer Interface Cable to the RS‐232 Connector on the back or on the bottom of the printer. Cash Drawer Connector
Power Connector
RS-232 Connector
16632a
3-14
Chapter 3: 7401-2xxx/3xxx Hardware Installation
2. Connect the other end of the printer cable to one of the RS‐232 (non‐powered) ports on the terminal. 3. Connect the external power supply cable to the Power Connector on the printer. 4. Plug the external power supply AC cable into an AC outlet. USB Installation
1. Connect the Printer Interface Cable to the USB Connector on the back or on the bottom of the printer. Cash Drawer Connector
Power Connector
USB Connector
16632b
2. Connect the other end of the printer cable to one of the USB connectors (USB 1 or USB 2) on the terminal. 3. Connect the external power supply cable to the Power Connector on the printer. 4. Plug the external power supply AC cable into an AC outlet. Chapter 3: 7401-2xxx/3xxx Hardware Installation
3-15
7401-K590 Self-Service Printer
For information about installing the K590 self‐service printer, refer to the NCR 7401‐K590 Self‐Service Printer Owner’s Guide (B005‐0000‐1346). 18012
3-16
Chapter 3: 7401-2xxx/3xxx Hardware Installation
Installing a Cash Drawer
1. Place the cash drawer in the desired location, within cable length of the terminal. 16269
2. Connect the cash drawer cable to the terminal cash drawer connector. Cash Drawer
15969c Note: The Cash Drawer can optionally be connected to the printer. Chapter 3: 7401-2xxx/3xxx Hardware Installation
3-17
Installing a Second Cash Drawer
The terminal supports a 2‐drawer configuration with a Y‐cable (1416‐C372‐0006). 1. Place the cash drawer in the desired location, within cableʹs length of the terminal. 2. Connect the Y‐cable to the terminal cash drawer connector. Dual Cash Drawer Y-Cable
1416-C372-0006
16270
Note: The Y‐cable can optionally be connected to the printer. 3-18
Chapter 3: 7401-2xxx/3xxx Hardware Installation
Installing PC Cards
PC cards (wireless, modem, and so forth) can be installed on any terminal with the Dual PCMCIA Port (7401‐K060). Only terminals with a Fixed‐Angle Mount require the removal of the Core Module from the mount to install a PC card. If you do not have a Fixed‐Angle Mount terminal, skip to Step 3. 1. Remove the screws that secure the Core Module to the Fixed‐Angle Mount. Core Module
Remove Screws
(one on each side)
Pedestal Mount
16396
Chapter 3: 7401-2xxx/3xxx Hardware Installation
3-19
2. Remove the Core Module from the Fixed‐Angle Mount. 16397
3-20
Chapter 3: 7401-2xxx/3xxx Hardware Installation
3. Remove the Wireless Antenna Cover. Wireless Antenna Cover
Screws (2)
Fixed-Angle Mount Model
Wireless Antenna Cover
Screws (2)
Tilt Mount Model
18615
4. Insert the PC card (wireless card, modem, and so forth). Chapter 3: 7401-2xxx/3xxx Hardware Installation
3-21
Mounting a Fixed-Angle Mount Terminal
A terminal attached to a Fixed‐Angle Mount can be installed on a: •
Pedestal (or on the edge of a flat horizontal surface) •
Wall •
Pole Pedestal Mount
Pole Mount
Wall Mount
16414
The sections that follow describe how to perform these installations. For installation instructions of feature kits not described in this section, refer to the Feature Kits appendix. 3-22
Chapter 3: 7401-2xxx/3xxx Hardware Installation
7401-K522 Pedestal Mount
To install the Fixed‐Angle Mount on a pedestal or the edge of flat horizontal surface, use the K522 Table Mount Bracket Kit. Flat Horizontal Surface
K-522 Mounting Plate
Securing Screw
16363
1. Secure the Mounting Plate to the flat horizontal surface of choice. Position the plate to permit the scanner module to hang over the edge of the surface. Chapter 3: 7401-2xxx/3xxx Hardware Installation
3-23
2. The cables for the 7401 can be routed through an opening in the back of the Fixed‐Angle Mount, or you can remove the plastic knockout in the bottom of the mount to permit routing the cables down through the flat surface. If you are routing cables out the bottom, drill a hole in the flat surface aligned with the rectangular opening in the Mounting Plate. 3. Install the 7401 to the Mounting Plate. The slots on the bottom of the Fixed‐Angle Mount mate to locking tabs on the Mounting Plate. 4. Install the Securing Screw. 3-24
Chapter 3: 7401-2xxx/3xxx Hardware Installation
7401-K521 Wall Mount
To install the Fixed‐Angle Mount on a wall, use the K521 Wall Mount Bracket Kit. 1. Secure the Wall Bracket to the wall with lag screws into the studs, or with hardware of similar strength. The recommended viewing height for the terminal is 1.2 m (48 in.) from the floor. Lag Screws (4)
1.2 m (48 in)
Recommended
Height from Floor
K521 Wall Bracket
16415
Chapter 3: 7401-2xxx/3xxx Hardware Installation
3-25
2. Install the slots on back of the Fixed‐Angle Mount onto the locking tabs of the Wall Bracket. 16416
3-26
Chapter 3: 7401-2xxx/3xxx Hardware Installation
7401-K521 Wall Mount with 7401-K530 Pole Brackets
To install the Fixed‐Angle Mount on a pole, use the K520 Post Mount Bracket Kit (same as K521 but includes strap kit). 1.2 m (48 in)
Recommended
Height from Floor
K521
K530
16392a
1. Cut two metal straps to length (pole circumference plus 2 inches). Chapter 3: 7401-2xxx/3xxx Hardware Installation
3-27
2. Loop one end of the metal strap through the slot on the clamp. Loop strap through slot
16417
3. Insert the end of the clamp into the slot on the Wall Bracket as shown below. Locking Tabs
(facing away from pole
and pointing up)
Wall Bracket
Route clamp
through opening
nearest to pole
Insert clamp into slot
18009
Note: There are two openings that the clamp can be routed through. Use the larger opening for round poles (nearest the pole). Use the narrow slot for square/rectangular poles. 3-28
Chapter 3: 7401-2xxx/3xxx Hardware Installation
4. Insert the metal strap through the opening on the opposite side of the Wall Bracket. Route the strap
through the slot
16405
Chapter 3: 7401-2xxx/3xxx Hardware Installation
3-29
5. Wrap the metal strap around the pole and loop it through the other end of the clamp. 16406
6. Snug the clamp and then crimp the metal strap with a pair of pliers. 16409
3-30
Chapter 3: 7401-2xxx/3xxx Hardware Installation
7. Using a 5/16‐nut driver, tighten the clamp. Caution: Do not over‐tighten the clamps. 16407
8. Repeat the previous steps for the second clamp. Chapter 3: 7401-2xxx/3xxx Hardware Installation
3-31
9. Install the slots on back of the Fixed‐Angle Mount onto the locking tabs of the Wall Bracket. 1.2 m (48 in)
Recommended
Height from Floor
16392
3-32
Chapter 3: 7401-2xxx/3xxx Hardware Installation
10. For a pole mount installation, route the cables through the Wall Bracket as shown below. 16408
Chapter 3: 7401-2xxx/3xxx Hardware Installation
3-33
Installing a K501 Tilt Mount Terminal
A Tilt‐Mount terminal can be installed on a flat horizontal surface or a flat vertical surface. NCR
Table-Top Mount
Wall Mount
16429
3-34
Chapter 3: 7401-2xxx/3xxx Hardware Installation
7401-K533 Wall Mount
To install the Tilt Mount on a flat vertical surface, use the K533 Wall Mount Bracket Kit. 1. Secure the Wall Plate to the wall with lag screws (4) into the studs or with hardware of similar strength. The recommended viewing height for the terminal is 1.2 m (48 in.) from the floor. F501/K501
K533 Wall Mount
Adapter Plate
Release Lever
Wall Plate
16400a
2. Install the Wall Mount Adapter Plate to the bottom of the terminal with screws (4). 3. Install the terminal to the Wall Plate. The bottom of the Wall Mount Adapter Plate has slots that mate to locking tabs on the Wall Plate. 4. Latch the Release Lever. Chapter 3: 7401-2xxx/3xxx Hardware Installation
3-35
Wall Mounting a 7401-K502 Core Module
To flush mount the Core Module on a flat vertical surface, use the F502 Flush Mount Bracket Kit. Flush Mount w/Power Supply
Mounted on the Outside Wall
Flush Mount w/Power Supply
Mounted on the Inside Wall
16683
3-36
Chapter 3: 7401-2xxx/3xxx Hardware Installation
1. Secure the Wall Plate to the wall with lag screws (4) into the studs or with hardware of similar strength. The recommended viewing height for the terminal is 1.2 m (48 in.) from the floor to the center of the screen. Note: Drill a hole in the wall for the cables if you are mounting the power supply on the opposite side of the wall. Flush Mounting Bracket
Wall Plate
Cable Routing
Cable Routing
(through wall)
16684
2. Mount the Power Supply to the wall with screws (4). 3. Route all cables through the brackets and connect them to the terminal. 4. Install the Flush Mounting Bracket to the back of the terminal with screws (4). 5. Install the terminal to the Wall Plate. The bottom of the Flush Mounting Bracket has slots that mate to locking tabs on the Wall Plate. Secure the unit with the screw. Chapter 3: 7401-2xxx/3xxx Hardware Installation
3-37
7401-9212 LCD No-Cabinet (12.1-inch)
The 12.1‐inch LCD No‐Cabinet model is purchased by customers who design their own enclosures to meet their specific needs. This section provides information that must be considered when designing enclosures. Front View
18577
Back View
Motion Sensor
18743
3-38
Chapter 3: 7401-2xxx/3xxx Hardware Installation
Installation Guidelines
•
To prevent moisture from entering system, the front of the display must be in close contact with the opening in the enclosure. •
Within every custom enclosure, the Electronics Box Back Cover MUST remain installed because it helps dissipate the heat generated by the CPU. •
Adequate ventilation must be provided in every custom enclosure. The maximum allowable ambient temperature within any enclosure is 45o C (113o F). •
To prevent accidental shorts, the power supply and any other peripherals within the enclosure must be mounted securely and within reach of the display’s connectors. •
This model comes with a motion sensor that is at the end of a 381 mm (15 in.) cable. When using the motion sensor, it must be mounted between 25 and 76 mm (1 to 3 in.) below the bottom of the display and centered along the width of the display. (F753 [AT&T] includes a front enclosure in which the motion sensor is already mounted.) •
Compliance of this device with regulatory requirements must be verified in the end‐use application. •
This device is a component which requires a suitable enclosure in its end‐use application. The end‐use product in which this component is used should be certified in accordance with UL 1950, EN60950, IEC950 or other applicable safety standard. NCR displays are not designed for horizontal or inverted use. NCR displays must be mounted no more than 40o forward or backward from horizontal. Failure to follow this guideline could result in overheating.
Chapter 3: 7401-2xxx/3xxx Hardware Installation
3-39
Mounting Specification Illustrations
16 mm
(.63 in.)
12.59 mm
(.496 in.)
299.72 mm
(11.8 in.)
Front surface of display bezel must
protrude through enclosure to provide
secure and watertight fit.
NCR enclosure fronts
typically use a dimension of
302.26 mm (11.9 in.) +/-.254 mm (.01 in.) by
221.23 mm (8.71 in.) +/-.254 mm (.01 in.) with
radiuses in the corners of 2.54 mm (.1in.).
218.44 mm
(8.6 in.)
Use four #8-32 machine screws
to mount display into enclosure.
264.16 mm
(10.4 in.)
327.15 mm
(12.88 in.)
18576
3-40
Chapter 3: 7401-2xxx/3xxx Hardware Installation
7401-9512 LCD No-Cabinet (15-inch)
The 15‐inch LCD No‐Cabinet model is purchased by customers who design their own enclosures to meet their specific needs. This section provides information that must be considered when designing enclosures. Installation Guidelines
•
To prevent moisture from entering system, the front of the display must be in close contact with the opening in the enclosure. •
Within every custom enclosure, the Electronics Box Back Cover MUST remain installed because it helps dissipate the heat generated by the CPU. •
Adequate ventilation must be provided in every custom enclosure. The maximum allowable ambient temperature within any enclosure is 45o C (113o F). •
To prevent accidental shorts, the power supply and any other peripherals within the enclosure must be mounted securely and within reach of the display’s connectors. •
This model comes with a motion sensor that is at the end of a 381 mm (15 in.) cable. When using the motion sensor, it must be mounted between 25 and 76 mm (1 to 3 in.) below the bottom of the display and centered along the width of the display. •
Compliance of this device with regulatory requirements must be verified in the end‐use application. •
This device is a component which requires a suitable enclosure in its end‐use application. The end‐use product in which this component is used should be certified in accordance with UL 1950, EN60950, IEC950 or other applicable safety standard. NCR displays are not designed for horizontal or inverted use. NCR displays must be mounted no more than 40o forward or backward from horizontal. Failure to follow this guideline could result in overheating. Chapter 3: 7401-2xxx/3xxx Hardware Installation
3-41
Mounting Specification Illustrations
The following illustration shows the minimum allowable dimensions for the display opening when the optional cosmetic bezel is used. OPTIONAL COSMETIC BEZEL
GASKET MUST MEET INSIDE SURFACE
OF CUSTOM DISPLAY OPENING.
(OPTIONAL COSMETIC GASKET NOT USED
IF OPTIONAL BEZEL IS NOT USED).
348.7 mm
3.730 in.
4.2 mm
.165 in.
9.4 mm
.372 in.
270 mm
10.630 in.
USE 4 #8-32 MACHINE SCREWS IN
CORNERS OF UNIT TO MOUNT DISPLAY
INTO ENCLOSURE. 8 TOTAL SCREWS
MAY BE USED FOR MULTIPLE MOUNTING
CONFIGURATIONS.
FRONT SURFACE OF DISPLAY BEZEL (IF USED)
MUST PROTRUDE THROUGH ENCLOSURE. GASKET
MUST MEET INSIDE SURFACE OF CUSTOM
APPLICATION'S DISPLAY OPENING. THIS IS
TO PROVIDE A SECURE AND WATERTIGHT FIT.
345.4 mm
13.600 in.
156.2 mm
6.150 in.
141.6 mm
5.575 in.
175 mm
6.888 in.
292.4 mm
11.510 in.
22.9 mm
.900 in.
200.7 mm
7.900 in.
17.2 mm
.678 in.
19100
3-42
Chapter 3: 7401-2xxx/3xxx Hardware Installation
The following illustration shows the maximum allowable dimensions for the display opening when the optional cosmetic bezel is not used. Gasket must meet inside surface of custom
application's display opening. This is to provide
a secure and watertight fit.
312.5 mm
12.305 in.
13.7 mm
0.540 in.
27.5 mm
1.083 in.
235.6 mm
9.275 in.
Use four #8-32 machine screws in the
corners of the unit to mount the display
into an enclosure. Six total screws may
be used for multiple mounting configurations.
345.4 mm
13.6 in.
156.2 mm
6.15 in.
175 mm
6.888 in.
141.6 mm
5.575 in.
292.4 mm
11.51 in.
22.9 mm
0.900 in.
200.7 mm
7.9 in.
17.2 mm
0.678 in.
19101
Chapter 3: 7401-2xxx/3xxx Hardware Installation
3-43
4055 Uninterruptible Power System (UPS)
The NCR 4055 UPS is available in two models for the 7401: Item
Description
Volt/Hz
4055‐1300‐7194 300 VA/180 Watt Kiosk UPS 120 Volt/60 Hz 4055‐1500‐7194 500 VA/300 Watt Kiosk UPS 120 Volt/60 Hz 19412
Power Mon II® Software (G099‐4551‐0100) is recommended for use with the 4055 UPS and the 7401. Note: On Windows 2000, the Power Mon software may appear to not fully shut the system down. In such cases you may still see a dim display. This does not cause the loss of any data. 3-44
Chapter 3: 7401-2xxx/3xxx Hardware Installation
Installing the UPS
Refer to the User’s Manual delivered with the NCR 4055 UPS before installing the UPS for use with the 7401. To install the UPS with the 7401 connect the power cable and the LAN cable from the 7401 to the UPS. Then connect the in‐house LAN cable to the UPS, and the power cable on the UPS to the AC power outlet. Note: If you are installing the K580/K590 Self Service Printer or the Printer Spacer in a Pedestal Mount, the UPS must be installed first. See 7401‐K037 and 7401‐K052 Feature Kits for more information. Installing the Power Mon II® Software
The Power Mon II® software is provided on CD‐ROM and may be installed over a network or using an integrated or parallel CD‐ROM drive. All operating system versions of the Power Mon software and installation documentation are contained on the CD. The Power Mon installation should auto start. If it doesn’t, browse the CD for the operating system you are using and run Setup.exe for that operating system. Follow the prompts to install the software. Note: When you are prompted for Configuration Code, enter 7 to identify the interface cable type. Chapter 3: 7401-2xxx/3xxx Hardware Installation
3-45
Configuring the Power Mon II® Software
Once Power Mon is installed, configure the software by clicking on the Power Mon icon. Select “Configure UPS” to configure the UPS parameters such as voice messages and battery run time. Note: Battery run time for the 4055 UPS running with a 7401 and a K580/K590 Self Service Printer at a load of 150 VA is approximately: Item
Approximate Battery Run Time
300 VA (180 W) 13 minutes* 500 VA (300 W) 23 minutes* * Times are approximate and may vary due to modified configurations, environmental conditions, ambient temperature, battery age, and other factors. Reference NCR EasyPoint 7401Site Preparation (B005‐0000‐1255) for additional power requirements for the 7401. 3-46
Chapter 3: 7401-2xxx/3xxx Hardware Installation
Finalizing the Installation
After the hardware installation has been completed, the terminal can be powered up to finalize the installation. The operating system, along with platform modifications, is pre‐installed. The following sections list the steps involved to complete the system installation for each of the Gold Disk operating systems. Completing the OS Installation (Win2000)
The system automatically reboots when the image recovery is complete and starts the software installation. This installation also installs most of the additional software and drivers that are included in the disk image. Complete the installation as follows. 1. After the terminal reboots, it will perform a disk check and then continue with the Windows 2000 installation. 2. Enter the User Name and Organization. 3. Enter the Computer Name for the client. 4. Enter the Administrator’s Account Password (optional) 5. When prompted, press Finish to reboot the client. 6. Login when prompted. 7. Run the MicroTouch screen calibration from the Desktop icon. Completing the OS Installation (WinXPe)
The system automatically reboots when the image recovery is complete and starts the software installation. This installation also installs most of the additional software and drivers that are included in the disk image. Complete the installation as follows. 1. Click the Admin button to login as Administrator. Chapter 3: 7401-2xxx/3xxx Hardware Installation
3-47
2. Read the EULA (End‐User License Agreement) information in the DOS window, then type EXIT and press Enter to close the DOS window. 3. Start the Network Setup Wizard. 4. Select options to identify the network information for the terminal environment. 5. Enter the Computer Description. 6. Enter the Computer Name. 7. Enter the Workgroup Name. 8. When prompted, press Finish to reboot the terminal. 9. Log in when prompted. 10. Open the Control Panel or use the TouchWare Icon on the desktop and run the MicroTouch screen calibration. Completing the OS Installation (WinNT)
The system automatically reboots when the image recovery is complete and starts the software installation. This installation also installs most of the additional software and drivers that are included in the disk image. Complete the installation as follows. 1. After the terminal reboots, press Next at the Windows Setup screen. 2. Accept the Microsoft license agreement. 3. Enter the User Name and Organization. 4. Enter the Computer Name for the client. 5. Enter the Administrator’s Account Password (optional) 6. When prompted, press Finish to reboot the client. 7. Log in when prompted. 8. Open the Control Panel and run the MicroTouch screen calibration. 3-48
Chapter 3: 7401-2xxx/3xxx Hardware Installation
Completing the OS Installation (Win98) - (Discontinued)
The system automatically reboots when the image recovery is complete and starts the software installation. This installation also installs most of the additional software and drivers that are included in the disk image. Complete the installation as follows. 1. When the terminal boots it enters the Windows setup routine. Note: When installing Win98 on terminals with Processor Boards (7401‐21xx/31xx) there are few differences in the procedure as follows: a) The terminal starts the Add New Hardware Wizard. b) For each device found, permit Windows to search for new drivers (take defaults). c) After each driver is installed you are asked to reboot. Answer No. 2. At the User Information screen, enter the User information. This can be done using a keyboard or you can use the touch screen keyboard. After entering the information, press Enter or touch OK. 3. Go into the Control Panel and set the terminal Date and Time. 4. In the Control Panel, run the MicroTouch screen calibration. Chapter 3: 7401-2xxx/3xxx Hardware Installation
3-49
Setting Auto-Logon (WinNT Terminal)
Since the client does not have a keyboard it is desirous to have it logon automatically. 1. Create a default user account that you want to use to logon to the client(s). a) Open the User Manager. Select the Windows Start button, select Programs, Administrative Tools (Common), and then Select User Manager. b) Select the User menu and then select New User. Give the account a password (mandatory). As an extra precaution set the password never expires and that the user can not change it. c) Select Groups to modify the new user’s group memberships. 3-50
Chapter 3: 7401-2xxx/3xxx Hardware Installation
d) Add the new user to the Administrators group. You need to do this in order to be able to later turn off the auto‐logon function. e) Select OK to close the Group Membership box. f) Select OK to create the account. 2. Modify the Registry. Select the Windows Start button and select Run. 3. Enter regedit and then select OK. Chapter 3: 7401-2xxx/3xxx Hardware Installation
3-51
4. Open the following registry subkey: HKEY_LOCAL_MACHINE\Software\Microsoft\WindowsNT\
CurrentVersion\Winlogon
5. Create a new string value to permit auto logon for the default user. Select the Edit menu, select New and then select String Value. 6. Name the new entry AutoAdminLogon. 3-52
Chapter 3: 7401-2xxx/3xxx Hardware Installation
7. With the new entry selected, select the Edit menu and then select Modify. Enter the value 1 for auto‐logon. A value of 0 sets it to no auto‐logon. 8. Select OK to set the value. 9. Modify the DefaulUserName to contain the user ID that you want to automatically logon. With the DefaulUserName selected, select the Edit menu and then select Modify. Enter the user ID. 10. Select OK to set the value. Chapter 3: 7401-2xxx/3xxx Hardware Installation
3-53
11. Create a new string value to contain the password for the default user. Select the Edit menu, select New and then select String Value. 12. Name the new entry DefaultPassword. 13. Edit the string value. With DefaultPassword selected, select the Edit menu and then select Modify. Enter the value of the password of the default user (from Step #1). The example below uses password. 14. Select OK to set the value. This completes the client installation. To bypass auto logon, and to log on as a different user, hold down the SHIFT key after a logoff or after a Windows NT restart. 3-54
Chapter 3: 7401-2xxx/3xxx Hardware Installation
Installing a Serial Mouse
Follow these steps to install a Serial Mouse on the terminal. 1. Edit the boot.ini file, which is located in the root of the C drive. a. Open Windows NT Explorer b. Go to the View menu and select Folder Options. c. Select the View tab. d. Scroll down until you see a folder that is labeled Hidden Files. Make sure the button labeled Show All Files is selected and then select OK. e. Select the C drive root directory. Scroll down until you find the file named boot.ini and select it. f.
Open the File menu and then select Properties. g. Uncheck the box labeled Read Only and then select OK. h. Open the boot.ini file with Notepad. It should have the following entries: [operating systems]
multi(0)disk(0)rdisk(0)partition(1)\WINNT="Windows
NT Workstation Version 4.00" /NoSerialMice
multi(0)disk(0)rdisk(0)partition(1)\WINNT="Windows
NT Workstation Version 4.00 [VGA mode]" /basevideo
/sos
2. Delete the text /NoSerialMice. The file should now look like: 3. Save the file and then restart the terminal with the serial mouse connected. After the system restarts it will see the mouse and install the supporting drivers. The drivers are located on the hard drive at C:\install\i386. If for some reason they are not on the hard drive, connect the terminal to a network and share a CD‐ROM drive with the NT Operating System disk installed, or copy the files needed to the network. Chapter 3: 7401-2xxx/3xxx Hardware Installation
3-55
Calibrating the Touch Screen
Be sure to observe for the following Touch Screen calibration guidelines: •
Calibrate the touch screen as part of the installation process. •
Recalibrate the touch screen when the system is installed at its final location. •
Recalibrate whenever the terminal is moved to a new location. •
Recalibrate the touch screen anytime the system has been disassembled for servicing. •
The Touch Screen can be calibrated using MicroTouch (Windows) or Microcal (DOS), or it can be calibrated from the BIOS. 3-56
Chapter 3: 7401-2xxx/3xxx Hardware Installation
Calibration Using MicroTouch (Windows)
1. From the Windows Start button, select Settings→Control
Panel→MicroTouch Touchscreen. 2. From the MicroTouch Touchscreen Properties screen, select Calibrate to begin calibration. Chapter 3: 7401-2xxx/3xxx Hardware Installation
3-57
3. The following screen is displayed with two targets. Place your finger on the target that has a finger icon pointing towards it and hold it until the statement Touch Enable is displayed over the finger icon. Note: For best results, press the screen near the circle and then slide your finger onto the circle without raising your finger from the screen. 4. Using the same method as above, touch the circle near the upper‐
right corner of the screen. 3-58
Chapter 3: 7401-2xxx/3xxx Hardware Installation
5. The MicroTouch Calibration dialog box then appears. Do not touch the screen until this dialog box is no longer displayed. 6. From the Calibration Complete screen, select Done. 7. Select Close to exit the MicroTouch program. 8. From the Control Panel, select File→Close to exit the Control Panel. Calibration Using Microcal (DOS)
The calibration program looks at where your finger is when you lift it off the screen, not where you touch it. Therefore, calibrate the screen as follows: 1. Touch the screen near the calibration target. 2. Keep your finger on the screen and slide it to the center of the target. 3. Hold your finger firmly on the target for two seconds, then lift it off quickly. 4. Verify that the calibration was set accurately before making a service call. Perform the calibration again if necessary. Chapter 3: 7401-2xxx/3xxx Hardware Installation
3-59
If cursor is not stable, or false touches are suspected, run the Noise Check Utility from the Microcal program. Choose the recommended frequency (the one with the lowest noise level). This should also be done if the Touch Screen is still not calibrated after one attempt to recalibrate it. 1. Set the video resolution by going to the Tools menu, Video and selecting 800 x 600 256 colors. 2. Go to the Tools menu, select Noise Check. 3. Follow the instruction prompts. Choose the frequency with the lowest noise level. Application software can possibly generate a dialog box from the Touch Driver, with the message that the touch screen needs to be recalibrated. If the screen appears to be working normally, then this message can be ignored. There will be a check box labeled Do not
show this message again. Make sure this box is checked. Calibration From the BIOS
1. Apply power to the terminal. 2. When the screen prompt that says Touch the screen two times to enter Setup appears, wait for the second prompt to touch the screen, and then touch the screen three times. This causes the system to bypass the BIOS Setup and go directly to the Touch Screen Calibration Setup. 3. As instructed on the screen, touch the circle near the lower‐left corner of the screen. For best results, press the screen near the circle and then slide your finger onto the circle without raising your finger from the screen. 4. Using the same method as above, touch the circle near the upper‐
right corner of the screen. 3-60
Chapter 3: 7401-2xxx/3xxx Hardware Installation
You should receive a Successful Calibration message and then the PhoenixBIOS Setup Utility should come up. Summary
If there is a Touch Screen calibration issue during or after installation, take the following actions in the order listed: 1. Recalibrate. 2. If recalibration is unsuccessful after two attempts, then run the Noise check to change the frequency. 3. If you are still unable to calibrate, change the touch screen glass. 4. The final step is to replace the Processor Board. If this corrects the problem, then the old glass is probably OK to reuse. Out-of-Box Failures
The RSD‐Atlanta Customer Satisfaction Hotline will replace out‐of‐box failed hard disks with identical, preloaded drives. Once a system is successfully installed, all disk contents are the responsibility of the customer. The customer is responsible for restoring operating system software and/or customer‐specific data onto replacement disks sent to repair a failed or damaged disk in the field. NCR provides recovery tools for the operating system and platform software. Chapter 4: 7401-4xxx Hardware Installation
Introduction
The 7401‐4xxx terminal is fully assembled at the factory. This chapter explains the mounting options and how to connect optional hardware components to the terminal. Installation Summary
The terminal should be removed from the shipping packaging and visual checks made to verify the correct hardware configuration. The system is then configured and any communication cables are connected. Only after inspection should the power cord be attached to the system and then connected to the AC power source. Power‐up self‐tests will run to verify basic functionality. ROM‐based setup should be used to configure network options. Full configuration depends upon the system server and the management web site. U.K. Keyboard Configuration
Regional Options in the Control Panel must be configured for 7401‐
4xxx terminals equipped with a U.K. keyboard (F130, F131, or F132). Windows 2000
1. From the Windows Start button, select Settings > Control Panel > Regional Settings. 4-2
Chapter 4: 7401-4xxx Hardware Installation
2. On the General tab, select the Down arrow in the Your locale (location) box and select English (United Kingdom from the list. 3. Select the Input Locales tab. 4. Select the Add button under the Input language window. 5. Select the Down arrow in the Input locale: box and select English
(United Kingdom) from the list. 6. Select the Down arrow in the Keyboard layout/IME: box and select United Kingdom from the list. 7. Select the OK button. 8. Highlight the EN English (United Kingdom) option in the Input language window and select the Set as Default button. 9. At the bottom of the dialog, select the Apply button and then the OK button. 10. Restart Windows. Windows XPe
1. From the Windows Start button, select Control Panel > Regional
and Language Options. 2. On the Regional Options tab, select the Down arrow in the Standards and formats section and select English (United Kingdom) from the list. 3. In the Location section, select the Down arrow and select United
Kingdom from the list. 4. Select the Languages tab. 5. Select the Details button in the Text services and input languages section. 6. Select the Add button in the Installed services section. Chapter 4: 7401-4xxx Hardware Installation
4-3
7. On the Add Input language dialog, select the Down arrow in the Input language box and select English (United Kingdom) from the list. Verify that United Kingdom displays in the Keyboard layout/IME: box. 8. Select the OK button. 9. On the Settings tab, select the Down arrow in the Default input language section and select English (United Kingdom) – United
Kingdom as the default. 10. At the bottom of the dialog, select the Apply button and then the OK button. 11. Exit the Control Panel. Windows NT
1. From the Windows Start button, select Settings > Control Panel > Regional Settings. 2. On the General tab, select the Down arrow in the selection box and select English (United Kingdom) from the list. 3. Select the Input Locales tab. 4. Highlight the EN English (United Kingdom) option in the Input locales window and select the Properties button. 5. Select the Down arrow on the Keyboard layout selection box and select United Kingdom from the list, then select the OK button. 6. Highlight the EN English (United Kingdom) option in the Input locales window and select the Set as Default button. 7. Select the Apply button. If the Files Needed dialog pops up, enter “C:\intall\i386” in the Copy files from: box and select the OK button. 8. Restart Windows. 4-4
Chapter 4: 7401-4xxx Hardware Installation
Installation Restrictions
•
Before installing the terminal, read and follow the guidelines in the NCR EasyPoint 7401 Site Preparation Guide and the NCR Workstation and Peripheral AC Wiring Guide. •
Install the terminal near an electrical outlet that is easily accessible. Use the power cord as a power‐disconnect device. •
Do not permit any object to rest on the power cord. Do not locate the terminal where the power cord can be walked on. •
Use a grounding strap or touch a grounded metal object to discharge any static electricity from your body before servicing the terminal. •
If the power cord is replaced, it must be replaced with the same type of cord with the protective shroud. •
Do not route the power cord through openings with sharp edges. Caution: This unit contains hazardous voltages and should only be serviced by qualified service personnel. Caution: DO NOT connect or disconnect the transaction printer while the terminal is connected to AC power. This can result in system or printer damage. Warning: The 7401 must be mounted securely to prevent a hazard. It must be installed in accordance with local building codes. When mounting the terminal on a table top, use care when lifting the terminal. The approximate weight is 90 lbs. (40.8 kg). Chapter 4: 7401-4xxx Hardware Installation
4-5
Connecting the Cables
The cable connectors are located under the Cable Cover in the front of the Core Module. Cable Routing
The AC Power Cord and the LAN Cable can be routed either out the bottom or the rear of the cabinet. Other cables connected to the Core Module are routed internally to 7401‐4xxx components within the cabinet. Cable Connector Identification
CRT
LAN
COM 1
USB 1
USB 2
Power
Keyboard
PS/2
RS-232
(COM 3 & 4)
COM 2
Microphone
(optional)
Parallel
Speaker
Audio Out
Cash Drawer
IRDA
19901
Note: COM1 and COM3 can be powered ports. They are enabled in the BIOS. Note: The COM3 & COM4 RS‐232 ports require the Dual RS‐232 Port Kit (7454‐F072) feature 4-6
Chapter 4: 7401-4xxx Hardware Installation
Installing Peripherals
The following peripherals are integrated into the 7401‐4xxx terminal. Removal procedures are covered in the NCR EasyPoint 7401 Hardware Service Guide (B005‐0000‐1341). •
Full page printer •
Motorized Card Reader •
U.S. and UK ruggedized keyboards with trackball •
Pin Pad The following peripherals are field installable devices. Installation instructions are provided in the sections that follow. •
Angled Magnetic Stripe Reader (7401‐F103) •
Country keyboards ‐ used with Custom keyboard shelf (7401‐F118) Before installing any new device, unplug the 7401‐4xxx AC power cord to remove power from the terminal. Chapter 4: 7401-4xxx Hardware Installation
4-7
Installing the Angled Magnetic Stripe Reader (MSR)
A 3‐track ISO Angled MSR is an optional feature available with the 7401‐4xxx terminal and also available as a kit (7401‐K103). MSR Harness
Mounting Bracket
19902
1. Use the following steps to install the Angled MSR 2. Unlock the Cabinet Keylock. Cable
Clamp
Gas Shock
MSR Blank
Keylock
19798a
4-8
Chapter 4: 7401-4xxx Hardware Installation
3. Lift the door until it is supported on the Gas Shock. 4. Remove the MSR Blank from the right side of the Cabinet. 5. Remove the Cable Clamp. 6. Plug the MSR cable into the MSR Connector on the Core Module. 19904a
MSR Connector
Cable Clamp
7. Attach the MSR assembly using the MSR Mounting screws (2). 8. Attach the Cable Clamp removed in step 5 to the MSR Mounting Bracket (rear hole). Installing Country Keyboards
The following international country keyboards are shipped separate from the 7401‐4xxx terminal and must be installed in the field. The required keyboard and trackball cables are pre‐installed in the 7401‐
4xxx keyboard tray. •
Swedish/Finnish Rugged Keyboard (2336‐K206) •
Italian Rugged Keyboard (2336‐K207) Use the following procedures to install a country keyboard. 1. Unplug the power cord to remove power from the terminal. Chapter 4: 7401-4xxx Hardware Installation
4-9
2. Unlock the cabinet lock and raise the core module door to open the cabinet. 3. Slide the Keyboard Drawer forward until it stops. 4. Remove the Motorized Card Reader Mounting Screw. Mushroom Studs
Motorized Card Reader
Mounting Screw
5. Slide the Motorized Card Reader back and lower the unit until the Mushroom Studs are clear of the retaining holes. 19898
4-10
Chapter 4: 7401-4xxx Hardware Installation
6. Unplug the two cables from the connectors at the rear of the Motorized Card Reader. Kick-out Capacitor
Harness Connector
Motorized Card
Reader Cable Connector
19897
7. Loosen the Keyboard Retaining Thumb Screws (2). Keyboard
Retaining
Thumb
Screws (2)
(inside cabinet)
19798h
8. Slide the Keyboard Drawer closed. Chapter 4: 7401-4xxx Hardware Installation
4-11
9. Pull the Keyboard Assembly forward, lift the assembly off the mushroom studs, and tilt the assembly up as shown below. Keyboard
Cable
Keyboard
Assembly
Keyboard
Tray
Track Ball/
Port D Cable
Pin Pad/
Port C Cables
10. Disconnect the Pin Pad/Port C cable and remove the cables out through the hole in the Keyboard Assembly. 19893b
11. Lay the Keyboard Assembly on a flat surface. Backing Plate
Screws (8)
Keyboard
Backing Plate
19895d
12. Remove the Keyboard Backing Plate. 4-12
Chapter 4: 7401-4xxx Hardware Installation
13. Insert the new keyboard. Pin Pad/Port C
Cable Connector
Keyboard
Cable Connector
Trackball/Port D
Cable Connector
Keyboard
Backing Plate
19895e
14. Install the Keyboard Backing Plate (8 screws). 15. Insert the cables through the hole in the Keyboard Assembly 16. Connect the cables (3). 17. Open the Keyboard Drawer to take up the slack in the cables. 18. Insert the Keyboard Assembly onto the mushroom studs in the Keyboard Tray. 19. Tighten the Keyboard Retaining Thumb Screws (2). 20. Install the MSR 21. Install the MSR cables. 22. Slide the Keyboard Drawer closed. 23. Lower the core module door. 24. Lock the cabinet lock. Chapter 4: 7401-4xxx Hardware Installation
4-13
Using the Full Page Printer
The 7401‐4xxx has a full page thermal printer to provide the customer with a record of their transaction. The printer is located inside the secure cabinet and issues the printed transaction record out a slot above the keyboard in the front of the cabinet. Rear
View
Front Paper
Guide Cover
Thumb Screws
Paper Roll
Holders
Printer Roll
Lever
Printer Test/
Display Panel
Printer
Power Cord
On/Off
Switch
Printer
Power Supply
19894b
Loading the Paper
1. Place the paper roll on the spindle. 2. Install the spindle in the slots of the paper roll holders with paper feeding off the bottom of the roll towards the front of the terminal. 3. Feed the paper into the rear paper guide until the auto‐load mechanism senses the paper and feeds the paper out the front of the cabinet. Note: The printhead lever must be closed for auto‐loading to function. 4-14
Chapter 4: 7401-4xxx Hardware Installation
Removing Paper from the Printer Feed Rolls
If paper becomes jammed in the printer feed rolls: 1. Unlock the cabinet Keylock. 2. Raise the bottom of the Display Module Door until fully open and supported by the Gas Shock. 3. Slide the Keyboard Tray forward until it stops. 4. Lift the printhead lever. 5. Loosen the two thumb screws and remove the Front Paper Guide Cover. 6. Remove the paper. Note: You can also feed paper manually using the Form Feed button on the Printer Switch and Display Panel. Refer to the “Using the Printer Test and Display Panel” section for details. Removing Power from the Printer
The printer has an On/Off switch located on the back of the printer and has a separate Power Supply located under the printer. The Printer Power Supply is plugged into the bottom connector of the Power Strip inside the terminal cabinet. Use either of the following methods to remove power: •
Press the On/Off Switch to the Off position. •
Unplug the Printer Power Supply plug from the Power Strip. Chapter 4: 7401-4xxx Hardware Installation
4-15
Using the Printer Test and Display Panel
READY
POWER
PAPER
ATTN
ERR
FORM LINE
FEED FEED TEST SELECT
F3
F2
F1
F0
19961
Display LED Indicators
The LEDs provide the following status information: PAPER/POWER (green)
Status
Indication
Printer OK Very short Off blink every 14 seconds DC power On or Flashing when power is on Paper supply Rapid On‐Off 50% cycle flashing when out of paper Paper low Rapid On‐Off 50% cycle flashing when paper low Diagnostic mode 10 % On and 90% Off when in diagnostic mode READY (green)
Status
Indication
System ready On = System ready to accept data Off = Not ready Data flow During receipt of data, LED blinks following state of the Busy signal Reverse channel When not printing during IEEE‐1284 reverse channel status, LED blinks after PtrBus signal flow 4-16
Chapter 4: 7401-4xxx Hardware Installation
ATTN/ERR (yellow)
Used with the buzzer to indicate the following conditions: Status
Indication
Switch press Short flash/beep when Switch F0‐F3 are pressed System warnings Flashing/beeping to alert operator of low paper or out of paper condition System error codes Repeating sequence of coded flash/beep tones (used during factory/depot repair) Normal display Off Panel Switches
The four momentary push button switches (F0‐F3) are used for manual interaction with the printer. F0/SELECT
Places the printer in On‐line or Off‐line (Test) mode. The READY LED is off when the printer is in Test mode. The ATTN/ERR LED blinks and the beep tone sounds every 14 seconds to indicate the printer is Off‐
line. F1/TEST
Alternately prints one of two test pages. •
One page is a short 85 mm (3.5 in.) page with that identifies the printer and the printer manufacturer. •
The second page is a full 280 mm (11 in.) page with the same information plus multiple lines of alphanumeric data scrolling across the page. Chapter 4: 7401-4xxx Hardware Installation
4-17
F2/LINE FEED
Advances the paper approximately 3 mm (0.1 in.) to test simple paper movement. F3/FORM FEED
Advances the paper one form length. The length of the paper feed depends on printer setup. F0 and F1 (Cutter Test)
Test the paper cutter. Feeds a short blank length of paper and actuates the paper cutter. The switches must be released at the same time. Full Page Printer Diagnostics and Setup
The 7401‐4xxx full page printer is replaceable in the field as a complete module. Field‐level diagnostics and setup are not typically performed on site. Refer to the NCR EasyPoint 7401 ATX 38 Printer User’s Manual (B005‐0000‐1454) for diagnostic and setup information. 4-18
Chapter 4: 7401-4xxx Hardware Installation
Installing a 7401-4xxx on a Table Top Mount
A 7401‐4xxx terminal attached to a Table Top Mount can be installed on any flat work surface following the height guidelines shown in the NCR EasyPoint 7401 Site Preparation Guide (B005‐0000‐1255). Locating
Locking
Slots
Locking
Slots
19964
Mounting Procedures
1. Using the Table Top Mount as a template, position the Mount on the surface where the terminal is to be located and mark all hole locations with a pencil. Chapter 4: 7401-4xxx Hardware Installation
4-19
To locate the 7401‐4xxx terminal so the edge of the Keyboard Tray is even with the edge of the table top, locate the front edge of the Table Top Mount 210 mm (8.25 in.) from the edge of the mounting surface. 2. Drill pilot holes or through holes for the mounting screws (4) or mounting bolts. Screws or bolts used for mounting the terminal are not provided with the mount and must be purchased locally. The holes in the mount are xx mm (xx in.) in diameter. 3. Drill the hole to route the cables out the bottom of the terminal, if using that cable routing solution. 4. Secure the Table Top Mount to the mounting surface. Note: When the front edge of the Table Top Mount is located away from the edge of the mounting surface, it may be necessary to remove the Motorized Card Reader, Keyboard, and Sliding Drawer assembly before placing the terminal onto the mount to provide access to the mounting screws. Refer to the “Accessing the Mounting Screws” section below for details. 5. Lower the terminal onto the Mount aligning the locking pins (4) on the bottom of the terminal with the slots in the mount. Caution: Use care when lifting the terminal. The 7401‐4xxx terminal weighs approximately 90 lbs. (40.8 kg). 6. Push the terminal to the back until the locating pins (2) in the back of terminal are fully engaged into the holes in the mount. 7. Secure the terminal to the mount using the 8x32 screws (2). 4-20
Chapter 4: 7401-4xxx Hardware Installation
Accessing the Mounting Screws
The following steps describe how to remove the Motorized Card Reader, Keyboard, and Sliding Drawer assembly to provide access the mounting screws. 1. Unlock the cabinet lock and raise the core module door to open the cabinet. 2. Slide the Keyboard Tray forward until it stops. 3. Remove the Motorized Card Reader (if present) as described in the “Removing the Motorized Card Reader” section in Chapter 4 of the NCR EasyPoint 7401 Hardware Service Guide (B005‐0000‐1341). 4. Remove the Keyboard as described in the “Removing the Keyboard Assembly” section in Chapter 4 of the NCR EasyPoint 7401 Hardware Service Guide (B005‐0000‐1341). 5. Feed the cables through the hole in the Keyboard Tray. 6. Release the Rail Latches and remove the Sliding Drawer assembly. 7. Remove the two screws holding the terminal to the mount. Chapter 4: 7401-4xxx Hardware Installation
4-21
Installing a 7401-4xxx on the EasyPoint 45 Pedestal
The 7401‐4xxx terminal is shipped with the Table Top Mount attached. Use the following procedure to mount a 7401‐4xxx terminal on an EasyPoint 45 Pedestal. 1. Unlock the Keylock. 2. Open the Display Door. 3. Slide the Keyboard Tray forward to access and remove the Table Top Mount screws (2) under the keyboard at the front of the terminal. 4. Slide the Remove the Table Top Mount from the bottom of the terminal. 5. Attach the Table Top Mount to the top of the pedestal using the four (4) screws. The EasyPoint 45 pedestal may be secured to the floor before mounting the 7401‐4xxx terminal onto the pedestal. Two 12.7 mm (0.5 in.) holes are provided in the base of the pedestal. Use 11 mm or 12 mm (0.375 in. to 0.5 in.) bolts or lag screws to secure the pedestal to the floor. Refer to the NCR EasyPoint 7401 Site Preparation Guide (B005‐0000‐
1255) for floor mounting details. 6. Route the AC power cord and network cable (if used) out the hole in the bottom of the terminal and through the hole in the Table Top Mount. 7. Slide the terminal into the Table Top Mount being careful not to pinch the cables. 8. Secure the terminal to the Table Top Mount using the screws (2) removed in Step 3. 4-22
Chapter 4: 7401-4xxx Hardware Installation
4055 Uninterruptible Power System (UPS)
The NCR 4055 UPS is available in two models for the 7401: Item
Description
Volt/Hz
4055‐1300‐7194 300 VA/180 Watt Kiosk UPS 120 Volt/60 Hz 4055‐1500‐7194 500 VA/300 Watt Kiosk UPS 120 Volt/60 Hz 19412
Power Mon II® Software (G099‐4551‐0100) is recommended for use with the 4055 UPS and the 7401. Note: On Windows 2000, the Power Mon software may appear to not fully shut the system down. In such cases you may still see a dim display. This does not cause the loss of any data. Installing the UPS
Refer to the User’s Manual delivered with the NCR 4055 UPS before installing the UPS for use with the 7401. To install the UPS with the 7401 connect the power cable and the LAN cable from the 7401 to the UPS. Then connect the in‐house LAN cable to the UPS, and the power cable on the UPS to the AC power outlet. Note: If you are installing 7401‐4xxx on the EasyPoint 45 Pedestal, the UPS must be installed first. See 2336‐K045 Feature Kit for more information. Chapter 4: 7401-4xxx Hardware Installation
4-23
Installing the Power Mon II® Software
The Power Mon II® software is provided on CD‐ROM and may be installed over a network or using an integrated or parallel CD‐ROM drive. All operating system versions of the Power Mon software and installation documentation are contained on the CD. The Power Mon installation should auto start. If it doesn’t, browse the CD for the operating system you are using and run Setup.exe for that operating system. Follow the prompts to install the software. Note: When you are prompted for Configuration Code, enter 7 to identify the interface cable type. Configuring the Power Mon II® Software
Once Power Mon is installed, configure the software by clicking on the Power Mon icon. Select “Configure UPS” to configure the UPS parameters such as voice messages and battery run time. Note: Battery run time for the 4055 UPS running with a 7401‐4xxx and a Full‐page Thermal Printer at a load of 150 VA is approximately: Item
Approximate Battery Run Time
300 VA (180 W) 13 minutes* 500 VA (300 W) 23 minutes* * Times are approximate and may vary due to modified configurations, environmental conditions, ambient temperature, battery age, and other factors. Reference NCR EasyPoint 7401Site Preparation (B005‐0000‐1255) for additional power requirements for the 7401. 4-24
Chapter 4: 7401-4xxx Hardware Installation
Finalizing the Installation
After the hardware installation has been completed, the terminal can be powered up to finalize the installation. The operating system, along with platform modifications, is pre‐installed. The following sections list the steps involved to complete the system installation for each of the Gold Disk operating systems. Completing the OS Installation (Win2000)
The system automatically reboots when the image recovery is complete and starts the software installation. This installation also installs most of the additional software and drivers that are included in the disk image. Complete the installation as follows. 1. After the terminal reboots, it will perform a disk check and then continue with the Windows 2000 installation. 2. Enter the User Name and Organization. 3. Enter the Computer Name for the client. 4. Enter the Administrator’s Account Password (optional) 5. When prompted, press Finish to reboot the client. 6. Login when prompted. 7. Run the MicroTouch screen calibration from the Desktop icon. Completing the OS Installation (WinXPe)
The system automatically reboots when the image recovery is complete and starts the software installation. This installation also installs most of the additional software and drivers that are included in the disk image. Complete the installation as follows. 1. Click the Admin button to login as Administrator. Chapter 4: 7401-4xxx Hardware Installation
4-25
2. Read the EULA (End‐User License Agreement) information in the DOS window, then type EXIT and press Enter to close the DOS window. 3. Start the Network Setup Wizard. 4. Select options to identify the network information for the terminal environment. 5. Enter the Computer Description. 6. Enter the Computer Name. 7. Enter the Workgroup Name. 8. When prompted, press Finish to reboot the terminal. 9. Log in when prompted. Open the Control Panel or use the TouchWare Icon on the desktop and run the MicroTouch screen calibration. Completing the OS Installation (WinNT)
The system automatically reboots when the image recovery is complete and starts the software installation. This installation also installs most of the additional software and drivers that are included in the disk image. Complete the installation as follows. 1. After the terminal reboots, press Next at the Windows Setup screen. 2. Accept the Microsoft license agreement. 3. Enter the User Name and Organization. 4. Enter the Computer Name for the client. 5. Enter the Administrator’s Account Password (optional) 6. When prompted, press Finish to reboot the client. 7. Log in when prompted. 8. Open the Control Panel and run the MicroTouch screen calibration. 4-26
Chapter 4: 7401-4xxx Hardware Installation
Completing the OS Installation (Win98) - (Discontinued)
The system automatically reboots when the image recovery is complete and starts the software installation. This installation also installs most of the additional software and drivers that are included in the disk image. Complete the installation as follows. 1. When the terminal boots it enters the Windows setup routine. Note: When installing Win98 on terminals with Processor Boards (7401‐21xx/31xx) there are few differences in the procedure as follows: d) The terminal starts the Add New Hardware Wizard. e) For each device found, permit Windows to search for new drivers (take defaults). f) After each driver is installed you are asked to reboot. Answer No. 2. At the User Information screen, enter the User information. This can be done using a keyboard or you can use the touch screen keyboard. After entering the information, press Enter or touch OK. 3. Go into the Control Panel and set the terminal Date and Time. In the Control Panel, run the MicroTouch screen calibration. Chapter 4: 7401-4xxx Hardware Installation
4-27
Calibrating the Touch Screen
Be sure to observe for the following Touch Screen calibration guidelines: •
Calibrate the touch screen as part of the installation process. •
Recalibrate the touch screen when the system is installed at its final location. •
Recalibrate whenever the terminal is moved to a new location. •
Recalibrate the touch screen anytime the system has been disassembled for servicing. •
The Touch Screen can be calibrated using MicroTouch (Windows) or Microcal (DOS), or it can be calibrated from the BIOS. Calibration Using MicroTouch (Windows)
1. From the Windows Start button, select Settings→Control
Panel→MicroTouch Touchscreen. 2. From the MicroTouch Touchscreen Properties screen, select Calibrate to begin calibration. 4-28
Chapter 4: 7401-4xxx Hardware Installation
3. The following screen is displayed with two targets. Place your finger on the target that has a finger icon pointing towards it and hold it until the statement Touch Enable is displayed over the finger icon. Note: For best results, press the screen near the circle and then slide your finger onto the circle without raising your finger from the screen. 4. Using the same method as above, touch the circle near the upper‐
right corner of the screen. Chapter 4: 7401-4xxx Hardware Installation
4-29
5. The MicroTouch Calibration dialog box then appears. Do not touch the screen until this dialog box is no longer displayed. 6. From the Calibration Complete screen, select Done. 7. Select Close to exit the MicroTouch program. 8. From the Control Panel, select File→Close to exit the Control Panel. Calibration Using Microcal (DOS)
The calibration program looks at where your finger is when you lift it off the screen, not where you touch it. Therefore, calibrate the screen as follows: 1. Touch the screen near the calibration target. 2. Keep your finger on the screen and slide it to the center of the target. 3. Hold your finger firmly on the target for two seconds, then lift it off quickly. 4. Verify that the calibration was set accurately before making a service call. Perform the calibration again if necessary. 4-30
Chapter 4: 7401-4xxx Hardware Installation
If cursor is not stable, or false touches are suspected, run the Noise Check Utility from the Microcal program. Choose the recommended frequency (the one with the lowest noise level). This should also be done if the Touch Screen is still not calibrated after one attempt to recalibrate it. 5. Set the video resolution by going to the Tools menu, Video and selecting 800 x 600 256 colors. 6. Go to the Tools menu, select Noise Check. 7. Follow the instruction prompts. Choose the frequency with the lowest noise level. Application software can possibly generate a dialog box from the Touch Driver, with the message that the touch screen needs to be recalibrated. If the screen appears to be working normally, then this message can be ignored. There will be a check box labeled Do not
show this message again. Make sure this box is checked. Calibration from the BIOS
1. Apply power to the terminal. 2. When the screen prompt that says Touch the screen two times to enter Setup appears, wait for the second prompt to touch the screen, and then touch the screen three times. This causes the system to bypass the BIOS Setup and go directly to the Touch Screen Calibration Setup. 3. As instructed on the screen, touch the circle near the lower‐left corner of the screen. For best results, press the screen near the circle and then slide your finger onto the circle without raising your finger from the screen. 4. Using the same method as above, touch the circle near the upper‐
right corner of the screen. You should receive a Successful Calibration message and then the PhoenixBIOS Setup Utility should come up. Chapter 4: 7401-4xxx Hardware Installation
4-31
Summary
If there is a Touch Screen calibration issue during or after installation, take the following actions in the order listed: 1. Recalibrate. 2. If recalibration is unsuccessful after two attempts, then run the Noise check to change the frequency. 3. If you are still unable to calibrate, change the touch screen glass. 4. The final step is to replace the Processor Board. If this corrects the problem, then the old glass is probably OK to reuse. Out-of-Box Failures
The RSD‐Atlanta Customer Satisfaction Hotline will replace out‐of‐box failed hard disks with identical, preloaded drives. Once a system is successfully installed, all disk contents are the responsibility of the customer. The customer is responsible for restoring operating system software and/or customer‐specific data onto replacement disks sent to repair a failed or damaged disk in the field. NCR provides recovery tools for the operating system and platform software. Chapter 5: Setup
Introduction
This chapter describes how to configure the BIOS CMOS options. Following this Introduction, there are sections specific to 7401‐
22xx/35xx/45xx terminals with BIOS Version 2.2.1.x (Pentium III/Celeron processors), 7401‐26xx/46xx terminals with ACPI BIOS Version 2.3.x.x (Pentium III/Celeron processors), and to 7401‐21xx/31xx terminals with BIOS Version 1.5.0.4 (Pentium processor). This older BIOS, version 1.5.0.4, is discontinued but is included in this chapter for reference purposes. Note: An external alphanumeric keyboard is not required to run the BIOS CMOS Setup Utility, but a keyboard makes the setup easier. Entering Setup without a Keyboard
1. Apply power to the terminal. 2. Calibrate the touch screen. a) When the screen prompt that says Touch the screen two times to enter Setup appears, touch the screen three times. This causes the system to bypass the BIOS Setup and go directly to the Touch Screen Calibration Setup. With Pentium III/Celeron terminals, you will not see this prompt if the Boot‐Time Diagnostics Screen is disabled, but you can still enter setup by touching the screen three times. Note: Setup can also be entered from the Boot Menu that is displayed when you press ESC during POST. 5-2
Chapter 5: Setup
b) As instructed on the screen, touch the circle near the lower‐left corner of the screen. For best results, press the screen near the circle and then slide your finger onto the circle without raising your finger from the screen. c) Using the same method as above, touch the circle near the upper‐right corner of the screen. You should receive a Successful Calibration message and then the PhoenixBIOS Setup Utility should come up. d) Select the setup parameters by touching the controls at the bottom of the screen. Entering Setup Using a Keyboard
1. Apply power to the terminal. 2. Press the F2 key when the message at the bottom of the screen prompts you to do so. With Pentium III/Celeron terminals, you will not see this prompt if the Boot‐Time Diagnostics Screen is disabled, but you can still enter setup by pressing F2. Note: Setup can also be entered from the Boot Menu that is displayed when you press ESC during POST. Chapter 5: Setup
5-3
How to Select Menu Options
The following keyboard controls are used to select the various menu options and to make changes to their values. •
Use the arrow keys to select (highlight) options and menu screens. •
Use the + and ‐ (or F5 and F6) keys to change field values. •
To view help information on the possible selections for the highlighted item, press F1. •
To save the changes, move the cursor to the Exit Menu, select either Save Changes & Exit or Save Changes, and press Enter. Note: If you are not using an external keyboard, you can touch the menu controls at the bottom of the screen. If you encounter difficulty doing this, recalibrate the screen. Setting the Date and Time
To set the date and time, perform the following steps: 1. In the Setup Main menu, move your cursor to the System Time field, type the desired value, and press Tab or Enter to continue with the next field. 2. Enter the desired date in the System Date field the same way as the last step. 3. Move the cursor to the Exit menu, select Exit Saving Changes or Save Changes, and press Enter. 5-4
Chapter 5: Setup
Setting Passwords
To set passwords, perform the following steps: 1. Move the cursor to the Set Supervisor Password selection and press Enter. The Set Supervisor Password menu displays. From this menu, the person setting up the password system can set the security password. Users can set user passwords. 2. Move the cursor to the Exit menu, select Exit Saving Changes and press Enter. Note: Only clear a password after obtaining the permission of the responsible supervisor. If the supervisor password is lost, it can be cleared by shorting the appropriate pins on the main processor board. For the location of these pins, refer to the EasyPoint 7401 Hardware Service Guide. If the user password is lost, and the supervisor is not available, then the above procedure can be used to clear the supervisor password. Then new supervisor and user passwords can be defined. Chapter 5: Setup
5-5
Configuring a Hard Drive
Note: Primary Master, Secondary Master, Primary Slave and Secondary Slave refer to the IDE drives. After installing a hard drive, you need to configure the hard drive using Setup. Perform the following steps: 1. On the Setup Main menu, select the appropriate IDE Adapter (such as, Primary Master) field and press Enter. A sub‐menu displays for the Primary Master drive that you selected. 2. Press Enter on the Type field. The workstation automatically fills out the remaining fields, depending on the installed drive. 3. Move the cursor to the Exit menu, select Exit Saving Changes and press Enter. Setting Memory Cache
The default setting enables memory cache. If your application requires memory cache to be disabled, you can change it by performing the following steps: 1. Move the cursor to the Cache Memory field on the Advanced menu and press Enter. The Cache Memory menu displays. 2. Select Enabled in the Memory Cache field to enable the memory cache. 3. Set the other fields on this menu as desired. Select Help for more information. 4. Move the cursor to the Exit menu, select Exit Saving Changes and press Enter. 5-6
Chapter 5: Setup
Setting Memory Shadow
The default setting enables memory shadow. This can increase your workstationʹs performance. This applies only if your workstation has a plug‐in video board. If you want to disable the memory shadowing, perform the following steps: 1. Move the cursor to the Memory Shadow field on the Main menu and press Enter. The Memory Shadow menu appears. 2. Select Disabled in the Video Shadow field to disable the video shadow. 3. Move the cursor to the Exit menu, select Exit Saving Changes or Save Changes, and press Enter. Setting Boot Options
To set boot options, perform the following steps: 1. Move the cursor to the Boot menu. The list of boot devices displays. 2. Select the sequence of drives that the workstation will access when booting the system. 3. Move the cursor to the Exit menu, select Exit Saving Changes and press Enter. Chapter 5: Setup
5-7
Allocating Interrupts
On the 7401, limited control of interrupt allocation is provided through the BIOS Setup Utility. Due to the nature of the PCI bus, the Plug and Play subsystem allocates the interrupts of PCI devices using all available interrupts. To free IRQ15, it is necessary to disable the secondary IDE bus. To do this, in the Advanced menu, choose Primary in the Local BUS IDE adapter selection. To free IRQs 4, 3, or 7, in the I/O Device Configuration selection, disable COM A, COM B, or the Parallel port, respectively. To finalize the freeing of interrupts and make unused interrupts available for use by PCI devices, it is necessary to reset the configuration data. This can be done in the Advanced menu. To use ISA devices that require interrupts, it is necessary to reserve those interrupts so that those interrupts are not allocated by the BIOS to PCI devices. To do this, in the Advanced menu, choose Advanced Chipset Control. Choose PCI/PNP IRQ Resource Exclusion, then set all ISA interrupts to Reserved. Restoring Factory Settings
To automatically reset all values to their default settings for the current screen, press F9. The terminal will automatically load BIOS default CMOS values for boot up. To reset all BIOS settings to their default settings go to the Exit menu, press F9, select either Save Changes & Exit or Save Changes, and press Enter. Refer to the “BIOS Default CMOS Values” section later in this chapter for the pre‐installed Setup defaults. 5-8
Chapter 5: Setup
BIOS Default CMOS Values (7401-22xx/35xx/45xx BIOS Version 2.2.1.x)
The following are the BIOS default CMOS values for the workstation. Note: When installing a new BIOS from the CD, the Processor Board type is automatically detected and the correct BIOS is automatically installed Main Values
Note: An asterisk (*) indicates a variable value based on system specification. System Time
(variable) System Date
(variable) Legacy Diskette A:
Disabled Legacy Diskette B:
Disabled Primary Master
* Type Auto Total Sectors * Maximum Capacity * Multi‐Sector Transfers 16 Sectors LBA Mode Control Enabled 32 Bit I/O Disabled Transfer Mode FPI0 4/DMA 2 Ultra DMA Mode Mode 2 Primary Slave
None Type Auto Multi‐Sector Transfers Disabled LBA Mode Control Disabled Chapter 5: Setup
32 Bit I/O Disabled Transfer Mode Standard Ultra DMA Mode Disabled Secondary Master
CD‐ROM Type Auto Multi‐Sector Transfers Disabled LBA Mode Control Disabled 32 Bit I/O Disabled Transfer Mode FPI0 4/DMA 2 Ultra DMA Mode Mode 2 Secondary Slave
None Type Auto Multi‐Sector Transfers Disabled LBA Mode Control Disabled 32 Bit I/O Disabled Transfer Mode Standard Ultra DMA Mode Disabled System Memory
640 KB Extended Memory
* Advanced Values
Installed O/S
Other Secured Setup Configuration
No Reset Confirmation Data
NO Cache Memory
5-9
5-10
Chapter 5: Setup
Memory Cache Enabled Cache System BIOS Write Protect Cache Video BIOS Write Protect Cache Base 0‐512 k Write Back Cache Base 512K‐640 k Write Back Cache Extended Memory Write Back Cache A000‐AFFF Disabled Cache B000‐BFFF Disabled Cache C800‐CBFF Disabled Cache CC00‐CFFF Disabled Cache D000‐D3FF Disabled Cache D400‐D7FF Disabled Cache D800‐DBFF Disabled Cache DC00‐DFFF Disabled Cache E000‐E3FF Write Protect Cache E400‐E7FF Write Protect Cache E400‐E7FF Write Protect Cache EC00‐EFFF Write Protect PS/2 Port
Touchscreen USB Port 2
Auto I/O Device Configuration
Serial Port A Enabled Base I/O Address/IRQ 3F8/IRQ 4 Powered Port Auto Serial Port B Base I/O Address/IRQ Enabled 2F8/IRQ 3 Chapter 5: Setup
Parallel Port Enabled Mode ECP Base I/O Address 378 Interrupt IRQ 7 DMA Channel DMA 1 Fdc on Lpt Disabled Floppy Disk Controller Disabled Serial Port C Enabled Mode Normal Base I/O Address 3E8 Interrupt IRQ 5 Powered Port Note: Must be set to On for the 7401‐4xxx with Pin Pad Auto Serial Port D Enabled Base I/O Address 2E8 Interrupt IRQ 11 Mode RS‐232 Disk‐On‐Chip Address CE00‐CFFF MSR Address CC00‐CDFF MSR Interrupt 6 System Monitors
+12 V Status * + 2.5 V Status * + 5 V Status * CPU Temperature * 5-11
5-12
Chapter 5: Setup
System Temperature * Vcc Status * Vcore Status * Vlcd Status * Vtt Status * Multiple ROM Menu
Parallel CD‐ROM Boot Disabled On‐board Intel SLP Disabled On‐board Intel LAN Enabled On‐board Intel PXE Enabled Lucent WaveLAN ROM Disabled WaveLAN PXE ROM Disabled Selectable ROM 7 Disabled Selectable ROM 8 Disabled Selectable ROM 9 Disabled Selectable ROM 10 Disabled Selectable ROM 11 Disabled Selectable ROM 12 Disabled Selectable ROM 13 Disabled Selectable ROM 14 Disabled Selectable ROM 15 Disabled Selectable ROM 16 Disabled Beep Error Codes
Off Large Disk Access Mode
DOS Local Bus IDE Adapter
Both Advanced Chip Set Control
Chapter 5: Setup
Graphics Aperture 64 MB Enable memory gap Disabled ECC Config Disabled SERR signal condition Multip0le bit Default Primary Video Adapter AGP PCI/PNP UMB Resource Exclusion C800 ‐ CBFF Available CC00 – CFFF Available D000 – D3FF Available D400 – D7FF Available D800 – DBFF Available DC00 ‐ DFFF Available PCI/PNP IRQ Resource Exclusion IRQ 3 Available IRQ 4 Available IRQ 5 Available IRQ 7 Available IRQ 9 Reserved IRQ 10 Available IRQ 11 Available PCI/IRQ line 1 Auto Select PCI/IRQ line 2 Auto Select PCI/IRQ line 3 Auto Select PCI/IRQ line 4 Auto Select Boot-Time Diagnostic Screen
Disabled QuickBoot Mode
Enabled 5-13
5-14
Chapter 5: Setup
Continuous POST
Disabled Boot menu retry
Keyboard Allow Warm Boot
Disabled Legacy USB Support
Disabled Security Values
Supervisor Password Is
Clear
User Password Is
Clear Set Supervisor Password
Press Enter Set User Password
Press Enter Diskette Access
Supervisor Fixed Disk Boot Sector
Normal Password on Boot
Disabled Power Values
Power Savings
Disabled Standby Timeout
Off Auto Suspend Timeout Off IDE Drive 0 Monitoring
Disabled IDE Drive 1 Monitoring
Disabled IDE Drive 2 Monitoring
Disabled IDE Drive 3 Monitoring
Disabled PCI Bus Monitoring
Disabled Video Power State Control
Auto Boot Values
Hard Drive
Chapter 5: Setup
CD-ROM
Removable Devices
IBA 4.0.22 Slot 0070
Exit Values
Exit Saving Changes
Press Enter Exit Discarding Changes
Press Enter Load Setup Defaults
Press Enter Discard Changes
Press Enter Save Changes
Press Enter 5-15
5-16
Chapter 5: Setup
Interrupts (7401-22xx/35xx/45xx BIOS Version 2.2.1.x)
The following table lists the default settings. To resolve any conflicts, refer to the notes that follow the table. IRQ
System Resource
NMI
I/O channel check
0 Reserved, interval timer 1 Reserved, keyboard buffer full 2 Reserved, cascade interrupt 3 Communications port (COM 2) or Port B 4 Communications port (COM 1) or Port A 5 Communications port (COM 3) or Port C 6 MSR 7 Parallel port 1 8 Real time clock 9 System monitor 10 Audio, LAN 11 Communications port (COM 4) or Port D 12 PS/2 compatible mouse port 13 Math coprocessor 14 On‐board IDE 15 Secondary IDE The Mouse uses IRQ 12 and so does the Touch Screen. Since the Touch Screen serves as a mouse, it cannot be freed up unless you donʹt want to use either. The Audio and LAN share IRQ 10, and since these are PCI IRQs, they can move around depending on what is available in the system. Chapter 5: Setup
5-17
Memory Map (7401-22xx/35xx/45xx BIOS Version 2.2.1.x)
The following table details the memory map for 7401‐22xx/35xx/45xx terminals BIOS Version 2.2.1.x (Pentium III/Celeron processors). The ESCD area from ED000‐EDFFF is not available for use as an Upper Memory Block (UMB) by memory managers. The area from E0000‐
EBFFF is currently not used by the BIOS and is available for use as UMB by memory managers. Parts of this area may be used by future versions of the BIOS to add increased functionality. Address Range (hex)
Size
FECFF000‐FECFF01B 27 Description
LAN PXE ROM 100000‐10000000 255 MB Extended memory F0000‐FFFFF 64 kB System BIOS EE000‐EFFFF 8 kB Main BIOS (available as UMB) ED000‐EDFFF 4 kB ESCD (plug and play configuration area) EC000‐ECFFF 4 kB OEM (available as UMB) E0000‐EBFFF 48 kB BIOS Reserved (currently available as UMB) D0000‐DFFFF 64 kB Available HI DOS memory CE000‐CFFFF 8 kB Flash Disk (optional) CC000‐CDFFF 8 kB NCR Trigantor MSR (optional) C0000‐CBFFF 48 kB Onboard video BIOS A0000‐BFFFF 128 kB Reserved for video memory 9FC00‐9FFFF 1 kB 80000‐9FBFF 127 kB Extended conventional 00000‐7FFFF 512 kB Conventional Extended BIOS Data (moveable by QEMM, 386MAX) 5-18
Chapter 5: Setup
BIOS Default CMOS Values (7401-26xx/46xx BIOS Version 2.3.x.x)
The following are the default CMOS values for the ACPI BIOS on the Summa II processor boards in the 7401‐26xx and 46xx terminals. Note: When installing a new BIOS from the CD, the Processor Board type is automatically detected and the correct BIOS is automatically installed Main Values
Note: An asterisk (*) indicates a variable value based on system specification. System Time
(variable) System Date
(variable) Legacy Diskette A:
Disabled Legacy Diskette B:
Disabled Primary Master
* Type Auto Total Sectors * Maximum Capacity * Multi‐Sector Transfers 16 Sectors LBA Mode Control Enabled 32 Bit I/O Disabled Transfer Mode FPI0 4/DMA 2 Ultra DMA Mode Disabled Primary Slave
None Type Auto Multi‐Sector Transfers Disabled Chapter 5: Setup
LBA Mode Control Disabled 32 Bit I/O Disabled Transfer Mode Standard Ultra DMA Mode Disabled Secondary Master
CD‐ROM Type Auto Multi‐Sector Transfers Disabled LBA Mode Control Disabled 32 Bit I/O Disabled Transfer Mode FPI0 4/DMA 2 Ultra DMA Mode Mode 2 Secondary Slave
None Type Auto Multi‐Sector Transfers Disabled LBA Mode Control Disabled 32 Bit I/O Disabled Transfer Mode Standard Ultra DMA Mode Disabled System Memory
640 KB Extended Memory
* Advanced Values
Installed O/S
Other Secured Setup Configuration
No Reset Confirmation Data
No 5-19
5-20
Chapter 5: Setup
Cache Memory
Memory Cache Enabled Cache System BIOS Write Protect Cache Video BIOS Write Protect Cache Base 0‐512 k Write Back Cache Base 512K‐640 k Write Back Cache Extended Memory Write Back Cache A000‐AFFF Disabled Cache B000‐BFFF Disabled Cache C800‐CBFF Disabled Cache CC00‐CFFF Disabled Cache D000‐D3FF Disabled Cache D400‐D7FF Disabled Cache D800‐DBFF Disabled Cache DC00‐DFFF Disabled Cache E000‐E3FF Write Protect Cache E400‐E7FF Write Protect Cache EC00‐EFFF Write Protect PS/2 Port
Touchscreen USB Port 2
Auto I/O Device Configuration
Serial Port A Enabled Base I/O Address/IRQ 3F8/IRQ 4 Powered Port Auto Serial Port B Base I/O Address/IRQ Enabled 2F8/IRQ 3 Chapter 5: Setup
Parallel Port Enabled Mode ECP Base I/O Address 378 Interrupt IRQ 7 DMA Channel DMA 1 Fdc on Lpt Disabled Floppy Disk Controller Disabled Serial Port C Enabled Mode Normal Base I/O Address 3E8 Interrupt IRQ 5 Powered Port Note: Must be set to On for the 7401‐4xxx with Pin Pad Auto Serial Port D Enabled Base I/O Address 2E8 Interrupt IRQ 11 Mode RS‐232 Disk‐On‐Chip Address CE00‐CFFF MSR Address CC00‐CDFF MSR Interrupt 6 System Monitors
+12 V Status * + 2.5 V Status * + 5 V Status * CPU Temperature * 5-21
5-22
Chapter 5: Setup
System Temperature * Vcc Status * Vcore Status * Vlcd Status * Vtt Status * Multiple ROM Menu
Parallel CD‐ROM Boot Disabled On‐board Intel SLP Disabled On‐board Intel LAN Enabled On‐board Intel PXE Enabled Lucent WaveLAN ROM Disabled WaveLAN PXE ROM Disabled Selectable ROM 7 Disabled Selectable ROM 8 Disabled Selectable ROM 9 Disabled Selectable ROM 10 Disabled Selectable ROM 11 Disabled Selectable ROM 12 Disabled Selectable ROM 13 Disabled Selectable ROM 14 Disabled Selectable ROM 15 Disabled Selectable ROM 16 Disabled Beep Error Codes
Off Large Disk Access Mode
DOS Local Bus IDE Adapter
Both Advanced Chip Set Control
Chapter 5: Setup
Graphics Aperture 64 MB Enable memory gap Disabled ECC Config Disabled SERR signal condition Multip0le bit Default Primary Video Adapter AGP Speedstep Mode Enabled PCI/PNP UMB Resource Exclusion C800 ‐ CBFF Available CC00 – CFFF Available D000 – D3FF Available D400 – D7FF Available D800 – DBFF Available DC00 ‐ DFFF Available PCI/PNP IRQ Resource Exclusion IRQ 3 Available IRQ 4 Available IRQ 5 Available IRQ 7 Available IRQ 9 Reserved IRQ 10 Available IRQ 11 Available PCI/IRQ line 1 Auto Select PCI/IRQ line 2 Auto Select PCI/IRQ line 3 Auto Select PCI/IRQ line 4 Auto Select Boot-Time Diagnostic Screen
Disabled 5-23
5-24
Chapter 5: Setup
QuickBoot Mode
Enabled Continuous POST
Disabled Boot menu retry
Keyboard Allow Warm Boot
Disabled Speaker Volume
Soft Legacy USB Support
Disabled Security Values
Supervisor Password Is
Clear
User Password Is
Clear Set Supervisor Password
Press Enter Set User Password
Press Enter Diskette Access
Supervisor Fixed Disk Boot Sector
Normal Password on Boot
Disabled Power Values
Power Savings
Disabled Standby Timeout
Off Auto Suspend Timeout Off IDE Drive 0 Monitoring
Disabled IDE Drive 1 Monitoring
Disabled IDE Drive 2 Monitoring
Disabled IDE Drive 3 Monitoring
Disabled PCI Bus Monitoring
Disabled Video Power State Control
Auto Chapter 5: Setup
Boot Values
IBA 4.0.22 Slot 0070
Hard Drive
CD-ROM
Removable Devices
Exit Values
Exit Saving Changes
Press Enter Exit Discarding Changes
Press Enter Load Setup Defaults
Press Enter Discard Changes
Press Enter Save Changes
Press Enter 5-25
5-26
Chapter 5: Setup
Interrupts (7401-26xx/46xx BIOS Version 2.3.x.x)
The following table lists the default settings. To resolve any conflicts, refer to the notes that follow the table. IRQ
System Resource
NMI
I/O channel check
0 Reserved, interval timer 1 Reserved, keyboard buffer full 2 Reserved, cascade interrupt 3 Communications port (COM 2) or Port B 4 Communications port (COM 1) or Port A 5 Communications port (COM 3) or Port C 6 MSR 7 Parallel port 1 8 Real time clock 9 System monitor 10 Audio, LAN 11 Communications port (COM 4) or Port D 12 PS/2 compatible mouse port 13 Math coprocessor 14 On‐board IDE 15 Secondary IDE The Mouse uses IRQ 12 and so does the Touch Screen. Since the Touch Screen serves as a mouse, it cannot be freed up unless you donʹt want to use either. The Audio and LAN share IRQ 10, and since these are PCI IRQs, they can move around depending on what is available in the system. Chapter 5: Setup
5-27
Memory Map (7401-26xx/46xx BIOS Version 2.3.x.x)
The following table details the memory map for 7401‐26xx/46xx terminals BIOS Version 2.3.1.2 (Pentium III/Celeron processors with ACPI). The ESCD area from ED000‐EDFFF is not available for use as an Upper Memory Block (UMB) by memory managers. The area from E0000‐EBFFF is currently not used by the BIOS and is available for use as UMB by memory managers. Parts of this area may be used by future versions of the BIOS to add increased functionality. Address Range (hex)
Size
FECFF000‐FECFF01B 27 Description
LAN PXE ROM 100000‐10000000 255 MB Extended memory F0000‐FFFFF 64 kB System BIOS EE000‐EFFFF 8 kB Main BIOS (available as UMB) ED000‐EDFFF 4 kB ESCD (plug and play configuration area) EC000‐ECFFF 4 kB OEM (available as UMB) E0000‐EBFFF 48 kB BIOS Reserved (currently available as UMB) D0000‐DFFFF 64 kB Available HI DOS memory CE000‐CFFFF 8 kB Flash Disk (optional) CC000‐CDFFF 8 kB NCR Trigantor MSR (optional) C0000‐CBFFF 48 kB Onboard video BIOS A0000‐BFFFF 128 kB Reserved for video memory 9FC00‐9FFFF 1 kB 80000‐9FBFF 127 kB Extended conventional 00000‐7FFFF 512 kB Conventional Extended BIOS Data (moveable by QEMM, 386MAX) 5-28
Chapter 5: Setup
BIOS Default CMOS Values (7401-21xx/31xx BIOS Version 1.5.0.4 Discontinued)
The following are the BIOS default CMOS values for the terminal. Note: When installing a new BIOS from the CD, the Processor Board type is automatically detected and the correct BIOS is automatically installed Main Values
System Time
(variable) System Date
(variable) Legacy Diskette A:
144 MV/1.25 MV, 3 ½ʺ Legacy Diskette B:
Disabled IDE Primary Master
Type [Auto] Cylinders 4191 Heads 16 Sectors/Track 63 Maximum Capacity 2163 MB Multi‐Sector Transfers 16 Sectors LBA Mode Control Enabled 32 Bit I/O Disabled Transfer Mode Fast PIO 4 Ultra DMA Mode Disabled IDE Primary Slave
Type None Chapter 5: Setup
IDE Secondary Master
Type None IDE Secondary Slave
Type None Memory Cache
Enabled Cache System BIOS area
Enabled Cache Video BIOS area
Disabled System Memory
640 kB Extended Memory
31744 kB Power Savings
Disabled Standby Timeout
Off Auto Suspend Timeout
Off Fixed Disk
Disabled Video
Disabled IDE Drive 0 Monitoring
Disabled IDE Drive 1 Monitoring
Disabled IDE Drive 2 Monitoring
Disabled IDE Drive 3 Monitoring
Disabled PCI Bus Monitoring
Disabled Boot sequence
1. LANDesk® Service Agent II 2. Hard Drive Continuous POST Disabled 5-29
5-30
Chapter 5: Setup
Advanced Values
I/O Device Configuration
Local Bus IDE adapter
Primary Serial port A
Auto Serial port B
Auto Mode
Parallel port
Mode
Normal Auto Bi‐directional Floppy disk controller
Disabled Disk-On-Chip Address
Disabled MSR Address
Disabled Plug and Play
No Reset Configuration Data
No PS/2 Mouse
Auto Large Disk Access Mode
DOS Secured Setup Configurations
No PCI Configuration
ISA Graphics Device Installed
No PCI/PNP ISA UMB Region Exclusion
Available (all) Chapter 5: Setup
Interrupts (7401-21xx/31xx BIOS Version 1.5.0.4 - Discontinued)
The following table lists the default settings. IRQ
System Resource
NMI I/O Channel Check 0 Reserved, Interval Timer 1 Reserved, Keyboard buffer full 2 Reserved, Cascade interrupt 3 Serial Port 2 4 Serial Port 1 5 User available 6 Reserved, Floppy 7 Parallel Port 1 8 Real Time Clock 9 NCR Motion, Thermal interrupt 10 LAN 11 Windows Sound System/USB 12 Touch Screen 13 Reserved, Math coprocessor 14 On‐board IDE (available if IDE is disabled) 15 MSR 5-31
5-32
Chapter 5: Setup
Memory Map (7401-21xx/31xx BIOS Version 1.5.0.4 Discontinued)
The following table details the memory map for the 7401‐21xx/21xx terminals BIOS Version 1.5.0.4 (Pentium processor). The ESCD area from ED000‐EDFFF is not available for use as an Upper Memory Block (UMB) by memory managers. The area from E0000‐EBFFF is currently not used by the BIOS and is available for use as UMB by memory managers. Parts of this area may be used by future versions of the BIOS to add increased functionality. Address Range (hex)
Size
FECFF000‐FECFF01B 27
Description
LAN PXE ROM
100000‐10000000 255 MB Extended memory F0000‐FFFFF 64 kB System BIOS EE000‐EFFFF 8 kB Main BIOS (available as UMB) ED000‐EDFFF 4 kB ESCD (plug and play configuration EC000‐ECFFF 4 kB OEM (available as UMB) E0000‐EBFFF 48 kB BIOS Reserved (currently available D0000‐DFFFF 64 kB Available HI DOS memory CE000‐CFFFF 8 kB Flash Disk (optional) CC000‐CDFFF 8 kB NCR Trigantor MSR (optional) C8000‐CBFFF 16 kB Available HI DOS memory A0000‐C7FFF 160 kB Video memory and BIOS 9FC00‐9FFFF 1 kB 80000‐9FBFF 127 kB Extended conventional 00000‐7FFFF 512 kB Conventional Extended BIOS Data (moveable by Chapter 6:
Operating System Recovery
Introduction
This chapter discusses procedures how to recover the Operating System using the integrated or parallel CD‐ROM drive. The software is distributed on bootable CD‐ROM media. The drivers necessary to run the CD‐ROM are temporarily installed during boot. It is also possible to perform a BIOS update using a network connection. Refer to the NCR FitClient Software Userʹs Guide for information about that procedure. Prerequisites
The following are required on the 7401 to perform an OS recovery using a CD: •
•
Bootable CD‐ROM drive −
Integrated 7401‐F058/F059 −
External 2336‐K007 (Parallel CD‐ROM – Series 5 or Series 6) The terminal BIOS must be 1.02.00.00 or greater. −
•
MicroSolutions BackPack CD‐ROM Series 6 requires BIOS 2.1.1.1 or greater Keyboard When performing an OS recovery from a larger source image (larger disk) to a smaller destination disk you must use the special procedure described in the OS Recovery from a Larger Disk Image section that follows. 6-2
Chapter 6: Operating System Recovery
7401-22xx/35xx Prerequisite
On terminals equipped with Pentium III/Celeron processors you must release memory resources to permit CD‐ROM access. Refer to the Setup chapter and make the following changes to the BIOS settings (Setup Utility). •
Reset BIOS to Default settings •
Set the On‐Board Intel PXE to Disabled External CD-ROM
If you do not have an integrated CD‐ROM drive, connect the external CD‐ROM as follows. 1. Connect the external CD‐ROM (2336‐K007) drive to the parallel port on the terminal. 2. Connect the opposite end of the CD‐ROM cable (end with the power connector pigtail) to the CD‐ROM drive parallel connector. Parallel Connector
Power
Connector
Parallel Connector
18250
Chapter 6: Operating System Recovery
6-3
Updating Procedures
1. Apply power to the terminal so the CD‐ROM drive can be opened. 2. Insert the CD that contains the operating system image. 7401 Model
Software CD LPINs
Win2000
WinXPe
WinNT
Win98
7401‐21xx, 31xx Not Supported Not Supported D370‐0433‐0100 D370‐0444‐0100 * 7401‐22xx, 25xx, 32xx, 35xx D370‐0504‐0100 D370‐0485‐0100 D370‐0483‐0100 D370‐0481‐0100 * 7401‐26xx D370‐0484‐0100 D370‐0567‐0100 D370‐0483‐0100 Not Supported 7401‐45xx D370‐0554‐0100 Not Supported D370‐0553‐0100 Not Supported 7401‐46xx D370‐0484‐0100 D370‐0567‐0100 D370‐0553‐0100 Not Supported * Support for Windows 98 has been discontinued. 3. Boot the terminal. 4. Press F2 at the screen prompt to enter the Setup Utility. 5. In the Advanced menu, select I/O Device Configuration. 6. Verify that LPT 1 Mode is set to ECP. 7. Go back to the Advanced menu, select Multiple ROM Menu. 8. Set the Parallel CD-ROM Boot to Enabled. 9. Exit Setup and Save Changes. As the terminal reboots, you should see a message during boot indicating that the CD‐ROM has been recognized: Micro Solutions BACKPACK CD-ROM v0.3
. . .
Booting from BACKPACK CD
Starting MS-DOS
6-4
Chapter 6: Operating System Recovery
10. Follow the DOS screen prompts. After each entry you are asked to confirm your input. You can use 1 or y for Yes, 2 or n for No. 11. Enter whether or not you want to perform Disk verification. (Answering Yes takes twice as long, but is recommended.) If Yes is selected: •
The Ghost software verifies write operations and handles bad FAT clusters. •
The Ghost error file (GHOST.ERR) is displayed before rebooting If No is selected: •
The Ghost error file is displayed before rebooting only if Ghost aborts. Caution: If the error file is displayed, the batch file pauses for user input before rebooting. You may use Ctrl‐C to cancel out of the batch file if you want to see the error file again, but nothing should be done that writes to the hard disk before rebooting. GHOST.ERR is on the RAM disk and is lost on reboot. 12. Select which type of recovery you want to perform from the next menu (normally option #1). 1) Redo entire disk with the first partition the same size. 2) Redo the first OS partition. 3) Redo the second OS partition. The Ghost software then begins the disk recovery from the CD. It displays a progress bar and gives you an estimate how long the process should take. When the recovery process is completed, the client hard disk is restored to its preinstalled condition, as originally received from the factory. 13. At the completion of the recovery process remove the CD and press Enter to reboot the terminal. Chapter 6: Operating System Recovery
6-5
14. Enter Setup when the terminal reboots and reset the Parallel CDROM Boot to Disabled. Completing the OS Installation (Win2000)
The system automatically reboots when the image recovery is complete and starts the software installation. This installation also installs most of the additional software and drivers that are included in the disk image. Complete the installation as follows. 1. After the terminal reboots, it will perform a disk check and then continue with the Windows 2000 installation. 2. Enter the User Name and Organization. 3. Enter the Computer Name for the client. 4. Enter the Administrator’s Account Password (optional) 5. When prompted, press Finish to reboot the client. 6. Login when prompted. 7. Run the MicroTouch screen calibration from the Desktop icon. Completing the OS Installation (WinXPe)
The system automatically reboots when the image recovery is complete and starts the software installation. This installation also installs most of the additional software and drivers that are included in the disk image. Complete the installation as follows. 1. Click the Admin button to login as Administrator. 2. Read the EULA (End‐User License Agreement) information in the DOS window, then type EXIT and press Enter to close the DOS window. 3. Start the Network Setup Wizard. 4. Select options to identify the network information for the terminal environment. 6-6
Chapter 6: Operating System Recovery
5. Enter the Computer Description. 6. Enter the Computer Name. 7. Enter the Workgroup Name. 8. When prompted, press Finish to reboot the terminal. 9. Log in when prompted. 10. Open the Control Panel or use the TouchWare Icon on the desktop and run the MicroTouch screen calibration. Completing the OS Installation (WinNT)
The system automatically reboots when the image recovery is complete and starts the software installation. This installation also installs most of the additional software and drivers that are included in the disk image. Complete the installation as follows. 1. After the terminal reboots, press Next at the Windows Setup screen. 2. Accept the Microsoft license agreement. 3. Enter the User Name and Organization. 4. Enter the Computer Name for the client. 5. Enter the Administrator’s Account Password (optional) 6. When prompted, press Finish to reboot the client. 7. Log in when prompted. 8. Open the Control Panel and run the MicroTouch screen calibration. Completing the OS Installation (Win98) – (Discontinued)
The system automatically reboots when the image recovery is complete and starts the software installation. This installation also installs most of the additional software and drivers that are included in the disk image. Complete the installation as follows. 1. When the terminal boots it enters the Windows setup routine. Chapter 6: Operating System Recovery
6-7
Note: When installing Win98 on terminals with Processor Boards (7401‐21xx/31xx) there are few differences in the procedure as follows: a) The terminal starts the Add New Hardware Wizard. b) For each device found, permit Windows to search for new drivers (take defaults). c) After each driver is installed you are asked to reboot. Answer No. 2. At the User Information screen, enter the User information. This can be done using a keyboard or you can use the touch screen keyboard. After entering the information, press Enter or touch OK. 3. Go into the Control Panel and set the terminal Date and Time. 4. In the Control Panel, run the MicroTouch screen calibration. 6-8
Chapter 6: Operating System Recovery
Gold Disk Contents
This section describes the contents of each of the Gold Disk Images, including all the additions and changes that were made on top of the generic operating system. For each operating system, NCR strongly recommends that the drivers placed in the c:\install directory be left there for the purposes of servicing and maintaining the system. If you are using the information in this section to build your own operating system image and not using NCRʹs provided OS Recovery image as a base image, then we recommend that all installed drivers be placed in a similar c:\install directory for support. Microsoft Operating System License Agreements
When purchasing a workstation or kiosk preloaded with a Microsoft operating system, the application provider must follow certain license agreement guidelines. Listed below are some of the major points of Microsoft’s “Embedded Software” agreement, which currently covers DOS, Win 3.11, Windows 95, Windows 98, Windows NT, Windows 2000, and Windows XPe. •
The end user application should not permit the user (typically a cashier) to exit the application so that they may be able to browse the operating system desktop, explorer, or other Microsoft operating system user interface elements. This does not apply to servicing, upgrading, or diagnosing problems for the workstation by services or field engineers. This restriction is meant to ensure that the end user is only permitted to navigate within the confines of the end user’s application under normal operating conditions. •
The NCR OS Recovery image can only be used to recover or update systems with licenses procured from NCR. Chapter 6: Operating System Recovery
6-9
Operating System Restrictions
The following section describes restrictions for operating systems used with the 7401 terminal. Standby and Hibernate Mode Restriction
When using a 7401 terminal without a keyboard or mouse, the Windows 2000, Windows XP PRO, and Windows XP Embedded OS Standby Mode and Hibernate Mode should be avoided. These two modes place the hardware in a low power state that requires an interrupt to restart the processor. The Windows 2000 and Windows XP Embedded Gold Disk Images disable Hibernate Mode and Standby Mode on the 7454 terminal. These two modes should not be used without a keyboard or mouse. NCR 7401-22xx/25xx/32xx/35xx Win2000 Operating System Recovery
Software (Version 02.03.00.01)
(LPIN: D370‐0504‐0100) This product should only be used on 7401 terminals with a Microsoft Windows 2000 license. 7401‐22xx/25xx/32xx/35xx Windows 2000 Operating System Recovery Software provides the means of restoring the operating system to the hard disk of a 7401 terminal. The bootstrap program (di_intel.bsd) and disk recovery boot image (di_intel.bid) are downloaded to the target terminal over the network and restore the hard disk to the preinstalled state as shipped from the factory. The following software is installed: •
Microsoft Windows 2000 Professional with Service Pack 2 •
Microsoft Internet Explorer 5.5 (version 5.50.4134.0600) •
SMI Lynx EM/EM+ Video driver (version 5.0.2195.178) •
SoundFusion Audio driver (version 5.12.01.3041) 6-10
Chapter 6: Operating System Recovery
•
Intel 82559 Ethernet LAN drivers (version 5.0.67.0) •
MicroTouch driver (version 5.62) •
NCRSYSM driver (version 2,02,01,002) •
Windows Installer (version 1.1) The following drivers are not installed automatically, but can be installed from their respective locations: •
Backpack CD‐ROM (3.02) C:\Install\Drivers\CDRom •
Edgeport USB (1.15.02) C:\Install\Drivers\USB Configures the following settings/revisions: •
Preinstalls W2K to include the Product ID Number (PID) •
Places the Gold Drive Part Number, Date Created, LPIN, and Release in Registry under: •
HKey-Local_Machine\Software\NCR\Gold Drive
Runs Sysprep, using sysprep.inf and sysprep.bat, so that the mini installation will run on initial boot with the following parameters: −
Skip EULA −
Automatically include PID •
Establishes a FAT32 primary system partition that fills the entire drive •
Includes necessary OS cab files in C:\Install •
Installs SP1 and SP2 •
Installs SMI Control Panel •
Installs Intel Proset utility •
Enables APM •
Sets ʹAPM monitor shutoffʹ to ʹNeverʹ •
Enables PME (in Intel Proset utility) set to ʹHardware Defaultʹ •
Enables DMA •
Sets color to 16 bit Chapter 6: Operating System Recovery
6-11
NCR 7401-26xx/46xx Win2000 Operating System Recovery Software
(Version 02.05.00.02)
(LPIN: D370‐0484‐0100) This product should only be used on 7401 terminals with a Microsoft Windows 2000 license. 7401‐26xx/46xx Windows 2000 Operating System Recovery Software provides the means of restoring the operating system to the hard disk of a 7401 terminal that has a Summa II processor board with ACPI BIOS. The bootstrap program (di_intel.bsd) and disk recovery boot image (di_intel.bid) are downloaded to the target terminal over the network and restore the hard disk to the preinstalled state as shipped from the factory. The following software is installed: •
Microsoft Windows 2000 Professional with Service Pack 2 •
Microsoft Security Rollup Package (W2KSRP1) •
Microsoft Internet Explorer 6.0 SP1 (6.0.2800.1106 SP1) •
SMI Lynx 3DM/3DM+ Video driver (version 5.0.2195.178) •
ESS Allegro Audio (5.12.1.1167) •
Intel 82559 Ethernet LAN drivers (version 5.0.67.0) •
MicroTouch driver (version 5.63 SR3) •
NCRSYSM installed (3.0.4.12) – Minimum required for ACPI support •
Windows Installer (version 2.0) •
ATX Printer driver (1.03) 6-12
Chapter 6: Operating System Recovery
The following drivers are not installed automatically, but can be installed from their respective locations: •
Backpack CD‐ROM (3.02) C:\Install\Drivers\CDRom •
Magtec MCR (1.01.07) C:\Install\Drivers\MCR •
USB Camera (2.15) C:\Install\Drivers\Camera •
Edgeport USB (2.15) C:\Install\Drivers\USB Configures the following settings/revisions: •
Preinstalls W2K to include the Product ID Number (PID) •
Places the Gold Drive Part Number, Date Created, LPIN, and Release in Registry under: •
HKey-Local_Machine\Software\NCR\Gold Drive
Runs Sysprep, using sysprep.inf and sysprep.bat, so that the mini installation will run on initial boot with the following parameters: −
Automatically include PID •
Establishes a FAT32 primary system partition that fills the entire drive •
Includes necessary OS cab files in C:\Install •
Installs SMI Control Panel (4.3.5) •
Installs Intel Proset utility •
Enables PME (in Intel Proset utility) set to ʹHardware Defaultʹ •
Enables DMA (DMACheck.exe provided in C:\Install) •
Sets Resolution to 800x600, color to High •
Makes PinPad testing folder available in C:\Install\Drivers\PinPad •
Replaces the standard EULA with the NCR‐specific EULA •
Installs MS SNMP, set to Manual Chapter 6: Operating System Recovery
•
6-13
Addresses hotplug keyboard issue, registry values added: KLM\System\CurrentControlSet\Services\i8042prt\Parameters •
Value: Headless •
Type: REG_DWORD •
Data: 0x1 •
Runs TerminalCheck.exe in Run registry to determine correct hardware platform (otherwise it will shut down) •
Hides MS splash screen by adding /noguiboot parameter to boot.ini 6-14
Chapter 6: Operating System Recovery
NCR 7401-45xx Win2000 Operating System Recovery Software
(Version 02.04.00.02)
(LPIN: D370‐0554‐0100) This product should only be used on 7401 terminals with a Microsoft Windows 2000 license. 7401‐45xx Windows 2000 Operating System Recovery Software provides the means of restoring the operating system to the hard disk of a 7401 terminal. The bootstrap program (di_intel.bsd) and disk recovery boot image (di_intel.bid) are downloaded to the target terminal over the network and restore the hard disk to the preinstalled state as shipped from the factory. The following software is installed: •
Microsoft Windows 2000 Professional with Service Pack 2 •
Microsoft Internet Explorer 5.5 (version 5.50.4134.0600) •
SMI Lynx EM/EM+ Video driver (version 5.0.2195.178) •
SoundFusion Audio driver (version 5.12.01.3041) •
Intel 82559 Ethernet LAN drivers (version 5.0.67.0) •
MicroTouch driver (version 5.63) •
NCRSYSM installed (3.0.1.9) •
Windows Installer (version 1.1) •
ATX Printer installed (1.05) •
MagTec magnetic card reader installed (1.01.07) •
Sun JVM installed (1.3.1_01) Chapter 6: Operating System Recovery
6-15
The following drivers are not installed automatically, but can be installed from their respective locations: •
Backpack CD‐ROM (3.02) C:\Install\Drivers\CDRom •
Edgeport USB (1.15.2) C:\Install\Drivers\USB Configures the following settings/revisions: •
Preinstalls W2K to include the Product ID Number (PID) •
Places the Gold Drive Part Number, Date Created, LPIN, and Release in Registry under: •
HKey-Local_Machine\Software\NCR\Gold Drive
Runs Sysprep, using sysprep.inf and sysprep.bat, so that the mini installation will run on initial boot with the following parameters: −
Automatically include PID •
Establishes a FAT32 primary system partition that fills the entire drive •
Includes necessary OS cab files in C:\Install •
Installs SP1 and SP2 •
Installs SMI Control Panel •
Installs Intel Proset utility •
Enables APM •
Sets APM monitor shutoffʹ to ‘Never’ •
Enables PME (in Intel Proset utility) set to ʹHardware Defaultʹ •
Enables DMA •
Sets color to 16 bit •
Makes PinPad testing folder available in C:\Install\Drivers\PinPad •
Changes audio hardware acceleration from ‘standard’ to ‘emulation only’ 6-16
Chapter 6: Operating System Recovery
•
Replaces the standard EULA with the NCR‐specific EULA NCR 7401-22xx/25xx/32xx/35xx WinXPe Operating System Recovery
Software (Version 02.05.00.01)
(LPIN: D370‐0485‐0100) This product should only be used on 7401 terminals with a Microsoft Windows XPe license. 7401‐22xx/25xx/32xx/35xx Windows XPe Operating System Recovery Software provides the means of restoring the operating system to the hard disk of a 7401 POS terminal. The bootstrap program (di_intel.bsd) and disk recovery boot image (di_intel.bid) are downloaded to the target terminal over the network and restore the hard disk to the preinstalled state as shipped from the factory. This enables installation of the following software: •
Microsoft Windows XPe w/ SP1 •
SMI Lynx 3DM/3DM+ Video driver (6.13.10.227) •
Intel 82559 Ethernet LAN drivers (6.01.03.0000) •
NCRSYSM driver (3.0.4.12) •
MicroTouch drivers (5.64) The following drivers are not installed automatically, but can be installed from their respective locations (Readme files exist in these locations, as well): •
Backpack CD‐ROM (4.0.100.1190) C:\Install\Drivers\CDRom •
Edgeport USB (2.20) C:\Install\Drivers\USB •
Inside Out Networks Watchport/V Camera (2.20) C:\Install\Drivers\Camera Chapter 6: Operating System Recovery
6-17
Furthermore, the following settings/revisions have been configured: •
Preinstalled XPe to include the Product ID Number (PID) •
Placed the Gold Drive Part Number, Date Created, LPIN, and Release in Registry under: HKey‐Local_Machine\Software\NCR\Gold Drive •
Established a NFTS primary system partition that fills the entire drive •
Included necessary OS cab files in C:\Install •
Installed SMI Control Panel (4.2.2) •
Installed Intel Proset utility •
Set virtual memory to 128 •
Enabled APM •
Set ‘APM monitor shutoff’ to ‘Never’ •
Set ‘Enable PME’ (in Intel Proset utility) to ‘Hardware Default’ •
Set color to 24 bit •
Added SetResolution.exe to RunOnce registry. •
Added NCR‐specific EULA. 6-18
Chapter 6: Operating System Recovery
NCR 7401-26xx/46xx WinXPe Operating System Recovery Software
(Version 02.05.00.01)
(LPIN: D370‐0567‐0100) This product should only be used on 7401 terminals with a Microsoft Windows XPe license. 7401‐26xx/46xx Windows XPe Operating System Recovery Software provides the means of restoring the operating system to the hard disk of a 7401 POS terminal. The bootstrap program (di_intel.bsd) and disk recovery boot image (di_intel.bid) are downloaded to the target terminal over the network and restore the hard disk to the preinstalled state as shipped from the factory. This enables installation of the following software: •
Microsoft Windows XPe w/ SP1 •
SMI Lynx 3DM/3DM+ Video driver (6.13.10.227) •
Intel 82559 Ethernet LAN drivers (6.01.03.0000) •
NCRSYSM driver (3.0.4.12) •
MicroTouch drivers (5.64) •
Edgeport USB driver (2.20) •
Practical Automation ATX 38 Printer driver (V1.04) The following drivers are not installed automatically, but can be installed from their respective locations (Readme files exist in these locations, as well): •
Backpack CD‐ROM (4.0.100.1190) C:\Install\Drivers\CDRom •
HyperCom available (V4.9.0) C:\Install\Drivers\HperCom •
Inside Out Networks Watchport/V Camera (2.20) C:\Install\Drivers\Camera Magtec MCR (1.01.07) C:\Install\Drivers\MagTek •
Chapter 6: Operating System Recovery
6-19
Furthermore, the following settings/revisions have been configured: •
Preinstalled XPe to include the Product ID Number (PID) •
Placed the Gold Drive Part Number, Date Created, LPIN, and Release in Registry under: HKey‐Local_Machine\Software\NCR\Gold Drive •
Established a NFTS primary system partition that fills the entire drive •
Included necessary OS cab files in C:\Install •
Installed SMI Control Panel (4.2.2) •
Installed Intel Proset utility •
Set virtual memory to 128 •
Enabled APM •
Set ‘APM monitor shutoff’ to ‘Never’ •
Set ‘Enable PME’ (in Intel Proset utility) to ‘Hardware Default’ •
Set color to 24 bit •
Added SetResolution.exe to RunOnce registry. •
Added NCR‐specific EULA. 6-20
Chapter 6: Operating System Recovery
NCR 7401-/22xx/25xx/26xx/32xx/35xx NT Operating System
Recovery Software (Version 02.05.00.02)
(LPIN: D370‐0483‐0100) This product should only be used on 7401 terminals with a Microsoft Windows NT Workstation 4.0 license. 7401‐22xx/25xx/26xx/32xx/35xx NT Operating System Recovery Software provides the means of restoring the operating system to the hard disk of a 7401 terminal that has either a Summa or Summa II processor board. The bootstrap program (di_intel.bsd) and disk recovery boot image (di_intel.bid) are downloaded to the target terminal over the network and restore the hard disk to the preinstalled state as shipped from the factory. The following software is installed: •
Microsoft Windows NT Workstation 4.0 with Service Pack 6a •
Microsoft Internet Explorer 6.0 SP1 (6.0.2800.1106 SP1) •
MicroTouch drivers (5.63 SR3) •
SMI Lynx 3DM Video driver (4.00.1381.0178) •
SoundFusion Audio driver (4.01.2086) •
ESS Allegro Audio (4.03.00.3077) •
Intel 82559 Ethernet LAN drivers (5.00.66.0000) •
NCRSYSM driver (3.0.4.12) •
Windows Installer (2.0) The following drivers are not installed automatically, but can be installed from their respective locations: •
Backpack CD‐ROM (2.04) C:\Install\Drivers\CDRom •
Edgeport USB (2.15) C:\Install\Drivers\USB •
USB Camera (2.15) C:\Install\Drivers\Camera Configures the following settings/revisions: Chapter 6: Operating System Recovery
•
Preinstalls NT to include the Product ID Number (PID) •
Places the Gold Drive Part Number, Date Created, LPIN, and Release in Registry under: 6-21
HKey-Local_Machine\Software\NCR\Gold Drive
•
Runs Sysprep (so that the mini installation will run on initial boot) with the following parameters: −
Automatically include PID •
Host.cmd set in RunOnce to update the registry •
Establishes a 2gb FAT16 primary system partition •
Establishes a secondary NTFS partition that fills the remainder of the drive •
Includes necessary OS cab files in C:\Install •
Makes SP6a folder available in C:\Install (installed) •
Installs SMI Control Panel (4.3.5) •
Installs Intel Proset utility •
ʹEnable PMEʹ (in Intel Proset utility) set to ʹHardware Defaultʹ •
Replaces the standard EULA with the NCR‐specific EULA •
Installs MS SNMP, set to Manual •
Disables SoundFusion Audio drivers in Devices Startup •
Disables ESS Audio Drivers •
Runs TerminalCheck.exe in Run registry to determine correct hardware platform (otherwise it will shut down) •
Runs EnableAudioDriver.exe in Run registry to enable the appropriate sound driver (SoundFusion or ESS) •
Enables DMA (DMACheck.exe provided in C:\Install) •
Hides MS splash screen by adding /noguiboot parameter to boot.ini •
Mutes Volume Line‐In 6-22
Chapter 6: Operating System Recovery
NCR 7401-21xx/31xx NT Operating System Recovery Software
(Version 01.04.01.00)
(LPIN: D370‐0433‐0100) Installs the following software: •
Microsoft Windows NT Workstation 4.0 with Service Pack 4a. Service Pack 6 included (but not installed) on the disk •
Microsoft Internet Explorer 5.0 •
MicroTouch TouchWare Version 5.4 for Mouse Port software •
Chips & Technologies 69000 Video driver •
CrystalWare Audio driver •
Intel EtherExpress software •
Intel PIIX Bus Master IDE drivers •
M‐Systems Disk‐On‐Chip 2000 driver (not installed) available •
Backpack CD‐ROM drivers (not installed) available Configures the following settings/revisions: •
Enables the NT Dump settings to: −
send an administrative alert −
write dump to file −
overwrite existing file −
auto reboot after dump •
Mutes the Volume Line‐In •
Changes event log to overwrite events as needed for the Application Type event logs •
Changes the Windows Scroll Bar Size from 16 to 18 pixels for easier Touch response Chapter 6: Operating System Recovery
•
6-23
Sysprep.inf answer file created to: −
Skip EULA −
Preinstall the Product ID Number (PID) •
Places the Gold Drive Part Number, Date Created, LPIN, and Version in Registry under: HKey-Local_Machine\Software\NCR\Gold Drive •
Windows Installer (Version 1.1) installed •
Removes the following key from the registry (as a current COM9 issue workaround): Hkey_Local_Machine\System\CurrentControlSet\Servic
es\Serial\Parameters\ Serial 10999 •
Changes page file size to 139‐256 6-24
Chapter 6: Operating System Recovery
NCR 7401-4xxx NT Operating System Recovery Software
(Version 02.05.00.02)
(LPIN: D370‐0553‐0100) This product should only be used on 7401 terminals with a Microsoft Windows NT Workstation 4.0 license. The 7401‐4xxx NT Operating System Recovery Software provides the means of restoring the operating system to the hard disk of a 7401‐45xx terminal that has a Summa processor board or s 7401‐46xx terminal that has Summa II processor board. The bootstrap program (di_intel.bsd) and disk recovery boot image (di_intel.bid) are downloaded to the target terminal over the network and restore the hard disk to the preinstalled state as shipped from the factory. The following software is installed: •
Microsoft Windows NT Workstation 4.0 with Service Pack 6a •
Microsoft Internet Explorer 6.0 SP1 (6.0.2800.1106 SP1) •
SMI Lynx 3DM Video (4.00.1381.0178) •
SoundFusion Audio (4.01.2086) •
ESS Allegro Audio (4.03.00.3077) •
Intel 82559 Ethernet LAN (5.00.66.0000) •
NCRSYSM (3.0.4.12) •
Windows Installer (2.0) •
MicroTouch (5.63 SR3) •
ATX Printer (1.05) The following drivers are not installed automatically, but can be installed from their respective locations: •
Backpack CD‐ROM (2.04) C:\Install\Drivers\CDRom •
Edgeport USB (2.15) C:\Install\Drivers\USB •
Magtec MCR ((1.01.07) C:\Install\Drivers\Magtec •
USB Camera (2.15) C:\Install\Drivers\Camera Chapter 6: Operating System Recovery
6-25
Configures the following settings/revisions: •
Preinstalls NT to include the Product ID Number (PID) •
Places the Gold Drive Part Number, Date Created, LPIN, and Release in Registry under: HKey-Local_Machine\Software\NCR\Gold Drive
•
Runs Sysprep (so that the mini installation will run on initial boot) with the following parameters: −
Automatically include PID •
Host.cmd set in RunOnce to update the registry •
Establishes a 2gb FAT16 primary system partition •
Establishes a secondary NTFS partition that fills the remainder of the drive •
Includes necessary OS cab files in C:\Install •
Makes SP6a folder available in C:\Install (installed) •
Installs SMI Control Panel (4.3.5) •
Installs Intel Proset utility •
ʹEnable PMEʹ (in Intel Proset utility) set to ʹHardware Defaultʹ •
Makes PinPad testing folder available in C:\Install\Drivers\PinPad •
Replaces the standard EULA with the NCR‐specific EULA. •
Installs MS SNMP, set to Manual •
Disables SoundFusion Audio drivers in Devices Startup •
Disables ESS Audio drivers •
Runs TerminalCheck.exe in Run registry to determine correct hardware platform (otherwise it will shut down) •
Runs EnableAudioDriver.exe in Run registry to enable the appropriate sound driver (SoundFusion or ESS) •
Enables DMA (DMACheck.exe provided in C:\Install) •
Hides MS splash screen by adding /noguiboot parameter to boot.ini •
Starts SerMouse device so trackball works properly 6-26
Chapter 6: Operating System Recovery
NCR 7401-22xx/25xx/32xx/35xx Win98 Operating System Recovery
Software (Version 02.03.00.01)
(LPIN: D370‐0481‐0100) Support for Windows 98 has been discontinued. This product should only be used on 7401 terminals with a Microsoft Windows 98 license. 7401 22xx/25xx/32xx/35xx Win98 Operating System Recovery Software provides the means of restoring the operating system to the hard disk of a 7401 terminal. The bootstrap program (di_intel.bsd) and disk recovery boot image (di_intel.bid) are downloaded to the target terminal over the network and restore the hard disk to the preinstalled state as shipped from the factory. The following software is installed: •
Microsoft Windows 98 Second Edition •
Microsoft Internet Explorer 5.5 (version 5.50.4134.0600) •
MicroTouch driver (version 5.62) •
SMI Lynx 3DM Video driver (version 4.12.01.0034) •
SoundFusion Audio driver (version 4.12.01.0034) •
Intel 82559 Ethernet LAN drivers (version 5.00.67.0000) •
NCRSYSM driver (version 2.01.01.004) •
Windows Installer (version 1.1) The following drivers are not installed automatically, but can be installed from their respective locations (Readme files exist in these locations, as well): •
Backpack CD‐ROM (3.04) C:\Install\Drivers\CDRom •
Edgeport USB (1.15.2) C:\Install\Drivers\USB Configures the following settings/revisions: •
Preinstalls Win98 to include the Product ID Number (PID) Chapter 6: Operating System Recovery
•
6-27
Places the Gold Drive Part Number, Date Created, LPIN, and Release in Registry under: HKey-Local_Machine\Software\NCR\Gold Drive
•
Adds Userinfo.exe to Start Menu to capture User Name, User Organization, Computer Name, and Workgroup (once the user has entered this information, userinfo will remove itself from the Start Menu) •
Establishes a FAT32 primary system partition that fills the entire drive •
Includes necessary OS cab files in C:\Install •
Installs Intel Proset Utility •
Applies a Microsoft hotfix to replace usbhub.sys version 4.10.2222 with 4.10.2223; this executable has been placed in C:\Install\Drivers\USB\Hotfix •
Enables DMA •
Disables DSound Acceleration and Sensaura/EAX in the SoundFusion control panel •
Disables game device and joystick •
Sets to High Color •
Enables PME (in Intel Proset utility) set to ʹHardware Defaultʹ •
Mutes the Volume Line‐In 6-28
Chapter 6: Operating System Recovery
NCR 7401-21xx/31xx Win98 Operating System Recovery Software
(Version 01.01.00.00)
(LPIN: D370‐0444‐0100) Support for Windows 98 has been discontinued. Installs the following software: •
Microsoft Windows 98 Second Edition •
Microsoft Internet Explorer 5.0 •
MicroTouch TouchWare Version 5.4 for Mouse Port software •
Chips & Technologies 69000 Video driver •
Crystal Audio driver •
Intel 8255x‐based PCI Ethernet Adapter •
Intel PIIX Bus Master IDE drivers •
Windows Installer (Version 1.1) •
Backpack CD‐ROM drivers available (not installed) Configures the following settings/revisions: •
Mutes the Volume Line‐In •
Places the Gold Drive Part Number, Date Created, LPIN, and Version in Registry under: HKey-Local_Machine\Software\NCR\Gold Drive Chapter 6: Operating System Recovery
6-29
OS Recovery from a Larger Disk Image
The following procedure should be used to restore an Operating System when the destination disk is smaller than the source image (i.e. OS Recovery was made on a 10 GB source disk, but is being recovered on a 4.3 GB drive). 1. Boot the system. You should see a message during boot indicating that the CD‐ROM has been recognized: Micro Solutions BACKPACK CD-ROM v0.3
. . .
Booting from BACKPACK CD
Starting MS-DOS
2. Follow the DOS screen prompts. After each entry, you are asked to confirm your input. You can use 1 or y for Yes, 2 or n for No. 3. Enter No at the Disk verification question. 4. Select which type of recovery you want to perform from the next menu (normally option #1). 1) Redo entire disk with the first partition the same size. 2) Redo the first OS partition. 3) Redo the second OS partition. 5. At the Press any key to continue dialog box, press [CTRL]-C to abort the process. When asked Terminate batch job? Answer Y. 6. From the command prompt, change to drive Z, which is the location of the Ghost software (CD‐ROM drive). 7. Run the Ghost command. Ghost.exe
8. Press Enter. 6-30
Chapter 6: Operating System Recovery
9. Select Local → Disk → From Image and press Enter. 10. The directory that Ghost is now looking in should be Z: (if not, switch to Z). Select the File name to load image from file (nnnnnnn.gho) and press Enter. 11. Select the Local destination drive and press Enter. 12. Set the sizes of the primary and secondary partitions as follows. O/S
Primary Partition/ Format
Secondary Partition Size
DOS 2 GB/FAT16 2 GB/FAT16 Win95 2 GB/FAT16 Fill remainder as FAT 32 WinNT 2 GB/FAT16 Fill remainder as NTFS Win98 Single FAT 32 partition N/A Win2000 Single FAT 32 partition N/A WinXPe Single NTFS partition N/A In order to do this you may need to clear the amount from the second partition. 13. Press Enter. 14. If you are recovering from Win9x, it is likely that the second partition will be too small for FAT32. If so, a dialog is displayed Converting partition from FAT32 to FAT, proceed?
Choose Yes. 15. At the next dialog box, Proceed with disk load? Destination drive will be
permanently overwritten, Choose Yes to start the recovery process. Chapter 7:
BIOS Updating Procedures
Introduction
The terminalʹs BIOS can be updated using a parallel CD‐ROM drive and software available on bootable CD‐ROM media. The drivers necessary to run the CD‐ROM are temporarily installed during boot. This chapter describes this procedure. It is also possible to perform a BIOS update using a network connection. Refer to the NCR FitClient Software Userʹs Guide for information about that procedure. Crisis Recovery
In the event the BIOS becomes corrupt, such as the result of a power failure during the BIOS Update procedure, you can use the method discussed later in this chapter in the BIOS Crisis Recovery section to recover the BIOS. Prerequisites
The following are required on the 7401 in order to perform a BIOS update using a CD. •
•
Bootable CD‐ROM drive −
Integrated 7401‐F058/F059 −
External 2336‐K007 (Parallel CD‐ROM – Series 5 or Series 6) The terminal BIOS must be 1.02.00.00 or greater. −
MicroSolutions BackPack CD‐ROM Series 6 requires BIOS 2.1.1.1 or greater •
Keyboard •
NCR BIOS and BIOS Update Software (LPIN: A370‐0022‐0100) 7-2
Chapter 7: BIOS Updating Procedures
Updating Procedures
External CD-ROM
If you do not have an integrated CD‐ROM drive, connect the Backpack External CD‐ROM as follows. 1. Connect the external CD‐ROM (2336‐K007) drive to the parallel port on the terminal. 2. Connect the power connector to the CD‐ROM drive. Parallel Connector
Power
Connector
Parallel Connector
18250
Chapter 7: BIOS Updating Procedures
7-3
3. Apply power to the terminal so the CD‐ROM drive can be opened. 4. Insert the BIOS update CD. NCR BIOS and BIOS Update Software LPIN: A370‐0022‐0100 5. Boot the terminal. 6. Press F2 at the screen prompt to enter the Setup Utility. 7. In the Advanced menu, select I/O Device Configuration. 8. Verify that LPT 1 Mode is set to ECP. 9. Go back to the Advanced menu, select Multiple ROM Menu. 10. Set the Parallel CD-ROM Boot to Enabled. 11. Exit Setup and Save Changes. As the terminal reboots, you should see a message during boot indicating that the CD‐ROM has been recognized: Micro Solutions BACKPACK CD-ROM v0.3
. . .
Booting from BACKPACK CD
Starting MS-DOS
12. Follow the screen prompts on the client to update the BIOS. You can select two methods to run the update program. •
Automatic BIOS Update – update process runs unattended Note: You will see a prompt for terminal model and serial number information if the program detects invalid information in the current BIOS, or if you are replacing the Processor Board, in which case there is not model/serial number information in the BIOS. Important: Model/Serial Number is mandatory for FitClient operation. •
Interactive BIOS Update – permits you to input/replace the model/serial number information that is stored in the BIOS. 7-4
Chapter 7: BIOS Updating Procedures
Note: Model/Serial number data that is currently stored in the BIOS is displayed during power up. 13. When you get the green window, this indicates a successful update. 14. Remove the CD. 15. Press any key to reboot. 16. Enter Setup when the terminal reboots and load the Setup
Defaults (Exit Menu). 17. From the Advanced menu, select Reset Configuration Data and then use the space bar to change the selection to Yes. 18. Exit Setup and Save Changes. 19. Remove the CD during reboot for the OS to begin. When system is restored, reset the BIOS to normal defaults. Chapter 7: BIOS Updating Procedures
7-5
BIOS Crisis Recovery
The procedures below provide a way to restore the BIOS resulting from a non‐recoverable condition. Note: Use this BIOS crisis recovery procedure only for a NON‐RECOVERABLE BIOS failure. A non‐recoverable BIOS state typically results from power loss during a flash BIOS update process. This is a rare occurrence and should not be confused with other hardware errors that cause a no video state. This procedure is not intended to be used for changing or upgrading an operational BIOS. Required Hardware
Part Number Part Name Use PC with at serial port Download BIOS 497‐0408349 Cable, 9‐Pin Female to 9‐Pin Female RS232 PC to terminal connection 497‐0411000 Cable, Parallel Interface 7401 parallel port to Dongle connection 497‐0413418 Parallel Dongle Forces BIOS recovery 497‐0414184 POS Connector Board 7401 parallel port (not required if already present) Required Software
Acquire the following software from NCR. NCR 74xx BIOS and BIOS Update Software LPIN: A370‐0022‐0100, Release 3.0 or later 7-6
Chapter 7: BIOS Updating Procedures
Recovery Procedures
1. Connect the Parallel I/F Cable to the parallel (Customer Display) connector on the terminal. COM1
19518
Parallel
2. Connect the two machines with the RS‐232 cable. Use COM Port 1 on both machines (COM1 is next to the USB ports on the terminal). RS-232 Cable
NCR 7401
PC
19519
3. Connect the Parallel Dongle to the Parallel I/F Cable. Parallel
Dongle
25-pin
D-Shell
Receptacle
497-0411000
28-pin
Sub-Miniature
D-Plug
Parallel
Port
16992
4. Boot the PC in the DOS mode with CD‐ROM support. Note: The PC must be running in the DOS mode (not in a Windows DOS box) for the software to operate correctly. Chapter 7: BIOS Updating Procedures
7-7
5. Insert the BIOS update CD into the PC. NCR BIOS and BIOS Update Software LPIN: A370‐0022‐0100 6. Apply power to the terminal. 7. On the PC, change directory to the CD‐ROM drive. E: [Enter]
8. Enter the update command: EMBflash [Enter] 9. Select the number for the 7401 terminal from the menu list: 1)
2)
3)
4)
5)
6)
7)
8)
7454
7401
7452
7453
7455
7460
7451
7456
2 [Enter]
A blue screen displays as the program runs, showing the program progress, followed by a green screen, indicating a successful load. PhoenixPhlash Status
Flash memory has been successfully programmed
PRESS ANY KEY TO EXIT
19502
The Class/Model/Serial # information is deleted using the Crisis Recovery procedure. Use the normal BIOS update procedures, as discussed earlier in this chapter, to restore the information. 7-8
Chapter 7: BIOS Updating Procedures
Cable/Connector Pin-Out Information
Parallel Dongle
25-Pin D-shell Receptacle
(Viewed from wiring side)
13
12
25
11
24
10
23
9
22
8
21
7
20
6
19
5
4
17
18
3
16
2
15
1
14
19513
RS-232 Cable
P1
5
9
1
6
P2
9-Pin
D-shell
Receptacle
1
1
2
2
3
4
3
5
5
6
6
7
7
5
9
1
6
4
8
8
P1
9-Pin
D-shell
Receptacle
P2
19512
Chapter 8:
NCR 7401 7890/7892 Scanner
Differences
Introduction
The 7401 integrated scanner module is a modified NCR 7890 Presentation Scanner or a NCR 7892 Bi‐Modal Presentation Scanner; however, there are a few differences to be aware of. 1. The 7401 Scanner does not have its own integrated motion detector, as does the NCR 7890 and NCR 7892 Scanners. 2. The Scanner Programming Tags should only be used to set 7401 Scanner factory defaults. Modify additional settings using the NCR OPOS Programming Sequence function. 3. The defaults used with the 7401 Scanner are different from the standard NCR 7890 and NCR 7892 defaults. Application developers who are integrating the 7401 Scanner should obtain a copy of the following documents: •
NCR 7890 Presentation Scanner Userʹs Guide (BD20‐0901‐A) •
NCR 7892 Bi‐Modal Presentation Scanner User Guide (B005‐0000‐1192) •
NCR Scanner/Scale Interface Programmerʹs Guide (BD20‐1074‐A) •
NCR Scanner Programming Tags (BST0‐2121‐74) These documents are available on the Information Products Publishing (IPP) web site at http://www.info.ncr.com/. 8-2
Chapter 8: NCR 7401 7890/7892 Scanner Differences
Starting the 7401 Scanner Motor and Laser
The NCR 7890 and NCR 7892 Scanners have a built‐in detector that senses when an object is in front of the unit. When an object is detected, it turns the laser and motor on so it can scan. This detector is provided so the scanner can be put into a low‐power‐consumption state when the unit is not in use, permitting the scanner to last longer and use less power. The 7401 Scanner does not have a detector, but it does turn off the motor and laser after a programmable period of time called the Active Time. This period of time is from when the motor and laser are first started until they are automatically turned off. The Active Time is set by default to 20 seconds for the 7890 and 7892 Scanner; to 30 seconds for the 7401 Scanner. NCR OPOS and the FitClient platform handle the lack of an integrated motion detector by using the 7401ʹs motion detector located under the LCD screen. The NCR OPOS driver receives information (events) from the motion detector on the front of the 7401 to determine when the scanner should be started. Note: This detector, although good at detecting someone walking up to the 7401, may not detect someone who has been standing in front of the 7401 for a while and then presenting an item below the 7401 Scanner for reading. Chapter 8: NCR 7401 7890/7892 Scanner Differences
8-3
After the Active Time period expires, if the NCR OPOS scanner driver does not get another motion event, the motor and laser are turned off. If a motion event is received during the Active Time period, the motor and laser will continue to run and the timer is restarted. The application using NCR OPOS should keep track of the motion detection events (and the time since the last event) to ensure that the scanner is running when the application is requesting scanner input. If no motion events are received before the Active Time period expires, and a transaction is still active, the application must either restart the scanner or perform some other recovery procedure, such as asking the customer if they still want the same service performed. These procedures should be well designed and tested so that the customer is not attempting to scan an item when the motor and laser are off. The motion events are documented in the NCR OPOS Online Help file that comes with the NCR OPOS software. The help file is also available on the IPP web site (search for a Title containing OPOS). Use of the motion detector without using the NCR OPOS drivers is not recommended and is currently not documented. If the application is not using NCR OPOS, it must prepare the scanner to read using the Enable Scanner command and the Start Scanner command sequences. These commands are the same as the 7890 and 7892 commands as documented in the NCR Scanner/Scale Interface Programmer’s Guide. Once the Start Command is successfully issued, the motor and laser are turned on for the Active Time period. The application should keep track of the time so that at the end of the Active Time period, the Start command is re‐issued or some other procedure is performed to continue the transaction. As noted in the OPOS paragraph above, the design of these procedures should be carefully considered to limit customer frustration. 8-4
Chapter 8: NCR 7401 7890/7892 Scanner Differences
Programming the 7401 Scanner Using Programming Tags
Obtain the following Scanner Programming Tags (BST0‐2121‐74): •
Programming Mode •
Hex 3 •
Hex 0 •
Hex 7 •
Save and Reset •
Default 1. Power cycle the 7401 terminal. 2. Listen for the Scanner power‐up tone. Immediately scan the Default Scanner Programming Tag. Note: If a keyboard is attached, the Pause key may be pressed to delay terminal restart until scanner testing is complete. Terminal restart can be resumed by pressing any key. 3. Listen closely to the scanner beep sequence returned from scanning the Default Programming Tag. 4. If four (4) short and three (3) long beeps are heard, the scanner is programmed with 7401 default settings and no further action is necessary. If beeps returned are something other than four (4) short and three (3) long, proceed to step 5. 5. Scan the Scanner Programming Tags in the following order: ‐ Programming Mode ‐ Hex 3 ‐ Hex 0 ‐ Hex 7 ‐ Save and Reset 6. Scan the Default tag again to verify correct 7401 scanner setting of four (4) short followed by three (3) long beeps. Chapter 8: NCR 7401 7890/7892 Scanner Differences
8-5
Programming the 7401 Scanner Through the RS-232 Interface
As with the 7890 and 7892, the 7401 Scanner can be programmed through the RS‐232 interface. The 7890, 7892, and 7401 Scanners have a Program command (33h 45h) which permits you to send the tag information through the communications port (COM1 on the 7401). Send the same sequences that would be input using the tags. See the NCR Scanner/Scale Interface Programmerʹs Guide for more information. The Disable command must be sent to the scanner before the Program command is sent. The default for the message format is the same for the 7401 Scanner as it is for the 7890 and 7892 Scanners. There is no Start sentinel, and no BCC is used. The command is issued followed by the End sentinel which is an ETX (End of Text) character (03h). For example, the Start command is issued as 33h 38h 03h or ASCII: 3 8 ETX. 8-6
Chapter 8: NCR 7401 7890/7892 Scanner Differences
7401 Scanner Default Settings
The 7401 Scanner is set up in manufacturing using an additional string of commands to change some of the default settings that are provided with the 7890 and 7892 scanners. Refer to the 7890 and 7892 documents for the complete list of defaults. The defaults specifically programmed for the 7401 Scanner are listed below. These defaults are different from the 7890 and 7892 defaults. Hex Command
ASCII
Command Description
Command
Comments
31h, 30h, 35h, 1, 0, 5 Select RS‐232 protocol The 7401 Scanner can only be used on an RS‐232 connection. 31h, 34h, 30h, 1, 4, 0 Disable Code 39 Enable with 1, 4, A, 1 31h, 35h, 30h, 1, 5, 0 Disable Interleaved Enable with 1, 5, A, 1 2 of 5 31h, 37h, 30h, 1, 7, 0 Disable Code 128 31h, 31h, 30h, 1, 1, 0 Disable Good Read Enable with 1, 1, A, 1 Tone 31h, 32h, 43h, 35h 1, 2, C, 5 30 Second Active Time Enable with 1, 7, A, 1 Other times can be programmed; see the 7890 programming books. Appendix A:
Cables
7401 Cables
Corporate ID
Part Number
Description
1416‐C041‐0030 497‐0008623 Ethernet 10/100BaseT 1416‐C266‐0040 497‐0407943 9‐pin female to 9‐pin female RS‐232 1416‐C266‐0152 497‐0409379 7193 RS‐232 50 foot 9‐pin female to 9‐pin female 1416‐C320‐0030 006‐8601011 Printer Power, SEV, straight receptacle 1416‐C321‐0030 006‐8601012 Printer Power, UK, straight receptacle 1416‐C322‐0030 006‐8601019 Printer Power, Australian, straight receptacle 1416‐C323‐0030 006‐8601010 Printer Power, International, straight receptacle 1416‐C325‐0030 006‐1009037 Printer Power, US, straight receptacle 1416‐C337‐0010 497‐0407427 RS‐232 interface, integrated 1416‐C337‐0040 497‐0407429 RS‐232 interface, remote 1416‐C337‐0152 497‐0407430 RS‐232 interface 50 foot 1416‐C359‐0007 497‐0408349 9‐pin female to 9‐pin female RS‐232 (27ʺ) 1416‐C373‐0080 497‐0409432 25 foot cable 1416‐C374‐0040 497‐0409433 14 foot cable 1416‐C408‐0030 230‐0113955 Power, SEV, right angle receptacle 1416‐C409‐0030 230‐0113956 Power, UK rectangular, right angle receptacle A-2
Appendix A: Cables
Corporate ID
Part Number
Description
1416‐C411‐0030 006‐1012224 Power, international, right angle receptacle 1416‐C417‐0040 497‐0411815 Printer extender, 9‐pin female to 25‐pin female 1416‐C418‐0040 497‐0411816 Printer extender, 25‐pin male to 25‐pin female 1416‐C419‐0030 250‐0023191 Power, 120 V twist lock, right angle receptacle 1416‐C464‐0006 497‐0413011 CD‐ROM 1416‐C472‐0006 497‐0411000 Parallel interface 1416‐C528‐0010 497‐0415949 USB, 1 meter 1416‐C528‐0040 497‐0415950 USB, 4 meter Appendix B:
Feature Kits
7401 Kits
Below is a comprehensive list of the optional hardware Feature Kits that can be installed in the customer environment. Kit installation instructions (for those requiring instruction) are available on the Information Products web sites. •
NCR Intranet: http://inforetail.atlantaga.ncr.com •
Internet: http://www.info.ncr.com To locate the installation guides on these sites: 1. Select General Search. 2. Select the Kit Instructions icon. 3. In the Kit Title field, enter the Kit Title. Example: MSR or In the Kit Number field, enter the Kit Number. Example: 7401‐K103 4. Select Search The file can be viewed online by left‐mouse clicking on the pub title, or if you prefer to download the entire file you can right‐
mouse click on the title then select the Save Target as... option. If you aren’t sure of the title of number you can display all kits associated with a terminal product class by: 1. In the Class drop‐down list, select the Class of the terminal. Example: 7401 B-2
Appendix B: Feature Kits
2. Select Search. Kit Number
Part Number
Description
2336‐K001‐V001 497‐0411988 Ethernet to RS‐232 port server 2336‐K007‐V001 497‐0413163 External CD‐ROM 2336‐K008‐V001 497‐0413014 USB to RS‐232 port server 2336‐K012‐V001 497‐0413710 USB to RS‐232 2‐port server 2336‐K016‐V001 230‐0145388 Hand‐held scanner (12 V power) 2336‐K019‐V001 497‐0417069 Mouse, RS‐232 2336‐K020‐V001 006‐8603087 Keyboard with trackball 2336‐K021‐V001 006‐8603088 Serial to mouse adapter for keyboard with trackball 2336‐K033‐V001 497‐0417357 Modem ‐ PCMCIA 56 kB 2336‐K037‐V001 497‐0419664 Pedestal Kit ‐ Wide keyboard Tray 2336‐K051‐V001 497‐0422195 7401 Printer Blank 2336‐K052‐V001 497‐0422194 7401 Floor Standing Pedestal 2336‐K100‐V001 497‐0421335 Keyboard, Black, 83‐key, compact w/trackball 2336‐K101‐V001 497‐0421339 PS/2 to Serial Adapter 2336‐K206‐V001 Swedish/Finnish Rugged Keyboard 2336‐K207‐V001 Italian Rugged Keyboard 2337‐K010‐V001 497‐0417702 Bravo 4‐label printer (US cord, without label peeler) 2337‐K011‐V001 497‐0417703 Bravo 4‐label printer (US cord, with label peeler) Appendix B: Feature Kits
Kit Number
Part Number
Description
2337‐K012‐V001 497‐0417705 Bravo 4‐label printer (EC cord, without label peeler) 2337‐K013‐V001 497‐0417708 Bravo 4‐label printer (EC cord, with label peeler) 2337‐K014‐V001 497‐0417709 Bravo 4‐label printer (UK cord, without label peeler) 2337‐K015‐V001 497‐0417710 Bravo 4‐label printer (UK cord, with label peeler) 2756‐K121‐V001 497‐0409421 Domestic power supply 2756‐K122‐V001 497‐0409434 Y‐cable adapter (mouse/keypad) 2756‐K124‐V001 497‐0409422 International power supply 5945‐K010‐V002 497‐0414162 Cable – 4 M RS‐232 (9‐pin D shell) 5945‐K012‐V001 497‐0414163 Cable – 8 M RS‐232 (9‐pin D shell) 5945‐K020‐V001 497‐0412046 Power supply (120 V, 60 Hz, US/Can) 5945‐K025‐V001 497‐0412800 Power supply (220‐240 V, 50 Hz) 5945‐K030‐V001 497‐0412047 Generic keyboard overlay 5945‐K100‐V004 497‐0416165 Electronic payment terminal with 2 track MSR 5945‐K300‐V004 497‐0416166 Electronic payment terminal with 3 track MSR 5992‐K095‐V001 497‐0412211 Stylus 5992‐K100‐V008 497‐0417677 Signature capture plus with 2 track MSR 7156‐K270‐V001 497‐0408657 Switch button (20 pieces ) B-3
B-4
Appendix B: Feature Kits
Kit Number
Part Number
Description
7156‐K280‐V001 497‐0408653 Slip table 7156‐K301‐V002 497‐0408654 Power supply 7156‐K309‐V001 Mounting Bracket 7156‐K330‐V002 497‐0408656 Power supply (w/US power cord) 7158‐K301‐V001 497‐0411975 Power supply (55 W) 7401‐K016‐V001 497‐0421022 600 MHz Celeron processor 7401‐K023‐V001 497‐0413159 128 MB memory 7401‐K024‐V001 497‐0414201 64 MB SDRAM service kit 7401‐K025‐V001 497‐0414202 128 MB SDRAM service kit 7401‐K030‐V001 497‐0412201 POS connector board 7401‐K031‐V001 497‐0414185 Adapter board kit 7401‐K040‐V001 497‐0420672 16 MB Flash Disk 7401‐K050‐V001 497‐0419933 Standard capacity hard drive (10 GB) 7401‐K051‐V001 497‐0413160 Large capacity hard drive (20 GB) 7401‐K059‐V001 497‐0421025 Integrated CD‐ROM 7401‐K060‐V001 497‐0412202 Dual PCMCIA port 7401‐K070‐V001 497‐0416029 Dual RS‐232 (Pentium III only) 7401‐K071‐V001 497‐0416030 S‐Video port 7401‐K075‐V001 497‐0427095 USB Camera for 7401‐4xxx 7401‐K103‐V001 497‐0425057 MSR, 3 Track ISO, Angled (Model 45xx) 7401‐K200‐V001 497‐0412200 High fidelity speaker module Appendix B: Feature Kits
Kit Number
Part Number
B-5
Description
7401‐K201‐V001 497‐0420675 Hi fi speaker module w/IRDA 7401‐K501‐V001 497‐0412157 Fixed‐angle to tilt mount conversion 7401‐K502‐V001 497‐0420092 Kit ‐ Flush Mount 7401‐K503‐V001 497‐0412158 Fixed‐angle mount 7401‐K504‐V001 497‐0420102 Fixed‐angle mount w/Keyboard Port 7401‐K505‐V001 Fixed Angle Mount II 7401‐K509‐V001 497‐0415774 Kit – Rear Cover for Fixed Angle Mount 7401‐K512‐V001 497‐0428826 Fixed Angle Mount II with 7892 Scanner 7401‐K521‐V001 497‐0411711 Wall mount bracket (fixed‐angle mount) 7401‐K522‐V001 497‐0411712 Table mount bracket (fixed‐angle mount) 7401‐K523‐V001 497‐0412811 Wall mount (fixed‐angle mount/self‐service printer) 7401‐K525‐V001 497‐0416031 Fixed‐angle mount with 7401‐K580 printer 7401‐K526‐V001 497‐0424762 Fixed‐angle mount with 7401‐K592 printer (Black) 7401‐K530‐V001 497‐0416032 Pole mount kit for 7401‐K525 7401‐K533‐V001 497‐0411713 Wall mount bracket (tilt mount) 7401‐K534‐V001 497‐0419085 Swivel mount bracket 7401‐K535‐V001 497‐0421099 Countertop swivel mount bracket 7401‐K536‐V001 497‐0420974 Fixed‐angle mount tilt bracket B-6
Appendix B: Feature Kits
Kit Number
Part Number
Description
7401‐K540‐V001 497‐0414186 Wall mount bracket with keyboard shelf 7401‐K542‐V001 497‐0414279 Tilt mount bracket for keyboard shelf 7401‐K543‐V001 497‐0417684 Wall mount bracket with keyboard shelf (wide) 7401‐K580‐V001 497‐0420105 Self‐service printer (80 mm) Discontinued 7401‐K582‐V001 497‐0420820 Self‐service printer (K582) 7401‐K590‐V004 497‐0424497 Self‐service printer (80, 82.5, 114 mm) 7454‐K101‐V002 497‐0412005 MSR 3 track ISO 7454‐K102‐V001 497‐0412299 MSR JIS 2 track 7455‐K026‐V001 497‐0423400 256 KB SDRAM Kit 7949‐K033‐V001 497‐418574 Pedestal – Straight Base 7949‐K034‐V001 497‐418575 Pedestal – Curved Base 7949‐K035‐V001 497‐418576 Pedestal – No Printer Option Index
—1—
12.1 inch LCD No‐Cabinet Feature, 3‐37 15 inch LCD No‐Cabinet Feature, 3‐40 —4—
4055 Uninterruptible Power System (UPS), 3‐43, 4‐22 —7—
7401 Cables, A‐1 7401 Kits, B‐1 7401 Scanner Default Settings, 8‐6 7401‐4xxx Model Numbers, 2‐2 7401‐4xxx Printer Full page printer diagnostics and setup, 4‐17 Loading the paper, 4‐13 Removing paper from the paper feed rolls, 4‐14 Removing power from the printer, 4‐14 Using the printer test and display panel, 4‐15 —A—
ACPI, 0‐38, 2‐22 Advance Configuration Power Interface, 0‐38, 2‐22 Advanced Power Management, 0‐37 Allocating interrupts, 5‐7 APM, 0‐37 Audio, 0‐28, 2‐13 Auto‐Logon setting, 3‐49 —B—
BIOS Configuring a hard drive, 5‐5 BIOS crisis recovery, 7‐5 BIOS Default CMOS Values (7401‐
26xx/46xx BIOS), 5‐18 BIOS Default CMOS Values (Pentium III/Celeron), 5‐8 BIOS Default CMOS values (Pentium), 5‐
28 BIOS Recovery crisis recovery procedures, 7‐5 using CD‐ROM, 7‐1 BIOS Setup Allocating interrupts, 5‐7 Default factory settings, 5‐7 Entering Setup with a keyboard, 5‐2 Entering Setup without a keyboard, 5‐1 How to select menu options, 5‐3 Index-2
Setting boot options, 5‐6 Setting memory cache, 5‐5 Setting memory shadow, 5‐6 Setting passrods, 5‐4 Setting the date and time, 5‐3 Boot options, setting, 5‐6 —C—
Cable connector identification, 3‐9, 4‐5 Calibrating the Touch Screen, 4‐27 Calibration from the BIOS, 4‐30 Calibration Using Microcal (DOS), 4‐29 Calibration Using MicroTouch (Windows), 4‐27 Cash drawer Installation, 3‐16, 3‐17 Cash Drawer Support, 0‐31 CD‐ROM drive, 0‐52 Clearing password, 5‐4 Compact Flash, 0‐50, 2‐30 Compatibility, 0‐54 Completing the OS Installation (Win2000), 3‐46, 4‐24 Completing the OS Installation (Win98), 3‐48, 4‐26 Completing the OS Installation (WinNT), 3‐47, 4‐25 Completing the OS Installation (WinXPe), 3‐46, 4‐24 Configuring 7401‐4xxx with U.K. keyboard, 4‐1 Configuring a hard drive, 5‐5 Configuring the Power Mon II® Software, 3‐45 Country keyboards, 4‐6, 4‐8 —D—
Date and time, setting, 5‐3 dual display implementation, 0‐35, 2‐19 —E—
EasyPoint 45 Pedestal, 2‐34 Ethernet 10/100Base‐T, 0‐23, 2‐8 —F—
Finalizing the Installation 7454‐2xxx and 3xxx, 3‐46 7454‐4xxx, 4‐24 Flash disk interface, 0‐30, 2‐15 FLASH memory implementation, 0‐36, 2‐
20 Full page printer diagnostics and setup (7401‐4xxx printer), 4‐17 —G—
Gold Disk Contents, 6‐8 Graphics subsystem, 0‐33, 2‐16 —H—
Hard disk drive, 0‐46, 2‐29 Hard drive, configuring, 5‐5 Hardware monitor, 0‐27, 2‐12 Hardware options, 0‐16, 2‐4 —I—
Installation Index-3
7401‐4xxx peripherals, 4‐6 Angled Magnetic Stripe Reader (MSR), 4‐7 Country Keyboards (7401‐F118), 4‐8 Fixed‐Angle mount, 3‐5 Tilt Mount, 3‐10 Installing a 7401‐4xxx on a Table Mount, 4‐18 Installing a 7401‐4xxx on the EasyPoint 45 Pedestal, 4‐21 Installing the Power Mon II® Software, 3‐
44 Installing the UPS, 3‐44 Integrated CD‐ROM, 2‐29 Internal speaker, 0‐47, 2‐30 Interrupts (7401‐26xx/46xx BIOS), 5‐26 Interrupts (Pentium III/Celeron), 5‐16 Interrupts (Pentium), 5‐31 Interrupts, allocating, 5‐7 ISA interrupts, 5‐7 —K—
Kit Configuration Diagram, 0‐20 —L—
LAN status LEDs, 0‐49, 2‐32 LCD adapter board, 0‐40, 2‐23 LCD backlight inverter module, 0‐40, 2‐24 —M—
Magnetic stripe reader, 0‐29, 0‐33, 2‐14, 2‐
16 Magnetic Stripe Reader, 2‐27 Memory cache, setting, 5‐5 Memory Map (7401‐26xx/46xx BIOS), 5‐
27 Memory Map (Pentium III/Celeron), 5‐17 Memory Map (Pentium), 5‐32 Memory shadow, setting, 5‐6 MicroTouch Touchscreen, 3‐56, 4‐27 Migration retail applications, 0‐55 retail peripherals, 0‐55 retail systems, 0‐56 Model number, 0‐12, 2‐2 Model Numbers, 0‐14 Motion sensor, 0‐47, 2‐31 Motorized Card Reader, 2‐27 Mounting a Fixed‐Angle Mount Terminal, 3‐21 Mounting the terminal Tilt mount, 3‐33 Wall mount, 3‐24, 3‐26 Wall mount – core module, 3‐35 MSR, 0‐29, 0‐33, 2‐14, 2‐16 —N—
NCR 7401/7890 or 7892 Scanner Differences, 8‐1 —O—
Operating System Recovery using CD‐ROM, 6‐1 Operating System Restrictions, 6‐9 Operator display Description, 0‐40, 2‐23 Index-4
OS Recovery from a Larger Disk Image, 6‐29 —P—
Password Clearing, 5‐4 Password setup, 5‐4 PCI expansion header, 0‐27, 2‐12 Pentium III connectors, 0‐53 Pin Pad, 2‐26 Plug and Play, 0‐37, 2‐21 POS connector board, 0‐47, 2‐30 Features, 0‐16, 2‐3 Power LED, 0‐33, 2‐16 Power OK LED, 0‐48, 2‐32 Power supply Description, 0‐49, 2‐32, 2‐33 Power/status LED, 0‐48, 2‐31 Printer Installation, 3‐13 Printers, 0‐43 Processor board Connector descriptions, 0‐30, 2‐15 Features, 0‐15, 2‐3 Processor Board Description, 0‐21, 2‐7 Processor/Chip Set, 0‐21, 2‐7 Programming the 7401 Scanner Through the RS‐232 Interface, 8‐5 Using Programming Tags, 8‐4 —R—
Removing paper from the paper feed rolls (7401‐4xxx printer), 4‐14 Removing power from the printer (7401‐
4xxx printer), 4‐14 Reset switch, 0‐46, 2‐29 Resolutions supported, 0‐35, 2‐17 Ruggedized Keyboard with Trackball, 2‐
26 —S—
Scanner module, 0‐50 Secure Cabinet with Integrated Speakers, 2‐25 serial mouse installation, 3‐54 Serial number, 0‐12, 2‐2 Serial ports, 0‐26, 2‐11 Setting Boot options, 5‐6 Memory cache, 5‐5 Memory shadow, 5‐6 Setting time and date, 5‐3 Setup utility, 0‐37, 2‐21 Speaker module, 0‐50, 2‐33 Standby and Hibernate Mode Restriction, 6‐9 Starting the 7401 Scanner Motor and Laser, 8‐2 System Configuration Diagram, 0‐19, 2‐6 —T—
Terminal Components not Supported, 0‐
18, 2‐5 TFT (thin film transistor), 0‐22 Time and date, setting, 5‐3 Touch screen controller, 0‐29, 2‐14 Index-5
—U—
U.K. Keyboard Configuration, 4‐1 Universal serial bus, 0‐26, 2‐11 USB RS‐232 port server, 0‐51 Using the Full Page Printer, 4‐13 Using the printer test and display panel (7401‐4xxx printer), 4‐15 —V—
Video subsystem, 0‐22, 2‐8 —W—
Wireless LAN communications, 0‐25, 2‐10