1
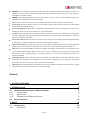
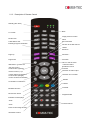
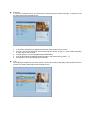
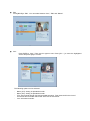
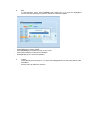
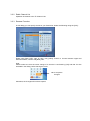
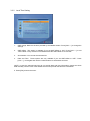
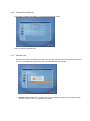
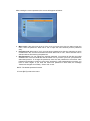
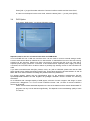
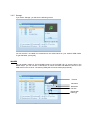
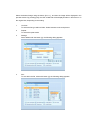
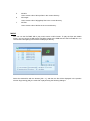
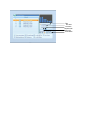
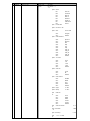
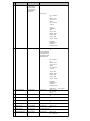
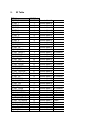
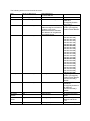
ProTUNE HD / C Digital HD / SD Cable TV Tuner User Manual Version 1.2 1 von 57 Disposal The packaging of your device is composed exclusively of recyclable materials. Please run this again sorted according to the "dual system". This product may not be disposed with the normal household waste, but should be brought to a collection point for recycling electrical and electronic equipment. The - Symbol on the Product, user‟s manual or packing refers to disposal. The materials are as marked recyclable. By recycling, material recycling or other forms of recovery from old devices, you make an important contribution to protect our environment. Ask your city or local authorities about ways to properly dispose e-waste in keeping with current environmental standards and regulations. Return spent batteries to a designated collection point. Never dispose of batteries along with your normal household waste. Batteries probably could contain toxic substances. Therefore, always dispose of batteries in accordance with current laws governing mandatory return schemes for e-waste. Safety Precaution The lightning flash with arrowhead symbol, within an equilateral triangle, is intended to alert the user to "dangerous voltage" and to prevent from a risk of electric shock. WARNING: To reduce the risk of electric shock, don't open the housing. Refer servicing to qualified personnel only. The exclamation point within an equilateral triangle is intended to alert the user to important operating and maintenance (servicing). WARNING: Do not use the ProTUNE HD where contact with or immersion in water is a possibility. Do not use near flower vase, washbowls, kitchen sinks, laundry tubs, swimming pools, etc. WARNING: Do not put the candle or lamp stand on the housing 2 von 57 WARNING: The unit should be connected to a power supply only of the type described in the operating instructions or as marked on the unit. If you are not sure of the type of power supply (for example, 120 or 230 V) to your home, consult your local dealer or local power company. WARNING: This product installs diodes. Do not open the housing or touch any parts in the inner mechanism. Consult your local dealer for technical service if the opening is required. Note: To ensure proper use of this product, please read this User manual carefully and retain for further reference. Unit Cleaning: After the unit power is turned off, you can clean the housing, panel and remote control with a soft cloth lightly moistened with a mild detergent solution. Accessories/Attachments: Never add any attachments and/or equipment without the manufacturer consent; as such additions may result in the risk of fire, electric shock, or other personal injury. Locating: Slots and openings in the housing are provided for ventilation to protect it from overheating. Do not block these openings or allow them to be blocked by placing the ProTUNE HD on a bed, sofa, or other similar surface, nor should it be placed over a radiator or heat register. Power Cord Protection: Place the power cord out of the way, where it will not be walked on. Please take special attentions to cords at plugs, convenience receptacles, and the point where they exit from the unit. Object and Liquid Entry: Never put objects of any kind into ProTUNE HD through openings, as they may touch dangerous voltage points or short-out parts that could result in a fire or electric shock. Never spill any liquid on the ProTUNE HD. Note: Moisture may be formed inside the unit when it is suddenly moved from a cold environment or an air-condition room to a warm place, immediately after a heater has been turned on, and in a steamy or very humid room. If the moisture forms inside the unit, it may not operate properly. To correct this problem, turn on the power and wait about two hours for the moisture to evaporate. Parts Replacements: When the unit parts need to be replaced, user should make sure the service technician use the replacement parts specified by the manufacturer or having the same characteristics as the original part. Unauthorized replacement may put the unit In the risk of fire, electric shock or other hazards. Safety Check After all the maintenances and repairs are done, user is required to request the service technician to conduct the overall safety check to ensure the machine is in the proper condition. Content 1. SCOPE OF DELIVERY 5 2. INTRODUCTION 5 2.1 DESCRIPTION FRONT PANEL / REMOTE CONTROL 2.1.1 FRONT PANEL 2.1.2 BACK PANEL 2.1.3 DESCRIPTION OF REMOTE CONTROL 2.2 BASIC FUNCTIONS 6 6 7 9 10 3. MENU 18 3.1 INSTALLATION 3.1.1 TP SEARCH 18 18 3 von 57 3.1.2 AUTOMATIC SEARCH 3.2 CHANNELS 3.2.1 TV-PROGRAMMLISTE 3.2.2 RADIO CHANNEL LIST 3.2.3 RENAME FAVORITES 3.2.4 DELETE ALL 3.3 SYSTEM SETUP 3.3.1 LANGUAGE 3.3.2 LOCAL TIME SETTING 3.3.3 TV SYSTEM 3.3.4 OSD SETTINGS 3.3.5 TIMER 3.3.6 FIRMWARE INFORMATIONEN 3.3.7 PARENTAL LOCK 3.3.8 FACTORY SETTING 3.3.11 COMMON INTERFACE 3.4 DVR OPTION 3.4.1 DVR MANAGER 3.4.3 DVR SETTINGS 3.4.4 DIASHOW SETTINGS 3.4.5 STORAGE 3.4.5 REMOVE STORAGE SAFELY 19 20 20 25 25 26 27 27 28 29 30 30 32 32 34 35 36 37 39 40 41 45 4. ASCII REMOTE PROTOCOL 46 5. IR TABLE 51 6. NETWORK SETTINGS 53 6.1 53 SETTING THE IP-ADDRESS 7. FIRMWARE UPDATE 55 7.1 7.2 55 55 FRONT PANEL MAINBOARD 8. TECHNICAL DATA 57 4 von 57 1. Scope of Delivery IR Remote Control Power Cord Product-/Software-CD 2. Introduction The ProTUNE HD / C is a HDTV-Tuner, to receive digital TV (DVB-C) and digital radio over satellite. The bi-directional RS-232 and Ethernet port allows you to control the ProTUNE HD by external control systems such as AVIT®, RTI®, AMX®, Crestron® or others. Setup can be done by the included IR Remote Control or by the easy to use front panel. The Tuner is designed for the use in presentation rooms, training and seminar facilities, schools, universities, hotels or in a home cinema. Important Note regarding cable receivers: To avoid subsequent complaints, we want to point out one important thing which applies to all cable receivers, and therefore to the ProTUNE HD / C, as well: Depending on the (regional) cable service provider, the ProTUNE HD / C may only be used limited, or not at all. The reason is that some cable service providers use a certain encryption for their program, some providers only use the encryption for „Pay-TV“ packages. Please verify if and how cable receivers can be operated within your cable network. 5 von 57 2.1 Description Front Panel / Remote Control 2.1.1 Front Panel 1. ON: Switch to Power On or standby mode. 2. Display: Shows current channel and program information when in operation, and current time in standby mode. 3. ENTER / MENU: To open the main menu, or to close the current menu level, and to confirm a selection. 4. EXIT: To Exit the main menu and current menu level 5. Up / Down: To switch between channels or navigation and adjustment of values in the menu (up or down). 6. Left / Right: Adjustment of volume and changes to values in the menu (left or right). 6 von 57 2.1.2 Back Panel 1. IF OUT: Cable output for daisy-chaining with other devices. 2. IF IN: Antenna (Cable) Input 3. AUDIO SYM.: Balanced audio output 4. USB: Interface for firmware updates, for the connection to a external data carrier, to be used for recording or time shift functions. 5. HDMI: Digital output for the transmision of audio and video data. 6. OPTICAL S/PDIF: Optical, digital audio output for the connection to an external AVReceiver. 7. S/PDIF: Electrical, digital audio output for the connection to an external AV-Receiver. 8. AUDIO R / AUDIO L: Analog audio output for the connection to stereo equipment or monitors. 9. Y/C Out: Analog video output for the connection to a Videoausgang für den Anschluss an einen Monitor (8-pol. Mini-DIN) 10. YPbPr: Component outputs, that can also be used as composite output if desired. 11. LAN: For the connection to a network or compatible hardware, for external control, and for firmware update. 12. RS232: For the connection to compatible hardware, for external control, and for firmware update. 13. Power Switch: Power ON or OFF. 7 von 57 14. Power Input (100-240VAC): IEC-Socket for the connection to current supply by a power cord. 8 von 57 2.1.3 Description of Remote Control Standby (ON / OFF) Mute TV / Radio Image preview in media Number 0-9/ player Letter Buttons A-Z Show Favorites Enabling Program Information Go back to the last channel viewed Electronic program guide Page Up Favorites + Page Down Favorites EXIT: to exit the menu or hide the dialog Enable the record Main Menu / go back one step in the menu Curser button (up/down), manager Selection of video output channel control (+/-) in Selection of TV formats normal mode and navigation Cursor button (left/right), volume control and navigation Subtitle Confirmation of selections Teletext Timeshift Multifeed-Function Red function button Program finder Enable the media player Audio PVR-Functions Zoom Pause for still image function Bookmark function 9 von 57 2.2 Basic Functions Turning on the ProTUNE HD Turn on the [Device mainstream] switch. If you turn on the ProTUNE HD for the first time, the first channel from the default channel list is displayed. With further commissioning shows the ProTUNE HD to the channel that was displayed before the last turn. Power 1. Press [Power] Key to enter the Standby state. 2. In Standby state, press [Power] Key again to call back the unit and play the previous channel.. 3. Use the device‟s main power switch on the back to turn off the unit completely. CH Press [CH] to switch channels in TV mode. VOL Press [VOL] to increase/decrease volume in TV mode. Channel Number In TV mode, you can enter the channel number directly with your remote control to switch to the desired channel. Mute 1. In TV mode, press [Mute ] to turn off sound. Activated Mute is indicated on the display by an icon. 2. Press [Mute ] again to turn on sound. Pause 1. In TV mode, press [Pause] to stop the image. The sound of the channel continues to run. 2. Press [Pause] again to continue the TV image from the current time. Recall Press [Recall] to switch between the current and the last channel viewed. FAV 1. 2. 3. In TV mode, press [FAV] to display the favorites list on the monitor. Each favorites list is being created by pressing the EDIT button, calling up the channel list, and selecting the desired channels by [FAV]. In the Favorite group window please navigate with [CH] and press [OK] to confirm selection. In larger favorites groups, [PGUP/PGDN] can be used to navigate. Press [VOL] to select between the different favorite groups. FAV +/1. 2. In TV mode, press [FAV +/-] to switch between Favorites and actual Favorite Groups. The ordering of the favorites is in accordance to the respective Favorite Group List. 3. Press [Exit], to leave the favorites window. Audio 1. In TV mode, press [Audio] to open the Audio options. 2. Select “Audio Track” with [CH], to change the “Audio Modes” press [VOL] for Stereo, Mono, Right/Left. INFO In TV mode, press [INFO] to open the information screen, where the parameters of the current channel are being displayed. The availability of so-called Service Information (SI-Data) depends on the respective program/service provider. Channel number Service Information Channel name EPG (Electronic Program Guide) The ProTUNE HD includes a electronic program guide (EPG). The EPG provides program information in table format (if provided by the broadcast station). The EPG includes information about the broadcast times and program contents. Press [EPG] to open the EPG window. 1. Press the “Time” function key [RED], to obtain information about the program for the upcoming days: Navigation icons for EPG 2. Use [VOL] to navigate, by pressing [OK] the desired time will be displayed. [EXIT] closes this dialogue. Back to previous menu Back to current time Scroll in a ½ hour intervall (back/forth) Scroll in a 2 hour intervall (back/forth) Scroll in a 1 day intervall (back/forth) 3. By pressing the“Timer” function key [GREEN], you can add the selected show directly to the Timer. To navigate, press [CHVOL] and set the desired date, on and off time using the number keys. To confirm, select “Save”. TV/Radio The [TV/R] button allows you to toggle between television and radio services. When transmitting a radio station, the receiver displays a background picture. To switch from radio back to television, press the TV/Radio button [TV/R] on the remote control.. OK In TV mode, press [OK] to enable the channel list. In menu/applications, press [OK] to confirm your selection. Multi In TV mode, press the [MULTI] button to enter the multi picture mode. 1. In Multi Picture Mode, nine channel preview windows are being displayed (static display), starting with the current channel. Only the marked preview channel is played continuously. 2. Press [CHVOL] to move the selected channel between the preview programs. 3. Use the number buttons [1] ~ [9] to move the marker directly on the corresponding channel. With [OK] you can get the selected channel in full screen mode. Sleep 1. Press [Sleep] in TV mode to set the Sleep Timer. You will see: “Sleep Timer OFF / Sleep Timer 10 / Sleep Timer 30 / Sleep Timer 60 / Sleep Timer 90 / Sleep Timer 120”.2. 2. If you set one off time, the system will be set to standby at the selected time. TXT 1. Press [TXT] in TV mode to open teletext. The support of this service depends on the channel provider. 2. If there is no teletext provided, you will see “No teletext” on the screen. Subtitle Press [SUB] in TV Mode to enable subtitles. The support of this service depends on the channel provider. GOTO (Search function) Press [Goto] or the yellow butten when in channel list, to enable the search function. You can navigate with the [CHVOL] buttons, confirm with the blue button, and delete with the red button. Zoom 1. Press [ZOOM] to activate the image enlargement function. 3. Press [ZOOM] again, and the video image will be enlarged x1, x2, x4, x6, x8, x12, x16, depending on number of strokes. 4. Press [EXIT] to leave the ZOOM function. TV/STB Press [TV/STB], to toggle between TV and STB mode. Menu Press [MENU] to enter the main menu. Another press of [MENU] will exit the main menu. Format Press [Format] in the full-screen mode, to select between the different resolutions: 576i -> 480i -> 576P -> 480P -> 720P_50 -> 720P_60 -> 1080i_25 -> 1080i_30. Exit Press [EXIT] to exit menus and applications.. 3. Menu 3.1 Installation When entering the menu, the first item is "Installation". The window is indicated as follows: 1. 2. Press [CHVOL] to select between TP Search, and Autom. Search. Press [OK] to get to the respective setting/function. 3.1.1 TP Search Press [VOL] to get to “TP Search”. A window will be displayed as indicated below: If you have a frequency list of your cable network provider, you can enter and add the corresponding data of the channels in this menu. To do this, select the different items and enter the data you‟re aware of. 3.1.2 Automatic Search If you select “Autom. Search”, you will see the following window: Use the cursor to go to the item „Search“. Now start the search run with the „OK“ button. After the search has been finished, use the „OK“ button again to confirm. The channels have now been saved successfully. 3.2 Channels 3.2.1 TV-Programmliste The TV Channel List allows editing your services, such as adding them to favorites, to lock them, to skip them, to move them, or to change them (editing). You can move the “highlighted” services by pressing [CH ] and press [OK] to preview the current highlighted program in the right scaled video Favorites If you want to add services to your favorite list, press [FAV] and confirm with [OK]. A small Icon will be visible behind the selected service 1. In TV mode, press [FAV] to display the favorites group window on the screen. 2. You can your favorite channels in the favorites group window by [CH] and confirm with [OK] in order to go to this channel. 3. In larger groups, you can navigate with [PGUP/PGDN]. 4. You can also select the different favorite groups in the channel list by [VOL]. 5. Press [Exit] to close the favorites group window. Lock Press [RED] to enable the lock mode, select a service and confirm with [OK]. Enter the PIN code and a small Icon will be visible behind the selected service. Skip Press [GREEN] key to enter into skip mode. Press [CH] key to move the highlighted service and press [OK] to add a “skip mark”. Move Press [YELLOW], then press [CH] to move the highlighted service and press [OK] to mark. A small Icon will be visible behind the selected service. Edit Press [BLUE] to “Edit”. You can select between “Sort”, “Edit” and “Delete”: Sort Press [RED] to “Sort”. There are four types to sort. Press [CH ] to move the highlighted service and press [OK] to confirm. The following options can be selected: - Name (A-Z): Sorting in Alphabetical order. Name (Z-A): Sorting in Alphabetical order. FTA: Sort channel through free and scramble sequence. Free channel will in the front of channel list and scramble channel will at the rear of channel list Lock: All locked channels. 2. - Edit In “Edit Channel” menu, press [GREEN], then press [CH] to move the highlighted service and press [OK] key to open the “Rename” window as follows. Press [RED] key to select “CAPS”. Press [GREEN] key to delete the char on the cursor. Press [YELLOW] key to save the modification Press [BLUE] key to cancel the operation 3. Cancel Press [BLUE], then press [CH] to move the highlighted service and press [OK] to mark as deleted. Exit the menu to delete the services. 3.2.2 Radio Channel List Operation is identical to the TV Channel List. 3.2.3 Rename Favorites In this dialog you can specify the title of your favorite list. Select the following using the [VOL]: Delete with [Red] "DEL" step by step, use [yellow] "CAPS" to choose between upper-and lowercase letters, confirm with [Blue] "OK". Note: Please make sure that the name change of a favorite is confirmed by [OK] and that it‟s also activated in the dialog, before leaving the menu: OK to accept the changes Otherwise, the changes will not be accepted. 3.2.4 Delete All If you press [OK] you can delete all services: To activate this function, press [VOL]. Confirm with „Yes“, or „No“ to abort. 3.3 System Setup 3.3.1 Language Please select the language menu as follows:: 1. Language: press [VOL] to select from the following languages: English, French, German, Russian, Arabic, Portuguese, Turkish, Spanish, Polish and Italian. 2. First Audio: Some channels have more than one audio language available; with this function, you can set the first audio for this channel. If the playing channel has the same audio as the “First Audio” you set, the system will play this audio language as default. If the channel hasn‟t the suited audio language, then the system will compare automatically with second audio language. The selections of audio languages include: English, French, German, Russian, Arabic, Portuguese, Turkish, Spanish, Polish and Italian. 3. Second Audio: If the channel has no corresponding audio with “First Audio”, but corresponding audio with “Second Audio”, the system will play the second audio language as default. If no audio language corresponds to the “Second Audio”, then the default language of the current channel will be played automatically. The selections of audio languages include: English, French, German, Russian, Arabic, Portuguese, Turkish, Spanish, Polish and Italian. 4. Teletext: You can set the teletext language if the operator provides such service. Otherwise, a pop-up message indicates: “No Teletext”. 5. Press [Exit] to leave the menu. 3.3.2 Local Time Setting 1. GMT-Usage: Refers to the time provided by the satellite stream. Press [VOL ] to change the settings. 2. GMT-Offset: This option is available if you set GMT-Offset to „ON“. Press [VOL], to set “GMT Offset”. Every selection increase/decrease the GMT Offset for 30 minutes. 3. Summertime: You can set the summertime. 4. Date and Time: These options are only available if you set GMT-Offset to “OFF”. Press [VOL], to navigate and use the number buttons to set the date and time. NOTE: In case the selected services do not provide date and time information, please set these data manually. But the most of the satellite services do provide date and time information. 5. Press [Exit] to leave the menu. 3.3.3 TV System In the Sub menu „TV Format“, the following screen is indicated: 1. You have the option between various modes dependent on your TV Set: Auto -> PAL -> PALN -> PAL-M ->PAL-BG -> NTSC -> 576i -> 480i -> 576P -> 480P -> 720P_50 -> 720P_60 -> 1080i_25 -> 1080i_30. Press [VOL], to select the required TV Mode. 2. Format function is used to switch between screen formats. You have the choice between: 4:3 PS / 4:3 LB / 16:9. Press [VOL], to select the required TV Mode. 3. RF channel (optional: only in devices with modulator): If your TV is too old for CVBS / YPbPr and HDMI, you can set the RF modulator of the STB to the respective UHF / VHF channel and connect the STB with a cable from the RF Modulator to TV antenna input. 4. HDMI output is the HDMI video output mode. Choose between RGB-Normal, RGB-Expand, YCbCr4:4:4 and YCbYr4:2:2. Press [VOL], to select the required TV Mode. 5. Digital Audio Out serves Settings for S/PDIF and the digital audio output for HDMI. Choose between LPCM Out, BS Out and Auto. Press [VOL] to select the desired mode. LPCM Out means that the ProTUNE HD decodes the digital sound, e.g. the AC3 audio track, and outputs it as stereo audio over HDMI, S/PDIF, or the anlog audio outputs (downmix). If youi select BS Out, the audio will be distributed over S/PDIF or HDMI undecoded. Auto means that the ProTUNE HD detects automatically if the connected TV Monitor is able to decode digital audio over HDMI or not. If the TV Monitor is able to decode AC3, the ProTUNE HD will output the undecoded audio; if the TV Monitor unable, the audio will be decoded first. 3.3.4 OSD Settings If you select “OSD Settings”, the following window will be displayed: 1. OSD Timeout: If you switch channels in full screen, information about the current channel will be indicated on the bottom of the screen. Press [VOL ] to set the duration of how long the information will be displayed on the screen. The range of the duration is “1 second ~ 10 seconds”. 2. OSD Transparency: You can press [VOL] to select the values. There are 5 levels of transparency, 10%, 20%, 30%, and 40% and “NO” (means no transparency function). 3. OSD Screen Saver: With this parameter you can set the start time for the launching of the screen saver. 3.3.5 Timer When you select “Timer Settings” you will see the following screen: 1. Timer Settings: Select „Timer“ and choose up to 8 Timer. Press [VOL] to enter into the following menu. 2. Select the required Timer mode with [VOL]. Select between “OFF”, “once” or “daily”. 3. Wakeup Channel: press [OK] key to enter channel list and select the related channel you want to set. 4. Wakeup Date: use the number keys to input your wakeup date 5. On Time: use number keys to set the wakeup time 6. Duration: Please set the duration (start – and end time) of the selected service 3.3.6 Firmware Informationen If you select “Firmware Information” you will see the following screen: This is for service purposes only. 3.3.7 Parental Lock Parental Lock” allows protecting the main menu and the channels (which are previously marked as “lock” in the Edit menu) with a PIN code. The default password is “0000”: 1. Parental Lock: Press [VOL] to set “ON” to force a password entry for every menu you like to enter. If you set “OFF” no password is required. After entering the correct password, the screen will appear as follows: 2. Menu Lock: If the menu lock is set to "Yes", then you have every time you want to open the menu, enter the password. When set to "No" to open the menu without previous password entry. 3. Program Lock: When set to "Yes" you must enter a password to view the channels you have not selected in the "channel" as blocked channels. When set to 7“No”, these channels can be selected without first entering the password. 4. New Password: You can change the existing password. You should do this after the initial establishment of the ProTUNE HD and each time it do if you think you know your passwordauthorized persons. To change the password, enter the new password in the section "New Password" and again to confirm it at the point "password". If the passwords do not match, you have to enter it again. If you enter the same new password in both fields, the message "Password changed successfully." Press "OK" to exit. NOTE: The default password is 0000. 5. Press [EXIT] to leave the menu. 3.3.8 Factory Setting If you enter Factory Settings you will see the following screen: 1. If you select „YES“ the ProTUNE HD will be set to standard value as originally delivered. Please make sure that you really want to do this! 2. Press [EXIT] to leave the menu or select „NO“. 3.3.11 Common Interface Receiving encrypted programs Your unit is equipped with a "Common Interface" for the inclusion of a CI module. To receive encrypted channels you must first insert a CI module with a valid smart card into slot provided. WARNING: Since the Common Interface has been placed inside the unit in order to prevent thievery, and therefore is not accessible in closed condition from the outside, the installation should only be done by trained service staff. Now if an encrypted program is being set, your ProTUNE HD automatically checks the CI slot and provides the encrypted program, if this program is part of an appropriate CI module with a valid smart card. To get more information on the CI module and the map, please select the following menu: Press [VOL] to get information about the Common Interface module and the Smart Card. In order to move deeper into the menu level, select the button [VOL] to exit, press [EXIT] 3.4 DVR Option If you select “DVR Option” you will see following screen: Important note for the use of external hard disks and USB Sticks Your ProTUNE HD has a USB 2.0 Interface which can be used to connect external storage media, such as external hard disks or USB Sticks, for data transfer. A standardized current of 500 mA is being emitted over this interface. Please note when connecting a external hard disk, that only units with a separate power supply should be connected. If hard disks without separate power supply are being connected, the ProTUNE HD is not able to deliver a possibly high starting current for the hard disk over USB. If you want to transmit/record data (film, pictures, music, etc.) with a USB Stick, please note that the USB Stuck should have a reading and writing transfer rate. These values should be at least between 15 and 20 MB/s. With such values, television recordings are possible without any disturbance. For storage capacity, please note the specifications given by the respective manufacturers. Bei der Speicherkapazität beachten Sie bitte Angaben der jeweiligen Hersteller. Please consider the following standards: On a USB Stick with a storage capacity of 2GB, approx. 35 hours of music or approx. 500 Songs / or 2400 pictures with 3 Megapixel / or 1 hour of movie in MPEG-2 format / and 1,5 hours of movies in MPEG-4 format can be stored. Please note that these standards depend on the size of the data that will be stored. Broadcasted TV programs can vary in their data size significantly. This depends on the broadcasting quality of each TV channel. DISK MODE Your ProTUNE HD is a PVR Ready Receiver (PVR = Personal Video Recorder), and therefore is equipped with USB 2.0 for an external hard drive. The recording capacity is dependent on the size of the connected hard disk or the USB drive and the data volume of the broadcast material. During the recording, in addition to the regular audio and video data, additional audio channels, teletext data, and subtitles are being recorded, given that they are available on the certain channel, and that they are activated. 1. Record Select this to record the current program immediately, with just one keystroke. 2. Timer Record Through this function, your ProTUNE HD will be turned on and off to record the selected program in your absence on the hard disk or USB drive. The timer can be programmed either manually or automatically. 3. Timeshift With the time shift recording time-shifted television is possible. So you can, while the recording is still running, already reflect this time lag. NOTE! For technical reasons it is not possible to receive two different channels at the same time. 3.4.1 DVR Manager If you select “Record Manager” you will see following screen: Here are the recordings made so far. These can be locked with [Green] and by entering the four-digit PIN number, deleted using the [Blue] button, or renamed by the [Red] button. To play the recording, press the [OK]. The reproduction is successful, following display appears. . Elapsed time Channel Duration of recording 3.4.2 Storage Format Select "Storage Format" and the following screen appears: By formatting the hard drive, the file system is renewed. This might be required if an error on the hard disk was detected. Warning! Formatting will cause complete erasure of the hard drive, which means that all recordings and mulitmedia files (e.g. MP3„s) will be lost. 3.4.3 DVR Settings If you select "DVR Settings", the following screen appears: With the time shift recording, time-shifted television is possible. So you can, while the recording is still running, already reflect this time lag. At the time shift function, simultaneous playback and recording can be utilized. You can see the beginning of the file, while pre-recorded passages (e.g. commercials) can be skipped. At the same time the live signal of the recording continues. 1. Set „time shift“ to „On“ by pressing [VOL], which means that the possibility of time shift functin is generally given. 2. In addition, if you set the the option „Time Shift Recording“ to „On“ using [VOL], it will enable a permanent recording of the current channel. 3. Toggle between the different host types by pressing [VOL]. 3.4.4 Diashow Settings When you select “Diashow Settings” you will see the following screen: You have the ability to reproduce images in a slideshow. Through this feature, the images will automatically be played in sequence on the screen. Press the button [VOL] to select between "full" for full screen mode, or "real" for the original size. The slide show time determines the duration of each JPG or BMP file. These can be varied with [VOL]. If the slide show should start again from the beginning, press [VOL] for "On", otherwise "Off" Navigate within the menu with [CH]. Select „Save“ by [OK] or „Cancel“. [Exit] to exit the menu. 3.4.5 Storage If you select “Storage” you will see the following screen: You will receive a so-called root contained for the media stored on your external USB media. To get that folder, press [OK]. IMAGES You can display images in JPG and BMP format on the ProTUNE HD. To view the files in the Media Player, you can connect a USB device on which the JPGs and BMPs are stored, to the USB socket on the receiver. The button [JPEG] will access the media player directly. Preview File Name Resolution File Size Repeat with button [2] Select the desired image using the button [CH], and then the image will be displayed in the preview window. By pressing [OK], the JPG or BMP file will be displayed either in full screen or in the original size, depending on the setting. 1. List View To select the list type within a folder. Select between music and pictures. 2. Repeat To select the repeat mode. 3. Settings Select default with the button [3], the following dialog appears: 4. Sort To sort within the file, select with button [4], the following dialog appears: 5. All MP3 Use to create a list of all mp3 files in the current directory. 6. All Images Use to create a list of all jpg/bmp files in the current directory. 7. All Files Use to create a list of all files in the current directory. MUSIC You can use the ProTUNE HD to play music tracks in MP3 format. To play the files with Media Player, you can connect a USB device with MP3 content to the USB socket of the ProTUNE HD. You can use the button [MP3] to access the media player directly. Select the desired file with the buttons [CH], and then the file will be displayed in the preview window. By pressing [OK], the music file is played using the following dialogue. Title File Size Duration Repeat with button [2] Trick Mode 3.4.5 Remove Storage Safely When you select “Remove Storage Media Safely” you will see following screen: This way you avoid a possible data loss during improper removal of the USB medium. 4. ASCII Remote Protocol RS232 Protocol 19200 Baud 8 DataBit No Parity 1 Stopbit IP Protocol: IPV4 TCP/IP xxx.xxx.xxx.xxx Every CMD start with ASCII-Escape ESC = 0x1b =27 then the Tuner-ID Is ASCI 0 0 = 0x30 = 48 the CMD .... and stop with ASCII – Carriage Return CR = 0xd = 13 For Example Get Version: ‚ESC„0FV? ‚CR„ ‚ESC„0FV01.00„CR„ Defaultport No. Command To ProTUNE HD From ProTUNE HD 1 ESC,0,F,B,?,CR ESC,0,F,B,State,CR Get IsBusy 10001 To ProTUNE HD From ProTUNE HD State = 1 if Busy when: Initializing Upgrade host OTA Upgrade Search Program USB Upgrade 2 Get Time ESC,0,F,T,?,CR 3 Set Time 4 Get Date ESC,0,F,T,HZ,HE, MZ,ME,SZ,SE,CR ESC,0,F,D,?,CR 5 Set Date ESC,0,F,D,DZ,DE, MZ,ME,YZ,YE,CR 6 Get DispLight ESC,0,F,L,?,CR ESC,0,F,L,VZ,VE,CR 7 Set DispLight ESC,0,F,L,CR 8 Get DispContr ESC,0,F,L,VZ,VE, CR ESC,0,F,C,?,CR 9 Set DispContr ESC,0,F,C,CR 10 Get Version ESC,0,F,C,VZ,VE, CR ESC,0,F,V,?,CR 11 GetLastIrKey ESC,0,F,I,?,CR ESC,0,F,V,MZ,ME,.,M 01.00 Z,ME,CR ESC,0,F,I,KEY,CR See IrTable 12 Set IrKey ESC,0,F,I,KEY,CR ESC,0,F,I,CR 13 GetKeyLock ESC,0,F,K,?,CR 14 SetKeyLock 15 GetPowerOn ESC,0,F,K,STATE ,CR ESC,0,F,S,?,CR 16 SetPowerOn 16 SetSleepTimer ESC,0,F,K,STATE,CR State 0 = UNLOCK ESC,0,F,K,CR State 1 = LOCK ESC,0,F,S,STATE,CR State 0 = Power Off ESC,0,F,S,CR State 1 = Power On ESC,0,F,E,CR Value = 0 off, 1 10, 2 30, 3 60, 4 90, 5 120 Minutes 17 SetFactoryReset ESC,0,F,F,9,CR ESC,0,F,F,CR FactoryReset 18 GetTunerType ESC,0,F,G,?,CR ESC,0,F,G,V,CR Value : 1 = Satelite, 2 = Cable, 3 = Terrestrial ESC,0,F,S,STATE ,CR ESC,0,F,E,VALUE ,CR ESC,0,F,T,HZ,HE,MZ, HHMMSS ME,SZ,SE,CR ESC,0,F,T,CR ESC,0,F,D,DZ,DE,MZ DDMMYY ,ME,YZ,YE,CR ESC,0,F,D,CR 0 - 31 ESC,0,F,C,VZ,VE,CR 0-7 Ask for Version Get Version 01.00 No. Command To ProTUNE HD From ProTUNE HD 19 ESC,0,F,A,?,CR ESC,0,F,A,H0 .. H11,CR GetStatus Get Status Hex as ascii - FF 0 Byte 0 : Status Bit 7 Power On Bit 6 Teletext On Bit 5 Menü On Bit 4 Mute On Bit 3 Subtile On Bit 2 Record On Bit 1 USB Present Bit 0 PVR On Byte 1: Last IR-CMD Byte 2: IR-Count 0 - 255 Byte 3: 0x03: Tuner Locked 0x04: No Signal 0xFF: NOINFO Byte 4: Video Resulution 0x00: By Source 0x01: By Native 0x02: 480i 0x03: 480p 0x04: 576i 0x05: 576p 0x06: 720p_50 0x07: 720p_60 0x08: 1080i_50 0x09: 1080i_60 0xFF: NOINFO Byte 5: TV Format 0x00: AUTO 0x01: 16:9 0x02: 4:3LB 0x03: 4:3PS 0xFF: NOINFO Byte 6: Audio Out 0x00: LPCM 0x01: BS 0xFF: NOINFO Byte 7: Audio Channel 0x00: STEREO 0x01: MONO 0x02: LEFT 0x03: RIGHT 0xFF: NOINFO Byte 8: Signal 0 - 100% Byte 9: Quality 0 - 100 % Byte 10: HDMI Out 0x00: AUTO 0x01: RGBN 0x02: RGBE 0x03: YUV444 0x04: YUV442 0xFF: NOINFO Byte Audio PID channel 11: Byte 12 ChanelNo - 13: Byte 14 FavGroup : Byte 1 = TV , 0 = Radio 15: 0 - 15 1-9999 0 - 255 No. Command To ProTUNE HD From ProTUNE HD 20 GetVolume ESC,0,A,V,?,CR ESC,0,A,V,Z,E,CR 21 SetVolume ESC,0,A,V,Z,E,CR ESC,0,A,V,CR 22 GetSenderID ESC,0,P,P,?,CR 23 SetSenderID 24 GetSenderName ESC,0,P,P,T,H,Z,E, CR ESC,0,P,N,?,CR ESC,0,P,P,T,H,Z,E,C 1 - 9999 R Programno ESC,0,P,P,CR 25 GetStream ESC,0,P,S,?,CR 26 GetInTime ESC,0,P,I,?,CR 27 GetOutTime ESC,0,P,O,?,CR 28 GetInfoDetailFirstBlock ESC,0,P,D,?,CR 29 GetInfoDetailNextBlock ESC,0,P,B,?,CR 30 GetNextStream ESC,0,N,S,?,CR 31 GetNextInTime ESC,0,N,I,?,CR 32 GetNextOutTime ESC,0,N,O,?,CR 33 GetNextInfoDetailFirstBlock ESC,0,N,D,?,CR 34 GetNextInfoDetailNextBlock ESC,0,N,B,?,CR 35 GetPresetFirst ESC,0,G,F,?,CR ESC,0,G,F,T,H,Z,E,N T,H,Z,E = AME,CR Progammno 1 9999 36 GetPresetNext ESC,0,G,N,?,CR ESC,0,G,N,T,H,Z,E,N NAME = AME,CR Programmname 37 GetPresetPrev ESC,0,G,P,?,CR ESC,0,G,P,T,H,Z,E,N AME,CR 38 StartAutoSearch ESC,0,P,A,M,S,CR 39 GetTXTPage ESC,0,T,P,?,CR ESC,0,T,P,H,Z,E,CR 100 - 899 40 SetTXTUp ESC,0,T,P,+,CR ESC,0,T,P,CR Next 41 SetTXTDwn ESC,0,T,P,-,CR ESC,0,T,P,CR Prev 42 SetTXTPage ESC,0,T,P,H,Z,E,CR ESC,0,T,P,CR 100 - 899 0 - 63 ESC,0,P,N,ASCIINA ME,CR ESC,0,P,S,ASCIINA ME,CR ESC,0,P,I,HZ,HE,MZ, ME,SZ,SE,CR ESC,0,P,O,HZ,HE,M Z,ME,SZ,SE,CR ESC,0,P,D,T,H,Z,E,C R ESC,0,P,B,INFO,CR ZDF ESC,0,N,S,ASCIINA ME,CR ESC,0,N,I,HZ,HE,MZ, ME,SZ,SE,CR ESC,0,N,O,HZ,HE,M Z,ME,SZ,SE,CR ESC,0,N,D,T,H,Z,E,C R ESC,0,N,B,INFO,CR Die Zahnfee Die Zahnfee HHMMSS HHMMSS Number of Chars Info max 120 Bytes each block until "---" HHMMSS HHMMSS Number of Chars Info max 120 Bytes each block until "---" Start Autosearch Programs Mode > 0 = linear, 1 = NIT Speicher > 0 = neu, 1 anfügen No. Command To ProTUNE HD From ProTUNE HD 43 GetTXTState ESC,0,T,S,?,CR ESC,0,T,S,STATE,CR 44 SetTXTState ESC,0,T,S,CR 45 GetMute ESC,0,T,S,STATE ,CR ESC 0,A,M,?,CR 46 SetMute ESC,0,A,M,CR 47 SetAudioFormat 48 SetAudioChannel ESC 0,A,M,STATE,CR ESC,0,A,F,STATE ,CR ESC,0,A,C,STATE ,CR 49 SetAudioPIDChange ESC,0,A,P,Z,E,CR ESC,0,A,P,CR Change AudioPID 0 - 10 50 SetHdmiOut ESC,0,V,H,VALUE ,CR ESC,0,V,H,CR Value = 0 Auto,1 RGB-N,2 RGBE, 3 YUV444,4 VUV422 51 SetFreeze ESC,0,V,F,0,CR 52 SetZoom ESC,0,V,Z,VALUE ,CR ESC,0,V,Z,CR Value 0=1x, 1=2x, 2=4x, 3=6x, 4=8x, 5=12x, 6=16x 53 SetTvFormat ESC,0,V,T,VALUE ,CR ESC,0,V,T,CR Value = 0 Auto, 1 16/9 PS, 2 4/3LB, 3 4/3PS 54 SetVideoResulution ESC,0,V,R,VALUE ,CR ESC,0,V,R,CR Value = 0 BySource, 1 ByNativTV, 2 480i, 3 480p, 4 576i, 5 576p, 6 720p50, 7 720p60, 8 1080i50, 9 1080i60 55 SetSubtitle ESC,0,V,S,CR 56 SetVideoformat ESC,0,V,S,VALUE ,CR ESC,0,V,V,VALUE ,CR STATE = 0 Off, 1 On VideoFormat = 0 YPbPr, 1 RGB 57 GetVideoformat ESC,0,V,V,?,CR ESC,0,V,V,VIDEOFO VideoFormat = 0 RMAT,CR YPbPr, 1 RGB ESC,0,A,M,CR ESC,0,A,F,CR ESC,0,A,C,CR toggle ESC,0,V,F,CR ESC,0,V,V,CR STATE = 0 TXT Off, 1 On State = 0 Mute Off, 1 Mute On State = 0 Mute Off, 1 Mute On State = 0 LPCM, 1 BS State = 0 Links, 1 Rechts, 2 Stereo , 3 Mon Freeze No. Command To ProTUNE HD 58 ESC,0,R,T,No,Mo de,Art,CT,CH,CZ, CE,YZ,YE,MZ,ME ,DZ,DE,HZ,HE,mZ ,mE,DHZ,DHE,D mZ,DmE,CR SetRecTimer From ProTUNE HD ESC,0,R,T,CR No = TimerNo (0 - 7) Modus = 0 off, 1 once, 2 daily, 3 weekly Art = 0 Channel, 1 Record CT..CE = ChannelID 0 9999 YZ,YE = Year MZ,ME = Moth DZ,DE = Day HZ,HE = Hour mZ,mE = Minute DHZ,DHE = Duration Hours DmZ,DmE = Duration Minutes 59 GetRecTimer ESC,0,R,T,No,?,C R No = TimerNo (1 - 8) ESC,0,R,T,No,Mode, Art,YZ,YE,MZ,ME,D Z,DE,HZ,HE,mZ,mE, DHZ,DHE,DmZ,DmE ,StreamName,CR No = TimerNo (1 - 8) Modus = 0 off, 1 once, 2 daily, 3 weekly Art = 0 Channel, 1 Record YZ,YE = Year MZ,ME = Moth DZ,DE = Day HZ,HE = Hour mZ,mE = Minute DHZ,DHE = Duration Hours DmZ,DmE = Duration Minutes Streamname 60 FormatUSBDevice ESC,0,R,F,Mode, CR ESC,0,R,F,CR Mode = 0 Formt Fat, 1 Format NTFS 61 SetTimeshiftEnable ESC,0,R,S,CR Mode = 0 Off, 1 On 62 GetTimeshiftEnable ESC,0,R,S,Mode, CR ESC,0,R,S,?,CR 63 SetTimeshiftToRecord ESC,0,R,R,CR 64 GetTimeshiftToRecord ESC,0,R,R,Mode, CR ESC,0,R,R,?,CR 65 SetRecordType ESC,0,R,P,CR 66 GetRecordType ESC,0,R,P,Mode, CR ESC,0,R,P,?,CR 67 SetSlideShowPicSize ESC,0,S,S,Mode, CR ESC,0,S,S,CR ESC,0,R,S,Mode,CR Mode = 0 Off, 1 On ESC,0,R,R,Mode,CR Mode = 0 TS, 1 PS ESC,0,R,P,Mode,CR Mode = 0 Full size, 1 Real size (max 15 Byte) 5. IR Table IR-Table ASCII 0 - t IR_KEY_0 0 IR_KEY_1 1 IR_KEY_2 2 IR_KEY_3 3 IR_KEY_4 4 IR_KEY_5 5 IR_KEY_6 6 IR_KEY_7 7 IR_KEY_8 8 IR_KEY_9 9 IR_KEY_MENU : IR_KEY_UP ; IR_KEY_DOWN < IR_KEY_SELECT = IR_KEY_BACK > IR_KEY_INFO ? IR_KEY_LEFT @ IR_KEY_RIGHT A IR_KEY_GUIDE B IR_KEY_GREEN C IR_KEY_RED D IR_KEY_YELLOW E DED_IR_KEY_BLUE F IR_KEY_AV G IR_KEY_PLAY H IR_KEY_STOP I IR_KEY_FW J IR_KEY_RW K IR_KEY_CODE L IR_KEY_MUTE M IR_KEY_ASTERIX N DED_IR_KEY_RAUTE O IR_KEY_CH_PLUS P IR_KEY_CH_MINUS Q IR_KEY_VOL_PLUS R IR_KEY_VOL_MINUS S IR_KEY_TXT T IR_KEY_TV U Remote Model 2 Remote Model 2 Remote Model 2 Remote Model 2 Remote Model 2 Remote Model 2 Remote Model 2 Remote Model 2 Remote Model 2 Remote Model 2 Remote Model 2 Remote Model 2 Remote Model 2 Remote Model 1 Remote Model 2 Remote Model 2 Remote Model 2 Remote Model 2 Remote Model 1 Remote Model 2 Remote Model 2 Remote Model 2 Remote Model 2 Remote Model 1 Remote Model 2 Remote Model 2 Remote Model 2 Remote Model 2 Remote Model 1 Remote Model 2 Remote Model 1 Remote Model 1 Remote Model 1 Remote Model 1 Remote Model 1 Remote Model 1 Remote Model 2 Remote Model 1 No Function No Function No Function No Function No Function No Function Works Works Works Works Works <-> IR-Table IR_KEY_WWW IR_KEY_AB IR_KEY_PUP IR_KEY_PDN IR_KEY_FAV_PLUS IR_KEY_FAV_MINUS IR_KEY_HOME IR_KEY_SUBT IR_KEY_APP1 IR_KEY_APP2 IR_KEY_APP3 IR_KEY_REC IR_KEY_POWER IR_KEY_TVR IR_KEY_EXIT IR_KEY_EPG IR_KEY_FAV IR_KEY_AUDIO IR_KEY_OK IR_KEY_ZOOM IR_KEY_PAUSE IR_KEY_PVRLIST IR_KEY_OPT IR_KEY_PREV IR_KEY_NEXT IR_KEY_GOTO IR_KEY_TS IR_KEY_STEP ASCII 0 - t V W X Y Z [ \ ] ^ ' a b c d e f g h i j k l m n o p q Remote Model 1 Remote Model 2 Remote Model 2 Remote Model 2 Remote Model 2 Remote Model 2 Remote Model 1 Remote Model 2 Remote Model 1 Remote Model 1 Remote Model 1 Remote Model 2 Remote Model 2 Remote Model 2 Remote Model 2 Remote Model 2 Remote Model 2 Remote Model 2 Remote Model 2 Remote Model 2 Remote Model 2 Remote Model 2 Remote Model 2 Remote Model 2 Remote Model 2 Remote Model 2 Remote Model 2 Remote Model 2 No Function No Function No Function No Function No Function 6. Network Settings 6.1 Setting the IP-Address To get to the setup menu, please proceed as follows: - Press the OK / SETUP - Turn on the unit by the power switch on the back. The MAC-Address will now appear on the display. Use the < / > + Use the Up/ DWN Use the OK und MENU button and keep it pressed. buttons to scroll through the menu. + buttons to change the current menu entry. + buttons to change the position of the cursor. After finishing the IP Settings, go to „Save and reboot“ and press the OK button IMPORTANT: When entering the IP-Address of the ProTUNE HD into the web browser, you will get to the website of the disposed X-Port module. Please don’t change anything here!! Please only make settings over the front panel. If you want to control over TCP/IP, the RS-232 connector must be disconnected. It’s not possible to use both networks at the same time (parallely). The following entries can be found in the menu: MAC [00:20:4A:BA:70:E4] DHCP DeviceName [ENABLE]/[DISABLE] [ProtuneHD007] IPAddress [192.168.001.100] Subnetmask [255.255.255.000] Gateway [130.000.000.014] DNSServer [192.168.001.001] PortNo Save and reboote Default and reboot [10001] [OK] Reboot [OK] [OK] MAC-Address of the ProTUNE HD A name can be assigned [Up]/[DWN] select characters. [Enter]/[Exit] Position within name Device address, if not DHCP. [Up]/[DWN] select Address assigned via DHCP is number. [Enter]/[Exit] invisible. In this case Position within address. 000.000.000.000 is indicated. The address can be gathered from DHCP-Server. Selection of Subnetmask Selectable are: [255.255.255.248] [255.255.255.240] [255.255.255.224] [255.255.255.192] [255.255.255.128] [255.255.255.000] [255.255.254.000] [255.255.252.000] [255.255.248.000] [255.255.240.000] [255.255.224.000] [255.255.192.000] [255.255.128.000] [255.255.000.000] [255.254.000.000] [255.252.000.000] [255.248.000.000] [255.240.000.000] [255.224.000.000] [255.192.000.000] [255.128.000.000] [255.000.000.000] Gateway address [Up]/[DWN] Select number. [Enter]/[Exit] Position within address. [000.000.000.000] = Disable DNS-Server address [Up]/[DWN] Ziffer auswählen. [Enter]/[Exit] Position in der Adresse. [000.000.000.000] = Disable Used Port 10001 = Default Button [Enter] All settings are being saved. Button [Enter] Sets all settings to „Default“ and saves them Button [Enter] Rejects all settings. 7. Firmware Update As soon as a updated firmware is available, it will be published on www.comm-tec.de, from which it can be downloaded. Please note that the ProTUNE HD requires two different firmwares (front panel and mainboard). To execute a firmware update, proceed as follows: 7.1 Front Panel To update the firmware of the front panel, use the program „FWLoaderProTUNE“, which can be found on both our homepage as well as the product CD in scope of delivery. You‟ll also need a crossed, serial cable (RS-232). 7.2 Mainboard The firmware of the mainboard must be updated via USB (e.g. USB-Stick) The category “Upgrade per USB” can be found in „User Settings“. If you have a USB 2.0 compatible Stick, or your USB hard drive is equipped with the lates software, it can be selected with [VOL], then select the upgrade file and confirm under „Start“ with [VOL]. Note: Please follow the warning. Otherwise, date could be lost, and the ProTUNE HD might lose its functionality. 8. Technical Data Type Description Cat.No. ProTUNE HD / C Professional, digital DVB HD Tuner 715010 Tuner module Single DVB-C Tuner incl. Loop Through IEC-Type, 75 Ohm Input Frequency Range: 50,5MHz – 858Mhz Modulation type: 16 / 32 / 64 / 128 / 256 QAM Symbol Rate: 3 – 6,9 Mbaud Error correction (FEC): ½, 2/3, ¾, 5/6, 7/8, Auto MPEG Transport Stream A/V Decoding Transportstream MPEG-2 ISO/IEC 13818 Profile Level MPEG2 SD, MPEG2 HD, H.264/AVC SD, H.264/AVC HD Aspect ratio 4:3/16:9 Letter Box TV Format PAL / NTSC Audio Decoding Dolby Downmix Audio Mode Single channel/Dual channel/Joint Stereo/Stereo Conditional Access System Common Interface, 1 x CI Slot (inside unit) Personal Video Recorder (PVR) Connection USB 2.0 for external hard drive or stick Functions Recording/ Playback (Trick Mode, FFW, RW, PLAY, PAUSE) Timeshift Video output Analog Digital Composite (BNC), YUV-HD (3x BNC), Y/C HDMI (Standard 1.3, HDCP Support, 9x EDID) Audioausgang Analog Digital unbalanced (2x Cinch) and balanced (1x 6-pol Phoenix plug) S/P-DIF (optical / electrical), HDMI Front Panel Buttons Display OK/Setup, left, right, up, down, Menu/Exit, On/Stand By LCD-Display, 2 lines with 24 digits each, bi-color, dimable. Control Frontpanel IR Remote Control RS-232 Interface, 9-pol Sub-D (male) Ethernet-Interface, RJ45 (TCP/IP) Power Supply Universal Power Supply: 100-240 VAC / 50-60Hz Power input: ca. 25W (with Single LNB) / ca. 3W (Standby) 431(483) mm x 44 mm x 346 mm (B x H x T), 19“, 1HE 3,5 kg Metal, black User Manual, Power Cord, Infrared Remote Control Measures Weight Housing Scope of Delivery Subject to change.