1
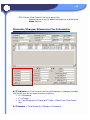
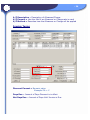
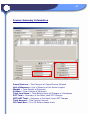
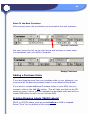
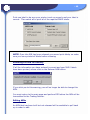
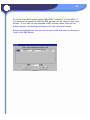
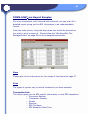
Commport Communications
International inc.
COMM-LiNK© pro
Users Manual
Your Guide to Installing and
Performing EDI
Version 8.0
62MB Installation
October 2005
- 2-
INDEX
COMM-LiNK© pro Installation
Getting Started With Installation…
3
COMM-LiNK© pro Tools
Importing and Exporting Data…
Performing EDI In Main…
Confirm & Edit Data In Maintenance…
Checking EDI Activity In Statistics…
Working With The Manage Button…
8
10
14
19
23
COMM-LiNK© pro Transactions
Creating Invoices…
Creating The ASN…
29
39
Summary
Printing & Using COMM-LiNK© pro Reports…
51
Reference
A Reference To New EDI Transaction Sets…
55
Agreement
Understanding Your COMM-LiNK© pro License Agreement…57
- 3-
Getting Started With
Installation…
- 4-
Thank You For Selecting COMM-LiNK© pro
Before you begin installation, please check the basic requirements for
running COMM-LiNK© pro, Version 8.0, in your architecture.
Processor:
Pentium 100 MHz,
RAM:
62 MB
UART Chip:
16550
Hard Drive:
1.2 GB
Modem:
14.4 / 28.8 kbps
Label Printer:
NEC or HP Laser compatible
MH10 Printer:
SATO - CX208 or CX212
Monitor:
SVGA
(Video Card capable of 800x600 resolution or greater)
Operating Software: Windows98, Windows 2000, Windows XP or higher
You should have received 1 Commlink CD or a Secured Link to our
website, along with a Users manual.
Installation
Insert CD into the CD ROM tray, or download the installation package
from the link provided by a Customer Care Representative at Commport.
The auto run will then prompt you to the next step.
Please follow the instructions on the screen upon request until your
computer indicates that COMM-LiNK© pro installation has been
successfully completed.
COMM-LiNK© pro installation will give you the option to load all the
programs into the directory of your choice. We recommend that the
default directory be selected in order to provide easy access for
Commport support, and to avoid any communication complications. The
default directory will be c:\Program Files and the default directory
structure is built as follows:
- 5-
C:\Program
C:\Program
C:\Program
C:\Program
C:\Program
C:\Program
C:\Program
Files\Commport\Commlink\Comm\Archive\EDI\In
Files\Commport\Commlink\Comm\Archive\EDI\Out
Files\Commport\Commlink\Comm\Flat\In
Files\Commport\Commlink\Comm\Flat\Out
Files\Commport\Commlink\Comm\Queue\In
Files\Commport\Commlink\Comm\Queue\Out
Files\Commport\Commlink\Update
Once installation has been completed, a Compro icon can be found on
your Windows desktop. Before starting COMM-LiNK© pro, however, the
installer must contact Commport for the correct information to setup the program
and test communications.
Compro.lnk
To start COMM-LiNK© pro. Double-click on the Compro icon.
Your Computer System Date Format
All EDI files are received in the format MM/DD/YY therefore it is very
important that your computer system date be set up in this manner.
Check your system date format in:
• Windows Start bar
• Select Settings
• Select Control Panel
• Select Regional Settings (or Regional Options)
The next very important step in setup is to complete the Compro.ini file
with the correct Company information. With your mouse, click on:
• Windows Start bar to display the program menu
• Select Accessories, Notepad and open the file noted below:
o Local Disk (C:)
o WINNT or WINDOWS [operating system
dependent]
o Select: Compro.ini
- 6-
Populate all red fields with information requested.
[Company]
Name = Your Company Name
DUNS = Your Duns number
UCC/EAN = Your 7 character number (required if doing transaction 856 –
ASN)
Tax 1 = GST number
Tax 2 = PST number
MailboxPath=as instructed by Commport
Mailbox=your assigned mailbox (Commport assigned)
TestMailbox= as instructed by Commport
ShipAdd=Your Shipping Address
ShipCity=Your Shipping City
ShipProv= Your Shipping Province (2 Letters)
ShipPostal=Your Postal Code
BillAdd=Your Billing Address
BillCity=Your Billing City
BillProv=Your Billing Province (2 Letters)
BillPostal= Your Postal Code
[Server]
ServerPath=\\EXPRESSLINK\D\EXPRES~1\EDI
ServerName= Assigned name from Commport
ServerPassword= Assigned password from Commport
Domain=EXPRESSMAIL
EntryName=FLEXPORT
MailinPath=MAILIN
;1=Network, 2=16Bit RAS, 3=32Bit RAS, 4=Local, 5=FTP
Connect=Communications Connection 3 or 5 [depending on dial-up
directly to Commport or FTP over the internet]
Retries=5 (times to redial)
Timeout=120
[User]
UserName=(Same as ServerName and Windows2000/ WinXP computer
name)
UserPassword=(Same as ServerPassword and Windows2000/ WinXP
computer name)
[Imp/Exp]
ArchiveImpPath=
- 7-
ArchiveExpPath=
CopyImpPath=
CopyExpPath=
;Automatically import
AutoImp=True
;Automatically perform EDI after import
AutoImpEDI=True
;Automatically Perform EDI
AutoEDI=False
;Time to Check EDI (Minutes)
CheckEDI=5
;Print MH10 Labels to a File
printToFile=True
[System]
EXEPath=C:\Program Files\Commport\Commlink
DBPath=C:\Program Files\Commport\Commlink
ComPath=C:\Program Files\Commport\Commlink\COMM
Version=7.0
Build=1000
Scripts=True
sqlmode=False
edimode=True
[Options]
SystemDB=C:\COMPRO\SYSTEM.MDW
[ASYNC]
PhoneNumber=Number as assigned by Commport
DialString=ATDT
HangupString=ATH0
Baud=19200
Parity=N
Bits=8
StopBits=1
InDirectory=C:\IN
OutDirectory=C:\OUT
ModemInit=ATZ
User=
Pass=
Flow=2
Redial=3
- 8-
port=2
[EMAIL]
EmailFlag=False
EmailServer=
EmailFrom=
[FTP]
FTPUserName= Provided by Commport
FTPPassword= Provided by Commport
FTPAddress=207.236.19.210
FTPConnect=TRUE
FTPTimeout=2
[RAS]
RASUserName= Provided by Commport
RASPassword= Provided by Commport
RASDomain=COMMPORT
RASPhoneNum= Provided by Commport
RASEntry=FLEXPORT
RASBook=COMMPORT.PBK
RASConnect=TRUE
RASRetries=3
RASTimeout=1
The rest of the Compro.ini file must remain as it is. While still in Notepad,
select File, then Save, then File again and Exit.
Import / Export of Data
EC (Electronic Commerce) or EDI (Electronic Data Interchange) is only
truly beneficial when the data comes directly from the Users Accounting,
Inventory or Management applications. COMM-LiNK© pro comes with
the ability to very easily receive and send data to from these applications.
COMM-LiNK© pro uses ASCII data files to move data between itself and
host applications. The default directories for these transfers are:
C:\ProgramFiles\Commport\Commlink\Comm\Flat\In for the movement
of data into COMM-LiNK© pro from the host.
- 9-
c:\ProgramFiles\Commport\Commlink\Comm\Flat\Out for the movement
of data out of COMM-LiNK© pro to the host.
When running COMM-LiNK© pro looks to these directories automatically,
which means that every 15 seconds it will start to work on the data that
is available in these directories. COMM-LiNK© pro can be fully
automated to create an outbound EDI file by placing an appropriately
named flat-file in the c:\Program
Files\Commport\Commlink\comm\Flat\In directory where the system will
immediately move the file through the translator and deliver it to the
mailbox.
Flat files to be imported must be saved using the file extension to
describe the type of data contained therein. For example a file containing
invoice data must be labeled as XXXXXXXX.810 for ANSI X.12 or
XXXXXXXX.880 for UCS. A Purchase Order must be labeled as
XXXXXXXX.850 for ANSI X12, or XXXXXXXX.875 for UCS.
However, before a transaction set can be imported or exported Commport
must be made aware of the requirement in order to ensure that firstly, it
can be handled and secondly that the import or export has been tested.
New Trading Partner Development
New Trading Partners requests and mappings should be forwarded to
Commport to develop the transaction sets, test their effectiveness and
then update the User’s version of COMM-LiNK© pro. A User can then
begin exchanging electronically with a new Trading Partner.
Please direct requests to: [email protected]
- 10 -
Performing EDI in Main...
- 11 -
Main
COMM-LiNK© pro is available in version 9, and requires either Windows
2000, or Windows XP or NT operating system for installation.
Peforming EDI
EDI is Electronic Data Interchange. COMM-LiNK© pro is designed to
make it “easy” for companies who wish to trade documents electronically
with their customers and suppliers, also known as Trading Partners.
Once the COMM-LiNK© pro installation has been completed and Trading
Partner relationships have been established, it is very important that a
user performs EDI to check for “mail” regularly. A daily or weekly check
will be necessary; depending on how many Trading Partners a user has,
and how often documents are exchanged. To peform EDI, select Main in
the area box and mouse click once on the Perform EDI button. That’s it.
All communication functions are performed in the background.
We recommend that COMM-LiNK© pro application be the only
application open at the time that EDI is performed in order to allow the
system to complete the communications process without interruption.
You should not have other programs running in the background.
Please do not use the computer for other tasks while doing EDI. Keeping
this in mind will ensure that your transactions are received or sent in
good order and a functional acknowledgment is immediately created and
- 12 -
sent to your Trading Partners. [The functional Acknowledgment is a
message acknowledging your receipt of a document]
COMM-LiNK© pro has a window on the right side that tells you the files
it is reading in or writing to send out.
- 13 -
Return Acknowledgments to Trading
Partners
COMM-LiNK© pro has automated this very important function, again
making it easy for the user. The process begins by receiving any
transaction, for example, a purchase order. The receiver must then
inform the sending Trading Partner that it was received, in good time, in
good order, and without errors.
Each Trading Partner has an established time period for receipt of a
functional acknowledgment. The ranges go from 6 hours to 72 hours,
depending upon the Trading Partner. To ensure that you comply with
these varying requests, COMM-LiNK© pro automatically creates and
sends any 997’s or 999’s as soon as a transaction is received via EDI. If
a trading partner claims they did not receive a functional
acknowledgment, then COMM-LiNK© pro has the functionality for the
user resend it, or else the user can contact [email protected] for
assistance.
The main screen also has a file menu from which you can do EDI,
however, clicking on the Perform EDI button is much more convenient as
it is displayed when the application first loads.
File
Under File you have the following option:
….Perform EDI
Check your mailbox for incoming or outgoing transactions.
….Exit
Exit will close COMM-LiNK© pro system.
- 14 -
Confirm & Edit Data in
Maintenance…
- 15 -
Maintenance
Maintenance provides access to several database of tables information for
your convenience to verify, and edit.
By clicking this button a list of the products you have entered will be
displayed in the next screen.
Product #
Unit OfMeasure
Vendor #
UPC Code
Description
GST
GST RatePST/QST
PST/QST Rate
Unit Price
Resale Price
To view more
columns click on the
left or right arrows on
the scroll bar found at
the bottom.
- 16 -
File
Under File you have the following option:
….Exit
Exit will cancel or quit the current screen only, not COMM-LiNK© pro
system.
Edit
Under Edit you have the following option:
…Select All
Selects all records in the list.
How to Add new Products/Items to the database
To add more product items scroll down to the last record (marked with an
asterix) and type in new information as listed below in a blank row.
Product #
UPC Code
PST/QST Rate
•
Unit Of Measure
Description
Unit Price
Vendor #
GST - Rate
Resale Price
Please note the instructions on
the screen when entering data:
• Unit of measure must be a
valid two letter code and will
default to “EA” for Each if the
field is left blank.
• GST field will default to “Yes” if
left blank. Rate will default to
“7%”.
• PST/QST field will default to
“No” if left blank. Rate will de
default to “8%”.
Use the down Arrow Key to advance to the next record.
To delete product line items, highlight one record at a time and use your keyboard
delete key.
Tips:
Home Key takes you to the beginning, the first field of the record you are currently working on.
End Key takes you to the end, the last field of the record you are currently working on.
All field calculations take place after you leave the record you are currently working on.
- 17 -
These fields contain company and trading partner information for
reference.
Mailbox
Postal Code
Company DunsNumber
Province UCC/EAN
Address
Tax1
City
Tax2
This listing is for the purpose of reference and use as a part of the
transaction process.
Store #
Province
Name
Postal Code
Address
This listing is for the purpose of reference.
City
- 18 -
Code
City
Name
Province
Address1
Postal Code
Address2
This listing is for the purpose of reference and to add or delete a new
Company.
Company
Mailbox Ref ID
Unique ID
- 19 -
Checking EDI Activity in
Statistics…
- 20 -
Statistics
Keeping track of EDI activity is an intricate part of the Electronic
Commerce function. Trading Partner activity, or failure to respond and so
on is easily handled using COMM-LiNK© pro’s Statistical Management
routines.
On the main screen in the area drop-down box: select Statistics, and then
use your mouse to click on the Batch Log button.
This module keeps you informed about all EDI sessions:
• Acknowledgment activity
• Upload/download activity
• EDI processing events and timing
• Trading partner activity
• Transaction activity
- 21 -
Each EDI session [every time perform EDI takes place] is called a batch.
The most current batch will always be found at the top of the list.
Use the scroll bar to move up and down the list or use the record selector
arrows on the bar to scroll up and down. The record selector bar also
tells you how many batches are stored in your database.
File
Under File you have the following option:
…Exit
Exit will cancel or quit the current screen only, not
COMM-LiNK© pro system.
View
Under View you have the following option:
- 22 -
….Batch
This allows you to
view the batch on
the screen. An
example of a screen
report is shown on
the right. From this
screen, the File menu
lets you exit from the
batch and the Print
lets you send the batch
directly to the printer.
Print
Under Print you have
the following option:
File Print
EDI Batch Log
- Printed 9/19/96 5:05:52 PM
_________
Batch # : 8
Started : 8/15/96 11:41:05 AM
Ended : 8/15/96 11:41:24 AM
Complete Inbound Transactions
------------------------------------------Sender: Company1 Limited
Receiver: Company2 Limited
Trans.
-------850
Count
Flat File
-------- ----------00001
Complete Outbound Transactions
-----------------------------------------Sender : Company2 Limited
Receiver: Company1 Limited
Trans.
------997
Count
Flat File
-------- ----------00001
….Batch
Send the batch directly to your printer without viewing.
Tips:
The Batch Log gives you the exact date and time a session was started and ended. From here you
can calculate the amount of time required to receive a file. It tells you how long an EDI session
lasts, how often and also the best time to perform EDI. This can be very helpful when working with
extremely large files.
NOTE: It is extremely important for all outbound transactions that your
company sends (examples Invoice or ASNs) that you keep track of the
inbound Acknowledgments (997) from your trading partners. If you have
not received an Acknowledgment back from a trading partner, this could
mean that they did not receive the transaction and follow up may be
required.
….Option
Launches Windows Notepad, which will allow you better printing options.
It will also allow you to save the batch report to your computer for later
access if desired.
- 23 -
Working with the Manage
Button...
- 24 -
The Manage Button
In COMM-LiNK© pro application the Manage button will appear
whenever you select a standard EDI transaction set from the drop down
area box. The Manage button allows you to view, edit or to print
transaction data as stored in the COMM-LiNK© pro database.
Search Criteria Dialog Box
Once you click on the Manage button, the system will present you with a
Search Criteria box for the transaction type you have selected. You can
select by three categories:
1) Type of transaction, either outbound or inbound or all
2) Transactions that have been acknowledged, unacknowledged or all
3) Transactions that have been sent, not sent or all.
You can also narrow down the search by selecting a date range and/or a
specific trading partner.
Quick Tip: The top header bar of the criteria search
box informs you which transaction you are currently
searching for.
Click on the calendar to display a
months view and to select the date
range.
Matching Records Found Dialog Box
The next screen displays all records found that matched the search
criteria you selected from the search criteria screen. Select and highlight
any records, using the record selector on the left and then click on File,
Edit, View or Print on the menu bar.
- 25 -
File
Under File you will have
the following options:
….Export
Exports an outbound flat
file to a host computer.
Deposits the file to a
directory called C:\Program
Files\Commport\Commlink\
COMM\FLAT\OUT unless
otherwise specified. With
your mouse, click OK in the
dialog box and perform the
EDI function to create this
files.
….Resend
Be careful of your transaction selection. In most cases COMM-LiNK©
pro will inform you if you are selecting the wrong data to resend.
….Exit
Exit will cancel or quit the current screen only, not COMM-LiNK© pro
system.
….Edit
Under Edit you will find the following options:
….Delete
Delete will remove the selected entries from the database. More than
one entry can be selected by holding the control key and clicking the
record selector to the left of the entry.
- 26 -
….Find
To find a specific transaction set, key in the full number in the Find What
entry box.
….Sort
The quickest way to sort a column is by double clicking on the header bar
of one column. Only one column can be sorted at a time. The
corresponding information in the other columns might change as different
columns are sorted.
To sort using the Edit function, highlight your column heading, click on
Edit then click on Sort.
….Select All
To select all of the records in the database click on Edit, and then click on
Select All.
View
View allows you, the user to look at the transaction, for analysis, editing
or resending. The transaction is presented in a “tree” fashion, similar to
Windows File Manager or Explorer. The tree depicts the hierarchical
structure of EDI and makes understanding, viewing and editing a
transaction a breeze. Highlight the transaction you wish to view or edit,
click on View and then select either Detailed or Payment Summary.
….Detailed
The transaction is presented in a “ tree” fashion by EDI segments on the
left side and your data is presented on the right side, where applicable
drop down list boxes are provided to assist for the insertion of correct
Qualifiers and Codes into the segments where approved by the standard
chosen.
- 27 -
Expand All
This displays in
tree format the
standard EDI
segment structure
of a transaction.
Expand all works
in conjunction with
the buttons View
Segment and
Cancel.
View Segment
Displays your
transaction data
stored as EDI
segments on the
right hand side.
Edit
Allows you to edit data in segment fields on the right hand side. Edit
works in conjunction with the buttons Undo and Cancel.
Undo
Enables you to undo the last change or move.
Cancel
Closes the view detail screen without saving any edits or changes.
Save & Exit
Saves any edits or changes made to the transaction and exits from the
View Detail screen.
- 28 -
Print
Allows you to print out a basic or a detailed version of the transaction.
Basic provides normal or basic printout of the data in a form familiar to
most users. The detail report is a true EDI version of the transaction, and
includes everything that was sent as part of the original EDI transaction.
- 29 -
Creating Invoices…
Transaction 810
- 30 -
How To Create an Invoice
Select the transaction, 810 Invoice from the area drop down box on the
main screen and click on AutoCreate 810
An invoice source window will appear from which you can select the
transaction type (850 = Purchase Order, 856 = ASN, 875 = Grocery
Purchase Order), the date range and/or the trading partner.
- 31 -
By choosing a source document, COMM-LiNK© pro will populate all of
the relevant information from the source document to the invoice screen
for completion and release.
Your next window will allow you to select a specific purchase order
number or bill of lading number (if you are creating from an ASN).
Select the purchase order by highlighting the entire line in blue. To
highlight, use your mouse to click on the left record selector pointing to a
purchase order. Now mouse click on Create Invoice button.
- 32 -
This is the invoice screen. All of the information on the screen will be
captured from the actual purchase order or ASN that was received in EDI
format. An invoice number must be entered and any changes to the
items must be made manually.
To remove an item from the invoice, select the item by highlighting the
entire line in blue. To highlight, use your mouse to click on the left
record selector pointing to the item. Mouse click on the Delete button.
(Do not use your keyboards delete key)
- 33 -
Select yes to continue and Commlink
system will delete the item and then
automatically recalculate the invoice totals.
Exit will not save the invoice but will close the invoice window.
Use this button to recalculate the invoice totals after changes have been
made.
If your invoice is correct, use the release button to create and queue your
invoice. Once released an invoice cannot be brought back to be altered
or changed again. To send the invoice the user must perform EDI.
Select yes to proceed or no to return to and/or change your invoice.
- 34 -
Invoice Header Information
The information required in the header record will vary depending upon
the Trading Partner’s requirements.
In testing phase, please work with your Commport Customer Service
Representative with regards to the information that needs to be manually
inputted. These can consist of:
•The
•The
•The
•The
•The
Invoice #
Invoice Date
Date Shipped
Department Number
Customer Number
- 35 -
•The Carrier Code (select from drop down list)
Missing carriers can be added through the maintenance
Menu options.
Discounts/Charges/Allowances/Tax Information
A/C Indicator = If you do not have any allowances or charges (besides
the taxes) you do not need to enter anything.
• A = Allowance
• C = Charge
• N = No Allowance or Charge•A/C Code = Select from Drop Down
box
A/C Amount = Total Amount of Charge or Allowance
- 36 -
A/C Description = Description of Allowance/Charge
A/C Percent = Use this field if an Allowance or Charge rate is used
A/C Method = Describes how the Allowance or Charge will be applied
Invoice Terms
Discount Percent = Numeric value
Example 2% = 2
Days Due = Amount of Days Discount is in effect
Net Days Due = Amount of Days Until Invoice is Due
- 37 -
Invoice Summary Information
Cases/Cartons = Total Number of Cases/Cartons Shipped
Unit of Measure = Unit of Measure of the Items shipped
Weight = Total Weight of Shipment
Volume = Total Volume of Shipment
Total Line Items = Total Before Discount/Charges or Allowances
PST Total = Summary of the Detail Level PST Charges
GST/HST Total = Summary of the Detail Level GST Charges
Total Amount = Total Invoice Amount
US Check Box = If in US Dollars please check
- 38 -
NOTE: These should auto-calculate based off detail level information and
any discount/charges/allowance additions. If there are any changes
made click the re-calculate button to refresh values.
If you have added any information in the Discount, or Allowance/Charges,
or Change Summary Totals Sections. Please Select “ReCalculate” to
Adjust Totals
Releasing the Invoice for Delivery
Once the Invoice is released it CANNOT be edited, to release follow the
below instructions:
•Click the “Release” button
•Return to the COMM-LiNK© pro Main screen and click “Perform EDI” to
send the Invoice using EDI
Note: the “Exit” button will not save the invoice
- 39 -
Creating the ASN...
Advance Ship Notice
Transaction 856
- 40 -
856 Advance Shipment Notice Management
An ASN can only be created after a purchase order (transaction 850, or
875 has been received) or a planning schedule (830) has been received.
Using your mouse, click on the Area down arrow on the main screen to
display a drop-down list and select transaction 856 Advance Ship Notice.
Manage displays the compiled ASNs.
- 41 -
Searching For Data
The date that appears will always be the current date. It is important
that you remember when your transactions, such as purchase orders
were received. Once you have filled in the date range, selected the
Trading Partner and the type of transaction. The choices are Inbound,
Outbound or All. All includes both inbound and outbound. The COMMLink system will locate any records stored in the database and display
them on a new screen called Matching Records Found.
Records found within the date
range specified will display
horizontally under these
headings. Use the scroll bar
arrows to view all of the
information to the right and
the left on your screen.
- 42 -
PO Date Ship Date
Ship To
Company Sender Mailbox Sender Code
Receiver Code
Ultimate
PO #
Receiver Mailbox
Select the purchase order by highlighting the entire line in blue. To
highlight, use your mouse to click on the record selector pointing to a
purchase order. Now, mouse click on Create ASN button.
It is very important that you select the correct date range that purchase
orders or planning schedule were received.
On the right side of the screen you will notice they types of transactions,
from which you can build an Advanced Ship Notice.
- 43 -
850
875
830
862
=
=
=
=
Purchase Order
Grocery Purchase Order
Planning Schedule
Shipping Schedule
Select desired transaction by clicking on the check box.
Select the purchase order by highlighting the entire line in blue. To
highlight, use your mouse to click on the left record selector pointing to a
purchase order. Now, mouse click on Create ASN button
This is the ASN request screen. The most important information required
to create the ASN is the Bill Of Lading number, the Carrier Code, the
number of containers required and the weight of each container. All of
the other information is pulled in from the actual Purchase order that was
received. Generally the report used to create the ASN is the Shipment
Packing Report (see reports).
- 44 -
Building a Shipment
To build a shipment you must physically pack the containers using the
COMM-LiNK interface.
This Entails:
1) Selecting the items from the left
- 45 -
2) Using the center arrows, move the items to the container on the right
Packs entire quantity
indicated on the Purchase
Order
Packs a specified quantity
(Different from original PO)
Unpacks (removes) items from
the container selected on the
right
The Auto-Create Function allows you to pack the same item into separate
containers in one easy function.
Select the item you wish to pack in more then one container, select the
“Auto Create” button from the bottom of the screen.
- 46 -
Choose the “Individual piece(s) in each container” function.
In the Total Qty, type the total amount of the product. For example if
there is a quantity of 10, enter 10. In the section for “pieces per
container” enter the amount that you want per container. If you want to
send out only two containers enter 5; if you want five containers enter 2.
Do not fill out the bottom information, please see note on page 47 for
explanation.
- 47 -
3) Specify container information (weight etc.)
NOTE: Leave this step until you have built the entire ASN, go back to the
first container. In the first container enter the information that is
required. If you enter this information as you go along it will be copied to
all the containers, which will result in a rejected ASN once it has reached
your trading partner.
Enter Trailer & Container Weight
The trailer can be left as UNKN. The weight for each container must be
entered. The volume, Packing Type and Description can be left as
generated by default. This is true unless otherwise dictated by your
trading partner. This is true unless otherwise dictated by your trading
partner.
4) Repeat until all items being shipped have been packed
- 48 -
Move To the Next Container
After moving items into a container you must select the next container.
Packed Container
Use your mouse to click on the right arrow and continue to move items
into containers until your ASN is complete.
Empty Container
Adding a Purchase Order
If you are shipping more than one purchase order in your shipment, you
must send all the desired purchase orders in one Advance Ship Notice.
If you wish to include additional Purchase orders in your ASN, use your
mouse to click on the Add POs button. This will take you back to the PO
selection screen, where you can highlight the purchase order and click on
create ASN button to add it to your current ASN.
Printing Shipping Labels (MH10 Labels)
MH10 or UCC128 labels must be printed before an ASN is released.
Select “Print” for the bottom of the screen.
- 49 -
Print one label to be sure your printer is set up properly and your label is
correct. Then select all to print all of the required MH10 labels.
NOTE: Once the ASN has been released you cannot print labels, so make
sure you have printed all labels before releasing
Releasing the ASN for Delivery
If all the information you have entered is correct and your MH10 labels
have been printed, mouse click on the Release ASN button.
If you click yes to this warning, you will no longer be able to change this
ASN.
You must return to the main page and perform EDI before the ASN will be
transmitted to the Trading Partner.
Editing ASNs
An ASN that has been built but not released will be available to pull back
up in order to edit.
- 50 -
Go to the main ASN screen, select “Edit ASN” instead of “Create ASN”, if
you have not released the ASN the BOL number will be listed on this next
screen. If you had not yet assigned a BOL number these fields will be
blank however the packing information will still have been saved.
Select and highlight the one you wish to work with and use your mouse to
click on the Edit button.
- 51 -
Printing & Using COMM-LiNK©
pro Reports…
- 52 -
COMM-LiNK© pro Report Samples
For every transaction, both inbound and outbound, you can print off a
detailed report giving you the EDI information in an understandable
format.
From the main screen, using the drop-down box select the transaction
you wish to print a report of. Please follow the “Working With The
Manage Button” on page 24 for more detailed instructions.
View
Please refer to the instructions for the usage of view found on page 27.
Print
The types of reports vary on which transaction you have selected.
Transaction Info.
This report gives you the EDI specific information, on the EDI transaction.
o Document Number
o Transaction Number
o Sender
o Receiver
o EDI File Name
o EDI Reception Date/Time
- 53 -
o Flat File Name (if used)
o Flat File Date (if used)
Detailed Report
This report gives you detailed information on each EDI segment that is
sent. This is set-up to mirror the information going out in EDI, so a lot of
it is using the EDI codes.
Basic Report
This report gives you the general overview of the information sent in the
inbound or outbound transaction. Organized by EDI segments being
sent.
Note: This report is not functional for all transactions
Basic 810/ Basic 850/Basic 860/Basic Payment Summary
This reports gives you detailed information about the outbound/inbound
transaction, but puts the language into a more readable format for those
who are not familiar with EDI.
PO Summary
This report gives you a listing of all items on the purchase order, ship to
locations, store numbers, item numbers, prices, quantities and unit of
measures.
850 Item Summary
This report gives you a summary of all items and quantities ordered on
the purchase order.
Packing Instructions
This report gives you a listing of all items on the purchase order, ship to
locations, store numbers, item numbers, prices, quantities and unit of
measures, and a space to mark how many containers are used for each
product.
Tips:
The Packing Instructions report is extremely useful when packing an Advance Ship Notice.
Some customers have found them a useful report similar in use to a warehouse pick slip.
- 54 -
Rejection Summary
This report is only used for 997 transactions. It gives you in a readable
language why the transaction has been rejected.
- 55 -
A Reference to new EDI
Transaction Sets…
EDI Transaction Sets
- 56 -
Transactions Currently Standard within COMM-LiNK© pro
As a true EDI translator, COMM-LiNK© pro software can read in all
transactions from a 101 Flight Confirmation to a 999
Acceptance/Rejection Advice.
There are approximately 1000 standard EDI transactions available to be
used. To make EDI simple, their number and a description, as assigned
by the ANSI X12 Committee for common transactions are as follows:
210
214
753
754
810
812
816
820
824
830
832
846
850
852
855
856
857
860
861
862
864
875
879
880
882
889
894
997
999
Motor Carrier Freight Details and Invoice
Transportation Carrier Shipment Status Inquiry
Request for Routing Instructions
Routing Instructions
Invoice
Credit /Debit Adjustment
Organizational Relationships
Payment Order / Remittance Advice
Application Advice
Planning Schedule
Pricing Sales Catalog
Inventory Inquiry/Advice
Purchase Order
Product Activity Data
Purchase Order Acknowledgment
Ship Notice / Manifest
Shipment & Billing Notice
Purchase Order Change Request - Buyer Initiated
Receiving Advice
Shipping Schedule
Text Message
Purchase Order (UCS)
Price Change
Invoice (UCS)
Direct Store Delivery Summary Information
Promotion Announcement
Delivery/Return Base Records
Functional Acknowledgment
Acceptance / Rejection Advice
- 57 -
UnderstandingYour…
COMM-LiNK© pro License
Agreement
- 58 -
COMM-LiNK©
pro
License Agreement
Copyright Proprietary Protection
This product is owned by Commport Communications International inc.
and is protected by Canadian and International copyright laws and
International treaty provisions. You must treat the Product like any other
copyrighted material, except to the extent that this Licence provides to
the contrary. Your right to use the Product terminates automatically if
you violate any part of this Licence. In the event of termination, you
must destroy all copies of the Product or return them to Commport.
Definitions
The following terms in blue are defined as they appear in this agreement.
Software means the special version of the computer program identified
above and all updates to the computer program (e.g., 2.0 to 2.01 or 5.0
to 5.1). The term also included all copies of any part of the computer
program. Documentation means the user’s manual(s) and other
printed materials accompanying the Software. Product means the
Software and Documentation. Licence means this Commport Licence
Agreement. Use means loading the Software into RAM or installing it on
a hard disk.
Licence Grant
Use one copy of the Software on a single computer, provided that the
Software is in use on only one computer at a time. Use one copy of the
Software on a single terminal connected to a single computer (i.e., with a
single CPU). The end user may copy the software from one single
terminal to another such single terminal, portable or home computer, or
terminal belonging to or used by the end user, provided that the software
is in use on only one computer at a time and is never installed on more
than two computers at any one time and is used only by the end user.
Install a single copy of the Software on a network server where it is
resident for the sole purpose of distributing it to other computers is not
"Use” that requires an additional Licence.
- 59 -
Backup
Make one copy of the Software for archival purposes, or copy the
Software onto the hard disk of your computer and retain the original for
archival purposes.
Transfer
After written notification to Commport, transfer of the entire Product on a
permanent basis to another person or entity, provided you retain no
copies of the Product and the transferee agrees to the terms of this
Licence, is permitted.
Restrictions
You may not:
1) Copy the Documentation.
2) Translate the Software.
3) Merge the software with another program or modify the software,
except as may be specifically described in the documentation. Any
modifications are subject to this Licence.
4) Reverse-engineer, disassemble, decompile, or make any attempt to
discover the source code of the software.
5) Sub-Licence, rent or lease any portion of the Product
6) Continue to use the software after the Licence has been canceled by
either you, or Commport as per the original agreement. It must be
deleted from the computer and the original disks must be physically
destroyed.
Limited Warranty
Commport represents and warrants that for a period of 90 days from your
receipt of the Product: 1) the disks on which the software is distributed
will be free from defects in materials and workmanship; and 2) the
Software will perform substantially in accordance with the
Documentation. Any written or oral information or advice given by
Commport agents, or employees will in no way increase the scope of this
warranty.
If the Product fails to comply with the warranty set forth above,
Commport’s entire liability and your exclusive remedy will be replacement
- 60 -
of the disk(s) or, at Commport’s option, Commport’s reasonable effort to
make the Product meet the warranty set forth above.
No Liability for Consequential Damages
In no event shall Commport be liable for any damages whatsoever
(including, without limitation, damages for loss of profits, business
interruption, loss of information, or other pecuniary loss) arising out of
the use of or inability to use the Product, even if Commport has been
advised of the possibility of such damages.
COMMPORT DISCLAIMS ALL OTHER WARRANTIES, EITHER
EXPRESS OR IMPLIED, INCLUDING BUT NOT LIMITED TO,
IMPLIED WARRANTIES OF MERCHANTABILITY AND FITNESS FOR
A PARTICULAR PURPOSE, WITH RESPECT TO THE PRODUCT. THIS
LIMITED WARRANTY GIVES YOU SPECIFIC LEGAL RIGHTS.