1
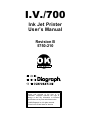
I.V./700
Ink Jet Printer
User’s Manual
Revision B
5750-210
The information contained in this manual is
correct and accurate at the time of its
publication. Diagraph reserves the right to
change or alter any information or technical
specifications at any time and without notice.
© 2000 Diagraph, Inc. All rights reserved.
Printed in the United States of America
I.V./700 Ink Jet Printer Features
Diagraph’s Model I.V./700 Ink Jet Printer has a variety of features that
make it uniquely suited to print on porous surfaces in industrial
printing applications.
Revision B
•
Self-contained printing system for marking products
moving on conveyors.
•
Adjustable printhead that allows for side, top, or
inclined conveyor printing at line speeds up to 250 feet
(76 meters) per minute.
•
Prints characters up to seven dots high, one half-inch
tall.
•
Ink supply system from a pressurized can. Cans can
be changed during operation for uninterrupted printing.
•
Detects product direction and speed of movement with
photosensors mounted in the front of printhead. An
external photosensor option is available.
•
Prints one message per item or many messages per
item.
•
Twelve function keys for easier editing and system
operation.
•
Built-in count, shift, time and date codes including
expiration dates.
•
Prints in three different fonts: 3/8 inch (9.5 mm), 1/2
inch (12.7 mm) and 1/2 inch (12.7 mm) bold.
•
Screen menus in multiple languages.
•
Two-line, twenty character per line, liquid crystal
display.
•
Power supply operates on 80 to 240 VAC input.
•
May be used between 40° F (4.4° C) and 110° F (43.4°
C).
•
Modular printhead design that incorporates Quick
Disconnects for easy maintenance
•
Modular spare parts kits for easy maintenance.
•
Long printhead bracket for easy printing on top of a
product.
•
Ink and electronics are separated throughout the
system to ensure reliability and industrial durability.
•
Can print with multiple colors of ink: Blue, Green, Red,
Orange and Yellow.
•
Supplies available worldwide.
Introduction - ii
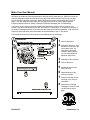
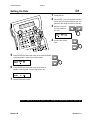
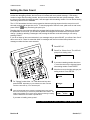
I.V./700 Controller
DISPLAY
1 Two-line, twenty character per line, liquid crystal
display (LCD).
2
3
4
5
1
LEDs
Power LED; lit when the printer has power.
Photo-eye LED; on while a product passes by.
Print LED; lit when the printer is in print mode.
Ink out LED; blinks when the ink can is out of
ink.
FUNCTION KEYS
6 PRINT: Starts and stops printing.
7 EDIT: Create, edit or delete a message.
8 PURGE: Purge all ink channels; with ALT (24), it
purges single channels.
9 MESSAGE INDENT: Sets the message
indentation from the leading edge of the product.
10 FONT: Selects the font to print.
11 TIME: Inserts the printed time into a message.
With ALT (24), it inserts a work shift code..
12 SET-UP: For configuration of the system.
13 INFORMATION: Provides status and setting
information.
14 DOT SIZE: Increases or decreases all dot sizes
at once.
15 CHARACTER WIDTH: Changes the width of
printed characters which produces changes in
the length of printed messages.
16 DATE: Inserts the date into a message. With
ALT (24), it inserts an expiration date.
17 ITEM COUNT: In print mode, it shows the last
count for Item, Pallet and Total; in edit mode, it
inserts the item count into a message. With
ALT (24), it inserts a pallet count.
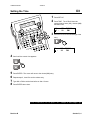
NUMERIC KEYPAD
18 Keys for number entry which will show alternate
characters when scrolled with the arrow keys
EDIT KEYS
19 DELETE: Erases the character under the cursor and
does not repeat.
20 BACKSPACE: Deletes the character to the left of the
cursor and will continue to delete when held down.
21 ENTER: Completes entries and enacts changes.
ARROW KEYS
22 Keys that provide cursor movement and screen
scrolling.
Revision B
2
3
4
7
6
5
9
8
10
11
ABC
ABC
i
12
12
12 3
17
7
8 13 9 14
4
5
6 19
1
2
3 20
.
0
-
Q
W
E
R
T
Y
U
I
O
P
A
S
D
F
G
H
J
K
L
:
Z
X
C
V
B
N
M
/
(
“
18
15 16
22
23
21
Alt
24
26
25
ALPHABETIC KEYS
23 Keys for character entry. Each character will show
alternate characters when scrolled with the up and
down arrow keys.
ALTERNATE KEYS
24 ALT: Provides alternate characters and functions
when used in combination with other keys.
25 ENTER: This key duplicates the function of key 21
SPACE BAR
26: Enters spaces in messages; can be scrolled with the
up and down arrows to show alternate characters
Introduction - iii
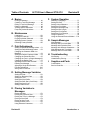
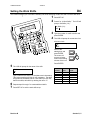
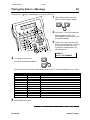
Make Your Own Manual
This manual evolved from the observation that users often make their own manuals: they find and
reproduce the instructions that are essential for their jobs and file away the rest. With this in mind, the
writers at Diagraph created this manual so that every easily altered feature occupies only one page
such as Printing a Message (one page); Setting the Date (one page) and Changing the Font (one
page). Only four subjects occupy more than one page and they do not require daily inspection:
Frequently Asked Questions, Setting a Password, Example Messages and Troubleshooting.
This preface is an invitation to find those pages that describe the features that are useful at your
location, copy them and assemble your own “cheat sheet” of instructions. In the discovery process, try
the example messages (Section G) to learn more about the printer and its capabilities. Also review the
frequently asked questions (A6) to accelerate the implementation of the I.V./700 printer.
The illustration below points out the ease-of-use characteristics of each page.
1
2
3
4
5
6
7
8
Revision B
Feature description.
Alphabetic reference. See
the table of contents for the
nine subject areas. By
using these references
instead of page numbers,
you can easily assemble
additional instructions.
Illustration of the controller.
Concise directions.
Numbered references to
keys with icons.
Representations of the
onscreen prompts.
Framed notes that contain
warnings or key items of
information.
References to example
messages in Section G that
use the feature on this
page.
Introduction - iv
Table of Contents
I.V./700 User’s Manual 5750-210
A. Basics
F. System Operation
Printing a Message .............................. A1
Creating a Text-Only Message ............ A2
Editing a Text-Only Message ............... A3
Deleting a Message ............................. A4
Viewing System Information ................ A5
Frequently Asked Questions................. A6
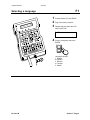
Selecting a Language........................... F1
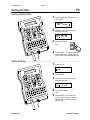
Setting the Date ................................... F2
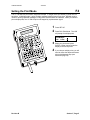
Setting Units of Measure ...................... F3
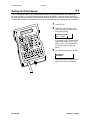
Setting the Print Mode.......................... F4
Setting the Message Gap..................... F5
Setting the Box Length ......................... F6
Setting the Print Speed ........................ F7
Setting the Print Direction..................... F8
Using a Password ................................ F9
Using the External Photocell Model .... F10
B. Maintenance
Loading Ink........................................... B1
Purging All Channels ........................... B2
Purging Individual Channels ................. B3
Adjusting Screen Contrast.................... B4
Resetting Factory Defaults .................. B5
G. Sample Messages
New Message ...................................... G1
Message with Count and Date.............. G2
Message with Expiration Date .............. G3
Message with Alternate Characters ...... G4
Wide Message with Time Mark............. G5
Message with Count and Pallet ............ G6
C. Print Adjustments
Setting an Individual Message Indent ... C1
Setting the Default Message Indent ..... C2
Changing the Character Width in a
Message .............................................. C3
Setting the Default Character Width ..... C4
Changing the Printed Dot Size ............. C5
Changing the Font in a Single MessageC6
Changing the Default Font .................... C7
Adjusting Individual Dot Diameter ........ C7
Rotating the Message .......................... C8
Adjusting a Single Dot Diameter ........... C9
First Dot Adjustment .......................... C10
Sizing Dots in Columns....................... C11
Revision B
H. Troubleshooting
Not Printing .......................................... H1
Unsatisfactory Printing.......................... H2
I.
Supplies and Parts
Consumables .........................................I1
Service Parts Kits...................................I2
D. Setting Message Variables
Setting the Date .................................. D1
Setting an Expiration Date .................... D2
Setting the Time .................................. D3
Setting the Work Shifts ........................ D4
Setting the Shift Start (Code Date) ....... D5
Setting the Item Count ......................... D6
Setting a Pallet Count........................... D7
E. Placing Variables in
Messages
Placing the Date ................................. E1
Placing the Expiration Date .................. E2
Placing the Time in a Message............. E3
Placing a Work Shift ........................... E4
Placing an Item Count ........................ E5
Placing a Pallet Count ........................ E6
Using Alternate Characters................... E7
Revision B
Introduction - v
DIAGRAPH USER'S MANUAL
5750210
A
Basics
Printing a Message ..........................................A1
Creating a Text-Only Message .......................A2
Editing a Text-Only Message ..........................A3
Deleting a Message .........................................A4
Viewing System Information ...........................A5
Frequently Asked Questions ...........................A6
Revision B
Section A, Page 1
DIAGRAPH USER'S MANUAL
5750210
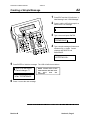
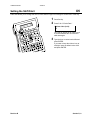
A1
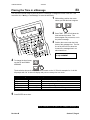
Printing a Message
1
Press PRINT and the LCD will show
“1-Print” and “2-Stop Print”
1-Print
2-Stop Print
2
Press 1 and the LCD will show the
name of the last message printed and
its corresponding text.
Name:DIAGRAPH
DIAGRAPH<
The screen example above shows the
message created at the factory.
3
4
Press ENTER to print.
5
Press 2 to stop printing.
Scroll until the
message to print
appears onscreen.
The print sample below is the default DIAGRAPH message printed with controller default settings.
This feature is a part of sample message G1
Revision B
Section A, Page 2
DIAGRAPH USER'S MANUAL
5750210
A2
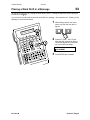
Creating a Simple Message
1
2
Press EDIT and the LCD will show “1New Message” and “2-Edit Message.”
Press 1 and the LCD will prompt for a
name for the new message.
Name:
<
3
Type a name and press ENTER.
Name:
TESTMESSAGE<
4
Type a simple message of letters and
numbers only, no codes. Correct
mistakes with DELETE and
BACKSPACE.
Editing…
123TESTING123<
5
Press ENTER to finish the message. The LCD will offer three choices:
1-Save:TESTMESSAGE
2-Cancel changes: T↓
2-Cancel changes: TE
3-Edit: TESTMESSAGE
6
NOTE: a down arrow on the
LCD indicates that this menu
has
more
than
two
selections.
Press 1 to save the new message.
This feature is a part of sample message G1, G2, g3, g4 and g5.
Revision B
Section A, Page 3
DIAGRAPH USER'S MANUAL
5750210
A3
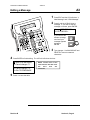
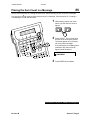
Editing a Message
1
2
Press EDIT and the LCD will show “1New Message” and “2-Edit Message.”
Press 2 and the LCD will show a
message. If you want to edit the
message on-screen, press ENTER.
Name:TESTMESSAGE
123TESTING123<
If you want to edit
another message,
scroll until your
message appears
and press
ENTER.
3
4
Press ENTER to finish editing. The LCD will offer three choices:
1-Save:TESTMESSAGE
2-Cancel changes: T↓
2-Cancel changes: TE
3-Edit: TESTMESSAGE
5
Type changes. Use BACKSPACE and
DELETE to remove unwanted
characters.
NOTE: a down arrow on the
LCD indicates that this menu
has
more
than
two
selections.
Press 1 to save the edits.
This feature is a part of sample message G1, G2, g3, g4 and g5
Revision B
Section A, Page 4
DIAGRAPH USER’S MANUAL
5750210
A4
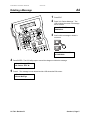
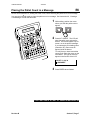
Deleting a Message
1
2
Press EDIT.
Press 3 for “Delete Message.” The
LCD will show the name of a message
and its content.
Name:DIAGRAPH
DIAGRAPH<
3
Scroll until the message to delete is
on-screen.
Name:TEST MESSAGE
12134567890<
4
Press ENTER. The LCD will prompt to cancel the changes or delete the message:
1-Cancel Changes:TE
2-Ok. Delete: TEST M
5
Press 2. The message is now deleted and the LCD shows the Edit screen:
2-Edit Message
3-Delete Message
I.V./700 • Revision B
Section A, Page 5
DIAGRAPH USER’S MANUAL - 5750210
A5
Viewing System Information
1
2
3
4
Menu Selection
1-Unused Messages
2-Date
3-Time
4-Print Speed
5-Item Count
6-Version
7-Support/Supplies
I.V./700 • Revision B
Press INFORMATION.
Scroll up and down to see all choices.
Press ENTER at any menu entry to
see the associated detail. The chart
below left shows all prompts with
explanatory notes.
Press ENTER when done.
Explanation
This selection shows the number or available messages. The I.V./700
can store 99 messages.
This selection shows the date currently set in the system in the year,
month and day format.
This selection shows the time set in the system in hours, minutes and
seconds.
This selection shows the speed recorded by the photosensors during the
last printing session.
This selection shows the number of times the current message has been
printed.
This selection shows the version of firmware in your controller.
This selection displays information on supplies and support for your
I.V./700 printer.
Section A, Page 6
DIAGRAPH USER'S MANUAL
5750210
A6-1
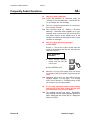
Frequently Asked Questions
Q1 How do I create a message?
Q1a Follow the directions on instruction page A2,
“Creating a Text-Only Message”. See Section G1
for an example of a new message.
Q2
How do I change the parameters of a message I
have already created?
Q2a See instruction page A3, “Editing a Text-Only
Message.” Determine what variables are in your
message such as Item Count (E5) and Date (E1)
and review Section D that explains how to set
variables and Section E that explains how to insert
variables in messages.
Q3
How do I select and print a message?
1 Press PRINT.
2 Press 1. The top line of the LCD will show the
name of the message and line two will show the
message contents.
Name: DIAGRAPH
DIAGRAPH<
3
Scroll through message
names until you find the
one to print.
4 Press ENTER to print.
Q4
What do I do if my print quality does not match
the quality of the print sample supplied with the
unit?
Q4a Determine exactly how your print differs from the
supplied sample. Is it too light? Is it missing
dots? Look in Section H, “Troubleshooting” to find
the solution to your printing problem.
Q5
If I am using sequential numbers while printing
and stop the print, what number will the print
start with when I send it to print again?
Q5a The numbers will start over again. Specifically,
they will begin with the starting number specified in
either “Setting the Item Count (D6)” or “Setting the
Pallet Count (D7)”.
Revision B
Section A, Page 7
DIAGRAPH USER'S MANUAL
5750210
A6-2
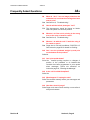
Frequently Asked Questions
Q6
What do I do if I see no image printed on the
substrate but I see that the message has been
sent to print?
Q6a See Section H, “Troubleshooting.”
Q7 How far will the built-in photoeyes "see"?
Q7a The photosensors should be placed no farther
than one-quarter inch from the product.
Q8
What do I do if the unit is printing in the wrong
area on the case or between cases?
Q8a See Section H, “Troubleshooting.”
Q9
What do I do with the unit if I won't be using it
for a week or more?
Q9a Purge the I.V./700 with conditioner, P/N 5750-112.
See instruction page B2 for details on flushing.
Q10 Can I turn the printhead straight up and print
on the bottom of the product?
Q10a No.
Q11 Can I print upside down?
Q11a Yes. Inverted printing requires no changes in
position of the printhead or its bracket—the
controller has been programmed to print upside
down messages. Follow the directions on
instruction page C6, “Rotating the Message”.
Q12 Is the unit Year 2000 Compliant?
Q12a Yes.
Q13 What happens if I unplug the unit?
Q13a The controller memory retains your messages and
parameters.
Q14 How often should I purge?
Q14a Purge at the start of each workday or more often in
dusty environments.
Revision B
Section A, Page 8
DIAGRAPH USER'S MANUAL
5750210
A6-3
Frequently Asked Questions
Q15 Do I have to stop printing to put in a new can of
ink?
Q15a No. There is enough ink in the ink delivery system
to allow continuous printing while you install a new
can of ink.
Q16 If I get lost in a menu, what button should I
press to find my way again?
)is a safe key to press if you
Q16a INFORMATION (
are unsure about editing, printing or working in the
Set-Up menu. Some of the other function keys
such as Date and Time, will not let you out of the
menu until you have entered a value or pressed
ENTER.
Q17 The character I want to print isn’t on the
keyboard.
Q17a All alphabetic and numeric keys on the I.V./700
keypad can display alternate characters when
used with the up and down arrows. The English
vowel set and the consonants C, N and Y have
alternate characters with phonetic marks such as
the umlaut (¨) and the acute accent (´). All
consonant keys provide access to the entire
alphabet in both uppercase and lowercase. The
punctuation keys provide multiple punctuation
marks. Follow the directions on instruction page
E7, “Using Alternate Characters” to create messages
with characters not on the keyboard.
Revision B
Section A, Page 9
DIAGRAPH USER'S MANUAL
5750210
B
Maintenance
Loading Ink.......................................................... B1
Purging All Channels ........................................ B2
Purging Individual Channels ............................. B3
Adjusting Screen Contrast ................................ B4
Resetting Factory Defaults ............................... B5
Revision B
Section B, Page 1
DIAGRAPH USER'S MANUAL
5750210
B1
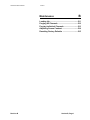
Loading Ink
Do not stop printing when you run low on ink. The I.V./700 has enough ink its delivery system to continue
printing until you install fresh can.
1
2
3
Unscrew the old can and set aside.
Remove the cap from the new can,
invert and screw into the ink
receptacle.
Dispose of the old can in accordance
with state and federal regulations
NOTE: DO NOT SHAKE
THE INK CAN.
Revision B
Section B, Page 2
DIAGRAPH USER'S MANUAL
5750210
B2
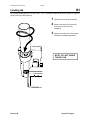
Purging All Channels
Purge the printer at the start of the workday.
1
2
Hold a disposable towel in front of the
printhead.
Press PURGE.
Hold for long purge
Purge 96/100<
The printhead will expel ink for
approximately two seconds.
Continue to press PURGE if you a want
a long purge of ink.
3
Clean the face of the printhead with
water.
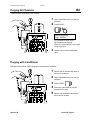
Purging with Conditioner
Extended shutdowns will require purging the printhead with conditioner.
1
2
3
4
5
Revision B
Remove the ink canister and attach a
canister of conditioner.
Hold a disposable towel in front of the
printhead.
Press PURGE.
Continue to press PURGE until the
expelled fluid is clear.
Remove the conditioner canister and
attach the ink canister.
Section B, Page 3
DIAGRAPH USER'S MANUAL
5750210
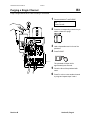
B3
Purging a Single Channel
Purge a single channel when a dot is missing or undersized.
1
Press and hold ALT and PURGE.
Dot: 7
Press i to exit
2
3
4
Press the corresponding numeric key to
select a channel to purge.
Hold a disposable towel in front of the
printhead.
Press PURGE.
The printhead will expel ink for
approximately two seconds.
5
6
Revision B
Clean the face of the printhead with
water.
Press i to exit or enter another channel
to purge and repeat steps 3 and 4.
Section B, Page 4
DIAGRAPH USER'S MANUAL
5750210
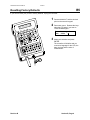
B4
Adjusting the Screen Contrast
You can change the contrast on the LCD by using the UP and DOWN arrows with the ALT key.
1
2
Revision B
Press and hold ALT and the
DOWN arrow. Hold for at least
five seconds. The screen
contrast will gradually dim.
Press and hold ALT and the UP
arrow. Hold for at least five
seconds. The screen contrast
will gradually become sharper.
Section B, Page 5
DIAGRAPH USER'S MANUAL
5750210
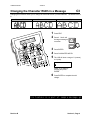
B5
Resetting Factory Defaults
If you want to reset your printer to factory defaults, unplug the controller.
1
2
Press and hold ALT and the decimal
point on the numeric keypad.
Reconnect power. Release the keys
when the LCD asks if you want to
“Erase All Messages?”
Erase all messages?
1-No
2-Yes
:2
3
Revision B
Make your selection and press
ENTER.
The controller will initialize and you
must set a language for the LCD, the
date, the time and the units of
measurement.
Section B, Page 6
USER'S MANUAL
5750210
Print Adjustments
C
Setting an Individual Message Indent....... C1
Setting the Default Message Indent ........ C2
Changing the Character Width in a
Message ...................................................... C3
Setting the Default Character Width ........ C4
Changing the Printed Dot Size ................. C5
Changing the Font in a Single Message ... C6
Changing the Default Font......................... C7
Rotating the Message................................. C8
Adjusting a Single Dot Diameter ............... C9
First Dot Adjustment ............................... C10
Sizing Dots in Columns............................ C11
Revision B
Section C, Page 1
USER'S MANUAL
5750210
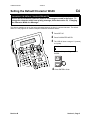
C1
Changing an Individual Message Indent
The message indent is the distance from the leading edge of the product to the starting character of the
message. The system default for message indent is 0.5 inches (12.7 mm).
Using the indent function while editing gives the message an indent value different from the default indent
distance. This feature is useful when printing on products of varying sizes.
1
2
3
4
Press EDIT.
Press 2 and scroll until
the target message is
on-screen.
Press ENTER.
Press INDENT, move the cursor to the
number for change and type in a new
indent value.
Set Message Indent:
001.0 inches
5
Revision B
Press ENTER to finish.
Section C, Page 2
USER'S MANUAL
5750210
C2
Setting the Default Message Indent
CHANGING MESSAGE INDENT The indent distance set in this routine will be the
default indent for all messages created in the future. To change the indent distance
in an existing message, follow Instruction C1, “Setting an Individual Message
Indent”.
The message indent is the distance from the leading edge of a product to the first printed character. For
products moving from right-to-left, the first printed character will be the beginning of the message. For
products moving from left-to-right, the first printed character will be the end of the message.
1
2
3
Press SET-UP.
Press INDENT.
Type in indent value.
Set Message Indent:
001.0 inches
4
Revision B
Press ENTER when done.
Section C, Page 3
USER'S MANUAL
5750210
C3
Changing the Character Width in a Message
Changing the Character allows you to change the horizontal dots in a printed character. The default value is
6.
Character Width 1
Character Width 4
Character Width 6
1
2
3
4
5
Press EDIT.
Press 2. Scroll until
the target message is
on-screen.
Press ENTER.
Press CHARACTER WIDTH.
The LCD will show a range of 1 (narrow)
to 9 (wide).
Set Character Width:
6
Select a new width by
scrolling and press
ENTER.
6
Press ENTER to complete the edit
change.
This feature is a part of sample message g5
Revision B
Section C, Page 4
USER'S MANUAL
5750210
C4
Setting the Default Character Width
CHANGING THE DEFAULT CHARACTER WIDTH The character width set in this
routine will be the default character width for all messages created in the future. To
change the character width in an existing message, follow Instruction C3, “Changing
the Character Width in a Message”.
This feature enables you to set the horizontal space between the dots in a printed character. The default
value is 6. See page C3 for scanned samples of different character widths.
1
2
3
Press SET-UP.
Press CHARACTER WIDTH.
The LCD will show a range of 1 (narrow)
to 9 (wide).
Set Character Width:
6
Select a width by scrolling and press
ENTER.
4
Revision B
Press ENTER to finish.
Section C, Page 5
USER'S MANUAL
5750210
C5
Changing the Printed Dot Size
The I.V./700 allows you to change the diameter of all the dots that form printed characters in a range from
0.05 inch (1.27mm) to 0.10 inch (2.54mm). The default dot size is 4.
1
2
Press SET-UP.
Press DOT SIZE. The LCD will prompt
for a dot diameter:
Dot diameter (1-9):
4
3
Scroll to a new dot
diameter and press
ENTER.
Try sample prints with the new dot
diameter to see if you have improved the
printing. If not, change the dot size and
run more print samples.
The scanned samples following show the differences in printed characters when the dot size is 3, then 4 and
finally 7.
Dot Size 3
Revision B
Dot Size 4
Dot Size 7
Section C, Page 6
USER'S MANUAL
5750210
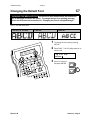
Changing the Font in a Single Message
C6
The I.V./700 has three fonts: 5 dot-tall, single dot(5S); 7 dot-tall, single dot (7S); and 7 dot-tall with double
dots. See scanned samples on Instruction C7.
The routine that follows changes the font in a single message.
1
2
3
4
Press EDIT.
Press 2 and scroll
until the target
message is onscreen.
Press ENTER.
Press FONT. The LCD will prompt for a
font selection.
1:7B 2:7S 3:5S
Set Font: 3
5
6
Revision B
Type the number of the new font and
press ENTER
Press ENTER again to finish the edit.
Section C, Page 7
USER'S MANUAL
5750210
C7
Changing the Default Font
CHANGING THE MESSAGE FONT The font set in this routine will be the default font
for all messages created in the future. To change the font in an existing message,
follow the directions on Instruction C6, “Changing the Font in a Single Message”.
The I.V./700 has three fonts:
7B:Double line characters
7 dots tall (“B” for bold).
7S: Single line characters
7 dots tall
1
2
5S: Single line characters
5 dots tall.
To change the font, start by pressing
SET-UP.
Press FONT. The LCD will prompt you to
select a font.
1:7B 2:7S 3:5S
Set Font: 3
3
Revision B
Scroll to a new font
and press ENTER.
Section C, Page 8
USER'S MANUAL
5750210
C8
Rotating the Message
This function will rotate the printed message 180 degrees, which enables you to print a readable message
that is upside down. Rotated messages allow you to print very close to the bottom of a box if the box is
moving upside down on the conveyor.
Setting the controller for rotated printing requires accessing a menu that is available only after a special
initialization. Start by unplugging the barrel connector from the I.V./700.
1
2
3
Press and hold ALT+INFORMATION.
Plug in the barrel connector.
Release the keys when the LCD shows
“Information”.
Information
1-Unused Messages
4
5
Press SET-UP.
Press M on the QWERTY keypad. The
LCD will prompt for a rotated message.
Rotate Message?
1-No
2-Yes :1
6
7
Revision B
Press 2 to rotate the message.
Press ENTER to finish.
Section C, Page 9
USER'S MANUAL
5750210
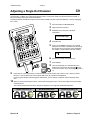
C9
Adjusting a Single Dot Diameter
This function allows you to change the dot diameter of individual dots from top to bottom by altering the stroke, in
microseconds, of a piston in an ink channel. When the dots in a row are too small, they require a dot-size increase. If
they are too large, they require a dot-size decrease.
Changing individual dot diameters requires a menu that is available only after a special initialization. Start by unplugging
the I.V./700.
1
2
3
Press and hold ALT+INFORMATION.
Plug in the barrel connector.
Release the keys when the LCD shows
“Information.”
Information
1-Unused Messages
4
5
Press SET-UP
Press J on the QWERTY keypad. The LCD will
prompt for the number of the dot that is not printing
like the other dots. The top dot on the printhead is
dot number 1 and the bottom dot is dot number 7.
Dot:1
6
7
8
9
10
Scroll to the number of the problem dot.
Press ENTER.
The LCD will prompt for a new diameter of the
selected dot. Move to the second digit (250) and
scroll to a new value. The scroll changes by units of
10.
Press SET-UP. The LCD will ask if you want to keep the “Factory Setting Y/N?” Select “1-NO.” When you select
NO, the I.V./700 remembers the new dot pulse width value only until the next initialization.
By running print samples and altering pulse-width values, you can change a single dot until it matches the other
dots.
When you achieve the best print, select “2-YES” when exiting this function. This choice makes the new pulse width
value permanent.
The scanned samples below show the changes in appearance of a single dot with different diameters.
Dot #4 reduced by 25
Revision B
Dot #4 at preset value
Dot #4 increased by 40
Section C, Page 10
USER'S MANUAL
5750210
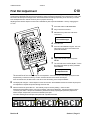
C10
First Dot Adjustment
When the I.V./700 has not printed for several minutes, the first dots printed in a message can be too small. You can
prevent these initial small dots with First Dot Adjustment, which increases the dot sizes only on the first print. Dots in the
second and all subsequent messages return to their defined dot-size settings, depending on the dot-size you choose.
First dot adjustments are made at the factory but may require fine-tuning.
Adjusting the first dot size requires a menu that is available only after a special initialization. Start by unplugging the
I.V./700.
1
2
3
Press and hold ALT+INFORMATION.
Plug in the barrel connector.
Release the keys when the LCD shows
“Information.”
Information
1-Unused Messages
4
5
Press SET-UP
Press K on the QWERTY keypad. The LCD
will prompt for the time in seconds that the
printer will stand idle.”
1st dot time:000 sec
6
Type in the amount of time and press
ENTER.
7
The LCD will show “1st Dot Adjust:1” for the
first valve (dot) at the top of the printhead.
Press ENTER.
1st dot adjust:1
Dot Adjustment:30
The second line of the LCD will prompt for “Dot Adjustment.” If this dot is small in the sample print (see the first
sample below), increase the value by 10 which increases the size of the dot for the first print.
If the dot was full-size, DO NOT enter a new value: leave the existing value and press ENTER
8
9
The display will change to “1st Dot Adjust:2” for the second valve. Press ENTER and the second line will prompt for
“Dot Adjustment.” Repeat this process through all seven dots.
After the seventh dot, press SET-UP. The LCD will prompt for “Factory Setting.” Select “2-YES.”
Wait the time designated in step 5, then print a message. If the print is satisfactory, unplug and replug to set the
I.V./700 in print mode. If the print is unsatisfactory reset the first dot by repeating this procedure (C8) and run
another sample. Repeat until you achieve a satisfactory first print.
The scans following show examples of first prints with a problem fourth dot.
Small fourth dot
Revision B
Fourth dot adjusted correctly
Fourth dot oversized
Section C, Page 11
USER'S MANUAL
5750210
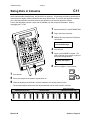
C11
Sizing Dots in Columns
When the I.V./700 prints a single dot, the printing channel has individual access to ink pressure. When all
seven channels print simultaneously, they share the ink pressure. This sharing can produce printed dots in
columns that are slightly smaller in diameter than single printed dots. The column dot adjustment enables
you to eliminate slight size variances between dots printed in rows and dots printed in columns.
Column dot adjustment requires a menu that is available only after a special initialization. Start by
unplugging the I.V./700.
1
2
3
Press and hold ALT and INFORMATION.
Plug in the barrel connector.
Release the keys when the LCD shows
“Information.”
Information
1-Unused Messages
4
5
Press SET-UP
Press I on the QWERTY keypad. The
LCD will prompt for a change in value of
the column dot adjustment:
Column Dot Adjust:
3
6
7
8
9
Scroll to a higher or lower number.
Press ENTER.
Run a print sample at the speed of a production run.
Continue adjusting until the dots in columns match the size of dots printed in rows.
The scanned samples below show the adjustments that can be made to dots in columns.
Dots with column
adjustment set too low
Revision B
Nominal letters
Dots with column
adjustment set too high
Section C, Page 12
USER'S MANUAL
5750210
Setting Message Variables
D
Setting the Date ............................................D1
Setting an Expiration Date ............................D2
Setting the Time ............................................D3
Setting the Work Shifts ................................D4
Setting the Shift Start (Code Date) ..............D5
Setting the Item Count .................................D6
Setting a Pallet Count....................................D7
Revision B
Section D, 1
USER'S MANUAL
5750210
D1
Setting the Date
1
2
3
Press SET-UP.
Press DATE. The LCD will show an entry
screen with a four-place field for year, two
places for the month, and two for the day.
Move the cursor to
the first number in
the year.
YYYY / MM / DD
1999 11 04
4
5
Scroll to the correct
year.
Press ENTER then move the cursor to the second number
in the month field. Scroll to the correct month.
YYYY / MM / DD
2000 11 04
6
Press ENTER then move the cursor to the second
number in the day field. Scroll to the correct day.
YYYY / MM / DD
2000 12 04
7
Press ENTER when done.
This feature is a part of sample messages G2 and g3
Revision B
Section D, 2
USER'S MANUAL
5750210
D2
Setting the Expiration Date
The I.V./700 sets the expiration date for a product by adding a user-defined number of days to the system
date.
1
4
Press SET-UP.
Press 2 and the LCD will prompt for the
number of days to add to the current
system date.
Expiration Days
0000
5
6
Type in the number of days before the
product expires.
Press ENTER to finish.
NOTE: Instruction E2 shows all the various formats
available for an expiration date in a message.
This feature is a part of sample message g3
Revision B
Section D, 3
USER'S MANUAL
5750210
D3
Setting the Time
1
2
Press SET-UP
Press TIME. The LCD will show the
system time by hours (HH), minutes (MM)
and AM or PM.
HH :
06 :
3
5
6
7
8
PM/AM
PM
Move the cursor to the second digit of the
entry.
HH :
06 :
4
MM
22
MM
22
PM/AM
PM
Scroll until the correct time appears.
Press ENTER. The cursor will move to the minute (MM) entry.
Repeat steps 3, 4 and 5 to set the minute entry.
Type AM or PM to set the time before or after 12 noon.
Press ENTER when done.
This feature is a part of sample message g5
Revision B
Section D, 4
USER'S MANUAL
5750210
D4
Setting the Work Shifts
This function enables you to divide the workday into shifts and assign a start time and a name to each shift.
1
2
Press SET-UP.
Press 4 for “4-Work Shifts.” The LCD will
prompt “Set Shifts (1-6).”
Set Shifts (1-6):
Shift: 1
3
4
Type the number of a shift to define and
press ENTER.
The LCD will prompt for a start time from
a 24-hour clock.
Start:
08:00
Scroll to the
starting hour and
press ENTER.
The cursor will
move to minutes.
Scroll to the starting
minutes of the hour.
Press ENTER.
5
The LCD will prompt for the name of the shift.
Shift Name:
A<
Type a name for the shift (1 to 19 alphanumeric characters).
This is the name that will print in your messages. The table
at right shows the default values. Note that if you use less
than three shifts, edit shift 3 by deleting the name “C.”
6
7
Shift
Number
1
2
3
4
5
6
Start
Time
08:00
16:00
00:00
00:00
00:00
00:00
Shift
Name
A
B
C
Repeat steps 2 through 5 to create additional shifts.
Press SET-UP to exit the work shift set-up.
Revision B
Section D, 5
USER'S MANUAL
5750210
D5
Setting the Shift Start
Code Date allows you to change the time for work shifts to begin from midnight to another hour in the day.
1
2
Press Set-Up
Press G for “G-Code Date.”
Rollover Hour (0-23):
00
The LCD will prompt for an entry from 0
to 23 that identifies the hour the work
shifts start again.
3
Revision B
Type the hour to restart work shifts and
press ENTER.
If you want to keep the rollover hour at
midnight, leave the default value of 00
and press ENTER.
Section D, 6
USER'S MANUAL
5750210
D6
Setting the Item Count
Item count enables you to print increasing or decreasing numbers on each item. If the starting number is
smaller than the ending number, the item count will increase with each printed message. If the starting
number is larger than the ending number, the item count will decrease with each printed message. When
the item count reaches the ending number, it will start again with the starting number. You can define starting
and ending values from 0 to 9999999.
The I.V./700 remembers the item count progression whenever printing stops so that the next print run will
start and continue with the previous count. To see the progress of the item count, pallet count or total count,
press COUNT
at any time during the print cycle.
Resetting the item count requires editing the message that includes the item count. Whenever you change
the parameters of item count, you will need to update all messages that contained item count prior to the
change. Update by selecting a message to edit, erasing the old item count and inserting a new one by
pressing COUNT.
If you do not have an item count autocode in your message and you press COUNT, you will see “Item Count”
above a row of Xs. These Xs mean that either no messages with item count have been printed or no
message contains the item count autocode.
1
2
Press SET-UP.
Press 5 for “5-Item Count.” The LCD will
prompt for a starting value.
Start:
0000001
1
4
3
4
2
5
3
5
For "Change" select either 1 or 2 with the arrow keys and
press ENTER. Depending on your selection, the item count will
increase or decrease by 1 or 2 with each print.
6
The LCD will prompt for the inclusion of leading zeros in the printed
item count. Press 2 if you want zeros printed before the number. The
width of the greatest count--which can be either the starting or ending
number--determines the number of printed zeros.
If you want a starting number other than
1, move the cursor to the right and type a
new starting number. Press ENTER.
Move the cursor to the right and type your
ending number. Press ENTER.
End
0001000
Change:
01
Leading Zero?
1-No
2-Yes
:__
If you want no leading zeros, press 1.
This feature is a part of sample message G2.
Revision B
Section D, 7
USER'S MANUAL
5750210
D7
Setting the Pallet Count
Pallet Count enables you to print the same number on several products that all belong on the same pallet.
For example, defining the pallet quantity as 20, causes the I.V./700 to print "1" on the first 20 items for the
first pallet, "2" on the second 20 items and so on.
The I.V./700 remembers the pallet count progression whenever printing stops so that the next print run will
start and continue with the previous count. To see the progress of the item count, pallet count or total count,
press COUNT
at any time during the print cycle.
Resetting the pallet count requires editing the message that includes the pallet count. Whenever you change
the parameters of pallet count, you will need to update all messages that contained pallet count prior to the
change. Update by selecting a message to edit, erasing the old pallet count and inserting a new one by
pressing COUNT.
If you do not have a pallet count autocode in your message and you press COUNT, you will see “Pallet
Count” above a row of Xs. These Xs mean that either no messages with pallet count have been printed or no
message contains the pallet count autocode.
1
2
Press SET-UP.
Press 6. The LCD will prompt for the
number of items per pallet.
Items per Pallet:
0000012
3
4
Move the cursor to the right and type the
number of items for each pallet and press
ENTER.
The LCD will prompt for the starting
number to print on items for the first
pallet.
Start
0000001
Type a number and press ENTER.
5
6
The LCD will prompt for the “End” number, the number to print
on items for the last pallet. Type a number and press ENTER.
The LCD will prompt for the inclusion of leading zeros in the
pallet count. Press 2 if you want zeros printed before the
number. The width of the greatest count--which can be either
the starting or ending number--determines the number of
printed zeros.
If you want no leading zeros, press 1.
End
0000100
Leading Zero?
1-No
2-Yes
:__
This feature is a part of sample message G6.
Revision B
Section D, 8
USER'S MANUAL
5750210
Placing Variables in Messages
E
Placing the Date ........................................ E1
Placing the Expiration Date ....................... E2
Placing the Time in a Message.................. E3
Placing a Work Shift ................................. E4
Placing an Item Count .............................. E5
Placing a Pallet Count .............................. E6
Using Alternate Characters ....................... E7
Revision B
Section E, Page 1
USER'S MANUAL
5750210
Placing the Date in a Message
E1
You must be in the edit mode to place a date in a message or change the format of the date. See
Instruction A2, “Creating a Text Message” to enter the edit mode.
1
While editing, position the cursor
where you want a date to appear.
2 Press DATE. The LCD will show the
date enclosed by braces. The
braces appear only on-screen, not in
the printed message.
3
Position the cursor under the initial
brace of the message date. The first
line of the LCD will now show the
format of the message date in an
abbreviated form.
DD/MM/YY
{ 04 / 07 / 01} SHIPMENT
4
To change the date format,
use the UP and DOWN ARROWS.
The chart below shows all the available date formats on the I.V./700 with examples for July 4, 2001.
Date in Message
{07/04/01}
{JUL}
{A}
{G}
{27}
{185}
{07}
{04}
{JUL}
{01}
{2001}
{04/07/01}
5
Format Prompt
MM/DD/YY
MON-ENGLISH
W/W
M
WW
DDD
MM
DD
MON
YY
YYYY
DD/MM/YY
Explanation
Two digits each for the month / the day / the year.
Month in three letters abbreviated from English
Current week as two alphabets. Week 53 = *
Month in a single letter: Jan is A, Feb is B, and so on.
Current week as two digits.
Day of the year in three digits.
Month in two digits.
Day of the month in two digits.
Month in three letters abbreviated from selected language.
Last two digits of the year.
Year in four digits.
Two digits each for the day / the month / the year.
Press ENTER when done.
This feature is a part of sample message G2
Revision B
Section E, Page 2
USER'S MANUAL
5750210
E2
Placing the Expiration Date in a Message
You must be in the edit mode to place an expiration date in a message or change the format of the
expiration date. See Instruction A2, “Creating a Text Message” to enter the edit mode.
1
2
3
While editing,
position the
cursor where you
want the
expiration date to
appear.
Press ALT+DATE. The LCD will
show the expiration date enclosed
by braces. The braces appear only
on-screen, not in the printed
message.
Position the cursor under the initial
brace of the expiration date. The
first line of the LCD will show the
format of the expiration date in an
abbreviated form.
XDD/MM/YY
{ 04 / 08 / 01} SHIPMENT
4
Scroll to change the
format.
The chart below shows all the available expiration date formats on the I.V./700 with
examples for August 4, 2001.
Date in Message
{04/08/01}
{08/04/01}
{04/AUG/01}
{AUG}
{H}
{216}
{31}
{2001}
{01}
{08}
{AUG}
{04}
{AUG 01]
5
Format Prompt
XDD/MM/YY
XMM/DD/YY
XDD/MON/YY
XMON-ENGLISH
XM
XDDD
XWW
XYYYY
XYY
XMM
XMON
XDD
XMON YY
Explanation
Two digits each for the day / the month / the year.
Two digits each for the month / the day / the year.
Two digits for the day, three letters for the month and two digits for the year.
Month in three letters abbreviated from English
Month in a single letter: Jan is A, Feb is B, and so on.
Day of the year in three digits.
Week as two digits.
Year in four digits.
The last two digits of the year.
Month in two digits.
Month in three letters abbreviated from selected language.
Day of the month in two digits.
Month in three letters and the year in two digits
Press ENTER when done.
INDIVIDUAL EXPIRATION DATES - The expiration date set in this procedure will be the default
expiration date for all future messages. To override this default for a single message, select the
message while in the edit mode. Press ALT+DATE, type a new number and then press ENTER.
This feature is a part of sample message g3
Revision B
Section E, Page 3
USER'S MANUAL
5750210
E3
Placing the Time in a Message
You must be in the edit mode to place the time in a message or change the format of the time. See
Instruction A2, “Creating a Text Message” to enter the edit mode.
1
While editing, position the cursor
where you want the time to appear.
2 Press TIME. The LCD will show the
time enclosed by braces. The
braces appear only on-screen, not in
the printed message.
3
Position the cursor under the initial
brace of the message time. The first
line of the LCD will now show the
format of the message time in an
abbreviated form.
hh:mm
{11:44} SHIPMENT
4
To change the time format,
use the UP and DOWN
ARROWS.
The chart below shows all the available time formats on the I.V./700 with examples for 11:44 AM.
All prompts with “hh” in them will display and print as a twenty-four hour clock.
Time in Message
{11:44}
{1}
{AM}
{44}
{11}
{11:44AM}
{1144}
5
Format Prompt
hh:mm
1:AM/2:PM
AM/PM
mm
hh
hh:mmAM/PM
hhmm
Explanation
Hours and minutes, 2 digits each separated by a colon.
1 = before 12 noon. 2 = after 12 noon.
AM for before 12 noon. PM for after 12 noon.
Minutes only in 2 digits.
The hour only in 2 digits.
Hours and minutes with AM or PM appended.
Hours and minutes with no separation.
Press ENTER when done.
This feature is a part of sample message g5
Revision B
Section E, Page 4
USER'S MANUAL
5750210
E4
Placing a Work Shift in a Message
Review work instruction D4, “Setting the Work Shifts” and D5, “Setting the Shift Start” before placing a
work shift in a message.
You must be in the edit mode to place the work shift in a message. See Instruction A2, “Creating a Text
Message” to enter the edit mode.
1
2
While editing, position the cursor
where you want the work shift to
appear.
Press ALT+TIME. The LCD will
show the shift enclosed by braces.
The braces appear only on-screen,
not in the printed message.
SHIFT
{B} SHIPMENT
3
Revision B
Press ENTER when finished.
Section E, Page 5
USER'S MANUAL
5750210
E5
Placing the Item Count in a Message
Review work instruction D6, “Setting the Item Count” before inserting an item count into a message.
You must be in the edit mode to place the item count in a message. See Instruction A2, “Creating a
Text Message” to enter the edit mode.
1
3
While editing, position the cursor
where you want the item count to
appear.
Press COUNT. The LCD will show
the item count enclosed by braces.
The braces appear only on-screen,
not in the printed message.
If you selected to print leading zeros
(Instruction D6), then zeros will
appear inside the braces.
COUNT 1, 2, 3
{1} SHIPMENT
3
Press ENTER when finished.
This feature is a part of sample message G2
Revision B
Section E, Page 6
USER'S MANUAL
5750210
E6
Placing the Pallet Count in a Message
Review work instruction D7, Setting the Pallet Count, before inserting the pallet count into a message.
You must be in the edit mode to place the pallet count in a message. See Instruction A2, “Creating a
Text Message” to enter the edit mode.
1
2
While editing, position the cursor
where you want the pallet count to
appear.
Press ALT+COUNT. The LCD will
show the pallet count enclosed by
braces. The braces appear only onscreen, not in the printed message.
If you selected to print leading zeros
(Instruction D7), then zeros will
appear inside the braces.
To verify that you have inserted the
correct code, place the cursor on the
initial brace. The type of code will
appear in the first line of the LCD.
PALLET 10, 20, 30
{1} SHIPMENT
3
Press ENTER when finished.
THIS FEATURE IS A PART OF SAMPLE MESSAGE G6
Revision B
Section E, Page 7
USER'S MANUAL
5750210
E7
Using Alternate Characters
All alphabetic and numeric keys on the I.V./700 keypad can display alternate characters when used with
the up and down arrows. The English vowel set and the consonants C, N and Y have alternate
characters with phonetic marks such as the umlaut (¨) and the acute accent (´). All consonant keys
provide access to the entire alphabet in both uppercase and lowercase. The punctuation keys provide
multiple punctuation marks. The instructions that follow explain how to access these characters.
1
While editing or creating a message,
type a letter and then place the
cursor on it.
Editing…
TESTING<
2
Press the up or down arrow and the
LCD will show the alternate
characters.
Editing…
TESTINg<
3
Press the right arrow when the
character or mark you want appears
onscreen.
The graphic below shows only some of the characters available. You can see all the characters by
scrolling through each character onscreen or by reviewing Appendix C of the I.V./700 Technical Manual
(5750-072).
Ä
Å
Ã
Æ
ê
è
é
É
ï
î
ì
í
Ö û
O ù
Õ ú
Ø Ü
e
ë
ê
è
i
ï
î
ì
o
ö
ô
ò
c n
ç ñ
Ç Ñ
>
?
@
A
V
W
X
Y
.
/
Ø
5
6
7
8
? $
/ %
- &
. ‘
C
D
E
F
[
\
]
^
2
3
4
5
:
;
<
=
_ )
! *
? +
# ,
I
a
å
ä
â
u
ü
û
ù
c n
ç ñ
Ç Ñ
This feature is a part of sample message G4 and G5
Revision B
Section E, Page 8
USER'S MANUAL
5750210
System Operation
F
Selecting a Language..................................F1
Setting the Date ...........................................F2
Setting Units of Measure ............................F3
Setting the Print Mode.................................F4
Setting the Message Gap ............................F5
Setting the Box Length ...............................F6
Setting the Print Speed ...............................F7
Setting the Print Direction ..........................F8
Using a Password........................................F9
Using the External Photocell Model.........F10
Revision B
Section F, Page 1
USER'S MANUAL
5750210
F1
Selecting a Language
1
2
3
Press and hold ALT and SPACE.
Plug in the barrel connector.
Release the keys when the LCD
shows “Self Test.”
Self Test
4
Scroll to a language and press
ENTER.
Language Choices:
1. English
2. Español
3. Deutsch
4. Français
5. Italiano
Revision B
Section F, Page 2
USER'S MANUAL
5750210
F2
Setting the Date
During Initialization
1
Press 2 when the LCD asks you to
set the date.
Set Date
1-No
2-Yes
2
:2
Move the cursor to the far right
number in the year.
YYYY / MM / DD
1999 07 / 07
3
4
Scroll to the correct
year.
Press ENTER. The cursor will move
to the Month field. Repeat steps 2
and 3 to alter the month and the day.
While Editing.......................................................................................
1
Press SET-UP.
Set-Up
1-Date
2
3
↓
Press ENTER.
Move the cursor to the far right
number in the year.
YYYY / MM / DD
1999 07 / 07
4
5
Revision B
Scroll to the correct
year.
Press ENTER. The cursor will
move to the Month field. Repeat
steps 3 and 4 to alter the month
and the day.
Section F, Page 3
USER'S MANUAL
5750210
F3
Setting Units of Measure
1
2
3
Press and hold ALT and SPACE.
Plug in the barrel connector.
Release the keys when the LCD
shows “Self Test.”
Self Test
4
5
Select a language, set the date and
set the time (see instruction page
F1).
Press 2 when the LCD prompts for
units of measure.
Select Units
1-No 2-Yes
6
Press 1 for U.S. Customary or 2 for
metric.
1-Inches
Units:1
Revision B
:2
2:Meters
Section F, Page 4
USER'S MANUAL
5750210
F4
Setting the Print Mode
The I.V./700 has two print modes: single and multiple. In Single mode (the default), it prints once on
each item. In Multiple mode, it prints a single message multiple times on one item. Multiple mode is
useful for printing repeated messages on long items such as sheets of wallboard. When you select to
print multiple prints, the I.V./700 will print until stopped by a photosensor signal.
1
2
Press SET-UP.
Press B for Print Mode. The LCD
will prompt for multiple prints.
Print Multiple
1-No 2-Yes
3
4
Revision B
:2
Make your choice and press
ENTER. Either choice returns the
display to the Set-Up menu
If you choose multiple prints, you will
need to define the distance between
prints with Message Gap (see
instruction page F4).
Section F, Page 5
USER'S MANUAL
5750210
F5
Setting the Message Gap
Message Gap defines the distance between the beginning of each messages when printing the same
message repeatedly on the same item.
1
2
Press SET-UP.
Press D for “D-Message Gap.”
Message Gap:
000.4 inches
3
Revision B
Type the distance in inches or
centimeters between messages and
press ENTER.
Section F, Page 6
USER'S MANUAL
5750210
F6
Setting the Box Length
The I.V./700 has the ability to ignore photosensor signals after detecting the box. This feature is useful
when you observe the I.V./700 printing between boxes or more than once per box. Setting an accurate
box length will prevent unwanted prints. Do not set the box length to be longer than the length of the
product: you can miss printing on the next box if it is following too closely.
1
2
Press SET-UP.
Press C for “C-Box Length.” The
display will prompt for distance.
Box Length:
000.2 inches
3
Revision B
Type in the box length in inches or
centimeters
Section F, Page 7
USER'S MANUAL
5750210
F7
Setting the Print Speed
The I.V./700 has the ability to print at a fixed speed while using the photosensors only to detect the
arrival of a product, not to track the direction and speed of the product. Since the motion detection is
off, fixed speed printing requires a fixed direction. Be sure to follow the directions on instruction page F8
to set the print direction. If the direction is not fixed, it is possible that your message will be unreadable.
1
2
Press SET-UP.
Press E for “E-Print Speed.” The
LCD will prompt for a Yes or No to
fixed speed printing.
Fixed Speed (Y/N):
1-No 2-Yes :2
If you select “1-No”, the display will
return to the Set-Up menu. If you
select “2-Yes”, the LCD will ask for
the speed in feet or meters per
minute.
3
Type the speed and press ENTER.
Print Speed:
040.0 ft/min
Follow the directions instructions on
page F8 to set the print direction.
Revision B
Section F, Page 8
USER'S MANUAL
5750210
F8
Setting the Print Direction
The I.V./700 can print in the direction you choose. In normal mode, the photosensors detect the
direction of the product and the controller adjusts the message to print correctly whether printing from
left-to-right or from right-to-left. In fixed speed mode (instruction page F6) the message will still print in
both directions but only one direction is correct: product moving in the other direction will receive a
message printed backwards. To avoid backward printing, the direction of the printing must be fixed as
well as the speed. The default direction is left-to-right.
1
2
Press SET-UP.
Press F for “F-Print Direction.” The
LCD will prompt for a Yes or No to
fixed direction printing.
Fixed Direction (Y/N):
1-No 2-Yes :1
If you select 1-No, the LCD will
return to the Set-Up menu.
3
If you select 2-Yes, the LCD will ask
you to set the print direction:
Fixed Direction
1-:ß 2:à :2
4
Revision B
Select a direction and press ENTER.
Section F, Page 9
USER'S MANUAL
5750210
F9-1
Using a Password
The I.V./700 can operate with password protection and lock out all functions except printing, purging
and access to information.
When password protected, the screen will report "Invalid Password" whenever it receives an incorrect
password. If you make a mistake during password entry, press ENTER and wait. The screen will
refuse your entry, report "Invalid", wait 3 seconds and give you another chance. It will repeat this cycle
until it receives the active password.
Valid passwords contain only alphabetic characters. Passwords CANNOT CONTAIN numbers,
punctuation marks, icon key entries or scrolled (alternate) characters.
Accessing the Password Feature
1
2
Press SET-UP.
Press H. The Password menu offers three choices: 1. Enable; 2. Disable; and 3. Change.
Password
1-Password Enable
Password
3-Change
Password
2-Password Disable
Enabling Password Protection
1
Press 1. The LCD will prompt
"PASSWORD" and show a blank
second line.
Password
______________
2
To enable password protection for
the first time, type DIAGRAPH and
press ENTER.
Password
********________
If you type DIAGRAPH correctly, the
screen will respond with "OK." Your
printer is now protected and will
allow access only to Information,
Print and Purge. All other functions
now require password entry.
Revision B
Section F, Page 10
USER'S MANUAL
5750210
F9-2
Using a Password
To enable password protection after changing to a password other than DIAGRAPH, you must enter the
new password when prompted for "PASSWORD." If you type the new password correctly, the screen
will respond with "OK."
Disabling Password Protection
1
2
Press SET-UP.
Type the current password.
Password
_____________
3
Press H to access the Password
menu.
Password
2-Password Disable
4
Press 2. The LCD will respond
"Disabling Password..."
All functions are now accessible
without password entry.
Revision B
Section F, Page 11
USER'S MANUAL
5750210
F9-3
Using a Password
Changing a Password
NOTE: You can change the password when password protection is disabled. If you do, record the new
password where you can find it easily because when the time comes to enable password protection, the
I.V./700 will no longer accept DIAGRAPH as the password.
Changing When Protection is Disabled
1
2
Press SET-UP.
Press H to access the Password
menu.
Password
1-Password Enable
1
3
6
3
Press 3 to select “Change
Password".
Password
3-Change
4
2
5
6
7
The LCD will respond with "Old
Password" and a blank line. Type
the current password and press
ENTER. If correct, the screen will
respond with "Old Password, OK"
and request "New Password."
Type a new password. Note that no scrolled characters, numbers or punctuation marks will be
accepted.
Press ENTER. The LCD will prompt "Confirm Password."
Type your new password exactly as you typed it before and press ENTER. If you vary your
spelling, the LCD will respond "New Password" and you must redefine the new password. When
you have entered your password successfully two times, the screen will return to the password
menu.
Revision B
Section F, Page 12
USER'S MANUAL
5750210
F9-4
Using a Password
Changing When Protection is Enabled
1
2
Press SET-UP and type the current
password. Press ENTER.
Press H to access the Password
menu.
Password
1-Password Enable
1
3
6
3
Press 3 to select “Change
Password".
Password
3-Change
2
4
The LCD will respond with "Old
Password” and show a blank line.
Old Password
_____________
Type the current password and
press ENTER. If correct, the screen
will respond with "OK" and request
"New Password."
5
6
Type a new password and press ENTER. The screen will prompt "Confirm Password."
Type your new password exactly as you typed it before and press ENTER. When the LCD reports
"OK", you have successfully changed the password.
Revision B
Section F, Page 13
USER'S MANUAL
5750210
F10
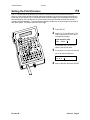
Using the External Photocell Model
These instructions cover the configuration of the I.V./700 with the external photosensor
Setting the controller for the external photosensor requires accessing a menu that is available only after
a special initialization. DO NOT USE THIS MENU option if you are using the standard I.V./700 and its
built-in photosensors. Start by unplugging the I.V./700
1
2
3
Press and hold ALT and
INFORMATION.
Plug in the cannon connector.
Release the keys when the LCD
shows “Information”.
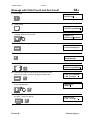
Information
1-Unused Messages
4
5
Press SET-UP.
Press L on the QWERTY keypad.
The LCD will prompt for an external
photocell.
External Photocell?
1-No
2-Yes :1
6
Press 2 and then ENTER. The LCD
will prompt for a fixed print speed.
Print Speed:
040.0 ft/min
7
Type in a print speed and then
ENTER. The LCD will prompt for a
fixed print direction.
Fixed Direction:
1:<--- 2: ---> :2
8
Revision B
Select the print direction and press
ENTER.
Section F, Page 14
USER'S MANUAL
5750210
Sample Messages
G
New Message.............................................. G1
Message with Date and Count................... G2
Message with Expiration Date ................... G3
Message with Alternate Characters .......... G4
Wide Message with Time Mark.................. G5
Message with Count and Pallet ................. G6
Revision B
Section G, Page 1
USER'S MANUAL
5750210
G1
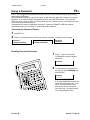
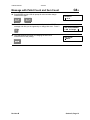
New Message
Message
2000 PRODUCTS IN 2000
Goal
Create a new message on the I.V./700.
Procedures: Pages Naming a message:A2
Adding text to a message: A2
Saving a message: A2, A3
Retrieving a message: A1, A3
1. Press EDIT to select a new message
1-New Message
2-Edit Message
2. Press 1 to start a new message
Name:
<
3. Type 2Y2 to name the message
Name:
2Y2<
4. Press ENTER to access the message editor
Editing…
<
5. Type 2000 PRODUCTS IN 2000.
Use the LEFT and RIGHT ARROW to see the entire message.
Editing…
2000 PRODUCTS IN 200<
6 Press ENTER to complete the message
Editing…
2000 PRODUCTS IN 200<
7. Press 1 to save the message
1-Save: 2Y2
2-Cancel Changes: 2↓<
Revision B
Section G, Page 2
USER'S MANUAL
5750210
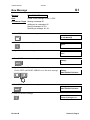
G2-1
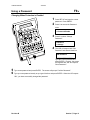
Message with Date and Count
Before starting, follow the directions on instruction pages D1, “Setting the Date”, and D6, “Setting the
Item Count”.
Message
158/2
Goal
Create a message with the current date and the product count.
Tools: Pages
Naming a message:A2
Adding text to a message: A2
Saving a message: A2, A3
Placing the Date: E1
Changing the Date Format: E1
Placing the Item Count: E5
1. Press EDIT to select a new message
1-New Message
2-Edit Message
2. Press 1 to start a new message
Name:
<
3. Type DATECOUNT to name the message. Press ENTER.
DATECOUNT
Name:
DATECOUNT<
4. Press DATE.
Editing
{06/07/99}<<
6. Move the cursor under the first brace.
MM/DD/YY
{06/07/99
7. Scroll until the first line shows DDD, the day in three digits (Julian date).
DDD
{158}
8. Move the cursor to the end of the message.
Editing…
{158}<
Revision B
Section G, Page 3
USER'S MANUAL
5750210
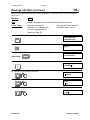
G2-2
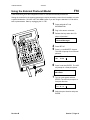
Message with Date and Count
9. Press SLASH.
Editing…
{158}/
10. Press COUNT.
Editing…
{158}/{1}
11. Press ENTER to complete the message
1-Save:DATECOUNT
2-Cancel Changes:D↓
12. Press 1 to save the message.
1-New Message
2-Edit Message
13. Run sample prints to see the count increase in each message.
Revision B
Section G, Page 4
USER'S MANUAL
5750210
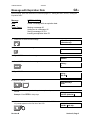
G3-1
Message with Expiration Date
Before starting, follow the directions on instruction pages D1, “Setting the Date”, and D2, “Setting the
Expiration Date.”
Message
USE BY: AUG 99
Goal
Create a message with an expiration date.
Tools: Pages
Naming a message:A2
Adding text to a message: A2
Saving a message: A2, A3
Inserting an expiration date: E2
1. Press EDIT to select a new message
1-New Message
2-Edit Message
2. Press 1 to start a new message
Name:
<
3. Type USEBY to name the message
Name:
USEBY<
4. Press ENTER to access the message editor
Editing…
<
5. Type USE BY:.
Editing…
USE BY:<
6 Press ALT+DATE.
Expiration Days
0000<
7. Type in the number days when the product expires and press
ENTER.
Example: Enter 0030 for thirty days.
6. Move the cursor under the first brace and scroll until the XMON
YY prompt appears on the first line of the LCD.
Revision B
Editing…
USE BY:{08/04/99}<
XMON YY
USE BY:{AUG 99}<
Section G, Page 5
USER'S MANUAL
5750210
Message with Expiration Date
G3-2
11. Press ENTER to complete the message
1-Save:USEBY
2-Cancel Changes: U↓
13. Press 1 to save the message.
1-New Message
2-Edit Message
Revision B
Section G, Page 6
USER'S MANUAL
5750210
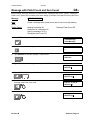
G4-1
Message with Alternate Characters
Message
GRüN BEANS- NT WT 20 lbs
Goal
Create a long message with alternate characters.
Tools: Pages
Naming a message:A2
Adding text to a message: A2
Saving a message: A2, A3
Using alternate characters: E7
1. Press EDIT to select a new message
1-New Message
2-Edit Message
2. Press 1 to start a new message
Name:
<
3. Type GB to name the message
Name:
GB<
4. Press ENTER to access the message editor
Editing…
<
5. Type GRU
Editing…
GRU<
6. Move the cursor under the U and scroll up until the U-umlaut (ü)
character appears.
Editing…
GRü<
7. Move the cursor to the right and type N BEANS:
Editing…
GRüN BEANS:
8. Move the cursor under the colon (:) and scroll up until the hyphen
(-)
appears.
Editing…
GRüN BEANS-
9. Move the cursor to the right and type NT WT 20 LBS
Editing…
BEANS-NT WT 20 LBS
Revision B
Section G, Page 7
USER'S MANUAL
5750210
Message with Alternate Characters
G4-2
10. Move the cursor under the colon the L and scroll down until the
lowercase l appears.
Move the cursor under the B and scroll down until the lowercase b
appears.
Move under the S and scroll down until the lowercase s appears.
Editing…
BEANS-NT WT 20 lbs
11. Press ENTER to complete the message
1-Save:GB
2-Cancel Changes: G↓
12. Press 1 to save the message.
1-New Message
2-Edit Message
Revision B
Section G, Page 8
USER'S MANUAL
5750210
G5
Wide Message with Time Mark
Before starting, review instruction pages D3, “Setting the Time”, and C3, “Adjusting the Character
Width”.
Message
11:44AM
Goal
Create a message with wide characters that tells the time of printing.
Tools: Pages
Naming a message:A2
Adding text to a message: A2
Saving a message: A2, A3
Using alternate characters: E7
Adjusting character widths: C3
1. Press EDIT to select a new message
1-New Message
2-Edit Message
2. Press 1 to start a new message
Name:
<
3. Type WTIME to name the message
Name:
WTIME<
4. Press ENTER to access the message editor
Editing…
<
5. Press TIME.
Editing…
{11:44}<
6. Move the cursor under the first brace ({) and scroll up until hh:mmAM/PM appears in the top line of
the LCD.
hh:mmAM/PM
{11:44AM}<
7. Press CHARACTER WIDTH and scroll down to 6.
Set Character Width
6
8. Press ENTER twice to complete the message
1-Save:WTIME
2-Cancel Changes: W↓
Revision B
Section G, Page 9
USER'S MANUAL
5750210
G6-1
Message with Pallet Count and Item Count
Before starting, follow the directions on instructions D6, “Setting the Item Count”, and D7, “Setting the
Pallet Count”. Select YES for leading zeros when setting up the Item Count and NO for the pallet count.
Message
APPLES 2/0000001
Goal
zeros.
Create a message with a pallet count and an item count with leading
Tools: Pages
Naming a message:A2
Adding text to a message: A2
Saving a message: A2, A3
Placing the Item Count: E5
Placing a Pallet Count: E6
1. Press EDIT to select a new message
1-New Message
2-Edit Message
2. Press 1 to start a new message
Name:
<
3. Type APPLES to name the message. Press ENTER.
Name:
APPLES<
4. Type APPLES for the message text and press SPACE.
Editing…
APPLES <
5. Press ALT + COUNT to insert the Pallet Count.
Editing…
APPLES {1}<
6. Move the cursor to the initial brace to confirm that the code in the
message is the Pallet Count code.
PALLET 10, 20, 30…
APPLES {1}
7. Move the cursor to the end of the message.
Editing…
APPLES {1}<
Revision B
Section G, Page 10
USER'S MANUAL
5750210
G6-2
Message with Pallet Count and Item Count
8. Press SLASH.
Editing…
APPLES {1}/<
9. Press COUNT.
Editing…
APPLES {1}/{0000001}<
10. Move the cursor to the initial brace to confirm that the code in the
message is the Item Count code.
COUNT 1,2,3
APPLES {1}/{0000001}<
10. Press ENTER to complete the message
1-Save:APPLES
2-Cancel Changes:A↓
11. Press 1 to save the message.
1-New Message
2-Edit Message
12. Press PRINT and then 1 to print this message
Name:APPLES
APPLES {1}/{0000001}<
13. Press ENTER and the LCD will show the next count in the
sequence of pallets. Press 2 to change the pallet count
Pallet Count=0000001
1-OK 2-Change :_
2
14. The LCD will prompt for a different pallet count. Move the cursor
to the right and type 2.
Pallet Count
0000002
2
15. Press ENTER and the LCD will prompt for the box number on
the pallet. Press 2 to change.
2
Revision B
Box # 1 of 12
1-OK 2-Change :1
Section G, Page 11
USER'S MANUAL
5750210
G6-3
Message with Pallet Count and Item Count
16. Press ENTER and the LCD will prompt for a box number change.
Press ENTER again.
17. The LCD will show the next item count it will print in the APPLES
message and offer you the opportunity to change that count. Press 2.
2
18. The LCD will show the screen for changing the Item count.
Press ENTER to start printing.
Revision B
Set Box #
01 of 12
Item Count=0000001
1-OK 2-Change :1
Item Count
0000001
Section G, Page 12
USER'S MANUAL
5750210
H
Troubleshooting
Not Printing ................................................. H1
Unsatisfactory Printing .............................. H2
Revision B
Section H, Page 1
USER'S MANUAL
5750210
H1-1
Troubleshooting the I.V./700
Problems with the I.V./700 separate into two areas: either the unit is not printing or the unit is printing
but the results are unsatisfactory.
Not Printing, Questions and Solutions
Q1 The I.V./700 is not printing and the power LED
is not lighted. Why?
S1
The printer does not have power.
following:
[1]
[2]
[3]
[4]
[2]
Check the
The round plug connection at the base of
the controller;
The cable connection at the base of the
power supply;
The round plug for a 15 VDC output;
The cable connection at the rear of the
printhead;
The wall receptacle to make sure that it is
supplying power.
Q2 The I.V./700 is not printing and the photocell
LED is not blinking. Why?
S2
The photosensors can not detect the product.
They can be either too far from the product or
dirty. Clean the photosensors and adjust the
printhead within 0.25 inch of the product.
Q3 The I.V./700 is not printing and the ink LED is
flashing. Why?
S3
The printer is out of ink. Replace the old ink can
with a new can.
Q4 The I.V./700 is not printing but all LED signals
are normal. Why?
S4
The character width setting is too small for the
product line speed. Increase the character width
by following the directions on instruction page
C3.
Q5 The I.V./700 is not printing and ALL the LEDS
are blinking. Why?
S5
Revision B
A short-circuit has occurred. Disconnect the
round plug connector, and the printhead.
Connect the round plug connector, but DO NOT
connect the printhead. If the unit initializes
normally, replace the printhead. If the unit does
not initialize normally, replace the controller. Call
Diagraph support for directions.
Section H, Page 2
USER'S MANUAL
5750210
H1-2
Troubleshooting the I.V./700
Unsatisfactory Print, Questions and Solutions
Q6 The I.V.700 is not printing even though all of
the LED’s are working normally.
S6
Remove the four Phillips screws from the
controller housing and check the cable
connection between the printhead cable and the
controller board.
Q7 All indications are normal but the I.V./700
prints on every other box. Why?
S7
The Photocell Off distance is longer than the
length of the product. Decrease the Photocell Off
distance by following the directions on instruction
page F5.
Q8 The I.V./700 is printing normally but it’s the
wrong message. Why?
S8
The wrong message has been selected to print.
Follow the directions on instruction page A1 and
select another message to print.
Q9 The I.V./700 is printing the correct message
but the message is too far to one side. Why?
S9
The message indent distance is incorrect. Adjust
the distance by following the directions on
instruction pages C1 and C2.
Q10 The I.V./700 is printing normally but the
message is too wide. Why?
S10 The character width is too big or too narrow.
Perform one of the following procedures:
[1] Shorten or widen the character width by
following the directions on instruction page
C3.
[2]
Revision B
Increase or decrease the fixed speed by
following the directions on instruction page
F6.
Section H, Page 3
USER'S MANUAL
5750210
H1-3
Troubleshooting the I.V./700
Q11 The I.V./700 is printing the correct message
but ink dots are missing from some of the
characters. Why?
S11 The faceplate of the printhead is dirty and some
of ink jet orifices are blocked. Clean the
faceplate with water and purge the printhead. If
any of the ink jet orifices remain blocked, then
remove the obstruction using a Broach Kit (1902857).
Q12 The I.V./700 is printing the correct message
but the ink dots are too small. Why?
S12 The dot size is too small. Increase the dot size
by following the directions on instruction page
C4.
Q13 The I.V./700 is printing the correct message
but the characters are out of position and
there are a lot of extra dots. Why?
S13 The printhead is too far from the product. Adjust
the printhead until it is closer to the box. The
faster the box travels the closer the printhead
must be to the box.
Q14 After sitting idle for a few minutes, the dots in
the in the first message are too small when
the I.V./700 starts printing again. Why?
S14 Undersized dots on startup can result from two
adjustments: dot size and print delay. These
variables need to be tested and set at the same
time to achieve a satisfactory solution. Adjust
the size of the first printed dots and the print
delay by following the directions on instruction
page C9.
Q14 I selected fixed speed and now my I.V./700
prints random dots Why?
S14 The I.V./700 print direction is wrong. Change the
print direction by following the directions on
instruction pages F8.
Revision B
Section H, Page 4
USER'S MANUAL
5750210
I
Supplies and Parts
Consumables ................................................I1
Service Parts Kits.........................................I2
Revision B
Section I, Page 1
USER'S MANUAL
5750210
I1
Consumables
Diagraph recommends using only Diagraph manufactured consumables and service parts.
The inks listed below are water-based and SARA-compliant. They ship in 13.5 fl oz (400 ml) canisters.
Supplies can be ordered at 1-800-521-3047. Orders can be faxed to 1-314-770-5707.
Product
I.V./700 Black Ink
I.V./700 Blue Ink
I.V./700 Green Ink
I.V./700 Red Ink
I.V./700 Orange Ink
I.V./700 Yellow Ink
I.V./700 Conditioner
Lint Free Wipes
Broach Refills
Revision B
Diagraph P/N
5750-085
5750-250
5750-251
5750-252
5750-253
5750-254
5750-111
6600-171
1901-563
Package
6/case
6/case
6/case
6/case
6/case
6/case
2/case
300/pkg
12/pkg
Section I, Page 2
USER'S MANUAL
5750210
I2
Service Parts Kits
1
2
3
4
5
6
I.V./700 Printhead
5750-199
I.V./700 Controller
5750-201
I.V./700 Power Supply
5750-113
I.V./700 Tubing Kit
5750-125
I.V./700 English/European Firmware Kit
5750-117
Broach Kit
1902-857
Revision B
Section I, Page 3