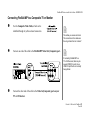
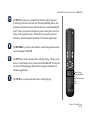
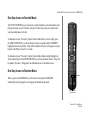
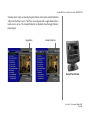
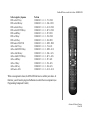
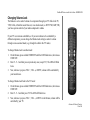
1
Installation
and User’s
Guide
Escient
Manual No. M22002-01A1
Revision 1.1 January, 2003
Copyright ©2003
FIREBALL-MP INSTALLATION & USER ’S GUIDE - M22002-01A1
Table of Contents
Chapter 1 - Introduction --------------------------------------------------------------------------------------------------6
About This Manual .................................................................................................................... 7
Record Your Serial Number....................................................................................................... 7
Copyright .................................................................................................................................. 7
Warranty Information ................................................................................................................. 8
Trademarks & Service Marks ...................................................................................................11
Escient Privacy Policy ............................................................................................................. 12
Cautions & Warnings............................................................................................................... 13
Important Safety Instructions................................................................................................... 14
Manual Disclaimers ................................................................................................................. 16
Limits ....................................................................................................................................... 16
Terms and Definitions.............................................................................................................. 17
Contact Information ................................................................................................................ 19
Chapter 2-Setting Up FireBall-MP----------------------------------------------------------------------------------- 20
Unpack The Equipment........................................................................................................... 21
Unpack The Equipment (continued)........................................................................................ 22
What Else Is Needed............................................................................................................... 23
FireBall-MP Back Panel Reviewed.......................................................................................... 24
Connecting FireBall-MP to a Composite TV or Monitor........................................................... 25
About Connecting Audio ......................................................................................................... 28
Connecting to Ethernet Networks............................................................................................ 29
Connecting to Third Party Control Systems ............................................................................ 30
Connecting an Escient Touch Screen ..................................................................................... 31
Connecting the Power Cord .................................................................................................... 32
FireBall-MP Power States: On, Standby, Off........................................................................... 33
Chapter 3 - Getting Started ------------------------------------------------------------------------------------------- 34
Front Panel Basics .................................................................................................................. 35
2
An extensive index is available in
the back of this manual. If you do
not find what you are looking for
in this Table of Contents, please
check the index.
TABLE OF CONTENTS
PAGE 2
FIREBALL-MP INSTALLATION & USER ’S GUIDE - M22002-01A1
Using the Remote Control ....................................................................................................... 36
Text Entry Via the FireBall-MP Remote Control ...................................................................... 41
What Is The Setup Process?................................................................................................... 44
Using the Remote, Keyboard, or Touch Screen ...................................................................... 45
Overview Of User Interface ..................................................................................................... 46
Chapter 4 - Playing Music --------------------------------------------------------------------------------------------- 51
Accessing Music Mode............................................................................................................ 52
Music Player Screen Overview ............................................................................................... 53
Navigating the Music Player Screen ....................................................................................... 54
Selecting and Listening to a Music Title .................................................................................. 55
Viewing Music by Artist, Title, Cover or Song.......................................................................... 55
One Key Access to Favorite Music.......................................................................................... 56
One Key Access to Random Music ......................................................................................... 56
Chapter 5 - Managing Music ---------------------------------------------------------------------------------------- 57
To Further Organize Your Music.............................................................................................. 58
To Create a New Music Playlist............................................................................................... 59
To Edit a Music Playlist............................................................................................................ 60
To Delete a Music Playlist ....................................................................................................... 61
To Change How Music is Played............................................................................................. 62
To Delete Digital Music on FireBall-MP ................................................................................... 63
To Edit Tracks.......................................................................................................................... 64
To Edit Disc Information .......................................................................................................... 65
To Access “More...” Music Options.......................................................................................... 66
To Create a New Music Group ................................................................................................ 67
To Edit a Music Group ............................................................................................................. 68
To Delete a Music Group......................................................................................................... 69
Chapter 6 - Using iRadio----------------------------------------------------------------------------------------------- 70
Entering iRadio Mode.............................................................................................................. 72
Navigating Among iRadio Stations .......................................................................................... 73
Playing an iRadio Station ........................................................................................................ 73
2
An extensive index is available in
the back of this manual. If you do
not find what you are looking for
in this Table of Contents, please
check the index.
TABLE OF CONTENTS
PAGE 3
FIREBALL-MP INSTALLATION & USER ’S GUIDE - M22002-01A1
Changing iRadio Options ........................................................................................................ 74
To Create a New iRadio Group ............................................................................................... 75
To Edit an iRadio Group .......................................................................................................... 76
To Delete an iRadio Group ...................................................................................................... 77
To Create a New iRadio Station .............................................................................................. 78
To Edit an iRadio Station ......................................................................................................... 79
To Delete an iRadio Station..................................................................................................... 80
Supported iRadio Bitrates ....................................................................................................... 81
Chapter 7 - Customizing FireBall-MP------------------------------------------------------------------------------- 84
Two Ways to Customize FireBall-MP ...................................................................................... 85
To Change Network Settings................................................................................................... 86
To Change Preferences........................................................................................................... 87
To Change Video Settings....................................................................................................... 88
To Change Com Port Settings................................................................................................. 89
To Change Security Settings ................................................................................................... 90
To Access FireBall-MP Utilities ................................................................................................ 92
Chapter 8 - Touch Screen Overview -------------------------------------------------------------------------------- 93
Escient ETP Touch Screen Interaction .................................................................................... 94
Elan VIA! Touch Panel Configuration .................................................................................... 100
Appendix A - Cable Pin-Out Configurations--------------------------------------------------------------------- 101
Pin Configurations for RS-232 Cables to Control Systems ................................................... 102
Appendix B - FireBall-MP Technical Specs --------------------------------------------------------------------- 103
Video Specifications .............................................................................................................. 104
Physical Specifications.......................................................................................................... 104
Audio Specifications .............................................................................................................. 105
Power Usage and Power Supply........................................................................................... 106
3rd Party Certifications .......................................................................................................... 106
FCC Part 15, Subpart B ........................................................................................................ 107
Appendix C - Minor Troubleshooting------------------------------------------------------------------------------ 108
Minor Troubleshooting Tips ................................................................................................... 109
2
An extensive index is available in
the back of this manual. If you do
not find what you are looking for
in this Table of Contents, please
check the index.
TABLE OF CONTENTS
PAGE 4
FIREBALL-MP INSTALLATION & USER ’S GUIDE - M22002-01A1
Appendix D - External Control Protocol ---------------------------------------------------------------------------111
External Control Overview......................................................................................................112
Appendix E - FireBall-MP Internet Connections --------------------------------------------------------------- 130
When Does FireBall-MP Connect To Internet?...................................................................... 131
Appendix F - Enhanced Entertainment Services -------------------------------------------------------------- 132
Enhanced Entertainment Services Using Escient's OpenGlobe Services ............................ 133
Appendix G - Home Networking ----------------------------------------------------------------------------------- 135
What is Home Networking?................................................................................................... 136
Direct Connection to a FireBall Server .................................................................................. 137
Connecting to an Ethernet Network ...................................................................................... 138
Appendix H - Remote Control -------------------------------------------------------------------------------------- 139
Installing Batteries Into Remote ............................................................................................ 140
Programming the Remote ..................................................................................................... 140
Programming TV/VCR Combo .............................................................................................. 141
Searching for Your Code ...................................................................................................... 142
Checking the Codes .............................................................................................................. 143
Re-Assigning Device Keys .................................................................................................... 144
Changing Volume Lock ......................................................................................................... 146
Manufacturer’s IR Codes....................................................................................................... 147
FireBall-MP Manual Index ------------------------------------------------------------------------------------------- 151
2
An extensive index is available in
the back of this manual. If you do
not find what you are looking for
in this Table of Contents, please
check the index.
TABLE OF CONTENTS
PAGE 5
FIREBALL-MP INSTALLATION & USER ’S GUIDE - M22002-01A1
Chapter 1 Introduction
About This Manual
Record Your Serial Number
Copyright
Warranty Information
Trademarks and Service Marks
Escient Privacy Policy
Cautions and Warnings
Important Safety Instructions
Manual Disclaimers
Limits
Terms and Definitions
Contact Information
1
CHAPTER 1 - INTRODUCTION
PAGE 6
FIREBALL-MP INSTALLATION & USER ’S GUIDE - M22002-01A1
About This Manual
This combination installation and user’s manual serves as a step-by-step guide to setting
up the FireBall-MP system developed and shipped by Escient. Chapter 2 shows you
how to set up and connect FireBall-MP to your other equipment, while the rest of the
Chapters show you how to use FireBall-MP for your music enjoyment.
Record Your Serial Number
The serial number for this unit is located at the rear of the device. Please record the
serial number in the space provided below. Refer to it whenever you call upon your
Escient dealer regarding this product.
FireBall-MP Serial No. __________________
Copyright
This manual is the copyrighted property of Escient. Any use or reproduction of this
manual in any form without the expressed written permission of Escient is a violation of
copyright laws. ©2000 - 2003 Escient.
CHAPTER 1 - INTRODUCTION
PAGE 7
FIREBALL-MP INSTALLATION & USER ’S GUIDE - M22002-01A1
Warranty Information
Terms of Coverage - Each Escient branded music management system sold comes with a standard one (1) year
warranty. This warranty provides no-charge coverage under normal product usage, for a period of one year from
the date of registration and/or purchase (whichever is earlier). This warranty program provides the following key
features and benefits:
•
•
•
•
•
•
Twelve (12) months service, parts and labor.
Five (5) day turn around time on all standard in-warranty repairs. No charges to the customer other than
in-bound shipping charges which are determined by the shipping method. All return shipments will be via
Standard Ground Transportation (approximately 5 business days).
Twelve (12) months of regular hour telephone support (9AM to 7PM EST), Monday through Friday.
24-hour email response from the Escient Support Website.
Free software upgrades for a period of twelve (12) months. 24-hour on-line software maintenance updates
provided via a broadband or dial-up telephone connection.
Access to 24-hour music database (CDDB) and entertainment services providing access to over a million CD
titles and associated information.
What is Covered - The goal of this warranty is to cover operational problems that might arise with your product
during normal use. This includes failure to start, improper operation, or intermittent failures. As part of the warranty,
Escient will pay for all labor and materials used in the repair of the system. Escient reserves the right to use new or
factory refurbished parts in the repair of these in-warranty systems.
Escient will also pay for the return shipment of the repaired system via standard ground transportation.
At Escient’s discretion, the Company will repair or replace any system sent in for repair. Upon repair, the product
will be new or like-new in condition and will meet all necessary regulatory requirements.
CHAPTER 1 - INTRODUCTION
PAGE 8
FIREBALL-MP INSTALLATION & USER ’S GUIDE - M22002-01A1
What is Not Covered - Escient products are sold through Escient approved dealers. A number of items must
remain intact in order for Escient to verify and validate this warranty. Additionally, there are several conditions which
violate Escient’s warranty program. These include:
•
•
•
•
•
•
•
The product was not purchased through an approved Escient Dealer.
Any product, on which the serial numbers has been defaced, modified or removed physically or electronically
will not be covered by an Escient warranty.
Escient will not cover under warranty damage to the product as a result of accident, misuse, abuse, neglect,
fire, water, lightning, or other acts of God or nature, improper storage, unauthorized modification, or failure to
follow instructions.
Any type of unauthorized repair or modifications made to the system resulting in damage to the product will
not be covered under this warranty.
Damage caused to the product as a result of improper shipping or installation.
Any problems related to the use of the product which is not a direct problem with the product.
Damage caused to the product as a result of improper installation to third party peripherals or products, or
incorrect connection to peripheral or products.
Additionally, Escient does not cover the following items under the terms or its warranty programs:
•
Installation or removal charges.
•
Cost of initial technical adjustments (setup costs).
•
Battery replacement.
Escient’s sole liability for any defective product is limited to the repair or replacement of the product at our
discretion. Escient shall not be liable for damages to other property caused by defects in this product, damages
based upon inconvenience, loss of use of the product, loss of time or data, commercial loss or any other damages,
whether real, incidental or consequential.
CHAPTER 1 - INTRODUCTION
PAGE 9
FIREBALL-MP INSTALLATION & USER ’S GUIDE - M22002-01A1
How to Return a Product - Contact your dealer or Escient’s Customer Support group at 800-372-4368. Please
have the following information ready for your dealer or Escient’s Customer Support technician.
•
•
•
•
Product Serial Number
Model Number
Date of Registration or Purchase
Place of Purchase
Upon reviewing the request for repair under warranty provisions, Escient’s Technical Support group will issue a
Return Material Authorization (RMA) number. This number is to be attached to the outside of the shipping carton.
Additional instructions will be provided by technical support.
Please be sure to use original packing carton and internal packing materials to assure proper shipment of the
system. Insurance costs are the responsibility of the customer. Most shippers only provide standard coverage for
$100 in cost so please protect yourself by providing additional insurance for the returned product.
Out of Warranty Repair - Escient provides out of warranty repair service on a cost plus labor basis. Minimum
charges will apply. Technical support will provide information on this service at the time of the call.
CHAPTER 1 - INTRODUCTION
PAGE 10
FIREBALL-MP INSTALLATION & USER ’S GUIDE - M22002-01A1
Trademarks & Service Marks
Escient and the Escient logo are registered trademarks of Escient.
FireBall-MP and Physital are trademarks of Escient®.
Other product names mentioned herein are used for identification purposes only and may
be trademarks of their respective companies.
CD-related data from Gracenote CDDB®, copyright ©1999 - 2003 Gracenote. CDDB is
a registered trademark of Gracenote. The Gracenote logo and the Gracenote CDDB logo
are trademarks of Gracenote. Music Recognition Service and MRS are service marks of
Gracenote.
Enhanced entertainment services are provided under the OpenGlobe™ name, by Escient.
These services provide the ability to explore new music, learn about artists and their
influences, purchase new music, movies, and more.
CHAPTER 1 - INTRODUCTION
PAGE 11
FIREBALL-MP INSTALLATION & USER ’S GUIDE - M22002-01A1
Escient Privacy Policy
Escient is committed to providing you with a product that you enjoy and are confident
in using, and are committed to providing services in a private and secure environment.
We recognize and respect each individual user’s privacy and have created this Privacy
Policy to demonstrate our commitment to your privacy.
We want you to be fully informed about the information that we collect, why we collect
it, and with whom we share it.
It is our hope that, after reading this notice, you will understand our commitment to
privacy and be confident that we will use your information responsibly. By using the
Escient FireBall-MP, you are accepting the practices described in this Privacy Policy.
2
The option to read the Escient
Privacy Policy appears on the zip
code screen of the Quick Start
automatic setup procedure.
In addition, you can access the
statement at any time by pressing
the SETUP key and choosing the
option: user information, privacy
policy.
CHAPTER 1 - INTRODUCTION
PAGE 12
FIREBALL-MP INSTALLATION & USER ’S GUIDE - M22002-01A1
Cautions & Warnings
Caution: To reduce the risk of electric shock, do not remove the cover. No user
serviceable parts are inside. Refer servicing to qualified service personnel.
Caution: To prevent electric shock, do not use a 3 wire to 2 wire adapter plug.
A 3 prong outlet is required.
Caution: You are cautioned that any change or modification not expressly approved in
this manual or approved in writing by an authorized representative of Escient could void
your warranty and/or your authority to operate this equipment.
Caution: Prolonged use of any video device which produces a static (non-moving,
non-changing) or repetitive image on your projector, television or plasma display device
can cause “screen burn-in”. You are encouraged to leave the FireBall-MP screen-saver
turned on and set to the lowest possible “time-out” duration.
CHAPTER 1 - INTRODUCTION
PAGE 13
FIREBALL-MP INSTALLATION & USER ’S GUIDE - M22002-01A1
Important Safety Instructions
• Read these instructions.
• Keep these instructions.
• Heed all warnings.
• Follow all instructions.
• Do not use this apparatus near water.
• Clean only with a dry cloth.
• Do not block any ventilation openings.
• Do not install near any heat sources such as radiators, heat registers, stoves, or other
apparatus (including amplifiers) that produce heat.
• Do not defeat the safety purpose of the grounding-type plug. A grounding type plug has
two blades and a third grounding prong. The third prong is provided for your safety. If
the provided plug does not fit into your outlet, consult an electrician for replacement of
the obsolete outlet.
CHAPTER 1 - INTRODUCTION
PAGE 14
FIREBALL-MP INSTALLATION & USER ’S GUIDE - M22002-01A1
• Protect the power cord from being walked on or pinched particularly at plugs,
convenience receptacles, and the point where they exit from the apparatus.
• Only use the attachments/accessories specified by the manufacturer.
• Unplug this apparatus during lightning storms or when unused for long periods of time.
• Servicing is required when the apparatus has been damaged in any way, such as powersupply cord or plug is damaged, liquid has been spilled or objects have fallen into the
apparatus, the apparatus has been exposed to rain or moisture, does
not operate normally, or has been dropped.
• The apparatus shall not be exposed to dripping or splashing and that no objects filled
with liquids, such as vases, shall be placed on the apparatus.
• WARNING To reduce the risk of fire or electric shock, do not expose this apparatus to
rain or moisture.
CHAPTER 1 - INTRODUCTION
PAGE 15
FIREBALL-MP INSTALLATION & USER ’S GUIDE - M22002-01A1
Manual Disclaimers
At the time of printing, the FireBall-MP screen shot images in this manual matched
the FireBall-MP interface screens. However, since FireBall-MP has the capability of
downloading software updates and enhancements on a regular basis, the resulting screen
updates may no longer match the images in this manual. Check the Escient website for
any updates.
Limits
The FireBall-MP system has the following maximum limits:
• Only MP3 tracks are available for streaming to FireBall-MP units.
• Up to 200 tracks can be added to a Playlist
CHAPTER 1 - INTRODUCTION
PAGE 16
FIREBALL-MP INSTALLATION & USER ’S GUIDE - M22002-01A1
Terms and Definitions
Following are terms used throughout this manual.
•
Button - refers to a graphic item on the display screen.
•
Group – a collection of similar music titles. Standard groups are provided (such
as groups based on genre) and custom groups can be created. For example, within
the Music Guide, groups contain a collection of CD’s, recorded CD’s, or custom
Playlists organized automatically by genre or manually by the user.
•
Highlight – highlighting is used to indicate the user’s selection on screen. When the
selection moves up, down, left, or right, the highlight moves to the next nearest item.
No action is taken except that more information may be displayed on the screen,
until the Select key is pressed.
•
Info text area – the portion of the guide screen used to display information about the
highlighted title.
•
Key - refers to one of the buttons on your remote or keyboard.
•
MP3 - a compressed digital audio format. MP3 files are smaller than the original CD
tracks and sound almost identical.
CHAPTER 1 - INTRODUCTION
PAGE 17
FIREBALL-MP INSTALLATION & USER ’S GUIDE - M22002-01A1
•
Playlist – a custom Music title made up of tracks from one or more titles – in effect,
a custom CD.
•
Selected – the result of pressing the PLAY or SELECT key to activate the
highlighted title, track, or program.
•
Source – any one of the primary modes of operation –iRadio or Music.
•
Title – a collection of music tracks.
•
Track – single song from a CD, collection of MP3s, or a Playlist. Tracks are
typically organized into Titles.
•
WAV– an uncompressed audio file format. WAV files are temporarily created before
they are compressed into MP3 files. If you choose the uncompressed bit rate for
your music recording preferences, uncompressed tracks are stored in the WAV
format.
NOTE: FireBall-MP can not stream WAV files from the FireBall-MP server.
CHAPTER 1 - INTRODUCTION
PAGE 18
FIREBALL-MP INSTALLATION & USER ’S GUIDE - M22002-01A1
Contact Information
Escient may be contacted by using the following information. Once you have worked
with your local Escient dealer, we encourage you to contact us if you are in need of any
further assistance.
Escient
6325 Digital Way
Indianapolis, Indiana 46278
Phone: 800-372-4368 Press “2” for Sales, or “3” for Support
Hours: Monday - Friday 9:00am - 7pm EST
Fax: 317-616-6790
www.escient.com
E-mail: [email protected]
2
Please visit the Escient website
at www.escient.com for the
current product updates, technical
information, and document
updates.
The website is also the most
convenient method for accessing
information, 7 days a week, 24
hours a day.
CHAPTER 1 - INTRODUCTION
PAGE 19
FIREBALL-MP INSTALLATION & USER ’S GUIDE - M22002-01A1
Chapter 2-Setting
Up FireBall-MP
Unpack The Equipment
What Else Is Needed
Back Panel Reviewed
Connecting FireBall-MP to a TV or Monitor
Connecting Devices Using the IR Input
Connecting to Ethernet Networks
Connecting to Third Party Control Systems
Connecting to a Multi-Room Controller or Touch Screen
Connecting the Power Cord
FireBall-MP Power States: On, Standby, Off
2
PAGE 20
FIREBALL-MP INSTALLATION & USER ’S GUIDE - M22002-01A1
Unpack The Equipment
u
v
Carefully unpack all of the FireBall-MP equipment from the shipping container.
Next, compare it to the following list and make sure you have everything
available before you get started.
•
•
•
•
•
•
•
•
•
•
FireBall-MP unit packed in plastic bag
Escient 48 button remote control with 2 AA batteries
Detachable A/C Power Cord - 6'
S-Video cable (Y-C) - 5'
Composite Video cable - 5'
Dual RCA cable - 5'
User/Installation Manual
Open Me First Guide
Thank You Card
Ethernet cable - 10'
2
Since no two people are likely to
have the same exact audio or video
configuration, the steps involved in
putting the FireBall-MP system together
are not specific to any one piece of
audio or video equipment. Therefore, it
may be necessary for you to customize
one or more of the cables that are
included with this equipment. Please
see Appendix A for a cable pin-out
configuration guide.
Depending upon the intricacy of the
audio and video equipment and the
access to each component, installation
should take approximately 2-4 hours.
CHAPTER 2 - SETTING UP FIREBALL-MP
PAGE 21
FIREBALL-MP INSTALLATION & USER ’S GUIDE - M22002-01A1
Unpack The Equipment (continued)
w
You must have a FireBall or FireBall E server (available separately) as FireBall
MP contains no music and streams everything from the FireBall server.
Optional items:
•
•
•
•
•
Escient Touch Screen: Model ETP-1000
RS-232 Communication Cables (control systems)
FireBall-MP Rack Mount Kit (available from Middle Atlantic at http://
www.middleatlantic.com or 973-839-1011)
Optical or Coaxial Digital Audio Cable
FireBall Wirless Keyboard
CHAPTER 2 - SETTING UP FIREBALL-MP
PAGE 22
FIREBALL-MP INSTALLATION & USER ’S GUIDE - M22002-01A1
What Else Is Needed
In order for FireBall-MP to function properly, you will need to provide the following
items:
u
A video source such as a television, monitor, VGA projector or touch screen.
v
An A/V receiver or preamp, speakers, and other associated audio equipment.
w
A FireBall or FireBall E Digital Music Manager.
NOTE: FireBall-MP does not store it's own digital music. FireBall-MP streams music
from other remote FireBall Digital Music Managers over an Ethernet network.
CHAPTER 2 - SETTING UP FIREBALL-MP
PAGE 23
FIREBALL-MP INSTALLATION & USER ’S GUIDE - M22002-01A1
FireBall-MP Back Panel Reviewed
Review the back panel of the FireBall-MP unit and the associated cabling.
2
Please note that audio and video
ports on the back panel of the
actual FireBall-MP unit are labeled
and color-coded.
CHAPTER 2 - SETTING UP FIREBALL-MP
PAGE 24
FIREBALL-MP INSTALLATION & USER ’S GUIDE - M22002-01A1
Connecting FireBall-MP to a Composite TV or Monitor
u
Use the Composite Video Cable, which can be
identified through its yellow colored connectors.
2
The cables you receive are black.
The connectors on the cables are
the only portions that are “colored.”
v
Connect one end of the cable to the FireBall-MP Video Out (Composite) port.
2
If connecting FireBall-MP to a
TV or AV Receiver, there may be
several VIDEO IN ports. Use a
VIDEO IN port that is not currently
being utilized.
w
Connect the other end of the cable to the Video In (Composite) port on your
TV or AV Receiver.
CHAPTER 2 - SETTING UP FIREBALL-MP
PAGE 25
FIREBALL-MP INSTALLATION & USER ’S GUIDE - M22002-01A1
Connecting FireBall-MP to an S-Video TV or Monitor
u
Use the S-Video Cable, which can be identified as a
gold cup connector with tiny pins inside.
2
Whenever possible, use the SVideo cable to connect FireBall-MP
to a TV or AV Receiver. S-Video
will provide better image quality
than Composite video.
v
Connect one end of the cable to the FireBall-MP Video Out (S-Video) port.
w
Connect the other end of the cable to the S-Video In port on your TV or AV
Receiver.
CHAPTER 2 - SETTING UP FIREBALL-MP
PAGE 26
FIREBALL-MP INSTALLATION & USER ’S GUIDE - M22002-01A1
Connecting FireBall-MP to a VGA Projector, Monitor or Touch
Screen.
u
Use a VGA cable.
(Not supplied with FireBall-MP.)
v
Connect one end of the cable to the FireBall-MP VGA port.
w
Connect the other end of the cable to the VGA port on your VGA device.
2
If you are connecting to a VGA
Projector or Monitor, you will need
to supply your own VGA cable
(must be less than 25 feet).
The Escient ETP-1000 includes the
proper VGA cable.
CHAPTER 2 - SETTING UP FIREBALL-MP
PAGE 27
FIREBALL-MP INSTALLATION & USER ’S GUIDE - M22002-01A1
About Connecting Audio
FireBall-MP does not contain an amplifier nor does it contain speakers, so it will be
necessary for you to have your FireBall-MP attached to an A/V receiver, TV, or amplified
speakers. Follow your particular manufacturer’s instructions for this hookup procedure.
FireBall-MP is equipped with output ports:
• 1 set of stereo analog audio outputs
• 1 coax digital output
• 1 optical digital output
Connect one of these outputs to your TV, receiver, or powered speakers.
CHAPTER 2 - SETTING UP FIREBALL-MP
PAGE 28
FIREBALL-MP INSTALLATION & USER ’S GUIDE - M22002-01A1
Connecting to Ethernet Networks
FireBall-MP has an Ethernet jack which is used to connect to the FireBall server and to
allow internet access through your Ethernet LAN.
u
Use the Ethernet Cable.
(Can be identified by see-through connectors. This
is the larger of the two cables with see-through
connectors, also known as an RJ-45 cable)
v
Connect one end of the ethernet cable to the FireBall-MP Ethernet jack.
w
Connect the other end of the ethernet cable to an Ethernet network.
CHAPTER 2 - SETTING UP FIREBALL-MP
PAGE 29
FIREBALL-MP INSTALLATION & USER ’S GUIDE - M22002-01A1
Connecting to Third Party Control Systems
Two RS-232 serial ports are available on FireBall-MP. You must use COM 2 to control
FireBall-MP from an external home theater or whole house control system.
FireBall-MP is compatible with AMX and Crestron RS-232 control systems. Additional
equipment may be supported. Please check the Escient website for an updated list of
compatible control systems.*
The RS-232 cable needed to connect FireBall-MP to any of these models is dependent
upon the model’s RS-232 pin configuration, and therefore the cable may have to be
custom-made. In most cases this will be a DB-9 Null Modem Cable (refer to Appendix
A).
u
Find the RS-232 pin configuration for your Control System model in Appendix
A of this manual.
v
Contact a Custom Cable Supplier to make a cable for your particular
configuration.
w
Connect one end of this cable to the COM 2 port.
x
Connect the other end of this cable to the RS-232 communication port on your
Control System.
2
* Control and Audio Distribution
system models that can integrate
with FireBall-MP are updated
periodically and may not be
reflected in this particular manual.
Please consult your Dealer or the
Escient website if you wish to use a
control system not specified in this
manual.
CHAPTER 2 - SETTING UP FIREBALL-MP
PAGE 30
FIREBALL-MP INSTALLATION & USER ’S GUIDE - M22002-01A1
Connecting an Escient Touch Screen
Two RS-232 serial ports are available on FireBall-MP. You must use COM 1 to control
FireBall-MP from the optional Escient ETP-1000 Touch Screen.
Other touch screen systems may be compatible. Please contact your dealer for more
information.
The RS-232 cable needed to connect FireBall-MP to the Escient ETP-1000 touch screen
is included with the touch screen.
u
Connect one end of this cable to COM 1.
v
Connect the other end of this cable to the RS-232 communication port on the
ETP-1000 touch panel.
2
Please consult your Dealer or the
Escient website if you wish to use
a touch screen not specified in this
manual.
See section “To Change Com Port Settings” in Chapter 7 to enable and configure the
touch screen for use.
CHAPTER 2 - SETTING UP FIREBALL-MP
PAGE 31
FIREBALL-MP INSTALLATION & USER ’S GUIDE - M22002-01A1
Connecting the Power Cord
u
Use the Power Cord.
v
Connect one end of power cord to the FireBall-MP AC Port (plug).
Caution: To prevent electric
shock, do not use a 3 wire to 2
wire adapter plug. A 3 prong
outlet is required.
2
w
Connect the other end of the power cord to a 120V electrical outlet.
It is recommended to connect
the power cord to a UPS, surge
supressor, or directly to a wall
outlet. NEVER CONNECT THE
POWER CORD TO A SWITCHED
OUTLET.
CHAPTER 2 - SETTING UP FIREBALL-MP
PAGE 32
FIREBALL-MP INSTALLATION & USER ’S GUIDE - M22002-01A1
FireBall-MP Power States: On, Standby, Off
After the FireBall-MP unit is plugged in, the Standby LED located next to the power
button will flash until the startup process is complete. Please wait. This may take
several minutes.
When the Standby LED is OFF, the FireBall-MP is now in a standby or “sleep” mode.
There is no video output when FireBall-MP is in standby mode. Press the Power button
(on the front panel or on the remote) once and the video output is displayed on your TV.
The unit is now ON.
Please follow the guidelines
regarding Power ON and Power
Standby procedures.
To change from the ON mode back to the standby or “sleep” mode, press the Power
button on the front panel or on the remote once.
FireBall-MP has four power
states:
If power is removed from FireBall-MP for any reason, including a power outage or if the
unit is unplugged, FireBall-MP will automatically return to the Standby state as soon as
power is restored. When FireBall-MP is turned on again, FireBall-MP will return to the
same source mode that it was in when power was lost.
To force the FireBall-MP to restart, PRESS and HOLD the Power button for 4
seconds, and release it when the standby LED starts blinking. When the Standby LED
is off and FireBall-MP has completed its startup process, press the Power button once to
turn on the FireBall-MP.
1.
ON - you will see video
output on your display.
2.
STARTING (flashing LED)
3.
STANDBY or SLEEP - no
video output, the Power
LED is lit constant, powered
but not running.
4.
OFF - unplugged from the
wall.
CHAPTER 2 - SETTING UP FIREBALL-MP
PAGE 33
FIREBALL-MP INSTALLATION & USER ’S GUIDE - M22002-01A1
Chapter 3 - Getting
Started
Front Panel Basics
Using the Remote Control
Text Entry Via the FireBall-MP Remote Control
What Is The Setup Process?
Using the Remote, Keyboard or Touch Screen
Overview of User Interface
3
PAGE 34
FIREBALL-MP INSTALLATION & USER ’S GUIDE - M22002-01A1
Front Panel Basics
The FireBall-MP front panel contains only the power button and IR receiver. You should
use the included wireless IR remote to control your FireBall-MP.
Power
On/Standby
CHAPTER 3 - GETTING STARTED
PAGE 35
FIREBALL-MP INSTALLATION & USER ’S GUIDE - M22002-01A1
Using the Remote Control
The FireBall-MP IR remote is a Universal remote control with capabilities to control
other Escient products, as well as 5 other common home theater sources.
SOURCE KEYS - puts the remote into each of the following modes:
AUX - all others
CBL - cable convertors
DVD - DVD player
TV - Television
FB - FireBall
TB - TuneBase 200
PP - not used
RCV - receivers or stereo tuners (TNR=RCV on remote)
GUIDE - toggles between the Guide and Player screen.
INFO - used to toggle the type of details you see on your screen. For instance, if you’re
in player mode the cover art would be replaced with track times. This is also used to
toggle “select all tracks/select no tracks” under the current title when you are in Delete
Music mode, Transfer to Portable mode, Create/Edit Playlist mode, Create/Edit Group
mode, and in the Record screens.
Power Key
Source
Keys
Mode Key
Setup Key
Option Key
Guide
Key
OpenGlobe
Key
Info
Key
View
Key
POWER - operates on the currently selected source and turns the unit to standby.
MODE - toggles through the different play modes.
SETUP - shows FireBall-MP’s setup menu for making system-wide changes.
FireBall-MP
Navigation
& Control Keys
CHAPTER 3 - GETTING STARTED
PAGE 36
FIREBALL-MP INSTALLATION & USER ’S GUIDE - M22002-01A1
OPTION - brings up the OPTIONS screen for the current Guide or Player.
OPENGLOBE - takes you to the CE-Commerce screens to allow you to browse and
purchase music and movies using your FireBall-MP.
VIEW - toggles the Guide screen Views through Artist, Music, Song, and Cover views.
Navigation Keys - the UP, DOWN, LEFT, and RIGHT ARROW keys are used to
navigate and highlight items, while the SELECT key is used to accept the currently
highlighted item.
Power Key
Source
Keys
Mode Key
Setup Key
Option Key
Guide
Key
OpenGlobe
Key
Info
Key
View
Key
FireBall-MP
Navigation
& Control Keys
CHAPTER 3 - GETTING STARTED
PAGE 37
FIREBALL-MP INSTALLATION & USER ’S GUIDE - M22002-01A1
NUMERIC/TEXT keypad - allows you to enter text and numbers. Both text and
numbers are active at all times unless only numeric data can be accepted at that time. An
on-screen indicator will show you when only numeric data will be accepted. Text entry is
described later in this section.
VOLUME - turns the volume up or down for the current source (See Appendix H.).
CH/PAGE up and down keys are used to page full screens in the Guide or Player.
Numeric/Text
Keypad
TRANSPORT Controls:
The BACKSPACE key operates as a standard Previous Track key when it is
pressed once by starting the current track over. Pressing the key again within
two seconds will skip back to the previous track. Pressing and holding this key
will perform a scan backwards and you will hear the music as it scans back at
high speed. This key is also used as the Backspace key when entering text in a
text box such as on the registration screen. Finally this key can also be used as
the back button when browsing the OpenGlobe CE-Commerce opportunities.
The PLAY key causes the currently highlighted item in the Guide or the Player
to be played. This key is also used to clear all of the text in a text box.
Volume
Control
CH Page
Transport Controls:
Previous Track/Rewind
Play
Next Track/Fast Forward
Stop
Pause
CHAPTER 3 - GETTING STARTED
PAGE 38
FIREBALL-MP INSTALLATION & USER ’S GUIDE - M22002-01A1
The SPACE key operates as a standard Next Track key when it is pressed
by advancing to the start of the next track. Pressing and holding this key will
perform a scan forward and you will hear the music as it scans forwardat high
speed. This key is also used as the Space key when entering text in a text box
such as on the registration screen. Finally this key can also be used as the
Forward key when browsing the OpenGlobe CE-Commerce opportunities.
The RECORD key is used as a Save button to commit changes made on many
screens throughout FireBall-MP.
The STOP key is used to stop music that is currently playing. This key is also
used as a Cancel button or to exit certain screens in FireBall-MP. This key also
acts as the STOP loading pages button when browsing the OpenGlobe CECommerce opportunities.
The PAUSE key is used to pause music that is currently playing.
Transport Controls:
Previous Track/Rewind
Play
Next Track/Fast Forward
Stop
Pause
CHAPTER 3 - GETTING STARTED
PAGE 39
FIREBALL-MP INSTALLATION & USER ’S GUIDE - M22002-01A1
iRADIO - selects Internet Radio as the current mode. The currently available Internet
Radio stations will be displayed.
MUSIC - selects Music as the current mode. The contents of your music collection will be
displayed.
NEXT - skips forward to the next song based on the current play mode.
RANDOM - allows one key access to start playing your music randomly.
ADD TO FAVORITES - adds the currently highlighted song to the special Playlist called
“favorites”.
PLAY FAVORITES - allows one key access to play your favorite music. Plays the “Favorites” Playlist.
Next
Random
iRadio
Music
Add to Favorites
Play Favorites
CHAPTER 3 - GETTING STARTED
PAGE 40
FIREBALL-MP INSTALLATION & USER ’S GUIDE - M22002-01A1
Text Entry Via the FireBall-MP Remote Control
The remote control can be used to enter text in all text fields. This text entry capability
is provided to allow you to fill out short text fields – such as those that occur in the setup
and edit screens. FireBall-MP’s IR keyboard should be used when extended typing is
required.
Entering Numeric Entry Mode
In fields where FireBall-MP expects only numeric characters to be entered (such as
phone number fields), an indicator will appear on the screen that displays the letters
“123” indicating that only numbers can be entered.
Typing Characters with the Remote
The remote control based text entry capability is similar to that provided on standard
telephones and cell phones. Each numeric key has characters associated with it that can
be accessed by pressing the key one or more times. You have .5 seconds after a key is
pressed to enter a second character from the same key. If you press the same key within
.5 seconds, the second character associated with that key replaces the initial character.
If you do not press the same key within .5 seconds, the text cursor moves to the next
location so that the same key can be pressed again to enter a second character.
2
Text entry is always in the Insert
Mode rather than in Overtype
mode.
CHAPTER 3 - GETTING STARTED
PAGE 41
FIREBALL-MP INSTALLATION & USER ’S GUIDE - M22002-01A1
The “2”, “3”, “4”, “5”, “6”, and “8” keys each support three letters and one number and
can be pressed from one to seven times to display upper case, lower case, and numeric
characters. The “7” and “9” keys both support four letters and one number and can be
pressed from one to nine times. The “1” and “0” keys support all of the special characters
and will cycle through each character for every key press.
The text characters follow the same convention used by a standard telephone – except in
the case of the “1” and “0” keys which contain additional characters that are useful for
editing music information.
When entering characters at the beginning of a field or characters that follow a space,
FireBall-MP assumes that upper case characters are preferred. Therefore, characters
are entered in the following cycle – uppercase, lowercase, and numeric. For example,
the first key press enters an uppercase letter corresponding to the first letter associated
with the key. Pressing the “2” key once displays an “A” in the text field, pressing the
“2” key twice displays a “B”, pressing it again will display a “C”. The fourth key press
displays a lower case “a”, the fifth key press displays a lower case “b”, and the sixth key
press displays a lower case “c”. Lastly, pressing the “2” key a seventh time displays the
number “2”.
When entering the second character in a text field or the second character following a
space, FireBall-MP assumes that lower case is preferred and the character entry cycles in
the following pattern – lowercase, uppercase, and numeric.
CHAPTER 3 - GETTING STARTED
PAGE 42
FIREBALL-MP INSTALLATION & USER ’S GUIDE - M22002-01A1
The following text entry table describes the sequence of characters that appear when
specific keys are pressed on the remote:
Numeric Key
1
2
3
4
5
6
7
8
9
0
Alpha-numeric Mode
1st character or
1st character after a space
1. / , ? ‘ : ; &~!
ABCabc2
DEFdef3
GHIghi4
JKLjkl5
MNOmno6
PQRSpqrs7
TUVtuv8
WXYZwxyz9
0@ _ - * # [ ] ( )+=
Alpha-numeric Mode
2nd character or
2nd character after a space
1. / , ? ‘ : ; &~!
abcABC2
defDEF3
ghiGHI4
jklJKL5
mnoMNO6
pqrsPQRS7
tuvTUV8
wxyzWXYZ9
0@ _ - * # [ ] ( )+=
Navigating within a text entry
box using the remote:
• Backspace over text – Backspace key
• Delete text – Play key (clears
all text input in the current Edit
Field)
• Insert a space in text – Space
key
• Cursor left within a text field
– Left arrow key
• Cursor right within a text field
– Right arrow key
To exit a text entry box:
• Press the Enter or Select key
to accept the text and move the
text cursor to the to the next
available text field or to highlight
the next available non-text field.
• Press the up or down cursor key
to move the highlight to the next
available field.
• Press the Record key (if in an
Option screen) to save the text
and exit the screen.
CHAPTER 3 - GETTING STARTED
PAGE 43
FIREBALL-MP INSTALLATION & USER ’S GUIDE - M22002-01A1
What Is The Setup Process?
Setting up a FireBall-MP is very easy once the FireBall Server is connected to an
ethernet network and properly configured.
Upon power on, FireBall-MP will try to automatically locate and connect to a FireBall
server. Please refer to your FireBall’s User’s Guide for instructions on properly
connecting the FireBall Server to an Ethernet network.
If a FireBall server is not located, the FireBall-MP will continue to scan the network until
a server is found. You should check your FireBall server’s power status and Ethernet
connetion. The FireBall-MP and FireBall Server must be on the same Ethernet network.
Note: FireBall-MP can only connect to one FireBall Server at a time.
CHAPTER 3 - GETTING STARTED
PAGE 44
FIREBALL-MP INSTALLATION & USER ’S GUIDE - M22002-01A1
Using the Remote, Keyboard, or Touch Screen
You can navigate through the FireBall-MP menus and screens using the IR remote,
optional wireless keyboard, or optional Escient touch screen.
Each device has its pros and cons and each individual user will undoubtedly have
their favorite access method. It is possible that you may end up using different devices
depending upon what you want to do.
The basics of navigation are:
•
Use the UP, DOWN, LEFT, and RIGHT ARROW keys to maneuver around the
screen to highlight items of interest.
•
Use the SELECT key to accept the highlighted item.
2
In order to use your ETP-1000
Touch Panel, it must be calibrated with the calibration utility
assisible from SETUP->AUDIO,
VIDEO, and COM PORTS->CALIBRATE TOUCH PANEL.
2
For a complete overview of each
access device, please refer to the
Appendices.
CHAPTER 3 - GETTING STARTED
PAGE 45
FIREBALL-MP INSTALLATION & USER ’S GUIDE - M22002-01A1
Overview Of User Interface
The FireBall-MP user interface is very simple and uses three common screens
throughout. The screens operate consistently, regardless of the source. The screens you
will see are Guide Screen, Player screen, and Options Screen.
Guide Screen Overview
Guides contain listings of content that can be selected for listening and assist you in
finding and organizing your library.
Sample Guide Screen
CHAPTER 3 - GETTING STARTED
PAGE 46
FIREBALL-MP INSTALLATION & USER ’S GUIDE - M22002-01A1
Content Icons
In front of each title in the Guide Screen is a content icon that describes the format and
the type of media in the music library. Following are descriptions of all the icons.
A collection of MP3 tracks
A collection of MP3 tracks on a disconnected remote FireBall-MP
An Internet Radio station.
Sample Guide Screen
A collection of songs known as a “playlist”
CHAPTER 3 - GETTING STARTED
PAGE 47
FIREBALL-MP INSTALLATION & USER ’S GUIDE - M22002-01A1
Player Screen
The Player screen is used to listen to audio content and display information about the
currently playing content.
•
The Music Player allows you to listen to a music selection and view the tracks
that are being played, the name of the artist, the title, track times, and a large
image of the album’s cover art.
•
The Radio Player allows you to listen to a selected iRadio station and view the
station information and song information (if available).
Options Screen
The OPTIONS menu for Music and iRadio are similarly configured but the wording is
different. Both of the menus allow you to organize and edit your music content.
CHAPTER 3 - GETTING STARTED
PAGE 48
FIREBALL-MP INSTALLATION & USER ’S GUIDE - M22002-01A1
Title/Track Area Details
•
•
•
•
•
•
•
Each item in the list represents a collection of music known as a "Title" in the Music
Guide or a “Station” in the Internet Radio Guide. Icons are displayed on the left side
of each row to indicate the type of Title or Station.
Each Guide always has one highlighted Title or Station.
The currently highlighted title’s information is displayed in the Info Text Area.
Pressing the SELECT key when a Title is highlighted will expand the Title and
reveal the tracks contained in that Title. Pressing the SELECT key again will
collapse the Title and hide the track names.
Titles are sorted alphabetically according to the current guide view: Cover, Songs,
Titles, and Artists. The guide view can be changed by toggling the MENU/VIEW
button on the remote or keyboard.
Tracks are sorted by the track location on the original CD. On Playlists, tracks are
sorted in the order they were originally selected when creating the Playlist.
Pressing the PLAY key when a Title is highlighted will play the Title. Pressing the
PLAY key when a Track is highlighted will play the track.
Screen Saver
All screens will display a screen saver after 10 minutes of inactivity (no user inputs
received from the remote, keyboard, or front panel). You can change the timing of this
option through the SETUP menu, PREFERENCES option. (10 minutes is the default)
CHAPTER 3 - GETTING STARTED
PAGE 49
FIREBALL-MP INSTALLATION & USER ’S GUIDE - M22002-01A1
Filter Bar Details
If more than 5 groups exist, the Filter Bar displays an arrow pointing right next to the
right most group. This indicates that additional groups are available. When you cursor
past the right most group to access a new group, all of the displayed groups will slide to
the left. An arrow pointing left will be displayed in the left most group.
There are two System groups created automatically: ALL which always exists and
includes all titles and PLAYLISTS which contains custom playlists created by you.
There are 15 groups generated automatically based on genre. These groups are Blues,
Classical, Country, Dance, Easy, Family, Jazz, Latin, New Age, Other, Pop, R&B, Rock,
and Sound Tracks. Each group will only appear if there is at least 1 Title of that genre in
the database.
CHAPTER 3 - GETTING STARTED
PAGE 50
FIREBALL-MP INSTALLATION & USER ’S GUIDE - M22002-01A1
Chapter 4 Playing Music
Accessing Music Mode
Music Player Screen Overview
Navigating the Music Player Screen
Selecting and Listening to a Music Title
Viewing Music by Artist, Title, or Song
One Key Access to Favorite Music
One Key Access to Random Music
4
PAGE 51
FIREBALL-MP INSTALLATION & USER ’S GUIDE - M22002-01A1
Accessing Music Mode
To access Music mode:
1.
Select the MUSIC key. FireBall-MP displays the Music Guide view so that you
can navigate and select an item of choice.
2.
Select the RANDOM key on the remote. FireBall-MP displays the Player
Screen and starts playing the currently selected group in Random Play Mode.
3.
Once you have created a “Favorites” playlist, you can select the PLAY
FAVORITES key to automatically start playing the music on this list.
2
While in Music mode, you can listen to MP3 tracks which are stored
on the FireBall Server's internal
hard drive.
CHAPTER 4 - PLAYING MUSIC
PAGE 52
FIREBALL-MP INSTALLATION & USER ’S GUIDE - M22002-01A1
Music Player Screen Overview
When you select a music title for listening, the screen displayed is the Music Player
screen.
2
When a Playlist is playing, the
cover and artist name from the
currently playing track will be
displayed and the Playlist name will
appear in place of the usual title.
CHAPTER 4 - PLAYING MUSIC
PAGE 53
FIREBALL-MP INSTALLATION & USER ’S GUIDE - M22002-01A1
Navigating the Music Player Screen
•
•
•
ARROW - Use the UP and DOWN keys to move the highlight from one track to
another. The RIGHT and LEFT keys are not used on the Music Player Screen.
SELECT - Pressing this key when a track is highlighted stops playing the selected
track and starts playing the highlighted track. You can also play the track by pressing
the PLAY key.
PAGE UP, PAGE DOWN - These keys are used to scroll the music player track
list one page at a time. Each page can display up to 12 tracks at a time. An arrow
will appear at the bottom of the track list when there are more than 12 tracks in the
current Title.
•
NUMERIC KEYPAD - You can enter a track number using the keypad and then
pressing the ENTER key.
•
INFO - When you press this key, detailed track information is displayed including
track times, current play mode, and the running time for the currently playing track.
•
•
RECORD - Not Available.
•
TRACK NEXT & BACK - These keys are used to skip forward and backward to the
next/previous track. An onscreen status is provided each time the key is pressed.
PLAY, PAUSE, & STOP - These keys are used to play, pause, or stop music. An
onscreen status is provided each time the key is pressed.
CHAPTER 4 - PLAYING MUSIC
PAGE 54
FIREBALL-MP INSTALLATION & USER ’S GUIDE - M22002-01A1
Selecting and Listening to a Music Title
u
Press the MUSIC key and the MUSIC GUIDE screen appears.
v
Use the LEFT and RIGHT ARROW keys to highlight the GROUP of your
choice.
w
Use the UP and DOWN ARROW keys to highlight the music title of your
choice.
x
Press the PLAY key to play the highlighted title. The title, tracks, and cover art
are displayed in the Player screen and the music plays.
Viewing Music by Artist, Title, Cover or Song
u
Press the MUSIC key if you are not in Music Mode.
v
Press the GUIDE key, if you do not see the Music Guide. The MUSIC GUIDE
screen appears.
w
Press the MENU/VIEW key. The screen will toggle through each of the
different Music Guide Views. You'll see your music collection sorted
alphabetically and displayed by Artist Name, Title, Songs or by Cover Art.
CHAPTER 4 - PLAYING MUSIC
PAGE 55
FIREBALL-MP INSTALLATION & USER ’S GUIDE - M22002-01A1
One Key Access to Favorite Music
The PLAY FAVORITES key on the remote or keyboard allows you to immediately start
playing the music in your “Favorites” playlist. No other key presses are required once
you have added music to the list.
To add music to your “Favorites” playlist from the Music Player screen, simply press
the ADD FAVORITES key on the keyboard or remote to quickly add the CURRENT
highlighted track to the playlist. "Song will be added to Favorites" will appear across the
bottom of the Player screen for 3 seconds.
To add music to your “Favorites” playlist from the Music Guide, simply highlight any
Track name and press the ADD FAVORITES key on the keyboard or remote. “Song will
be added to Favorites” will appear in the Information area of the Guide screen.
One Key Access to Random Music
Random
When you press the RANDOM key on the remote or keyboard, FireBall-MP
automatically starts playing the current group in Random Group mode.
Add to Favorites
Play Favorites
CHAPTER 4 - PLAYING MUSIC
PAGE 56
FIREBALL-MP INSTALLATION & USER ’S GUIDE - M22002-01A1
Chapter 5 Managing Music
To Further Organize Your Music
To Create a New Music Playlist
To Edit a Music Playlist
To Delete a Music Playlist
To Change How Music is Played
To Delete Digital Music on FireBall-MP
To Edit Tracks
To Edit Disc Information
To Access “More...” Music Options
To Create a New Music Group
To Edit a Music Group
To Delete a Music Group
5
PAGE 57
FIREBALL-MP INSTALLATION & USER ’S GUIDE - M22002-01A1
To Further Organize Your Music
You can easily manage your music through FireBall-MP’s MUSIC OPTIONS feature.
This set of screens allows you to create and manage Playlists (lists of songs) and Groups,
look up and edit music information, and transfer music to portable players. In addition,
MUSIC OPTIONS also allows you to adjust play modes.
2
“Button” refers to a graphic item
on the display screen.
“Key” refers to the pushdown
mechanisms on your remote or
keyboard.
There are two screens of MUSIC OPTIONS. The first screen appears when you press
the OPTION key while in MUSIC mode. The second screen becomes available after
selecting the “more...” button in the MUSIC OPTIONS panel.
2
Use the ARROW keys to highlight
the desired option and use the
SELECT key to activate the
desired option.
CHAPTER 5 - MANAGING MUSIC
PAGE 58
FIREBALL-MP INSTALLATION & USER ’S GUIDE - M22002-01A1
To Create a New Music Playlist
A Playlist is a collection of specific songs from your music collection.
u
v
Press the MUSIC key.
w
SELECT the new playlist button. A screen displays so that you can enter the
name for the new playlist.
x
y
After you have entered the new name, press SELECT to continue.
z
Press the OPTION key. The OPTION panel appears.
When the playlist name is saved, the screen transitions to the EDIT PLAYLIST
screen where you will select the tracks you want to add to the Playlist from
all the music FireBall-MP knows. Use the ARROW keys to navigate through
the music and highlight your choice. Use the SELECT key to toggle between
including (shows check mark) or not including a track in the current Playlist.
2
If no songs are added to a new
Playlist, it is not saved. Likewise,
if all songs are removed from a
playlist, it is deleted.
Up to 200 songs may be added to
a playlist.
There is no limitation on the
number of playlists you can create.
Press the RECORD key to save the new playlist and exit the OPTION mode.
CHAPTER 5 - MANAGING MUSIC
PAGE 59
FIREBALL-MP INSTALLATION & USER ’S GUIDE - M22002-01A1
To Edit a Music Playlist
u
Press the MUSIC key to show the Music Guide.
v
Use the ARROW keys to highlight the music playlist you want to edit.
w
Press the OPTION key.
x
SELECT the edit playlist button. The EDIT PLAYLIST screen is displayed and
allows you to edit the name of the playlist. You do not have to edit the name of
the playlist in order to modify its members.
y
Press the SELECT key to continue so that you can modify the tracks in the
playlist.
z
Cursor UP and DOWN to highlight the titles. A check mark indicates when a
track is to be included in the playlist. Use the SELECT key to toggle between
including or not including a track.
{
Press the RECORD key to save this playlist and exit the OPTION mode.
2
Use the INFO key when a Title
is highlighted in the Edit Playlist
screen to add/remove all tracks
to/from the playlist.
CHAPTER 5 - MANAGING MUSIC
PAGE 60
FIREBALL-MP INSTALLATION & USER ’S GUIDE - M22002-01A1
To Delete a Music Playlist
u
Press the MUSIC key to show the Music Guide.
v
Use the ARROW keys to highlight the music playlist you want to delete.
w
Press the OPTION key.
x
At the OPTION panel, SELECT the delete playlist button to remove the
currently active playlist. The DELETE PLAYLIST screen displays and shows
the contents of the playlist.
y
Press the RECORD key to delete the playlist and return to the previous Guide
or Player view. A dialog message displays asking for confirmation before the
playlist is deleted.
CHAPTER 5 - MANAGING MUSIC
PAGE 61
FIREBALL-MP INSTALLATION & USER ’S GUIDE - M22002-01A1
To Change How Music is Played
u
v
w
Press the MUSIC key and then press the OPTION key.
At the OPTION panel, SELECT the play mode option button.
Select the option of your choice from the available settings:
•
normal - Start with a selected track and play the entire Title or Playlist to
the end.
•
•
repeat track - Keep playing the current track over and over again.
repeat title - Keep playing the current music Title (MP3, or Playlist) from
start to finish and then start over.
•
repeat group - Keep playing all the music Titles in the current group of
music from start to finish and then start over.
•
random title - Randomly select and play songs from the current Title (MP3,
or Playlist)
•
random group - Randomly select and play songs from the current group of
music.
x
Press the SELECT key to set the selected play mode and return to the previous
screen.
Note: The MODE key on the remote will cycle through each of these modes.
CHAPTER 5 - MANAGING MUSIC
PAGE 62
FIREBALL-MP INSTALLATION & USER ’S GUIDE - M22002-01A1
To Delete Digital Music on FireBall-MP
FireBall-MP uses an internal hard drive to store your digitally recorded music. If you
want to delete music from your FireBall-MP, follow these instructions.
u
Press the MUSIC key to show the Music Guide.
v
Press the OPTION key.
w
At the OPTIONS panel, SELECT the delete music option. The DELETE
MUSIC screen displays an information panel that shows a storage meter
indicating how much storage space has been used, the number of tracks that
have been recorded, as well as how many more tracks and hours of music can
still be recorded to FireBall-MP.
x
Press the SELECT key to advance to the Delete Music Select Guide.
y
Cursor UP and DOWN to highlight the titles and SELECT to expand and
collapse titles. Use the SELECT key on a highlighted track to toggle a check
mark on and off. A check mark indicates when a track is to be deleted.
z
Press the INFO key to select or deselect all tracks on a highlighted title.
{
Press the RECORD key to delete the selected music tracks and exit the
DELETE MUSIC screen.
2
The hours left and tracks left
calculations are based on the
current bit rate setting which is also
shown on the information screen.
2
Use the INFO key when a Title is
highlighted in the Delete Music
Select Guide to select/deselect all
tracks.
CHAPTER 5 - MANAGING MUSIC
PAGE 63
FIREBALL-MP INSTALLATION & USER ’S GUIDE - M22002-01A1
To Edit Tracks
This option allows you to modify the track name for the currently highlighted title.
u
Press the MUSIC key to show the Music Guide.
v
Use the ARROW keys to highlight the title which contains the tracks you want
to edit.
w
Press the OPTION key.
x
At the OPTION panel, SELECT the edit tracks button. The EDIT TRACKS
screen displays.
y
Use the UP and DOWN ARROW keys to highlight the desired track.
z
Enter a new track title/name and press the ENTER key to save the current track
name and advance to the next track. You can press the PLAY key to clear the
current track name.
{
Press the RECORD key to accept the changes.
CHAPTER 5 - MANAGING MUSIC
PAGE 64
FIREBALL-MP INSTALLATION & USER ’S GUIDE - M22002-01A1
To Edit Disc Information
This option allows you to edit the music collection’s information such as artist name,
title, label name, and year of release. Or, you can have FireBall-MP look up the latest
information from Escient's OpenGlobe service.
Edit Disc is also the method to identify the current disc and download it’s cover art.
u
Press the MUSIC key on your remote or keyboard.
v
Press the GUIDE key. The MUSIC GUIDE screen appears.
w
Use the ARROW keys to highlight the disc you want to edit.
x
Press the OPTION key.
y
At the OPTION panel, SELECT the edit disc button. The EDIT DISC INFO
screen displays.
z
Use the ARROW keys to move to the text field of your choice and edit the field.
CHAPTER 5 - MANAGING MUSIC
PAGE 65
FIREBALL-MP INSTALLATION & USER ’S GUIDE - M22002-01A1
To Access “More...” Music Options
There are two screens of MUSIC OPTIONS. The first screen appears when you press
the MUSIC key followed by the OPTION key.
2
“Button” refers to a graphic item
on the display screen.
“Key” refers to the pushdown
mechanisms on your remote or
keyboard.
The second screen becomes available after SELECTING the “more...” button in the
original MUSIC OPTIONS screen.
2
Use the ARROW keys to highlight
the desired option and use the
SELECT key to activate the desired
option.
CHAPTER 5 - MANAGING MUSIC
PAGE 66
FIREBALL-MP INSTALLATION & USER ’S GUIDE - M22002-01A1
To Create a New Music Group
A group is a collection of content that classifies your music titles to make them easier
to find. Genre groups such as Jazz, and Country are automatically generated depending
upon the current music in your collection. The groups you create can be named whatever
you want (i.e., My Favorites, Party Mix, Classics, etc...).
u
Press the MUSIC key, and then press the OPTION key. Use the ARROW keys to
highlight the more... button and press the SELECT key.
v
At the MORE MUSIC OPTIONS panel, SELECT the new group button. A
screen displays so that you can enter the name for the new group.
w
After you have entered the new name, press SELECT to continue.
x
When the group name is saved, the screen transitions to the EDIT MUSIC
GROUP screen where you will select titles to be included in the new group.
Cursor UP and DOWN to highlight the titles. A check mark indicates when
a title is to be included in the group. Use the SELECT key to toggle between
including or not including a title.
y
Press the RECORD key to save the new group and exit the OPTION mode.
2
Music can reside in more than one
group. For example, the same
music could exist in the groups: All,
Rock, Favorites, and Mine.
CHAPTER 5 - MANAGING MUSIC
PAGE 67
FIREBALL-MP INSTALLATION & USER ’S GUIDE - M22002-01A1
To Edit a Music Group
u
Press the MUSIC key to show the Music Guide.
v
Use the RIGHT and LEFT ARROW keys to highlight the group you want to
edit.
w
Press the OPTION key. Use the ARROW keys to highlight the more... button
and press the SELECT key.
x
At the MORE MUSIC OPTIONS panel, SELECT the edit group button. The
EDIT GROUP screen displays which allows you to edit the name of the group.
You do not have to edit the name of the group in order to modify the members
of the group.
y
Press the SELECT key to continue so that you can modify the titles in the group
when the EDIT MUSIC GROUP screen displays.
z
Cursor UP and DOWN to highlight the titles. A check mark indicates when
a title is to be included in the group. Use the SELECT key to toggle between
including or not including a title.
{
Press the RECORD key to save this group and return to the Guide.
CHAPTER 5 - MANAGING MUSIC
PAGE 68
FIREBALL-MP INSTALLATION & USER ’S GUIDE - M22002-01A1
To Delete a Music Group
u
Press the MUSIC key to show the Music Guide.
v
Use the RIGHT and LEFT ARROW keys to highlight the group you want to
delete.
w
Press the OPTION key. Use the ARROW keys to highlight the more... button
and press the SELECT key.
x
At the MORE MUSIC OPTIONS panel, SELECT the delete group button to
remove the currently active group. The DELETE GROUP screen displays and
shows the contents of the group.
y
Press the RECORD key to delete the group. A dialog message displays asking
for confirmation before the group is deleted.
CHAPTER 5 - MANAGING MUSIC
PAGE 69
FIREBALL-MP INSTALLATION & USER ’S GUIDE - M22002-01A1
Chapter 6 - Using
iRadio
Important Note for Playing iRadio Stations
Entering iRadio Mode
Reviewing the iRadio Guide
Navigating Among iRadio Stations
Playing an iRadio Station
Changing iRadio Options
To Create a New iRadio Group
To Edit an iRadio Group
To Delete an iRadio Group
To Tune Stations
To Create a New iRadio Station
To Edit an iRadio Station
To Delete an iRadio Station
Supported iRadio Bitrates
67
PAGE 70
FIREBALL-MP INSTALLATION & USER ’S GUIDE - M22002-01A1
Important Note for Playing iRadio Stations
In order for your FireBall-MP to play Internet Radio stations, it must be connected to an
Ethernet network which is routed to the Internet. Broadband Internet connections (DSL,
Cable Modem, ISDN, T1, etc...) using an Internet “router”or “gateway”will provide the
best iRadio sound quality and user experience.
If your FireBall server is connecting to the Internet using it's built-in modem on a dialup
ISP account, you will NOT be able to use the iRadio feature. This is due to the fact that
the FireBall server is not a “router”and can not transfer iRadio streams to FireBall-MP
clients.
Please refer to the Home Networking Chapters in this manual for more information on
properly configuring your Ethernet network.
PAGE 71
FIREBALL-MP INSTALLATION & USER ’S GUIDE - M22002-01A1
Entering iRadio Mode
Select the iRADIO key. FireBall-MP displays the Radio Guide view so that you can
navigate and select an Internet Radio station to play.
Guide Screen Overview
Guides contain listings of content that can be selected for listening and assist you in
finding and organizing your Internet radio stations.
CHAPTER 6- USING IRADIO
PAGE 72
FIREBALL-MP INSTALLATION & USER ’S GUIDE - M22002-01A1
Navigating Among iRadio Stations
Use the UP and DOWN ARROW keys to move from one station to another. Use the
RIGHT and LEFT ARROW keys to move between the groups in the Filter bar.
To change the stations in the guide one page at a time, use the PAGE UP and PAGE
DOWN keys.
Playing an iRadio Station
To play a specific station, press SELECT (or PLAY) when that station is highlighted. The
iRadio Player screen is displayed.
2
To maximize the enjoyment
of this feature, a Broadband
connection is required to avoid
the “buffering and popping”
experience associated with a
slower connection. However,
even a Broadband connection
has factors (such as the number
of users on the system or server
capability) that may adversely affect your listening experience.
In the Player screen, to advance to the next or previous station without returning to the
Radio Guide, use the PAGE UP and PAGE DOWN keys. The STOP key will stop the
Internet Radio stream from playing. Pause will NOT pause the stream.
CHAPTER 6- USING IRADIO
PAGE 73
FIREBALL-MP INSTALLATION & USER ’S GUIDE - M22002-01A1
Changing iRadio Options
Press the OPTION key while in iRadio mode for the iRadio OPTIONS menu to appear.
This screen allows you to organize and access content based on stations and groups.
iRadio options are organized much like music options. In other words, after you select a
specific option, sometimes a second or third screen is provided to refine your request.
The term GROUPS on the iRadio option screen refers to a collection of stations that are
organized together so that you can easily find your favorite stations. Some groups are
created automatically while others are created by you. The ALL groups contains all of
the Internet Radio stations. Genre based groups are automatically setup for new stations
as they are updated by Escient.
CHAPTER 6- USING IRADIO
PAGE 74
FIREBALL-MP INSTALLATION & USER ’S GUIDE - M22002-01A1
To Create a New iRadio Group
A group is a collection of content that classifies your stations to make them easier to find.
Genre groups such as Jazz, and Country are automatically generated depending upon the
current iRadio stations in your collection. The groups you create can be named whatever
you want (i.e., My Favorites, Stuff, Talk).
u
Press the iRADIO key on your remote or keyboard, and then press the OPTION
key. Use the ARROW keys to highlight the new group button on the displayed
panel and press the SELECT key.
v
A screen displays so that you can enter the name for the new group.
w
After you have entered the new name, press SELECT to continue.
x
When the group name is saved, the screen transitions to the EDIT RADIO
GROUP screen where you will select stations to be included in the new group.
Cursor UP and DOWN to highlight the stations. A check mark indicates when
a station is to be included in the group. Use the SELECT key to toggle between
including or not including a station.
y
Press the RECORD key to save the new group and exit the OPTION mode.
CHAPTER 6- USING IRADIO
PAGE 75
FIREBALL-MP INSTALLATION & USER ’S GUIDE - M22002-01A1
To Edit an iRadio Group
u
Press the iRADIO key to show the Radio Guide.
v
Use the RIGHT and LEFT ARROW keys to highlight the group you want to
edit.
w
Press the OPTION key. Use the ARROW keys to highlight the edit group
button on the displayed panel and press the SELECT key.
x
The EDIT GROUP screen displays which allows you to edit the name of the
group. You do not have to edit the name of the group in order to modify the
members of the group.
y
Press the SELECT key to continue so that you can modify the stations in the
group when the EDIT RADIO GROUP screen displays.
z
Cursor UP and DOWN to highlight the stations. A check mark indicates when
a station is to be included in the group. Use the SELECT key to toggle between
including or not including a station.
{
Press the RECORD key to save this group and return to the Guide.
CHAPTER 6- USING IRADIO
PAGE 76
FIREBALL-MP INSTALLATION & USER ’S GUIDE - M22002-01A1
To Delete an iRadio Group
u
Press the iRADIO key to show the Radio Guide.
v
Use the RIGHT and LEFT ARROW keys to highlight the group you want to
delete.
w
Press the OPTION key. Use the ARROW keys to highlight the delete group
button on the displayed panel and press the SELECT key.
x
The DELETE GROUP screen displays and shows the stations in the selected
group.
y
A dialog message displays asking for confirmation before the group is deleted.
Press the RECORD key to delete the group.
2
delete group does not remove
any of the underlying stations
which remain available in the “ALL”
group.
CHAPTER 6- USING IRADIO
PAGE 77
FIREBALL-MP INSTALLATION & USER ’S GUIDE - M22002-01A1
To Create a New iRadio Station
An iRadio station is an Internet link or “URL”to a radio stream. Creating a new iRadio
station means manually entering a link to a known Internet Radio Stream. FireBall-MP
can stream WMA V2, V7, and V8 formats, up to 192kbps.
u
Press the iRADIO key on your remote or keyboard, and then press the OPTION
key. Use the ARROW keys to highlight the new station button on the displayed
panel and press the SELECT key.
v
A screen displays so that you can enter the name, location, URL, speed, genre,
and channels. (The cover art is selected based on the genre.) Enter the radio
station stream's internet address into the URL field. For example: "http://
www.streamaudio.com/stations/WXYZ.asf"
w
After you have entered the new information, press RECORD to save the new
station and return to the Radio Guide.
x
To play the new station, highlight the station name in the Radio Guide, then
press the PLAY key. If the URL is correct and the sever is up and running, you
should hear the station playing in a few moments. If there is a problem with the
stream, you will see the "Station Not Available" message.
2
If you are entering a URL for a
new station, make sure it uses
a WMA Internet radio stream.
New stations can be found
on Internet sites such as
www.radio-locator.com
CHAPTER 6- USING IRADIO
PAGE 78
FIREBALL-MP INSTALLATION & USER ’S GUIDE - M22002-01A1
To Edit an iRadio Station
u
Press the iRADIO key to show the Radio Guide.
v
Use the ARROW keys to highlight the station you want to edit.
w
Press the OPTION key. Use the ARROW keys to highlight the edit station
button on the displayed panel and press the SELECT key.
x
The EDIT INTERNET STATION screen displays which allows you to edit the
information for the station.
y
Press the RECORD key to save this station and return to the Guide.
CHAPTER 6- USING IRADIO
PAGE 79
FIREBALL-MP INSTALLATION & USER ’S GUIDE - M22002-01A1
To Delete an iRadio Station
u
Press the iRADIO key to show the Radio Guide.
v
Use the ARROW keys to highlight the station you want to delete.
w
Press the OPTION key. Use the ARROW keys to highlight the delete station
button on the displayed panel and press the SELECT key.
x
The DELETE RADIO STATION screen displays and shows the station’s name.
y
Press the RECORD key to delete the station.
z
A dialog message displays asking for confirmation before the station is deleted.
Highlight the delete button and press the SELECT key to delete the station.
CHAPTER 6- USING IRADIO
PAGE 80
FIREBALL-MP INSTALLATION & USER ’S GUIDE - M22002-01A1
Supported iRadio Bitrates
FireBall-MP supports the following iRadio bitrates and sampling frequencies:
WMA-Audio V2, V7 and V8
12Kbps
Sampling
Frequency
8KHz
8KHz
8KHz
11.025KHz
11.025KHz
16KHz
16KHz
8KHz
16Kbps
16KHz
22.05KHz
Bitrate
5Kbps
6Kbps
8Kbps
10Kbps
Stereo/
Mono
Mono
Mono
Mono
Mono
Mono
Mono
Mono
Stereo
Mono
Stereo
Mono
CHAPTER 6- USING IRADIO
PAGE 81
FIREBALL-MP INSTALLATION & USER ’S GUIDE - M22002-01A1
16KHz
20Kbps
22Kbps
22.05KHz
32KHz
22.05KHz
32KHz
22.05KHz
32KHz
32Kbps
36kbps
40Kbps
44kbps
44.1KHz
32KHz
32KHz
32 Khz
32KHz
48Kbps
44.1KHz
Stereo
Mono
Stereo
Mono
Stereo
Stereo
Stereo
Stereo
Mono
Stereo
Stereo
Stereo
Stereo
Stereo
Mono
Stereo
CHAPTER 6- USING IRADIO
PAGE 82
FIREBALL-MP INSTALLATION & USER ’S GUIDE - M22002-01A1
64Kbps
80Kbps
96Kbps
128Kbps
160Kbps
192Kbps
32 Khz
44.1KHz
44.1KHz
44.1KHz
44.1KHz
48KHz
44.1KHz
48KHz
44.1KHz
48KHz
Stereo
Stereo
Stereo
Stereo
Stereo
Stereo
Stereo
Stereo
Stereo
Stereo
CHAPTER 6- USING IRADIO
PAGE 83
FIREBALL-MP INSTALLATION & USER ’S GUIDE - M22002-01A1
Chapter 7 Customizing
FireBall-MP
Two Ways to Customize FireBall-MP
To Change Network Settings
To Change Preferences
To Change Video Settings
To Change COM Port Settings
To Change Security Settings
To Access FireBall-MP Utilities
7
PAGE 84
FIREBALL-MP INSTALLATION & USER ’S GUIDE - M22002-01A1
Two Ways to Customize FireBall-MP
There are two methods of customizing FireBall-MP: through the OPTIONS menu or
through the SETUP Menu. The OPTIONS menu is used to customize features which
need frequent changing during the normal operation of the system, while the SETUP
menu provides access to general user preferences.
Use the OPTIONS menu for:
•
•
Organizing access to content - managing groups, managing play lists, editing
music information, deleting music, and looking up music information.
Adjusting player controls - play modes (random, repeat, etc.)
Use the SETUP Menu to change:
•
•
•
•
•
•
2
The OPTIONS menu is discussed
in Chapter 6: Managing Music.
network settings
preferences
video
com ports
security
utilities
These menus will be covered in this chapter.
CHAPTER 7 - CUSTOMIZING FIREBALL-MP
PAGE 85
FIREBALL-MP INSTALLATION & USER ’S GUIDE - M22002-01A1
To Change Network Settings
u
Press the SETUP key on the remote control or keyboard. The FireBall-MP
SETUP main menu displays.
v
w
Select the menu item internet configuration. The menu displays.
Select the sub-menu item you want to modify and follow the instructions on the
screen.
ethernet settings - The Ethernet network can be configured Dynamically or
Manually. Contact your system Administrator or ISP of you need help with these
settings.
server connection - This option allows you to select which FireBall Server to
connect to. Only 1 FireBall server connection is allowed at one time, for each
FireBall-MP.
x
Exit SETUP by selecting the EXIT menu item located at the bottom of the main
menu, or by pressing the SETUP key when on the main menu or any sub-menu.
2
If you backspace at any point while
in the password box, the entire
password is erased.
CHAPTER 7 - CUSTOMIZING FIREBALL-MP
PAGE 86
FIREBALL-MP INSTALLATION & USER ’S GUIDE - M22002-01A1
To Change Preferences
u
Press the SETUP key on the remote control or keyboard. The SETUP main
menu displays.
v
Select the menu item preferences. The menu displays.
w
Select the sub-menu item you want to modify and follow the instructions on the
screen.
screen saver preferences - Specifies the number of minutes of inactivity
allowed before the screen saver is activated and the screen saver mode. The
default setting is 10 minutes. Selections you may choose from are 5, 10, 15, 30,
or 60 minutes.
x
Exit SETUP by selecting the EXIT menu item located at the bottom of the main
menu, or by pressing the SETUP key when on the main menu or any sub-menu.
CHAPTER 7 - CUSTOMIZING FIREBALL-MP
PAGE 87
FIREBALL-MP INSTALLATION & USER ’S GUIDE - M22002-01A1
To Change Video Settings
u
Press the SETUP key on the remote control or keyboard. The SETUP main
menu displays.
v
w
Select the menu item video settings. The menu displays.
x
Exit SETUP by selecting the EXIT menu item located at the bottom of the main
menu, or by pressing the SETUP key when on the main menu or any sub-menu.
Select the sub-menu item you want to modify and follow the instructions on the
screen.
screen centering - Adjusts the horizontal placement of the FireBall-MP screen
so that the generated computer image is centered horizontally on your TV.
brightness - Use the brightness controls of your TV for optimum viewing.
contrast - Use your display’s contrast controls to help reduce video “blooming”
while creating a clearer, more readable interface.
sharpness - Sets the sharpness or detail control of your TV so that onscreen
text is as readable as possible.
color bars - Displays the SMPTE color bars. You may use this screen to test
the display for color and tint accuracy.
CHAPTER 7 - CUSTOMIZING FIREBALL-MP
PAGE 88
FIREBALL-MP INSTALLATION & USER ’S GUIDE - M22002-01A1
To Change Com Port Settings
u
Press the SETUP key on the remote control or keyboard. The SETUP main
menu displays.
v
w
Select the menu item com ports. The menu displays.
x
Exit SETUP by selecting the EXIT menu item located at the bottom of the main
menu, or by pressing the SETUP key when on the main menu or any sub-menu.
Select the sub-menu item you want to modify and follow the instructions on the
screen.
com port settings - During the Quick Start setup, touchscreens attached to
the communication ports were automatically detected. If you attach additional
equipment use this screen to indicate which of the 2 com ports are used by an
optional touch panel, external control system, or Elan system.
calibrate touch panel - Allows an attached ETP-1000 touch screen display
device to be calibrated.
2
The LEFT, and RIGHT ARROW
keys on the remote or keyboard
are used to position the screen
horizontaly.
CHAPTER 7 - CUSTOMIZING FIREBALL-MP
PAGE 89
FIREBALL-MP INSTALLATION & USER ’S GUIDE - M22002-01A1
To Change Security Settings
u
Press the SETUP key on the remote control or keyboard. The SETUP main
menu displays.
v
w
Select the menu item security. The menu displays.
Select the sub-menu item you want to modify and follow the instructions on the
screen.
password protection - Allows you to password protect access to the Setup
functions. Subsequent access to setup will be password protected.
If you specify a password, you will be prompted when the SETUP key is pressed to
enter the password. If the password entered matches the stored password, full access
is granted until the next power OFF cycle. If the password does not match, you will be
asked 2 more times to enter the correct password. If after the third try the password still
does not match, you will not be able to access the FireBall-MP Setup menus.
CHAPTER 7 - CUSTOMIZING FIREBALL-MP
PAGE 90
FIREBALL-MP INSTALLATION & USER ’S GUIDE - M22002-01A1
If you do not specify a system password, unrestricted access to the Setup Menus
will be enabled. If security access is in place, a password will be required to
access the Setup Menus the first time you press the SETUP key, after each
Power On.
You are given the option of enabling password protection by entering a password
and then verifying it. If you leave these fields blank, password protection will
be disabled. Select a numeric only password and enter it twice for verification
purposes. You can use the remote control or keyboard.
x
Exit SETUP by selecting the EXIT menu item located at the bottom of the main
menu, or by pressing the SETUP key when on the main menu or any sub-menu.
CHAPTER 7 - CUSTOMIZING FIREBALL-MP
PAGE 91
FIREBALL-MP INSTALLATION & USER ’S GUIDE - M22002-01A1
To Access FireBall-MP Utilities
u
Press the SETUP key on the remote control or keyboard. The SETUP main
menu displays.
v
Select the menu item utilities. The menu displays. (No other use of the system
is permitted while one of the utility processes is running.)
w
Select the menu item you want to access and follow the instructions on the
screen.
system reset - performs a soft reset of the FireBall-MP. (This is the same as
holding the front panel power button in for 4 seconds to reboot)
configuration information - Displays the current FireBall-MP internal settings
including software versions, hardware versions, serial number, customer ID,
and network settings.
IR remote control - allows you to control FireBall-MP using the FB, TB, or PP
modes on the remote control. This is useful if you have more than one FireBall
in the same room, so that all FireBalls do not respond to the same IR codes.
x
Exit SETUP by selecting the EXIT menu item located at the bottom of the main
menu, or by pressing the SETUP key when on the main menu or any sub-menu.
CHAPTER 7 - CUSTOMIZING FIREBALL-MP
PAGE 92
FIREBALL-MP INSTALLATION & USER ’S GUIDE - M22002-01A1
Chapter 8 - Touch
Screen Overview
Escient ETP Touch Screen Interaction
Elan VIA! Touch Panel Configuration
8
PAGE 93
FIREBALL-MP INSTALLATION & USER ’S GUIDE - M22002-01A1
Escient ETP Touch Screen Interaction
This section describes how FireBall-MP can be controled from the optional ETP
Touch Screen. Contact your Escient Dealer for more information on the ETP Touch
Screen.
When you initially setup FireBall-MP, you will need to use the remote or wireless
keyboard to navigate through the automatic setup program called Quick Start. Once
you have gone through this setup, you will be able to calibrate FireBall-MP and
use the Touch Screen. (See the side note on this page for calibration info.)
There are a couple of differences between the guides and player screens that appear
when using the touch screen device.
The Guide screen looks like this
when no touch screen is in use.
The Player screen looks like this
when no touch screen is in use.
2
If the touch screen does not seem
to be centered or is otherwise not
working, please use the remote or
keyboard and press the SETUP key
to go to the SETUP menu,choose
audio video and com ports,
calibrate touch panel.
Use the arrow keys to select the
option “calibrate touch panel”
and follow the instructions on the
screen.
CHAPTER 8 - CUSTOMIZING FIREBALL-MP
PAGE 94
FIREBALL-MP INSTALLATION & USER ’S GUIDE - M22002-01A1
When an Escient touch screen is detected and powered on or the SETUP option for an
external control system’s XY coordinates is set, the touch screen buttons will appear on
the Guide screen and the Player screen.
Toggles through the 3 available
guide button bars:
1. genres filter bar
2. remote control button bar
3. alpha-numeric bar
2
The default bar is the genres filter
bar. The genres automatically
scroll to the left and right when
the leftmost or rightmost genre is
selected if there are more genres
to view.
play
stop
record
all
page up
page down
On the Guide screen a row of buttons appears on the right of the music content to let
you play, stop, or record your music. Respectively, the stop, record, and all buttons
will come in handy for canceling tasks, completing tasks, and toggling all tracks to be
included or excluded. The page up and page down buttons allow you to scroll the guide
one page at a time.
CHAPTER 8 - CUSTOMIZING FIREBALL-MP
PAGE 95
FIREBALL-MP INSTALLATION & USER ’S GUIDE - M22002-01A1
Pressing the toggle button again will change the view from the alpha-numeric bar to the
remote control button bar.
remote control
button bar
The remote control bar includes:
•
Pause, Skip forward, and Skip backward transport controls
•
Player - Show the Player screen
•
Source - Toggle between Radio and Music source modes
•
View - Changes the Music Guide View
•
Options - Displays the Options Menu
•
Favorites - Plays the Default Favorites Playlist
•
Random - Plays the current Group in Random Play Mode
CHAPTER 8 - CUSTOMIZING FIREBALL-MP
PAGE 96
FIREBALL-MP INSTALLATION & USER ’S GUIDE - M22002-01A1
Pressing the toggle button once will change the view from the styles bar to the alphanumeric bar. This bar lets you enter a letter or number to jump down to the music
selection that begins with that letter. Pressing a letter will display the pressed letter in
the on screen display area located between the two smoked glass windows at the top of
the guide.
alpha-numeric bar
Escient Touch Panel
CHAPTER 8 - CUSTOMIZING FIREBALL-MP
PAGE 97
FIREBALL-MP INSTALLATION & USER ’S GUIDE - M22002-01A1
Selecting music to play or selecting the player button on the remote control button bar
will present the Player screen. The Player screen appears with a toggle button when a
touch screen is in use. The transport button bar is displayed when the toggle button is
pressed again.
toggle button
transport button bar
Escient Touch Panel
CHAPTER 8 - CUSTOMIZING FIREBALL-MP
PAGE 98
FIREBALL-MP INSTALLATION & USER ’S GUIDE - M22002-01A1
The remote control button bar is displayed when the toggle button is pressed again.
remote control button bar
The Remote Control Button Bar includes:
•
Guide - Show the Guide screen
•
OpenGlobe - Go to the OpenGlobe Home screen
•
Page Up/Down - scroll the Track list a page at a time
•
Info - Display the Info screen
•
Options - Display the Options menu screen
•
Mode - Cycle through the Play Modes
•
Add - Add the currently highlighted track to the Favorites Playlist
•
Setup - Display the Setup menu
Escient Touch Panel
CHAPTER 8 - CUSTOMIZING FIREBALL-MP
PAGE 99
FIREBALL-MP INSTALLATION & USER ’S GUIDE - M22002-01A1
Elan VIA! Touch Panel Configuration
Using FireBall-MP with the Elan VIA! system is quite easy. You can use Elan System
Controllers or direct VIA! touch panel connections. FireBall-MP uses a special screen
overlay to provide VIA! touch panels with the required control points. You will need to
have the latest VIA! Tools. Please contact Elan for more information.
Connect FireBall-MP to the Elan VIA! Touch Screen
1) Route the IR output of the VIA panels to either the direct IR port of the FireBall-MP
(recommended) or use an emitter on the front of the FireBall-MP (IR receiver is located
on the right hand edge of the display window.
2) Connect the video out of FireBall-MP to the VIA panel.
3) Using new version of VIA tools, select custom overlay template, and choose FireBallMP as a component in the VIA panel
Music Guide Screen with
Elan VIA! IR Frame Overlay
Configuring FireBall-MP for Elan VIA! control
1) Press SETUP->AUDIO VIDEO AND COM PORTS-> COM PORT SETTINGS.
2) Navigate to the IR FRAME button and press the SELECT key until the button is set to
ENABLE
3) Navigate to the SAVE button and press the SELECT key.
4) Press SETUP to exit the setup menus. The Elan VIA! IR frame should now be visible
on all video outs. Make sure the FireBall-MP video is being routed to the VIA panels.
CHAPTER 8 - CUSTOMIZING FIREBALL-MP
PAGE 100
FIREBALL-MP INSTALLATION & USER ’S GUIDE - M22002-01A1
Appendix A Cable Pin-Out
Configurations
Pin configurations for RS-232 Cables to Control Systems
A
PAGE 101
FIREBALL-MP INSTALLATION & USER ’S GUIDE - M22002-01A1
Pin Configurations for RS-232 Cables to Control Systems
FireBall-MP to AMX / Crestron / PHAST
FireBall-MP
(DB9-Female)
Pin
Function
2
RD
3
TD
5
GND
AMX/Crestron/PHAST
(DB9-Female)
Pin
Function
3
TD
2
RD
5
GND
2
RS-232 cable between FireBall-MP
and Control System must be 25
feet or less.
APPENDIX A - CABLE PIN-OUT CONFIGURATIONS
PAGE 102
FIREBALL-MP INSTALLATION & USER ’S GUIDE - M22002-01A1
Appendix B
- FireBall-MP
Technical Specs
Video Specifications
Physical Specifications
Audio Specifications
Power Usage and Power Supply
3rd Party Certifications
FCC Part 15, Subpart B
B
PAGE 103
FIREBALL-MP INSTALLATION & USER ’S GUIDE - M22002-01A1
Video Specifications
·
·
·
·
·
·
·
·
·
NTSC
10 bit Video DACs
Frequency Response:
Composite:
S-Video:
SNR:
Crosstalk:
Input Impedance:
Output Impedance:
-2 dB @ 5MHz
-2 dB @ 5MHz
50 dB
50 dB
75Ohm
75Ohm
Physical Specifications
Width: ~ 17 3/8"
Height: ~ 4 5/8" w/ feet; ~ 4" w/o feet
Depth: ~ 11 7/8"; Installed 14 3/8"
APPENDIX B - FIREBALL-MP TECHNICAL SPECS
PAGE 104
FIREBALL-MP INSTALLATION & USER ’S GUIDE - M22002-01A1
Audio Specifications
·
·
·
·
·
·
·
·
Frequency Response: 2 – 20,000 Hz, ±1 dB
THD+N (playback) < -80 dB FS A (< 0.01%)
A_D-DSP-D-A Dynamic Range: > 96 dB FS A @ 1kHz
Channel Separation: >95 dB
Full Scale Line Output: >2 Vrms, 50 k ohms
S/PDIF Output: 0.4Vpp to 0.6Vpp, <0.05Vdc (75ohm terminated)
Power Requirements: AC 90-132 VAC, 50-60 Hz
Power Consumption: < 60 watts
APPENDIX B - FIREBALL-MP TECHNICAL SPECS
PAGE 105
FIREBALL-MP INSTALLATION & USER ’S GUIDE - M22002-01A1
Power Usage and Power Supply
·
·
·
·
·
·
Open frame 60 Watt Supply
Support for holding Power button for 4 seconds to force reset
Full Power Off may be accomplished by removing the power cord from the wall
power outlet
Discrete Suspend (Sleep) and Resume (Wake up) commands
Automatic Restore in the event of Power Loss
UL/CUL recognized power supply
3rd Party Certifications
FCC: US Part 15, Class B
NTSC Video Output: NTSC RS-170A
cETL Listing
Part 68
Conforms to:
Certified to:
CE
UL STD 6500-2000
CAN/CSA STD E60065-00
APPENDIX B - FIREBALL-MP TECHNICAL SPECS
PAGE 106
FIREBALL-MP INSTALLATION & USER ’S GUIDE - M22002-01A1
FCC Part 15, Subpart B
Class B
Note: This equipment has been tested and found to comply with the limits for a Class B digital
device, pursuant to Part 15 of the FCC Rules. These limits are designed to provide reasonable protection against harmful interference in a residential installation. This equipment generates, uses, and
can radiate radio frequency energy and, if not installed and used in accordance with the instructions,
may cause harmful interference to radio communications. However, there is no guarantee that interference will not occur in a particular installation. If this equipment does cause harmful interference to
radio or television reception, which can be determined by turning the equipment off and on, the user
is encouraged to try to correct the interference by one or more of the following measures:
•
•
•
•
•
Reorient or relocate the receiving antenna.
Increase the separation between the equipment and receiver.
Connect the equipment into an outlet on a circuit different from that to which the receiver is connected.
Consult the dealer or an experienced radio TV technician for help.
Shielded cables must be used with this unit to ensure compliance with the Class B FCC limits.
APPENDIX B - FIREBALL-MP TECHNICAL SPECS
PAGE 107
FIREBALL-MP INSTALLATION & USER ’S GUIDE - M22002-01A1
Appendix
C - Minor
Troubleshooting
Minor Troubleshooting Tips
C
PAGE 108
FIREBALL-MP INSTALLATION & USER ’S GUIDE - M22002-01A1
Minor Troubleshooting Tips
Following are some easily resolved problems you may encounter during the installation
of your FireBall-MP unit. If you are experiencing difficulties that do not appear in the
following list, please contact your dealer, check the Escient Website, or contact Escient
tech support.
No Power
FireBall-MP may be plugged into an unswitched AC power receptacle.
Power: but no video
Make sure FireBall-MP is connected to the video source (television) before you power
on FireBall-MP. Make sure that the LED next to the Power button is not blinking.
Following is the Power ON/Standby sequence.
After the FireBall-MP unit is plugged in, the Standby LED located next to the power
button will flash until the startup process is complete. This may take a few minutes.
When the Standby LED is OFF, the FireBall-MP is now in a standby or “sleep” mode.
Press the Power button (on the front panel or on the remote) once and the video output
and front panel display will turn on. The unit is now ON.
To change from the ON mode back to the standby or “sleep” mode, press the Power
button on the front panel or on the remote once.
APPENDIX C - MINOR TROUBLESHOOTING
PAGE 109
FIREBALL-MP INSTALLATION & USER ’S GUIDE - M22002-01A1
Remote LED does not blink when you press a key.
Replace the batteries with two (2) new AA alkaline batteries.
Remote LED blinks when you press a key, but home entertainment component
does not respond
•
Make sure the Remote is aimed at your home entertainment component and is not farther
than 15 feet away.
•
Check that the correct mode is selected (Press FB for FireBall-MP.)
•
Replace the batteries in the remote control with two (2) new AA alkaline batteries.
Remote does not control home entertainment components or commands are not
working properly
Try all listed codes for the component brands being set up. Make sure they can be operated with an
infrared remote control.
APPENDIX C - MINOR TROUBLESHOOTING
PAGE 110
FIREBALL-MP INSTALLATION & USER ’S GUIDE - M22002-01A1
Appendix D External Control
Protocol
External Control Overview
Command / Response Overview
Unsolicited Status Events
Remote/Keyboard Commands
Database Commands
Status Commands
Control Commands
D
PAGE 111
FIREBALL-MP INSTALLATION & USER ’S GUIDE - M22002-01A1
External Control Overview
This appendix describes the external control protocol commands and responses which
allow an external control system to navigate the Escient products, get library information
to build custom user interfaces, perform transport controls, and receive unsolicited
feedback on system status.
This information is intended for experienced custom installers and software developers.
Please refer to the Escient Dealer Support are on the Escient website for further
information about external control of FireBall-MP.
APPENDIX D- EXTERNAL CONTROL PROTOCOL
PAGE 112
FIREBALL-MP INSTALLATION & USER ’S GUIDE - M21101-
Commands and Responses Overview
The external control protocol is standard ASCII based. ESCX is the four letter preamble that is used for all commands. This preamble must
be uppercase. The commands provided in this protocol allow an external control system to navigate the Escient products, get library information to build custom user interfaces, perform transport controls, and receive unsolicited feedback on system status.
All external control commands are made up of the preamble (ESCX), command group (01,02,10,20,50,70), sub command (specific task),
specific data (# of data items, and a size of data packet then the actual data packet repeated for the # of data items), and a carriage return end
marker.
External Control Command Structure
2
3
4
5
4
3
1
Example
ESCX
01
08
002
0005
Hello
0003
Bye
Carriage Return
DATA #2
DATA #1
END
MARKER
# DATA
ITEMS
2
DATA ITEM
#2 SIZE
SUB COMMAND
4
DATA ITEM
#1 SIZE
COMMAND
GROUP
PREAMBLE
Bytes
DESCRIPTION
The external control commands are broken down into the following Command Groups:
01 – Command Responses
02 – Unsolicited Events
10 – Remote Button / Keyboard Commands
20 – Database Commands
50 – Status Commands
70 – Control Commands
APPENDIX D- EXTERNAL CONTROL PROTOCOL
PAGE 113
FIREBALL-MP INSTALLATION & USER ’S GUIDE - M21101-
All commands will cause one of the following response numbers to be issued. Some commands, such as database commands will also send
back additional responses that contain more detailed information.
Command Responses
COMMAND
GROUP
01
01
01
01
01
01
01
01
01
01
RESPONSE NUMBER
01
02
03
04
05
06
07
08
09
10
RESPONSE DESCRIPTION
OK
Bad Command Structure
Empty Library or Bad Range
Wrong Number of Command Arguments
Invalid Subcommand
Invalid Command
Not Available During Standby (deprecated)
Requested data not available
External control command not yet implemented (future)
Not Available at This Time
Response Format: ESCX01xx, where xx = Command response
Response 07 has been deprecated due to the new auto-on function. Whenever a valid command is received (with two exceptions), the system will automatically enter the “on” mode, if it is in standby. A client may still handle response 07, but it is no longer sent from the host for any
reason.
Response 10 will be sent when a normally valid command is sent to the host, but it cannot be processed due to the system’s mode. For example, a database play will not be processed while the system is in setup or options mode, autobuilding a changer, etc. Note that a keypress
command will never return this response, as even audio transport keys (play, stop) have alternate functions in various modes.
Unsolicited status events can be sent to report the state changes of the Escient products. There are two currently defined message levels:
5 - track changes, and 10 - all (including 1-second playing time updates). Clients are registered at level 5 by default. Clients may change
their message level using the ESCX7002 command. See the control commands section for instructions on how to resister and unregister for
unsolicited status event levels.
APPENDIX D- EXTERNAL CONTROL PROTOCOL
PAGE 114
FIREBALL-MP INSTALLATION & USER ’S GUIDE - M21101-
Unsolicited Status Events
02
COMMAND
GROUP
EVENT NUMBER
01
02
02
02
02
02
02
03
02
04
EVENT DESCRIPTION
Power status changed. When the system has booted into an off state you will
receive a “RDY” status indicating it is ready to be powered on and from then
on an “OFF” or an “ON “ status.
Event Format: ESCX02010010003xxx,
Where xxx = a 3 character string
“RDY” = when power is first applied and it boots into
the off state (standby mode) – ready for power on.
“ON “ = if power on turned on (GUI appears)
“OFF” = if power is off (standby mode) (Video out off)
Play Mode changed (normal, random, etc) [future implementation]
Event Format: ESCX0202,
Where 02 = means the database has changed
Guide View changed
Event Format: ESCX02030010002xx
Where xx = the new guide view
01 = Guide changed to Artist view
CD titles are displayed sorted by artist name
02 = Guide changed to Titles view
CD titles are displayed sorted by CD title
03 = Guide changed to Song view
Song titles are displayed sorted by song title
04 = Guide changed to Cover view
Covers are displayed sorted by artist then by title
Playing Artist/Title/Song has changed
APPENDIX D- EXTERNAL CONTROL PROTOCOL
PAGE 115
FIREBALL-MP INSTALLATION & USER ’S GUIDE - M21101-
02
02
05
02
06
02
07
02
08
02
09
Event Format: ESCX02040060002aa0003bbbccccdddeeeefffgggghhhiiiijjj
aa = the play state
01 = Play, 02 = Stop, 03 = Pause
Radio only:
04 = Locating Station, 05 = Buffering data,
06 = Station Not Found
bbb = current track number (0 if Radio Mode)
cccc = length of artist name
ddd = artist name
eeee = length of title name
fff
= title name (station name if Radio Mode [future])
gggg = length of track name
hhh = track name
jjj
= current track time (0 if Radio Mode)
The current track, artist name, title name, track name, and current track time
are only returned for the play event. The stop and pause events just signify
that the state has changed.
Guide Mode changed (Playlist edit mode, Record mode, Delete mode, etc)
[future implementation]
Screen Mode changed (Guide, Player, Options, Setup, etc) [future implementation]
Database has changed. The external control system should re-read the
library information. [future implementation]
GUI to Movie. User switched to the Full screen movie.
[future implementation]
Movie to GUI. User switched back to the FireBall-MP GUI from a movie.
[future implementation]
The Remote Button / Keyboard commands are used when the video output of the FireBall-MP system is displayed on a TV or large screen
projector and it is desired to directly select the FireBall-MP control functions through an external control system.
The up, down, left, right, and select functions can be used to navigate objects on the screen and select them. The active FireBall-MP control
APPENDIX D- EXTERNAL CONTROL PROTOCOL
PAGE 116
FIREBALL-MP INSTALLATION & USER ’S GUIDE - M21101-
function is highlighted and the selection cursor is moved over it.
Various other commands are used to mimic the operation of the remote control. Note that the command response will be “OK” as long as the
key code is a valid one, even though the system may ignore the key if the system is in a mode where the key would not normally be processed.
Remote Button / Keyboard Commands
COMMAND
GROUP
10
10
10
10
10
10
10
10
10
10
10
10
10
10
10
10
10
10
10
10
10
10
10
10
10
10
10
10
10
01
02
03
04
05
06
SUB
COMMAND NUMBER
COMMAND DESCRIPTION
Left
Up
Right
Down
Select
Move To X and Y Coordinates and Select
The upper left point on the screen is (0,0) and the resolution of the
screen is 720 by 480 pixels.
07
08
09
Power Toggle
Power On
Power Off
10
11
12
13
14
15
16
17
18
19
20
21
22
23
24
25
26
“0”
“1”
“2”
“3”
“4”
“5”
“6”
“7”
“8”
“9”
“~”
“.”
“/”
“,”
“?”
“@”
“-“
APPENDIX D- EXTERNAL CONTROL PROTOCOL
PAGE 117
FIREBALL-MP INSTALLATION & USER ’S GUIDE - M21101-
10
10
10
10
10
10
10
10
10
10
10
10
10
10
10
10
10
10
10
10
10
10
10
10
10
10
10
10
10
10
10
10
10
10
10
10
10
10
10
10
10
10
10
27
28
29
30
31
32
33
34
35
36
37
38
39
40
41
42
43
44
45
46
47
48
49
50
“_”
“*”
“#”
Ch/Page +
Ch/Page Mode Increment – Only works in Player
Mode Play – Normal – Only works in Player
Mode Play – Repeat Track – Only works in Player
Mode Play – Repeat Title – Only works in Player
Mode Play – Repeat Group – Only works in Player
Mode Play – Random Title – Only works in Player
Mode Play – Random Group – Only works in Player
Setup
Option
Guide (toggles between Guide and Player) **
Guide Explicit (always goes to Guide) **
Player Explicit (always goes to Player) **
OpenGlobe
Info
Menu (DVD Menu and Guide View Increment)
Guide View – Covers
Guide View – Artist
Guide View – Title
Guide View - Song
51
52-53
54
55
56
57
58
59
Play a numbered playlist (argument has playlist number)
Not used
Play
Stop
Pause
Previous Track
Next Track
Record
60
61
62
63
64
65
66
67
68
Movies
Music
iRadio
Title
Angle
Resume
Next
Add Favorites
Play Favorites
APPENDIX D- EXTERNAL CONTROL PROTOCOL
PAGE 118
FIREBALL-MP INSTALLATION & USER ’S GUIDE - M21101-
10
10
10
10
10
10
10
10
10
10
10
10
10
10
10
10
10
10
10
10
10
10
10
10
10
10
10
10
10
69
70
71
74
75
76
77
78
79
80
81
82
83
84
85
86
87
88
89
90
91
92
93
94
95
96
97
98
99
Random
““
BACKSPACE
“A”
“B”
“C”
“D”
“E”
“F”
“G”
“H”
“I”
“J”
“K”
“L”
“M”
“N”
“O”
“P”
“Q”
“R”
“S”
“T”
“U”
“V”
“W”
“X”
“Y”
“Z”
** This command does not function if the Options screen, OpenGlobe CE-Commerce screen, or Playlist Edit screens are displayed.
Command Format: ESCX10xx
01 – ESCX1001
02 – ESCX1002
03 – ESCX1003
04 – ESCX1004
05 – ESCX1005
APPENDIX D- EXTERNAL CONTROL PROTOCOL
PAGE 119
FIREBALL-MP INSTALLATION & USER ’S GUIDE - M21101-
06 – ESCX10060020003aaa0003bbb
aaa = X coordinate
bbb = Y coordinate
10 – ESCX1010
20 – ESCX1020
21 – ESCX1021
22 – ESCX1022
etc…
51 – ESCX10510010001x
x = Playlist number (1 – 6)
All the Database commands are available regardless of the power state, except for Command 05, Play which will return an error response
if attempted during standby. The groups, styles, and custom genres are grouped into system groups and user groups. The system groups
have system groupings such as the All group, MP3 group, and Playlists groups. The user groups contain the genres for your music and your
custom genres that have been created. The All radio station group and the NetRadio group are contained in the radio system groups while all
other radio stations are in the system group. Titles are returned listed in alphabetical order by title regardless of the state of the user interface.
Database Commands
COMMAND
GROUP
20
SUB
COMMAND
01
DESCRIPTION
Get number of groups (genres) in the database
APPENDIX D- EXTERNAL CONTROL PROTOCOL
PAGE 120
FIREBALL-MP INSTALLATION & USER ’S GUIDE - M21101-
20
ESCX20010010002xx
xx = which list to get groups from, where
01 = System Music Groups
02 = User Music Groups
03 = System Radio Groups
04 = User Radio Groups
Reply Format: ESCX20010010004xxxx,
Where xxxx = total number of groups in the specified list
20
20
20
20
02
Once the total number of groups is known, you can ask information for a range of
groups using the 02 subcommand
Get group information
ESCX20020030002aa0004bbbb0004cccc
aa = which list to get groups from, where
01 = System Music Groups
02 = User Music Groups
03 = System Radio Groups
04 = User Radio Groups
bbbb = starting group number
cccc = ending group number
Reply Format: ESCX2002xxxGROUP1GROUP2etc…,
Where xxx = total number of groups multiplied by 2,
Each group is made up two items so
GROUP1 above = 0003xxxyyyyzzzzzzzz where
0003 = length of item #1 (always 3)
xxx = number of titles in the group
yyyy = length of item #2 (length of group name)
zzzzzzzz = group name (length depends on yyyy)
GROUP2, etc… have the same format as GROUP1
APPENDIX D- EXTERNAL CONTROL PROTOCOL
PAGE 121
FIREBALL-MP INSTALLATION & USER ’S GUIDE - M21101-
20
03
20
20
20
04
Get title (music or movie) or station (radio) information (includes Playlists because
they are virtual CD titles)
ESCX20030040002aa0004bbbb0004cccc0004dddd
aa = which list to get groups from, where
01 = System Music Groups
02 = User Music Groups
03 = System Radio Groups
04 = User Radio Groups
bbbb = group number to get titles for
cccc = starting title number
dddd = ending title number
Reply Format: ESCX2003xxxTITLE1TITLE2etc…,
Where xxx = total number of titles multiplied by 2,
Each title is made up of two items so
TITLE1 above = 0003xxxyyyyzzzzzzzzzz
0003 = length of item #1 (always 3)
xxx = number of tracks in the title (0 for Radio)
yyyy = length of item #2 (length of title)
zzzzzzzzzz = title/radio station(length depends on yyyy)
TITLE2, etc… have the same format as TITLE1
Get track information
ESCX20040050002aa0004bbbb0004cccc0004dddd0004eeee
aa = which list to get groups from, where
01 = System Music Groups
02 = User Music Groups
bbbb = group number to get tracks for
cccc = title number to get tracks for
dddd = starting track number
eeee = ending track number
Reply Format: ESCX2004xxxTRACK1TRACK2etc…,
Where xxx = total number of tracks,
Each TRACK is made of one item so
APPENDIX D- EXTERNAL CONTROL PROTOCOL
PAGE 122
FIREBALL-MP INSTALLATION & USER ’S GUIDE - M21101-
20
20
05
20
20
06
20
TRACK1 = bbbbzzzzzzz
yyyy = length of track name
zzzzzzz = track name (length depends on yyyy)
TRACK2, etc… have the same format as TRACK1
Play music track/radio station/Playlist
ESCX20050040002aa0004bbbb0004cccc0004dddd
aa = which database to get groups from, where
01 = System Music Groups
02 = User Music Groups
03 = System Radio Groups
04 = User Radio Groups
bbbb = group number
cccc = title/station number
dddd = track number (ignored for radio)
Get group number for a specific music or radio genre by name.
ESCX20060020002aa0004bbbb
aa = which list to get groups from, where
01 = System Music Groups
02 = User Music Groups
03 = System Radio Groups
04 = User Radio Groups
bbbb = which group you want the number for
0004 is the length of the group name
01 - System Music group name examples are:
All, Playlists, CDs, MP3s
APPENDIX D- EXTERNAL CONTROL PROTOCOL
PAGE 123
FIREBALL-MP INSTALLATION & USER ’S GUIDE - M21101-
20
20
02 -User Music group name examples are:
Blues/Folk
Classical
Country
Dance
Easy Listening
Family
HipHop-Rap
Jazz
Latin
New Age
Other
Pop
R&B/Soul
Rock
Soundtracks
03 - System iRadio group name examples are:
All, NetRadio
APPENDIX D- EXTERNAL CONTROL PROTOCOL
PAGE 124
FIREBALL-MP INSTALLATION & USER ’S GUIDE - M21101-
20
20
20
20
07
04 - User iRadio group name examples are:
Alternative
Classic Rock
Classical
Country
Eclectic
Hip Hop
Holiday
International
Jazz
New Age
Oldies
R&B
Religious
Soft Rock
News/Talk
Top 40
Rock
Other
Reply Format: ESCX20060010004xxxx,
Where xxxx = group number for the group specified by aaaa
Once group number is known, use the 02 subcommand for info.
Get title (music or movie) or station (radio) information by name (includes Playlists
also, because they are virtual CD titles). Partial strings can be used. Case does
not matter.
APPENDIX D- EXTERNAL CONTROL PROTOCOL
PAGE 125
FIREBALL-MP INSTALLATION & USER ’S GUIDE - M21101-
20
Status Commands
COMMAND
SUB
GROUP
COMMAND
50
01
ESCX20070030002aa0004bbbb0004cccc
aa = which list to get groups from, where
01 = System Music Groups
02 = User Music Groups
03 = System Radio Groups
04 = User Radio Groups
bbbb = group number to get titles for
cccc = which title/station/Playlist you want the number for
0004 is the length of the title/station/Playlist name
Reply Format: ESCX2007xxxTITLE1TITLE2etc…,
Where xxx = total number of titles/station/Playlists that match
Multiplied by 2, each title is made up of two items so
TITLE1 above = 0003xxx0004yyyy
0003 = length of item #1 (always 3)
xxx = number of tracks in the title/station/Playlist (0 for Radio)
0004 = length of item #2 (always 4)
zzzz = title/station/Playlist number
Most likely only one title will be returned for this command,
however if you have duplicate titles,
TITLE2, etc… have the same format as TITLE1
Once the title/station/Playlist number and the number of tracks are known you can
use the 04 – Get track information command or the 05 – Play music track/radio
station/Playlist command.
DESCRIPTION
Get power state
APPENDIX D- EXTERNAL CONTROL PROTOCOL
PAGE 126
FIREBALL-MP INSTALLATION & USER ’S GUIDE - M21101-
50
ESCX5001
50
50
Reply Format: ESCX50010010003xxx,
Where xxx = a 3 character string
“ON “ if power on
“OFF” if power is off (standby mode)
Get music play mode
ESCX5002
50
50
50
02
03
04
Reply Format: ESCX50020010002xx,
Where xx = music play mode, where
01 = normal
02 = repeat track
03 = repeat title
04 = repeat group
05 = random title
06 = random group
Get sort order [future implementation]
ESCX5003
Reply Format: ‘ESCX50030010002xx,
Where xx = guide sort order, where
01 = by artist
02 = by title
03 = by song
Get current playing artist, title, song [future implementation]
APPENDIX D- EXTERNAL CONTROL PROTOCOL
PAGE 127
FIREBALL-MP INSTALLATION & USER ’S GUIDE - M21101-
50
ESCX5004
50
50
Reply Format: ‘ESCX5004003aaaabbccccddeeeeff, where
aaaa = length of the artist name that is playing
bb = artist name – length depends on aaaa
cccc = length of the title that is playing
dd = music title – length depends on cccc
eeee = length of the song that is playing
ff = song title – length depends on eeee
Get current screen that is displayed in the GUI [future implementation]
ESCX5005
05
Reply Format: ‘ESCX50050010002xx,
Where xx = current GUI screen, where
01 = guide
02 = player
03 = options
04 = configuration
Control Commands
COMMAND
GROUP
70
70
SUB
COMMAND
01
70
02
DESCRIPTION
Select guide source
ESCX70010010002xx
xx = guide source, where
01 = Music
02 = iRadio
03 = Movies
Register for unsolicited events (by default you are registered to receive the unsolicited events for level 5)
APPENDIX D- EXTERNAL CONTROL PROTOCOL
PAGE 128
FIREBALL-MP INSTALLATION & USER ’S GUIDE - M21101-
70
70
70
70
70
ESCX7002
ESCX70020010002xx
xx = event level, where
05 = All events except 1-second updates while playing
10 = All level 5 events, plus one-second track playing time
updates during music play
03
04
If the short version of the command is used, event level 5 will be used as the
default level.
Unregister for unsolicited events (prevent unsolicited events)
ESCX7003
Set Music Play Mode
ESCX70040010002xx
xx = music play mode, where
01 = normal
02 = repeat track
03 = repeat title
04 = repeat group
05 = random title
06 = random group
Note that when the host is in power standby mode, any command will cause the unit to enter the power on mode before executing the command. There are two exceptions to this: a client may register and unregister for unsolicited events without turning the host on, and the Status
Command “Get Power State” (ESCX5001) will return the current state of the unit without turning it on.
APPENDIX D- EXTERNAL CONTROL PROTOCOL
PAGE 129
FIREBALL-MP INSTALLATION & USER ’S GUIDE - M22002-01A1
Appendix E
- FireBallMP Internet
Connections
E
PAGE 130
FIREBALL-MP INSTALLATION & USER ’S GUIDE - M22002-01A1
When Does FireBall-MP Connect To Internet?
FireBall-MP is designed to automatically connect and disconnect from the Internet as
needed through your Ethernet network. If your FireBall Server is connected to the
Internet using it's internal modem, you will NOT be able to access Internet Radio
or the OpenGlobe Entertainment features.
iRadio:
Each time an iRadio Station is selected, FireBall-MP will automatically connect to the
Internet to begin streaming the audio. The status of the connection followed by the
audio streaming bit rate are displayed in the lower left portion of the iRadio Player. The
Internet radio stream can be manually terminated by pressing STOP.
OpenGlobe CE-Commerce:
Each time you press the OpenGlobe (OG) button on the remote or IR Keyboard, an
Internet connection is automatically established with the OpenGlobe service – unless a
connection had previously been established.
APPENDIX E - FIREBALL-MP INTERNET CONNECTIONS
PAGE 131
FIREBALL-MP INSTALLATION & USER ’S GUIDE - M22002-01A1
Appendix F
- Enhanced
Entertainment
Services
Enhanced Entertainment Services using Escient's
OpenGlobe Services
F
PAGE 132
FIREBALL-MP INSTALLATION & USER ’S GUIDE - M22002-01A1
Enhanced Entertainment Services Using Escient's OpenGlobe
Services
Escient provides Entertainment Services that are noted under the name of OpenGlobe™.
These are provided to you within your FireBall-MP™ to expand your music experience.
The OpenGlobe area is an area within your FireBall-MP user interface that provides
additional content or information related to the music you have stored on, or are listening
to on your FireBall-MP.
For example, while listening to a Music Title or navigating through the onscreen music
guide, you can simply press the OG button on your remote, keyboard or an optional
touch screen, and immediately move to the OpenGlobe page on the Internet that contains
a list of the week’s top CD’s in your favorite categories.
Or, you might want to access the latest info on one of your favorite artists and see their
musical influences or read their biography.
As these services evolve, and new services are featured, you will be able to take
advantage of the latest entertainment services offerings to enhance your music listening
experience. You can purchase CDs now, and at some point, we hope to expand on these
services to perhaps even offer the ability to download music, rather than having to wait
for them in the mail.
APPENDIX F - ENHANCED SERVICES
PAGE 133
FIREBALL-MP INSTALLATION & USER ’S GUIDE - M22002-01A1
As new services, peripherals, ISPs, applications, and user interface software are developed,
FireBall-MP will access the updated software via the Internet connection, and provide
you with the most current services and software. (Software is downloaded to your system
automatically during regularly scheduled connections so you always have the latest
software. You must be “connected” for this to occur.)
APPENDIX F - ENHANCED SERVICES
PAGE 134
FIREBALL-MP INSTALLATION & USER ’S GUIDE - M22002-01A1
Appendix G Home Networking
What is Home Networking?
Direct Connection to a FireBall Server
Connecting to an Ethernet Network
G
PAGE 135
FIREBALL-MP INSTALLATION & USER ’S GUIDE - M22002-01A1
What is Home Networking?
A network is a group of computers, printers, and other devices that are cabled together in
specific ways so that information can be exchanged and shared with each other. Just as
you can connect two computers to share files or use the same connection to the Internet,
you can connect FireBall-MP(s) to a home network so that you can share the digital
music contained on each unit.
Home networks are relatively easy to set up and installation tutorials are readily available
on the Internet. Basically there are three popular kinds of home networks: Ethernet,
wireless (802.11) and HomePNA (HPNA). Each of these home networking standards
require different boards or adapter installed on your PC(s), associated software, and
cables to connect.
In an Ethernet configuration, Ethernet network interface boards are installed on your
PC(s) and Ethernet cables are used to connect all equipment.
The FireBall-MP contains built-in Ethernet capabilities.
APPENDIX G - HOME NETWORKING
PAGE 136
FIREBALL-MP INSTALLATION & USER ’S GUIDE - M22002-01A1
Direct Connection to a FireBall Server
The simplest way to connect a FireBall-MP client to a FireBall Server is to use a
special Etherent cables commonly called a “crossover” cable.
Connect one end of the Ethernet crossover cable to the Ethernet port on the back of the
FireBall Server and the other end to the Ethernet port on the back of the FireBall-MP.
If your FireBall Server is an older FireBall model without built-in Ethernet, you
will have to obtain an optional HPNA to Ethernet bridge such as the Escient HPNA
Broadband Kit. Please contact your Escient dealer.
APPENDIX G - HOME NETWORKING
PAGE 137
FIREBALL-MP INSTALLATION & USER ’S GUIDE - M22002-01A1
Connecting to an Ethernet Network
FireBall-MP can operate on any standard Ethernet network. Most Ethernet networks
are connected together using a device called a “router”, “hub”, or “personal gateway”.
Your FireBall Server and your FireBall-MP Clients must be connected to the same
Ethernet network. You can have an unlimted number of FireBall-MP clients, however,
each FireBall Server can only stream to four (4) clients at one time. Each Fireball-MP
can only connect to 1 server at a time.
APPENDIX G - HOME NETWORKING
PAGE 138
FIREBALL-MP INSTALLATION & USER ’S GUIDE - M22002-01A1
Appendix H Remote Control
Installing Batteries Into Remote
Programming the Remote
Programming TV/VCR Combo
Searching for Your Code
Checking the Codes
Re-Assigning Device Keys
Changing Volume Lock
Manufacturer’s IR Codes
H
PAGE 139
FIREBALL-MP INSTALLATION & USER ’S GUIDE - M22002-01A1
Installing Batteries Into Remote
1.
2.
3.
4.
On the back of the Remote, push the tab and remove the battery cover.
Obtain two (2) fully-charged AA alkaline batteries. Match the + and – marks on the
batteries to the + and – marks in the battery case, then insert the new batteries.
Press the battery cover back into place. The tab should click when the cover is
locked.
Test the unit by pressing any key on the remote. If the batteries are inserted correctly,
the LED will blink each time you press a key.
Programming the Remote
2
When batteries need replacement,
the Remote will blink twice with
every key press. Simply replace
them and the remote control will
be restored to its full functionality,
including favorite settings.
The Remote can control up to 8 different components. Note that 3 of these are already
reserved for Escient's FireBall-MP, TuneBase 200, and PowerPlay products. Perform the
following instructions for each component you want controlled:
1. Turn on a component (e.g., VCR) and, if applicable, insert media, (e.g., cassette or
disc). NOTE: Please read steps 2-4 completely before proceeding. We recommend
highlighting or writing down the codes and device you wish to program before
moving onto step 2.
2. On the Remote, press a component key once (i.e., AUX, CBL, DVD, TV, RCV).
Press and hold CODE SET until the LED blinks twice, then release.
3. Use the Manufacturer’s Codes (last section in this appendix) to locate the type
of component and brand name and then enter the first four-digit code for your
component. If performed correctly, the LED will blink twice.
APPENDIX H - REMOTE CONTROL
PAGE 140
FIREBALL-MP INSTALLATION & USER ’S GUIDE - M22002-01A1
4.
5.
If the LED did not blink twice, then repeat steps 2 through 3 and try entering the
same code again.
Aim the Remote at the component and press PWR once. It should turn off. If it does
not respond, repeat steps 2-3, trying each code for your brand until you find one that
works. If the device does not have a PWR key, press PLAY.
Repeat steps 1 through 4 for each component you want the Remote to control.
Programming TV/VCR Combo
1.
2.
3.
4.
5.
Turn on the TV/VCR Combo and insert a video cassette. NOTE: Please read steps
2-4 completely before proceeding. We recommend highlighting or writing down the
code for the brand you wish to program before moving onto step 2.
On the Remote, press DVD. Press and hold CODE SET until the LED blinks twice,
then release CODE SET.
Use the Setup Codes For TV/VCR Combos (last section in this appendix) to locate
the brand name and then enter the first four-digit code for your component. If
performed correctly, the LED will blink twice. NOTE: If the LED did not blink
twice, then repeat steps 2 through 3 and try entering the same code again.
Aim the Remote at the component and press PWR once. It should turn off. If it does
not respond, repeat steps 2-3, trying each code for your brand until you find one that
works. If it still does not work, try searching for the code (see Searching For Your
Code). NOTE: If the device does not have a PWR key, press PLAY.
If you’ve located a setup code that works, but it has a separate TV code, you’ll also
need to program it into the Remote to access volume control as follows:
APPENDIX H - REMOTE CONTROL
PAGE 141
FIREBALL-MP INSTALLATION & USER ’S GUIDE - M22002-01A1
a.
b.
Press TV once. The LED will blink twice.
Enter the TV code for your TV/VCR Combo. If correct, the LED will blink
twice.
If there is no separate TV code listed, you will need to perform the following steps to
access volume control:
a. Press and hold CODE SET until the LED blinks twice, then release CODE
SET.
b. Enter 9 - 9 - 3 . The LED will blink twice.
c. Press DVD once. The LED will blink twice.
Searching for Your Code
If your device does not respond to the Remote after trying all codes listed for your brand,
or if your brand is not listed at all, try searching for your code. For example, to search for
a code for your TV:
1. On the Remote, press TV once.
2. Press and hold CODE SET until the LED blinks twice, then release CODE SET .
3. Enter 9 - 9 - 1. The LED will blink twice.
4. Aim the remote control at the TV and slowly alternate between pressing PWR and
TV. Stop when the TV turns off. NOTE: In the search mode, the Remote will send IR
codes from its library to the selected device, starting with the most popular code first.
5. Press CODE SET once to lock in the code.
6. To search for the codes of your other components, repeat steps 1 through 5, but
APPENDIX H - REMOTE CONTROL
PAGE 142
FIREBALL-MP INSTALLATION & USER ’S GUIDE - M22002-01A1
substitute the appropriate key (i.e., AUX, CBL, DVD, RCV) for the (Auxiliary, VCR,
Cable, Satellite, CD, Amplifier, or Tuner) component you are searching for.
Checking the Codes
If you have set up the Remote using the Searching For Your Code procedure, you may
need to find out which four-digit code is operating your equipment.
For example, to find out which code is operating your TV:
1.
2.
3.
4.
5.
6.
On the Remote, press TV once.
Press and hold CODE SET until the LED blinks twice, then release CODE SET .
Enter 9 - 9 - 0. The LED will blink twice.
To view the code for the first digit, press 1 once. Wait 3 seconds, count the LED
blinks (e.g., 3 blinks = 3) NOTE: If a code digit is “0”, the LED will not blink.
Repeat step 4 three more times for remaining digits. Use 2 for the second digit, 3 for
the third digit, and 4 for the fourth digit.
To check for the codes of your other components, repeat steps 1 through 5, but
substitute the appropriate key (i.e., AUX, CBL, DVD, RCV) component you are
checking. As before, write down each four-digit code.
APPENDIX H - REMOTE CONTROL
PAGE 143
FIREBALL-MP INSTALLATION & USER ’S GUIDE - M22002-01A1
Re-Assigning Device Keys
The Remote can be set up to control a second TV or VCR, or any combination of eight
home entertainment components. For example, to have the Remote control a TV, a Cable
Converter, and two VCRs, you will need to reassign the unused AUX key to operate the
second VCR as follows:
1. On the Remote, press and hold CODE SET until the LED blinks twice, then release
CODE SET .
2. Enter 9 - 9 - 2. The LED will blink twice.
3. Press DVD once, then press AUX once.
4. The AUX key is now ready to be programmed for your VCR. See Programming
Component Control. To reassign other device keys, repeat steps 1 through 4 by
substituting the key sequence from the below chart for the most popular components:
To Re-Assign Key Sequence
TV as VCR key:
TV as 2nd CBL key:
TV as 2nd AUX key:
TV as 2nd RCV/TNR key:
TV as AMP key:
TV as CD key:
TV as SAT key:
2
You cannot re-assign the FB, TB,
or PP keys.
However, the keys can be used
in conjunction to re-assigning
other device keys.
Perform
CODE SET - 9 - 9 - 2 - DVD - TV
CODE SET - 9 - 9 - 2 - CBL - TV
CODE SET - 9 - 9 - 2 - AUX - TV
CODE SET - 9 - 9 - 2 - RCV - TV
CODE SET - 9 - 9 - 2 - PP - TV
CODE SET - 9 - 9 - 2 - TB - TV
CODE SET - 9 - 9 - 2 - FB - TV
APPENDIX H - REMOTE CONTROL
PAGE 144
FIREBALL-MP INSTALLATION & USER ’S GUIDE - M22002-01A1
To Re-Assign Key Sequence
DVD as 2nd TV key:
DVD as 2nd CBL key:
DVD as 2nd AUX key:
DVD as 2nd RCV/TNR key:
DVD as AMP key:
DVD as CD key:
DVD as SAT key:
DVD back to DVD/VCR:
AUX as 2nd TV key:
AUX as 2nd DVD/VCR key:
AUX as 2nd CBL key:
AUX as 2nd RCV/TNR key:
AUX as AMP key:
AUX as CD key:
AUX as SAT key:
AUX back to AUX:
Perform
CODE SET - 9 - 9 - 2 - TV - DVD
CODE SET - 9 - 9 - 2 - CBL - DVD
CODE SET - 9 - 9 - 2 - AUX - DVD
CODE SET - 9 - 9 - 2 - RCV - DVD
CODE SET - 9 - 9 - 2 - PP - DVD
CODE SET - 9 - 9 - 2 - TB - DVD
CODE SET - 9 - 9 - 2 - FB - DVD
CODE SET - 9 - 9 - 2 - DVD - DVD
CODE SET - 9 - 9 - 2 - TV- AUX
CODE SET - 9 - 9 - 2 - DVD - AUX
CODE SET - 9 - 9 - 2 - CBL - AUX
CODE SET - 9 - 9 - 2 - RCV - AUX
CODE SET - 9 - 9 - 2 - PP - AUX
CODE SET - 9 - 9 - 2 - TB - AUX
CODE SET - 9 - 9 - 2 - FB - AUX
CODE SET - 9 - 9 - 2 - AUX - AUX
When a reassignment is done, the LED will blink twice to confirm your choice. At
that time, you will need to program the Remote to control the new component (see
Programming Component Control).
APPENDIX H - REMOTE CONTROL
PAGE 145
FIREBALL-MP INSTALLATION & USER ’S GUIDE - M22002-01A1
Changing Volume Lock
The Remote is set to control volume of a component through your TV while in the TV,
VCR, Cable, or Satellite mode. However, in an Audio mode (i.e. RCV/TNR; AMP, CD),
you have separate control of your audio component’s volume.
If your TV is not remote controllable, or if you want volume to be controlled by a
different component, you can change the Volume Lock setting to control a volume
through a non-associated mode (e.g., through the cable in the TV mode).
To change Volume Lock to another mode:
1. On the Remote, press and hold CODE SET until the LED blinks twice, then release
CODE SET .
2. Enter 9 - 9 - 3 and then press any mode key once (except TV). The LED will blink
twice.
3. Now, whenever you press VOL +, VOL –,or MUTE, volume will be controlled by
your mode choice.
To change Volume Lock back to the TV mode:
1. On the Remote, press and hold CODE SET until the LED blinks twice, then release
CODE SET .
2. Enter 9 - 9 - 3 and then press TV. The LED will blink twice.
3. Now, whenever you press VOL +, VOL –, or MUTE on the Remote, volume will be
controlled by your TV.
APPENDIX H - REMOTE CONTROL
PAGE 146
FIREBALL-MP INSTALLATION & USER ’S GUIDE - M22002-01A1
Manufacturer’s IR
Codes
Setup Codes for TVs:
AOC 0030, 0019
Admiral 0093, 0463
Aiko 0092
Akai 0030
Alaron 0179
Ambassador 0177
America Action 0180
Ampro 0751
Anam 0180
Audiovox 0451,0180, 0092, 0623
Baysonic 0180
Belcor 0019
Bell & Howell 0154, 0016
Bradford 0180
Brockwood 0019
Broksonic 0236, 0463
CXC 0180
Candle 0030, 0056
Carnivale 0030
Carver 0054
Celebrity 0000
Cineral 0451, 0092
Citizen 0060, 0030, 0056, 0039, 0092
Concerto 0056
Contec 0180
Craig 0180
Crosley 0054
Crown 0180,0039
Curtis Mathes 0047, 0054, 0154, 0051, 0451,
0093,
0060, 0030, 0145, 0056, 0016, 0039,
0166, 0466, 1147, 1347
Daewoo 0451, 0019, 0039, 0092, 0623, 0624
Daytron 0019
Denon 0145
Dumont 0017,0019
Dwin 0720, 0774
Electroband 0000
Emerson 0154, 0236, 0463, 0180, 0282, 0178,
0019, 0179, 0039, 0177, 0623, 0624
Envision 0030
Fisher 0154
Fujitsu 0179
Funai 0180, 0179, 0171
Futuretech 0180
GE 0047, 0051, 0451, 0093, 0282, 0178,
0021, 0135, 1147, 1347
Gibralter 0017, 0030, 0019
GoldStar 0030, 0178, 0019, 0056
Gradiente 0053, 0056
Grunpy 0180, 0179
Hallmark 0178
Harley Davidson 0179
Harman/Kardon 0054
Harvard 0180
Hitachi 0145, 0056, 0151
Infinity 0054
Inteq 0017
JBL 0054
JCB 0000
JVC 0053
KEC 0180
KTV 0180, 0030, 0039
Kenwood 0030, 0019
LG 0056
LXI 0047, 0054, 0154, 0156, 0178
Logik 0016
Luxman 0056
MGA 0150, 0030, 0178, 0019
MTC 0060, 0030, 0019, 0056
Magnavox 0054, 0030, 0179
Majestic 0016
Marantz 0054, 0030
Matsushita 0250
Megatron 0178, 0145
Memorex 0154, 0250, 0463, 0150, 0178, 0056,
0016
Midland 0047, 0017, 0051, 0039, 0135
Minutz 0021
Mitsubishi 0093, 0150, 0178, 0019
Motorola 0093
Multitech 0180
NAD 0156, 0178, 0166
NEC 0030, 0019, 0056
NTC 0092
Nikko 0030, 0178, 0092
Onwa 0180
Optimus 0154, 0250, 0166
Optonica 0093, 0165
Orion 0236, 0463, 0179
Panasonic 0051, 0250
Penney 0047, 0156, 0051, 0060, 0030, 0178,
0021, 0019, 0056, 0039, 0135, 1347
Philco 0054, 0463, 0030, 0145, 0019
Philips 0054
Pilot 0030, 0019, 0039
Pioneer 0166
Portland 0019,0039, 0092
Prism 0051
Proscan 0047
Proton 0178, 0466
Pulsar 0017, 0019
Quasar 0051, 0250, 0165
RCA 0047, 0051, 0093, 0019, 0090, 0135,
1047, 1147, 1247, 1347
Radio Shack 0047, 0154, 0165, 0180, 0030,
0178,
0019, 0056, 0039
Realistic 0154, 0165, 0180, 0030, 0178, 0019,
0056, 0039
Runco 0017, 0030, 0603
SSS 0180, 0019
Sampo 0030, 0039
Samsung 0060, 0030, 0178, 0019, 0056
Samsux 0039
Sansei 0451
Sansui 0463
Sanyo 0154
Scimitsu 0019
Scotch 0178
Scott 0236, 0180, 0178, 0019, 0179
Sears 0047, 0054, 0154, 0156, 0178, 0179,
0056, 0171
Semivox 0180
Semp 0156
Sharp 0093, 0165, 0039
Shogun 0019
Signature 0016
Sony 0000
Soundesign 180, 0178, 0179
Squareview 0171
Starlite 0180
Supreme 0000
Sylvania 0054, 0030
Symphonic 0171
TMK 0178, 0056, 0177
Tandy 0093
Technics 0051, 0250
Technol Ace 0179
Techwood 0051, 0056
Teknika 0054, 0180, 0150, 0060, 0019, 0179,
0056, 0016, 0039, 0092
Telefunken 0056
Toshiba 0154, 0156, 0060
Totevision 0039
Vector Research 0030
Victor 0053
Vidikron 0054
Vidtech 0178, 0019
Wards 0054, 0165, 0030, 0178, 0021, 0019,
0179, 0056, 0016
White Westinghouse 0463, 0623, 0624
Yamaha 0030, 0019
Zenith 0017, 0463, 0016, 0092
Setup Codes for VCRs:
APPENDIX H - REMOTE CONTROL
PAGE 147
FIREBALL-MP INSTALLATION & USER ’S GUIDE - M22002-01A1
Admiral 0048,0209
Adventura 0000
Aiko 0278
Aiwa 0037, 0000
Akai 0041
America Action 0278
American High 0035
Asha 0240
Audiovox 0037
Beaumark 0240
Bell & Howell 0104
Brocksonic 0209
Broksonic 0184, 0121, 0209, 0002
CCE 0072, 0278
Calix 0037
Canon 0035
Carver 0081
Cineral 0278
Citizen 0037, 0278
Colt 0072
Craig 0037, 0047, 0240, 0072, 0271
Curtis Mathes 0060, 0035, 0041, 0162
Cybernex 0240
Daewoo 0045, 0278
Denon 0042
Dynatech 0000
Electrohome 0037
Electrophonic 0037
Emerex 0032
Emerson 0037, 0184, 0000, 0121, 0043, 0209,
0002, 0278
Fisher 0047, 0104
Fuji 0035, 0033
Funai 0000
GE 0060, 0035, 0048, 0240
Garrard 0000
Go Video 0526
GoldStar 0037, 0038
Gradiente 0000
HI-Q 0047
Harley Davidson 0000
Harman/Kardon 0081, 0038
Harwood 0072
Headquarter 0046
Hitachi 0000, 0042, 0041
Hughes Net. Sys. 0042
JVC 0067, 0041
Jensen 0041
KEC 0037, 0278
KLH 0072
Kenwood 0067, 0041, 0038
Kodak 0035, 0037
LXI 0037
Lloydʼs 0000
Logik 0072
MEI 0035
MGA 0240, 0043
MGN Technology 0240
MTC 0240,0000
Magnasonic 0278
Magnavox 0035, 0039, 0081, 0000, 0149
Magnin 0240
Marantz 0035, 0081
Marta 0037
Matsushita 0035,0162, 0454
Memorex 0035,0037, 0048, 0039, 0047, 0240,
0000, 0104, 0209, 0046, 1162, 1262
Minolta 0042
Mitsubishi 0048,0067, 0043
Motorola 0035, 0048
Multitech 0000,0072
NEC 0104, 0067, 0041, 0038
Nikko 0037
Noblex 0240
Olympus 0035
Optimus 0037, 0048, 0104, 0162, 0454, 1062,
1162, 1262
Orion 0184,0209, 0002
Panasonic 0035, 0162, 0225, 0454, 1162
Penney 0035, 0037, 0240, 0042, 0038
Pentax 0042
Philco 0035, 0209
Philips 0035, 0081
Pilot 0037
Pioneer 0067
Profitronic 0240
Proscan 0060
Protec 0072
Pulsar 0039
Quarter 0046
Quartz 0046
Quasar 0035, 0162, 0454, 1162
RCA 0060, 0035, 0048, 0240, 0042, 0149
Radio Shack 0000
Radix 0037
Randex 0037
Realistic 0035, 0037, 0048, 0047, 0000, 0104,
0046
Runco 0039
STS 0042
Samsung 0240, 0045
Sanky 0048, 0039
Sansui 0000, 0067, 0209, 0041, 0271
Sanyo 0047, 0240, 0104, 0046
Scott 0184, 0045, 0121, 0043
Sears 0035, 0037, 0047, 0000, 0042, 0104,
0046
Semp 0045
Sharp 0048
Shintom 0072
Shogun 0240
Singer 0072
Sony 0035, 0032, 0000, 0033
Sylvania 0035, 0081, 0000, 0043
Symphonic 0000
TMK 0240
Tatung 0041
Teac 0000, 0041
Technics 0035, 0162
Teknika 0035, 0037, 0000
Thomas 0000
Toshiba 0045, 0043
Totevision 0037,0240
Unitech 0240
Vector 0045
Vector Research 0038
Video Concepts 0045
Videosonic 0240
Wards 0060, 0035, 0048, 0047, 0081, 0240,
0000, 0042, 0072, 0149
White Westinghouse 0209, 0278
XR-1000 0035, 0000, 0072
Yamaha 0038
Zenith 0039, 0000, 0209, 0033
Setup Codes for TV/VCR Combos:
American High 0035 (for TV use 0051)
Brocksonic 0002, 0294,
Colt 0072
Curtis Mathis 0035 (for TV use 0051)
Daewoo 0278
Emerson 0002, 0294, 0479
Funai 0000
GE 0035 (for TV use 0051),
0060 (for TV use 0047),
0048 (for TV use 0093), 0240
Hitachi 0035 (for TV use 0051), 0000
HQ 0000
Lloyds 0000
MGA 0240
Magnavox 0081 (for TV use 0054),
0035 (for TV use 0051), 0000
Magnin 0240
Memorex 0037, 0162 (for TV use 0250)
Mitsubishi 0048 (for TV use 0093)
Orion 0002, 0294, 0479
Panasonic 0035 (for TV use 0051),
0162 (for TV use 0250)
Penney 0035 (for TV use 0051), 0240,
0162 (for TV use 0250)
Quasar 0035 (for TV use 0051),
APPENDIX H - REMOTE CONTROL
PAGE 148
FIREBALL-MP INSTALLATION & USER ’S GUIDE - M22002-01A1
0162 (for TV use 0250)
RCA 0060 (for TV use 0047),
0035 (for TV use 0051),
0048 (for TV use 0093)
Sansui 0000, 0479
Sanyo 0240
Sears 0000, 0037
Sharp 0048 (for TV use 0093)
Sony 0032 (for TV use 0000)
Symphonic 0000
Zenith 0000
Setup Codes for Cable Coverters:
ABC 0003,0008, 0014, 0017, 0007, 0011,
0013
Allegro 0153, 0315
Archer 0153, 0797
Bell & Howell 0014
Century 0153
Citizen 0153, 0315
Comtronics 0040
Contec 0019
Eastern 0002
Emerson 0797
Everquest 0015,0040
Focus 0400
Garrard 0153
Gemini 0015
General Instrument 0476, 0276, 0011, 0810
GoldStar 0144, 0040
Goodmind 0797
Hamlin 0020, 0259, 0009, 0034
Hitachi 0011
Hytex 0007
Jasco 0015, 0153, 0315
Jerrold 0003, 0012, 0476, 0276, 0014, 0015,
0011, 0810
Memorex 0000
Movie Time 0063
NSC 0063
Oak 0019, 0007
Optimus 0021
Panasonic 0000, 0107, 0021
Paragon 0000
Philips 0153
Pioneer 0144, 0533
Popular Mechanics 0400
Pulsar 0000
Quasar 0000
RCA 0021
Radio Shack 0015, 0315, 0797, 0883
Recoton 0400
Regal 0020, 0259
Regency 0002
Rembrandt 0011
Runco 0000
SL Marx 0040
Samsung 0144, 0040
Scientific Atlanta 0008, 0477, 0017, 0877
Signal 0015,0040
Signature 0011
Sprucer 0021
Starcom 0003, 0015
Stargate 0015, 0040, 0797
Starquest 0015
TV86 0063
Teleview 0040
Tocom 0012, 0013
Toshiba 0000
Tusa 0015
Unika 0153
United Artists 0007
Universal 0153, 0191
Viewstar 0063
Zenith 0000, 0525
Zentek 0400
Setup Codes for Satellite or
DBS Receivers:
AlphaStar 0772
Chaparral 0216
Echostar 0775
Expressvu 0775
General Instrument 0627, 0361, 0869
HTS 0775
Hitachi 0819
Hughes Net. Sys. 0749
JVC 0775
Jerrold 0627, 0361
Magnavox 0724, 0722
Memorex 0724
Next Level 0869
Panasonic 0701
Philips 0724, 0722
Primestar 0627, 0361
RCA 0566, 0143, 0392, 0855
Radio Shack 0869
Realistic 0052
Sony 0639
Star Choice 0869
Toshiba 0790
Uniden 0724, 0722, 0052
Zenith 0856
Setup Codes for CD Players:
Aiwa 0157, 0124
Burmester 0420
California Audio Lab 0029
Carver 0157, 0179, 0437
DKK 0000
Denon 0003, 0873
Emerson 0305
Fisher 0179,0174
Garrard 0420, 0393
Genexxa 0032, 0305
Harman/Kardon 0157, 0173
Hitachi 0032
JVC 0072
Kenwood 0028, 0037, 0190, 0681, 0826
Krell 0157
LXI 0305
Linn 0157
MCS 0029
MTC 0420
Magnavox 0157, 0305
Marantz 0029, 0157, 0180
Mission 0157
NSM 0157
Nikko 0174
Onkyo 0101, 0868
Optimus 0000, 0032, 0179, 0305, 0037, 0420,
0145, 0468, 0437
Panasonic 0029, 0303
Parasound 0420
Philips 0157, 0626
Pioneer 0032, 0305, 0468, 0244
Proton 0157
QED 0157
Quasar 0029
RCA 0179, 0305, 0053, 0764
Realistic 0179, 0420, 0180
Rotel 0157, 0420
SAE 0157
Sansui 0157, 0305
Sanyo 0179
Scott 0305
Sears 0305
Sharp 0037, 0180, 0861
Sherwood 0180
Sony 0000, 0185, 0490
Soundesign 0145
Tascam 0420
Teac 0420, 0393, 0174, 0180
Technics 0029, 0303
Victor 0072
Wards 0157, 0053
Yamaha 0036, 0187
Yorx 0461
Setup Codes for DVD Players:
Harman/Kardon 0582
JVC 0558
Kenwood 0534
Magnavox 0503
APPENDIX H - REMOTE CONTROL
PAGE 149
FIREBALL-MP INSTALLATION & USER ’S GUIDE - M22002-01A1
Mitsubishi 0521
Onkyo 0503
Panasonic 0490
Philips 0503, 0539
Pioneer 0525, 0571
Proscan 0522
RCA 0522
Samsung 0573
Sony 0533
Technics 0490
Theta Digital 0571
Toshiba 0503
Yamaha 0490, 0545
Zenith 0503, 0591
Setup Codes for LD Players:
Denon 0059
Mitsubishi 0059
NAD 0059
Pioneer 0059
Sony 0193, 0201
Setup Codes for Cassette Decks:
Aiwa 0029, 0197
Carver 0029
Denon 0076
Harman/Kardon 0182, 0029
JVC 0244, 0273
Kenwood 0070
Magnavox 0029
Marantz 0029
Onkyo 0135, 0282
Optimus 0027, 0220
Panasonic 0229
Philips 0029
Pioneer 0027, 0220, 0099
Sansui 0029
Sony 0243, 0170, 0291
Technics 0229
Victor 0273
Wards 0027
Yamaha 0097, 0094
Setup Codes for Stereo Tuners
or Receivers:
ADC 0531
Adcom 0616
Aiwa 0158, 0189, 0121, 0405
Akai 0224
Capetronic 0531
Carver 0189, 0008, 0042, 0360
Casio 0195
Clarinette 0195
Curtis Mathes 0080
Denon 0004
Emerson 0424
Fisher 0042, 0219, 0360
Garrard 0463, 0424
Harman/Kardon 0110, 0189, 0891
JBL 0110
JVC 0074
Kenwood 0027, 0186, 0042, 0077
Koss 0424
LXI 0181
Linn 0189
Lloydʼs 0195
MCS 0039, 0346
Magnavox 0531, 0189, 0195, 0391
Marantz 0039, 0189
Modulaire 0195
NAD 0320
Nakamichi 0097, 0347
Onkyo 0135
Optimus 0531, 0670, 0186, 0042, 0177, 0181,
0219, 0738, 0801, 1023
Panasonic 0039, 0309
Penney 0195
Philips 0189, 0391
Pioneer 0531, 0014, 0150, 0630, 0080, 1023
Quasar 0039
RCA 0531, 0054, 0346, 0360, 0530
Realistic 0195, 0163, 0181
Sansui 0189, 0346
Sanyo 0219, 0801
Scott 0163,0322
Sharp 0186
Sherwood 0491, 0502
Sony 0158, 0168, 0474
Soundesign 0670
Teac 0463, 0163
Technics 0039, 0309, 0208
Victor 0074
Wards 0158, 0014, 0189, 0080, 0054
Yamaha 0176, 0186
Yorx 0195
Zenith 0857
Setup Codes for Stereo Amplifiers:
Aiwa 0406
Carver 0269
Curtis Mathes 0300
Denon 0160
Harman/Kardon 0892
JVC 0331
Linn 0269
Magnavox 0269
Marantz 0269
Panasonic 0308
Philips 0269, 0892
Pioneer 0013, 0300
Sony 0220,0689
Technics 0308
Victor 0331
Wards 0013
Yamaha 0354
Setup Codes for Home Automation:
GE 0240
Lutron 0597
One For All 0167
Radio Shack 0240
Security System 0167
Universal X10 0167
X10 0167
Setup Codes for DBS Audio Services:
Aiwa 0010, 0159, 0404
Fisher 0052
Harman/Kardon 0477
JBL 0477
JVC 0073
Jerrold 0459, 0520
RCA 0056
Scientific Atlanta 0460
Sony 0010, 0159
Starcom 0459
Setup Codes for Video Accessories:
Archer 0160
GC Electronics 0160
Jebsee 0160
Rabbit 0081
Radio Shack 0160
TeleCaption 0171
APPENDIX H - REMOTE CONTROL
PAGE 150
FIREBALL-MP INSTALLATION & USER ’S GUIDE - M22002-01A1
FireBall-MP
Manual Index
X
PAGE 151
FIREBALL-MP INSTALLATION & USER ’S GUIDE - M22002-01A1
Index
Symbols
3rd Party Certifications
Audio, Video, and Com Ports Settings
A
B
Accessing Music Mode 52
Access “More...” Music Options 66
Access FireBall Utilities 92
Access to Favorite Music 56
Access to Random Music 56
ADD TO FAVORITES
Back Panel Review 24
Batteries
specs 106
remote 40
alpha-numeric bar
on touch screen 97
touch screen-guide 97
AMX
RS-232 pins 102
Audio
connecting to FireBall 28
change 88
remote 140
brightness
change 88
Button
definition 17
C
Cable Pin-Out Configurations 101
calibrate touch panel 89
Cautions & Warnings 13,16
Change Audio, Video, and Com Ports Settings
88,89
INDEX
PAGE 152
FIREBALL-MP INSTALLATION & USER ’S GUIDE - M22002-01A1
Change How Music is Played 62
Change Internet Configuration Settings 86
Change Preferences 87
Change Security Settings 90
Changing iRadio Options 74,78
Changing Volume Lock
on remote 146
Checking the Codes 143
CH PAGE
remote 38
color bars 88
command set for external system control 113
Composite TV
how to connect 25
com port settings 89
Connecting Audio 28
Connecting FireBall to an S-Video TV or Monitor 26
Connecting FireBall to a Composite TV or
Monitor 25
Connecting FireBall to a VGA Projector or
Monitor 27
Connecting to Internet Using HPNA 29
Connect Multi-Room Controller or Touch
Screen 30,31
Contact Information
Escient 19
contrast
change 88
Control Systems
RS-232 pins 102
Copyright 7,11
Copyright Information 7,11
Create a New iRadio Group 75
Create a New Music Group 67
Create a New Music Playlist
procedure 59
Crestron
RS-232 pins 102
Customer Service
Escient 19
Customize FireBall
2 ways 85
Customizing FireBall 84
D
Definitions 17
of terms 17
Delete an iRadio Group 77,80
Delete a Music Group 69
Delete a Music Playlist 61
INDEX
PAGE 153
FIREBALL-MP INSTALLATION & USER ’S GUIDE - M22002-01A1
Delete Digital Music on FireBall 63
Digital Music on FireBall
how to delete 63
Disclaimers
manual screen images 16
Disc Information
to edit 65
E
Edit an iRadio Group 76,79
Edit a Music Group 68
Edit a Music Playlist 60
Edit Disc Information 65
Edit Tracks 64
Elan VIA! 100
electric shock
preventing 13,32
Email
Escient 19
Enhanced Entertainment Services
through OpenGlobe 132
contact information 19
hours 19
phone numbers 19
tech support 19
website 19
Escient Touch Screen Overview 93
External Control Protocol
commands 111
F
Favorite Music
how to play 56
FB SOURCE
remote 36
Filter Bar Details 50
FireBall Internet Connections
when does it connect? 130
FireBall name
to edit 86
FireBall Technical Specs 103
Entering Numeric Entry Mode
G
Escient Convergence Corp.
Getting Started 34
Gracenote 11
remote 41
address 19
INDEX
PAGE 154
FIREBALL-MP INSTALLATION & USER ’S GUIDE - M22002-01A1
Group
add new 67
add new music 67
create new iRadio 75
definition 17
delete iRadio 77
delete music group 69
edit iRadio 76
edit music group 68
groups
I
INFO
remote 36
Information
contacting Escient 19
Info text area
definition 17
Installing Batteries Into Remote 140
Internet Connections
when does FireBall connect 130
overview 50
iRADIO
remote 36
iRadio Group
GUIDE
Guide screen
looks on touch screen 95
H
Highlight
remote 40
create new 75
delete 77,80
edit 76,79
iRadio Mode
how to access 72
definition 17
iRadio Options
what is it 136
iRadio Station
Home Networking
How to Return a Product
warranty info 10
changing 74
how to navigate 73
to play 73
INDEX
PAGE 155
FIREBALL-MP INSTALLATION & USER ’S GUIDE - M22002-01A1
K
Key
definition 17
L
Listening to a Music Title 55
M
Managing Music 57
Manual Disclaimers 13,16
Minor Troubleshooting 108
MODE
remote 36
Model and Serial Numbers 7
Monitor
Music Group
delete 69
edit 68
Music Mode
how to access music 52
Music Options
how to access “more” 66
Music Player Screen
how to navigate thru remote 54
Music Player Screen Overview 53
Music Playlist
create 59
delete 61
edit 60
Music Title
choosing to play 55
how to connect 26
N
definition 17
connecting to FireBall 30,31
Navigating Among iRadio Stations 73
Navigating the Music Player Screen 54
Navigation Keys
remote 40
Networking
change how played 62
New iRadio Group
MP3
Multi-Room Controller
MUSIC
Music
remote 37
home 136
INDEX
PAGE 156
FIREBALL-MP INSTALLATION & USER ’S GUIDE - M22002-01A1
create 75
remote 37
New Music Group
OPTION
New Music Playlist
Options
create 67
create 59
NEXT
remote 37
changing for iRadio 74
music 58
remote 40
Options Screen
remote 39
normal
Organize Your Music 58
Out of Warranty Repair 10
NUMERIC/TEXT keypad
P
Numeric Entry Mode
password protection 90
PAUSE
NEXT TRACK/FAST FORWARD
how music is played 62
remote 38
remote 41
music-overview 48
remote 39
O
PHAST
Off
power state 33
Phone - Escient 19
PLAY
power state 33
Player Screen
On
One Key Access to Favorite Music 56
One Key Access to Random Music 56
OpenGlobe
enhanced services 132
RS-232 pins 102
remote 38
overview 48
Player screen
appears on touch screen 98
Player Screen Overview
INDEX
PAGE 157
FIREBALL-MP INSTALLATION & USER ’S GUIDE - M22002-01A1
music 53
Playing an iRadio Station 73
Playing Music 51
Playlist
create music playlist 59
definition 18
delete 61
edit 60
PLAY FAVORITES
remote 38
Programming the Remote 140
Programming TV/VCR Combo 141
R
Rack shelves
available from Escient 22
RANDOM
remote 40
remote 40
random group
on privacy 12
Random Music
remote 36
random title
Policy
POWER
Power States: On, Standby, Off 33
Power Supply
specs 106
Power Usage and Power Supply
specs 106
Preferences
music recording 87
nightly updates 87
screen saver 87
to change 87
PREVIOUS TRACK/REWIND
how music is played 62
how to play 56
how music is played 62
Re-Assigning Device Keys
on remote 144
RECORD
remote 39
Register with Escient 45
Remote
checking the codes 143
how to enter text 34,41
programming tv/vcr combo 141
re-assigning device keys 144
INDEX
PAGE 158
FIREBALL-MP INSTALLATION & USER ’S GUIDE - M22002-01A1
searching for your code 142
to program 140
typing characters 41
remote control button bar
on touch screen 96,99
seen on touch screen 96
Repair
warranty 10
repeat group
how music is played 62
repeat title
how music is played 62
Searching for Your Code 142
Security Settings
change 90
Selected
definition 18
Selecting and Listening to a Music Title 55
Serial No 7
Serial Number 7
Service Marks 11
Settings
change security 90
internet configurations 86
repeat track
SETUP
reset the FireBall unit
Setup Process 44
sharpness
how music is played 62
procedure 33
Returning a Product 10
S
remote 36
change 88
SMPTE color bars 88
Source
definition 18
S-Video TV
Specs
screen burn-in
Standby
screen centering 88
screen saver preferences 87
Start setup 34
STOP
how to connect 26
need for screen saver 13
technical 103
power state 33
INDEX
PAGE 159
FIREBALL-MP INSTALLATION & USER ’S GUIDE - M22002-01A1
remote 39
TRANSPORT
seen on touch screen 97
transport button bar
customer service 19
Troubleshooting
styles bar
Support
remote 38
on touch screen 98
minor tips 108
T
Typing Characters with the Remote 41
Technical Specs
U
Terms and Definitions 17
Terms of Coverage
Unpack The Equipment
FireBall 103
warranty info 8
Text Entry Via the FireBall Remote Control
34,41
Title/Track Area Details 49
toggle button
on touch screen 97
touch screen
buttons on guide 95
hardware install 21,22
update software 92
User Interface
overview 46
Using iRadio 70
Utilities
to access FireBall 92
update software 92
web sync 92
Touch Screen Interaction 94
Touch Screen Overview 93
Tracks
V
Trademarks & Service Marks 11
Video, and Com Ports Settings
definition 18
edit 64
VGA Projector
how to connect 27
INDEX
PAGE 160
FIREBALL-MP INSTALLATION & USER ’S GUIDE - M22002-01A1
change 88
Video specs 104
VIEW
remote 37
VOLUME
remote 38
Volume Lock
remote 146
W
Warnings 13
Warranty Information 8
website
Escient 19
What is Covered
warranty info 8
INDEX
PAGE 161