1
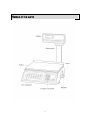
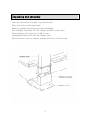
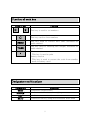
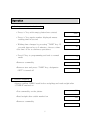
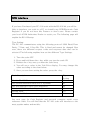
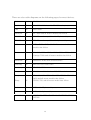
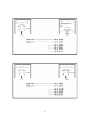
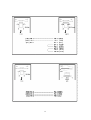
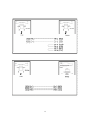
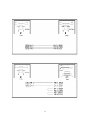
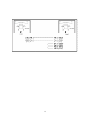
Operating manual
MODEL : PC-100
POS
ECR Interface
ACOM
1
Gratitude
Thank you for your purchasing our product, we are always trying to serve
you with a good quality as a reliable weighing instrument and enhanced
features to supporting various kinds of conveniences of conveniences
Specifications
PC-100 ( ECR Interface )
Items
Minimum graduation
6 kg
15 kg
30 kg
2g
5g
10 g
Maximum Tare
Full tare
A/D update speed
9 times / sec.
Internal resolution
60,000
Display(digit)
VFD Weight(5)
Operating temp.
-10℃ ~ 40℃
Humidity
RH.35% ~ 85%(no condensation)
Power source
AC 115, 230 / 50, 60Hz
Power consumption
AC only Approx. 6W
Fuse rating
250V / 0.2A
Platter size/mm(inch)
350(13.8) x 270(10.6)
Size mm(inch)
Poled -> 365(14.4) x 365(14.4) x 470(18.5)
Precautions
Place the scale on the flat and rigid surface
Place the scale far away from heavy EMI noises
Level the scale with adjusters
Do not subject the impact on the scale
Do not use cleaner included solvent or sinner
The scale must be calibrated by authorized person initially and
regularly under an each country’s related law
2
Names of the parts
3
Unpacking and assembly
Open the carton box and take out packed scale
Place the scale on the rigid desk.
Remove packing Styrofoam and vinyl packaging
Put in display assembly into the display bracket of the scale.
Fasten display pole with two of M4 screws.
Arranging harness wire into the display pole.
Fasten bottom cover on display bracket with four of M3 screws.
4
Function of each key
Name of key
0
9
C
Function
This key is used to set numbers
This key used to clear numbers
ZERO
This key used to correct zero shift, activated on
stable marked
TARE
This key used to entering tare weight, activated on
stable marked
*
Printer version
This key is used to print
Battery version
This key is used to restart the scale from standby
mode in battery used
Designators and functions
Designators
“ZERO”
“STABLE”
“NET”
“BATT”
Functions
It indicates centered zero
It indicates stable status in weighing
It indicates tare entered
It indicates battery using and exhausted when blink
5
Using Battery(optional)
Scale works by battery when not in using AC power, please read carefully
for the best condition of rechargeable battery, while scale is being worked
by battery the designator “BATT” is indicated
First operation from delivery
The battery may be exhausted during a long delivery or other reasons,
please charge the battery fully.
Charging times
Times for a full charged battery are 11 hours with scale turned on and 15
hours with scale turned off. When you use a scale out door it is
recommended charge the battery after message “Lo-bAt”(low battery)
Voltage indication
Scale indicates a voltage either turned on by power switch or restarting
from stand by mode by “*”key
Warning voltage
The battery exhausted to lower lever then scale warns “Lo-Bat” with beep
Sound three times, this means battery will work a few hours more, please
Charge the battery
Power down voltage
If the scale is left after a message “Lo-Bat” for a long time then scale will
Put power down mode itself, at this moment turn off power switch
immediately and commence the charging battery
Stand by mode
Scale is left without weighing or key input for a time which has been set to
Waiting time then scale will jump into the stand by mode in order to saving
a battery power and scale will wake up by pressing “*”key, waiting time is
programmable.
6
Operation
1. Setting a waiting time(optional)
• Press “*” key with empty platter(zero status)
timE
• Press “*” key again, number displayed means
waiting time in second
• Waiting time changes by pressing “TARE” key 15
seconds interval up to 3 minutes, choose a time
*Set time “0”for a continues operations
30
45
• Press”*”key to programming and exit to normal
mode
0
•Remove commodity
0
•Remove tare and press “TARE” key, designator
“NET” it turned off
0
2. General weighing
Always confirm “ZERO” mark before weighing and read weight after
“STABLE” marked on
324
•Put commodity on the platter
•Read weight after stable marked on
324
•Remove commodity
0
7
3. Weighing with tare
A. Unknown Tare
• Place the tare on the platter
156
• Press “TARE” key, designator “NET” is
turned on
0
• Put commodity on the tare
324
• Read weight after designator “STABLE”
marked on
324
• Remove commodity
0
• Remove tare and press “TARE” key, designator
“NET” is turned off
0
4. Errors table
Error
Meaning
Treatment
ZERO
Initial zero error
Remove weight on the platter and
Restart the scale
Otherwise call service
OF-1
Add up over flow
Clear sum total
OF-2
Transaction over flow
Clear sum total
OF-3
Daily total over flow
Clear daily total
ADC
Analog circuit Failure
Call service
EEP
Memory failure
Call service
PARA
Parameter failure
Call service
8
ECR Interface
Instructions for Setting the RS-232 Port
If you have Purchased your PC-100 scale with the RS-232 kit you will be
Able to interface you scale to a PC or virtually any ECR(Electronic Cash
Register) if you do not have this Feature or aren’t sure. Please contact
your local ACOM Authorizes Dealer to assist you. The following page will
explain the RS-232setup.
Type Setting:
The PC-100 communicates using the following protocol: 9600 Baud, Even
Parity, 7 Data, and 1 Stop Bit. This is fixed and cannot be changed How
ever, there are different request codes and response data that can be
selected. The following explains how set the different Type Settings.
1.
2.
3.
4.
Turn the scale OFF
Press and hold down the * key while you turn the scale ON
Release the * key ones you hear the scale beep
You will see a value in the Unit Price display. You may change this
value according to the chart below.
5. Once you are done setting the value, press the * key
Basic Description
Type
Setting
Disable RS-232 Port
00
NCI General Interface (Most P.O.S. Systems)
01
NCI ECR Interface (Most Cash Registers)
02
Toledo 8213 (Many Cash Register)
03
Stream Mode
10
Hand Shake Mode
20
See next page for Cash Register and personal computer model cross
reference chart. You will find that the PC-100 scale will interface to the
most popular makes and models.
9
There are also cable diagrams on the following pages for most devices.
Make
Setting
Models
Casio
01
SA-3000,all Casios with RS-232 scale ports
CRS
02
CRS-3000
DataSym
02
DT-2000 and all newer models that follow
IBM PC
01
IBM PCs and compatible with 25 pin serial ports
IBM PC
01
IBM PCs and compatible with 9 pin serial ports
NCR
02
2170, 7452, 7453, 7445 Falcon, and all newer
models that follow
Omron
02
RS-4841,4810, 4541, 4341, 4310, 4510, 4540,
Vantage 7000, and all newer models that follow
Panasonic
02
Panasonic ECRs with serial interface
Samsung
02
ER-550, 650, 6500, 6540
Samsung
02
ER-5100, 5140
Sanyo
03
All older models that have RS-232 scale interface
Sharp
03
ER*A880,A850,A750,A650,A570,A550S,A470,A460,
A430 and all newer models that follow
Sharp
03
UP600, 700, and all newer model that follow
Swintec
02
2250, with 25 pin serial ports
Swintec
02
2250, with 9 pin serial ports
Uniwell
03
UX 70-05, UX60-05, UX 43-05, TX850, SX6000,
SX7000
10
11
12
13
14
15
16
17
ACOM Inc.
#679-1, Yugo-ri, Gunnae-myuun, Pocheon-gun,
Kyunggi-do, 487-811 Korea
18