1
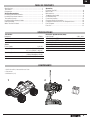
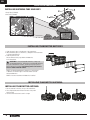
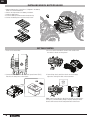
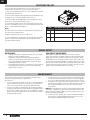
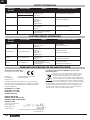
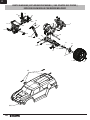
™
1/18-Scale
Monster Truck
ECX8300 | ECX8300OMP
ECX8400 | ECX8400OMP
Instruction Manual
Bedienungsanleitung
Manuel d’utilisation
MANUALE
Congratulations on your purchase of the ECXTM SmashTM
Monster Truck. This 1/18-scale model introduces you to
the sport of RC driving.
Herzlichen Glückwunsch zum Kauf des ECXTM SmashTM
Monster Truck. Dieses 1/18 Scale Model öffnet Ihnen
die Welt des RC Car Sports.
Nous vous félicitons pour l’achat du ECXTM SmashTM
Monster Truck. Ce modèle 1/18 vous introduit au sport
de la conduite RC.
Congratulazioni per l’acquisto di questo SmashTM ECX
Monster Truck. Questa vettura in scala 1/18 vi introdurrà
nel mondo dei modelli RC.
EN
NOTICE
All instructions, warranties and other collateral documents are subject to change at the sole discretion of Horizon Hobby, Inc.
For up-to-date product literature, visit http://www.horizonhobby.com and click on the support tab for this product.
Meaning of Special Language:
The following terms are used throughout the product literature to indicate various levels of potential harm when operating this product:
NOTICE: Procedures, which if not properly followed, create a possibility of physical property damage AND little or no possibility of injury.
CAUTION: Procedures, which if not properly followed, create the probability of physical property damage AND a possibility of serious injury.
WARNING: Procedures, which if not properly followed, create the probability of property damage, collateral damage, and serious injury
OR create a high probability of superficial injury.
WARNING: Read the ENTIRE instruction manual to become familiar with the features of the product before operating.
Failure to operate the product correctly can result in damage to the product, personal property and cause serious injury.
This is a sophisticated hobby product and NOT a toy. It must be operated with caution and common sense and requires some basic mechanical
ability. Failure to operate this Product in a safe and responsible manner could result in injury or damage to the product or other property. This
product is not intended for use by children without direct adult supervision. Do not attempt disassembly, use with incompatible components
or augment product in any way without the approval of Horizon Hobby, Inc. This manual contains instructions for safety, operation and maintenance. It is essential to read and follow all the instructions and warnings in the manual, prior to assembly, setup or use, in order to operate
correctly and avoid damage or serious injury.
Safety Precautions and Warnings
As the user of this product, you are solely responsible for operating
in a manner that does not endanger yourself and others or result
in damage to the product or the property of others.
This model is controlled by a radio signal subject to interference
from many sources outside your control. This interference can cause
momentary loss of control, so it is advisable to always keep a safe
distance in all directions around your model, as this margin will help
avoid collisions or injury.
Age Recommendation: Not for children under 14 years.
This is not a toy.
•Never operate your model with low transmitter batteries.
•Always operate your model in an open area away from cars, traffic
or people.
•Never operate the model in the street or in populated areas
for any reason.
•Carefully follow the directions and warnings for this and any optional
support equipment (chargers, rechargeable battery packs, etc.) you
use.
•Keep all chemicals, small parts and anything electrical out
of the reach of children.
2
•Moisture causes damage to electronics. Avoid water exposure
to all equipment not specifically designed and protected for
this purpose.
•Never lick or place any portion of your model in your mouth
as it could cause serious injury or even death.
•Exercise caution when using tools and sharp instruments.
•Take care during maintenance, as some parts may have sharp edges.
•Immediately after using your model, do NOT touch equipment on
the model such as the motor, electronic speed control and battery,
because they generate high temperatures. You may
burn yourself seriously by touching them.
•Do not put fingers or any objects inside rotating and moving parts, as
this may cause damage or serious injury.
•Always turn on your transmitter before you turn on the
receiver in the car. Always turn off the receiver before
turning your transmitter off.
•Keep the wheels of the model off the ground when
checking the operation of the radio equipment.
EN
Table of Contents
Specifications................................................................................. 3
Transmitter..................................................................................... 3
Components................................................................................... 3
Vehicle Preparations
Installing Transmitter Batteries..................................................... 4
Installing Transmitter Antenna...................................................... 4
Transmitter Controls....................................................................... 5
Installing Vehicle Battery Holder................................................... 6
Getting Started.............................................................................. 6
When You Are Finished................................................................. 7
Operation
Resetting The ESC......................................................................... 8
Motor Care..................................................................................... 8
Maintenance.................................................................................. 8
Troubleshooting Guide................................................................... 9
Limited Warranty........................................................................... 9
Contact Information..................................................................... 10
Customer Service Information..................................................... 10
Compliance Information For The European Union....................... 10
Parts Diagram.............................................................................. 39
Parts List...................................................................................... 41
Specifications
Transmitter
Frequency27MHz
ModulationAM
Battery
AA x 8
Servo
Power Supply
Output Torque
Operating Speed
Size
Electronic Speed Control (ESC)
Input Voltage
4.8V ~ 8.4V
Electric Capacity (FET)
Forward 26A/700A
Electric Capacity (FET)
Reverse 13A/350A
PWM Frequency
1kHz
BEC Voltage
5V/1A
Size
45.7mm (L) x 39.2mm (W) x 20,9mm (H)
Weight
34 g
4.8V~6V
23.6 oz-in @6.0V (1.7kg-cm)
18.1 oz-in @4.8V (1.3kg-cm)
0.24sec/60 degrees @6.0V
0.30sec/60 degrees @4.8V
22.5mm (L) x 11.5mm (W) x 26mm (H)
Components
1.ECX™ Smash™ 1/18-scale Monster Truck
2.Transmitter
3.AA Batteries (12)
1
2
3
3
EN
Vehicle Preparations
Installing Antenna Tube and Body
2
1.Body Clips (ECX8323)
2. Antenna (ECX1087)
1
installing transmitter batteries
1. Slide the panel open on the bottom of the transmitter.
2.Obey the battery plus (+) and minus (-) diagram in the transmitter
to install 8 AA batteries.
3.Slide the panel closed. We recommend using only alkaline AA batteries
in the transmitter.
CAUTION: If using rechargeable batteries, charge only
rechargeable batteries. Charging non-rechargeable batteries
may cause the batteries to burst, resulting in injury to persons
and/or damage to property. Low battery power can result in
loss of control of the RC vehicle.
NEVER install damaged batteries, batteries of mixed types
or batteries of different ages in the transmitter. Remove
exhausted batteries.
NEVER store the transmitter with batteries installed.
installing transmitter antenna
Installing Transmitter antenna
1.Put the antenna in the hole in top of the transmitter.
2.The collapsed antenna will be 4.25 inches long when
fully inserted.
3.Turn the antenna clockwise until it is tight.
4
1
EN
Transmitter controls
Reverse Switch
ST. D/R
Adjusts the
amount the front
wheels move
when turned left
or right (Steering
Dual Rate)
Allows you to change the direction of
steering (ST. REV) and throttle (TH. REV)
controls. (Default settings are Normal for
steering and Reverse for throttle)
Throttle Trim
Power Switch
Power on
or off the
transmitter
Adjusts the neutral point of
the electronic speed control
Steering Trim
Battery Level Indicator
Bright Green: Indicates good
battery voltage. Light begins
to dim below 8V (replace
batteries).
Adjust to make the vehicle
drive straight with no input
at the steering wheel
Bright Red: Indicates strong
signal strength. Light dims as
output power decreases.
Throttle Trigger
Steering Wheel
Forward
Stop
(when TH.
REV switch on R)
Reverse
(when TH.
REV switch on R)
Controls power to motor for forward
or reverse (See TH. REV switch)
Control steering. Right and Left
steering with ST. REV Switch
on N (See ST. REV switch)
AM 27 MHz Transmitter Crystal
Part #
ECX1081
ECX1082
ECX1083
ECX1084
ECX1085
ECX1086
AM Transmitter Crystal
(RX)
Description
Crystal Set 1 26.995
Crystal Set 2 27.045
Crystal Set 3 27.095
Crystal Set 4 27.145
Crystal Set 5 27.195
Crystal Set 6 27.255
AM Receiver Crystal
(RX)
Note: Paired AM crystals must be
replaced to change control frequencies.
Do NOT use FM Crystals.
5
EN
installing vehicle battery holder
1. Obey the battery plus (+) and minus (-) diagram in the battery
holder to install 4 AA batteries.
2.Remove the clip and raise the battery hold down.
3.Install the battery box.
4.Lower the battery hold down and reinstall the clip.
5.Connect the battery box to the Receiver/ESC unit.
getting started
1.Power on the transmitter.
3.Do a test of the transmitter’s control of the vehicle with
the vehicle’s wheels off the ground.
2. Connect the battery box to the Electronic Speed Control (ESC) /
Receiver unit and power on the vehicle.
4.Start driving slowly and if the wheels are not straight,
adjust the steering trim dial on the transmitter.
ON
TIP: Seat the motor brushes by driving smoothly on a flat surface
during use of the first battery charge. Properly seating the motor
brushes will increase the life and performance of the motor.
6
EN
when you are finished
1.Power off the vehicle.
3.Disconnect the battery box from the ESC/Receiver unit.
OFF
2.Power off the transmitter.
4.Remove the battery box from the vehicle.
OperatioN
• ALWAYS turn on your transmitter before you turn on the
receiver in the vehicle. Always turn off the receiver before
turning your transmitter off.
• ALWAYS operate your vehicle in a wide open area. Operating the
vehicle in a small space or indoors can cause overheating at low
speeds. Operating at low speed increases heat in the electronic
speed control (ESC). Overheating can damage the vehicle and
failure may result.
Steering Dual Rate
• If the vehicle turns too sharply and/or spins out easily, reduce
the steering dual rate (turn the knob counterclockwise).
• For sharper or additional steering, increase the steering dual rate
(turn the knob clockwise).
Throttle Operation
• Pull the transmitter trigger to increase throttle.
• Push the trigger to apply brake or reverse.
Important: The slower the vehicle is moving, the quicker it will
change from forward to reverse.
7
EN
resetting the esc
The ESC comes preset and ready for use. If for some reason you
should need to reset the ESC, use the following instructions:
1. Turn on the transmitter and ESC. Press the setup button—the RED
and GREEN LEDs will come on.
2. Pull the throttle trigger all the way back (full speed) and press the
setup button once—only the GREEN LED will come on.
3. Push the trigger full forward (brake/reverse) and push the setup
button once—only the RED LED will come on.
4. Let the throttle trigger return to the neutral (center) position and
press the setup button once more to save the program and exit setup
mode—only the GREEN LED will be on.
Notes:
LED
A: If the receiver does not receive a signal from the Transmitter, the
ESC will not enter program mode.
B: While in program mode, the motor will not run.
C: If the setup button is not pressed for 20 seconds while in program
mode, the ESC will exit the program mode, and the data will be
restored to default settings.
LED Status Description
LED Indication
Solid Red
Forward
Solid Green
Reverse
Solid Green & Red
Brake
initial setup
motor care
• Seat the motor brushes by driving smoothly on a flat surface
during use of the first battery charge.
• Prolong motor life by preventing overheating conditions.
Undue motor wear results from frequent turns, stops and
starts, pushing objects, driving in deep sand and tall grass,
and driving continuously up hill.
• Over-temperature protection is installed on the ESC to prevent
circuit damage, but cannot protect the motor from driving
against heavy resistance.
Ride Height Adjustment
Ride height is an adjustment that affects the way the vehicle
jumps, turns and goes over bumps. Drop one end of the vehicle from
approximately 3 inches (75 mm) in height onto a flat surface. When
dropping the front of the vehicle, after the vehicle settles, make sure
the front arms are equal and parallel to the flat surface. Do the same
with the rear to make sure both arms are parallel with the flat surface.
Lower the front ride height to increase steering. Lower the rear ride
height to increase traction but decrease steering.
Maintenance
Your ECX Smash Monster Truck needs periodic maintenance and
cleaning to keep performing at its optimal level.
After each run:
1. Look over your vehicle to make sure there is no physical damage
that can impede the operation of your vehicle, such as broken
parts or tires that may have come unglued and need repair.
2. If there are no defects or broken parts that need to be repaired,
completely wipe down the vehicle and body using paper towels or
shop towels. In hard to reach places, use a toothbrush or a small
brush to remove dirt or debris out of the small areas that cannot
be removed with a towel.
8
3. Screws can come loose over time and need to be retightened. For
screws fastening into plastic parts, make sure they fit snugly but
are not over tightened, which could cause the plastic to strip out.
4. If you plan to store your vehicle for more than a week, it is a good
idea to remove the batteries from the radio and vehicle to prevent
any unexpected damage, such as corrosion, that can result in
costly repairs.
NotICe: A small amount of current is constantly pulled from the battery when it is plugged in, even with the power switch turned to OFF. Always unplug your vehicle’s battery from the ESC when not in use to
prevent it from fully discharging.
5. Perform any other needed repairs to parts that may have broken
off the chassis. Driving a damaged vehicle will result in costly
and possibly irreparable damage to the vehicle.
EN
Troubleshooting Guide
Problem
Possible Cause
Solution
Short Run Time
• Vehicle batteries damaged/low voltage
• Motor dirty or brushes worn
• Check/change AA batteries
• Check/clean/replace the motor
Sluggish Action
• Motor dirty or brushes worn
• Bind in drivetrain
• Vehicle batteries have low voltage
• Check/clean/replace the motor
• Clean/adjust the gear mesh between the spur and pinion gears
• Replace AA vehicle batteries
Controls Reversed
• ST. REV or TH. REV
• Change switch position on the transmitter
Motor/ESC overheat
• Bind in drivetrain
• Clean/adjust the gear mesh between the spur and pinion gears
Doesn’t Operate
• Transmitter batteries low
• Transmitter powered off
• ESC powered off
• AA batteries have low voltage
• Replace/recharge
• Power On
• Power On
• Replace the vehicle AA batteries
Poor Range
• Transmitter batteries low
• Transmitter antenna is damaged or loose
• Receiver antenna damaged
• Replace/recharge
• Check/tighten
• Check/repair/replace
limited Warranty
What this Warranty Covers
Horizon Hobby, Inc. (“Horizon”) warrants to the original purchaser
that the product purchased (the “Product”) will be free from defects
in materials and workmanship at the date of purchase.
What is Not Covered
This warranty is not transferable and does not cover (i) cosmetic damage,
(ii) damage due to acts of God, accident, misuse, abuse, negligence,
commercial use, or due to improper use, installation, operation or
maintenance, (iii) modification of or to any part of the Product, (iv)
attempted service by anyone other than a Horizon Hobby authorized service
center, or (v) Products not purchased from an authorized Horizon dealer.
OTHER THAN THE EXPRESS WARRANTY ABOVE, HORIZON MAKES NO
OTHER WARRANTY OR REPRESENTATION, AND HEREBY DISCLAIMS
ANY AND ALL IMPLIED WARRANTIES, INCLUDING, WITHOUT
LIMITATION, THE IMPLIED WARRANTIES OF NON-INFRINGEMENT,
MERCHANTABILITY AND FITNESS FOR A PARTICULAR PURPOSE. THE
PURCHASER ACKNOWLEDGES THAT THEY ALONE HAVE DETERMINED
THAT THE PRODUCT WILL SUITABLY MEET THE REQUIREMENTS OF THE
PURCHASER’S INTENDED USE.
Purchaser’s Remedy
Horizon’s sole obligation and purchaser’s sole and exclusive remedy shall
be that Horizon will, at its option, either (i) service, or (ii) replace, any
Product determined by Horizon to be defective. Horizon reserves the right
to inspect any and all Product(s) involved in a warranty claim. Service
or replacement decisions are at the sole discretion of Horizon. Proof of
purchase is required for all warranty claims. SERVICE OR REPLACEMENT
AS PROVIDED UNDER THIS WARRANTY IS THE PURCHASER’S SOLE AND
EXCLUSIVE REMEDY.
Limitation of Liability
HORIZON SHALL NOT BE LIABLE FOR SPECIAL, INDIRECT, INCIDENTAL
OR CONSEQUENTIAL DAMAGES, LOSS OF PROFITS OR PRODUCTION OR
COMMERCIAL LOSS IN ANY WAY, REGARDLESS OF WHETHER SUCH
CLAIM IS BASED IN CONTRACT, WARRANTY, TORT, NEGLIGENCE, STRICT
LIABILITY OR ANY OTHER THEORY OF LIABILITY, EVEN IF HORIZON HAS
BEEN ADVISED OF THE POSSIBILITY OF SUCH DAMAGES. Further, in
no event shall the liability of Horizon exceed the individual price of the
Product on which liability is asserted. As Horizon has no control over use,
setup, final assembly, modification or misuse, no liability shall be assumed
nor accepted for any resulting damage or injury. By the act of use, setup or
assembly, the user accepts all resulting liability. If you as the purchaser or
user are not prepared to accept the liability associated with the use of the
Product, purchaser is advised to return the Product immediately in new and
unused condition to the place of purchase.
Law
These terms are governed by Illinois law (without regard to conflict
of law principals). This warranty gives you specific legal rights, and you
may also have other rights which vary from state to state. Horizon reserves
the right to change or modify this warranty at any time without notice.
WARRANTY SERVICES
Questions, Assistance, and Repairs
Your local hobby store and/or place of purchase cannot provide warranty
support or service. Once assembly, setup or use of the Product has been
started, you must contact your local distributor or Horizon directly. This
will enable Horizon to better answer your questions and service you in
the event that you may need any assistance. For questions or assistance,
please direct your email
to [email protected], or call 877.504.0233 toll
free to speak to a Product Support representative. You may also
find information on our website at www.horizonhobby.com.
Inspection or Services
If this Product needs to be inspected or serviced, please use the Horizon
Online Service Request submission process found on our website or call
Horizon to obtain a Return Merchandise Authorization (RMA) number. Pack
the Product securely using a shipping carton. Please note that original
boxes may be included, but are not designed to withstand the rigors of
shipping without additional protection. Ship via a carrier that provides
tracking and insurance for lost or damaged parcels, as Horizon is not
responsible for merchandise until it arrives and is accepted at our facility.
An Online Service Request is available at http://www.horizonhobby.com
under the Support tab. If you do not have internet access, please contact
Horizon Product Support to obtain a RMA number along with instructions
for submitting your product for service. When calling Horizon, you will be
asked to provide your complete name, street address, email address and
phone number where you can be reached during business hours. When
sending product into Horizon, please include your RMA number, a list of
the included items, and a brief summary of the problem. A copy of your
original sales receipt must be included for warranty consideration.
Be sure your name, address, and RMA number are clearly written
on the outside of the shipping carton.
Notice: Do not ship Li-Po batteries to Horizon. If you have any
issue with a Li-Po battery, please contact the appropriate Horizon
Product Support office.
Warranty Requirements
For Warranty consideration, you must include your original sales
receipt verifying the proof-of-purchase date.
Provided warranty conditions have been met, your Product will be serviced
or replaced free of charge. Service or replacement decisions are at the sole
discretion of Horizon.
Non-Warranty Repairs
Should your service not be covered by warranty service will be
completed and payment will be required without notification or
estimate of the expense unless the expense exceeds 50%
of the retail purchase cost.
By submitting the item for service you are agreeing to payment of the
service without notification. Service estimates are available upon request.
You must include this request with your item submitted for service. Nonwarranty service estimates will be billed a minimum of ½ hour of labor. In
addition you will be billed for return freight. Horizon accepts money orders
and cashiers checks, as well as Visa, MasterCard, American Express, and
Discover cards. By submitting any item to Horizon for service, you are
agreeing to Horizon’s Terms and Conditions found on our website http://
www.horizonhobby.com/Service/Request/.
9
EN
Contact information
Country of
Purchase
United States of
America
United Kingdom
Horizon Hobby
Horizon Service Center
(Electronics and engines)
Horizon Product Support
Horizon Hobby Limited
Address
Phone Number/Email Address
4105 Fieldstone Rd
Champaign, Illinois
61822 USA
877-504-0233
[email protected]
Units 1-4 Ployters Rd
Staple Tye
Harlow, Essex
CM18 7NS
United Kingdom
+44 (0) 1279 641 097
[email protected]
Germany
Horizon Technischer Service Christian-Junge-Straße 1
25337 Elmshorn
Germany
+49 (0) 4121 2655 100
[email protected]
France
Horizon Hobby SAS
+33 (0) 1 60 47 44 70
14 Rue Gustave Eiffel
Zone d’Activité du Réveil Matin
91230 Montgeron
Customer Service Information
Country of
Purchase
United States of
America
Horizon Hobby
Address
Phone Number/Email Address
Sales
4105 Fieldstone Rd
Champaign, Illinois
61822 USA
(800) 338-4639
[email protected]
United Kingdom
Horizon Hobby Limited
Units 1-4 Ployters Rd
Staple Tye
Harlow, Essex
CM18 7NS
United Kingdom
+44 (0) 1279 641 097
[email protected]
Germany
Horizon Hobby GmbH
Christian-Junge-Straße 1
25337 Elmshorn
Germany
+49 4121 46199 60
[email protected]
France
Horizon Hobby SAS
14 Rue Gustave Eiffel
Zone d’Activité du Réveil Matin
91230 Montgeron
+33 (0) 1 60 47 44 70
[email protected]
Compliance Information for the European Union
Declaration of Conformity
(in accordance with ISO/IEC 17050-1)
Product(s):
Item Number(s):
Equipment class:
2WD 1/18 Monster Truck Smash
ECX8300, ECX8400
1
The object of declaration described above is in conformity with
the requirements of the specifications listed below, following the
provisions of the European R&TTE directive 1999/5/EC and EMC
Directive 2004/108/EC:
EN 300 220-3 V. 1.1.1: 2000
EN 301 489-1 V1.7.1: 2006
EN 301 489-3 V. 1.4.1: 2002
EN 60950-1:2006+A11
EN55022: 2006+A1:2007
EN55024: 1998+A1: 2001+A2: 2003
EN61000-3-2:2006+A1:2009+A2:2009
EN61000-3-3:2008
Signed for and on behalf of:
Horizon Hobby, Inc.
Champaign, IL USA
October 29, 2011
10
Steven A. Hall
Vice President
International Operations and Risk Management
Horizon Hobby, Inc.
Instructions for disposal of WEEE by users in the
European Union
This product must not be disposed of with other waste.
Instead, it is the user’s responsibility to dispose of their
waste equipment by handing it over to a designated
collections point for the recycling of waste electrical and
electronic equipment. The separate collection and recycling
of your waste equipment at the time of disposal will help
to conserve natural resources and ensure that it is recycled
in a manner that protects human health and the environment. For more
information about where you can drop off your waste equipment for
recycling, please contact your local city office, your household waste
disposal service or where you purchased the product.
IT
parts diagram | explosionszeichnung | vue ÉclatÉe des pieces |
esploso del modello con referenza pezzi
32
28
37, 38, 39,
40, 41, 42
12
15
24
27
28
15
11
19
34
8
33
17
17
15
36
9
31
23
31
11
18
18
19
13
26
6
39
IT
parts diagram | explosionszeichnung | vue ÉclatÉe des pieces |
esploso del modello con referenza pezzi
24
24
24
24
12
29
5
30
19
24
19
10
10
29
36
22
31
10
23
13
31
18
7
13
25
3,4,5
40
IT
parts diagram | explosionszeichnung | vue ÉclatÉe des pieces |
esploso del modello con referenza pezzi
21
16
21
21
14
20
35
35
10
10
parts list | Ersatzteile | Pièces de rechange | Pezzi di ricambio
#
Description
Beschreibung
Description
Descrizione
1
ECX8150
Transmitter Radio: Smash
Sender: Smash
Emetteur: Smash
Trasmettitore: Smash
2
ECX8151
Transmitter Replacement
Antenna
Ersatzantenne Sender
Antenne de remplacement
pour émetteur
Antenna di ricambio per
trasmettitore
3
ECX8301
Painted Body Trim 1: Smash
Lackierte Karosserie Version
1: Smash
Carrosserie décoration 1:
Smash
Adesivi colorazione
carrozzeria: Smash
4
ECX8302
Painted Body Trim 2: Smash
Lackierte Karosserie Version
2: Smash
Carrosserie décoration 2:
Smash
Adesivi colorazione
carrozzeria: Smash
5
ECX8303
Clear Body: Smash
Karosserie klar: Smash
Carrosserie transparente:
Smash
Carrozzeria trasparente:
Smash
6
ECX8304
Pre-Mount Front Tire Set (2),
Black: Smash
Vorderreifen vormontiert Set
(2) Schwarz :Smash
Pneus avant montés sur jantes
noires (2): Smash
Set gomme anteriori
premontate (2), Nere:
Smash
7
ECX8305
Pre-Mount Rear Tire Set (2),
Black: Smash
Hinterreifen vormontiert Set (2)
Schwarz: Smash
Pneus arrière montés sur
jantes noires (2): Smash
Set gomme posteriori
premontate (2), Nere:
Smash
8
ECX8306
Main Chassis & Battery
Strap: Smash
Chassis und Akkuhalter: Smash
Châssis avec support de
batterie: Smash
Telaio principale e fascette
batteria: Smash
9
ECX8307
Front Suspension Arm Set
w/Pivot Block: Smash
Querlenkerset vorne: Smash
Set de bras de suspension
avant avec renfort de cellule:
Smash
Set bracci sospensione
anteriore con perno
bloccaggio: Smash
10
ECX8308
Rear Suspension Arm Set
w/Pivot Block: Smash
Querlenkerset hinten: Smash
Set de bras de suspension
arrière avec renfort de cellule:
Smash
Set bracci sospensione
posteriore con perno
bloccaggio: Smash
11
ECX8309
Front & Rear Bumper Set:
Smash
Stoßfängerset vorne/hinten:
Smash
Set de pare choc avant et
arrière: Smash
Set paraurti anteriore e
posteriore: Smash
12
ECX8310
Shock Tower Set: Smash
Dämpferbrücke Set: Smash
Set de support d’amortisseurs:
Smash
Set supporti ammortizzatori:
Smash
41
IT
parts list | Ersatzteile | Pièces de rechange | Pezzi di ricambio
#
Description
Beschreibung
Description
Descrizione
13
ECX8311
Wheel Nut & Drive Pin Set:
Smash
Radmutter & Mitnehmer Set:
Smash
Ecrou de roue avec goupille:
Smash
Set pin e dado fissaggio
ruote: Smash
14
ECX8312
Transmission Set: Smash
Getriebe Set: Smash
Transmission: Smash
Set trasmissione: Smash
15
ECX8313
Top Plate & Kickplate:
Smash
Top & Kickplate: Smash
Renfort de châssis avec
plaque de friction: Smash
Piastra superiore e zoccolo:
Smash
16
ECX8314
Pinion & Spur Set: Smash
Motorritzel & Zahnrad Set:
Smash
Pignon avec couronne: Smash
Set pignone e corona:
Smash
17
ECX8315
Steering Set: Smash
Lenkung Set: Smash
Direction: Smash
Set sterzo: Smash
18
ECX8316
Wheel Bushing Set: Smash
Radlager Set: Smash
Set de bagues de roues:
Smash
Set boccole ruote: Smash
19
ECX8317
Steering & Camber Link
Set: Smash
Lenk & Sturzstangenset: Smash
Biellettes de carrossage et de
direction: Smash
Set rinvii sterzo e camber:
Smash
20
ECX8318
Gear Cover Set: Smash
Getriebeabdeckung: Smash
Capot de transmission: Smash
Set copertura ingranaggi:
Smash
21
ECX8319
Slipper Set: Smash
Rutschkupplung Set: Smash
Sliper: Smash
Set scorrimento: Smash
22
ECX8320
Driveshaft & Axle Set:
Smash
Antriebswellen & Achsen Set:
Smash
Cardans avec axes de roues:
Smash
Set albero e semiasse:
Smash
23
ECX8321
Spindle, Carrier, Front Axle,
& Hub Set: Smash
Achsschenkel,
Set de fusées av et arr, étriers
Achschenkelträger, Vorderachse et axes de roues avant: Smash
u. Radträger Set: Smash
Set supporto ruota: Smash
24
ECX8322
Body Mount Set: Smash
Karosseriehalterset: Smash
Set de supports de carrosserie:
Smash
Set montaggio carrozzeria:
Smash
25
ECX8323
Body Clips (10): Smash
Body Clips (10): Smash
Clips de carrosserie (10):
Smash
Clips carrozzeria (10):
Smash
26
ECX8324
Complete Fastener Set:
Smash
Befestigungsset kpl.: Smash
Set de colliers: Smash
Set completo fissaggi:
Smash
27
ECX8325
Battery Box Set: Smash
Batterie/Akku Box: Smash
Boîtier de piles: Smash
Set portapile: Smash
28
ECX8326
Front Shock Set (2): Smash
Stoßdämpfer vorne Set (2):
Smash
Amortisseurs avant (2): Smash
Set ammortizzatori anteriori
(2): Smash
29
ECX8327
Rear Shock Set (2): Smash
Stoßdämpfer hinten Set
(2):Smash
Amortisseurs arrière (2):
Smash
Set ammortizzatori
posteriori (2): Smash
30
ECX8328
Shock Adjustment Set:
Smash
Stoßdämpfereinstellwerkzeug:
Smash
Set de cales d’amortisseurs:
Smash
Set regolazione
ammortizzatori: Smash
31
ECX8329
Hinge Pin Set: Smash
Querlenkerbolzenset: Smash
Set d’axes de suspension:
Smash
Set perni snodo: Smash
32
DYN4901
Tazer ESC/Receiver Unit:
Mini Surface
Tazer Regler/Empfänger
Einheit: Mini Surface
Unité RX/variateur: Mini
Surface
Unità ESC/ricevitore Tazer:
Mini Surface
33
DYN4905
Tazer Servo w/ Servo Saver:
Mini Surface
Tazer Servo mit Servo Saver:
Mini Surface
Mini servo avec sauve-servo:
Mini Surface
Servo c/salvaservo Tazer:
Mini Surface
34
DYN4906
Tazer Servo Saver Set: Mini
Surface
Tazer Servo Saver Set: Mini
Surface
Sauve-servo: Mini Surface
Set salvaservo Tazer: Mini
Surface
35
DYN4921
Tazer 280 Motor w/
Mounting Hardware
Tazer 280 Motor m. Zbh.
Visserie
Motore Tazer 280 c/viti per
montaggio
36
ECX8330
Pin Brace Set
Bolzenhalterset
Renfort de cellule
Set fermi perni
37
ECX1081
Crystal Set 1 26.995
Quarz Set 1 26.995
Paire de quartz 1 26.995
Set quarzi 1 26.995
38
ECX1082
Crystal Set 2 27.045
Quarz Set 2 27.045
Paire de quartz2 27.045
Set quarzi 2 27.045
39
ECX1083
Crystal Set 3 27.095
Quarz Set 3 27.095
Paire de quartz 3 27.095
Set quarzi 3 27.095
40
ECX1084
Crystal Set 4 27.145
Quarz Set 4 27.145
Paire de quartz 4 27.145
Set quarzi 4 27.145
41
ECX1085
Crystal Set 5 27.195
Quarz Set 5 27.195
Paire de quartz 5 27.195
Set quarzi 5 27.195
42
ECX1086
Crystal Set 6 27.255
Quarz Set 6 27.255
Paire de quartz 6 27.255
Set quarzi 6 27.255
42
ECX8300, ECX8300OMP | ECX8400, ECX8400OMP
www.ecxrc.com
© 2011 Horizon Hobby, Inc.
ECX and Smash are trademarks or registered trademarks of Horizon Hobby, Inc.
Created 10/2011 34369