1
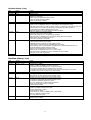
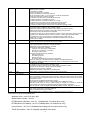
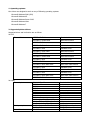
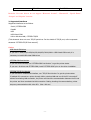
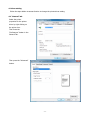
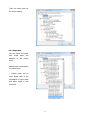
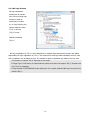
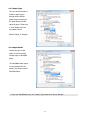
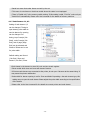
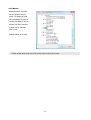
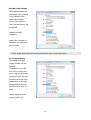
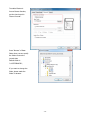
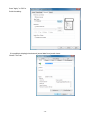
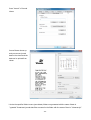
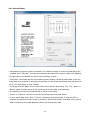
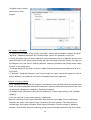
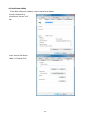
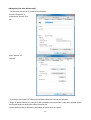
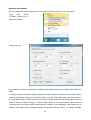
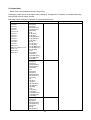
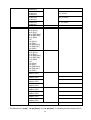
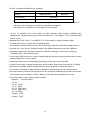
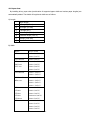
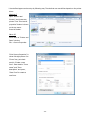
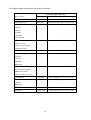
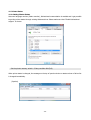
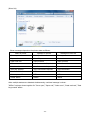
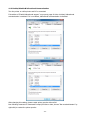
Windows Driver Specifications (Function, Setting, Specifications) For Ver. 2.25 / Ver.1660 6-1-12 Tanashi-cho, Nishi-Tokyo-shi, Tokyo 188-8511 JAPAN Tel 81-424-68-4631 Fax 81-424-68-4740 [email protected] http://www.citizen-systems.co.jp/ Index Index....................................................................................................................................................... - 1 Revision history (2.xx) ............................................................................................................................ - 3 Revision history (1.xx) ............................................................................................................................ - 3 1. Operating systems.............................................................................................................................. - 6 2. Supported printer drivers ................................................................................................................... - 6 3. Supported interfaces .......................................................................................................................... - 7 4. Driver setting ......................................................................................................................................- 8 4.1 “General” tab ................................................................................................................................ - 8 4.1.1 Paper Size............................................................................................................................... - 9 4.1.2 NV Logo Process ..................................................................................................................- 10 4.1.3 Paper Type............................................................................................................................ - 11 4.1.4 Paper Media.......................................................................................................................... - 11 4.1.5 Paper Feed ..........................................................................................................................- 12 4.1.6 Cutter Mode..........................................................................................................................- 12 4.1.7 Cash Drawer #1, #2 ............................................................................................................- 13 4.1.8 Buzzer...................................................................................................................................- 14 4.1.9 Bar Code Printing .................................................................................................................- 15 4.1.10 Logo Printing ......................................................................................................................- 15 4.2 Electronic Journal Data (Ver.2.xx drivers only)...........................................................................- 17 4.2.1 Journal Viewer......................................................................................................................- 22 4.3 Watermark (Ver.2.xx drivers only) ..............................................................................................- 24 4.4 Upside Down Printing (Ver.2.xx drivers only) .............................................................................- 26 4.5 Coupon printing (Ver.2.xx drivers only) ......................................................................................- 28 4.6 File Sender ..................................................................................................................................- 31 4.7 POS Printer Utility .......................................................................................................................- 32 4.8 Reprint (Ver.2.xx drivers only) ....................................................................................................- 34 4.9 Driver Port Setting ......................................................................................................................- 36 4.10 Status Monitor Library...............................................................................................................- 37 5. Printer fonts......................................................................................................................................- 38 6. Barcode.............................................................................................................................................- 42 7. 2D Barcode .......................................................................................................................................- 43 7.1 Format of the 2D barcode font ...................................................................................................- 43 7.2 2D Barcode Font Usage ..............................................................................................................- 44 8. Graphic printing function ..................................................................................................................- 46 9. Special functions...............................................................................................................................- 47 10. Paper sizes......................................................................................................................................- 48 11. Printer Status..................................................................................................................................- 52 -1- 11.1 Getting Printer Status ...............................................................................................................- 52 11.2 Enable/Disable Bi-directional Communication ..........................................................................- 54 12. Example of Usage for specific software .........................................................................................- 56 12.1 Example of usage by Microsoft Word .......................................................................................- 56 12.2 Example of program by Visual Basic.........................................................................................- 57 12.3 Example of program by Visual C++ .........................................................................................- 58 - -2- Revision history (2.xx) Date 09/06/25 09/010/29 09/12/15 Version V2.00 V2.01 V2.02 10/05/20 10/5/27 V2.02 (modified) V2.23 10/11/25 V2.24 11/4/13 V2.25 12/6/15 Details Issued Added CT-S601 Added CT-S281 and CT-S4000 Windows7 is supported Status function is supported on all the drivers. Driver port setting function is added. Status monitor library is added. Added CT-S651 and CT-S851 Version number is changed to same version as driver itself. Status monitor is updated to Ver2.2.4.0. Online/Offline can be detected correctly.. USB data transfer time out value of status monitor is changed to 8 seconds to avoid the communication error caused by bi-directional communication via USB on Windows7. (32-bit)/(64-bit) are added to FileDescription of DLLs. Windows7 device icon for CT-S60,651,801 and 851 are added. Ethernet is added for supported interface Explanation about printer status is added Source code sample for VC++ programming is modified. POS Printer Utility is updated to Ver1.8.3 (Wrong setting values are corrected.) Status Monitor Library is updated to Ver1.3.1 (The time to get status is shortened.) CT-S310II driver is added. 2 dimensional barcode fonts are added. “Label/BM” function is changed to “Paper Media” function. “Cutter Mode” is refined to support Label/BM paper cutter mode. “Paper Feed” function is newly added for the adjustment of paper feeding before the cut. File sender garbage character problem is fixed. Changes to show/hide buttons and tabs are added. Status monitor is updated to Ver2.2.5.2 for minor changes. POS Printer Utility is updated to 2.0 and is excluded from driver installer. Document for Ver1.660 is integrated. Explanation about TCP/IP port is added. Revision history (1.xx) Date 05/08/01 05/09/01 Version 050420(V1.00) 050901 (V1.40) 05/11/16 06/1/28 051116 (V1.51) V1.53 06/7/30 V1.56 07/3/20 V1.57 07/04/30 V1.57a Details This document is released CT-S280 driver is added. FontAxx / FontBxx are added to CD-S500 series driver The problem with longer data than full column is corrected. Fewer columns problem with Font 15cpi Size 80 is corrected. The problem with mixed font lines between printer font and TrueType font is corrected. The problem with custom size paper for CT-S300 is fixed. CT-S2000 driver is added Printing garbage problem with parallel I/F is fixed. High resolution CD-S500 graphic printing problem is fixed. CD-S500 longer than full column printing problem is fixed. Automatic line feed is added to the end of CT-S280 printing. The problem of feed length after barcode printing is fixed. The problem of divided TrueType font is fixed. The print speed down by above change is improved. Graphic print method of CT-S300 is changed. CT-S4000 driver is added. Another problem of feed length after barcode printing is fixed. Problem of unstable character size is fixed. CT-S4000 Label driver is added. BD2-2220/2221 is added. “Printer Features“ function is added to print in fixed length. Drivers are adapted to Windows Vista Euro mark problem is solved. CT-S310 driver is added PMU2xxx driver is added. -3- 07/12/21 V1.581 08/07/02 1.582 08/12/25 1.582a 09/04/08 1.583 09/12/15 1.600 10/2/9 10/6/21 1.610 (not released) 1.630 11/1/6 1.640 64 bit drivers are added. Installer version is available. CT-S2000Label is added. CT-S4000 Compress driver is added. Partial cut is added to Cut method of PMU-2xxx NV logo transaction by ESC ( L can be chosen for CT-S2000/4000/PPU700 Graphic print method of CT-S280 is changed. The problem of printing some Unicode characters is fixed. The width information of FontA88 is corrected. The width information of 6.25cpi and 48point is corrected. The problem of wrong position logo by multiple page printing is fixed. Problem of wrongly printed printer font at the end of page is fixed. The problem of paper length by multiple page of upside down printing is fixed. POS Printer Utility can be called from [Tool] property of driver. File transfer function is added to [Tool] property of driver Strange print position problem of printer font with Upside-Down function is fixed. Missing last vertical dot-line problem in high quality graphic printing is fixed. Actual printing area for CD-S500series is expanded. The problem of white gap in horizontal direction printing is fixed.(This solution requires firmware upgrade as well. Applicable model is CT-S2000, CT-S4000, CT-S310 and succeeding models.) The command for cut for CT-S300 & 310 is changed from GS V to ESC i, ESC m. FontBxx size of CT-S2000/4000/S28x/BD2-2xxx/PMU-2xxx/CBM1000II is corrected. CT-S281 driver is added. The problem of white gap in horizontal direction causes garbage printing with old version CT-S310 firmware. So the function was removed from CT-S310 driver. CT-S281L driver is added. Custom paper definition in GPD file is changed as follows. Deleted left margin (*MinLeftMargin): All models Changed max defined size (*MaxSize): CT-S4000: from (640,32767) to (896,26182) Others from (???,32767) to (???,26182) No change: CT-S500 series Changed minimum defined size (*MinSize): Label type (203,203) Non label type (20,20) PPU700 (203,719) No change: CD-S500series and CT-S4000 compressed. Solution for white gap in horizontal direction is added to CT-S281standard driver. The problem of disappeared button for POS Printer Utility by changing driver name is fixed. CT-P290 series are added. The problem to print through Remote Desktop is solved. The problem of order to print NV logo in multiple pages on Windows7 is fixed. Icons for "Printer functions" in driver property are changed. Upside down printing function is deleted. Label/Black mark driver is integrated into standard driver. Status monitor is renewed and status function is very much improved. Problem caused by printing from multiple processes is fixed. With the combination of logo printing at print job end + double high printer font for last print data, paper feeding length is changed according to logo data presence in the NV memory of the printer. This problem is fixed. (32-bit)/(64-bit) are added to FileDescription of DLLs. Status monitor is updated to Ver2.2.4.0. Online/Offline can be detected correctly.. USB data transfer time out value of status monitor is changed to 8 seconds to avoid the communication error caused by bi-directional communication via USB on Windows7. Paper at presenter exit can be detected as PRINTER_STATUS_OUTPUT_BIN_FULL on PPU-700. Driver for BD2-4280,BD2-4281are added. Driver name of PMU-2320 is changed to PMU2xxx Driver for PMU2xxxIII Presenter is added Status Monitor Library is updated to Ver1.3.1. (The time to get status is shorten.) File version of driver and related files Windows Driver : Ver2.25 or Ver.1.660 Status Monitor Library : Ver1.3.1 CITIZEN Printer COM Port : Ver1.0.1 (Installed with 2.xx series driver only) CITIZEN Driver Port Setting : Ver1.3.0 (Installed with 2.xx series driver only) Journal Viewer : Ver1.3.0.0 (Installed and working with 2.xx series driver only) TCP/IP Port Monitor : Ver1.00 (Supplied separately from driver) -4- Caution (1) You are hereby notified that any dissemination, distribution or copying of this document without written consent is strictly prohibited. (2) The contents of this document are subject to change without prior notice. (3) We tried to ensure the content of this document but if you find any mistakes, please let us know. (4) Regardless of article (3), we cannot be responsible for any damages/influences caused by the use of this driver. (5) If you do not agree any of above, you are not allowed to use the driver. Trade marks Microsoft, Windows 2000, Windows XP, Windows Server 2003, Windows Vista, Windows 7, Visual Basic, Visual C++, Visual C#, .Net, Microsoft Word, Microsoft Access and TrueType are trademarks of Microsoft Corporation. All other company names or product names are the trademarks or registered trademarks of their respective holders. CITIZEN is a registered trade mark of CITIZEN WATCH CO., LTD., Japan CITIZEN es una marca registrada de CITIZEN WATCH CO., LTD., Japón -5- 1. Operating systems Our drivers are designed to work on any of following operating systems. Microsoft Windows 2000 (SP4) Microsoft Windows XP Microsoft Windows Server 2003 Microsoft Windows Vista Microsoft Windows 7 2. Supported printer drivers Supported driver and its function are as follows. Ver.2.25 Thermal Printer Ver1.660 Thermal printer Dot impact printer Control Board CITIZEN CT-S2000 Standard driver CITIZEN CT-S2000 Label With label function CITIZEN CT-S310 Standard driver CITIZEN CT-S310 Black mark With black mark function CITIZEN CT-S281 Standard driver CITIZEN CT-S281 Label With label function CITIZEN CT-S4000 Standard driver CITIZEN CT-S4000 Label With label function CITIZEN CT-S601 Standard driver CITIZEN CT-S651 Standard driver CITIZEN CT-S651 Black mark With black mark function CITIZEN CT-S801 Standard driver CITIZEN CT-S801 Label With label function CITIZEN CT-S851 Standard driver CITIZEN CT-S851 Black mark With black mark function CITIZEN CT-S310 II Standard driver CBM1000 Type II CT-P29x CT-S2000 CT-S280 CT-S281 CT-S300 CT-S310 CT-S4000 CT-S4000 Compress PMU2xxx (including Type II/III) PMU2xxxIII Presenter PPU-700 (including Type II) CD-S500 CD-S501/503 BD2-222x -6- Standard driver No drawer Standard driver No cutter, No drawer With cutter, No drawer Standard driver Standard driver Standard driver 1/2 compression No drawer With presenter No drawer (ESC/POS)No cut function (ESC/POS)With cut function For LT2xxx mechanism BD2-428x For MLT428x mechanism Remarks: Ver.1.6xx drivers do not support “Electronic Journal”, “Watermark”, “Upside Down”, “Coupon” and “Reprint” function. 3. Supported interfaces Supported interfaces are as follows. Serial / CITIZEN COM Parallel USB USB Virtual COM LAN or Wireless LAN / CITIZEN TCP/IP (This document does not cover TCP/IP port driver. For the details of TCP/IP port, refer to separate document “CITIZEN TCP/IP Port manual”.) Caution USB Virtual COM driver If you use CT-S281/310/310II/601/651/801/851/2000/4000 in USB Virtual COM mode, it is necessary to install USB virtual COM driver. CITIZEN COM Port Monitor If you use serial interface, use “CITIZEN COM Port Monitor” to get the printer status. If you use 1.6x driver and CITIZEN COM, install “CITIZEN COM” prior to the driver installation. CITIZEN TCP/IP Port Monitor If you use LAN or wireless LAN interface, use “TCP/IP Port Monitor” to get the printer status. If multiple PCs connect to a printer through LAN or wireless LAN and one of the PC is turned off without terminating LAN connection, the printer will check the communication between the PC and the printer and then terminate the LAN connection. Duding checking the communication, printer stops any communication with other PCs. (Max. 180 sec.) -7- 4. Driver setting Follow the steps bellow to access function to change the printer driver setting 4.1 “General” tab Select the printer properties for the printer driver by right clicking on the printer icon. Then Press the “Preferences” button in the General Tab. Then press the “Advanced” button. -8- There are some items for the printer setting. 4.1.1 Paper Size You can choose the paper size. Listed paper size depends on the printer driver. Default paper size depends on printer driver. * Custom paper can be used. Please refer to the explanation of paper width and paper length in this document. -9- 4.1.2 NV Logo Process NV logo registration method can be chosen here. When printing logo function is used as mentioned in section 4.1.10 Logo Printing, the chosen method is used. “FS q” is old way “GS (L” is new. Default is basically “GS ( L”. NV logo registration by “FS q” is done altogether for multiple logo data and ID numbers are added sequentially. NV logo registration by “GS ( L” can be done for each logo data individually and key code with 2 characters can be added by user. It is possible to access registered logo data by this key code. The function to support “GS (L” depends on the model. If “Paper Type” is not shown, it means that the printer driver does not support “GS ( L” function and only “FS q” is supported. If Logo function of CITIZEN POS Printer Utility work for a model, default of NV Logo Process for the model is GS ( L. - 10 - 4.1.3 Paper Type You can choose Receipt or Ticket as paper types. Receipt allows flexible paper length according to the data length to avoid waste of paper. Ticket print in fixed length even the print data is short. Default setting is “Receipt” 4.1.4 Paper Media Choose the type of the paper to use from either normal paper or label/BM paper. *If Label/Black Mark paper is not supported for the model, you cannot choose Label/BM Paper. * If you use Label/Black mark, 4.1.3 Paper Type needs to be set for Receipt. - 11 - 4.1.5 Paper Feed Behavior and paper feeding length can be set for end of middle page (Page) and end of last page (Job). Feed Length (dot) : It can be set from 0 to 406 dots. Auto Feed to Cut Position : Automatic paper feeding for the cut can be set for valid/invalid. *If Auto Feed to Cut Position is set for valid and Feed Length is specified, paper feed to cut position is done first then specified paper feed is performed. 4.1.6 Cutter Mode Cutting method for middle page end (Page) and cutting method for receipt end (Job) can be chosen. For the normal paper, there can be maximum 6 different cutting method combinations by partial cut, full cut and no cut. For the label/black mark paper, cut or no cut can be chosen. Default setting depends on the driver. - 12 - * Partial cut mean that cutter leaves one tab by the cut. * This menu is not shown on the driver model where the cutter is not equipped. * There is “Partial only” in the memory switch setting. If this setting is valid, “Full Cut” works only as “Partial Cut” automatically. Please refer User’s manual for the details of memory switches. 4.1.7 Cash Drawer #1, #2 Setting of cash drawer 1/2 can be changed. Timing to open drawer, pulse width to send to drawer for opening can be changed. For timing, top of receipt (Job Start), end of receipt (Job End), end of page (Page End) can be selected and 50ms to 250ms can be set for pulse width. Default setting are Drwer1 / Job End / 50ms and Drawe2 / Job End / 50ms. *Cash drawer is the drawer to store bill, coin and etc at cash register. * Driver model which does not have cash drawer function * If the two cash drawers are connected to the printer, do not open 2 drawers at the same timing. It may cause the printer malfunction. * Pulse width for drawer opening is set for 50ms as default. Depending o the cash drawer type, this setting may not open the cash drawer. Please adjust the pulse width according to the specification of the drawer. * Please refer to the User’s manual for the details to connect printer and cash drawer - 13 - 4.1.8 Buzzer Buzzer function of printer can be utilized from the driver. The timing of buzz can be selected from top of receipt (Job Start) or end of receipt (Job End). Number of buzz can be selected from 1 to 9. Default setting is no buzz. * Driver model which does not have buzzer does not show this menu. - 14 - 4.1.9 Bar Code Printing HRI character setting can be changed. (HRI character is the character which comes with barcode.) No HRI, Top, Bottom or both (Top and Bottom) can be selected. Default is not HRI characters. Please refer to section of Barcode in this document for the details * Driver model which does not have barcode function does not show this menu. 4.1.10 Logo Printing The setting of NV logo printing function can be changed. The position to print NV logo can be chosen from top of page or end of page. The page to print logo can be chosen from first page, middle page, or last page. NV logo data to print can be chosen from logo1 to logo5. Default setting is set for printing no NV logo - 15 - * As mentioned in section “4.1.2 NV Logo Process”, there are 2 different commands to register logo data. Please make sure if the NV logo data is registered by FS q command or GS (L command. Please refer to command reference for the details of the command. * If “FS q” command is used, each logo data is recognized as follows. logo1:Firstly registered NV logo logo2:Secondly registered NV logo logo3:Thirdly registered NV logo logo4:Fourthly registered NV logo logo5:Fifthly registered NV logo * If “GS (L” command is used, the each logo data is recognized as follows. logo1:NV logo saved as key code “L1” logo2:NV logo saved as key code “L2” logo3:NV logo saved as key code “L3” logo4:NV logo saved as key code “L4” logo5:NV logo saved as key code “L5” - 16 - 4.2 Electronic Journal Data (Ver.2.xx drivers only) Electronic journal is the function to save printed data in the PC. The setting for this function can be done as follows. From the Properties of printer driver, choose "Preferences". Choose “Advanced” tab. - 17 - To enable Electronic Journal Viewer function, put the check mark in "Record Journal". Press "Browse" of Base Folder then you can specify the folder to store the journal data. Default folder is "c:¥CITIZEN¥EJD"。 If you want to change the folder, please make the folder in advance. - 18 - Press "Apply" or "OK" to finish the setting. It is possible to display/print electronic journal data from journal viewer. Choose “Tool” tab. - 19 - Press "Launch" of Journal Viewer Journal Viewer shows up and you can see journal data in the viewer and the data can be printed from viewer * Under the specified folder to save journal data, folders are generated with the name of data in “yymmdd” format and journal data files are saved in the folder with the name of time in “hhmmss.ejd” - 20 - format. * Each print job is saved as individual journal data file. * The path length of folder to save journal data must be within 100 characters (Unicode). * Do not use network driver for destination folder to save journal data. - 21 - 4.2.1 Journal Viewer * Journal data is grouped by folder by the date. It is possible to display or print the journal data of the specified day in "Calendar". There are journal data on the date which is shown in bold in the Calendar. * By right-click on the Calendar, the menu to go back today is shown. * "EJD Folder" is the folder that the journal data is stored. Usually, it should be same folder as the one that printer driver specifies for saving the journal data. You can choose other folder from drop down list for up t o 7 used folders or press “Browse” * The image of journal data is shown in the viewer area in the left. By pressing "Top", "Up", "Down" or "Bottom" button, the data shown on the viewer moves to other data in the same day. * It is possible to choose the file data directly in the list of the bottom. * “Printer” of "EJD Print" shows the printer driver that launches the Journal Viewer. * To print journal data, press “Print”. There are 2 choices to print journal data. If “Print this EJD" is selected, the data shown on the viewer is printed. If "Print EJD of the day" is selected, all the journal data of the day will be printed altogether without cut between each data. - 22 - * NV logo, printer font and barcode font cannot be shown correctly on the viewer because those are realized by the function of printer side. Substitute image of NV logo, barcode or 2D barcode will replace NV logo data, barcode data and 2D barcode. And generic font replaces printer font on the viewer. Therefore, the impression on the viewer is different from actual printing results. * Journal data which include special function like Control font may show garbage character on the viewer. *** Please refer to the other section for the details of printer font, barcode font, 2D barcode font or special function. * Journal data does not include attribute of upside down printing. It is affected by the setting of the driver to print the journal data. * When journal data is generated, cut, drawer and buzzer setting are not included as well. Setting at the printing from journal viewer is applied. * The data printed by Reprint function is not recoded as journal data. * Data sent to printer by “File Sender” function is not recoded as journal data. * Journal viewer shows the data made by other printer driver. If a journal data is printed to different printer driver from original driver that made the journal data, it may not print correctly. - 23 - 4.3 Watermark (Ver.2.xx drivers only) It is possible to print data with overlapping the image data which is specified in advance. From the Properties of printer driver, choose "Preferences". Choose "Advanced" tab. - 24 - To enable Water mark function, put check mark in "Embed Watermark" and press "Add" to specify the watermark image data. Then specify the position of overlapping from "Top", "Middle" or "Bottom". * The watermark image data to use for overlapping is black/white bitmap format data only. * Size of watermark image data is limited in horizontally 1023 pixels width. There is no limit for vertical size. Paper size limitation of driver is effective for watermark image size as well. * Up to 5 watermark image data can be specified in advance. If you want to more, remove existing data by pressing “Delete” and “Add” new one. * Please note about the limitation of this Watermark function. * Based on 24 vertical dots, image block from Windows and watermark image is overlapping、 (1)If the received image block is taller than 24 pixels, white gap is generated in the watermark image. Especially, it can be seen in the case to use tall printer font. (2)If the received image block is shorter than 24 pixels, image block is expanded automatically in vertical direction. * Barcode font and image data cannot be overlapped. - 25 - 4.4 Upside Down Printing (Ver.2.xx drivers only) Printing data in upside down can be done by this function. From the Properties of printer driver, choose "Preferences". Choose "Advanced" tab. - 26 - To enable upside down printing, put check mark in "Upside Down Printing". * Printer font is printed upside down as well. * NV logo saved by “GS (L” command cannot be printed upside down. Please save the upside down data in advance. - 27 - 4.5 Coupon printing (Ver.2.xx drivers only) Coupon printing is the function like this. Coupon image data is specified to link with a keyword and if the keyword is found in the print data, the coupon image data is printed automatically. From the Properties of printer driver, choose "Preferences". Choose "Coupon" tab. - 28 - To enable coupon function, check mark in "Print Coupon". Add ”Coupon” information * To register the information of the coupon, press “Add”. “Add Coupon Information” dialogue shows up. "Keyword", "Replacing Characters" and "Coupon Image" need to be registered on it as a set. * Coupon information up to 10 can be registered. Coupon information has to be aligned in priority order. Upper information in the list has higher priority and lower information has lower priority. The order can be changed by “Up” and “Down”. Searching Keyword, "Replacing Characters and printing coupon image are done in the priority order. * The image data to use for coupon must be in black/white bitmap format and its width must be up to 1023 pixels. * If "Keyword", "Replacing Characters" and "Coupon Image" are same, it cannot be registered. If any of them is different, it is handled as new coupon information and can be registered. Behavior of coupon printing * First, characters to correspond with "Keyword" are searched in the print data. When the characters are found, the coupon image data linked with the keyword is set to be printed at the end of print data. Then corresponding characters are replaced by “Replacing Characters” * If multiple coupon information exists, jobs are separated to “Coupon image printing” and “Character replacing”. * First, the routine of “Coupon image printing” is performed. “Keyword” searching of first coupon information starts from top of print data. If the corresponding characters are found, linked coupon image is printed at the end of printing. Then same routine is repeated from 2nd coupon information to last coupon information. Then the routine of “Replacing character” is performed. “Keyword” searching of first coupon information starts from top of print data. - 29 - When the corresponding characters are found, characters are replaced by “Replacing characters” of first coupon information. The same routine is repeated from 2nd coupon information to last coupon information. * Because of the above routine flow, the replaced characters in higher priority coupon information can be re-replaced by the low priority coupon information. ・ *** Limitation of coupon printing function Limitation of character * Character replacing does not work for TrueType font. Choose printer font to replace characters. * Character replacing does not work barcode font. * Character replacing does not work for “Control” font. * Character data with mixed font or with mixed font size cannot be recognized as continuous characters. Therefore, it cannot be found by searching keyword. * Characters extending 2 lines cannot be found by searching keyword. * Symbol font of TrueType (such as Webdings, MS Extra ) cannot be found by searching keyword * If the character length of keyword and replacing characters is different "Keyword" >"Replacing Characters": Characters after replaced character moves forward "Keyword" <"Replacing Characters": The characters beyond print width are ignored. Limitation for the application *MS-Word may separate the data even if they are in the same line and using same font and font size. If the character is separated, it cannot be found by searching keyword. *AutoCorrect function of MS-Word may change the character such as quotation mark automatically. In such case, it cannot be found by searching keyword. *Notepad does not handle device font. Printer font cannot be used for Notepad. Only TrueType can be used. Therefore, replacing characters do not work for Notepad. *If left/right margin is set for zero, the characters in margin area may not be printed or deleted. Therefore, such characters may not be found by searching keyword. * From VB or VC, it is possible to send more character than print width using method or API. The data beyond print width is ignored and it cannot be found by searching keyword. Limitation of coupon printing *If the NV log is set to print at the end of print job, coupon is printed after NV logo. * In case of multiple page printing, the coupon printing set in the middle page is done after the last page printing. *In case of multiple copy printing, coupon is printed at the end of each copy. *If the “Ticket is set for Paper Type, coupon is printed after reaching fixed length. *If the print direction is set for horizontal, coupon is not printed in horizontal direction. - 30 - 4.6 File Sender The data file to send to printer can be transmitted to the printer using this function. There is no data added by the driver and the data file itself is simply transmitted to the printer. From the Properties of printer driver, choose "Tool" tab. Press “Browse of "File Sender" and specify the file to send to the printer. The data is sent to printer by pressing "Send". * This function can be used for the purpose such as loading firmware data. - 31 - 4.7 POS Printer Utility If the utility software is installed, it can be launched as follows. From the Properties of printer driver, choose "Tool" tab. Press "Launch POS Printer Utility" of "External Tool". - 32 - This is the launched screen. Please refer to the HELP file of POS Printer Utility for the details of POS Printer Utility. *Remarks:If the status monitoring function is active, the communication between PC and printer takes longer time. *If the driver is installed with status monitoring function enabled through Plug & Play, interface such as parallel or USB, the communication right after the diver installation may fail. In such case, please reboot PC then the communication becomes stable. - 33 - 4.8 Reprint (Ver.2.xx drivers only) The last print job can be re-printed by this function. From the Properties of printer driver, choose "Tool" tab. Press “Reprint” of "Reprint". * If printing is done before PC reboot, the last data before the boot can be reprinted. * Target of reprint function is 1 print job. If the print data covers more than 1 page, the reprinted data is not the last page but whole print data of last print job. * Upside down printing is affected by the setting of upside down at reprint. - 34 - * Reprint data is not handled as Electronic journal data. * The print data sent by File Sender cannot be reprinted. To use this reprint function, journal viewer function must be installed. - 35 - 4.9 Driver Port Setting This is to change the time-out setting etc. for the status monitoring function, when necessary. From Start menu, CITIZEN=> Driver Port => Driver Port Setting Dialog shows up. ・It is possible to set time-out duration for sending/receiving data through each interface (USB, COM, LPT, LAN) ・To change the time-out duration setting, change the number of time-out setting and press “Save” button then at Print Spooler Control, press “Restart” button. (or press “Stop” button and press “Start” button.) ・If ”Driver Watch Mode” is check-marked, printer status is always monitored and the interval to check the status is fixed by “Watch Timing(s)”. If “Driver Watch Mode” is not check-marked, printer status is monitored only when printer status monitoring API is called by user application. New setting can be effective same way as time-out duration setting. (Print Spooler Control: “Save” => “Restart”) Usually, - 36 - check-mark the “Driver Watch Mode”. ・Default values of each interface are set for optimum ones and usually do not need to change. However, the time-out value of LPT is set for 90sec as default of OS and 90 seconds is too long for time-out.. When you use LPT, change the value to 5 sec which is recommended value..・If you see the difficulty to get printer status, set the sending time-out value larger. Usually, this will make it possible to get the status. 4.10 Status Monitor Library Status monitoring function supplies the own method to get the status from the printer. Using status monitor API from user program, it is possible to get more status information than the status information that OS supplies as standard way. Refer to the Status Monitor Library API specifications for the details. “Readme.txt shows the place where the sample program is stored. From Start menu, CITIZEN => Driver Port => Status Monitor Library - 37 - 5. Printer fonts Printer font is the characters stored in the printer. Printing by printer font is much faster than printing by TrueType font. Therefore, we recommend using these printer fonts for faster printing. Following printer fonts can be selected by using Windows driver. Driver CBM1000II CT-S280 CT-S281 CT-S300 CT-S310 CT-S310II CT-S601 CT-S651 CT-S801 CT-S851 CT-S2000 CT-S4000 CT-P29x PMU2xxx PMU2xxxIIIPresenter PPU-700 BD2-222x BD2-428x Font 15 cpi 15 cpi [Euro] 15 cpi [Ext.] 15 cpi [RED Euro] 15 cpi [RED Ext.] 15 cpi (RED) 7.5 cpi 7.5 cpi [Euro] 7.5 cpi [Ext.] 7.5 cpi [RED Euro] 7.5 cpi [RED Ext.] 7.5 cpi (RED) 3.75 cpi 3.75 cpi [Euro] 3.75 cpi [Ext.] 3.75 cpi [RED Euro] 3.75 cpi [RED Ext.] 3.75 cpi (RED) 1.8 cpi 1.8 cpi [Euro] 1.8 cpi [Ext.] 1.8 cpi [RED Euro] 1.8 cpi [RED Ext.] 1.8 cpi (RED) 20 cpi 20 cpi [Euro] 20 cpi [Ext.] 20 cpi [RED Euro] 20 cpi [RED Ext.] 20 cpi (RED) 10 cpi 10 cpi [Euro] 10 cpi [Ext.] 10 cpi [RED Euro] 10 cpi [RED Ext.] 10 cpi (RED) 5 cpi 5 cpi [Euro] 5 cpi [Ext.] 5 cpi [RED Euro] 5 cpi [RED Ext.] 5 cpi (RED) 2.5 cpi 2.5 cpi [Euro] 2.5 cpi [Ext.] 2.5 cpi [RED Euro] 2.5 cpi [RED Ext.] 2.5 cpi (RED) 25 cpi 25 cpi [Euro] 25 cpi [Ext.] 25 cpi [RED Euro] 25 cpi [RED Ext.] 25 cpi (RED) 12.5 cpi 12.5 cpi [Euro] Font A Font B Font C - 38 - Font size 12 / 24 / 36 / 48 / 60 / 72 / 80 CBM1000II CT-S280 CT-S281 CT-S300 CT-S310 CT-S310II CT-S601 CT-S651 CT-S801 CT-S851 CT-S2000 CT-S4000 CT-P29x PMU2xxx PMU2xxxIIIPresenter PPU-700 BD2-222x BD2-428x 12.5 cpi [Ext.] 12.5 cpi [RED Euro] 12.5 cpi [RED Ext.] 12.5 cpi (RED) 6.25 cpi 6.25 cpi [Euro] 6.25 cpi [Ext.] 6.25 cpi [RED Euro] 6.25 cpi [RED Ext.] 6.25 cpi (RED) 3 cpi 3 cpi [Euro] 3 cpi [Ext.] 3 cpi [RED Euro] 3 cpi [RED Ext.] 3 cpi (RED) FontA11 FontA11 [255] FontA11 [Ext.] FontA12 FontA12 [255] FontA12 [Ext.] FontA21 FontA21 [255] FontA21 [Ext.] FontA22 FontA22 [255] FontA22 [Ext.] FontA24 FontA24 [255] FontA24 [Ext.] FontA42 FontA42 [255] FontA42 [Ext.] FontA44 FontA44 [255] FontA44 [Ext.] FontA48 FontA48 [255] FontA48 [Ext.] FontA84 FontA84 [255] FontA84 [Ext.] FontA88 FontA88 [255] FontA88 [Ext.] FontB11 FontB11 [255] FontB11 [Ext.] FontB12 FontB12 [255] FontB12 [Ext.] FontB21 FontB21 [255] FontB21 [Ext.] FontB22 FontB22 [255] FontB22 [Ext.] FontB24 FontB24 [255] FontB24 [Ext.] FontB42 FontB42 [255] FontB42 [Ext.] FontB44 Font A 9.5 19 9.5 19 38.5 19 38.5 77 38.5 77 Font B 7 (CT-S310) 9.5 (CT-S2000) 13.5 (CT-S310) 19 (CT-S2000) 7 (CT-S310) 9.5 (CT-S2000) 13.5 (CT-S310) 19 (CT-S2000) 27 (CT-S310) 38.5 (CT-S2000) 13.5 (CT-S310) 19 (CT-S2000) 27 (CT-S310) - 39 - FontB44 FontB44 FontB48 FontB48 FontB48 FontB84 FontB84 FontB84 FontB88 FontB88 FontB88 Control CD-S500 series [255] [Ext.] 38.5 (CT-S2000) 54.5 (CT-S310) 77 (CT-S2000) [255] [Ext.] 27 (CT-S310) 38.5 (CT-S2000) [255] [Ext.] 54.5 (CT-S310) 77 (CT-S2000) [255] [Ext.] 16 cpi 16 cpi [Euro] 16 cpi [Ext.] 16 cpi [RED Euro] 16 cpi [RED Ext.] 16 cpi (RED) 8 cpi 8 cpi [Euro] 8 cpi [Ext.] 8 cpi [RED Euro] 8 cpi [RED Ext.] 8 cpi (RED) 12 cpi 12 cpi [Euro] 12 cpi [Ext.] 12 cpi [RED Euro] 12 cpi [RED Ext.] 12 cpi (RED) 6 cpi 6 cpi [Euro] 6 cpi [Ext.] 6 cpi [RED Euro] 6 cpi [RED Ext.] 6 cpi (RED) FontA11 FontA11 [255] FontA12 FontA12 [255] FontA21 FontA21 [255] FontA22 FontA22 [255] FontB11 FontB11 [255] FontB12 FontB12 [255] FontB21 FontB21 [255] FontB22 FontB22 [255] Control 12 7x9 dot 12 / 24 / 36 / 48 / 60 / 72 / 80 9x9 dot 7x9 dot 9 18 9 18 9x9 dot 9 18 9 18 12 * The difference of “xx cpi”, “xx cpi [Euro]” and “xx cpi [Ext.]” is characters/functions assigned to 80 - 40 - ~ FF hex. The details of difference are as follows. Font xxx cpi 80-9F(hex) A0-FF(hex) Special function WPC1252 xxx cpi [Euro] WPC1252 xxx cpi [Ext.] Code Page 437 Special function: Special functions are assigned. (Refer to section 9 for the special functions.) Windows Code: Characters from Windows code table are assigned. Code Page 437: Characters from code page 437 are assigned. * “xx cpi”, “xx cpi(RED)” font: If the number is smaller, character width is larger. 4 different sizes (Standard size, x2/x4/x8 width) can be chosen from each font. For example, “7.5 cpi” is double width font of “15 cpi”. * Standard font size of “xx cpi”, “xx cpi(RED)” is 12. If the number is larger, character is taller. * “FontAxx (Bxx)” font: xx means size of height and width. For example, FontA48 is based on font A and 4 times high and 8 times wide from standard size 11. * Line pitch by “xx cpi” and by “FontAxx (FontBxx)” are different because the font size is different. * Supported characters by the driver are based on WPC1252 codepage. The font with [255] uses characters (80h – FFh) defined by user. * The font with (RED) is to print in 2 colors (usually black and red). But it requires correct memory switch setting and paper for 2 color printing. * If printing direction is set for Landscape (Horizontal), printer font cannot be printed. * “Control” font is only for special functions and not for printing. Please refer to the section of “Special functions“for the details. (We do not guarantee the correct functioning of special functions.) * The function of centering or right aligning by application software does not work with the driver. * If the print data for printer font is longer than one line, extra part is basically ignored but in some case, one character may be printed in next line. Please do not send the longer data than one line. * Printer font name contains space. Please be careful. Example (““ mean the space.) “15cpi” “15cpi [Euro]” “15cpi [Ext.]” “15cpi [REDEuro]” “15cpi [REDExt.]” “15 cpi(RED)” “FontA11 [255]” “FontA11 [Ext.]” - 41 - 6. Barcode Using following font, barcode can be printed on the printer. Barcode font Font size Codabar 20 / 40 / 42 / 60 / 64 / 80 / 84 Code128 20 / 40 / 42 / 60 / 64 / 80 / 84 Code39 20 / 40 / 42 / 60 / 64 / 80 / 84 Code93 20 / 40 / 42 / 60 / 64 / 80 / 84 JAN13 (EAN) 20 / 40 / 42 / 60 / 64 / 80 / 84 JAN8 (EAN) 20 / 40 / 42 / 60 / 64 / 80 / 84 ITF 20 / 40 / 42 / 60 / 64 / 80 / 84 UPC-A 20 / 40 / 42 / 60 / 64 / 80 / 84 UPC-E 20 / 40 / 42 / 60 / 64 / 80 / 84 *This barcode printing utilizes the printer function on the printer. * Size of barcode can be selected by choosing font size. * As mentioned in previous section, HRI character can be printed above, below or both. * The wider barcode than printing width cannot be printed. * Each barcode has limitation of characters to use. Please refer to Command reference. * The sub code set type A/B/C for Code128 should be specified as {A, {B, {C prior to the print data. * The data for sub code set C of Code128 is printed in decimal address of the input character. For example, Input data “1” => Output 49 (”1” address = 31h = 49dec) * Printer font and barcode cannot be printed in the same line. * The function of centering or right aligning by application software does not work with the driver. * As this function utilizes the printer’s internal function, barcode image cannot be shown on the Windows application software. The barcode data is shown instead. * If printing direction is set for Landscape (Horizontal), barcode cannot be printed. * In the font name of “JAN13 (EAN)” and “JAN8 (EAN)”, a space is included before the “(“. Example (““ means a space) “JAN13(EAN)” “JAN8 (EAN)” - 42 - 7. 2D Barcode 7.1 Format of the 2D barcode font 2 dimensional barcode symbologies (QR code and PDF417) can be printed by following printer fonts of this driver. 2D Barcode font QR_CONTROL Font size 9.5 Function QR code command setting Control character _M1 Description _M2 _W01 ~ _W16 _EL _P Specify QRCode for model 2. Set the module width of QRCode. From 1 to 16 dots. Set error correction level L. Restoration ability 7%. Set error correction level M. Restoration ability 15%. Set error correction level Q. Restoration ability 25%. Set error correction level H. Restoration ability 30%. Number of QRCode data. Specify the figure of four digits. From 0000 to 7089. Print QRCode data. None Specify the encoded QR data. _D00 ~ _D30 _P Set the number of digits of PDF417. 00 is processed automatically. Process by the number of specified digits excluding 00. Set the number of steps of PDF417. 00 is processed automatically. Process by the number of specified steps excluding 00. Set the module width of PDF417. Set the height of the step of PDF417 Specify the error correction level. From 0 to 8. Specify the error correction level by the calculation. Cancel simple PDF417. Specify simple PDF417. Number of PDF417 data. Specify the figure of four digits. From 0000 to 7089. Print PDF417 data. None Specify the encoded PDF417 data. _EM _EQ _EH _N**** QR_DATA 9.5 PDF417_CONTROL 9.5 QR code data setting PDF417 command setting _S00 _S03 ~ _S90 _W2 ~ _W8 _H2 ~ _H8 _e0 ~ _e8 _E01 ~ _E40 _T0 _T1 _N***** PDF417_DATA 9.5 PDF417 data setting Specify QRCode for model 1. *The data number to use for 2D barcode is 7089 bytes for QR code and 65532 bytes for PDF417. However, if the size of symbolized 2D barcode is larger than print area of the printer, it will not be printed. *Center alignment or left alignment function supported by the application software cannot work correctly - 43 - with 2D barcode font. *As the 2D barcode font is the function of the driver, 2D barcode image cannot be shown on the application software or print preview on the Windows. Only print data is shown as text. *If Orientation is set for Landscape on the printer, 2D barcode cannot be printed. *Printer font cannot be used by Visual Basic.Net, Visual C.Net 7.2 2D Barcode Font Usage The steps to print 2D barcode are as follows. a) 2D barcode format setting(Using QR_CONTROL, PDF417_CONTROL font) b) 2D barcode data setting(Using QR_DATA, PDF417_DATA font) c) 2D barcode print command(Using QR_CONTROL, PDF417_CONTROL font + “_P”) * 2D barcode data number setting (_N**** of QR_CONTROL, _N***** of PDF417_CONTROL) must be done before2D barcode data setting (QR_DATA, PDF417_DATA). Followings are sample program by Visual Basic to use 2D barcode font. - 44 - ' Set the format of the QRCode. 'model2, module width 2, error level M, number 33 of QR data. Printer.FontSize = 9.5 Printer.FontName = "QR_CONTROL" Printer.Print "_M2_W02_EM_N0033"; ' Specify the encoded QR data. Printer.FontSize = 9.5 Printer.FontName = "QR_DATA" Printer.Print "http://www.citizen-systems.co.jp/"; 'Print QRCode data. Printer.FontSize = 9.5 Printer.FontName = "QR_CONTROL" Printer.Print "_P"; Printer.EndDoc ‘Set the format of the PDF417. ‘digit 3, step automatically, module width 3, step height 3, error level 01, number 22 of PDF417 data. Printer.FontSize = 9.5 Printer.FontName = "PDF417_CONTROL" Printer.Print "_D03_S00_W3_H3_E01_N00022"; ' Specify the encoded PDF417 data. Printer.FontSize = 9.5 Printer.FontName = "PDF417_DATA" Printer.Print "PDF417-Code Test Print"; 'Print PDF417 data. Printer.FontSize = 9.5 Printer.FontName = "PDF417_CONTROL" Printer.Print "_P" Printer.EndDoc - 45 - 8. Graphic printing function Graphic printing is supported by this driver. The resolution is as follows. Resolution (DPI) Thermal Printers 203 x 203 TrueType font is printed as graphic by this driver. ・If the long size graphic data is printed with the horizontal paper orientation, a gap about 1mm may be generated. ・Print data size of graphic printing is large. Therefore serial interface is not adequate for graphic printing because of its slow communication speed. - 46 - 9. Special functions To use special function of printer, it is necessary to send specified character in “Control” font. If other font is used, it does not work for the special functions. "Control" Model All All All All All All All All All All All All All All All All All All All All All All All All All All All All All All All All All All All drawer models drawer models drawer models drawer models drawer models drawer models drawer models drawer models drawer models drawer models models models models cutter models cutter models models models models models models models models models models models models models models models models models models models models models Printer Function 50ms pulse to drawer #1 100ms pulse to drawer #1 150ms pulse to drawer #1 200ms pulse to drawer #1 250ms pulse to drawer #1 50ms pulse to drawer #2 100ms pulse to drawer #2 150ms pulse to drawer #2 200ms pulse to drawer #2 250ms pulse to drawer #2 Horizontal Tab (HT) Line Feed (LF) Carriage Return (CR) Receipt paper Full Cut * Receipt paper Partial Cut * NV Bitmap data ID:1 Normal printing NV Bitmap data ID:2 Normal printing NV Bitmap data ID:3 Normal printing NV Bitmap data ID:4 Normal printing NV Bitmap data ID:5 Normal printing NV Bitmap data ID:1 Double Width printing NV Bitmap data ID:2 Double Width printing NV Bitmap data ID:3 Double Width printing NV Bitmap data ID:4 Double Width printing NV Bitmap data ID:5 Double Width printing NV Bitmap data ID:1 Double Height printing NV Bitmap data ID:2 Double Height printing NV Bitmap data ID:3 Double Height printing NV Bitmap data ID:4 Double Height printing NV Bitmap data ID:5 Double Height printing NV Bitmap data ID:1 Quadruple printing NV Bitmap data ID:2 Quadruple printing NV Bitmap data ID:3 Quadruple printing NV Bitmap data ID:4 Quadruple printing NV Bitmap data ID:5 Quadruple printing "xx cpi" ASCII Hex Hex A B C D E a b c d e 5 6 7 F P G H I J K Q R S T U V W X Y Z [ ] ^ _ ` 41 42 43 44 45 61 62 63 64 65 35 36 37 46 50 47 48 49 4A 4B 51 52 53 54 55 56 57 58 59 5A 5B 5D 5E 5F 60 81 82 83 84 85 89 8A 8B 8C 8D 95 96 97 9D 9E * Depending on the memory switch setting of the printer, cutting method may not follow as specified. * The function not supported by printer does not work. - 47 - 10. Paper sizes By installing driver, paper sizes (combination of supported paper width and various paper lengths) are automatically added. The details of length and width are as follows. A) Length Paper length a) A4 length (297mm) b) B5 length (257mm) c) 6 in Page (6 in) d) Letter length (11 in) e) Executive length (10.5 in) f) Receipt (3276 mm) g) User-Defined size B) Width Model Paper width CT-S280/281 58mm (32Col.) 58mm (30Col.) CT-P290/291 58mm (36Col.) CT-S300/310 80mm (48Col.) PMU2xxx 80mm (42Col.) PPU-700 58mm (32Col.) 58mm (30Col.) CT-P292/293 80mm (48Col.) 58mm (36Col.) CBM1000II 80mm (48Col.) BD2-xxxx 80mm (42Col.) 58mm (36Col.) 58mm (30Col.) CT-S601 83mm (53Col.) CT-S651 80mm (48Col.) CT-S801 80mm (42Col.) CT-S851 58/60mm (36Col.) CT-S2000 58mm (30Col.) CT-S4000 112mm (69Col.) 83mm (53Col.) 80mm (48Col.) 80mm (42Col.) - 48 - CD-S500 series 76mm 69.5mm 58.5mm * As mentioned in previous section, if the “Paper Type” is set for “Receipt” and print data is shorter than paper size, printing is finished before reaching the specified paper size with cutting paper or just stopping printing. If the “Paper Type” is set for “Ticket”, the printer continues paper feeding until reaching the chosen paper size. * It is not possible to choose f) Receipt (3276 mm) size from application software like MS-Word or MS-ACCESS. - 49 - * User defined paper can be set up by following way. The size that user can define depends on the printer driver. Windows 7 Open “Devices and Printers” and choose any printer. Then “Print server properties” button is shown on the top menu. Press the button. Other OS From menu of “Printer and Faxes” window, File -> Server Properties "Print Servers Properties" is shown like right picture. On "Forms" tan, put check mark in "Create a new form". Enter data in "Form name" and "Form description" and press、 "Save Form" to create a new form. - 50 - * The range of paper size that user can define is as follows. User deign paper size range Driver name Minimum Minimum (20,20) (896,26182):Max print width is 832 (203, 203) (896,26182):Max print width is 832 (20,20) (664,26182):Max print width is 640 (203, 203) (664,26182):Max print width is 640 (203, 719) (640,26182):Max print width is 575 (20,20) (640,26182):Max print width is 575 (203, 203) (640,26182):Max print width is 575 CT-P290/291 (20, 20) (480, 26182):Max print width is 407 CT-S280 (20,20) (464,26182):Max print width is 383 CT-S281 Label (203, 203) (464,26182):Max print width is 383 CD-S50x (144, 144) (432, 18572)Max print width is 400 CT-S4000 CT-S4000 Label CT-S601 CT-S651 CT-S801 CT-S851 CT-S2000 CT-P292/293 CT-S651 Black Mark CT-S801 Label CT-S851 Black Mark CT-S2000 Label PPU-700 CBM1000II CT-S300 CT-S310 PMU2xxx BD2-222x CT-S300 Black Mark CT-S310 Black Mark CBM1000II Label PMU23xxIII Presenter CT-S281 BD2-428x * Unit is dot. 1 dot is converted as 1/203 inch. - 51 - 11. Printer Status 11.1 Getting Printer Status Uses own language monitor (Status monitor), bidirectional communication is enabled and it get possible to get the printer status through existing Windows driver. Please make sure that “Enable bidirectional support” is chosen. Set the printer memory switch 1-3 Busy condition ON (Full) When printer status is changed, the message on the top of spooler window or status column of driver list is changed immediately. (Spooler) - 52 - (Driver list) Shown messages depend on the printer status as follows. Status of printer Message on spooler Message on driver list Cover open Door Open Door open Paper end Out of Paper Paper out Paper near end Paper Problem Paper problem Cutter error User Intervention Required User intervention Head over-heat User Intervention Required User intervention FEED key pressed User Intervention Required User intervention Interface cable disconnected Offline Offline Printer power off Offline Offline Printer offline Offline Offline When multiple statuses are detected simultaneously, combined message is shown. “Offline” is always shown together for “Cover open”, “Paper end”, “Cutter error”, “Head overheat”, “Feed key pressed” status. - 53 - 11.2 Enable/Disable Bi-directional Communication Turn the printer on while printer and PC is connected. If checkbox of “Enable bidirectional support” on property page of driver is ticked, bidirectional communication is enabled. If it is not ticked, bidirectional communication is disabled. After changing this setting, please restart printer spooler without fail. Run following command on Command Prompt (On Vista or later, choose “Run as administrator” by right-click) to restart the printer spooler. - 54 - net stop spooler net start spooler Stopping printer spooler Starting printer spooler - 55 - 12. Example of Usage for specific software 12.1 Example of usage by Microsoft Word Example to use printer font on MS-Word2003 A.From the menu, click File--> Print --> Printer Name Choose the printer to use then click Close button. B. Then from menu File --> Page setting --> Paper size And choose the paper size to use. C. Then move to Margin tab and Set the proper margins. (If you set the margins to zero, it will be corrected to minimum number automatically after the error message.) D. Choose the printer font in the font list box (Refer to above printer font section) E. Choose the printer font size in the font size list box. (Refer to above printer font section) F. Enter the data to print on Word, Step from here is important. G. From menu Tools --> Options --> Compatibility Then choose “Microsoft Word 6.0/95” or “Use printer metrics to lay out document” in “Options” H. Finally File --> Print --> OK Example to use special function to open drawer1 Step A to C is same as above. D. Choose “Control” from font list box E. Choose “12” in font size list box. F. Enter “A” on Word screen. (Function to send 50ms pulse to drawer1 is assigned to “A”.) Follow step G and H mentioned above. - 56 - 12.2 Example of program by Visual Basic Following is the Visual Basic 6.0 program list for “CITIZEN CT-S2000” to utilize various printing and special functions. ' Set “CT-S2000“ as default printer driver Dim X As Printer For Each X In Printers If X.DeviceName = “CITIZEN CT-S2000” Then Set Printer = X Exit For End If Next ‘Printing Windows font Printer.FontSize=10 Printer.FontName=”Arial” Printer.Print “Font Arial / Size 10” ‘Printing Printer font Pritner.FontSize=12 Printer.FontName=”15 cpi” Printer.Print “15 cpi / Size 12” ‘Printing Barcode Printer.FontSize=42 Printer.FontName=”Code39” Pritner.Print “ABC123456” ‘Opening cash drawer Printer.FontSize=12 Pritner.FontName=”Control” Printer.Print “A” ‘Drawer 1 at 50ms ‘Cutting paper Printer.FontSize=12 Pritner.FontName=”Control” Printer.print “P” ‘Partial cut ‘Printing graphic data from NV memory Printer.FontSize=12 Pritner.FontName=”Control” Printer.print “G” ‘Print #1 gaphic data in NV memory Printer.EndDoc Also you can send commands through driver but it is necessary to choose printer font first. (Please use this way at your own risk. We do not recommend this usage.) (ex) Pritner.FontSize=12 Printer.FontName=”15 cpi” Printer.Print CHR$(&H1B) + “V” + CHR$(1) Printer.Print “15 cpi / Size 12” Printer.EndDoc ‘90 degrees right turned. Caution: PrintDocument object of Visual Basic.Net etc does not support printer font. Therefore the above method using printer font cannot be used. - 57 - 12.3 Example of program by Visual C++ Following is the Visual C++ 6.0 program list using MFC library. // Get the DEVMODE structure of printer to use // lpdevmode is the pointer for got DEVMODE structure // Generate device context of specified printer HDC hdc; hdc = CreateDC(_T("CITIZEN CT-S2000"), _T("CITIZEN CT-S2000"), NULL, lpdevmode); if (!hdc) return; // Attach the printer device context to CDC CDC PrinterCDC; PrinterCDC.Attach(hdc); // Make Print-Job DOCINFO docInfo; memset(&docInfo, 0, sizeof(docInfo)); docInfo.cbSize = sizeof(docInfo); docInfo.lpszDocName = _T("Driver Print Test"); docInfo.lpszOutput = NULL; docInfo.lpszDatatype = NULL; docInfo.fwType = NULL; // Start printing int ypos = 0; PrinterCDC.StartDoc(&docInfo); PrinterCDC.StartPage(); // Windows font CFont setFont; CFont* poldFont; CSize setSize; CString txtPrintData; setFont.CreatePointFont(10*10, _T("Arial"), &PrinterCDC); poldFont = PrinterCDC.SelectObject(&setFont); txtPrintData = _T("Font Arial / Size 10"); setSize = PrinterCDC.GetTextExtent(txtPrintData); PrinterCDC.TextOut(0, ypos, txtPrintData); PrinterCDC.SelectObject(poldFont); setFont.DeleteObject(); ypos += setSize.cy; // Printer font setFont.CreatePointFont(12*10, _T("15 cpi"), &PrinterCDC); poldFont = PrinterCDC.SelectObject(&setFont); txtPrintData = _T("15 cpi / Size 12"); setSize = PrinterCDC.GetTextExtent(txtPrintData); PrinterCDC.TextOut(0, ypos, txtPrintData); PrinterCDC.SelectObject(poldFont); setFont.DeleteObject(); ypos += setSize.cy; // Barcode setFont.CreatePointFont(42*10, _T("Code39"), &PrinterCDC); poldFont = PrinterCDC.SelectObject(&setFont); txtPrintData = _T("ABC123456"); setSize = PrinterCDC.GetTextExtent(txtPrintData); PrinterCDC.TextOut(0, ypos, txtPrintData); - 58 - PrinterCDC.SelectObject(poldFont); setFont.DeleteObject(); ypos += setSize.cy; // Cash drawer setFont.CreatePointFont(12*10, _T("Control"), &PrinterCDC); poldFont = PrinterCDC.SelectObject(&setFont); txtPrintData = _T("A"); setSize = PrinterCDC.GetTextExtent(txtPrintData); PrinterCDC.TextOut(0, ypos, txtPrintData); PrinterCDC.SelectObject(poldFont); setFont.DeleteObject(); ypos += setSize.cy; // Cut paper setFont.CreatePointFont(12*10, _T("Control"), &PrinterCDC); poldFont = PrinterCDC.SelectObject(&setFont); txtPrintData = _T("P"); setSize = PrinterCDC.GetTextExtent(txtPrintData); PrinterCDC.TextOut(0, ypos, txtPrintData); PrinterCDC.SelectObject(poldFont); setFont.DeleteObject(); ypos += setSize.cy; // Graphic data from NV memory setFont.CreatePointFont(12*10, _T("Control"), &PrinterCDC); poldFont = PrinterCDC.SelectObject(&setFont); txtPrintData = _T("G"); setSize = PrinterCDC.GetTextExtent(txtPrintData); PrinterCDC.TextOut(0, ypos, txtPrintData); PrinterCDC.SelectObject(poldFont); setFont.DeleteObject(); ypos += setSize.cy; // End Printing PrinterCDC.EndPage(); PrinterCDC.EndDoc(); // Release Printer Device Context PrinterCDC.Detach(); DeleteDC(PrinterHDC); *Visual C#.Net does not allow using the printer font. - 59 -