1
User Guide
INTRODUCTION
Dear customer:
Thank you for purchasing a SAGEM Wi-Fi IP Radio; we appreciate your trust in us.
This product was manufactured with the upmost care, should you encounter any difficulties during its use, we
recommend that you refer to this user guide. You can also find information on the following site:
http://www.sagem.com/faq
For your comfort and safety, we ask that you read the following paragraph carefully:
Recommendations and safety instructions
Do not install your Wi-Fi IP Radio in a humid room (bathroom, laundry, kitchen, etc.), or within 1.50
m of a tap or water source, or outside. Your Wi-Fi IP Radio should be used at an ambient
temperature of between 15 °C and 35 °C for optimum sound results.
Do not set up your Wi-Fi IP Radio in a dusty environment as dust deposits might adversely affect
the sound quality.
Avoid objects or liquids getting into the unit.
Unplug the power lead if the unit will not be used for a long period.
Do not handle your AC cord with wet hands. If liquid spills on your amplifier, unplug immediately and
contact your dealer for cleaning instructions.
Only the power supply provided with the Wi-Fi IP Radio should be used. Connect this to the mains
in accordance with the installation instructions in this user guide and the information on the
identification label affixed to the power supply (voltage, current, mains frequency). As a precaution,
in case of danger, the mains adapters act as a disconnecting mechanism for the 230 V power
supply. They should be placed near the device and should be easily accessible.
At the end of their useful life, batteries must be disposed of according to the recycling instructions
presented in this booklet.
Do not attempt to remove any screws or open the unit. No user serviceable parts are inside.
Some sensitive medical equipment and safety equipment may be affected by the radio-frequency
transmissions of your telephone. In all cases, we ask that you respect the safety recommendations.
The CE marking certifies that the product meets the essential requirements of Directive 1999/5/CE
of the European Parliament and of the Council pertaining to microwave radio equipment and
telecommunication terminal equipment, for the safety and health of users, for electromagnetic
interference. Furthermore, it efficiently uses the frequency spectrum attributed to ground and spatial
communication to prevent damaging interference.
The declaration of compliance may be looked up on the www.sagem.com site, section "support" or
can be obtained from the following address:
Sagem Communication - Customer relations department
4 rue du petit albi - 95800 Cergy Saint-Christophe -France
CONTENTS
1.
2.
Your Wi-Fi IP Radio
5
Main Features
Unpacking
Front Panel
Keypad Area
Rear Panel
Keypad Functions
Installing the batteries
Wi-Fi IP Radio set-up
Menu structure
5
5
6
6
7
8
9
10
14
Installation
15
Network Setup
Basic Requirements
Configuration as a Wireless Client
Configuration as a Wired Client
Configuration as a Wireless Access Point (AP)
Windows Media Player 11: Installation and connection
Installation & Connection to Windows Media Connect V2.0
3.
Listening to Music
37
Listening to Internet Radio
Listening to FM Radio
Listening to the music in your computer
Listening to the Music on your USB drive
The Playback Screen
4.
Alarm
37
40
42
45
47
48
Clock
Setting the Clock Manually
Setting the Clock Automatically
Alarm settings
Snooze
5.
15
15
16
20
23
25
34
48
48
49
49
52
Miscellaneous Setup Functions
Backlight Settings
Language Choice
Equalizer Settings
Reset to Factory Default Settings
Clear Favorites
Check Firmware Version
Software Updation
53
53
53
54
54
54
55
55
3
CONTENTS
6.
Appendix
57
Care and Maintenance
Problems
57
57
7.
Specifications
60
8.
Environment
62
Packaging
Batteries
The product
9.
62
62
62
Guarantee terms and conditions
4
63
YOUR WI-FI IP RADIO
1. Your Wi-Fi IP Radio
This product is a wifi IP radio which may also be used as an alarm clock. This product is a WiFi IP Radio. Connected to an Internet residential gateway, it enables users to browse/play/
store worldwide IP radio stations via the V-Tuner web server. It is mainly dedicated to Internet
network access. The device may also be used to play the user's own digital music, and to listen
to music on local FM broadcast services.
1.1.
MAIN FEATURES
1. IEEE 802.11b/g wireless connection and IEEE 802.3 Ethernet connection to access the
network resource.
2. Subscription vTuner services for listening to Internet radio stations directly. No PC server
is required to listen to the Internet radio.
3. Built-in FM Radio tuner for listening to local FM broadcast services.
4. Compliant with the UPnP A/V protocol and popular UPnP-based streaming servers, such
as Microsoft Windows Media Player 11 and the MusicMatch Jukebox. Users benefit from
the network audio streams delivered from UPnP-based audio servers.
5. Direct access/playback of music from external USB storage devices (including Flash,
MP3 player, 2.5" HDD-based storage, single/first partition supported).
6. Supported audio formats: .mp3, .wma, .wav (including IMA-AMPCM)
7. A management function for storing the user's favorite radio stations in the memory for
quick access.
8. Playback controls: Play, Pause, Stop, Fast Forward, Fast Backward, Next, and Prev.
9. Selectable play modes: Sequential, Single, Random, repeat all, repeat single, and nonrepeat.
10. Predefined equalizer and volume controls.
11. Simple means of upgrading the device with new firmware.
12. Dual alarm and snooze function to wake you up with any available music source.
1.2.
UNPACKING
The product package includes the following items:
• 1 x IP radio device,
• 1 x 2dBi WiFi antenna,
• 1 x FM antenna (cable with 2.5mm plug),
• 1 x power adapter (DC 5V / 3A),
• 1 x remote controller,
• 2 x AAA batteries,
• 1 x CD / User Manual,
• 1 x Quick Guide.
5
YOUR WI-FI IP RADIO
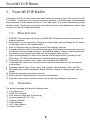
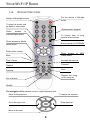
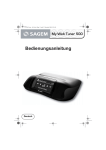
1.3.
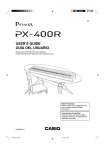
FRONT PANEL
IrDA receiver
Display screen
INTERNET RADIO
USB port
1.4.
Speaker cover
KEYPAD AREA
STOP
Power
4-direction control
OK button
SNOOZE
6
YOUR WI-FI IP RADIO
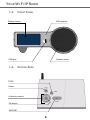
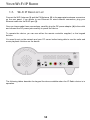
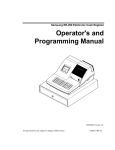
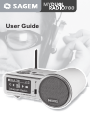
1.5.
REAR PANEL
Power switch
DC power jack
Reset button
WiFi antenna connector
RJ45 port
Status LED
RCA jack for line out
3.5mm headphone jack
2.5mm FM antenna jack
7
YOUR WI-FI IP RADIO
1.6.
KEYPAD FUNCTIONS
Put the device in Standby
mode.
Switch off backlight screen
To stop the music and
go back to main menu
Alphanumeric Keypad
Direct
access
to
Internet Radio menu
To launch time to stop
current music source
Direct access to Media
server menu
Direct access to FM Radio
menu
Reduce the volume
Mute
Direct access
Player menu
to
Play / Pause
Increase the volume
Rewind
Forward
Previous
Next
List of favoris
Repeat the song
or the song list
Shuffle
The navigator of the remote control, a rapid selection tool.
Move to the previous
To select the function
Go to the top of list
Enter next list
Move to the next
8
MP3
YOUR WI-FI IP RADIO
1.6.1.
Installing the batteries
Take the remote control and turn it around so that the battery compartment is accessible.
Insert the batteries one after the other in compliance with the battery polarity, as shown on the
battery slot.
Refit the battery compartment cover, first by the bottom, then lowering the top until full closure.
At the end of their useful life, batteries must be disposed of according to the recycling
instructions presented in this booklet.
9
YOUR WI-FI IP RADIO
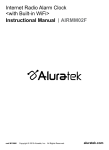
1.7.
WI-FI IP RADIO SET-UP
Connect the WiFi Antenna (1) and the FM Antenna (2) to the appropriate antenna connectors
on the rear panel. If you prefer to use Ethernet for wired network connection, plug your
Ethernet cable into the RJ45 port (3).
Once you have made these connections, carefully plug the DC power adapter (4) to the outlet
and connect the DC power jack carefully to power the device.
To operate the device, you can use either the remote controller supplied, or the keypad
buttons.
You need to set up the network and your PC server before being able to use the radio and
music playback functions on the device.
(1)
(4)
(3)
(2)
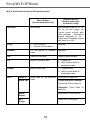
The following tables describe the keypad functions available when the IP Radio device is in
operation.
10
YOUR WI-FI IP RADIO
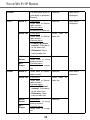
(A) For the Selection Screen & Playback screen
Select Screen
(Screen with menu list)
Playback Screen
(Screen with name
of station / song)
SNOOZE
No function
Launches the timer for 15, 30,
45, or 60 min (stops the
current music source after
time selected) - Information
screen displayed for 3s. Goes back to standby screen
with timer icon ON.
STOP
1. STOP MUSIC.
2. Go back to main menu.
Identical.
POWER
Put the device in Standby
mode.
Identical.
OK
Select the function.
Goes to option screen.
UP
Move to previous item.
1. Volume up.
2. After 2s goes back to
playback screen.
DOWN
Move to next item.
1. Volume down.
2. After 2s goes back to
playback screen.
Goes back to the previous
menu.
Goes back to radio list.
LEFT
Radio IP
Radio FM
If radio FM (direct access) :
Goes back to the menu list.
Otherwise: Goes back to
radio list.
Media
Server
Goes back to the song list.
MP3
Player
Goes back to song list.
11
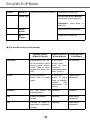
YOUR WI-FI IP RADIO
RIGHT
Radio IP
Goes back to the next menu.
Radio FM
Goes back to radio list.
If radio FM (direct access) :
Goes back to the menu list.
Otherwise: Goes back to
radio list.
Media
Server
Goes back to the song list.
MP3
Player
Goes back to song list.
(B) For the Idle screen (clock screen)
Standby screen
& Music Playing
Standby Screen
& Alarm Music
Standby Screen
& No Music
SNOOZE
Launches 15, 30, 45,
or 60 min timer to stop
current music source
(Goes back to clock
screen with timer icon
ON).
STOPS the
music (Goes
back to clock
screen &
reactivates alarm
after 10 min.).
No function
STOP
STOPS MUSIC&
Goes back to main
menu.
STOPS the
music & Goes
back to standby
screen
(No
reactivation
of
alarm).
Alarm menu
displayed.
POWER
Put the device
Standby mode.
Identical.
Identical.
OK
Displays playback
screen.
Identical.
Main menu
displayed.
UP
Volume up (after 2s
goes back to playback
screen).
Identical.
Main menu
displayed.
12
in
YOUR WI-FI IP RADIO
DOWN
LEFT
Volume down (after 2s
goes back to playback
Screen).
Identical.
Main menu
displayed.
Radio IP
First press:
Goes back to Station
radio screen.
Second press:
Goes back to radio list.
Identical.
Main menu
displayed.
Radio FM
First press:
Goes back to Station
radio screen.
Second press:
Goes back
radio list.
to
• If radio FM (direct
access) : Goes back
to the menu list.
• Otherwise: Goes
back to radio list.
Media
Server
First press:
Goes back to song
playing screnn.
Second press:
Goes back to songs
list.
Identical
Radio IP
Goes back to Station
radio screen.
Identical.
Radio FM
First press:
Goes back to Station
radio screen.
Second press:
• If radio FM (direct
access) : Goes back
to the menu list.
• Otherwise: Goes
back to radio list.
Goes back
radio list.
Media
Server
First press:
Goes back to song
playing screnn.
Second press:
Goes back to songs
list.
Identical.
MP3
Player
RIGHT
MP3
Player
13
Main menu
displayed.
to
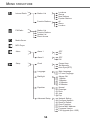
MENU STRUCTURE
Internet Radio
FM Radio
Station List
Locations
Genres
New Stations
Popular Stations
Favorite Stations
All
Genre
Location
Station List
Favorite Stations
Update List
Direct Access
Media Server
MP3 Player
Alarm
Setup
Alarm 1
OFF
ON
Alarm 2
OFF
ON
Clock
Current time
Set Manually
Auto-Sync (NTP)
Language
Main Language
V-Tuner Language
Backlight
Always ON
1 Minute
3 Minutes
10 Minutes
30 Minutes
Equalizer
Normal
Classique
Rock
Jazz
Pop
Advanced Setup
Network Setting
Configure Network
Reset to Default
Clear Favorites
Device MAC Address
Firmware Version
F/W Upgrade (thru. USB)
14
INSTALLATION
2. INSTALLATION
2.1.
NETWORK SETUP
2.1.1.
Basic Requirements
For the IP Radio device to work properly under your existing network environment, your
network must feature the following:
You must have a router device with an enabled DHCP server function, so that it can
automatically assign the IP address to your computer or another network device.
If you already have a router device in your home, it will be easy to setup the IP Radio device
with your existing network environment. If you don't know what you have on your home
network, the following FAQ will help you to troubleshoot before operating your IP Radio device.
The minimum streams to receive Radio IP are :
- 192 KPS for a normal quality,
- 640 KPS for an upper quality.
How does your computer or Notebook PC access the Internet?
The answer might be one of the following:
Case I
I have to plug an Ethernet cable to the computer, and
1. I have to execute a dial-up program from my computer to link to the ISP service, and I can
then access the Internet.
¸ You need to purchase a (wireless) broadband router.
2. No extra dial-up program is executed in my computer, but I set a fixed IP address in my
computer.
3. No extra dial-up program is executed in my computer, and I set a dynamic IP address in
my computer.
¸ There is a router device in your home. You can configure the IP Radio device in wired
client mode to operate it with your home network.
Case II
I use wireless connection, and
1. I have to execute a dial-up program from my computer to link to the ISP service, and I can
then access the Internet.
15
INSTALLATION
¸ There is no router device in your home. You need to purchase a new router device to
upgrade your home network.
2. No extra dial-up program is executed in my computer, but I set a fixed IP address in my
computer.
¸ If the IP address is provided by your ISP supplier, there is probably no DHCP service in
your home network. You need to buy a new router device.
If the IP address is a virtual IP, such as 192.168.xxx.xxx, you should have a router
device. Therefore, the IP Radio device will function with your home network.
3. No extra dial-up program is executed in my computer, and I set the dynamic IP address in
my computer.
¸ There is a wireless router device in your home, the IP Radio device will be able to
operate with your home network.
Moreover, the IP radio allows to play the music loaded in your PC, this one being connected
to the same router.
2.1.2.
Configuration as a Wireless Client
There are three network configuration modes available for the IP Radio device: simple wireless
client, wired client, or wireless access point (AP).
The factory default mode is the client mode. If an Ethernet cable is available, the device will
automatically select a suitable client mode to operate. Users can also manually change the
network configuration settings via the Setup menu "Setup/Advanced Setup/Configure
Network".
If you have a 802.11b/g wireless network in your home, this mode is the most straightforward
means of connecting the IP Radio device to the existing network.
Simply power the device, without connecting an Ethernet cable, and the device will
automatically switch to the wireless client mode and detect all available wireless APs (Access
Points). The first time the device is set to the wireless client mode, you need to determine
which AP to connect to and enter the encryption key. Once the settings have been established,
the device will remember the settings and attempt to connect to the designated AP when it is
switched on. However, if you encounter any difficulty in connecting to the designated AP, the
device will display the AP list for you to configure the device once again.
16
INSTALLATION
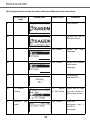
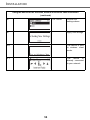
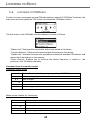
(A) Using the device for the first time, without an Ethernet cable connection:
Screen on the
right
Screen shot
Next screen
Comment
1
Initial screen
2
Device run as a
Wireless Client.
3
"OK" button
Select the
language.
4
"OK" button
Select the Internet
radio menu
language.
5
MMI
Scanning for
available APs.
6
" " button
(Once)
7
Numeric
pads
key
17
" "
button
or "OK" button
Select the AP that
you can connect to
your router device.
"OK" button
Enter the
encryption key if
the AP is
encrypted.
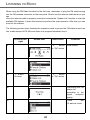
INSTALLATION
Using the device for the first time, without an Ethernet cable connection
(continued)
8
"OK" button
Confirm the
settings above.
9
Apply new settings.
10
The device is now
in wireless client
mode.
11
The
device
is
already connected
to your network.
18
INSTALLATION
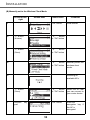
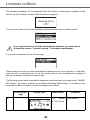
(B) Manually set to the Wireless Client Mode:
Screen on the
right
Screen shot
1
Next screen
"OK" button
2
" " button
(4 times)
" "
button
or "OK" button
3
" " button
(Once)
" "
button
or "OK" button
4
" "
button
or "OK" button
5
Comment
Initial screen
Manually select the
wireless client
mode.
Scanning for
available APs.
6
" " button
(Once)
7
Numeric
pad
key
19
" "
button
or "OK" button
Select the AP that
you can connect to
your router device.
"OK" button
Enter the
encryption key if
the AP is
encrypted.
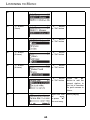
INSTALLATION
Manually set to the Wireless Client Mode (continued)
8
"OK" button
Confirm the
settings above.
9
Apply new settings.
10
The device is now
in wireless client
mode.
11
The
device
is
already connected
to your network.
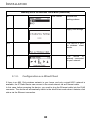
2.1.3.
Configuration as a Wired Client
If there is no 802.11b/g wireless network in your home, and only a wired 802.3 network is
available, the IP Radio device can connect to the wired network via an Ethernet cable.
In this case, before powering the device, you need to plug the Ethernet cable into the RJ45
connector. The device will automatically switch to the wired client mode when it detects a link
status via the Ethernet connection.
20
INSTALLATION
(A) Using the device for the first time, without an Ethernet cable connection:
Screen on the
right
Screen shot
Next screen
Comment
1
Initial screen
2
Device run as a
Wired Client.
3
" "
button
or "OK" button
Select the
language.
4
" "
button
or "OK" button
Select the Internet
radio menu
language.
5
MMI
The device is now
in
wired
client
mode.
It
is
already
connected to your
network.
21
INSTALLATION
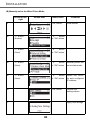
(B) Manually set to the Wired Client Mode:
Screen on the
right
Screen shot
1
Next screen
"OK" button
Comment
Initial screen
2
" " button
(4 times)
" "
button
or "OK" button
3
" " button
(Once)
" "
button
or "OK" button
4
" " button
(Once)
" "
button
or "OK" button
Manually select the
wired client mode.
5
" " button
(Once)
" "
button
or "OK" button
Select the DHCP
for auto configured
IP address.
"OK" button
Confirm the
settings above.
6
7
Apply new settings.
22
INSTALLATION
Manually set to the Wired Client Mode (continued)
8
The device is now
in
wired
client
mode.
9
The
device
is
already connected
to your network
2.1.4.
Configuration as a Wireless Access Point (AP)
If you wish to extend your wireless network coverage range, you need to add new access
points to specific locations in your home. This will enable other wireless notebook PCs and
network devices to access the extended wireless network. The IP Radio device can also be
configured as a wireless AP. With this feature, you can easily extend your wireless coverage
without having to purchase another AP.
To configure the IP Radio device as an AP, you need to setup the device manually via the MMI
menu "Setup/Advanced Setup/Configure Network/AP mode". You then need to enter the IP
address, the SSID, the channel number and the AP encryption. Once these settings have been
established, the device will automatically reboot and function as an AP.
Manually set to the Wireless AP Mode:
Screen on the
right
Screen shot
1
2
Next screen
"OK" button
" " button
(4 times)
" "
button
or "OK" button
23
Comment
Initial screen
INSTALLATION
Manually set to the Wireless AP Mode (continued)
3
" " button
(Once)
" "
button
or "OK" button
4
" " button
(2 times)
" "
button
or "OK" button
Manually select the
AP mode.
5
" " button
(Once)
" "
button
or "OK" button
Select the DHCP
for auto configured
IP address.
6
Numeric
pad
key
"OK" button
Enter the Identifier
(name) for this AP.
7
Numeric
pad
key
"OK" button
Select the wireless
channel
to
be
allocated to this AP.
8
" " button
(Once)
"OK" button
Select one of the
security functions.
9
Numeric
pad
"OK" button
Enter the
encryption key if
the AP is
encrypted.
key
24
INSTALLATION
Manually set to the Wireless AP Mode
(continued)
10
"OK" button
Confirm
the
settings above.
11
Apply new settings.
12
The device is in
wireless AP mode
now.
13
The
device
is
already connected
to your network and
can now operate.
2.1.5.
Windows Media Player 11: Installation and connection
Please follow the instructions below:
Step 1:
Download the WMP11.
Download the Windows Media Player 11 (WMP11) installation file, e.g., wmp11windowsxp-x86-enu.exe, from the Microsoft web site.
Install the wmp11-windowsxp-x86-enu.exe without making any modifications.
Click on 'next' to complete the installation.
25
INSTALLATION
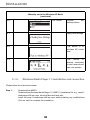
Step 2:
Activate the Media Player.
Find the "Windows Media Player" icon in the Program list,
and click on this program to activate it.
Step 3:
Switch from "Now Playing" to "Library" by clicking on the Library Tab to manage
the content and share your media. The following screen will be displayed:
26
INSTALLATION
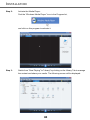
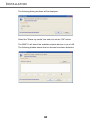
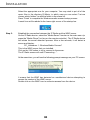
Step 4:
Add your Media content to the WMP11 media library.
Click on the "Library" tab again to access the pull-down menu. To add your
media files to the WMP11 media library, click on "Add to Library…"
The following screen will be displayed:
Click on the Add button , select the media folder in your computer, and then click
on the OK button.
27
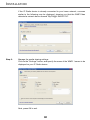
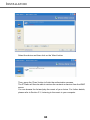
INSTALLATION
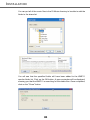
You can put all of the music files in the D:\Music directory to be able to add the
folder to the share list.
You will see that the specified folder will have been added to the WMP11
monitor folder list. Click on the OK button. A pop-up window will be displayed,
showing you that the WMP11 is searching for the media files. Once completed,
click on the "Close" button.
28
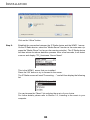
INSTALLATION
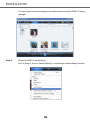
You can now browse and manage your media content using the WMP11 Library
manager.
Step 5:
Share the WMP11 media library.
As in to Step 4, click on "Media Sharing" to activate the media sharing function.
29
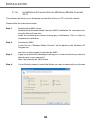
INSTALLATION
The following dialog windows will be displayed.
Select the "Share my media" box and click on the "OK" button.
The WMP11 will detect the available network devices in your LAN.
The following window shows that no devices have been detected.
30
INSTALLATION
If the IP Radio device is already connected to your home network, a screen
similar to the following may be displayed, showing you that the WMP11has
detected a network device named "My DU@L RADIO 700".
Step 6:
Manage the media sharing settings.
Click on the "Settings" button, and specify the name of the WMP11 server to be
displayed on your IP Radio device.
Next, press OK to exit.
31
INSTALLATION
Step 7:
Authorize access from your IP Radio device.
The WMP11 access control settings are simple. When the WMP11 detects a
new network device (as shown on the final screen in Step 5), you need to decide
whether you want to allow or deny the requests from that device.
Select the device icon and then click on the "Allow" button to allow further
streaming requests from that device.
The device state icon will change accordingly.
Next, press the OK button to activate the settings.
There is an alternative means of access management for your network devices.
A small icon
will be added to the Windows XP status bar to inform you that
the WMP11 has detected network devices.
Double-click on it to manage the access for the devices.
32
INSTALLATION
Click on the "Allow" button.
Step 8:
Establish the connection between the IP Radio device and the WMP11 server.
On the IP Radio device, select the "Media Server" function in the main menu (or
press the "Media Player" hot key on the remote controller). The IP Radio device
will then initiate the server detection process. After a few seconds, it will detect
a server and display "PC_Hostname: Server Name"
This is the WPM11 server that you installed.
Press the 'OK' button to try to connect to the server.
The IP Radio screen will read "Connecting…." and will then display the following
list:
You can browse the "Music" list and play the music of your choice.
For further details, please refer to Section 3.3, Listening to the music in your
computer.
33
INSTALLATION
2.1.6.
Installation & Connection to Windows Media Connect
V2.0
This software will allow you to broadcast musical files from your PC to the wifi network.
Please follow the instructions below:
Step 1:
Download the WMC server.
Download the Windows Media Connect (WMC) installation file, wmcsetup.exe,
from the Microsoft web site.
Install the wmcsetup.exe without making any modifications. Click on 'Next' to
complete the installation.
Step 2:
Activate the WMC.
A new file icon "Windows Media Connect" will be added to the Windows XP
Program list.
Step 3:
Step 4:
and click on this program to activate the WMC.
A pop-up window will be displayed, asking you to "select the device you want to
allow access to your computer".
Skip it by pressing the 'Next' button.
You will then be asked to select the folders you want to share with your devices
34
INSTALLATION
Select the appropriate one for your computer. You may wish to put all of the
music files in the directory D:\Music, in which case you can select "Let me
choose which folders" to add the folder to the share list.
Press 'Finish' to complete the Windows media connect setup process.
A small icon will be added to the lower right corner of the startup bar.
Step 5:
Establish the connection between the IP Radio and the WMC server.
On the IP Radio device, select the "Media Server" function in the main menu (or
press the "Media Player" hot key on the remote controller). The IP Radio device
will initiate the server detection process. After a few seconds, it will detect a
server and display:
PC_Hostname: 1: Windows Media Connect"
This is the WMC server that you installed.
Click on the 'OK' button to try to connect to the server.
The IP Radio screen will read "Connecting…".
At the same time, you will see the following prompt message on your PC screen:
It means that the WMC has detected an unauthorized device attempting to
access the content of the WMC server.
Double click on the WMC icon to authorize access from the device.
35
INSTALLATION
Select the device and then click on the 'Allow' button
Then, press the 'Close' button to finish the authorization process.
The IP Radio will then be able to retrieve the contents or service from the WMC
server.
You can browse the list and play the music of your choice. For further details,
please refer to Section 3.3, Listening to the music in your computer.
36
LISTENING TO MUSIC
3. LISTENING TO MUSIC
The IP Radio device is a high-performance audio player that can play music from various types
of source. You can use it to listen to Internet radios all over the world, local FM broadcasting
services, music files in your computer, and even music files in portable MP3 players.
The following part of this manual explains how to listen to the music using the IP Radio device.
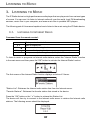
3.1.
LISTENING TO INTERNET RADIO
Command from the remote control:
.
Go to preview/next station.
Back to station list.
Vol -,
Decrease the hearing level.
Vol +,
Increase the hearing level.
Add (or cancel) the song from (to the) list of favourites.
To listen to music or programs on Internet radio stations, select the "Internet Radio" function
in the main menu and then press the "OK" button to activate the Internet Radio function.
The first screen of the Internet Radio function displays a choice of 2 items:
"Station List": Retrieves the Internet radio station lists from the Internet server.
"Favorite Stations": Retrieves the favorite station lists stored in the device.
Press the "OK" button or the " " button to retrieve the Station List.
The device will then try to connect to the Internet radio server to retrieve the Internet radio
stations. The following screen should be displayed:
37
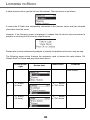
LISTENING TO MUSIC
It takes few seconds to get the list from the Internet. The next screen is as follows.
It means the IP Radio has successfully connected to the Internet server and has retrieved
information from the server.
However, if the following screen is displayed, it means that the device has encountered a
problem in retrieving the list from the Internet server.
Please refer to the troubleshooting chapter to identify the problem and solve it step by step.
The following screen shots illustrate the sequence used to browse the radio station "4U
Classic Rock" in France and play back music from it.
Screen on the
right
1
Screen shot
Next screen
Initial screen
.
2
" " button
(4 times)
3
" " button
(15 times)
Comment
" "
button
or "OK" button
.
" "
button
or "OK" button
.
38
LISTENING TO MUSIC
4
5
6
7
" "
button
or "OK" button
.
" " button
" "
button
or "OK" button
.
Press the " "
button to add the
current station to
the list of favorites
for quick access in
future.
Try to connect to
the radio station.
.
Buffering the music
from
the
radio
station.
.
8
Music playing…
When the complete
list of available
radios is selected ,
an
alphabetical
research may be
used by selecting
on
the
remote
control the first
letter of the radio to
be choosen, and
the
first
radio
starting with this
letter
is
then
displayed.
.
39
LISTENING TO MUSIC
3.2.
LISTENING TO FM RADIO
To listen to music or programs on local FM radio stations, select the "FM Radio" function in the
main menu and then press the "OK" button to activate the FM Radio function.
The first screen of the FM Radio function displays a choice of 4 items:
"Station List": Retrieves the tuned radio station lists stored in the device.
"Favorite Stations": Retrieves the favorite station lists stored in the device.
"Update List": Activates the auto scan procedure to detect all available FM stations, and
stores the tuned stations in the memory.
"Direct Access": Enables you to fine-tune the station frequency or switch to the
previous / next FM station manually.
Command from the remote control:
Frequency choice mode:
Vol -,
Vol +,
Forward/backward in frequency range (step of 0.05Mhz).
Auto scanning to previous/next.
Back to menu.
Decrease the volume.
Increase the volume.
Add (or suppress) the station (to the) from favourites.
Mode normal (station list, favourites):
Vol -,
Vol +,
Previous/nest in station list.
Back to station list.
Decrease the volume.
Increase the volume.
Add (or suppress) the station (to the) from favourites.
40
LISTENING TO MUSIC
When using the FM Radio function for the first time, remember to plug the FM antenna plug
into the FM antenna connector on the rear panel. Stretch out the antenna cable as far as you
can.
Once the antenna cable is properly connected, activate the "Update List" function to scan the
available FM stations. It takes few seconds to perform the scan operation. After that, you can
tune into the stations.
The following screen shots illustrate the sequence used to pre-set the FM stations and tune
into a radio station 98.70 MHz and listen to a program broadcast from it.
Screen on the
right
1
Next screen
" "
button
or "OK" button
.
2
3
Screen shot
Comment
Initial screen
:
" " button
(2 times)
" "
button
or "OK" button
4
Pre-setting the FM
station list
according to the
signal
reception
quality.
5
There
are
15 stations tuned.
41
LISTENING TO MUSIC
6
" " button
" "
button
or "OK" button
7
Press the " "
button to add the
current station to
the list of favorites
for quick access in
future.
Tuned to
and music
playing…
3.3.
station
LISTENING TO THE MUSIC IN YOUR COMPUTER
To listen to the music stored in your own computer, you need to install and activate the media
server utility for the computer in which your digital music is stored. Please refer to the section
describing installation of the Media Server.
Once you have installed and activated the media server, you can enjoy listening to the music
via the IP Radio device.
Command from the remote control:
Vol -,
Vol +,
Fast forward/backward in the file (10 S step).
Previous/Next file.
Pause / Play.
Decrease the volume.
Increase the volume.
Add (or cancel) the song from (to the) list of favourites.
Shuffle ON / OFF: Random research.
repeat: OFF / ALL / SINGLE.
Select the "Media Server" function in the main menu and then press the "OK" button to activate
the stream from the Media Server function.
42
LISTENING TO MUSIC
The following message will be displayed while the device is detecting all available media
servers on your network. It takes a few seconds to complete.
The screen will then list all of the available media servers that you are able to select.
If you stay locked on one of the intermediates windows, you may have to
activate the service " network sharing " of windows media player.
If no server is detected, the list will be empty.
Please check to ensure you have activated the media server on your computer. If, after that,
there are still no media servers on the list, please refer to the troubleshooting chapter to
identify the problem and solve it step by step.
The following screen shots illustrate the sequence used to connect to a media server "JAMESNB: James:", the service of which is provided by Windows Media Player 11, browsing to the
music album "Best of Roxette" to play the songs on this album.
Screen on the
right
Screen shot
1
Next screen
" "
button
or "OK" button
43
Comment
Initial screen
LISTENING TO MUSIC
2
3
" " button
(Once)
" "
button
or "OK" button
4
" "
button
or "OK" button
5
" " button
(6 times)
" "
button
or "OK" button
6
" " button
(4 times)
" "
button
or "OK" button
7
" "
button
or "OK" button
Press the " "
button to add the
current station to
the list of favorites
for quick access in
future.
8
Wait until end
of
song,
or press " "
for next song.
Music playing.
44
LISTENING TO MUSIC
9
Next song playing.
Once the music starts, you can use the playback buttons, as you would with a traditional stereo
or CD player.
3.4.
LISTENING TO THE MUSIC ON YOUR USB DRIVE
To listen to the music on your USB drive or portable MP3 player, connect the USB drive to the
USB connector on the IP Radio device. Next, select the "MP3 Player" function in the main
menu and press the "OK" button to activate the MP3 player function.
The first screen of the MP3 Player function shows the root folder content of the attached USB
drive.
If the following "NO DEVICE" screen is displayed, there may be a problem in accessing the
USB device. Unplug the USB device and then plug it in again.
To play back songs stored in the USB drive, simply browse the folder of the music album of
your choice and then press "Play".
45
LISTENING TO MUSIC
Command from the remote control:
Vol -,
Vol +,
Fast forward/backward in the file (10 S step).
Previous/Next file.
Pause / Play.
Decrease the volume.
Increase the volume.
Add (or cancel) the song from (to the) list of favourites.
Shuffle ON / OFF: Random research.
repeat: OFF / ALL / SINGLE.
The following screen shots illustrate the sequence used to listen to the music in the folder
"Diamonds Love Song" in the attached USB drive.
Screen on the
right
Screen shot
1
2
Next screen
Comment
" "
button
or "OK" button
Initial screen
" "
button
or "OK" button
Select the music
folder to browse
and play back.
" "
button
or "OK" button
Select the music
folder to browse
and play back.
.
3
" " button
(2 times)
4
" " button
(Once)
.
.
46
LISTENING TO MUSIC
5
" "
button
or "OK" button
.
6
.
Warning ! :
The interface of MP3 reader must be USB2. USB1 is not guaranteed.
Warning ! :
Before disconnecting the MP3 player, go to the setup menu and choose
"Remove MP3 player". Select "Yes" to confirm.
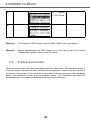
3.5.
THE PLAYBACK SCREEN
When the music starts, the screen will display playback information. This includes the title of
the song / station, the album & artist, and the music progression. There is also a status line at
the bottom of the screen. This shows the current state of the wireless signal, the connection
quality, the connection status, and the playback status. This information can help with
troubleshooting if you encounter problems while listening to the music.
47
ALARM
4. ALARM
In addition to the music playback function, the IP Radio Device also provides a simple alarm
function. There are two different alarms, one to wake you up in the morning, and another used
to remind you of important times of day, or dates.
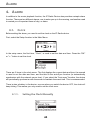
4.1.
CLOCK
Before setting the alarm, you need to set the clock on the IP Radio device.
First, select the Setup function in the Main Menu.
In the setup menu, the first item, "Clock", is used to set the date and time. Press the "OK"
or " " button to set the clock.
There are 3 items in the clock menu. The first displays the current date and time; the second
is used to set the date and time, and the third is the auto-Sync function (to automatically
synchronize with the network server time). If you select the "Auto-sync" function, the device
will periodically synchronize with the server to maintain the exact time. This is recommended.
There is also a battery in the device, so even when you switch the device OFF, the clock will
keep ticking. This means you only need to set the clock once.
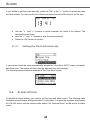
4.1.1.
Setting the Clock Manually
48
ALARM
If you decide to set the clock manually, press the "OK" or the " " button to access the date
and time screen. You can use the four directional buttons and the OK button to set the time.
a. Use the " " and " " buttons to switch between the items to be altered. The
selected item will flash.
b. Use the " " and " " buttons to alter the value selected.
c. Press the "OK" button to confirm.
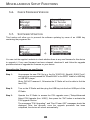
4.1.2.
Setting the Clock Automatically
If you choose to set the clock automatically, access the "Auto-Sync (NTP)" menu, and select
your time zone. The device will then alter the date and time automatically.
The following screen shows an example of the Time Zone screen.
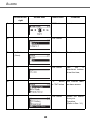
4.2.
ALARM SETTINGS
To enable an alarm setting, you need to set the time and alarm music. The following table
illustrates a typical alarm setting procedure. It sets Alarm 1 to generate an alarm (play music)
at 7:00 AM, and to use the Internet radio station "4U Classical Rock" as the source of alarm
music.
49
ALARM
Screen on the
right
Screen shot
Next screen
1
"OK" button
2
"OK" button
3
" " button
(Once)
Comment
Initial screen
"OK" button
Enable alarm 1.
4
"OK" button
Use
the
4
directional buttons
to set the time;
5
" "
button
or "OK" button
Set Internet radio
as alarm source.
6
"OK" button
Select the station
from your
Favorites.
(Refer to Sec. 3.1)
50
ALARM
7
Alarm information,
displayed for 3~5
seconds
8
The alarm is set.
Once you have set and activated the alarm, a bell icon will be added to the clock screen.
When it is time for the alarm, the device will activate the alarm and play back the specified
music. As with traditional clock alarms, the IP Radio device also provides a SNOOZE function
for you to stop the alarm, and request it to be activated 10 minutes later. You can press the
"STOP" button to switch the alarm and music off completely.
In rest position, there is no icon displayed to indicate that alarm is on.
51
ALARM
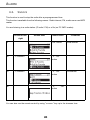
4.3.
SNOOZE
This function is used to stop the radio after a preprogrammed time.
This function is available from the following menus : Radio Internet, FM, media serve rand MP3
reader.
You are listening to a radio station (IP radio / FM) or a file (on PC /MP3 reader):
Screen on the
right
Screen shot
1
Next screen
"OK" button
2
" "Boutton
" " "OK"
button
3
" "Boutton
" " "OK"
button
4
" "
button
Comment
Initial screen
Countdown
"OK"
You can also use the remote control by using " snooze " key up to the choosen time.
52
MISCELLANEOUS SETUP FUNCTIONS
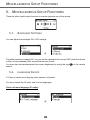
5. MISCELLANEOUS SETUP FUNCTIONS
There are other useful setup functions to ensure optimum use of the device.
5.1.
BACKLIGHT SETTINGS
You can adjust the backlight ON / OFF settings.
¸
The default setting is always ON. You can set the backlight to be turned OFF when the device
is idle (no keys pressed) after a specified amount of time.
You may also activate/deactivate the screen brightness by using the key
of the remote
control.
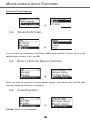
5.2.
LANGUAGE CHOICE
V-Tuner is a base recording the radio stations on Internet.
You may choose the IP radio and V-tuner languages.
Choice of main language (IP radio):
¸
53
MISCELLANEOUS SETUP FUNCTIONS
Choice of V-Tuner language:
¸
5.3.
EQUALIZER SETTINGS
¸
You can adjust the equalization from Radio, media server and MP3 menus. Once on the
selected station screen, or file , key OK.
5.4.
RESET TO FACTORY DEFAULT SETTINGS
¸
When you reset the device to its factory default settings, your Internet radio and FM radio
favorites settings will be stored in the device.
5.5.
CLEAR FAVORITES
¸
Caution! This is not recommended.
54
MISCELLANEOUS SETUP FUNCTIONS
5.6.
CHECK FIRMWARE VERSION
¸
5.7.
SOFTWARE UPDATION
This function will allow you to proceed the software updating by mean of an USB2 key
containing the programm file.
¸
You can visit the supplier's website to check whether there is any new firmware for this device
to upgrade it. If any new firmware has been released, download it and follow the upgrade
procedure below to upgrade the firmware on your device.
Upgrading the Firmware on your Device:
Step 1:
Uncompress the new F/W file (e.g. the file "20070315_ShrekW_R102C7.zip")
and copy the uncompressed file "ShrekW.BIN" to the ROOT folder of a USB key
or USB MP3 player.
(Note: DO NOT rename it!, Otherwise the IP Radio will not be able to find the
new F/W)
Step 2:
Turn on the IP Radio and then plug the USB key into the front USB port of the
IP Radio.
Step 3:
Operate the IP Radio to access the F/W upgrade menu ("Setup\Advanced
Setup\ F/W Upgrade (thru. USB)"), then press the "OK" button to activate the
F/W upgrade function.
The messages "F/W Upgrading", and "Don't Power Off!!" messages should be
displayed. After few seconds, once the upgrade procedure has been
completed, the device will reboot automatically.
55
MISCELLANEOUS SETUP FUNCTIONS
Step 4:
You can check whether the IP Radio upgrade has been has been successful by
checking the F/W version in the menu "Setup\Advanced Setup\Firmware
Version". In this case, the version should be R1.02C7. If a different version
number is shown, there may have been a problem during the upgrade.
Check to ensure the file "ShrekW.bin" in the USB key is the correct one.
56
APPENDIX
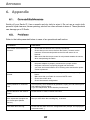
6. Appendix
6.1.
Care and Maintenance
Switch off your Radio IP. Use a smooth and dry cloth to wipe it. Do not use a rough cloth,
powerful liquid cleaners, thinner painting, alcohol nor other solvents to clean it. These products
can damage your IP Radio.
6.2.
Problems
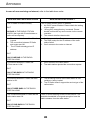
Refer to the table presented below in case of an operational malfunction:
Problems
Remedies
The remote control does not
function.
•
•
•
Check that the batteries are correctly introduced.
Check that you too are not far from the Radio (7 meters are the
maximum recommended) and that the infra-red sensor is not
blocked.
Make sure that the remote control is well pointed towards the sensor,
when manipulating the Radio.
The screen is switched off.
Make sure that :
•
the power adapter is properly connected to a power socket.
•
the power connector is properly plugged into the Radio.
•
your fuse and circuit-breaker are in working order and that the power
socket is powered.
Choosen station can not be
heared.
•
•
•
•
To hear the station, you must confirm your selection by pressing OK
button.
Make sure that your Radio is not set to MUTE mode.
Check the volume level.
Check the network configuration.
Audio parasites or clearness
less.
The frequency FM is disturbed by parasites. Deploy the FM antenna jack
until obtaining a high signal.
If you use ear-phones, check that they function well.
Access denied to the Internet
Radio.
Check the Wi-Fi router, Livebox or the line.
Access denied to the Radio
from a personal computer as
an access point (Media
Server).
Check that your Radio is not encoded.
else you must have the encoding key to access.
The alarm does not ring.
Check that the alarm source is configurated well (sample: the mp3 player
is disconnected,...).
57
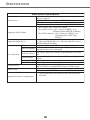
APPENDIX
Problem of the connexion to
the router.
•
•
•
Not able to get IP Address.
•
•
The connection between the
radio and the vTuner is not
OK.
•
•
•
•
•
•
The IP Radio is booted
normally but it doesn't get an
IP address.
•
•
•
No DHCP server enabled. Please check the setting of your router.
Wrong WiFi encryption key is entered. Please double confirm the key
and re-enter via the remote controller.
Trouble in the RJ45 port or WiFi module.
DNS no response. Please ping the IP address of the DNS to check if
it is the case.
DNS doesn't have the record of the vTuner server or radio station that
you are trying to connect.
Traffic jam for the internet access. Please try later.
vTuner server is out of service or heavy loaded to reply in time.
The authorization process is failed. VTuner server reject the access
request.
The streaming service of the radio station is unavailable or heavy
loaded.
The IP Radio doesn't support the service type of the radio station.
There is some buffering trouble on the internet. The available
bandwidth is not good enough to have the stable streams from the
radio station.
No DHCP server enabled. Please check the setting of your router.
Wrong WiFi encryption key is entered. Please double confirm the key
and re-enter via the remote controller.
The network interface has trouble.
58
APPENDIX
In case of non receiving on Internet, refer to the table here under.
What has been done with succes
The IP Radio is booted normally.
BUT
NO BAR IN THE RADIO STATION
LOGO* (the logo with 5 bars between a
radio and a computer).
1. The network interface of the IP radio
is good.
2. The connection between IP Radio
and router was OK.
3. The IP Radio already got an IP
address.
What could be the trouble ?
The IP Radio doesn't get an IP address.
1. No DHCP server enabled. Please check the setting
of your router.
2. Wrong WiFi encryption key is entered. Please
double confirm the key and re-enter via the remote
controller.
3. The network interface has trouble.
1. Can't access to the vTuner server.
2. The DNS lookup for the IP address of the radio
station failed.
3. Can't access to the router or internet.
BUT
ONLY ONE BAR IN THE RADIO
STATION LOGO
Connection between IP Radio and
vTuner server is OK.
1. Can't access to the radio station.
2. The radio station rejected the connection request.
BUT
ONLY TWO BARS IN THE RADIO
STATION LOGO
Connection between IP Radio and radio
station is OK.
BUT
1. The streaming service of the radio station is unavailable or heavy loaded.
2. The IP Radio doesn't support the service type of the
radio station.
ONLY THREE BARS IN THE RADIO
STATION LOGO
The connection between IP radio and the
radio station was OK.
There is some buffering trouble on the internet. The
available bandwidth is not good enough to have the
stable streams from the radio station.
BUT
ONLY FOUR BARS IN THE RADIO
STATION LOGO
59
SPECIFICATIONS
7. SPECIFICATIONS
Hardware and Port Characteristic
CPU
Memory
Front Panel Display
AMRISC 10020
Flash 1MB, SDRAM 2MB
128x64 Graphic-based & Back-lighted LCD
1 x Power button (Standby/Operation mode)
5 x push buttons for elementary operation
1 x push button for main menu
1 x push button for Snooze function
1 x IrDA Receiver on front panel
1W + 8W speaker pair,
(internal PA spec.: 2W per channel)
1 x 3.5mm phone-jack for stereo out
2 x RCA connectors for stereo out
1 x RJ45, 10/100 Mbps with Auto-MDI/MDIX
WiFi antenna: external 2dBi antenna
FM antenna: external cable antenna with 3.5mm plug
1 x USB Jack (type A) on front panel, USB 2.0 Compliant
1 x LED for status indicator (at rear panel)
DC 5V / 3A
Front Panel Keypad
Remote Control
L/R Speaker
Audio Port
Ether Port
Antenna
USB Port
LED Indicator
Input Power
Device Management Characteristic
Management Method
Upgrade Method
MMI
Through USB Port
Device Management Characteristic
Management Method
Upgrade Method
MMI
Through USB Port
Environment, Certification and Reliability
Operating Temperature
Storage Temperature
EMC/Safety
Reliability
Temperature: 0~40oC, Humidity 10%~90% non-condensing
Temperature: -20~70oC, Humidity: 0~95% non-condensing
CE, CB
Refer to AMIT’s reliability test items;
Vibration Test; Drop Test
60
SPECIFICATIONS
Main Audio Characteristic
PC-based audio server (streaming out the music per audio
adapter’s request)
Audio Source
Attached USB-based storage or MP3/WMA player
FM Radio
vTuner Internet radio stations (streaming MP3 & WMA).
1. Thru vTuner: .mp3, .wma (w/o DRM)
2. Thru Audio Server: .mp3, .wma (w/o DRM), .wav
(including IMA-ADPCM @48kbps)
Supported Audio Format
3. Thru USB connector: .mp3, .wma (w/o DRM), .wav
(including IMA-ADPCM @
48kbps)
Popular UPnP compliant media servers
Supported Audio Server
(eg. Microsoft Media Player 11, Microsoft Media Connect,
and MusicMatch JukeBox)
MMI
Support multi-language MMI
Browse by Album, Artist, Genre, and Playlist, Folder
Music Navigation
(depends on the server connected)
Play, Pause, Stop, Fast Forward, Fast Backward, Next, and
Playback Control
User Operation
Prev
Sequential, Single, Random, Repeat All, Repeat Single, NonPlayback Mode
Repeat
Pre-defined EQ
Normal, Classic, Rock, Jazz, Pop
Sound Effect
Volume
Support direct access and playback for the music stored in
USB extension
attached USB 2.0 compliant MP3 player or USB storage.
24 hours / Dual alarm, snooze
Alarm Clock
Music source: USB, WiFi, Internet radio, FM Radio, Buzzer
1. Client mode (both wired and wireless, auto detection)
2. AP mode
Supported Network Configuration
61
ENVIRONMENT
8. ENVIRONMENT
Preservation of the environment is an essential concern of Sagem Communication. The desire
of Sagem Communication is to operate systems observing the environment and consequently
it has decided to integrate environmental performances in the life cycle of its products, from
manufacturing to commissioning, use and elimination.
8.1.
Packaging
The presence of the logo (green dot) means that a contribution is paid to an
approved national organisation to improve packaging recovery and recycling
infrastructures.
To facilitate recycling, please respect the sorting rules set up locally for this
kind of waste.
8.2.
Batteries
If your product contains batteries, they must be disposed of at appropriate
collection points.
8.3.
The product
The crossed-out waste bin stuck on the product or its accessories means that
the product belongs to the family of electrical and electronic equipments.
In this respect, the European regulations ask you to dispose of it selectively:
• "At sales points in the event of the purchase of similar equipment.
• "At the collection points made available to you locally (drop-off centre,
selective collection, etc.).
In this way you can participate in the re-use and upgrading of Electrical and Electronic
Equipment Waste, which can have an effect on the environment and human health.
62
WARRANTY
9. GUARANTEE TERMS AND CONDITIONS
Dear Customer,
You have just purchased a Sagem My du@l player 700 and we thank you for your custom. This equipment
was manufactured with the greatest care and we hope that it gives you complete satisfaction.
Our helpline is at your disposal to provide you with any technical assistance you may need to operate your
Sagem My du@l player 700 at 0207 536 54 00 (national call rate).
If the helpline advisor diagnoses a technical problem that cannot be fixed over the phone, we undertake to
remedy by repair, free of charge for labour and replacement parts , subject to the terms and conditions
below, any defects in the Sagem My du@l player 700 during a period of twelve (12) months from the date
of purchase of the telephone, where those defects are a result of fautly workmanship. Proof of purchase
will be required ; so, please keep the receipt in a safe place.
An on-site exchange service will be performed the next working day after your call at the helpline (if call
registered by 16.00). It is strongly recommanded to save all the details in your phone directory and other
personal data.
No coverage shall be given under this warranty if the following conditions are applicable :
-
the required documents have been modified or altered in order to take advantage of the warranty.
-
the manufacturing numbers, product brands or labels have been altered or made illegible.
-
interventions on the product have been made by an unauthorized person.
-
the product has been subjected to abnormal or improper use.
-
the product has been damaged from external causes such as lightning, overvoltage, moisture,
accidental deteriorations, improper care as well as all Acts of God.
This present warranty does not affect the consumer rights that you may have under the laws in effect in
your country.
63
User Manual
Data subject to change without notice
Sagem Communication
Société anonyme au capital de 300 272 000 € - 480 108 158 RCS PARIS
27, rue Leblanc - 75512 PARIS CEDEX 15 - FRANCE
www.sagem.com