1
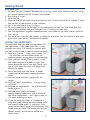
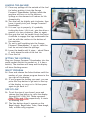
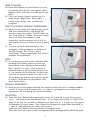
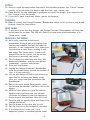
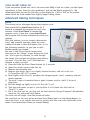
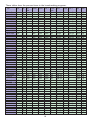
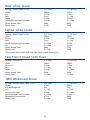
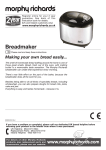
GFBM1000 Instructions & Recipes 1 Exploded Diagram 2 Making bread is easy, everyone knows that. But ... It can be a bit messy. The result can be a bit unpredictable. Occasionally it might have to be thrown away (quietly). The windows might have to be opened to get rid of the burnt smell (before anyone else notices). And it never tastes quite the same as the last lot, either. The problem, of course, is that there are just too many variables, too many things to do; mixing, kneading, resting, knocking back, doing it over again, pre-warming, temperature, timing, answering the phone ... Then theres washing up, and wiping up the spilt flour. Its quite amazing the distance flour can travel when youre kneading dough. Your George ForemanTM Breadmaker doesnt have these problems. Like everything else these days, its controlled by a microchip. Itll do everything apart from answering the phone. And itll do it the same way every time theres hardly any washing up it kneads with the lid closed, so flour doesnt get everywhere Now for the bad news to get the best out of it, you have to read this booklet. Just once. Just to get the hang of the machine. Then you can stick it in a drawer (until something goes wrong). Safety (this is an important bit) Treat electrical appliances with respect most of them can give you a nasty bite. 1. Dont put your George Foreman Breadmaker in water, dont use it in the bathroom, dont use it near a basin or any other source of water, and dont use it outdoors. 2. The George Foreman Breadmaker must be used by or under the direct supervision of a responsible adult. 3. Store it and use it out of reach of children. Things like this fascinate children, so let them watch, let them help, but keep a close eye on them, so they dont get hurt. 4. Dont touch hot surfaces use oven gloves or folded tea towels. The window and the upper parts of the body get very hot, the lid and the lower parts of the body just get hot. 5. Keep clear of the vents in the sides and back of the George Foreman Breadmaker and the top of the lid. 6. Dont plug your George Foreman Breadmaker in until after youve loaded the loaf tin (with the ingredients), into it. 7. Unplug it before you take the loaf tin out. 8. Position your George Foreman Breadmaker on a firm, level, heat-resistant surface, close to a power socket and out of reach of children. 9. Leave at least 5cm (2 inches) of space all round your George Foreman Breamaker to allow for ventilation. 10. Dont use your George Foreman Breadmaker near or under curtains, cupboards, or anything that might scorch or burn. 11. Keep the George Foreman Breadmaker and the mains lead away from hotplates, hobs, and burners. 12. Dont cover the George Foreman Breadmaker, and dont put anything on top of it, or itll overheat. 13. Route the mains lead so that it doesnt overhang and cant be caught or tripped over. 3 14. Unplug your George Foreman Breadmaker when youre not using it, and let it cool down before moving or cleaning it. 15. Dont use accessories or attachments other than those we provide. 16. Dont use it for any purpose other than those described in these instructions. 17. Dont use anything metal or sharp on the loaf tin or the kneading arm, to avoid scratching the non-stick surfaces. 18. Dont use it if it malfunctions, if its dropped or damaged, or if the mains lead or plug is damaged. The mains lead must be replaced by the manufacturer, in order to avoid hazard. (Contact Salton Customer Service - details on Back Page). 19. This appliance is not intended for use by young children or infirmed persons. 20. This appliance is not a toy. 21. If the supply cord is damaged, it must be replaced by the manufacturer or its service agent or a similarly qualified person in order to avoid hazard. Household use only Before use Take the packaging off your George Foreman Breadmaker, but keep it all until youre happy that its working properly. If theres a plastic label on the outside of the George Foreman Breadmaker, listing its features, take it off. Before using your George Foreman Breadmaker for the first time, or if its been out of use for a while, clean it out to remove dust, etc. (See Cleaning). If you give the George Foreman Breadmaker to anyone else, give them this booklet too. How it works Choose a recipe Measure out the ingredients Put them into the loaf tin in the correct order (this is essential) Put the loaf tin into the machine Close the lid Select a program Choose the loaf size you want, 500g, 750g, 1kg (thats 1lb, 11/2 lb and 2lb). Pick a colour light, medium, or dark crust. Set the timer (if appropriate) Start the program. When its finished, your George Foreman Breamaker will beep, then itll keep your bread warm for an hour. 4 Making Bread PREPARATION 1. Sit your George Foreman Breadmaker on a firm, level, heat-resistant surface, close to a power socket and out of reach of children. 2. Dont plug it in yet. 3. Open the lid. 4. Grip the loaf tin handle firmly and twist the loaf tin anti-clockwise to release it from the catches in the bottom of the machine. 5. Lift it out and check that its clean. 6. Fit the kneading arm to the shaft in the bottom of the loaf tin. The shaft and the hole in the kneading arm are D-shaped, so itll only go on one way. 7. Get the ingredients together. Measure them, have them all to hand, ready to add to the loaf tin. 8. Set out a wire tray (for the bread), a heatproof placemat (for the loaf tin), and oven gloves (for your hands protect both hands). ADDING THE INGREDIENTS Its important that you add the ingredients in the right order. If the yeast gets wet, it may activate too early. If it comes in contact with any salt in the recipe, it may not work properly. 9. Keep any extras fruit, nuts, raisins, etc. to one side, and add them when the machine beeps (during the second kneading). 10. First, add the liquid. This is usually water, but might include milk and/or eggs. The water should be warm, but only warm, not hot or cold. Both hot and cold water will inhibit the yeast. 11. Dont use milk with the timer; it might curdle before the bread-making process starts. 12. Add any sugar and salt required by the recipe. 13. Add any wet ingredients honey, syrup, molasses ... 14. Add the dry ingredients flour, dried milk, herbs, spices ... 15. Add the dried yeast (or baking powder/baking soda) last. Lay it on top of the other ingredients dont get it wet, or itll start working too soon. 16. If youre using the timer, its essential to keep the yeast (baking powder/baking soda) and water/liquid apart. If you dont, the yeast will activate, grow, and die before the bread-making starts. The result will be hard, dense, coarse, and about as edible as a house brick. 5 LOADING THE MACHINE 17. Clean any spillage off the outside of the loaf tin before putting it into the George Foreman Breadmaker. Spillage inside the machine will burn on to the surfaces. Spillage on the element will reduce its life dramatically. 18. Turn the loaf tin slightly anti-clockwise, then lower it gently into your George Foreman Breadmaker. 19. If it wont go in properly, its probably fouling the drive. Lift it out, give the drive a quarter of a turn clockwise, then try again. 20. Now grip the loaf tin handle firmly and twist clockwise to engage the lugs underneath the loaf tin with the catches in the bottom of the machine. 21. Try not to spill anything into the George Foreman Breadmaker if you do, take the loaf tin out and clean the spillage. 22. Lower the handle until it stops about 25mm (1 inch) above the side of the loaf tin. 23. Close the lid. SETTING THE CONTROLS Plug your George Foreman Breadmaker into the power socket (switch the socket on, if it has a switch). The machine will beep and the display will show flashing zeroes. SELECT PROGRAM 24. Press and release the Select button until the number of your chosen program shows in the top right of the display. 25. If you go pass the setting you want, you can press the Stop button to go back to the top of the display, or carry on to 16 then press again to get back to 1. SIZE OF LOAF 26. To set the size of your bread, press and release the Size button to cycle the display through 2LB/1.5LB/1LB. These represent 500g, 750g, and 1.5kg respectively. It starts off showing 2LB. 27. The Size button doesnt operate on the Bagel dough, Bagel bake, Cake, Pizza dough, Jam, or Bake only programs. 6 CRUST COLOUR 28. Press and release the Crust button to cycle the display through the crust options Light, Medium, Dark, and stop it on the option you want. 29. The Crust button doesnt operate on the Bagel dough, Bagel bake, Super rapid, Dough, Pizza dough, Jam, or Bake only programs. START THE GEORGE FOREMAN BREADMAKER 30. When youre happy with the settings, press the Start/Pause button, and watch the machine leap into action. The LED lights up, the timer colon (:) flashes, the timer counts down, to show the amount of time remaining, and the pointer on the left of the display shows you which process is going on. 31. If youre using the Wholewheat or Jam programs, nothing happens for between 5 and 30 minutes. Dont worry, this is intentional. These recipes need this time to preheat the ingredients. OOPS! 32. If you discover youve made a mistake after pressing Start/Pause, press and hold the Stop button, then reprogram the machine. Dont leave it too long. If the program is substantially into the cycle before you stop it, the results will be affected. In that case, you have to decide whether its best to let the program run and put up with the results, or stop it, throw out the ingredients, and start from scratch. DOUGH CONSISTENCY 33. Keep an eye on the dough (through the window) during the first 5 minute kneading period. It should form a smooth ball. If it doesnt, you might have to adjust the ingredients. Do this during the second kneading. ADJUSTING 34. Press the Start/Pause button and hold it down for 2 seconds to stop the program cycle the time on the display will flash. If the dough looks sticky or clings to the sides of the loaf tin, sprinkle a tablespoon of flour over it. If it looks too dry, give it a tablespoon of warm water. Dont leave the lid open for longer than you need to open it, add whatever you need, then close it. Press the Start/Pause button to resume the program cycle. Wait until the flour/water is fully incorporated into the dough before adjusting again. 7 EXTRAS 35. Seven to eight minutes before the end of the kneading process, the Extras beeper sounds, to let you know its time to add the fruit, nuts, raisins, etc.. 36. Open the lid, lay the additional ingredients on top of the dough, then close the lid. Dont touch or stir the dough. 37. If you dont want to add any extras, ignore the beeping. FINISHING 38. When its done, the George Foreman Breadmaker beeps to let you know your bread is ready. Press the Stop button. KEEP WARM 39. If you dont press the Stop button, the George Foreman Breadmaker will keep the bread warm for an hour. The LED will flash to let you know the Breadmaker is in Keep warm mode. REMOVING THE BREAD 40. As it cools, moisture in the bread evaporates, drying it out and firming it up. Leaving the bread in the loaf tin traps the moisture. It cant evaporate, so it soaks into the bread as it cools down, making it soft and soggy. The keep warm feature will prevent this up to a point, but the sooner the bread is removed, the better. 41. This is where you need the wire tray, the heatproof placemat, and the oven gloves (remember protect both hands). 42. Press the Stop button. 43. Unplug the George Foreman Breadmaker from the power socket (switch the socket off first, if it has a switch). 44. Hot air and steam will billow out when you open the lid, so keep your hands, arms, face, etc. away from the area above the Breadmaker. 45. Put on the oven gloves (both hands), open the lid (use the handle), and let it rest on its hinges. 46. With the oven gloves on, grip the loaf tin handle firmly and twist the loaf tin anticlockwise to release it from the catches in the bottom of the machine, then lift it out. 47. Turn the loaf tin upside down and shake it to release the bread. 48. Put the bread on the wire tray to cool. 49. Put the loaf tin on the heatproof placemat. 50. If the bread wont come out, run a heatproof plastic or wooden spatula round 8 51. 52. 53. 54. the inside of the loaf tin dont use anything metal or sharp, to avoid scratching the non-stick surface. Check that the kneading arm is still in the loaf tin. If it has come off with the bread, let it cool, then use a plastic or wooden spatula to dig it out of the bottom of the bread dont use anything metal or sharp, to avoid scratching the non-stick surface. For best results, let the bread sit for 20-30 minutes to firm up and dry out before cutting. Cutting while its still warm and moist may make it soggy. If youd rather tear a bit off, smother it in butter, and eat it hot, hold a bit of kitchen towel under your chin, to keep the drips off your clothes. Dont cut the bread until youve checked the kneading arm. If the knife hits the kneading arm, youll score the non-stick surface, youll probably damage the knife, and you may cut yourself. CONTINUOUS USE If you want to make more bread, let the George Foreman Breadmaker cool right down first, and check the inside for crumbs and other debris. If you try to use it while its hot, youll get one of two possible error messages on the display (_ _H means its too hot, _HI means its much too hot). Unplug it, remove the loaf tin, and leave the Breadmaker to cool down fully before trying again. USING THE TIMER With the timer, you can set the finishing time up to 18 hours ahead. You cant use it with the Bagel bake, Super rapid, Jam, or Bake only programs. Dont use it for bread or dough containing fresh milk, yoghurt, cheese, eggs, fruit, onions, or anything else which might go off a bit when left for a few hours in a warm moist environment. We dont recommend using the timer with the Fruit & nut, Dough, or Pizza dough programs. They may work with some ingredients, but generally, the ingredients used in these programs arent really suited to being left for any length of time. a) If youre using salt in the recipe, add it with the liquid ingredients, and keep it away from the yeast. b) Apart from the salt, follow steps 1 to 29, to set the George Foreman Breadmaker up. c) Decide when you want your bread to be ready, e.g. 6 p.m. d) Check the time now, e.g. 7 a.m. e) Work out the difference between the two times, e.g. 11 hours. f) Use the arrow buttons to set the program time to the time youve just worked out (e.g. 11 hours). The time will show on the LCD display as soon as you start to press the and buttons. Each press will increase or decrease the time displayed by 10 minutes. You cant reduce the time to less than the program time. The maximum time which can be shown on the display is 18 hours. g) Go to step 30 (press Start/Pause), then go to work/shopping/whatever. When you return, youll be welcomed home by the aroma of freshly baked bread. 9 h) A word of caution leaving the ingredients together for an extended period will inevitably cause some interaction, especially on a hot or humid day. The results may not be quite as good as bread made right away. DOUGH If you use the timer for the Dough or Pizza dough programs, you must remove the finished dough as soon as the program has finished, otherwise it will deteriorate. The programs BAGEL DOUGH (1) Youll not be surprised to learn that this program cycle is designed specifically for making bagels. BAGEL BAKE (2) Nor that this one is for baking them. This program sets the George Foreman Breadmaker up as a bagel oven. It bakes bagels, then goes into keep warm mode for an hour. You can vary the time from 15 minutes to 2 hours, to suit the recipe, to bake pre-prepared dough, or ready-made bagel dough from the supermarket. a) Put the shaped bagel dough portions on the steaming rack and lower it into the George Foreman Breadmaker (see Rack, on page 13). b) Lower the handle and close the lid. c) Use the Select button to move the pointer down to the Bagel bake program (2), then press one of the arrow buttons to show the time. d) Use the arrow buttons to increase or decrease the time. You can set any time between 15 minutes and 2 hours, in 1 minute steps. e) If you keep your finger on the buttons, the display changes faster. f) Press Start/Pause. WHITE BREAD (3) Use this program for basic, no frills white bread, and for recipes based on white bread dough. This is the shortest of the programs. WHOLEWHEAT (5) Because of the heavier flour, this program pre-heats the ingredients for up to half an hour before kneading, and lets the dough rise for a little longer. Wholewheat loaves tend to be smaller and denser. FRENCH (7) The French program uses slightly longer kneading and rising times, to make French-type bread with a lighter texture and crispy crust. Recipes suitable for this program dont normally use butter (or margarine) or milk. French-type bread doesnt keep very well eat it on the day its made. FRUIT AND NUT (9) Use this program for sweet breads with extras fruit, nuts, chocolate chips, peel, etc. The bake times have been extended to allow for the additional ingredients. RAPID (4, 6, 8, 10) This option is available with the White, Wholewheat, French and Fruit and nut programs. For: It cuts an hour from the program time, by reducing the time the dough is 10 allowed to rise between the processes. Against: Because of this, your bread will be denser/coarser than normal, and any additional ingredients (raisins, nuts, etc.) may not be distributed evenly. SUPER RAPID (11) This program will produce a loaf of bread in just under an hour. It will be smaller and denser than a normal loaf, but just as tasty. You can use this program with the Lighter white bread recipe on page 20. CAKE (12) This program is for cake and batter recipes, rather than dough, generally using baking powder or baking soda as the raising agent, rather than yeast. DOUGH AND PIZZA DOUGH (13, 14) With these programs you can use the George Foreman Breadmaker as a mixing/ kneading machine, to save your labour. It wont heat up during these programs. When you remove the dough from the machine, punch it back then cover and let it rest for ten minutes or so before cutting/shaping. JAM (15) The Jam program preheats the ingredients for 15 minutes, then bakes for 50 minutes. Allow plenty of room for the jam to expand when boiling. If jam boils over into the inside of the Breadmaker, it will be very, very difficult to clean. If it does boil over, press the Stop/Reset button, unplug the George Foreman Breadmaker, let it cool down, and clean it out before it sets. Warning: Dont mess with hot jam it retains its heat for a long time and it sticks like glue. If it gets on to your skin it wont let go until its given you a nasty burn. Dont reduce the sugar, and dont use sugar substitutes. The correct amounts/proportions of sugar, fruit, and pectin are essential for a good set. Use ripe fruit, not overripe or under ripe. Dont purée the fruit. Remove stems, seeds, and stones, then either crush it with a potato masher, or cut it up. Jam should have bits of fruit in it. Dont worry about tiny seeds (strawberries, raspberries, etc.). BAKE ONLY (16) This program uses the George Foreman Breadmaker as an oven. It wont mix, rise, or anything else, it just bakes then goes into keep warm mode for an hour. Use this program to bake dough youve made earlier, or ready-prepared dough from the supermarket. Most products will expand while baking leave room for this when you fill the loaf tin. You can also use the rack, with or without steam, with this program (see Rack, on page 13). a) Use the Select button to bring the pointer down to the Bake only program (16), then press one of the arrow buttons to show the time. b) Use the arrow buttons to increase or decrease the time. You can set any time between 15 minutes and 2 hours, in 1 minute steps. c) If you keep your finger on the buttons, the display changes faster. d) Press Start/Pause. 11 USING PACKET BREAD MIX If you use packet bread mix, dont use more than 500g of mix at a time, put the liquid ingredients in first, then the dry ingredients, and use the White program (3). We recommend that you set the loaf size on the display to 1.5LB or 2LB, as the packet mixes which we tried needed the slightly longer baking times. Advanced baking techniques PAUSE This allows you to intervene during the program cycle. Press and hold the Start/Pause button for 2 seconds to suspend the program for up to ten minutes. Press Start/Pause to resume the program cycle. If you dont press Start/Pause, the program will resume automatically after ten minutes. With this feature, you can create a decorative crust, add crumble toppings, glaze the crust, crease the bread to form pull-apart rolls, or try the following example, to give you a rustic Mediterranean type bread: Use one of the French bread recipes and intervene at the shape stage, before the final rise. Youve got ten minutes, so read through the recipe first and get everything ready before you start. If you do this, youll find that ten minutes is plenty of time. a) Press and hold the Start/Pause button for 2 seconds. b) Open the lid and remove the loaf tin. c) Remove the kneading arm. d) Remove the dough, set it on a lightly floured surface, and roll it out to a 21.5cmx33cm (81/2"x13") square. e) Brush lightly with olive oil, sprinkle with chopped garlic, basil, rosemary and sundried tomatoes. f) Top with 3 cups of crumbled feta or goats cheese, and/or, add 2-3 slices of prosciutto. g) Roll the dough up tightly into an 21.5cm (81/2") roll. h) Tuck the ends under to seal it, and to allow it to fit back into the loaf tin 19cm(7 1/2") wide. i) Put it into the loaf tin, put the loaf tin back into the George Foreman Breadmaker, close the lid, and press Start/Pause. The final rise will begin, then the bread will bake. You could put on the oven gloves and use Start/Pause again, as the baking begins, to score the crust, or to remove the loaf tin, gently mist the crust with cold water, then return it and press Start/Pause to resume baking. 12 RACK The rack can be used with one, two, or all three of its trays. Two are marked TOP/MID. TRAY, the third is marked BOTTOM TRAY. The bottom tray is deeper than the other two, and must be fitted to the bottom position in the rack, otherwise the rack wont work properly. Cover the trays liberally with polenta/cornmeal (the yellow stuff, not cornflour) otherwise theyll stick like cement. Put the shaped dough on the polenta covered trays, then slide the trays into the rack until the tabs in the rack slip through the holes at the sides of the trays. Take the loaf tin out of the George Foreman Breadmaker. It must not be used with the rack. Lower the rack into the Breadmaker so that the handle mountings sit on the rack supports inside the Breadmaker. Lower the handle, close the lid, and start baking. Although the trays are designed for bagels (hence the centre holes), weve used them to make very nice dinner rolls. You can use them for anything you can fit on them. A couple of tips: Dont let the dough portions expand outside the trays, else theyll be difficult to remove. When you lower the handle, it may end up being engulfed by a dinner rolls, but its easy enough to cut out (and it tasted just fine). Rolls will expand through the bagel holes in the trays. Again, it doesnt take much to pull them off. STEAM This gives the ultimate professional touch steam baking for a crisper crust. Warning: When youre using steam, take care when opening the lid, as therell be more steam/hot air coming out. So stand well clear. Before you fit the rack, unplug the George Foreman Breadmaker and pour up to 170ml (6 fl oz) water into the oval barrier on the floor of the Breadmaker. Dont let it get outside the barrier, and dont let it get inside the drive. If you miss, dry up all spilt water before plugging in. Now plug the George Foreman Breadmaker in and insert the rack with your bagels or rolls. Close the lid and start baking. The steam will fog up the window, so you wont see much going on, but when it clears, youll see your rolls rising and the crust crisping. Try the recipes in this booklet to get a feel for the process, then experiment with your own recipes. Theres no such thing as a failed experiment. Its just another step on the road to perfection (and even the early steps taste pretty good). 13 Ingredients FLOUR The type of flour used is important. You cant use ordinary plain flour for making bread. Buy flour with strong or bread in its title. The commonest is normally marketed as strong white flour. These strong or bread flours contain more gluten than ordinary baking flour. Gluten is the name of the protein that gives the bread its structure and texture. It retains the carbon dioxide produced by the yeast, putting the elasticity, the bounce, into the dough. OTHER BREAD FLOURS These include strong brown or Farmhouse flour, strong wholemeal, and wholewheat bread making flours. These provide an excellent source of dietary fibre, but contain lower levels of gluten than strong white flour. This means that brown loaves tend to be smaller and denser than white loaves. Generally speaking, if you substitute strong white flour for half of the brown flour in the recipe, you can make bread with a brown bread flavour and a white bread texture. YEAST Yeast is a living organism. Given moisture, food, and warmth, the yeast will grow and release carbon dioxide gas. The carbon dioxide forms bubbles which are trapped in the dough, making it rise. Of the various types of yeast available, we recommend using active dry yeast or easy blend dried yeast. These are usually sold in sachets and dont have to be dissolved in water first. You may also see fast action yeast or bread machine yeast. These are more potent yeasts, which can make the dough rise up to 50% faster. If you want to use these, youll need to do a bit of experimenting to get the best results. You could start off by trying them with some of the RAPID programs. LIQUID The liquid ingredient is usually water or milk, or a mixture of these. Water makes a crispier crust. Milk gives a softer crust with a velvety texture. The liquid should be warm, not hot or cold. Both hot and cold water will inhibit the yeast. Some recipes call for hand-hot water (thats 46°-52°C or 115°-125°F), to speed up the process. Only the fast yeasts can handle this temperature. Dont use milk with the timer; it might curdle before the bread-making process starts. BUTTER/FAT These make the dough more tender and enhance the flavour, giving the finished loaf a richer quality. They help to retain moisture, making the bread keep fresh longer. Margarine or olive oil can be used instead of butter, but they are less effective. LOW FAT SPREAD Dont use low fat spread. Never mind what the manufacturer says, its designed for spreading, not for baking. Its low fat, where the recipe needs fat. Its also likely to be full of the additives, E-numbers and other gunge weve so far managed to avoid. 14 SUGAR Sugar activates and feeds the yeast, allowing it to grow. It adds flavour and texture, and helps with browning the crust. Many sachet yeasts do not need sugar to activate. Honey, syrup, or molasses may be used instead of sugar, provided the liquid ingredient is adjusted to compensate. Dont use artificial sweeteners. They wont feed the yeast, they may kill it. SALT Salt helps to control the growth of the yeast. Without salt, the bread could rise too much, then collapse. It also adds to the flavour. Keep it away from the yeast until the last minute, or it might inhibit it. EGGS Eggs will make your bread richer and more nutritious, add colour, and help with the structure and texture. Eggs count as part of the liquid ingredient of the bread, so adjust the other liquid ingredients if you are adding egg(s). Otherwise the dough may be too wet to rise properly. HERBS AND SPICES These can be added at the beginning, along with the main ingredients. Dried herbs and spices such as cinnamon, ginger, oregano, parsley and basil will add flavour and interest. Use small quantities (1 2 teaspoons) to avoid overpowering the flavour of the bread. Fresh herbs, such as garlic and chives may contain enough liquid to upset the balance of the recipe, so adjust the liquid content. EXTRAS Dried fruit and nuts should be chopped finely; cheese should be grated; chocolate chips should definitely be chips, not lumps. Dont add more than the recipe requires, otherwise the bread may not rise properly. Be careful with fresh fruit and nuts. These contain liquids (juices and oils), so you may need to adjust the main liquid ingredient to compensate. Extras can be added with the rest of the ingredients, but its generally better to add them when the machine beeps, during the program. For example, if youre using walnuts, putting them at in the beginning of the program will give the kneading arm ample time to seek them out and pulverise them. If you add them at the beep, theyve got a fair chance of making it through the program in reasonably large pieces. Storing bread Commercial bread contains all sorts of additives (chlorine, chalk, coal-tar dye, sorbitol, soya, etc.). Your bread wont have any of these, so it wont keep like commercial bread, and it wont look like commercial bread. On the plus side, it wont taste like commercial bread either itll taste like bread should. Its best eaten fresh, but you can store it for a couple of days at room temperature, in a polythene bag with the air squeezed out. To freeze home-made bread, let it cool, put it in a polythene bag, suck all the air from the bag, then seal it. 15 Power cuts If you suffer from a power cut lasting less than an hour, the program will carry on as soon as the power is restored. The program time will be extended by the duration of the power cut. If the power cut lasts for more than an hour, the program will fail. If this happens, unplug the George Foreman Breadmaker, let it cool down, then empty the loaf tin, dispose of the ingredients, clean it out, and start again. Take care not to scratch the non-stick surfaces of the loaf tin and the kneading arm. nb Make sure you remove the kneading arm before you dispose of the ingredients. If you forget, Customer Service Department will be happy to sell you another one. This also works if you accidentally unplug the Breadmaker, or switch the power socket off. Error codes If the George Foreman Breadmaker is too hot, the display will show _ _H or _HI, if its too cold, itll show _ _L. If this happens, press the Stop/Reset button, remove the loaf tin, and allow the Breadmaker to reach room temperature before trying again. Any other error code probably means youve broken it. Customer Service Department will be happy to give you an estimate for repairs (see After Sales Service). Cleaning Unplug the George Foreman Breadmaker and let it to cool down fully before cleaning. 1. Open the lid. If you want to remove the lid, open and lift it gently at the same time. As it approaches 90° itll slip out of its hinges. To replace it, fit the flat hinge parts on the lid into the slotted hinge parts in the body. 2. If the kneading arm has stuck on to the shaft, fill the loaf tin with warm water. This should soften any dough residues and allow the kneading arm to be removed. Dont leave it to soak. 3. If the inside of the kneading arm gets clogged with flour, soak it in warm water, then dig out the flour with a wooden cocktail stick. 4. Wash the loaf tin and kneading arm in warm soapy water, rinse, then dry thoroughly. 5. Wipe all other surfaces, internal and external, with a damp cloth. Use a little washing-up liquid if necessary, but be sure to clean it all off, otherwise it might taint the next lot of bread. 6. Make sure everything is dry before reusing the George Foreman Breadmaker or storing it away. Dont immerse the George Foreman Breadmaker in water or any other liquid. Dont use harsh or abrasive cleaners or solvents. Dont put any of the parts in a dishwasher. 16 Recipes There are many external factors which can affect the taste and texture of your bread (e.g. yeast type, flour type, sugar type, kitchen temperature, even air pressure and height above sea level). The recipes in this booklet have been designed to produce edible results, regardless of external factors. Use them to get the hang of the machine. Then you can start to have real fun with it. Use the recipes as a guide, but vary the ingredients, vary the quantities, taste the results. Keep notes, write down what changes you make, and youll build up a range of recipes which suit your taste. Keep notes of the not-so-successful ones too, so you know what not to do next time. If you already have bread recipes, or find recipes in other publications, compare them with the recipes given here, to find out which program to try first, then experiment until the results match your desires. Be careful with quantities when using other recipes. Dont fill the loaf tin above about a quarter full, certainly not as much as a third full. If you overfill it, the rising bread may push the lid off. Thats on a good day. On a bad day, itll probably spill over the side, burn on to the element and clog up the drive. USING THE RECIPES IN THIS BOOKLET Tablespoons (tbsp) are 15ml, teaspoons (tsp) are 5ml. Dried milk should be dried skimmed milk. Yeast is dried yeast. If you use quick acting dried yeast, use 1 tsp quick acting dried yeast where the recipe calls for 3 or more tsp yeast, and 1/2 tsp quick acting dried yeast where the recipe calls for less than 3 tsp yeast. Use flour marketed as strong flour or bread-making flour. USING OTHER RECIPES If you use recipes from bread machine cookery books, we recommend using recipes for the larger 750g or 1kg loaves (11/2 or 2 pounds). Check that the recipe uses no more than 4 1/2 cups of flour. If it uses more than this, youll have to scale it down to fit. These tables show the process times in the bread-making programs. 17 These tables show the process times in the bread-making programs. Type Crust White (3) Light White (3) Size Preheat 1kg 0 750g 0 500g 0 5min 3min 3min 20min 22min 22min 40min 40min 40min Punch back 10s 10s 10s Medium 1kg 0 750g 0 500g 0 5min 3min 3min 20min 22min 22min 40min 40min 40min 10s 10s 10s 24m 50s 15s 24m 50s 15s 24m 50s 15s 49m 45s 49m 45s 49m 45s 50min 3:10 45min 3:05 40min 3:00 White (3) Dark 1kg 0 750g 0 500g 0 5min 3min 3min 20min 22min 22min 40min 40min 40min 10s 10s 10s 24m 50s 15s 24m 50s 15s 24m 50s 15s 49m 45s 49m 45s 49m 45s 60min 3:20 55min 3:15 50min 3:10 White rapid (4) Light 1kg 0 750g 0 500g 0 5min 3min 3min 20min 22min 22min 40min 40min 40min 10s 10s 10s 9m 50s 9m 50s 9m 50s 10s 10s 10s 29m 50s 29m 50s 29m 50s 40min 2:00 35min 1:55 30min 1:50 White rapid (4) Medium 1kg 0 750g 0 500g 0 5min 3min 3min 20min 22min 22min 40min 40min 40min 10s 10s 10s 9m 50s 9m 50s 9m 50s 10s 10s 10s 29m 50s 29m 50s 29m 50s 50min 2:10 45min 2:05 40min 2:00 White rapid (4) Dark 1kg 0 750g 0 500g 0 5min 3min 3min 20min 22min 22min 40min 40min 40min 10s 10s 10s 9m 50s 9m 50s 9m 50s 10s 10s 10s 29m 50s 29m 50s 29m 50s 60min 2:20 55min 2:15 50min 2:10 Wholewheat (5) Light 1kg 30min 750g 30min 500g 30min 5min 3min 3min 22min 15min 15min 50min 50min 50min 10s 10s 10s 24m 50s 10s 24m 50s 10s 24m 50s 10s 44m 50s 44m 50s 44m 50s 40min 3:30 37min 3:27 35min 3:25 Wholewheat (5) Medium 1kg 30min 750g 30min 500g 30min 5min 3min 3min 22min 15min 15min 50min 50min 50min 10s 10s 10s 24m 50s 10s 24m 50s 10s 24m 50s 10s 44m 50s 44m 50s 44m 50s 45min 3:35 42min 3:32 40min 3:30 Wholewheat (5) Dark 1kg 30min 750g 30min 500g 30min 5min 3min 3min 22min 15min 15min 50min 50min 50min 10s 10s 10s 24m 50s 10s 24m 50s 10s 24m 50s 10s 44m 50s 44m 50s 44m 50s 53min 3:53 50min 3:50 48min 3:48 Wholewheat rapid (5) Light 1kg 5min 750g 5min 500g 5min 5min 3min 3min 15min 17min 17min 30min 30min 30min 10s 10s 10s 39m 50s 0 39m 50s 0 39m 50s 0 0 0 0 40min 2:15 37min 2:12 36min 2:10 Wholewheat Medium 1kg 5min 750g 5min rapid (5)apid 500g 5min 5min 3min 3min 15min 17min 17min 30min 30min 30min 10s 10s 10s 39m 50s 0 39m 50s 0 39m 50s 0 0 0 0 45min 2:20 42min 2:17 40min 2:15 Wholewheat rapid (6) Dark 1kg 5min 750g 5min 500g 5min 5min 3min 3min 15min 17min 17min 30min 30min 30min 10s 10s 10s 39m 50s 0 39m 50s 0 39m 50s 0 0 0 0 53min 2:28 50min 2:25 48min 2:23 French (7) Light 1kg 0 750g 0 500g 0 5min 3min 3min 20min 22min 22min 40min 40min 40min 10s 10s 10s 29m 50s 10s 29m 50s 10s 29m 50s 10s 59m 50s 59m 50s 59m 50s 45min 3:20 42min 3:17 40min 3:15 French (7) Medium 1kg 0 750g 0 500g 0 5min 3min 3min 20min 22min 22min 40min 40min 40min 10s 10s 10s 29m 50s 10s 29m 50s 10s 29m 50s 10s 59m 50s 59m 50s 59m 50s 55min 3:30 52min 3:27 50min 3:25 French (7) Dark 5min 3min 3min 20min 22min 22min 40min 40min 40min 10s 10s 10s 29m 50s 10s 29m 50s 10s 29m 50s 10s 59m 50s 59m 50s 59m 50s 65min 3:40 62min 3:37 60min 3:35 1kg 0 750g 0 500g 0 Knead 1 Knead 2 Rise 1 18 Rise 2 Shape Rise 3 Bake Total 24m 50s 15s 24m 50s 15s 24m 50s 15s 49m 45s 49m 45s 49m 45s 40min 3:00 35min 2:55 30min 2:50 Type Crust French rapid (8) Light French rapid (8) 5min 3min 3min 20min 22min 22min 20min 20min 20min Punch back 8s 8s 8s Medium 1kg 0 750g 0 500g 0 5min 3min 3min 20min 22min 22min 20min 20min 20min 8s 8s 8s 44m 52s 0 44m 52s 0 44m 52s 0 0 0 0 55min 2:25 52min 2:22 50min 2:20 French rapid (8) Dark 1kg 0 750g 0 500g 0 5min 3min 3min 20min 22min 22min 20min 20min 20min 8s 8s 8s 44m 52s 0 44m 52s 0 44m 52s 0 0 0 0 65min 2:35 62min 2:32 60min 2:30 Fruit & nut (9) Light 1kg 0 750g 0 500g 0 5min 3min 3min 20min 22min 22min 40min 40min 40min 10s 10s 10s 24m 50s 5s 24m 50s 5s 24m 50s 5s 49m55s 49m55s 49m55s 55min 3:15 52min 3:12 50min 3:10 Fruit & nut (9) Medium 1kg 0 750g 0 500g 0 5min 3min 3min 20min 22min 22min 40min 40min 40min 10s 10s 10s 24m 50s 5s 24m 50s 5s 24m 50s 5s 49m55s 49m55s 49m55s 65min 3:25 62min 3:22 60min 3:20 Fruit & nut (9) Dark 1kg 0 750g 0 500g 0 5min 3min 3min 20min 22min 22min 40min 40min 40min 10s 10s 10s 24m 50s 5s 24m 50s 5s 24m 50s 5s 49m55s 49m55s 49m55s 75min 3:35 72min 3:32 70min 3:30 Fruit & nut rapid (10) Light 1kg 0 750g 0 500g 0 5min 3min 3min 20min 22min 22min 25min 25min 25min 10s 10s 10s 54m 50s 0 54m 50s 0 54m 50s 0 0 0 0 55min 2:40 52min 2:37 50min 2:35 Fruit & nut rapid (10) Medium 1kg 0 750g 0 500g 0 5min 3min 3min 20min 22min 22min 25min 25min 25min 10s 10s 10s 54m 50s 0 54m 50s 0 54m 50s 0 0 0 0 65min 2:50 62min 2:47 60min 2:45 Fruit & nut rapid (10) Dark 5min 3min 3min 20min 22min 22min 25min 25min 25min 10s 10s 10s 54m 50s 0 54m 50s 0 54m 50s 0 0 0 0 75min 3:00 72min 2:57 70min 2:55 Knead 3 2min 2min 2min Rest 2min 2min 2min Type Cake (12) Crust Light Medium Dark Size Preheat 1kg 0 750g 0 500g 0 1kg 0 750g 0 500g 0 Knead 1 1min 1min 1min Type Size Dough (13) 1kg 750g 500g Pizza Dough (14) Bagel dough (1) Bagel bake (2) Bake only (16) Jam (15) Type Super rapid (11) Preheat 0 0 0 0 0 0 0 15min Size 1kg 750g 500g Knead 1 Knead 2 Rise 1 Knead 2 3min 3min 3min Knead 1 Knead 2 Rise 1 3min 3min 3min 3min 5min 0 0 0 27min 24min 21min 22min 15min 0 0 0 60min 60min 60min 30min 5min 0 0 0 Knead 1 2min 2min 2min Knead 2 12min 12min 12min 19 Rise 2 Rise 3 Bake 44m 52s 0 44m 52s 0 44m 52s 0 0 0 0 45min 2:15 42min 2:12 40min 2:10 Knead 4 1min 1min 1min Punch back 0 0 0 0 10s 0 0 0 Rise 1 14min 16min 18min Shape Knead 5 2min 2min 2min Total Bake 69min 79min 89min Total 1:20 1:30 1:40 Rise 2 Bake/Stir Total 0 0 0 0 9m 50s 0 0 0 0 0 0 0 0 15-120m 0 50min 1:30 1:27 1:24 0:55 0:35 15-120m 1:30 1:05 Bake 31min 29min 27min Total 0:59 0:59 0:59 Basic white bread Setting: White/rapid (3/4) Water Oil Salt Sugar Dried skimmed milk powder White bread flour Dried yeast 2 lb Loaf 280ml 2 tbsp 2 tsp 3 tbsp 2 tbsp 560g 2 tsp 11/2 lb Loaf 230ml 2 tbsp 11/2 tsp 2 tbsp 11/2 tbsp 400g 2 tsp 2 lb Loaf 300ml 2 tbsp 2 tsp 3 1/2 tbsp 2 1/2 tbsp 560g 21/2 tsp rapid setting (11) 11/2 lb Loaf 230ml 11/2 tbsp 11/2 tsp 3 tbsp 2 tbsp 375g 2 tsp Lighter white bread Setting: White/rapid (3/4) Water Honey Salt Dried skimmed milk powder Oil White bread flour Dried yeast This recipe also works well with the Super Easy French bread (milk free) Setting: French (7) Water Olive oil Salt Sugar White bread flour Dried yeast 2 lb Loaf 260ml 2 tbsp 11/2 tsp 2 tbsp 500g 11/2 tsp 11/2 lb Loaf 230ml 1 tbsp 1 tsp 11/4 tbsp 400g 11/4 tsp 2 lb Loaf 375ml 35g 11/2 tsp 3 tbsp 2 1/2 tbsp 575 g 2 1/2 tsp 11/2 lb Loaf 280ml 25g 11/4 tsp 21/2 tbsp 2 tbsp 430g 2 tsp 100% Wholemeal bread Setting: Wholewheat/rapid (5/6) Water Butter/Margarine Salt Soft brown sugar Dried skimmed milk powder Wholemeal bread flour Dried yeast 20 50% Wholemeal bread Setting: Wholewheat/rapid (5/6) Water Butter/Margarine Salt Soft brown sugar Dried skimmed milk powder White bread flour Wholemeal bread flour Dried yeast 2 lb Loaf 360ml 35g 11/2 tsp 3 tbsp 2 1/2 tbsp 285g 285g 2 1/2 tsp 11/2 lb Loaf 270ml 25g 11/4 tsp 21/2 tbsp 2 tbsp 215g 215g 2 tsp 2 lb Loaf 350ml 25g 2 tbsp 11/2 tsp 1 tbsp 200g 300g 2 tsp 11/2 lb Loaf 225ml 15g 1 tbsp 1 tsp 1 /2 tbsp 140g 200g 11/2 tsp Granary bread Setting: White/rapid (3/4) Water Butter/Margarine Dried skimmed milk powder Salt Sugar Granary flour White bread flour Dried yeast Farmhouse grain bread Setting: Wholewheat/rapid (5/6) 2 lb Loaf 11/2 lb Loaf Water 525ml 325ml Salt 2 tsp 1 tsp 1 Sugar 1 /2 tbsp 1 tbsp 1 Dried skimmed milk powder 2 /2 tbsp 2 tbsp Butter/Margarine 35g 25g White bread flour 350g 300g Wholemeal bread flour 330g 200g Mixed seeds 100g 75g 1 Dried yeast 2 /2 tsp 2 tsp Virtually any combination of seeds will work in this recipe, including sunflower, pumpkin, poppy, sesame, and caraway seeds. 21 Herb bread Setting: White/rapid (3/4) Water Oil Dried skimmed milk powder Sugar Salt White bread flour Tarragon Oregano Basil Thyme Minced garlic Dried yeast 2 lb Loaf 400ml 2 1/2 tbsp 2 1/2 tbsp 2 1/2 tbsp 2 tsp 580g 2 1/2 tsp 2 1/2 tsp 2 1/2 tsp 2 1/2 tsp 1 1/2 tsp 2 1/2 tsp 11/2 lb Loaf 300ml 2 tbsp 2 tbsp 2 tbsp 11/2tsp 435g 2 tsp 2 tsp 2 tsp 2 tsp 1 tsp 2 tsp 2 lb Loaf 200ml 11/2 tbsp 1 large 1 tbsp 1 tsp 95g 350g 40g 100g 30g 1 tbsp 2 tsp 11/2 lb Loaf 130ml 1 tbsp 1 large 2 tsp 1 tsp 65g 310g 30g 75g 3 tbsp 2 tsp 11/2 tsp Two cheese bread Setting: Wholewheat/rapid (5/6) Water Butter/Vegetable oil Egg Sugar/Honey Salt Wholemeal bread flour White bread flour Dried skimmed milk powder Cheddar cheese (grated) Parmesan (grated) Sesame seeds Dried yeast Cinnamon and raisin bread Setting: Fruit and nut/rapid (9/10) 11/2 lb Loaf Water 180ml Egg 1 Oil 1 tbsp Salt 1 tsp Dried skimmed milk powder 3 tbsp Vanilla essence 1 tsp Sugar 2 tbsp Raisins 2 tbsp Ground cinnamon 2 tsp White bread flour 360g Dried yeast 11/2 tsp Dont try to make a 2 lb version itll probably escape from the Breadmaker. 22 Pizza dough Setting: Pizza dough (14) A 1lb mix makes one medium/thin crust 12" pizza base, a 11/2 lb mix makes a 15" base and a 2lb mix makes two 12" bases. 2 lb 11/2 lb 1 lb Tepid water 300ml 265ml 150ml 1 Olive oil 2 tbsp 1 /2 tbsp 1 tbsp 1 3 Salt 1 /4 tsp 1 /2 tsp 11/2 tsp Plain flour (not bread flour) 530g 450g 280g 1 2 Sugar 2 tsp 1 / tsp 1 tsp 1 2 Yeast 2 tsp 1 / tsp 1 tsp Bagel dough Setting: Bagel dough (1), then Bagel bake (2), with steam Makes 8 - 10 bagels depending on size Egg, medium 1 Full fat milk 100ml Oil 1 tbsp Sugar 2 tsp 1 Salt /2 tsp White bread flour 280g Yeast 2 tsp (+ 1 egg white and 2 tbsp water for glazing) (+ sea salt, sesame seeds or poppy seeds for decorating) 1. Put the ingredients into the loaf tin in the order above. Close the lid, select Bagel dough (1), and press Start/Pause. 2. When the process has finished, cover the dough and let it rest for 30 minutes, then divide it into equal sized balls. 3. Put the balls you are not immediately going to bake into the fridge, so that it doesnt over-prove. 4. Shape the balls you are going to bake, and roll them tightly, until there is tension in the skin of the dough, then cover and let them rest until they have doubled in size. 5. Press a thumb through each ball to form bagels. 6. Cover the trays liberally with polenta/cornmeal to prevent sticking. 7. Glaze the bagels with the egg white and water, decorate with sea salt, seeds, etc. 8. Set the bagels on the baking trays, then slide them into the rack, with the tray marked BOTTOM at the bottom. 9. Unplug the George Foreman Breadmaker and pour 60ml (2 fl oz) water into the oval barrier on the floor of the Breadmaker. 10.Dont put the loaf tin back into the Breadmaker. 11.Fit the rack into the Breadmaker, lower the handle, and close the lid. 12.Select Bagel bake (2), and press the timer button to bring the time up to 50 minutes. 13.Plug the George Foreman Breadmaker in, then press Start/Pause. 14.When the baking cycle has finished, stand back when opening the lid, to avoid the hot air and steam. 15.Use the oven gloves. 23 Dinner rolls Setting: Dough (13), then Bake only (16), with steam Water 325ml Butter 5 tbsp Egg (medium, beaten) 1 Salt 2 tsp White bread flour 600g Dried milk 2 tbsp Sugar 11/2 tbsp Yeast 2 tsp 1. Put the ingredients into the loaf tin in the order above. Close the lid, select Dough (13), and press Start/Pause. 2. When the process has finished, remove the dough, divide it into 6 balls, and shape. 3. Cover the trays liberally with polenta/cornmeal to prevent sticking. 4. Set the shaped dinner rolls on the trays and leave them to prove for about 20 minutes. Youll need to keep an eye on them, otherwise they might over run the trays. 5. Slide the trays into the rack, with the tray marked BOTTOM at the bottom. 6. Unplug the George Foreman Breadmakerand pour 170ml (6 fl oz) water into the oval barrier on the floor of the Breadmaker. 7. Dont put the loaf tin back into the Breadmaker. 8. Fit the rack into the Breadmaker, lower the handle, and close the lid. 9. Select Bake only (16), and press the timer button to bring the time up to 50 minutes. 10. Plug the George Foreman Breadmaker in, then press Start/Pause. 11. When the baking cycle has finished, stand back when opening the lid, to avoid the hot air and steam. 12. Use the oven gloves. 13. One of the dinner rolls will have engulfed the rack handle. Run a knife (carefully) along the handle to free it, before removing the rack. Dont throw the cut roll away itll taste just as good as the others. 24 Peanut cake Setting: Cake (12) Plain flour (dont use bread flour) 200g } combine these Baking powder 1 tsp } ingredients 3 Bicarbonate of soda /4 tsp } in a bowl 1 Salt /4 tsp } and set aside Eggs, large 2 Natural low fat yogurt 41/2tbsp Crunchy peanut butter (softened) 41/2tbsp Apple sauce 2 tbsp Water 50ml Vanilla essence 1 tsp White sugar 60g 1. Combine the first four ingredients in a bowl and mix well. Set aside. 2. Put the remaining ingredients into the loaf tin in the order above. Keep the lid open, set the George Foreman Breadmaker to Cake, and press Start/Pause. 3. As the kneading arm starts to move, add the flour mixture steadily, a spoonful at a time, then close the lid and leave it to finish. 4. When its done, remove the cake from the loaf tin and cool on a wire rack. Raisin cake Setting: Cake (12) Plain flour (dont use bread flour) 250g White sugar 125g Full fat milk 250ml Butter 60g Eggs, large 2 Raisins 2 tbsp Baking powder 1 tbsp Vanilla essence 1 tsp 1 Salt /4 tsp Put the milk, butter, eggs and vanilla essence into the loaf tin, then add the remaining ingredients. Close the lid, set the George Foreman Breadmaker to Cake, and press Start/Pause. When its finished, let it cool for at least 10 minutes in the loaf tin, then remove it and let it cool on a wire rack. When it cool, dust it with icing sugar. For a change, try adding a teaspoon of either mixed spice, cinnamon, lemon/orange zest, or strong coffee to the cake before mixing. 25 Jam Setting: Jam (15) Fruit 335g (raspberries, strawberries, plums) Sugar 335g Lemon juice 1 tsp 1. Raspberries should be lightly crushed with a potato masher, strawberries and plums should be roughly cut up, but not pulped. 2. Put all the ingredients into the loaf tin and close the lid. 3. Set the George Foreman Breadmaker to the Jam setting and press Start/Pause. 4. At the end of the cycle the machine will beep. 5. Put on the oven gloves, remove the loaf tin from the machine and pour the hot jam into a heatproof container, or jam jars which have been rinsed out with boiling water, then dried. Take great care when handling hot jam. 6. Allow to cool, then put the jars in the fridge, where the jam will continue to thicken. Gluten-free bread Setting: White/rapid (3/4) 360ml (13 floz) hand-hot water 1 tbsp oil 1 /2 tsp salt 1 packet Glutafin gluten-free white mix 1 packet yeast (included with the Glutafin mix Add the ingredients to the loaf tin in order (yeast last). We found the best results with the George Foreman Breadmaker to White, the crust set to medium, and the size set to 2lb. We suggest you try this first, to get a feel for it, then experiment. 26 Troubleshooting What to do if: THE BREAD COLLAPSED The dough may have been too moist. Reduce the recipe liquid by 2 tbsp. If tinned fruit was used, it may not have been properly drained. Leaving the bread in the bread pan while it cools can cause moisture released in the baking process to soak back into the bread. The flour may have been too coarsely ground. Try using finer flour. THE CORE OF THE BREAD IS TOO MOIST The dough may have been too moist, see above. The flour may have been too heavy. This problem can occur with rye, bran and wholemeal flours. Reduce the amount of heavy flour and replace with white flour. THE BREAD HAS SWOLLEN TOO MUCH You may have used too much yeast, try reducing it slightly. Too much sugar can cause the yeast to work too fast, and the bread to rise too much. Try reducing the amount of sugar. If you add sweet/sugary ingredients such as dried fruit, honey or molasses, reduce the amount of sugar to compensate. You might try reducing the recipe liquid by 2 tbsp, as this will slow the action of the yeast. Use a coarser flour. Less yeast is needed with fine flour than with the same type of flour ground coarsely. 27