1
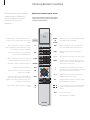
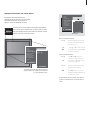
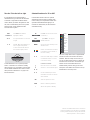
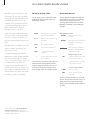
BeoVision 5
Guide
3
NOTE: This equipment has been tested and found
to comply with the limits for a class B digital
device, pursuant to part 15 of the FCC Rules.
These limits are designed to provide reasonable
protection against harmful interference in a
residential installation.
This equipment generates, uses and can radiate
radio frequency energy and, if not installed and
used in accordance with the instructions, may
cause harmful interference to radio
communications. However, there is no guarantee
that interference will not occur in a particular
installation. If this equipment does cause harmful
interference to radio or television reception, which
can be determined by turning the equipment off
and on, the user is encouraged to try to correct
the interference by one or more of the following
measures:
– Reorient or relocate the receiving antenna
– Increase the separation between the equipment
and receiver
– Connect the equipment into an outlet on a
circuit different from that to which the receiver
is connected
– Consult the retailer or an experienced radio/TV
technician for help
This class B digital apparatus meets all
requirements of the Canadian InterferenceCausing Equipment Regulations.
CAUTION: To reduce the risk of
electric shock, do not remove
cover (or back).
No User-serviceable parts
inside. Refer servicing to
qualified service personnel.
WARNING: To prevent fire or electric
shock, do not expose this appliance
to rain or moisture.
This symbol indicates that a
dangerous voltage
constituting a risk of electric
shock is present within this
unit.
This symbol indicates that
there are important
operating and maintenance
instructions in the literature
accompanying this unit.
DOLBY, DOLBY DIGITAL, PRO LOGIC and the
double-D symbol are trademarks of Dolby
Laboratories Licensing Corporation.
DTS and DTS Digital Surround are registered
trademark of Digital Theater Systems, Inc.
Caution
To prevent electric shock, do not use the polarised
plug on the BeoVision 5 with an extension cord,
receptacle, or other outlet, unless the blades can
be fully inserted to prevent blade exposure.
Complete all the connections in your setup before
connecting any appliance to the AC outlet. Note:
Your BeoVision 5 operates on a normal household
current (120 volts, 60 Hz) and has a polarised
plug. Because one blade of the plug is wider than
the other, the plug fits in the wall outlet only one
way. Do not defeat the safety feature of this plug.
If you need an extension, use a polarised cord.
Note to Cable-TV installer
This reminder is provided to call your attention to
Article 820-22 of the National Electrical Code
(Section 54 of Canadian Electrical Code, Part 1)
which provides guidelines for proper grounding
and, in particular, specifies that the cable ground
shall be connected to the grounding system of the
building as close to the point of cable entry as
practical.
4
The User’s guides
This Guide contains information about daily use, more advanced operations,
setting-up and connecting BeoVision 5, editing and fine-tuning channels, adjusting
settings, and maintenance of your BeoVision 5.
BeoVision Avant
Guide
Should you lose or damage the BeoVision 5
CD-rom, the information can also be found on
the Bang & Olufsen web-site;
www.bang-olufsen.com
or you can contact your retailer.
The CD-rom Reference book contains information about connecting video
signals and external video equipment, connecting loudspeakers, adjusting the
loudspeaker setup, connecting and using an audio system, distributing sound via a
BeoLink® system, and activating Parental Control. It also contains an overview of
on-screen menus.
Both guides contain an index which can help you find the specific subject you
want to know more about.
An explanation of symbols in the
guides
The illustration below shows what a
button, source or status display looks like in
the instruction sequences used in the
guides.
Buttons on the Beo4
remote control
TV
LIST
▲
ss
We expect that your Bang & Olufsen retailer delivers the product to your home,
installs it and makes all necessary connections as well as the initial setting-up.
However, the information required to install and set up the product is included in
the guides in case you need it at a later date if, for example, you move your
products or expand your system.
tt
▼
STORE
P-IN-P
TV 12
UPDATE
Displays on the Beo4
remote control
Displays on the
BeoVision 5
The Reference book is a file in PDF-format on the
enclosed CD-rom. To read this PDF-file, the
Acrobat Reader program must be installed on your
computer. If you do not have the program, it can
be installed from the CD-rom. Then select the file
with the language you want, and the Reference
book opens.
Contents
Daily use, 6
Find out how to use BeoVision 5 and the Beo4 remote control, watch and select
channels, adjust sound, and – if your BeoVision 5 is equipped with a motorised
stand – turn the television left and right.
Advanced operations, 12
Find everything you need to know about using BeoVision 5 beyond daily use;
operate connected video equipment with Beo4, use BeoVision 5 with a largescreen projector in a BeoTheatre setup, perform sound and picture adjustments,
view two sources at the same time, apply closed captioning, and make
BeoVision 5 start or stop at a specific time.
Setting up and socket overview, 24
Find out how to handle and place BeoVision 5 for daily use. This chapter also
contains an overview of the connection panels on the television and a description
of how you register equipment connected to BeoVision 5.
Tuning and preference settings, 30
Find out how to add, remove and fine-tune channels, adjust or set aspects of the
picture and sound, and – if your BeoVision 5 is equipped with a motorised stand –
preset stand positions.
Maintenance, 34
Find out how to take care of your BeoVision 5 and Beo4 remote control.
Index, 36
Find the specific subject you want to know more about.
5
Introducing BeoVision 5 and Beo4
6
The Beo4 remote control integrates
remote operation of BeoVision 5
with any supported source you
choose to connect to your
BeoVision 5.
The Beo4 display – shows the current source, TV,
or extra sources or buttons called up via the LIST
button
Buttons on the Beo4 remote control
Look through the basic principles of the Beo4
remote control and try them out. Each button
on Beo4 is explained below.
Switch on BeoVision 5 and your TV channels.
Press TV repeatedly to switch between TV sources
such as cable and antenna TV networks
TV
Switch on the BeoVision 5 and your Satellite
receiver to watch Satellite channels
SAT
Switch on BeoVision 5 and a connected VCR.
Videotape playback starts at the same time
V TAPE
Press twice to start a recording here and now
Press to activate closed captioning
RADIO
CD
A TAPE
TV
FORMAT
DVD
TV
LIGHT
RADIO
SAT
DVD
CD
V TAPE
RECORD
A TAPE
7
8
9
4
5
6
1
2
3
TEXT
0
MENU
Adjust the lights (if a light control system is
installed)
0–9
Select channels or enter data in on-screen menus
MENU
Call up a menu overlay to be able to operate a
specific function for a source. Press again to call
up the main on-screen menu
TEXT
Step between TV channels, tracks on a DVD or
tracks on an audio CD, for example. Move up and
down through on-screen menu options
▲
▼
LIST
Press once to pause VCR or DVD playback or
pause a recording. Press again to stop paused
playback or recording completely. Press to return
to a previous on-screen menu
STOP
GO
ss
Adjust volume – press the middle to mute the
sound
LIST
Switch on BeoVision 5 and a connected DVD
player. DVD playback starts at the same time
LIGHT
RECORD
Reveal more sources or functions in the Beo4
display, such as FORMAT
Switch on radio, CD, or audio cassette (A TAPE) if
these audio sources are available
tt
Rewind or fast forward a video cassette. View
available settings in a fill-in menu
EXIT
GO
STOP
∧
∨
Accept and store instructions or settings; resume
paused playback or recording
The coloured buttons give you access to different
functions, depending on the source you have
selected
EXIT
•
Exit on-screen menus
Switch BeoVision 5 to standby
7
Displayed information and screen menus
TV SETUP
1 SOUND
2 PICTURE
Information about selected sources is
displayed at the top left corner of your screen.
On-screen menus allow you to switch on,
adjust or switch off additional functions.
3 STAND POSITIONS
4 CLOSED CAPTIONING
5 PARENTAL CONTROL
6 RECORD LOCK
7 EXTERNAL SOURCES
CLOSED CAPTIONING
DISPLAY
OFF
TYPE
CC1
8 FIRST TIME SETUP
TV ANT 12
SPEAKER 5
VOL 30
A selected source is shown briefly when activated. Other settings,
such as volume level or speaker mode, are shown while you adjust
them, and disappear from the screen after a few seconds. Press GO
on Beo4 to see your current source status.
9 RF / CHANNEL SETUP
10 TIMER PLAY
select
Option menu
store
Fill-in menu
How to use option menus…
0–9
Press the number keys on Beo4
to select a numbered option on
a list directly, or…
TV SETUP
1
2
3
4
5
6
7
8
9
10
SOUND
PICTURE
STAND POSITIONS
CLOSED CAPTIONING
PARENTAL CONTROL
RECORD LOCK
EXTERNAL SOURCES
FIRST TIME SETUP
RF / CHANNEL SETUP
TIMER PLAY
▲ ▼
GO
CLOSED CAPTIONING
…press ▲ or ▼ to move through
the option menu, and press GO
to enter your choice
DISPLAY OFF
TYPE
CC1
How to use fill-in menus…
ss tt
Press ss and tt to view your
choices for a single setting in a
▲ ▼
fill-in menu, or ▲ or ▼ to move
from setting to setting
select
store
On-screen menus like those shown above will
give you either a list of options to choose from
or a list of settings to fill in.
0–9
GO
Press the number keys on Beo4
to enter numeric settings
Press GO to enter your choice.
SETTINGS STORED appears at the
bottom of the screen
For both option and fill-in menus, press STOP to
go back to a previous menu, or EXIT to leave all
menus.
On-screen menus
8
In order for you to find your way
through the on-screen menus your
BeoVision 5 offers, this chapter
shows you the overall structure of the
menu system.
Refer to On-screen menus on the
CD-rom for further information about
the individual menus.
PARENTAL CONTROL
SOUND
ADJUSTMENT
TV PARENTAL GUIDELINES
VOLUME
ACCESS CODE
BASS
OVERALL
TREBLE
FANTASY VILOLENCE
SUBWOOFER
SEXUAL SITUATIONS
LOUDNESS
LANGUAGE
DIALOGUE
SPEAKER TYPE
FRONT
MPAA RATINGS
ACCESS CODE
REAR
SUBWOOFER
RATING
SPEAKER DISTANCE
ACCESS CODE
CENTRE
OLD CODE
LEFT FRONT
NEW CODE
RIGHT FRONT
CONFIRM CODE
RIGHT REAR
LEFT REAR
RECORD LOCK
SOURCE LOCKED
SPEAKER LEVEL
SEQUENCE
EXTERNAL SOURCES
LEFT FRONT
V. TAPE
RIGHT FRONT
DVD
RIGHT REAR
V. AUX
LEFT REAR
SAT
SPEAKER MODE
VIDEO
STB
FIRST-TIME SETUP
SOUND SYSTEM
RF / CHANNEL SETUP
PICTURE
RF SETUP
BRIGHTNESS
CONTRAST
CABLE BOX
ADD / REMOVE CHANNELS
COLOUR
RF INPUT
TINT
STAND POSITIONS
ADD CHANNEL
FINE TUNE
TV ON
RF INPUT
TV STANDBY
CHANNEL
FINE
CLOSED CAPTIONING
SOUND
DISPLAY
TYPE
TIMER PLAY
ON
OFF
The extended on-screen menu system for
BeoVision 5. The presence of the greyed menu
items depends on whether these optional extras
are available in your system. Press MENU on Beo4
to access the main menu.
9
Watch TV or Satellite programmes
10
Switch on the TV or Satellite source
of your choice and step through your
channels.
If you watch your programmes via
digital receivers or cable boxes, you
can operate the available channels
and services they may offer via the
Beo4 remote control.
Specific menu overlays* are available
for each of the receivers or boxes
which are registered and compatible
with BeoVision 5. The menu overlays
show the functions available, as well
as the set of Beo4 buttons that give
you access to those functions.
If you have connected a satellite
receiver, you must register it in the
EXTERNAL SOURCES menu. Please
refer to Register equipment
connected to BeoVision 5 on page
28 for information about registering
connected equipment.
Watch TV or SAT channels
Adjust volume or mute the sound
Once you have selected your TV source and
specific channel type, you can use Beo4 to
step between the available channels or enter
the channel number. To watch television
channels received via Satellite, press SAT. To
watch a specific Satellite channel, enter the
channel number.
Adjust the volume at any time, or mute the
sound completely. Adjustments to the sound
volume are briefly displayed on the screen.
TV
TV C 2
TV
Switch on TV channels. Press TV
repeatedly to switch between TV
sources like cable and antenna
TV ANT 59
VOL 32
Press ∧ or ∨ on Beo4 to adjust
the volume up or down. Volume
is adjusted in steps of two
VOL 34
TV
TV STB
▲
▼
SAT
SAT
0–9
•
VOL – –
Step through available TV
channels one by one
Switch on Satellite channels, if
these are available in your setup
Use the number keys to select a
specific channel. This applies to
both TV and Satellite channels
Switch the system to standby
If you have selected TV and wish to see the
number of the active channel, press TV once. The
active channel is displayed at the top left corner of
the screen. Press TV again to change between
cable and antenna channels.
*NOTE! For further information about the menu
overlays available for the different types of boxes,
please contact your Bang & Olufsen retailer to
receive a complete Product List.
∧
∨
∧
∨
VOL 34
To mute the sound, press the
middle of the ∧ ∨ button
Press ∧ or ∨ to bring the
sound back
11
Turn the TV to the left or right
Selected functions for TV or SAT
If your BeoVision 5 is equipped with a
motorised stand, you can turn the television
to the left or right with the Beo4 remote
control. When you switch the system on and
off, then it automatically returns to a preset
position which can be adjusted via the
on-screen menu system.
Use the Beo4 remote control to operate
selected functions via menu overlays. Each
menu overlay is not explained in detail. The
operations described below apply to all
receivers or cable boxes, but the functions
activated will vary.
LIST
STAND
Press LIST until STAND is
displayed on Beo4
TV
TV STB
Press TV until the correct source
is selected, or…
GUIDE
FAV
INFO
ss
tt
1–9
Turn your BeoVision 5 to the left
or right
Press 1 – 9 to make BeoVision 5
turn to a particular position –
1 is the outermost left and 9 is
the outermost right position
SAT
SAT
MENU
Call up the menu overlay for the
selected source
Press a coloured button on Beo4
to activate a function shown in
the menu overlay
0–9
To make BeoVision 5 turn to specific positions
when it is switched on or switched to standby,
stand positions for on and standby must be preset.
Use the STAND POSITIONS menu. Refer to ‘Preset
stand positions for BeoVision 5’ on page 32 for
further information.
…press SAT to call up your
Satellite channels
In menus or services…
Move the cursor in the desired
direction or to the desired option
▲
▼
ss
Press the number keys to activate
a numbered function or service
in the menu overlay
tt
0–9
PREV CH
1
MOVIES
2
SPORTS
3
NEWS
4
ALL
5
MENU
6
LIST
7
SERVICES
The menu overlay above is from a digital Satellite
receiver and shows the functions and services
available*. With the overlay on the screen, you
can use your Beo4 remote control to operate the
functions shown in the menu. The functions you
activate via the coloured Beo4 buttons are
available directly, without calling up the menu
overlay first. Press MENU a second time to call up
the BeoVision 5 main setup menu.
Use the number keys to enter
information in menus or services
when relevant
GO
Select an option in a menu
EXIT
Return to watching television
•
Switch the system to standby
*NOTE! For detailed instruction in the various
functions offered by your set-top box or Satellite
receiver, please refer to the user’s guide enclosed
with the product or box in question.
Use a Video Cassette Recorder via Beo4
12
With Beo4, you can switch on and
operate a VCR you have connected
to BeoVision 5 and registered in the
EXTERNAL SOURCES menu*. All
playback, wind, and stop functions
can be operated with Beo4. Eject a
video cassette via the close-up
operation panel on the VCR.
A set of functions available for your
VCR can be seen on a menu overlay
that you call up on the screen. You
can then operate these functions via
Beo4.
Switch on and use a VCR
Record here and now
You can switch on your VCR, start and stop
playback and search through a tape via a
direct button on Beo4.
You can make an immediate recording of a
programme from any source or channel you
choose. You can watch what you are
recording, select another source, or switch
BeoVision 5 to standby – the recording just
continues.
V TAPE
ss
tt
STOP
With BeoVision 5 and Beo4, you can
make an instant recording of any
source you choose.
A timed recording must either be
preset via on-screen guides available
with the source you wish to record
from, or via the VCR’s own menus. In
the second case, the VCR’s own
remote control must be used. The
Record lock function can help ensure
that a signal is available between the
source and the VCR when the timed
recording is preset to take place.
GO
STOP
•
Press to switch on your VCR
directly and start playback
Rewind or fast forward through
the cassette
While BeoVision 5 is on…
Press to be able to start a
RECORD
recording
RECORD
Press again to start recording the
programme currently being
broadcast
RECORD
When recording is initiated on
BeoVision 5, RECORD appears
briefly on your screen
Press to pause playback
Press to resume playback, or…
…press to stop playback
completely
Switch the BeoVision 5 and the
VCR to standby
If your VCR has an automatic standby feature that
switches the VCR off when playback has been
paused or stopped for a period of time, you can
reactivate the VCR by pressing another source
button on Beo4, such as TV, followed by V TAPE.
SAT
•
V TAPE
STOP
During recording you can…
…switch to another source than
the one being recorded, or…
…switch BeoVision 5 to standby
– the recording continues
To return to your recording…
Switch to the VCR
Press to stop the recording
completely
To ensure a successful recording, you must make
sure that the VCR is set to the correct input. If you
attempt to switch to another TV source while
recording, then the RECORD indication appears on
the screen.
*NOTE! Please refer to Register equipment
connected to BeoVision 5 on page 28 for
information about registering equipment in the
EXTERNAL SOURCES menu.
13
Selected VCR functions
Selected functions offered by your VCR can be
operated via Beo4 and the menu overlay for
your VCR. Call up the menu to see a list of the
Beo4 buttons that activate VCR functions and
services. The buttons described below apply to
all VCRs, but the functions activated will vary.
V TAPE
Press to switch on your VCR
MENU
Press to call up the menu overlay
SLOW
INPUT
SAP/Hi-Fi
ZERO/CA SKIP
Press a coloured button on Beo4
to activate a specific function
shown in the menu overlay
0–9
▲
▼
ss
tt
0–9
1
DISPLAY
2
TAPE
3
SPEED
Press the number keys indicated
in the menu to call up the
specific function or service
In menus or services…
Move a cursor up or down, left
or right in the desired direction
or to the desired option
Use the number keys to enter
information in menus or services
when relevant
GO
Press to select a menu option
EXIT
Press to return to VCR viewing
The Beo4 menu overlay is an example of the menu
overlay for a VCR. This allows you to use the Beo4
remote control to operate some of the functions
offered by the VCR*. You can also activate the
functions attached to the coloured Beo4 buttons
directly, without calling up the menu overlay first.
Press MENU a second time to call up the
BeoVision 5 main setup menu.
*NOTE! For instruction in the various functions
offered by your VCR, please refer to the VCR’s
own user’s guide. For further information about
overlay menus showing selected functions for your
particular VCR, contact your Bang & Olufsen
retailer to receive a complete Product List.
>> Use a VCR via Beo4 – recording
14
TV recording from the VCR
Record lock a source
The channels you wish to record must be
stored in the VCR tuner, as well as in the
BeoVision 5 tuner. The recording is controlled
by the VCR. For further information about
recording, please refer to the VCR’s own user’s
guide.
You can lock the VCR on to the source you
want to record from, and in this way ensure
that there is a signal between BeoVision 5 and
your VCR. This is useful when you preset a
timed recording via a set-top box or other
equipment connected to the V AUX sockets
on BeoVision 5.
V TAPE
Press to switch on the VCR
STOP
Pause the VCR, if necessary
RECORD
RECORD
RECORD
•
V TAPE
STOP
Press to be able to start a
recording
Press to start recording. RECORD
is shown on the screen
During recording you can…
…switch BeoVision 5 to standby.
The recording continues
Return to the recording
Press to stop the recording
To ensure that recording takes place, remember to
set the input selector correctly on the VCR.
TV SETUP
1 SOUND
2 PICTURE
3 STAND POSITIONS
4 CLOSED CAPTIONING
5 PARENTAL CONTROL
6 RECORD LOCK
7 EXTERNAL SOURCES
8 FIRST TIME SETUP
9 RF / CHANNEL SETUP
10 TIMER PLAY
RECORD LOCK
SOURCE LOCKED
SAT
select
store
> Press MENU to call up the main TV SETUP
menu.
> Press 5 to call up the RECORD LOCK menu (6 if
your BeoVision 5 is equipped with a motorised
stand).
> Use ss tt to select which source to lock – only
available sources will appear.
> Press GO to store the source or input you have
chosen.
> Press EXIT or a source button, such as TV or
SAT, to leave all menus, or press STOP to back
up through previous menus.
Use a DVD player via Beo4
You can switch on and operate a
connected DVD player with the Beo4
remote control, once the player has
been registered in the BeoVision 5
EXTERNAL SOURCES menu.
A subset of the functions which may
be available for a particular DVD
player* or available on a specific
DVD disc can also be operated via
Beo4 and a menu overlay which you
call up on the screen.
For more information about how to
register extra equipment in the
EXTERNAL SOURCES menu, refer to
Register equipment connected to
BeoVision 5 on the BeoVision 5
CD-rom.
15
Switch on and use a DVD player
Selected DVD functions
You can switch on your DVD player directly
with Beo4. You can play and pause the disc.
Selected functions offered by a connected
DVD player can be operated via Beo4 and the
menu overlay for the DVD player. Call up the
menu and find out which Beo4 buttons to
press to gain access to DVD functions.
DVD
Press to switch on your DVD
player and start playback of a
disc
STOP
Pause playback
STOP
Stop paused playback
completely, or…
DVD
MENU
GO
•
…resume playback
Press to switch on your DVD
player and start playback
Call up the menu overlay
Press a coloured button on Beo4
to activate a specific function
shown in the menu overlay
0–9
Switch BeoVision 5 and the DVD
player to standby
▲
▼
ss
tt
0–9
Use the number keys indicated in
the menu to activate the specific
function or service
In menus or services…
Move the cursor up or down, left
or right to highlight the desired
option
Use the number keys to enter
information in menus or services
when relevant
GO
Press to select a menu option
EXIT
Press to return to DVD viewing
AUDIO
SUBTITLE
DISC MENU
DVD TOOL BAR
An example of the Beo4 menu overlay for a DVD
player. You can also activate the functions
attached to the coloured Beo4 buttons directly,
without calling up the menu overlay first. Press
MENU a second time to call up the BeoVision 5
main setup menu.
*NOTE! For detailed instruction in the specific
functions available for your DVD player, please
refer to the DVD player’s own user’s guide. For
further information about the Beo4 menu overlay
for selected DVD functions and your specific DVD
player, contact your Bang & Olufsen retailer to
receive a complete Product List.
Use BeoVision 5 in a BeoTheatre setup
16
Turn your family room into a
BeoTheatre setup, using the
BeoVision 5 surround sound setup
and a large-screen projector,
connected to BeoVision 5.
If you have a home automation
system connected, the screen, lights
and curtains are equally adjusted
when you switch to the BeoTheatre
setup.
Switch to BeoTheatre setting
Use your Beo4 remote control and move the
picture from the BeoVision 5 television screen
onto a larger projector screen for a special
occasion or movie.
LIST
FORMAT
0
BeoVision 5 switches the picture and
the display information concerning
the current source to the projector
screen.
Refer to Connect a projector to
BeoVision 5 on the BeoVision 5
CD-rom for information about how
to connect BeoVision 5 to a Home
automation system.
EXIT
Press LIST repeatedly to display
FORMAT in the Beo4 display
Press to switch between a
BeoTheatre setting and ordinary
television setting
Press to exit the FORMAT
function on Beo4
To return to the ordinary family room setup, simply
repeat the procedure – select FORMAT in the Beo4
display, and then press 0.
Speaker setup and sound system
If you have connected loudspeakers
to BeoVision 5, you can select a
speaker mode.
Determine which or how many
loudspeakers you want to switch on
when you watch, for example, the
news or a movie. You can select
alternative speaker modes at any
time*.
The number of available speaker
modes depends on how many
speakers you have in your setup.
There are five speaker modes in all.
To be able to enjoy all the speakers
in a surround sound setup – a
subwoofer, two front, two center
and two rear speakers – you must
choose a source that is encoded with
Dolby surround sound.
You can adjust the balance between
the loudspeakers you have
connected to BeoVision 5. Balance
can be adjusted between left and
right speakers, as well as between
the front and rear speakers.
Change speaker mode
You can select a speaker mode at any time,
even if you have preset a default speaker
mode, or if a programme causes a speaker
mode to be selected automatically. In most
cases, the speaker mode you select applies
until you switch BeoVision 5 to standby.
LIST
SPEAKER
Press LIST repeatedly until
SPEAKER is shown in the Beo4
display
1–5
Use the number buttons to select
the speaker mode you want
EXIT
Press to exit the SPEAKER
function
When SPEAKER is displayed in the Beo4 display, it
is also possible to adjust the balance between the
loudspeakers. Please refer to ‘Adjust sound and
picture settings’ for further information.
Modes available in a surround sound setup
SPEAKER1… Mono sound in the centre speakers
only. Use this mode for watching, for example,
the news. The subwoofer is always active in
Speaker modes 2 – 5. Speaker mode 1 does not
activate the subwoofer, and is ideal for night
listening.
SPEAKER2… Stereo sound in the front speakers.
Use this mode when you listen to an audio-only
source, such as a CD, from a connected audio
system. This mode is selected automatically for
audio-only sources.
SPEAKER3… Stereo sound in the front speakers
with the mono sound, for example, of speech
and sound effects concentrated in the centre
speakers. Use this mode when you watch TV
programmes broadcast in stereo.
SPEAKER4… Enhanced stereo sound in the front
and rear speakers. Use this mode when you
want, for example, an enhanced effect of the
stereo sound on a CD.
SPEAKER5… Surround sound reproduced by all
the speakers in the system together. Use this
mode when you want to experience the full
effect of surround sound when watching a
programme or movie encoded with Pro Logic,
DTS or Dolby Digital, or when listening to a CD
pre-recorded with one of the sound systems.
Refer to Loudspeaker setup –
surround sound on the BeoVision 5
CD-rom for more information about
connecting speakers to BeoVision 5.
*NOTE! If you watch a movie, DVD or broadcast
encoded with DTS or Dolby Digital, then the
appropriate speaker mode is selected
automatically. This ensures optimum sound quality.
If you choose to select a speaker mode manually,
you may experience reduced sound quality.
17
>> Speaker setup and sound system
18
Adjust speaker balance
See the active sound system
You can adjust the speaker balance between
connected loudspeakers with the Beo4 remote
control. Balance can be adjusted between the
left and right loudspeakers, as well as the
front and rear speakers.
If the current programme or source contains a
Dolby sound system, such as Dolby Digital, you
can see the name of the active sound system
on the screen. However, it is not possible to
adjust or preset a sound system.
LIST
SPEAKER
ss
tt
BAL > <
▲
▼
FRONT 0
Press LIST on Beo4 repeatedly
until SPEAKER is shown in the
Beo4 display
Press to adjust the balance
between left and right speakers
Press to adjust the balance
between front and rear speakers
TV SETUP
1 SOUND
2 PICTURE
3 STAND POSITIONS
4 CLOSED CAPTIONING
5 PARENTAL CONTROL
6 RECORD LOCK
7 EXTERNAL SOURCES
8 FIRST TIME SETUP
9 RF / CHANNEL SETUP
10 TIMER PLAY
SOUND
1 ADJUSTMENT
2 SPEAKER TYPE
3 SPEAKER DISTANCE
4 SPEAKER LEVEL
5 SPEAKER MODE
6 SOUND SYSTEM
select
select
The SOUND SYSTEM menu
Sound systems that can appear in the menu are:
DOLBY DIGITAL, DOLBY PRO LOGIC, DOLBY 3
STEREO, DOLBY DIGITAL + DOLBY PRO LOGIC,
DTS and MONO/STEREO.
To call up the SOUND SYSTEM menu…
> Press MENU on Beo4 to call up the main
TV SETUP menu.
> Press GO to call up the SOUND menu.
> Press 6 to call up the SOUND SYSTEM menu.
The current sound system is shown on the
screen. MONO/STEREO appears if no Dolby
sound variant is currently active.
> Press EXIT or a source button, such as TV or
SAT, to exit all menus or press STOP to back up
through previous menus.
Adjust the picture format
If the picture format on the screen is
not to your satisfaction, you can
instruct BeoVision 5 to optimise the
picture format for you. You can also
choose to change the picture format
yourself.
On BeoVision 5, picture formats are
divided into three main groups:
Format 1: For panorama and 4:3
picture format. For NTSC TV
sources, choose Format 1.
Format 2: For NTSC letter-box
pictures. The picture is expanded,
and can be moved up or down on
the screen.
Format 3: For wide-screen pictures in
16:9 picture format. If the TV
source is a digital TV (DTV) input,
format 3 is selected automatically.
In this case, format adjustment is
done via the DTV menu overlay.
Please refer to Watch TV or
Satellite programmes on page 10
for more information about the
menu overlay.
19
Adjust the picture format if you would like a
standard, wide-screen, or full-screen picture
format. You can also instruct BeoVision 5 to
optimise the picture format for you.
LIST
FORMAT
GO
1–3
FORMAT 2
▲
▼
▲
▼
LIST
FORMAT
GO
EXIT
Press LIST repeatedly until
FORMAT is shown in the Beo4
display
Press to optimise the picture,
or…
Press 1, 2 or 3 to select a picture
format
The format is shown on the
screen
When format 1 is selected…
Press to switch between
panorama and 4:3 picture
format
When format 2 is selected…
Press to move the picture up or
down, or…
…you can optimise the picture in
format 2 by pressing LIST until
FORMAT is shown, followed by
GO
To exit the FORMAT function
Do not allow still pictures to be displayed on
the screen for an extended period of time, as
this can cause a permanent after-image to remain
on the screen. Examples of still pictures are logos,
video games, computer images and images
displayed in 4:3 picture format.
See two sources simultaneously
20
The Picture-in-Picture function allows
you to watch two sources at the
same time. One source, such as a TV
channel, is shown in full size, and a
second source is shown in a small
window on the screen. You can
insert, for example, VCR or DVD
playback in the small window.
Picture-in-Picture
When you activate the Picture-inPicture function, a small window is
super-imposed on the screen. You
can move this window around on
the screen, from one corner to
another, or swap the source in the
small window with the source shown
in full size.
While e.g. TV is on…
Press LIST repeatedly until P-IN-P
LIST
P-IN-P
appears in the Beo4 display
When Picture-in-Picture is on and a TV or
Satellite source is shown in the small window
on the screen, you can change channels for
that source. If VCR is selected in the window,
then you can play, cue or wind the cassette.
SAT
V TAPE
DVD
Operate this source with Beo4 as
usual
0
When the Picture-in-Picture function
is activated, the sound always
follows the source shown in full size,
but buttons pressed on your Beo4
remote control affect the picture in
the small window.
Select which source to display in
the small window*
Press to swap the sources
To move the inserted picture…
LIST
Press LIST repeatedly until P-IN-P
P-IN-P
appears in the Beo4 display
Use the coloured buttons to
move the picture to one of the
corners of the screen
TV
To exit the P-IN-P function, press
the source button that
corresponds to the source shown
in the main picture
*NOTE! Do not choose the VCR as your Picture-inPicture source if a recording is being executed on
your VCR, as Picture-in-Picture may disrupt your
recording. BeoVision 5 will attempt to avoid the
situation by making it impossible to activate the
Picture-in-Picture function.
Select sound type
Different sound types, such as stereo
and mono sound, may be available
for your TV channels. Different audio
programs* may also be available.
While you are watching a TV
channel, you can select a Second
Audio Program (SAP). Simply switch
between the types of sound
available. You can only select the
sound channels which are actually
being broadcast.
21
Select mono, stereo or SAP
The available sound types will be displayed on
the screen. For sources other than TV, the
different types of sound and displayed
information depend on the source currently in
use. The type of sound you select applies until
you switch BeoVision 5 to standby or select
another sound type.
LIST
SOUND
GO
STEREO
Press LIST repeatedly until
SOUND is shown in the Beo4
display
Press GO to display the current
sound type on the screen
GO
GO
Press GO repeatedly to display
and listen to the available sound
types
EXIT
Press to exit the SOUND function
In order to call up SOUND in the Beo4 display, it is
necessary to add the function to Beo4. Please refer
to ‘Customising your Beo4’ in Beo4’s own User’s
guide on the CD-rom for further information.
*NOTE! You can preset a sound type
(mono/stereo) or SAP, a Second Audio Program,
for TV sources via the FINE TUNE menu. Please
refer to Edit and fine tune channels on page 30
for further information.
Apply closed captioning
22
You can apply subtitles or closed
captioning to all your sources and
channels.
Select a type of closed captioning via
the CLOSED CAPTIONING menu.
You can, however, choose to turn
closed captioning on or off at any
time – for example, while watching a
specific programme – even if you
have preset BeoVision 5 to display
closed captioning at all times.
Closed captioning options
Choose the type of closed captioning you wish
to view and whether or not you want closed
captioning to be displayed automatically.
TV SETUP
1 SOUND
2 PICTURE
3 STAND POSITIONS
4 CLOSED CAPTIONING
5 PARENTAL CONTROL
6 RECORD LOCK
7 EXTERNAL SOURCES
8 FIRST TIME SETUP
9 RF / CHANNEL SETUP
10 TIMER PLAY
CLOSED CAPTIONING
DISPLAY
OFF
TYPE
CC1
select
store
While BeoVision 5 is on…
> Press MENU to call up the main TV SETUP
menu.
> Press 3 to call up the CLOSED CAPTIONING
menu (4 if your BeoVision 5 is equipped with a
motorised stand).
> Press ss tt to adjust the setting for DISPLAY.
Choose ON or OFF.
> Press ▼ to move to TYPE and press ss tt to
select a type of closed captioning. Options are:
CC1, CC2, CC3, CC4, TEXT1, TEXT2, TEXT3, or
TEXT4.
> Press GO to store.
> Press EXIT or a source button, such as TV or
SAT, to leave all menus, or press STOP to back
up through previous menus.
To turn closed captioning on or off while
watching a programme…
Press TEXT to see the status of
TEXT
CC ON
closed captioning – CC ON
appears on the screen
TEXT
Press again to turn closed
captioning off
TEXT
Press a third time to restore
closed captioning
Make BeoVision 5 start or stop at a specific time
If your BeoVision 5 is integrated with
a Bang & Olufsen audio system with
a Master Link cable, you can – via
this system – make BeoVision 5 start
or stop automatically on a specific
date and time, or at the same time
and day every week.
Switch on the Timer play function on
BeoVision 5. You can then program
the timed settings on the connected
audio system. The programmed
source, such as CD or radio, is then
played through the BeoVision 5
loudspeakers and switched off at the
appointed times.
Refer to the Guide enclosed with
your audio system for further
information about how to program
timed settings.
Switch on the Timer play function
You must activate the Timer play function in
order for your timers to be executed.
While BeoVision 5 is on…
> Press MENU on Beo4 to call up the main menu.
> Press 9 to call up the TIMER PLAY menu (10 if
your BeoVision 5 is equipped with a motorised
stand).
> Press ss or tt to reveal ON. To switch off the
Timer play, select OFF instead.
> Press GO to store the setting, or EXIT to leave
the menu.
TV SETUP
1 SOUND
2 PICTURE
3 STAND POSITIONS
4 CLOSED CAPTIONING
5 PARENTAL CONTROL
6 RECORD LOCK
7 EXTERNAL SOURCES
8 FIRST TIME SETUP
9 RF / CHANNEL SETUP
10 TIMER PLAY
select
TIMER PLAY
TIMER PLAY
ON
store
23
Set up BeoVision 5
24
We recommend that you follow the
procedure described below when you
set up your BeoVision 5:
– Unpack the BeoVision 5 and place
it as described and illustrated to
the right under Handling your
BeoVision 5;
– Consider the appropriate
surroundings for your BeoVision 5.
Guidelines are included to the
right;
– Connect the cables, additional
equipment, and speakers as
described on the following pages.
For an overview of the connection
panels, refer to Connection panels on
BeoVision 5 on page 25.
Handle your BeoVision 5
Due to the weight of BeoVision 5, any
moving/lifting should always be done by two
persons. BeoVision 5 is equipped with a
special handle for lifting it out of the packing.
After that the handle must be removed.
NOTE! BeoVision 5 is not designed to stand on
its own, it must be supported until mounted
on the chosen bracket or stand!
– Make sure that the BeoVision 5 is set up and
connected in accordance with this Guide.
– The BeoVision 5 is developed for indoor use in
dry, domestic environments only. Use
BeoVision 5 within a temperature range of
10–40ºC (50–105ºF), and at an altitude of no
more than 1500 metres (5000 ft.).
– Avoid placing your BeoVision 5 in direct sunlight
or direct artificial light (such as a spotlight), as
this may reduce the sensitivity of the remote
control receiver. Do not place any items on top
of the BeoVision 5.
– Do not attempt to open the BeoVision 5. Leave
such operations to qualified service personnel.
Before placing BeoVision 5 you must remove the
handle.
Overview of socket and connection
panels
The illustration to the right shows the
placement of the various socket and
connection panels on the BeoVision 5:
1 Top connection panel
2 Mains connection
3 Bottom connection panel
4 PC connection socket
5 Close-up connection panel
4
1
2
3
5
Connection panels on BeoVision 5
Source signals and external
equipment you wish to connect to
BeoVision 5 must be connected to
the appropriate panel. Four panels
are available:
– A top panel with connections for
RF antenna or cable A and B signal
input, Master Link connection, an
additional IR receiver, Digital TV
input and connection of a
projector;
– A bottom connection panel on
BeoVision 5 is for connection of
additional equipment. There are
sockets for extra video sources,
such as a VCR or DVD player.
Another group of sockets on the
bottom connection panel is
intended for the connection of
loudspeakers in a surround sound
system. The bottom socket panel
contains a socket for recording
purposes, and low power IR
transmitter connections (for a
projector and an RF cable box)*;
– A close-up connection panel for
headphones or a CamCorder;
– A PC connection socket.
Refer to Connect video signals on the
CD-rom for information about how
to connect video signals.
25
Top connection panel
The following sockets and areas are available
on the BeoVision 5 top connection panel:
PROJ. OUT
RF IN A
For connection of an RF signal, input A.
RF IN B
For connection of an second or split RF signal,
input B.
MASTER LINK
For connection of a Bang & Olufsen audio system
or for BeoLink distribution.
IR RECEIVER
RF IN A
Y/G
DTV IN
Pr/R
H
Pb/B
V
RF IN B
MASTER LINK
IR RECEIVER
For connection of an additional IR receiver.
PROJ. OUT
For connection of a large-screen projector.
DTV IN
Five sockets are available for connection of
component signals from, for example, a High
Definition set-top box: Y/G, Pr/R, Pb/B, H and V.
– Sources with an RGB-type interface have to be
connected to all 5 sockets.
– For Y, Pr, Pb-type inter-faces, use the sockets
Y/G, Pr/R and Pb/B – no connection should be
made to the H and V sockets.
– If the DTV IN sockets are used, then make sure
that the analogue sound outputs (RIGHT and
LEFT) and the digital sound output (COAX or
OPTICAL) from the set-top box are connected to
the relevant sockets in the STB area on the
bottom connection panel. Also, make sure that
the CTRL socket in the STB area is used for
connecting the IR transmitter controlling the
set-top box, if the box is included in the Product
List available through your Bang & Olufsen
retailer.
*NOTE! The type of source you connect has to be
registered in the EXTERNAL SOURCES menu.
Please refer to Register equipment connected to
BeoVision 5 on page 28 for further instruction.
>> Connection panels on BeoVision 5
26
S-VIDEO
S-VIDEO
VIDEO
RIGHT
COAX
LEFT
VIDEO
S-VIDEO
S-VIDEO
S-VIDEO
S-VIDEO
RIGHT
VIDEO
RIGHT
VIDEO
RIGHT
VIDEO
RIGHT
VIDEO
RIGHT
LEFT
COAX
LEFT
COAX
LEFT
COAX
LEFT
COAX
LEFT
FRONT
CENTRE
FRONT
REAR
SUBWOOFER
REAR
SPEAKERS
OPTICAL
REC OUT
CTRL
V TAPE
OPTICAL
DVD
Bottom connection panel
Each signal or source has a dedicated area
containing the necessary sockets. The area
V TAPE is for VCR connections, STB for set-top
box connections, and so on.
Dedicated areas on the panel
REC OUT
For recording purposes.
We recommend that you use the sockets LEFT,
RIGHT and VIDEO.
V TAPE
For connection of a Video Cassette Recorder
(VCR).
DVD
For connection of a DVD player.
V AUX
For connection of auxiliary video equipment.
SAT
For connection of a Satellite receiver.
STB
For connection of a set-top box.
CATV
For connection of a Low-power IR transmitter. Use
the CTRL socket to connect the IR transmitter from
a cable box that uses an RF signal.
PROJ
For connection of a Low-power IR transmitter. Use
the CTRL socket to connect the Low-power IR
transmitter from various projector types.
CTRL
OPTICAL
CTRL
V AUX
OPTICAL
CTRL
SAT
OPTICAL
STB
CTRL
CTRL
CATV
CTRL
PROJ
DATA
SPEAKERS
For connection of surround sound loudspeakers.
S-VIDEO
For S-Video video input, if relevant to the source.
DATA
For connection of a Home automation system with
a projector.
The sockets VIDEO and S-VIDEO are mutually
exclusive. We recommend that you use the
S-VIDEO socket.
Socket types which apply to some or all of
the dedicated areas
CTRL
Intended for a Low-power IR transmitter. Enables
Beo4 remote control of the connected equipment.
Refer to Connect video signals on the CD-rom for
further information about Low-power IR
transmitters.
FRONT
DIN-socket for connection of front speakers, left
and right speakers respectively. You can connect
either front speaker to either socket.
OPTICAL
For digital sound input – optical cable.
COAX
For digital sound input via a co-axial cable.
The sockets OPTICAL and COAX are mutually
exclusive. We recommend that you use the COAX
socket.
VIDEO
For composite video input.
RIGHT, LEFT
For analogue sound input from the right and left
sound channel respectively.
Always connect both the analogue and the digital
sound input. Connect the sound inputs to the
sockets RIGHT, LEFT and to either the COAX or the
OPTICAL socket.
CENTRE
DIN-socket for connection of centre speakers.
REAR
DIN-socket for connection of rear speakers, left
and right speakers respectively. You can connect
either rear speaker to either socket.
SUBWOOFER
DIN-socket for connection of a subwoofer unit.
27
Close-up connection panel
PC connection socket
The following sockets are available on the
close-up connection panel:
PC IN For connection of a video signal from a PC.
You can connect the sound signal to the L/R
sockets on the close-up connection panel
described on this page, or to the RIGHT and
LEFT sockets in the V AUX socket area on the
bottom connection panel described on the
previous page. If you connect the sound signal
to the V AUX socket area, you must register
your PC in the EXTERNAL SOURCES menu.
Please refer to Register equipment connected to
BeoVision 5 on page 28 for further information.
PHONES For connection of headphones.
L/R For the audio/sound connection (Left and
Right, respectively).
S-VHS For connection of S-VHS or Hi-8
CamCorders only.
Use headphones
You can connect headphones to the PHONES
socket on the BeoVision 5 close-up connection
panel and listen, for example, to a CD from a
connected audio system, or to a video
programme. Connected loudspeakers can then be
muted by pressing the middle of the Beo4 volume
button.
Use a CamCorder
If you connect your CamCorder to the close-up
connection panel on BeoVision 5, you can watch
your CamCorder recordings on your screen.
To watch CamCorder recordings on
BeoVision 5…
> Connect your CamCorder to the VIDEO, L and R
sockets on BeoVision 5 when it is in standby.
Connect a Super-VHS CamCorder to the S-VHS
socket on the close-up connection panel,
instead of the VIDEO socket.
> Now switch BeoVision 5 on and start playback
on your CamCorder – the signal is selected
automatically and the picture from your
CamCorder appears on your screen.
PHONES
L
R
VIDEO
S–VHS
The close-up connection panel.
The PC connection socket.
Use a connected PC…
> Press LIST on Beo4 until PC* appears in the
display.
> Press GO to select PC as your source.
If you select PC as your source, you can not call up
the BeoVision 5 main menu on the screen without
choosing another source first, such as TV. Note
also that adjustment of brightness, colour, contrast
or tint must be done via the PICTURE menu, and
not via the PC. Refer to ‘Store picture adjustments’
on page 33 for further information.
Do not allow still pictures, such as computer
images, to be displayed on the screen for an
extended period of time, as this can cause a
permanent after-image to remain on the
screen!
You can select the CamCorder input via Beo4.
Press LIST repeatedly until CAMCORD* appears in
the display and then press GO.
*NOTE! In order to display CAMCORD or PC on
Beo4, you must first add this function to the Beo4
list of functions. Please refer to Beo4’s own Guide
on the CD-rom for further information
Register equipment connected to BeoVision 5
28
When you connect additional video
sources or equipment to your
BeoVision 5, you must register the
equipment in an on-screen menu.
This enables you to operate the
equipment with your Beo4 remote
control.
Find the type of specific video
equipment you have connected in
the EXTERNAL SOURCES menu. If the
specific equipment is not available,
then choose one of the generic
options that matches the type of
equipment you have connected.
Register additional equipment
Find the name of your VCR (V.TAPE), DVD
player, Satellite receiver, or set-top box in the
EXTERNAL SOURCES menu, or register it as a
generic device type.
EXTERNAL SOURCES
V.TAPE
DVD
V.AUX
SAT
STB
Panasonic ...
Panasonic ...
NONE
Hughes ...
Generic RGB
store
For information about where and
how to connect the equipment,
please refer to Connection panels on
BeoVision 5 on page 25.
While BeoVision 5 is on…
> Press MENU on Beo4 to call up the main
TV SETUP menu.
> Press 6 to call up the EXTERNAL SOURCES menu
(7 if your BeoVision 5 is equipped with a
motorised stand).
> Use ▼ ▲ to step to the menu option you want.
> Press ss tt to view your choices for each menu
option.
> Press GO to store.
Once you have completed menu operations…
> Press EXIT or a source button, such as TV or
SAT, to leave all menus, or press STOP to back
up through previous menus.
The audio/video equipment which is available on
the menu for additional sources is listed in the
Product List, which is available from your Bang &
Olufsen retailer.
*NOTE! In order to display the extra LIST ‘button’,
V.AUX, on Beo4, you must add this extra ‘button’
to the Beo4 LIST function. Please refer to Beo4’s
own Guide on the CD-rom for further instruction.
The second choice means, however, that while
it is possible to select this type of audio/video
equipment with Beo4, you can not operate its
functions with Beo4.
Options on the EXTERNAL SOURCES menu
V.TAPE… Choose your particular VCR, or select:
GENERIC NTSC… For an unspecified NTSC VCR.
NONE… If no VCR is connected.
DVD… Choose your particular DVD player, or
select:
GENERIC NTSC… For an unspecified NTSC DVD
player.
NONE… If no DVD player is connected.
V.AUX… Choose your equipment type, or select:
GENERIC NTSC… For unspecified audio/video
equipment. You can connect a Satellite receiver
or set-top box to V.AUX. If this is the case, use
V.AUX* to select this input. On the other hand,
if this input is used for a cable box set up for
V.AUX INPUT in the RF SETUP menu, then select
the cable box via the TV button on Beo4.
PC… If a PC is connected.
NONE… If no equipment is connected.
SAT… Choose your Satellite receiver, or select:
GENERIC NSTC/HDTV… For an unspecified NTSC
or HDTV receiver.
NONE… If no Satellite receiver is connected.
STB… Choose your particular set-top box, or
select:
GENERIC NTSC/YPbPr/RGB… For an unspecified
NTSC, YPbPr, or RGB set-top box.
NONE… If no set-top box is connected.
29
Edit and fine-tune channels
30
When you have connected
BeoVision 5 to either a cable network
or an antenna, and automatic tuning
has been performed, all available
channels are stored. However, it may
be necessary to edit channels.
Channels that do not broadcast
meaningful signals may still get
stored during tuning, or channels
may be excluded from tuning
because they were either out of reach
or the signal was too weak. In these
cases, you can remove empty channel
numbers or add those channels
which were excluded during
automatic tuning.
Editing or fine-tuning of a stored
channel may also be required if, for
example, the signal is weak, if you
want to select mono or stereo sound,
or if you want to add a Second Audio
Program, SAP, to a specific channel.
RF/CHANNEL SETUP menu
Add or remove stored channels
To gain access to the menus required for
editing and fine-tuning channels, call up the
RF/CHANNEL SETUP menu. Here, you can gain
access to functions for adding or removing
channels, fine tuning, and selection of sound
type or SAP (Second Audio Program).
You can edit the number of available
channels. You can add a new channel or
remove a stored channel. In most cases, the
menu for adding or removing channels
appears automatically, once automatic tuning
has been completed, but you can also call it
up manually.
RF / CHANNEL SETUP
1 RF SETUP
2 ADD / REMOVE CHANNELS
3 FINE TUNE
select
While BeoVision 5 is on…
> Press MENU on Beo4 to call up the main
TV SETUP menu.
> Press 8 to call up the RF/CHANNEL SETUP menu
(9 if your BeoVision 5 is equipped with a
motorised stand).
> Press the number button that corresponds to
the menu item you want:
1 – ensure access to channels
2 – add or remove channels
3 – fine tuning or mono/stereo/SAP selection.
> Or, use ▼ ▲ to step to the item you want and
press GO to call up the selected menu.
Once you have completed menu operations…
> Press EXIT or a source button, such as TV or
SAT, to exit all menus or press STOP to back up
through previous menus.
ADD / REMOVE CHANNELS
RF INPUT
ADD CHANNEL
REMOVE CHANNEL
add
ANT
4
--
done
What’s on the ADD/REMOVE CHANNELS
menu…
(RF INPUT)
RF INPUT appears on the menu if you connect
cable or antenna to both RF IN sockets on the
BeoVision 5 top connection panel. Choose the
signal type, CABLE or ANT (antenna). You can
distinguish between two separate signals of the
same type – for example, two cable signals – by
selecting CABLE A or CABLE B.
ADD CHANNEL
If no channels are available to add, then this
option is dimmed and cannot be selected. If
channels can be added, then you can enter the
number of the channel you wish to add, and
press the green button on Beo4 to add it.
REMOVE CHANNEL
To remove stored channels, enter the number of
the channel you wish to remove and press the
green button on Beo4 to remove it.
31
Fine-tune channels
If necessary, you can fine tune a channel. If
you have both antenna and cable inputs, you
must select the appropriate input before
entering the channel number and starting
fine tuning. In the FINE TUNE menu, you can
also select a sound type, such as mono or
stereo, or select a Second Audio Program
(SAP).
FINE TUNE
RF INPUT
CHANNEL
FINE
ANTENNA
4
+3
SOUND
STEREO
store
What’s on the FINE TUNE menu…
(RF INPUT)
RF INPUT appears on the menu if you connect
cable or antenna to both RF IN sockets on the
BeoVision 5 top connection panel. Choose the
signal type, CABLE or ANT (antenna). You can
distinguish between two separate signals of the
same type – for example, two cable signals – by
selecting CABLE A or CABLE B.
CHANNEL
Enter the number of the channel you wish to
fine tune or adjust.
FINE
Choose this option to fine tune a channel signal
within a range of ± 8.
SOUND
Select STEREO, MONO or SAP. If SAP is selected,
but not currently broadcast, the best available
sound type (usually stereo) is selected.
Even though you store a sound type, mono, stereo
or SAP, you can still make temporary changes to
the sound type with Beo4. Please refer to ‘Select
sound type’ on page 21.
Preset stand positions for BeoVision 5
32
If your BeoVision 5 is equipped with a
motorised stand, you can turn the
entire system to the left or right via
your Beo4 remote control.
You can preset a stand position for
BeoVision 5 to turn to automatically
when you switch it on and want to
watch TV, and a position for it to turn
to when you switch it off.
Preset stand positions
Determine a position for BeoVision 5 to turn
to when you switch it off, and a position for it
to turn to when you switch it on.
STAND POSITIONS
TV ON
TV STANDBY
1
2
left
3
4 5 6 7
8
right
store
9
While BeoVision 5 is on…
> Press MENU on Beo4 to access the main
TV SETUP menu.
> Press 3 to call up the STAND POSITIONS menu.
> Use ▼ ▲ to step to TV ON or TV STANDBY.
> Press ss tt to modify the position for the
chosen option.
> Press GO to store.
Once you have completed menu operations…
> Press EXIT or a source button, such as TV or
SAT, to exit all menus or press STOP to back up
through menus.
Adjust sound and picture settings
You can adjust different aspects of
sound and picture using the
on-screen menu system and store the
adjustments you have made.
33
Store sound adjustments
Store picture adjustments
You can store volume, bass, treble and
subwoofer levels, and indicate whether the
loudness function should be on or off.
Store brightness, contrast, colour and tint
levels for the BeoVision 5. If you have a large
screen in a BeoTheatre setup, you can activate
the BeoTheatre mode and store a second set
of picture adjustments for this particular
situation.
You can store a default volume level
via the SOUND ADJUSTMENT menu.
This determines the initial sound level
when BeoVision 5 is switched on.
SOUND ADJUSTMENT
You can adjust bass, treble, and
subwoofer levels, and indicate
whether or not you want the
loudness function activated. The
loudness function makes the sound
output more dynamic at low volume
levels.
PICTURE
VOLUME
.........
...................
BASS
...................
.........
BRIGHTNESS .........
...................
TREBLE
...................
.........
CONTRAST
...................
.........
SUBWOOFER ...................
.........
COLOUR
...................
.........
LOUDNESS
TINT
..............
..............
ON
store
Finally, you can adjust and store
brightness, contrast, colour and tint
levels, if necessary.
While BeoVision 5 is on…
> Press MENU on Beo4 to call up the main
TV SETUP menu.
> Press GO to call up the SOUND menu.
> Press GO again to call up the
SOUND ADJUSTMENT menu.
> Use ▼ ▲ to step to the menu option you want.
> Press ss tt to modify inputs for the chosen
option. You can adjust volume (VOLUME), bass
(BASS), treble (TREBLE), subwoofer*
(SUBWOOFER) or set the loudness function
(LOUDNESS) to ON or OFF.
> Press GO to store your settings.
> Press EXIT or a source button, such as TV or
SAT, to exit all menus or press STOP to back up
through previous menus.
*If a subwoofer is not connected, SUBWOOFER
cannot be adjusted. If you play a DVD disc
encoded with DTS, the menu options BASS and
TREBLE can not be adjusted.
While BeoVision 5 is on…
> Press MENU on Beo4 to call up the main
TV SETUP menu.
> Press 2 to call up the PICTURE menu.
> Use ▼ ▲ to step to the menu option you want.
> Press ss tt to adjust the chosen option. You can
adjust brightness (BRIGHTNESS), colour
(COLOUR), contrast (CONTRAST) or tint (TINT)
levels.
> Press GO to store.
> Press EXIT or a source button, such as TV or
SAT, to exit all menus or press STOP to back up
through previous menus.
Maintenance
34
Normal maintenance, such as
cleaning the BeoVision 5, is the
responsibility of the user. To achieve
the best result, follow the instructions
to the right.
Any defective parts are covered by
the guarantee during the warranty
period. Please consult your Bang &
Olufsen retailer to determine
recommendations for normal
maintenance.
Cleaning cabinet surfaces…
Wipe dust off the surfaces using a dry, soft
cloth. Remove grease stains or persistent dirt
with a lint-free, firmly wrung cloth, dipped in
a solution of water containing only a few
drops of mild detergent, such as washing-up
liquid.
About the plasma screen…
Clean only with a dry, soft cloth. Do not use
liquid cleaners or aerosol cleaners.
Never use alcohol or other solvents to clean any
part of BeoVision 5!
Do not allow still pictures to be displayed on
the screen for an extended period of time, as
this can cause a permanent after-image to
remain on the screen. Examples of still
pictures are logos, video games, computer
images and images displayed in 4:3 picture
format.
Cleaning the Beo4…
Wipe the Beo4 remote control with a soft,
lint-free, wet cloth which is wrung firmly.
2
1
Changing the batteries
When BATTERY appears in the Beo4 display, it
is time to change the batteries in the remote
control.
The Beo4 requires three batteries. We
recommend that you use 1.5 volt (size AAA)
Alkaline batteries only. Replace the batteries
as shown on this page. We recommend that
you keep a finger on top of the batteries until
the lid is replaced.
When you have replaced the batteries, you
must wait for about 10 seconds until the
display reads TV. The Beo4 remote control is
then ready to operate again.
NOTE! If the front screen glass should crack or
chip, or if it should be damaged in any way, it
must be replaced immediately, as it could
otherwise cause injury. Please contact your
Bang & Olufsen retailer.
3
2
1
35
36
Index
Beo4 remote control
DVD player
Changing the batteries, 34
Cleaning Beo4, 34
Introducing BeoVision 5 and Beo4, 6
Bottom connection panel – DVD sockets, 26
Register a DVD player connected to
BeoVision 5, 28
Use a DVD player via Beo4, 15
BeoLink
Headphones
BeoVision 5 in a link room – link connection,
CD-rom p. 14
Distribute sound, CD-rom p. 13
Use BeoVision 5 in a link room, CD-rom p. 15
Use Headphones, 27
BeoTheatre
CamCorder
Close-up connection panel, 27
Use a CamCorder, 27
Connect a Home automation system,
CD-rom p. 5
Use BeoVision 5 in a BeoTheatre setup, 16
Language
Closed captioning
Apply closed captioning, 22
What’s on the CLOSED CAPTIONING menu,
CD-rom p. 26
Parental control – programme language,
CD-rom pp. 20–22
Select sound type, 21
Loudspeakers
Connections
Connect BeoVision 5 to your audio system,
CD-rom p. 11
Connection panels on BeoVision 5, 25–27
Headphones, 27
Home automation system, CD-rom p. 5
IR transmitters, CD-rom p. 4
Loudspeaker connections – surround sound,
CD-rom pp. 7–10
Projector, CD-rom p. 5
Register equipment connected to BeoVision 5,
28
The close-up connection panel, 27
Video signals, CD-rom p. 3
What’s on the EXTERNAL SOURCES menu,
CD-rom p. 28
Adjust speaker balance, 18
Calibrate the speaker level, CD-rom p. 10
Change speaker mode, 17
Connect loudspeakers, CD-rom p. 8
Place loudspeakers, CD-rom p. 7
Preset a speaker mode, CD-rom p. 19
Set speaker distance, CD-rom p. 9
What’s on the SPEAKER DISTANCE menu,
CD-rom p. 24
What’s on the SPEAKER LEVEL menu,
CD-rom p. 25
What’s on the SPEAKER MODE menu,
CD-rom p. 25
What’s on the SPEAKER TYPE menu,
CD-rom p. 24
Maintenance
Contact
Contact Bang & Olufsen, 38
Displays and menus
Beo4 display, 6
Displayed information and screen menus, 7
On-screen menus, CD-rom pp. 23–30
About the plasma screen…, 34
Cleaning Beo4, 34
Cleaning surfaces…, 34
Handle your BeoVision 5, 24
37
Master Link
Record
Timer play
BeoLink – distribute sound, CD-rom p. 13
BeoLink – BeoVision 5 in a link room,
CD-rom p. 14
Connect BeoVision 5 to your audio system,
CD-rom p. 11
Program the AV setup – option, CD-rom p. 11
Top connection panel – Master Link socket, 25
Use an integrated audio system, CD-rom p. 12
Record here and now, 12
Record lock a source, 14
Record TV programmes from the VCR, 14
Make BeoVision 5 start and stop at a specific
time, 23
Tune
RF setup
Assign an access code, CD-rom p. 20
Preset the MPAA rating, CD-rom p. 22
Preset TV parental guidelines, CD-rom p. 21
What’s on the TV PARENTAL GUIDELINES
menu, CD-rom p. 27
What’s on the MPAA RATING menu, CD-rom p. 27
What’s on the ACCESS CODE menu, CD-rom p. 27
When Parental control is active…, CD-rom p. 22
Add or remove stored channels, 30
Auto-tune with no cable box, CD-rom p. 18
Auto-tune with RF cable box, CD-rom p. 17
Cable box and source for RF inputs,
CD-rom p. 17
Fine-tune channels, 31
Identify sources for RF inputs, CD-rom p. 18
Identify the cable box socket, CD-rom p. 16
RF/Channel setup menu, 30
What’s on the ADD/REMOVE CHANNELS
menu, CD-rom p. 29
What’s on the FINE TUNE menu, CD-rom p. 29
What’s on the RF SETUP menu, CD-rom p. 29
PC
Socket panels
Connection, 27
Use a connected PC, 27
BeoVision 5 connection panels, 25–27
Parental Control
Auto-tune with no cable box, CD-rom p. 18
Auto-tune with RF cable box, CD-rom p. 17
Fine-tune channels, 31
What’s on the ADD/REMOVE CHANNELS
menu, CD-rom p. 29
What’s on the FINE TUNE menu, CD-rom p. 29
TV channels
Add or remove stored channels, 30
Auto-tune with no cable box, CD-rom p. 18
Auto-tune with RF cable box, CD-rom p. 17
Fine-tune channels, 31
RF/Channel setup menu, 30
Selected functions for TV and SAT, 11
Watch TV or SAT channels, 10
What’s on the ADD/REMOVE CHANNELS
menu, CD-rom p. 29
What’s on the FINE TUNE menu, CD-rom p. 29
What’s on the RF SETUP menu, CD-rom p. 29
Sound
Picture
Adjust picture format, 19
Picture-in-picture, 20
Store picture adjustments – brightness, colour,
contrast and tint, 33
What’s on the PICTURE menu, CD-rom p. 26
Adjust volume or mute the sound, 10
BeoLink – distribute sound, CD-rom p. 13
See the active sound system, 18
Select mono, stereo or SAP, 21
Store sound adjustments – volume, bass,
treble, subwoofer and loudness, 33
What’s on the ADJUSTMENT menu, CD-rom p. 24
Placement
VCR
Bottom connection panel – V TAPE sockets, 26
Record here and now, 12
Record lock a source, 14
Record TV programmes from the VCR, 14
Register a VCR connected to BeoVision 5, 28
Selected VCR functions, 13
Switch on and use a VCR, 12
Surround sound
Place BeoVision 5, 24
Place loudspeakers, CD-rom p. 7
Position of TV
Preset stand positions for BeoVision 5, 32
Turn the TV to the left or right, 11
What’s on the STAND POSITIONS menu,
CD-rom p. 26
Projector
Connect a projector, CD-rom p. 5
Use BeoVision 5 in a BeoTheatre setup, 16
Adjust speaker balance, 18
Calibrate the speaker level, CD-rom p. 10
Change speaker mode, 17
Connect loudspeakers, CD-rom p. 8
Place loudspeakers, CD-rom p. 7
Preset a speaker mode, CD-rom p. 19
Set speaker distance, CD-rom p. 9
Use BeoVision 5 in a BeoTheatre setup, 16
What’s on the SPEAKER DISTANCE menu,
CD-rom p. 24
What’s on the SPEAKER LEVEL menu,
CD-rom p. 25
What’s on the SPEAKER MODE menu,
CD-rom p. 25
What’s on the SPEAKER TYPE menu, CD-rom p. 24
Video signals
Connect video signals, CD-rom p. 3
38
For your information…
Your needs as a user are given careful
consideration during the design and
development process of a Bang & Olufsen
product and we strive to make our products
easy and comfortable to operate.
Therefore, we hope that you will take the
time to tell us about your experiences with
your Bang & Olufsen product. Anything which
you consider important – positive or negative
– may help us in our efforts to refine our
products.
Thank you!
Write to:
Bang & Olufsen a/s
Customer Service
Dept. 7210
Peter Bangsvej 15
DK–7600 Struer
or fax:
Bang & Olufsen
Customer Service
+45 97 85 39 11 (fax)
or Email:
[email protected]
Visit our Web-site on…
www.bang-olufsen.com
Technical specifications, features and the use
thereof are subject to change without notice!
3508584
1002
Printed in Denmark by Bogtrykkergården a-s, Struer
www.bang-olufsen.com