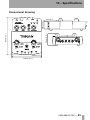
1
D00735710B
»
US-122
USB Audio/MIDI Interface
OWNER’S MANUAL
Ü
CAUTION: TO REDUCE THE RISK OF ELECTRIC SHOCK, DO NOT REMOVE COVER
(OR BACK). NO USER-SERVICEABLE PARTS INSIDE. REFER SERVICING TO QUALIFIED SERVICE PERSONNEL.
ÿ
The lightning flash with arrowhead symbol, within an equilateral triangle, is intended
to alert the user to the presence of uninsulated “dangerous voltage” within the product’s enclosure that may be of sufficient magnitude to constitute a risk of electric
shock to persons.
Ÿ
The exclamation point within an equilateral triangle is intended to alert the user to the
presence of important operating and maintenance (servicing) instructions in the literature accompanying the appliance.
This appliance has a serial number located on the
rear panel. Please record the model number and
serial number and retain them for your records.
Model number
Serial number
WARNING: TO PREVENT FIRE OR SHOCK
HAZARD, DO NOT EXPOSE THIS
APPLIANCE TO RAIN OR MOISTURE.
Important Safety Instructions
1
2
3
4
5
6
7
8
9
Read these instructions.
Keep these instructions.
Heed all warnings.
Follow all instructions.
Do not use this apparatus near water.
Clean only with dry cloth.
Do not block any ventilation openings. Install in
accordance with the manufacturer’s instructions.
Do not install near any heat sources such as radiators, heat registers, stoves, or other apparatus
(including amplifiers) that produce heat.
Do not defeat the safety purpose of the polarized
or grounding-type plug. A polarized plug has two
blades with one wider than the other. A grounding type plug has two blades and a third grounding prong. The wide blade or the third prong are
provided for your safety. If the provided plug does
not fit into your outlet, consult an electrician for
replacement of the obsolete outlet.
For USA
TO THE USER
This equipment has been tested and found to comply with
the limits for a Class B digital device, pursuant to Part 15
of the FCC Rules. These limits are designed to provide reasonable protection against harmful interference in a residential installation. This equipment generates, uses and
can radiate radio frequency energy and, if not installed
and used in accordance with the instructions, may cause
harmful interference to radio communications. However,
there is no guarantee that interference will not occur in a
particular installation. If this equipment does cause harmful interference to radio or television reception, which can
be determined by turning the equipment off and on, the
user is encouraged to try to correct the interference by one
or more of the following measures:
a) Reorient or relocate the receiving antenna.
b) Increase the separation between the equipment and
receiver.
c) Connect the equipment into an outlet on a circuit different to that to which the receiver is connected.
Consult the dealer or an experienced radio/TV teccnicioan
for help.
CAUTION
Changes or modifications to this equipment not expressly
approved by TEAC CORPORATION for compliance could
void the user’s authority to operate this equipment.
2 — TASCAM US-122
10 Protect the power cord from being walked on or
11
12
pinched particularly at plugs, convenience receptacles, and the point where they exit from the
apparatus.
Only use attachments/accessories specified by
the manufacturer.
Use only with the cart, stand, tripod, bracket, or
table specified by the manufacturer, or sold with
the apparatus. When a cart is used, use caution
when moving the cart/apparatus combination to
avoid injury from tip-over.
13 Unplug this apparatus during lightning storms or
when unused for long periods of time.
14 Refer all servicing to qualified service personnel.
•
•
•
Servicing is required when the apparatus has
been damaged in any way, such as power-supply
cord or plug is damaged, liquid has been spilled
or objects have fallen into the apparatus, the
apparatus has been exposed to rain or moisture,
does not operate normally, or has been dropped.
Do not expose this apparatus to drips or splashes.
Do not place any objects filled with liquids, such
as vases, on the apparatus.
Do not install this apparatus in a confined space
such as a book case or similar unit.
Declaration of Conformity
Model Number
: US-122
Trade Name
: TASCAM
Responsible party : TEAC AMERICA, INC.
Montebello, California, U.S.A.
Telephone number : 1-213-726-0303
This device complies with Part 15 of the FCC Rules.
Operation is subject to the following two conditions:
(1) This device may not cause harmful interference, and
(2) This device must accept any interference received,
including interference that may cause undesired operation.
Table of Contents
1 Introduction
Overview .................................. 4
Features .................................... 4
What’s in the package ................4
Copyright and trademarks ..........5
Nomenclature used in this
manual .....................................5
2 Controls and indicators
Top Panel .................................. 6
Rear Panel ............................... 7
Front Panel Descriptions ......... 8
3 Installation
System Requirements .............. 9
PC (Windows) ..............................9
Mac OS .........................................10
Installation ...................................10
Installation under Windows .......11
Macintosh ....................................13
Setting Up OMS (Mac OS pre-X
only) .........................................13
Tuning Your PC ........................ 14
Notes on USB interfacing ........ 15
4 Hooking up Audio and
MIDI to the US-122
Hooking up audio .................... 16
Hooking up MIDI ..................... 16
Using Direct Monitoring ......... 17
5 The US-122 Control Panel
Main Page ................................ 18
Buffer Size Adjustment ........... 18
Optimizing the USB .....................19
The Chromatic Tuner ............... 19
6 Interfacing with your
Audio Software
Audio Control Panel ....................20
ASIO Control Panel ......................20
Setting the Sample Rate and Bit
Depth .......................................21
Input Enabling .............................21
ASIO 2 Direct Monitoring ....... 22
7 A Sample Recording
Session in Cubasis
Setting Up ................................ 23
Recording Your Tracks ............ 24
Overdubbing ................................25
8 Other Applications
Setting up Sound Manager
Support – pre-Mac OS X ..... 26
MacOS 9.0 ................................ 26
MacOS 8.6 ................................ 27
Setting audio I/O options under
OS X (10.2.3 and above) ..... 28
To use the System Preferences ...28
Setting sampling frequency and bit
length under OS X (10.2.3 and
above) ......................................28
9 Technical Support
Troubleshooting (Windows) .. 29
Tech Support Contacts ............ 29
Before Contacting Us ..................30
Troubleshooting FAQ ............. 31
10 Specifications
Audio specifications ................ 32
Audio performance ................. 33
Other characteristics ............... 34
Physical characteristics ........... 34
Dimensional drawing ............. 35
Selecting the US-122 as your
Audio Device ........................ 20
TASCAM US-122 — 3
1 – Introduction
Overview
The US-122 is a USB powered audio/
MIDI interface designed for Digital
Audio Workstation (DAW) software
applications. Its design incorporates a
two-input, two-output 24-bit audio interface with balanced inputs, input inserts,
guitar impedance matching, phantom
powering, and a 16-channel MIDI interface.
Because the US-122 is USB-based, it’s
the ideal companion to any desktop- or
laptop-based digital recording setup.
And since it’s as compact, like a laptop,
requiring no additional power source, it
can be combined with one to create a
complete portable digital audio workstation solution.
Features
The input section comprises a 24-bit
audio interface, capable of streaming
two simultaneous channels of audio into
your computer. Inputs include two balanced XLR mic inputs with phantom
power capability, two 1/4” balanced line
inputs (switchable to high-impedance
unbalanced, for direct input of a guitar,
bass or other hi-Z source), with TRS
inserts on each input channel. Outputs
include a pair of unbalanced line outputs
on RCA connectors, and a separate headphone output.
The US-122 also features MIDI input
and output ports, allowing you to send
and receive data between your computer
and other MIDI-equipped devices.
What’s in the package
The US-122 package contains the following items in addition to the main unit
and this manual. When opening the
package, please make certain that all the
included items are present. If anything is
missing, contact the dealer where you
purchased it.
• US-122 main unit
• USB cable
4 — TASCAM US-122
• CD-ROM containing drivers (Windows and Mac OS), Cubasis, and documentation
• CD-ROM containing Gigastudio 24
and sample soundware (for Windows
only).
• Warranty and registration cards for
US-122
• Registration card for Cubasis
• TEAC address list
1 – Introduction
Copyright and trademarks
This product is designed to help you
record and reproduce sound works to
which you own the copyright, or where
you have obtained permission from the
copyright holder or the rightful licensor.
Unless you own the copyright, or have
obtained the appropriate permission
from the copyright holder or the rightful
licensor, your unauthorized recording,
reproduction or distribution thereof may
result in severe criminal penalties under
copyright laws and international copyright treaties. If you are uncertain about
your rights, contact your legal advisor.
Under no circumstances will TEAC Corporation be responsible for the consequences of any illegal copying
performed using the US-122.
Microsoft, Windows, Windows 98, Windows Me, Windows 2000 and Windows
XP are trademarks of Microsoft Corporation.
The full name of the product referred to
as “Windows 98” is “Microsoft® Windows® 98 operating system”.
Pentium is a registered trademark of
Intel Corporation.
MIDI is a registered trademark of the
Association of Manufacturers of Electronic Instruments (AMEI).
Mac and Mac OS are trademarks of
Apple Computer
All other band or product names are
trademarks or registered trademarks are
the property of their respective companies or organizations.
Nomenclature used in this manual
The following conventions are used in
this manual:
This typeface is used to designate software dialog messages .
Physical controls, indicators and connectors on the US-122 are shown LIKE
THIS.
This typeface is used to designate software menu functions and on-screen controllers.
TASCAM US-122 — 5
2 – Controls and indicators
Top Panel
1
7
89
2 3 4 5
A
1 LINE OUT level control Controls the level to the RCA outputs.
PHONES level control Controls the
level to the headphones output.
2 MIDI IN indicator Indicates
presence of incoming MIDI data at the
MIDI input.
MIDI OUT indicator Indicates transmission of MIDI data from the MIDI
output.
6 — TASCAM US-122
6
3 USB indicator Indicates a valid
USB connection to the host computer
when lit.
4 DIRECT switch Enables/disables direct monitoring of the input
signals
5 MONO switch Enables/disables mono output from the direct monitoring system.
2 – Controls and indicators
A PHANTOM switch Switches
6 DIRECT MONITOR level
+48V power to the microphone inputs to
allow powering of condenser microphones.
control Adjusts the level of the
direct monitoring signal, when this is
enabled.
7 L and R input level
NOTE
NOTE
Only use the phantom powering with condenser microphones which need it. Keep
this switch in the OFF position with all
other kinds of equipment connected to the
XLR inputs.
controls Input level adjustment.
Rotate clockwise to increase the input
level of audio sources.
8 MIC/LINE / GUITAR
switches Switch inputs individually between mic/line level and Hi-Z
(guitar) level.
To avoid noise and possible damage to
equipment, turn down the input LEVEL
controls when switching the phantom
power on and off.
9 SIGNAL indicators Indicate
Also note that this setting consumes power.
If you are operating the unit with a battery-powered laptop computer, this will
reduce the battery life of the computer.
the presence of an audio signal on the
respective channel (specifically, when
the input level exceeds -37 dBFS).
OL indicators Indicate an overload of
the input level to the respective channel
(specifically, a level of -2.5dBFS).
Rear Panel
B
C
D
E F
B USB jack Input for USB connec-
E OUTPUT L/R jacks Unbal-
tion (USB 1.1) to host computer.
anced (RCA) analog audio outputs.
C MIDI OUT MIDI output
D MIDI IN MIDI input,
F PHONES jack Standard 1/4" stereo headphone output.
TASCAM US-122 — 7
2 – Controls and indicators
Front Panel Descriptions
G H
I
G MIC IN L and R Balanced XLR
Inputs L and Rfor microphones.
1=Ground, 2=hot, 3=cold
H LINE/GUITAR L and R Analog inputs (1/4" TRS jack - tip=hot,
ring=cold, sleeve=ground) L and R. Bal-
8 — TASCAM US-122
anced when MIC/LINE-GUITAR switch
is set to MIC/LINE; unbalanced when set
to GUITAR.
I INSERT L and R TRS 1/4" jacks
(tip=send, ring=return, sleeve=ground)
for analog inserts for L and R inputs.
3 – Installation
System Requirements
PC (Windows)
Minimum requirements: Pentium II - 266 MHz (or equivalent) processor running Windows 98 (Second
Edition) or Windows Me (Millennium
Edition), Windows 2000 or Windows
XP, 96MB RAM.
Recommended: Pentium II
300MHz processor with 128MB RAM
or better (these requirements are for use
with Cubasis VST. Other applications
will have different requirements. Consult
your application’s manufacturer for further information).
which utilize Intel-based chipsets. You
can determine your chipset by going into
the Device Manager. On the Windows 98
desktop, right click on My Computer,
and select Properties. Click on the Device
Manager tab, and then click on the plus
(+) sign next to Universal Serial Bus
Controllers. (see illustration below)
NOTE
NOTE:
The US-122 is not supported under Windows 95. We also do not recommend Windows 98 First Edition, due to its limited USB
implementation. A fast EIDE hard disk is
required for throughput of multiple audio
tracks. 96MB RAM is the minimum recommended, but with all digital audio programs, you will obtain better results with
more RAM. An SVGA graphics card is suggested (minimum 256 colors, 800x600 resolution or better).
The US-122 has been successfully used
with the following chipsets:
Although this product has been checked
for use with normally configured computers which meet the specifications
above, we cannot guarantee the operation of the product, even with computers
meeting the specifications, due to differences in architecture and implementation
between computers.
• Intel 82371 AB/EB PCI to USB Universal Host Controller
• Intel 82371 SB PCI to USB Universal
Host Controller
• Intel 82801 AA PCI to USB Universal
Host Controller
• ALi PCI to USB Open Host Controller
Chipsets are also a concern with USB
audio. We have found that the most
dependable motherboards are ones
Some other chipsets, notably those specifying Open Host Controllers or OHCI
(rather than Universal Host Controllers
or UHCI), have been subject to occaTASCAM US-122 — 9
3 – Installation
sional incompatibilities. While most
OHCI systems have no problems with
the US-122, occasionally some older
OHCI systems will exhibit problems. We
have found that, in the majority of these
rare cases, a PCI-based USB card utiliz-
ing an Opti-chip controller will work
dependably. These cards (also available
in PCMCIA format for laptops) are
available through a number of manufacturers.
Mac OS
PowerPC running Mac OS 8.6 or better,
and a USB port. Any Macintosh computer with one or more USB ports running Mac O/S 8.6 or later (check the
Web site for updates), or Mac OS X
10.2.3 or above.
Very early iMac computers may need
one (or more) firmware updates to use
the US-122. Which firmware update(s)
is (are) needed depends on which Mac
OS version is installed in the early iMac.
Apple provides details in Apple Support
Article #58174.
PowerBook G3 Series (or later) with
built in USB (or using a 3rd party PCMCIA USB Card) have been tested and
work fine. Additionally, older PowerMac
computers using 3rd party PCI-based
USB cards also have been tested and
work fine. Any iMac, G3 or G4 will
work fine as well. Mac OS versions earlier than 8.6 do not implement full USB
support, and are not recommended.
Again, plenty of RAM and fast drives are
suggested.
Installation
Because the US-122 is a USB device,
connection is straightforward. Simply
plug the USB cable into the US-122, and
the other end into your computer. However, you should not connect the unit
before installing the drivers (see below).
Windows machines: Make certain
that your computer’s USB host port is
enabled (normally, most standard PC
BIOS settings default to enabled, but
make certain that it hasn’t been turned
off in the BIOS).
Also make sure that virus protection is
turned off before you install the US-122
drivers.
10 — TASCAM US-122
NOTE
NOTE:
Handle the enclosed CD-ROM with care. If
it becomes dirty or scratched, it will be
impossible for a computer to read it, and
the software cannot be installed. If the disc
becomes unreadable, a charge will be
made for its replacement.
Do not attempt to play the enclosed CDROM using an audio CD player, as this may
cause damage to hearing, as well as to
speakers, etc.
Use only the enclosed USB cable to connect
the US-122 and the computer. Do not use
other types of cable for this purpose, as
some cables contain resistors. If you
attempt to use such a cable, the audio
input and output will not work properly,
and the sound level will be inaudible or
very faint.
3 – Installation
Installation under Windows
The US-122 drivers are available on the
CD as executable installers. You’ll find
two executable installer files in the
Driver folder on the disc, labeled as:
US122_Win9x_x_yy.exe (for Windows
98 Second Edition and Me (Millennium
Edition)) and as US122_Win2k_x_yy.exe
(for Windows 2000 and Windows XP)
where x and yy represent the version
numbers.
Note that we have also included the individual driver files, available from the
root level of the CD. However, we recommend using the installers, as they will
also locate and uninstall any files pertaining to older versions of the US-122
drivers.
NOTE
You should also check the TASCAM Web
site to determine the latest version of the
drivers. If necessary, download and install
these latest drivers, following the instructions given here.
To install under Windows 98SE
or Me: Note that the US-122 will run
under Windows 98 SE (Second Edition)
or Me (Millennium Edition). Due to its
limited USB capabilities, First Edition
Win98 is not recommended.
NOTE
Run the Installer with the US-122 NOT connected to the computer.
1 Double click on the executable file
US122_Win9x_y_zz.exe (where y
and zz represent the version num-
2 Click the Setup button. The
Welcome dialog box will appear.
3 Click the Next button. The driver
files will be installed to your hard
drive.
In some cases, the Add Hardware
Wizard may ask for the file
US122WDM.SYS. Should this occur,
click Browse and direct it to the
path Windows/System32/Drivers.
In some cases, the Add Hardware
Wizard may ask for your Windows
98 or Windows Me CD-ROM if it is
unable to find all the needed system files. We suggest you have it
handy.
4 The Setup Complete dialog will
appear. Click Yes, I want to restart
my computer, followed by the Finish
button. The computer will reboot.
5 Connect the US-122 to the computer. The Windows Plug and Play
system will notice a new USB
device and start the Add New
Hardware wizard, which will find
the needed files on its own. This
will take about 30-60 seconds.
The drivers are now installed and the
US-122 is ready to operate.
NOTE
If you are running Windows 98SE, you may
need to install the appropriate Microsoft
Hotfix #Q269601.
ber). The installer will run.
TASCAM US-122 — 11
3 – Installation
To install under Windows 2000
or Windows XP:
NOTE
Run the Installer with the US-122 NOT connected to the computer.
1 Double click on the executable file
US122_Win2k_x_yy.exe (the US-122
setup icon). The installer will run.
2 Click the Next button. The
Welcome dialog box will appear.
3 Click the Next button. The driver
files will be installed to your hard
drive.
NOTE
You may be prompted by a message
informing you that the software you are
about to install does not have a digital certificate. Simply click Continue the
installation anyway and proceed.
4 If you are prompted to restart your
computer, do so.
5 Connect the US-122 to the computer. The Windows Plug and Play
system will notice a new USB
device and start the Add New
Hardware wizard, which will find
the three needed files on its own.
6 When prompted, select the Install
the software automatically option,
and if any warning appears
regarding digital certificates, etc.
ignore them and select Continue
anyway.
7 This process will take about 30-60
seconds.
12 — TASCAM US-122
The drivers are now installed and the
US-122 is ready to operate.
NOTE
When using the US-122 with Windows XP,
you may need to run the Windows Update
program to install the Windows
Messenger Update for Audio/Video to
improve the USB audio functionality of the
system. This update is listed in the Windows XP update list.
To install using Windows New
Hardware Wizard:
1 Insert the CD-ROM into your computer’s drive.
2 Connect the US-122 to the computer.
The Windows Plug and Play system will notice a new USB device
and start the Add New Hardware
wizard.
3 Choose Search for a suitable driver
for my device and press Next.
4 Enter the path where the drivers
are stored (that is, the CD-ROM)
and press OK.
5 After Windows finds the “firmware download” driver, click Next.
6 Click Finish. The other driver components will be automatically discovered and loaded (probably
three different components will be
discovered). This may take some
time.
7 Click Finish if prompted, and
reboot if prompted
3 – Installation
Macintosh
NOTE
2 Double-click on the appropriate
US-122 installer package to expand
it.
Run the Installer with the US-122 NOT connected to the computer.
There are two files for the Macintosh:
3 Double-click the resulting installer
file, and follow its instructions.
• US-122_OS_9_x_yy.hqx for pre- OS X
systems (OS 8.8 and above)
• US-122_OS_X_x_yy.sit for OS X systems (OS X 10.2.3 and above)
Where x and yy refer to the version numbers of the software.
In OS X, you will need to enter an
Administrator name and password
to install the drivers, etc.
4 Connect the US-122 to the computer. When the US-122 is connected, the system will find the
drivers which have just been
installed by itself.
1 Insert the CD-ROM into the computer, and drag the appropriate
installer package to your hard
disk.
Setting Up OMS (Mac OS pre-X only)
Cubasis, ProTools and several other
applications rely on OMS for MIDI
implementation. OMS (Open Music System) is a standard for MIDI management
on the Macintosh. Since the US-122 can
send and receive MIDI, you will need to
install OMS in order to use the US-122.
The exception is Digital Performer,
which utilizes FreeMIDI. The drivers
support OMS and FreeMIDI independently.
To set up OMS to work with the
US-122:
1 First, run the OMS installer. If you
do not have the current version of
OMS, it may be freely downloaded
at www.opcode.com.
2 Locate the US-122 Drivers folder,
which was placed on your desktop
when you ran the US-122 installer.
In this folder, locate the US-122
OMS driver. Drag the US-122
OMS driver into the OMS folder
inside your System folder. Do not
drag this file into the Opcode
folder on your hard drive - it will
not work correctly
3 Restart your computer. Then connect the US-122 and start the OMS
Setup application (located in the
Opcode folder on your hard drive).
4 Select New Studio Setup from the
File menu. When prompted to
select a serial (modem or printer)
port, leave both selections
unchecked. Click Yes and continue.
OMS will assess all the MIDI ports
attached to your computer and
build OMS instruments for the
ones it recognizes.
5 When the setup is complete you
should see a list of all your conTASCAM US-122 — 13
3 – Installation
nected MIDI ports. At the least you
should see two icons pertaining to
the US-122 specifically: the US-122
icon, and the US-122 MIDI port.
Once OMS setup is successfully completed, you can proceed with setting up
the US-122 with your chosen application. Please refer to the specific documentation for your application for more
details.
Tuning Your PC
A few words about computers and audio.
Much has been written about the best
ways to optimize your PC for handling
audio applications, and generally speaking, it’s a much deeper topic than we’ve
got space for in this manual. But here are
a few basic points to help you get the
best out of your audio programs:
Don’t run extraneous applications.
While it’s likely you’ll sometimes use
your computer for applications other
than audio, it’s strongly recommended
that you avoid running other applications
at the same time you’re running audio
programs. Processing digital audio
requires considerable overhead from
your computer, so don’t overtax the system by running other applications (especially graphics or internet tools) that can
steal those resources.
Certain devices, such as network cards
and WinModems, can cause conflicts
with the native handling of USB. Should
you experience such conflicts, the
offending device can usually be temporarily disabled in the Device Manager.
Refer to your Windows manual for
detailed instructions on how to resolve
conflicts.
Assuming your computer has an IDE
hard disk (most do), enabling Direct
Memory Addressing (DMA) on will
14 — TASCAM US-122
improve performance. Some programs
(such as Cubase VST) allow you to configure the DMA as enabled on install. If
you’ve not already done this, here’s how
to configure the DMA transfer mode: On
the Windows desktop, go to the Start
menu, Settings, Control Panel, System.
In the System Properties window, select
the Device Manager tab. Click on the
plus sign next to Disk Drives, and highlight the IDE disk listing, then click on
the Properties button. Check the DMA
box under Options. (see the illustration
below).
In addition, a number of simple hardware modifications and enhancements
can substantially improve your computer’s handling of audio, as well as your
track count and DSP capability:
Increase the amount of RAM in your
system. While most digital audio software applications will function according to the amount of RAM in their
3 – Installation
minimum system requirements, increasing your computer's RAM as much as
possible will markedly improve performance.
Consider the addition of a dedicated hard
disk for audio; preferably one with a
high spindle rate (over 7200 rpm and a
seek time of 8.5ms or less is recommended for most audio applications).
Using different drives for program and
audio data speeds up the seek time for
the audio track data. Note that simply
partitioning a large drive will not have
the same effect, as the computer will still
be accessing the same physical drive.
Consult your DAW application’s documentation for full details of recommended drive configurations, etc.
If you’re presently using a PCI-based
graphics card, and your motherboard has
an AGP slot, consider getting an AGPbased graphics card. This will decrease
traffic on the PCI bus and allow for faster
screen redraws.
Special Note: For even more detail on
optimizing your PC for audio, please
refer to the Computer Recording Support
areas on the TASCAM Web site for PC
Optimization documents.
Notes on USB interfacing
The USB protocol is an extremely versatile one, and much has been made of the
possibility of using multiple (over 100)
devices on a single bus. While this is certainly a possibility, we recommend using
as few other USB devices as possible in
a system equipped with the US-122. The
demands placed on the USB bus by passing multiple tracks of audio through it
are considerable, and adding additional
devices will risk reducing that bandwidth.
NOTE
The drivers of many other USB devices,
especially CD burners, scanners, printers,
and cameras, are written to poll the USB
bus on a regular basis (usually once every
millisecond). This can lead to dropouts,
clicks, pops and other artifacts in your
audio. We strongly suggest unplugging any
non-essential USB devices while recording
with the US-122. USB keyboards and mice
are the notable exceptions—in most cases
they are passive devices with very minor
bandwidth requirements.
Another well-documented advantage of
USB is the ability to “hot-plug” devices
(that is, plug them in and out without
powering the computer down). While
this applies to the US-122 as well, we
recommend against plugging or unplugging the unit while running your audio
application. Doing so can result in audible pops, or even hanging or crashing the
program.
You’ll find a listing of web links and
resources on hard disk recording on our
Web site at www.tascam.com.
TASCAM US-122 — 15
4 – Hooking up Audio and MIDI to the US-122
Hooking up audio
To monitor output from your computer,
connect the analog outputs of the US122 to your mixer, amplifier or powered
monitors. Output volume is controlled
by the LINE OUT level control.
To record audio from the US-122 into
your computer, simply connect a device
to the appropriate input. Microphones
should be plugged into the L and R MIC
IN XLR inputs.
NOTE
The US-122 can supply phantom power, so
if you’re using condenser microphones, you
will not need an external preamp or power
supply.
You can connect line-level sources (e.g.
keyboards and sound modules) into one
of the two LINE/GUITAR IN jacks (L or
R). If you wish to plug in a guitar, bass,
or other high-impedance source, simply
move the appropriate sliding switch to
the GUITAR position.
The inputs of the L and R channels are
available as either balanced XLR miclevel inputs, or balanced (1/4") line-level
inputs (unbalanced when used as guitar
inputs).
While it’s possible to use both mic and
line level analog inputs simultaneously
on either input, in actual practice this is
not recommended, as the signal level of
the inputs will be summed and very
likely interfere with each other.
Input level is regulated by the INPUT
level controls. The INPUT level controls
directly affect the input level at the A/D
converters on the US-122, so it’s advisable to use the SIGNAL and OVER indicators to help set your levels. Unlike
analog tape, when recording digital
audio, it’s important to keep your input
level close to 0dB, but never to exceed it.
If the input level is too high, the audio
signal will clip - not a desirable sound. If
the input level is too low, then the
dynamic range of which the US-122’s A/
D converters are capable is not being
used, and the signal will be closer to the
noise floor than it needs to be. In either
case, this cannot be fixed after the tracks
have been recorded, so it’s important to
make this adjustment carefully.
Hooking up MIDI
The MIDI IN and OUT jacks give you 16
channels of MIDI I/O. Simply connect
the MIDI OUT of your keyboard or
other device to the MIDI IN jack on the
US-122, and vice versa. If you’ve got a
MIDI sync box, you can use the MIDI
ports to send and receive MTC (MIDI
16 — TASCAM US-122
Time Code). This allows you to sync
tracks from your MTC-capable Portastudio, DTRS multitrack, or any other
machine that accepts timecode with your
digital audio software, transferring
tracks back and forth for editing and processing.
4 – Hooking up Audio and MIDI to the US-122
Using Direct Monitoring
In digital and computer audio, the
amount of time it takes for the input signal to pass through the circuitry of the
unit and the software processing and
arrive at the outputs will sometimes
result in an audible delay (this is commonly referred to as “audio latency”).
This added delay can be confusing when,
for example, you’re trying to overdub to
previously recorded tracks.
The direct monitor feature built into the
US-122 eliminates this problem by providing a way to listen to the signals
you’re recording directly, without any
computer processing delay. When the
DIRECT switch is on, the sound passed
through the USB and computer processing is not monitored, and the input signals are passed directly to the outputs for
monitoring.
You can use the DIRECT MONITOR
level control to set the level of the
directly monitored signal, and the
MONO switch to fold the two direct
monitor stereo channels into mono.
The LINE OUT and PHONES level controls directly affect the audio levels that
appear on the LINE OUTPUT and
PHONES jacks, respectively.
TASCAM US-122 — 17
5 – The US-122 Control Panel
Main Page
The following description applies to both
the Windows and Mac OS versions of
the US-122 Control Panel program. You
access the Control Panel at the following
locations:
• Mac OS (pre-X): Control Panel
• Mac OS X: /Applications/
In the Control Panel’s main page, you
can specify a number of the US-122
options.
• Windows: Control Panel
Buffer Size Adjustment
The US-122 driver temporarily stores
input and output audio samples in buffers. Larger buffers provide more safety
against other system activities interrupting the audio and producing clicks, pops
or other audible artifacts. Smaller buffers
provide lower latency when using the
computer to send input audio to output
channels in order to monitor the input.
The driver lets you select which buffer
size works best for your computer and
audio application.
NOTE
This adjustment does not affect the latency
of the US-122’s hardware input monitor,
which is always less than 1.5 ms.
18 — TASCAM US-122
To adjust the buffer size, run the US-122
Control Panel. The Latency slider lets
you change the buffer size from a minimum of 256 samples (128 samples on
the Mac) to a maximum of 2048 samples. All audio programs that use the US122 must quit before a new audio latency
setting takes effect.
This slider is marked Audio Safety
Buffer under OS X, and is calibrated in
milliseconds, rather than samples.
Using Cubase VST at 44.1 kHz sampling
rate, a 256 sample buffer size gives
approximately. 12 ms of monitoring
latency, while a 2048 sample buffer gives
approximately 43 ms latency.
5 – The US-122 Control Panel
Optimizing the USB
There is another option available which
allows you to disable the audio, and only
use the MIDI facilities of the US-122.
This is useful if you have a high volume
of MIDI data to be transmitted through
the interface and the timing is critical.
The Chromatic Tuner
Open the US-122’s control panel and
select the Tuner tab.
440 Hz for a middle “A” note, but you
can use the up/down arrows to change it
to a number between 430 and 450 Hz.
As you play, the detected note will be
displayed below the Tuning lights (A# or
E, for example). If the note is sharp, the
Sharp arrow and a Tuning light to the
right of 0 are bright red; if the note is
flat, the Flat arrow and a Tuning light to
the left of 0 are bright red.
In the Input section, select the US-122
input channel that you want to tune (L or
R).
Play a note and adjust the level for that
input until the signal is strong, but not
clipping.
The Level meter on the screen should display bright green segments without
lighting the top red segment.
If desired, you can change the Tuning
Standard in the Reference section. Normally, the Tuning Standard is set to
The numbers below the tuning lights
indicate how far out of tune the note is,
in cents (100 cents is one semitone).
When the note is in tune, the center ‘0’
light and both the Flat and Sharp arrows
are bright green.
NOTE
The chromatic tuner consumes some CPU
bandwidth in your system. Therefore,
when you finish using the tuner, we recommend that you either select another control panel tab or close the control panel.
TASCAM US-122 — 19
6 – Interfacing with your Audio Software
This section is intended to present the
basic concepts needed to interface the
US-122 with the bundled Cubasis VST
application.
This discussion, however, is not intended
to replace your software’s user’s manual.
If you’ve got questions specific to Cubasis, please refer to the Cubasis User
Manual for further detail.
Selecting the US-122 as your Audio Device
Audio Control Panel
In Cubasis, open the Audio Control
Panel. It’s located in the Audio pulldown menu, under System. Select the
ASIO Device pull-down menu, and select
ASIO US-122 Driver. If your software
In the Audio Control Panel, you can
select the number of audio channels you
wish to use, as well as the sampling rate,
Disk Cache settings, and MIDI to Audio
offset. See the Cubasis manual for more
information on these settings.
(for example, the bundled Cubasis) only
supports 16-bit recording, a 16-bit driver
has also been included.
ASIO Control Panel
In the Audio Control Panel, click on the
button marked ASIO Control Panel. The
US-122 Control Panel will appear. Refer
20 — TASCAM US-122
to "The US-122 Control Panel" on
page 18 for information on these settings.
6 – Interfacing with your Audio Software
Setting the Sample Rate and Bit Depth
The US-122 supports sample rates of
44.1kHz and 48kHz. In the Audio
Control Panel, select the pull-down
menu for Sample Rate and select either
44.1 kHz or 48 kHz.
The US-122 control protocol includes
two separate drivers for 16-bit or 24-bit
operation. This selection is made in the
Audio Control Panel (see the illustration).
NOTE
The bundled Cubasis VST supports only 16bit audio. If you want to record in 24-bit
mode you will need to upgrade to Cubase
VST or another application that supports
24-bit audio.
Input Enabling
You will need to enable the inputs on
Cubasis. Open the Audio Input window
(see the illustration here) and select one
mono track or a stereo pair.
Note that Cubasis supports only one
input for recording (though this can be a
mono or stereo track).
Then select the inputs on Cubasis’ internal mixer. If you’re recording a mono
input, left click on the input selector
above the channel strip and select the
desired input L or R. If you’re recording a
stereo track, the inputs will both be
selected automatically Verify that the
designated channels’ inputs (IN) are
selected, and the associated channels are
receiving signal.
TASCAM US-122 — 21
6 – Interfacing with your Audio Software
Highlight a track in the arrange window,
and that track will automatically be
record enabled.
Verify that the drop-in and drop-out features in Cubasis (on the transport bar)
are not enabled (or if so, that they are
enabled at the desired locate points).
Press the RECORD button on the screen.
Cubasis will issue a one or two bar
count-in (depending on what’s set in
Cubasis’ Metronome preferences
menu), then commence recording.
ASIO 2 Direct Monitoring
Some audio programs that can use ASIO
2 for audio input and output, such as
Steinberg’s Cubase VST, support a feature called “Direct Monitoring”. This
lets the program’s user interface control
hardware input-to-output monitoring
paths. Without Direct Monitoring
enabled, the latency is controlled by your
buffer size setting (see "The US-122
Control Panel" on page 18) and your
program can add effects such as reverb
and EQ in both the monitor and record
22 — TASCAM US-122
paths. With Direct Monitoring enabled
the latency is ultra-low (less than 1.5ms),
but you can’t hear effects in the monitor
path (although they will be recorded if
enabled).
To enable Direct Monitoring in Cubase
VST, open the Audio Control Panel. In
the Monitoring section of the window,
check ASIO Direct Monitor. (You also
need either Record Enable Type or Tape
Type monitoring enabled.)
7 – A Sample Recording Session in Cubasis
Okay. You’ve got your US-122 connected to your computer, and you’ve
loaded the drivers. Your audio software
is loaded, and you’re ready to cut some
tracks. Let’s walk through a typical
recording session with the US-122 and
Cubasis.
NOTE
This chapter is intended as a quick start
guide toward recording and mixing with
Steinberg Cubasis and the US-122. It is in no
way meant to be a comprehensive guide to
Cubasis. For full details on the Cubasis
application, please refer to the Steinberg
Cubasis manual on the US-122 CD. You’ll
find Windows and MacOS versions.
Setting Up
Before starting Cubasis, make sure that
the US-122 is connected to your computer’s USB port, and that the device has
been initialized.
NOTE
When launching or closing the application
(e.g. Cubasis VST), turn down the LINE
OUT and PHONES controls.
When Cubasis VST is running, do not
disconnect or connect the cables of the
US-122 or any other USB equipment.
If you launch Cubasis or another audio
program before the US-122 has been initialized, the software will not “see” the
US-122 and you will not be able to operate the software’s controls, perform
MIDI I/O, or record or play back audio.
Likewise, many software applications
don’t expect that devices will be
removed while the program is running.
So make sure to exit your audio application programs before disconnecting the
US-122.
cation by double- clicking on its icon on
the screen. Open the Audio Control
Panel and select the US-122 as your
audio device (see “Selecting the US-122
as your audio device” in previous chapter.) If you don’t see the US-122 listed in
your Audio Control Panel, make sure it’s
been installed correctly by referring to
the section on Troubleshooting.
Select the ASIO Control Panel, and
choose a sample Rate (44.1 kHz or
48 kHz). Your Audio Clock Source
should be set to internal, unless you’re
using an S/PDIF digital input from
another audio interface, or otherwise
slaving Cubasis to an external source.
It is also advisable, as with all audio
devices, that you turn your amplifier or
powered monitors off until the program
is up and running, to avoid audio spikes.
Select the Disk Caching Scheme. Option
1 is Virtual Tape Recorder, used primarily when your tracks are linear and of
longer duration. Option 2 corresponds to
Audio Sequencer, and is more applicable
when using loops and shorter segments
of audio. Option 3, Tape Recorder/
Sequencer, is your best choice when
working with a combination of short
audio clips and longer linear tracks. (For
further information on Disk Caching,
please refer to the Cubasis VST manual.)
Once you are certain that the US-122 is
up and running, start the Cubasis appli-
If you’re using the US-122’s internal
MIDI interface, you’ll need to enable it
TASCAM US-122 — 23
7 – A Sample Recording Session in Cubasis
in the Options/MIDI Setup menu. For
more information on setting up VST’s
very sophisticated MIDI functions,
please refer to the VST manual.
Connect your audio sources to the US122. Connect an analog source via the
XLR or 1/4” inputs.
Recording Your Tracks
In Cubasis, choose the input(s) you wish
to enable on the US-122. In the Audio
menu, select Input, and click on the input
pair on the US-122. The green Input
icons will light in VST’s Input window
for active inputs.
Select the Audio track(s) to record to by
highlighting that track in the Arrange
window.
NOTE
If this is the first track recorded in a given
project, Cubasis will probably respond with
a dialog box asking you for a path to save
the audio files. It is highly recommended
that you create a unique folder for each
song or project, as audio.WAV files can
accumulate very quickly on your hard disk,
and keeping them organized can get pretty
complicated.
Once you’ve enabled your tracks, you’ll
want to monitor audio through them to
set your levels. Open Cubasis’ Monitor
Mixer (Audio/Monitor menu), and make
certain you’ve assigned your channel
inputs and enabled them. You should see
audio signal on those channels’ meters
(assuming you’re sending signal from
your source).
If your input signal is too high, the OL
LED will glow steadily red. If the signal
level is too low, you might only see a
24 — TASCAM US-122
flicker, or nothing at all, on the SIGNAL
LED.
You can regulate the input level of the
input source in several ways. First, make
sure that the signal you’re sending to the
US-122 is within a reasonable range - it
should illuminate the green SIGNAL
LED, but the red OL LED should only
flicker occasionally. You can then fine
adjust the level with the input level controls for the selected channel(s).
On Cubasis’ Transport Bar, you can
enable the recording to drop in or out of
Record based on the locate points you’ve
set. If you do not wish to enable this
function, make certain the buttons for
drop in and drop out are not enabled.
Press the RECORD button on the screen.
If you’ve got the metronome’s Count-off
function enabled, you’ll hear a one or
two bar countoff, and then the program
will enter Record mode. It will stop
recording when it reaches the drop out
point, or if none is enabled, when you hit
the STOP button.
Cubasis will now create a display of the
track(s) you’ve just recorded. This can
take a few seconds to a few minutes,
depending on how long the recorded
tracks are and how many there are.
You’ll then see the tracks appear in your
arrange window.
7 – A Sample Recording Session in Cubasis
Overdubbing
To overdub more tracks, simply select
and enable additional tracks as you did
the previous ones, and repeat the procedure. You can monitor the tracks you’ve
already recorded via the US-122’s outputs, while recording additional tracks
into Cubasis via the US-122’s inputs. Be
sure to assign each track to its own channel in the program’s internal mixer. For
more information on Cubasis’ mixer
functions, including groups and output
assigns, please refer to the Cubasis manual.
When overdubbing, you can also select
the Direct Monitor mode by using the
DIRECT MONITOR switch on the US122.
TASCAM US-122 — 25
8 – Other Applications
It’s important to note that the US-122 is
fully functional as a 16- and 24-bit audio
interface and 16 channel MIDI interface
with virtually all Windows and MacOS
compatible applications. Since the US428’s release, TASCAM has been working together with developers throughout
the professional audio industry and
beyond to create support for new applications; much of this research will also
benefit users of the US-122. Since the
development of new support for the US-
428 and US-122 is ongoing and expanding, we recommend you visit the Computer Recording area of the TASCAM
Web site (www.tascam.com) for current
news and information, and check out the
online users’ forum as well.
These individual documents are also
available on the CD-ROM, as well as on
our Web site. As new application support
becomes available, we will be posting
the information for free download.
Setting up Sound Manager Support – pre-Mac OS X
Use the Sound Manager with ProTools
Free and other Mac OS applications.
The Macintosh Sound Manager is a standard 2-channel software interface for
playing and recording sound on a Mac.
The audio inputs and outputs (speakers)
that are built into any Macintosh use the
Sound Manager interface, and essen-
tially every Mac application that uses
sound supports it. This includes not only
audio recording and editing programs,
but also games, video editors, web
browsers, MP3 players, and even Macintosh beeps and system sounds. Even
some audio-oriented programs only support Sound Manager I/O, such as Digidesign’s Pro Tools Free. The Sound
Manager input and output sources are
selected by control panels. The control
panels used are different in MacOS 8.6
and 9.0, and are explained separately
below.
MacOS 9.0
The Sound control panel in MacOS 9.0
is used to select Sound Manager inputs
and outputs. With this control panel
active, click on the left of the window
where it says Output to display the possible Sound Manager output devices. On
the right, click on US-122 to select it as
the Sound Manager output. Use the output volume slider to mute or enable
26 — TASCAM US-122
sound output. Moving the volume slider
to the right or clicking on it will send a
system beep out of the US-122 outputs.
When you click Input on the left, the
available input devices appear on the
right. Click on US-122 to select it as the
Sound Manager input device. Below it is
Input Source”: select L:R.
8 – Other Applications
When an application is using the Sound
Manager inputs, this Input Source field
is grayed out, displaying the current
inputs but preventing you from changing
them here. You can still change the input
pair without quitting your program, however. To do this, bring up the US-122
control panel and go to the System tab.
You will find a selection there labeled
Sound Manager Input. Here you can
change the input pair at any time, even
when an audio program is active. The
grayed out Input Source field in the
Sound control panel Input section will
display any input changes you make.
MacOS 8.6
The Monitors and Sound control panel
in MacOS 8.6 has a Sound section. It
displays the currently selected Sound
Manager output and lets you select
among several Built In input sources. It
cannot be used to select the US-122 as
the Sound Manger input or output.
The Sound control panel has a selection
line at the top to let you choose among
Alert Sound, Sound In, Sound Out, and
Volume windows.
NOTE
If your Sound control panel does not have
all these options, you should use the alternative Sound control panel found in Apple
Extras/Sound Control Panel.) With Output
selected, you can choose US-122 as the
Sound Manager output. Since the US-122
has its own output volume control, its
slider under Volume in this control panel is
only used to enable or mute the US-122
output.
Under Sound In you can select the US122 instead of the Mac’s Built-in
sources. You can also do this under the
US-122 control panel’s System tab.
There you will find a field labeled Sound
Manager Input. You can change this setting at any time, even while a program is
using the Sound Manager I/O.
TASCAM US-122 — 27
8 – Other Applications
Setting audio I/O options under OS X (10.2.3 and above)
In Mac OS X, you can set the preferred
audio input and output device using the
Sound Preference Pane, or very often
you can select the audio input and output
devices from the applications themselves.
To use the System Preferences:
From the Apple menu, select System
Preferences and click the Sound icon.
Click the Input tab and choose the
TASCAM US-122 as the input device.
Click the Output tab and choose the
TASCAM US-122 as the output device.
You may choose to keep alerts and sound
effects played through the Built-in audio
controller.
Setting sampling frequency and bit length under OS X (10.2.3 and
above)
Launch the Audio and MIDI Setup application. Click the Audio tab.
You can also set the default input and
output audio devices in this application.
Make sure that the selected Audio device
on the left side of the screen shows the
TASCAM US-122.
Set the Current format of either the input
or the output section to the sampling frequency and bit length you want to use.
Note that some applications allow you to
override this setting.
28 — TASCAM US-122
This program also allows you to set the
input and output gain of the US-122
audio I/O.
9 – Technical Support
Troubleshooting (Windows)
When installing the US-122 for the first
time, if you experience any unusual
behavior, here are some things to check:
Audio Drivers In Control Panel /
System / Device Manager (Win98SE/
ME) or Control Panel / System /
Hardware / Device Manager (Win2000/
XP), find the Audio control panel. It’s
called Sound, Video And Game
Controllers in Win98SE, or Sound &
Multimedia in Windows 98/ME and
Windows 2000/XP. You should see two
entries for the US-122:
• TASCAM US-122
• US-122 WDM Interface
Under Recording, US-122 L:R should
appear in the drop down menu
MIDI Drivers: In Control Panel /
Multimedia, select the MIDI tab. When
Single Instrument is selected, you should
see:
• US-122
In Control Panel / Multimedia, select the
Devices tab. Under Audio Devices, you
should see:
• Audio for US-122
Under Midi Devices And Instruments
you should see:
• MIDI for US-122.
In Control Panel / Multimedia, select the
Audio tab.
Expand by clicking on the plus (+) sign
and you should see:
Under Playback, US-122 Out should
appear in the drop down menu
• US-122 Port 1
Port 1 corresponds to the US-122’s
MIDI I/O ports.
Tech Support Contacts
If you’re unable to solve an installation
problem, you’ve got several options for
help.
users of a variety of software platforms,
so someone’s likely to be familiar with
your program of choice.
First, we recommend you visit our Web
site at www.tascam.com, and check for
any updates, FAQ or support news.
Also, since many of the situations you’re
likely to encounter will be related to the
software you’re using, it’s a good idea to
check not only our Web site, but the Web
sites and resources of the software program’s manufacturer as well.
Also on our Web site, you’ll find our
always lively Online User Forums.
TASCAM Product Specialists are on line
to field questions, but don’t be surprised
if your question is answered by another
user. The BBS is also a forum for discussion, comments and ideas on the US122, US-224 and US-428. You’ll find
You can also contact our telephone support. Outside the US, please see the Contact page of our Web site for worldwide
contact information.
TASCAM US-122 — 29
9 – Technical Support
Before Contacting Us
Before contacting us with your query,
please have the following information
available:
• Type of Computer (PC or Mac), processor type and speed, and (if possible) motherboard?
• Type of USB Host controller (see the
US-122 manual for details)?
• Installed RAM, type of hard drive(s)?
• Type of graphic card?
• What OS are you running?
• If running Windows98SE, have you
installed the HotFix?
• What other hardware is installed in
this computer? SoundBlaster or other
audio cards? Other USB devices/hubs?
30 — TASCAM US-122
Scanner, CD burners, WinModem,
etc.?
• What application(s) are you running?
• If running the bundled Cubasis application, is/was another version of
Cubase or Cubasis installed?
• What plug-ins do you have installed?
Please provide us with full details of
your problem, including:
• Any errors or oddities encountered
during setup and installation.
• Items listed above that do not appear.
• Any error messages encountered.
Please try to copy or quote them in
full.
• Any behavior that may cause errors,
especially repeatable ones.
9 – Technical Support
Troubleshooting FAQ
While this manual contains some basic
questions, you will find a much more
detailed FAQ document on the
TASCAM Web site.
should light to indicate the presence of
analog audio signal at the inputs. Make
sure your monitor or headphone levels
are turned up, and connected correctly.
Q. I don’t see the US-122 in
Cubasis’ Audio Control Panel.
A. Check to see if the US-122 is
Q. My audio is distorted.
A. Check to see if the signal is overload-
installed correctly within your OS. In
Windows, go to the Device Manager
(My Computer/Control Panel/Setup),
and click on the Sound, video and Game
controllers tab to make sure the US-122
is installed and operating correctly. Also
check to see that your USB cable is connected securely, and that the unit is powered up before booting Cubasis.
Q. I’ve connected audio to the
US-122, but can’t hear
anything.
A. Make sure your input levels are suffi-
ing. The red OL indicators should only
occasionally flicker. In the case of a digital input, try reducing the output level of
the source.
Q. I can see a response on
screen from my DAW to the US122, but I don’t hear any audio.
A. Make sure your audio signal path is
correctly routed. Make sure the channels
you’re trying to monitor are not in Input
mode. Make sure your output level is
turned up. Make sure that the US-122
ASIO driver (16 or 24 bit) is selected
cient. The green SIGNAL indicators
TASCAM US-122 — 31
10 – Specifications
Audio specifications
Nominal input levels
MIC L and R (XLR balanced)
–54 dBu (TRIM=max) to –16 dBu
(TRIM=min)
LINE/GUITAR input in LINE position –34 dBu (TRIM=max) to +4 dBu
(1/4" jack, balanced)
(TRIM=min)
LINE/GUITAR input in GUITAR posi- –42.2 dBV (TRIM=max) to –4.22 dBV
tion (1/4" jack, unbalanced)
(TRIM=min)
INSERT returns
–10 dBV
Maximum input levels
MIC L and R (XLR balanced)
0 dBu
LINE/GUITAR input in LINE position +20 dBu
(1/4" jack, balanced)
LINE/GUITAR input in GUITAR posi- +11.8 dBV
tion (1/4" jack, unbalanced)
INSERT returns
+6 dBV
Input impedance
MIC inputs (XLR balanced)
2.2 kΩ
LINE/GUITAR input in LINE position 22 kΩ
(1/4" jack, balanced)
LINE/GUITAR input in GUITAR posi- 910 kΩ
tion (1/4" jack, unbalanced)
INSERT returns
100 kΩ
Nominal output levels
LINE OUTPUTs (unbalanced RCA)
–10 dBV
INSERT sends
–10 dBV
Maximum output levels
LINE OUTPUTs (unbalanced RCA)
+6 dBV
INSERT sends
+6 dBV
PHONES (1/4" stereo jack)
+4.2 dBV (100 kΩ), phones level at –3 dB
32 — TASCAM US-122
10 – Specifications
Maximum output power
PHONES (1/4" stereo jack)
10 mW + 10 mW (40 Ω), phones level at
–3 dB
Audio performance
Signal-to-noise ratio and dynamic range
MIC IN to INSERT send
>100 dB (A weighting, TRIM=min, input
impedance at 150 Ω)
LINE IN to INSERT send
>100 dB (A weighting, TRIM=min, input
impedance at 150 Ω)
LINE IN (through ADC and DAC) to
LINE OUT
> 93 dB (A weighting, TRIM=min, input
impedance at 150 Ω, LINE OUT=–3 dB)
LINE IN (through direct monitor) to
LINE OUT
> 97 dB (A weighting, TRIM=min, input
impedance at 150 Ω, LINE OUT=–3 dB)
GUITAR IN to INSERT send
> 98 dB (A weighting, TRIM=min, output
impedance at 600 Ω)
LINE OUT (from digital source)
>99 dB (A weighting, LINE OUT=–3 dB)
Total harmonic distortion (THD)
MIC IN to INSERT send
<0.007% (TRIM=min, 1 kHz, +20 dBu
input)
LINE IN to INSERT send
<0.007% (TRIM=min, 1 kHz, +20 dBu
input)
LINE IN (through ADC and DAC) to
LINE OUT
<0.009%, +20 dBu input, LINE OUT=–
3 dB, phones output at minimum)
LINE IN (through direct monitor) to
LINE OUT
<0.009%, +20 dBu input, LINE OUT=–
3 dB, phones output at minimum)
GUITAR IN to INSERT send
<0.05% (TRIM=min, 1 kHz, –4.2 dBV
input)
TASCAM US-122 — 33
10 – Specifications
Other characteristics
Digital audio
A/D conversion
24-bit, 17 samples delay
D/A conversion
24-bit, 15.4 samples delay
Sampling frequencies
44.1 kHz, 48 kHz (software selectable)
MIDI
MIDI IN and MIDI OUT ports
Conform to MIDI standards
Host computer compatibility
Windows
Windows 98SE, Windows Me, Windows
2000, Windows XP
Macintosh
Mac OS 8.8 and above (pre-OS X) or OS
10.2.3 and above (OS X)
Operating system
Communication
Audio/MIDI interface
protocols
USB 1.1
Windows
ASIO, MME, GSIF
Macintosh
ASIO, Sound Manager, CoreAudio and
CoreMIDI (OS X), OMS, Free MIDI
Bundled software
Cubasis (not for OS X), Giga24 (Windows
only)
Physical characteristics
Dimensions
External dimensions (w x h x d)
149 x 60 x 196 (mm), 5.9 x 2.4 x 7.7 ()in)
Weight
925 g (2 lb)
Supplied by USB connection
5 V, maximum current 500 mA
Power
34 — TASCAM US-122
10 – Specifications
Dimensional drawing
60mm (2.4")
196mm (7.7")
40mm (1.6")
2mm (0.1")
145mm (5.7")
149mm (5.9")
TASCAM US-122 — 35
»
US-122
TEAC CORPORATION
Phone: +81-422-52-5082
3-7-3, Nakacho, Musashino-shi, Tokyo 180-8550, Japan
www.tascam.com
TEAC AMERICA, INC.
Phone: +1-323-726-0303
7733 Telegraph Road, Montebello, California 90640
www.tascam.com
TEAC CANADA LTD.
Phone: +1905-890-8008 Facsimile: +1905-890-9888
5939 Wallace Street, Mississauga, Ontario L4Z 1Z8, Canada
www.tascam.com
TEAC MEXICO, S.A. De C.V
Phone: +52-555-581-5500
Campesinos No. 184, Colonia Granjes Esmeralda, Delegaacion Iztapalapa CP 09810, Mexico DF
www.tascam.com
TEAC UK LIMITED
Phone: +44-1923-438880
5 Marlin House, Croxley Business Park, Watford, Hertfordshire. WD1 8TE, U.K.
www.tascam.co.uk
TEAC DEUTSCHLAND GmbH
Phone: +49-611-71580
Bahnstrasse 12, 65205 Wiesbaden-Erbenheim, Germany
www.tascam.de
TEAC FRANCE S. A.
Phone: +33-1-42-37-01-02
17 Rue Alexis-de-Tocqueville, CE 005 92182 Antony Cedex, France
www.tascam-europe.com
TEAC AUSTRALIA PTY.,LTD. A.B.N. 80 005 408 462
Phone: +61-3-9672-2400 Facsimile: +61-3-9672-2249
280 William Street, Port Melbourne, Victoria 3000, Australia
www.tascam.com.au
TEAC ITALIANA S.p.A.
Phone: +39-02-66010500
www.teac.it
Printed in Taiwan