1
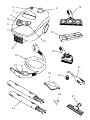
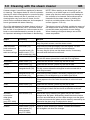
STC 2000
STC 3000
Instruction manual
3
14
2
1
4
6
5
7
15
9
8
16
10
12
11
17
19
18
20
13
21
We congratulate you on your new ALTO Steam Cleaner
We are confident that the new steam cleaner of ALTO will live up to your expectations
of modern, quick and efficient cleaning.
You have now got a cleaning device, which in many ways will facilitate your future
cleaning tasks and make them more efficient. 140°C hot steam is an efficient solution,
which does not only clean but also disinfects. Many tasks, which were previously hard
and time-consuming, can now be solved in a few minutes - and with a far better result.
With this instruction manual we wish to give you the basic knowledge to enable you to:
l Use the steam cleaner in a safe and adequate way (section 1)
l Operate the steam cleaner and the accessories appropriately and reasonably
(section 2)
l Clean with the steam cleaner (section 3)
l Maintain the steam cleaner (section 4)
l Locate and correct a fault which may occur when using the steam cleaner
(section 5) and finally
l Gain knowledge of the 2 years’ warranty policy of ALTO.
Section 3 of the instruction manual dealing with fields of application is only meant as
an appetizer. Therefore you should read the instruction manual carefully through
before you start cleaning and you will soon discover that places which were hard to
clean, can now be cleaned in a twinkling. Many possibilities of quick and efficient
cleaning are lying ahead.
If - contrary to expectation - problems with your steam cleaner should arise, which
cannot be remedied by means of the information in section 5, the whole service organisation of ALTO will be ready to help you.
ALTO is a world-wide concern with a comprehensive knowledge within development
and production of environmentally friendly cleaning solutions. Our product range comprises cleaning solutions for selected customer groups - from machines for domestic
use to big industrial cleaning systems.
The expertise of ALTO is cleaning with focus on the needs of the customers. The key
word is confidence - we name it Total Cleaning ConfidenceTM. We want you, as a
customer, to feel confident that the cleaning equipment you get from us, is the most
efficient equipment available and that it fulfil all of your expectations.
Best regards
ALTO Danmark A/S
2
Contents
1.0
2.0
3.0
4.0
5.0
6.0
Fields of application GB
Safety instructions and warnings ............
Operating instructions ..............................
Cleaning with the steam cleaner ..............
Maintenance ................................................
Trouble-shooting and correction .............
Warranty ......................................................
4
5
7
8
9
9
The applications for this product are domestic
cleaning jobs:
Tiles, floors, bathroom, kitchen, walls, ceilings,
etc.
NOTE!
Machine and accessories MUST be stored
in a frost-free room.
FROST DAMAGE IS NOT COVERED
BY THE WARRNTY!
Survey of models ( type designation: P892)
(See drawing on the inside of the back cover)
1.
2.
3.
4.
5.
6.
7.
8.
9.
10.
11.
12.
13.
14.
15.
16.
17.
18.
19.
20.
21.
Carrying handle
Water filling cap
Steam regulation knob
Start/stop button
Control light for start of cleaning (green)
Start/stop button for steam
Warning lamp for water filling (orange)
Connection for high pressure hose
Pressure gauge
Hose with handle
Release
Lock for release
2 extensions
Floor brush
Carpet adapter
Triangular brush
Steam nozzle
Small round brush for steam nozzle
Cloth
Funnel for water filling
Glass cleaner
Steam iron
STC 2000
X
X
X
X
X
X
X
X
X
X
X
X
X
X
X
X
X
X
X
*)
*)
STC 3000
X
X
X
X
X
X
X
X
X
X
X
X
X
X
X
X
X
X
X
X
X
*)
*) Optional equipment. Contact your ALTO distributor for further information.
Technical data
Model
Power
Voltage
Power consumption
Tank capacity
Steam pressure
Measurements (HxWxL)
Weight
Electric cable, length
Hose, length
Boiler, aluminium
Boiler, stainless steel
watt
volt
amp.
l
bar
mm
kg
m
m
STC 2000
400
230
6.1
2
4
280 x 265 x 445
5.4
7.5
2.7
X
STC 3000
2200
230
9.6
3
4.5
280 x 265 x 445
5.7
7.5
2.7
X
We reserve the right to alterations.
3
1.0 Safety precautions and warnings
GB
Before starting up your steam cleaner, we advise you to carefully read through this section (1.0) and section
2.0. Follow all instructions to minimise the risk of injuries when using the machine.
Prior to operation
Before starting up your steam cleaner please check it
carefully for any defects. If you find any, do not start
up the cleaner and contact your ALTO distributor.
Especially check:
l The insulation of the electric cable should be
faultless and without any cracks. If the electric
cable is damaged, it should be replaced by an
authorized ALTO distributor.
l Check that the voltage stated on the model tag of
the machine corresponds to your mains voltage.
l Check that the electric fuse exceeds the power
consumption stated on the model tag of the machine.
Mains power connection
The following should be observed when connecting
the steam cleaner to the electric installation:
l The electric installation shall be made by a
certified electrician.
l It is strongly recommended that the electric
supply to this machine should include a residual
current device.
l Do not touch plug and socket with wet hands.
Wiring instruction for UK
1. This unit must be earthed. The green or green and
yellow wire must be connected to the earth terminal
marked E or by the earth symbol.
2. The brown or red wire should be connected to the
live terminal marked L.
3. The blue or black wire should be connected to
neutral terminal marked N.
Fuse rating: This unit should be protected by a 13
amp fuse to BS1362.
Should you have any doubts please contact our
Customer Support department on 01768 868995 or
your nearest ALTO distributor.
Extension cable
If you want to apply an extension cable when
operating your steam cleaner, make sure that it is
strong enough to carry the power consumption of
the steam cleaner (see model tag and contact a
certified electrician).
Always make sure that the extension cable is intact
before operation.
Application
l The steam cleaner is only intended for domestic
use.
4
l The machine must only be operated by persons,
who have read and understood this instruction
manual.
l WARNING! Never direct the steam jet towards
persons or animals. This may cause serious burns.
l WARNING! Never use the steam cleaner on
electrical installations (plugs, lamps or the like)
or the machine itself.
l WARNING! If the steam cleaner is used on
electrical appliances, these should be
disconnected from the power supply, and the
cleaning should be made according to the
instructions of the manufacturer. Never reconnect electrical appliances until they are
completely dry.
l WARNING! Never try to clean clothes or
footwear on yourself or other persons.
l WARNING! Children and steam may be a
dangerous combination. Therefore never leave
the steam cleaner without supervision if
connected or with steam pressure.
l WARNING! Be careful if you want to empty the
steam cleaner of hot water. The water may be close
to boiling point and there is a risk of steam leak.
l Avoid damaging the electric cable such as
running over by a car, squeezing, pulling,
knotting/kinking and keep it away from sharp or
hot objects.
l Do not use the machine if the electric cable or
other important parts of the equipment are
damaged - e.g. safety devices, hoses, handle or
cabinet.
l The machine should not be covered during
operation.
General
l Steam cleaning of asbestos-containing and other
dangerous or poisonous materials is not allowed.
l Always unplug the machine before cleaning the
machine.
l Never use the machine in an environment where
there could be a danger of explosion.
l Of safety reasons only use original ALTO
accessories and spare parts.
Safety devices on the machine
l The release (11) is fitted with a lock (12). When the
lock is activated, the release cannot be controlled.
l The socket for water filling is fitted with a child
resistant screw cap. Press the screw cap down
while unscrewing it.
2.0 Operating instructions
2.1 Operation and control facilities
l Steam regulation knob (3). Infinitely variable
adjustment. Turning to (+) higher steam pressure, turning to (-) lower steam pressure.
l Start/stop button for steam cleaner (4): Button
with orange lamp turns on the steam cleaner
(orange light on). Button without light turns off
the steam cleaner (orange light out).
l Control light for start of cleaning (5): Green
lamp. Light turns on when the cleaner is ready
for use.
l Start/stop button for steam (6): Button with
orange lamp allows steam for the spray handle
(orange light on). Button without light shuts off
steam (orange light out).
l Control lamp for water filling (7): Orange lamp
which turns on when a re-fill of water is required.
l Pressure gauge (9) (only STC 3000): Shows the
steam pressure.
l Release with lock (11). When the release is
activated, steam is coming out. The release
features a lock, which prevents activation of the
release.
2.2 Water filling
Only use water without impurities. Cold as well as
hot water may be used. The steam cleaner must be
in horizontal position during the filling.
WARNING! The steam cleaner must not be connected to the power supply during the filling of water.
Water filling - cold machine
1. Unscrew the water filling cap (2) by pressing the
cap while turning it round.
2. Place the enclosed funnel (20) in the filler hole.
3. Fill up with water as occasion requires.
However, do not overfill the boiler. NOTE: The
water level may fall due to air in the boiler, but
do not replenish.
4. Screw the cap on again by pressing it down
while turning it round.
Water filling - hot machine
WARNING! If the steam cleaner is hot, it is very
important to follow the procedure below:
1. Disconnect the steam cleaner on the start/stop
button (4).
2. Activate the trigger of the spray handle, until no
more steam comes out (the start button for
steam (6) must be activated).
3. Disconnect the plug from the socket.
4. Carefully loosen the water filler cap (2), as surplus steam may come out. Do not remove the
cap until no more steam oozes out.
GB
5. Wait at least 15 minutes before replenishing with
water. If you add water earlier, it may strike back
when hitting the hot boiler.
6. Follow items 2-4 in section 2.2 Water filling cold machine.
2.3 Attachment of hose
1. Open the flap for the hose connector (8) and
insert the hose.
Make sure that the split pin comes into place.
You will hear a small click.
2. Attach the required tool (see section 2.7).
2.4 Mains power connection
1. Uncoil the cable completely and plug it in.
2.5 Starting up
1. Check that the steam cleaner is in horizontal
position as the water in the boiler must be in
contact with the heating element.
2. Activate the start/stop button (4). An orange light
will turn on indicating that the steam cleaner has
been started and is heating the water.
3. Wait until the steam cleaner has heated the
water completely. When the green lamp (5)
(orange light) turns on, the steam cleaner is
ready for use.
When the boiler is full, it will take approximately
10-15 minutes until the water has in the boiler
has been heated. The heating time will be
shorter if you use hot water or if the boiler is not
completely full.
4. If required empty the hose of condensed water
in the following way:
4.1 Adjust the steam regulation knob (3) to max.
steam (+).
4.2 Press the start/stop button for steam (6).
The steam supply is connected when the
orange light in the button turns on.
4.3 Activate the trigger of the spray handle and
hold the nozzle against a cloth to catch any
condensed water.
WARNING! Do not get too close to the steam jet
as you may scald yourself.
It may be necessary to empty the hose of
condensed water when the cleaner is started up
or after a long break.
5. Note! Always make a test on a hidden spot to
find out whether cleaning with the steam
cleaner discolours or causes any damage to
the surface, which is to be cleaned. If you are
in doubt, ask the distributor of the product in
question.
5
Operating Instructions
2.6 End of operation and storage
After use the steam cleaner should be stopped in
the following way:
1. Press the stop button for steam supply (6). The
orange light will turn out.
2. Press the stop button for the steam cleaner (the
orange light in the button will turn off) and
disconnect the plug from the socket.
3. Detach the hose (10).
Now the steam cleaner can be placed in the store
room.
2.7 Accessories
Mounting of accessories. Push the chosen
accessory on to the extension or the spray handle
until the button (A) falls into place.
(B)
GB
(B)
When the adapter is used with cloth, the dirt is
collected in the floor brush which will have to be
cleaned at intervals.
2.7.3 Triangular brush (16)
The triangular brush used for cleaning of small
surfaces and corners is mounted directly on the
spray handle or together with one or two extensions
according to the character of the task.
By pushing the check pawl (A) forward and backward you may choose between a locked or a
movable position of the brush.
The enclosed cloth can be mounted by tipping up
the clips (B) on the upper side of the brush.
(A)
(A)
NOTE: Mounting or dismounting of accessories
may be a little more tricky when the steam cleaner
is hot as the materials will naturally expand a little
when hot.
2.7.1 Floor brush (14)
The floor brush used for the cleaning of floors and
other big surfaces is mounted with one or two
extensions on the spray handle. By pushing the
check pawl (A) forward and backward you may
choose between a locked or a movable position of
the brush.
(A)
(B)
(B)
2.7.4 Steam nozzle (17) and small brush (18)
WARNING! The steam nozzle may become very
hot. The steam nozzle is used for cleaning of
stubborn stains or places hard to get at, as for
instance chinks or the like. It is mounted on the
spray handle or with one or two extensions
according to the character of the task. For use with
the steam nozzle a small round brush (18) is
included, which is used if the cleaning task requires
brushing during steam affection.
(A)
2.7.2 Carpet adapter
The carpet adapter is used for the protection of
sensitive surfaces against the bristles of the floor
brush. It is slid over the bristles of the floor brush.
The adapter can be used with the enclosed cloth
(19), which is secured by the clips (B) on the upper
side of the floor brush.
6
(A)
2.7.5 Glass cleaner (21) (only STC 3000)
The glass cleaner is intended for the cleaning of
windows, mirrors and other smooth surfaces. The
glass cleaner can be mounted directly on the spray
handle or with one or two extensions as occasion
requires.
When the rubber scraper is dismounted, the nozzle
can be used for application of steam. For light steam
cleaning of textiles as an example.
3.0 Cleaning with the steam cleaner
GB
A steam cleaner is an efficient appliance for domestic cleaning. The diagram below is a list of inspiration
showing for which cleaning tasks in normal everyday
life the steam cleaner will be of practical use. As
cleaning tasks vary from home to home, the list
should not be considered adequate, but examples of
how to get started with steam cleaning.
NOTE ! When starting a new cleaning job, you
should try on a hidden spot as in some cases the
steam may discolour and cause minor damage to
the surfaces to be cleaned. Soft surfaces can be
cleaned with the steam cleaner by holding the
brush at a suitable distance from the sensitive
surface (approx. 5-10 cm).
One of the advantages of a steam cleaner is that no
chemicals are used as the 140°C hot steam looses
filth and dirt. It is collected in a cloth mounted on the
brush or removed afterwards by means of a cloth.
An important advantage is that steam is disinfecting.
The steam volume is infinitely variable by means of
the steam button at top of the machine (3). Always
use as little steam as possible to save energy.
When cleaning soft objects always use as little
steam as possible.
Object
Accessory
Method
Exhaust hood
Triangular brush (16)
Pull the brush mounted with a cloth over the even surfaces. For
very dirty steel screens, use the steam nozzle.
Tiles and other
hard surfaces as
for instance
walls and ceilings
Floor brush (14)
or
triangular brush (16)
(steam nozzle (17) +
small round brush (18))
With cloth mounted pull slightly over the surface. For soft
surfaces fold the cloth to reduce the heat affection.
For very dirty tile joints use the steam nozzle, if necessary
mounted with the small round brush.
Freezer
Steam nozzle (17)
Defrosting. Let the steam under the ice by making a hole in the
ice with the steam jet and the ice will fall off in big flakes.
Wash basin
Steam nozzle (17)
Flush with the nozzle. Collect any dirt with a cloth.
Cooker
Steam nozzle (17)
Flush with the nozzle. Collect any dirt with a cloth.
Refrigerator
Steam nozzle (17)
Triangular brush (16)
Flush with the nozzle. Collect any dirt with a cloth.
For big, even surfaces the triangular brush mounted with a
cloth may be used.
Furniture
Triangular brush (16)
Floor brush (14)
With cloth mounted (folded if necessary) slightly pull over the
upholstery. Do not forget to try on a hidden spot at first.
Radiator
Steam nozzle (17)
The concentrated steam jet will remove and bind the dust.
Place papers or the like under the radiator to collect dirt and
water.
Toilet
Steam nozzle (17)
Flush with the nozzle. Collect any dirt with a cloth.
Carpets
Floor brush (14)
With carpet adapter (15) mounted, pull slightly over the carpet.
Do not forget to clean the floor brush at intervals as dirt will
collect.
Windows,
mirrors and
other glass
surfaces
(only STC 3000)
Glass cleaner (21)
Start at the top by steaming the glass and pull the rubber
scraper over the glass. Alternatively steam the whole window
at a time and afterwards pull the rubber scraper over the glass.
In cold environments the glass must be carefully warmed up as
otherwise the glass may be subjected to stress.
Blinds
Triangular brush (16)
Mounted with a cloth. Close the blinds and slightly pull over it.
Clothes
Steam nozzle (17) or
glass cleaner (21)
without scraper
(only STC 3000)
Used for steam cleaning of clothes. Creases and wrinkles
will straighten out when on a hanger.
7
4.0 Maintenance
l Always remove the plug from the socket before
any maintenance of the steam cleaner.
l The electrical components of the cleaner must
only be checked by an authorised service shop.
l Check the electric cable for damages or aging at
regular intervals. If the condition of the machine
is not all right, it must not be used.
l Never empty the machine as long as the water in
the boiler is still hot.
Cleaning of the machine
Clean the machine with a damp cloth.
Cleaning of boiler
WARNING! Always clean the machine when it is
cold and NOT connected to the power supply.
The boiler should be descaled each 4-6 weeks
dependent on the water and how often the steam
cleaner is used.
STC 2000
The boiler is most easily cleaned by filling it with
approximately ½ litre of water, screwing the water
filling cap on and shaking it. Thus the scale deposits
at the bottom come loose. Then pour out the water
and scale deposits and any dirt will be rinsed out.
l Empty the tank by unscrewing the drain plug and
letting the water off. (The drain plug is a
threaded rubber plug on the underside of the
steam cleaner). Do not forget to screw the drain
plug on again. If much scale comes out during
the emptying, repeat the procedure.
STC 3000
The boiler is most easily cleaned by filling it with
approx. ¼ litre of water and approx. ¼ litre of 32%
acetic acid, screwing the water filling cap on and
shaking it. Leave the machine for 10 minutes and
then empty the tank by unscrewing the drain plug
and letting the water off. (The drain plug is a
threaded rubber plug on the underside of the steam
cleaner). Do not forget to screw the drain plug on
again. If much scale comes out during the emptying,
repeat the procedure. Afterwards the boiler should
be carefully flushed with clean water.
8
Washing of cloths
l The cloths can be washed in a washing machine
at 60°C and dried in a tumbler. Avoid the use of
a softener which may reduce the absorbency of
the cloth.
NOTE! When empty and lead over a bump - i.e. a
threshold - the STC 3000 may make a chinking
sound. It is not a fault and has no functional
importance. The reason is that the built-in pressure
switch may vibrate a little and thus touch parts of
the boiler.
5.0 Trouble-shooting
Problem
Cause
Correction
Machine does not start
heating after having
been switched on
(control lamp not alight)
Have you pressed the
button completely down?
Is the power on?
Try again.
No steam comes out
after having activated
the release of the
spray handle.
The handle may be defective Check the connection between the hose
Leak between hose coupling coupling and the hose socket of the machine.
and hose socket.
Machine is not switched on. Check that both switches of the machine are
on.
No steam comes out
during operation
The handle may be defective Check whether lamp for low water level is
alight. If yes, fill on water (see section 2.2).
Leak between hose conNote: Carefully unscrew the filler cap until
nection and hose socket
steam comes out. WAIT until the steam
pressure has left the boiler, unscrew the filler
cap and fill on water.
Steam comes out
The O-rings are worn, has
between the extension
fallen off or have been
and the hose connection wrongly placed
Steam comes out by the
water filling cap at
top of the machine
Check the plug of the machine.
Check the fuses of the electric installation.
Place the O-rings in the small groove. If that
does not help, contact ALTO in Penrith.
Has the water filling cap been Press down the water filling cap and tighten
correctly screwed on before it up.
heating?
Is the O-ring worn, has
fallen off or been placed
wrongly ?
Place the O-ring in the small groove. If that
does not help, contact ALTO in Penrith.
Should other malfunctions occur than those mentioned above, please contact ALTO in Penrith.
Customer services:
ALTO Cleaning Systems Ltd.
Gilwilly Industrial Estate
Penrith, Cumbria CA11 9BN
Phone: 01 768 868995
6.0 Warranty
Your quality product is guaranteed for 24 months
from date of purchase (purchase receipt must be
presented) on the following conditions:
l that defects are attributable to flaws or defects in
materials or workmanship.
(Usual wear and tear as well as misuse are not
covered by the guarantee).
l that the directions of this instruction manual
have been thoroughly observed.
l that repair has not been carried out or attempted
by other than ALTO-trained service staff.
l that only original accessories have been applied.
l that the product has not been exposed to abuse
such as knocks, bumps or frost.
l that only water without any impurities has been
used (mentioned in section 2.2 of this instruction
manual).
l that the machine has not been used for rental
nor used commercially in any other way.
Repairs under this guarantee include replacement
of defective parts. The machine should be handed
in to the shop where it was purchased or forwarded
to one of the service centres of the ALTO organisation with description/specification of the fault (the
guarantee repair will then be excl. of carrying
charges and packaging).
Any other repair of the machine (if the warranty
terms have not been respected) will be invoiced.
(I.e. malfunctions due to Possible Causes
mentioned in section 5.0 Troubleshooting Chart
of the instruction manual).
9
Printed in Denmark
Copyright ©1999 ALTO Danmark A/S
ALTO Danmark A/S
Industrikvarteret
DK-9560 Hadsund
Tel.: +45 7218 2100