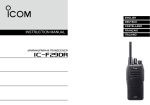
1
Shown when you are receiving the signal
Adventurer
Dual watch-shown when you are monitoring
two channels at once.
Shown when the unit is in VOX (voice activated
mode)
100
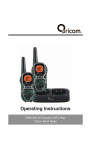
Personal Mobile Radio(PMR)
User Guide
2.Charging the battery pack
Shown when the buttons are locked
TX
Up and Down buttons
Press to change the
speaker Volume. Press
after menu button
to change the channels
RX
SC
DCM VOX
MENU button
Press to change
Channels and
sub-channels, and
to switch between
modes
ON/OFF button
CALL button
Press to send Ring
tones to other
handsets
Microphone
Your PMR includes 1.2V AA x 3 rechargeable
battery pack for each units.
To remove the belt clip
Insert your
fingernail
behind the tab
Then switch ON the main socket.
The PMR must be used with mains adaptor,
provided with the unit.
Using any other adaptor will result in non -Compliance
with the EN60065 and will invalidate any approval to this
Apparatus.
Lift the belt
clip off
It is easier to fit the batteries without the belt clip
in place.
Pull the tab forward(away from the handset)
to release the belt clip. Then lift the belt clip
off.
During Charging, the battery level indicator icon will start scrolling
on the display in both clock mode and PMR on mode.
To fit the batteries
It takes about 10 hours to recharge the battery fully if they've
become completely run down. New battery take up to 12 hours to
charge fully.
8
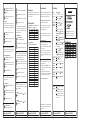
What' s on the display
battery
pack
Stop watch
2. If the unit power ON
TX
3.Make sure the up
arrow is showing,
and pointing towards
the top of the handset.
4.Replace the cover and
close the screw clock wise.
Battery Meter
The battery meter is located in the lower left side of the LCD panel.
These in dicate the amount of power available. As the power is used
the bars will disappear. When the battery level reach it minimum level
in PMR on mode, unit will emit two beep tones and automatically turn
off the power and proceeds to watch mode.
Battery Life
The PMR has a built in power saver feature to make the batteries
last longer. But when you are not using the PMR , it's better to
switch it off to save the battery power.
8
RX
Channel number(1to8)
Sub-channel number(0 to 38)
Effective Range
The Transmission range of the product is wholly dependent on the
environment or terrain in which it is being used, the following
diagram attempts to guide the user on the sort of performance to
expect in everyday use.
To replace the belt clip
Signal Strength
Optimum(open area)(1)
Medium ground based
obstruction(2)
To set the Time
your Watch has a 24 hour Time clock.
In watch mode, press and hold the MENU button for 3
Seconds.The Hour segment in display will flash.
Press UP or Down button to increase or decrease the hour
number displayed.
Press MENU button again to set the minutes. The minutes
segment start to flash.
Heavily built up area(3)
0
Range(Km)
3
Range Slope
Press and hold the MENU button for 3 seconds to confirm
the time setting and exit the time setting mode.
Note: Once you remove the battery from the unit, clock will
reset to default time 12:00
Using Stop Watch
In watch mode, press and hold CALL button for 3 Seconds.
The stop watch appear on the display.
Press UP button once to start the stop watch.
Press UP button once to stop the stopwatch.
Press DOWN button once to re-set the timer.
PTT
3
1
3
Press TALK button to confirm.
Each channel also has 38 sub-channels(sometime called CTCSS
codes) letting you set up group of users within the same channels, for
more private communication.If you have a set a sub-channel, you can
communicate only with other users tuned to the same channel and
sub-channel.
To turn the sub-channel function off, simply set the sub-channel to
0 (zero).Then you can communicate with any PMR user on the same
channel who also turned off sub-channel operation(or whose PMR
does not have the feature).
Press the MENU button twice
The current sub-channel number flashes on the display.
PTT
Press the UP or Down button to go to the sub-channel you
want.
Press the TALK button to confirm.
Binatone Help Line: 0845 345 9677
Binatone Help Line: 0845 345 9677
The level of VOX sensitivity is shown by numbers on the display. At
the highest level(level 3), the handset will pickup softer noise
(including background noise); at the lowest level, it will pick up only
quite loud noise.
1
Binatone Help Line: 0845 345 9677
Binatone Help Line: 0845 345 9677
To turn VOX mode ON and OFF:
Press MENU button Three times
VOX icon display and OF flashes on the LCD panel.
Press UP button to set the level of sensitivity.
If you press the Down button until OF appear on the display,
you can turn off the VOX mode.
2
3
PTT
Press TALK button to confirm the setting.
As long as the handset in VOX mode, VOX is shown steadily
on the display.
Ring tone
You can send ring tone to other handsets within range and tuned to
the same channel,(and sub-channel if applicable), to alert them you
want to communicate with them.
Press and release the CALL button
You can hear ring tone for about two seconds, while the
transmitting symbol( )and call signal( )appear on the LCD
panel. Any other PMR handset within the range and tuned to
the same channel will hear Ring tone, and may decide to
transmit to you.
Transmitting and Receiving.
PMR transmission is 'one way-at-a-time' _ while you are speaking,
you can not receive a transmission.
PMR is an open-license band _ always identify yourself when
transmitting, as other people may be communicating on the same
channel.
To speak to another PMR user
Press and hold the TALK button so that the Transmitting
PTT
symbol ( ) appear on the LCD panel.
Speak clearly into the microphone, in a normal tone - don't
2
shout
3
When you're finished speaking, release the TALK button.
Press TALK button to stop monitoring.
VOX(voice activated transmission)mode
In VOX mode your PMR will transmit whenever it detects your
voice (or other noise) without the TALK button pressed. It will
transmit for 2 seconds even if you stop talking.
Press UP or Down button to go to the channel you want
2
Shown when you are transmitting the signal
Binatone Help Line: 0845 345 9677
PTT
1
Turning ON and OFF your PMR
To switch the PMR ON, Press and hold the ON/OFF button
until the channel display comes.
Slide the belt clip down into the slot until it clicks
into place.
To activate the monitoring feature
Press the MENU and DOWN button at the same time
Your handset will pick up any signals on the current channel,
Including background noise.
Changing the channels and sub-channels
PMR has eight channels, numbered 1to8. To communicate with
other PMR users within range, you must all have your PMR watch
tuned to the same channel.
Press the MENU button once
1
The current channel number flashes on the display
2
Important safety warning
If you are using a head set, to protect your hearing, do not turn the
volume to the highest level .
To reduce radio frequency exposure when you're using your
adventure-100, hold the handset at least 5cm(2inches)from your face.
Never use your PMR outdoors in a thunderstorm.
Don't use yourPMR in the rain.
If your PMR ever get wet, turn it off and remove the battery.
Dry the battery compartment and leave the cover off for few hours.
Don't use the PMR until it is completely dry.
Keep the PMR out of the reach of babies and young children.
Monitoring the current channel
Normally Watch PMR will not pick up very weak signals. But you can
monitor the current channel for all sounds.
Volume control
To adjust the loudspeaker volume
Press the UP or Down button.
The volume level is shown by the bars on the display. You can
change the volume either While you're using your PMR
handset, or while the handset is idle (switched on but not in
Use).
Range Check
The transmission range will be affected as shown in the diagram
above. The transmitting range typical values for different environment
conditions will be (1) 3km (2) 1.5km (3) 750m. It should be
remembered that these are only guide values as actual achieved
distances will be dependent on the environment and terrain.
Note: To obtain the better reception, reposition the
Antenna.
To listen to another PMR user
Make sure you are not pressing the TALK button
Receiving symbol( ) is shown on the display when the other
person is speaking. Don't try to transmit until they have finished.
To switch the PMR OFF
Press and hold the ON/OFF button until the channel display
goes off.
You hear a musical tone each time to confirm.
Transmitting range
The talk range depends on environmental and terrain. It will be
greatest (up to about 3km or 1 3/4 miles) in wide open spaces,
without obstructions such as hills or buildings. Don't try to use two
PMR handsets which are less than 1.5m (5feet)apart.If you do, you
may get interference.
Standby mode(Clock Mode)
Installing the battery will automatically turn-on and proceeds
to Watch mode.
Press and hold CALL button for 3 second to exit from the
Stopwatch mode.
SC
DCM VOX
Battery power level. when the bars disapper
charge the batteries
3.Using the Stopwatch
Press UP or DOWN button to increase or decrease the
minutes number displayed.
2.Insert the battery pack
facing battery contact
plate in.
Time
When charging the handset, use only the rechargeable
Ni-NH battery pack supplied with the PMR.
Don't try to charge the non-rechargeable batteries.
Make sure the battery compartment cover is securely locked in
place when you are charging the battery pack.
Disposed of used batteries safely and in a way that will not harm
the environment _ never try to burn them or put them anywhere, they
could get burnt or punctured.
Don't leave dead batteries in your PMR .
4.Using the Personal Mobile Radio
1.Fitting the Battery pack
1.Loosen the screw counter
clock wise direction by using
a cion or your fingers. Open the
battery compartment
1. If the unit is in standby mode
Charge jack
Plug the mains adaptor into
a 230V AC ,50Hz main socket
with the switch on the socket
set to OFF.
Shown when you are sending the call tone
Socket for handsfree kit(headset)
and charge
under the hinged
cover
Mic/spk jack
Insert the round
connector of
the 7.5V DC/200mA
adaptor into the
charge jack.
SC Shown when the unit is scanning all channels
Volume level
TALK button
Press and hold while
you' re transmitting
Lift the charge jack cover
located on the side of your unit.
Important _ read these
Safety Warning before
you charge the battery
1
Setting Call-Ring tones
Press MENU button for Four times, the unit will enter to
Call-Ring setting mode. The LCD will display CA while 1
is flashing.
Binatone Help Line: 0845 345 9677
Press UP or Down button to change the Call-Ring tone.
(5 different tones),the different Call-Ring tone can be heard
during changing.
2
3
PTT
Press TALK button to confirm your setting after you select
your desired Call-Tone.
Setting Call-Ring off
If you don't want to hear the call tone, you can set the Call-Ring
mode to OFF. In this stage, you can send the call-ring(default callring number 1)to other party but the PMR you held will not sound.
Select the desired channel by pressing UP or Down button.
3
Press MENU button once to change the CTCSS code.
4
Press UP or Down button to select the desired CTCSS code.
5
CA
Press UP or Down button until display OF on t he LCD panel.
2
PTT
PTT
To end the Dual Watch mode
Press MENU button Seven times.
The channel number flashes on the display.
Press TALK button to confirm your setting.
Roger Beep ON/OFF setting
The roger Beep is a Tone which is automatically transmitted
whenever the TALK button is released. This lets other person know
that you have finished talk and you are now in receive mode.
To enable or disable the Roger Beep tone
Press the MENU button for Five times until the On
1
flashing on the LCD screen.
3
Press UP or Down button until the "OF " shown on the display.
PTT
PTT
SC appears on the display, and channel number change
continuously. When a signal is detected, the unit will pause.
Press UP or Down button to enable ('On ' will appear on the
LCD )or disable (' OF ' Will appear on the LCD) the key tone
feature.
PTT
2
Press UP button to continue scanning for main channel.
3
Press Down button to scan the Sub-channels.
Press TALK button to confirm the setting.
To turn the Key-Tone ON or OFF
Press the MENU button Six times. The " On " icon flashes
1
on the display.
2
Press TALK button to exit from the Dual Watch mode.
Scanning Channels
When the Scan function is tuned on, the handset will continuously
scan the through all eight channels and all 38 sub-channels until it
find one on which another user is transmitting.
1
Press MENU and UP button at the same time.
Press UP or Down button to enable ("ON" will appear on the
display) or disable ("OF" will appear on the display) the
roger tone.
Key tone ON/OFF setting
This feature allows the PMR unit to sound a confirmation tone
whenever keys are pressed.
3
3
4
PTT
7. Guarantee and service
5. Cleaning and care
To clean your PMR watch, use a soft cloth dampened with water. Do
not use cleaners or solvent, which may cause damage which may
not covered by guarantee.
Press TALK button to stop the scan and communicate.
Locking the buttons
With the button locked you can transmit (Talk), receive or
monitor(MON) the current channel. But you can't change the volume
(
) or use the MENU button.
To lock the button
Press and hold the MENU button until "
display.
" appears on the
To unlock the buttons
Press and hold the MENU button until "
from the display.
" disappears
Operating frequency 446.00625 to 446.09375 MHz(eight channels)
Channel spacing 12.5 KHz
Output power 0.5 W
Cha nnel
F requency(MHz)
Cha nnel
F requency(MHz)
1
446. 00625
5
446. 05625
2
446. 01875
6
446. 06875
3
446. 03125
7
446. 08125
4
446. 04375
8
446. 09375
Interference Elimination Codes
(CTCSS - Continuous Tone Coded Squelch System)
Cod e
Frequ ency(Hz)
The Binatone Adventurer is fully guaranteed for 12 months from the date
of purchase shown on your sales receipt. The guarantee does not cover
damage by misuse or negligence, or by excessive voltages.
Please keep your sales(till)receipt-this is your guarantee. You
should also keep the original packaging material.
6. Technical specification
1
2
2
Press TALK button to confirm the setting.
The display switches backwards and forwards between the two
channels. If handset detects a signal on either channel, it will stop
and receive it. As long as the unit is in Dual watch mode, DCM is
shown steadily on the display.
Press MENU button for Four times, the unit will enter to
Call-Ring setting mode.
1
3
2
Cod e
Frequ ency(Hz)
1
67. 0
20
131 .8
2
71. 9
21
136 .5
3
74. 4
22
141 .3
4
77. 0
23
146 .2
5
79. 7
24
151 .4
6
82. 5
25
156 .7
7
85. 4
26
162 .2
8
88. 5
27
167 .9
9
91. 5
28
173 .8
10
94.8
29
179 .9
11
97.4
30
186 .2
12
100. 0
31
192 .8
13
103. 5
32
203 .5
14
107. 2
33
210 .7
15
110. 9
34
218 .1
16
114. 8
35
225 .7
17
118. 8
36
233 .6
18
123. 0
37
241 .8
19
127. 3
38
250 .3
When you first unpack your Binatone Adventurer, check for visible
damage. If you see any damage, don't use the handsets-return
the whole system to where you bought it .
Binatone Help Line: 0845 345 9677
Binatone Help Line: 0845 345 9677
Problem
Possible cause
No power
Battery is low or not fitted correctly
PMR is not switched on
check
weak reception/
no reception/
noisy reception
Battery is low or not fitted correctly
Other user is not within range
check
PMR are not tuned to the same channel
check
Noisy reception is more likely when using high
numbered sub-channels
try using a lowernumbered sub-channel,agreeing it with the rest
of your group first
Volume level is too low
increase the volume
Speak in a normal voice,5-8cm(2-3 inches )
away from the microphone
Local conditions are impairing reception
move
to a different location. away from obstructions
and as high as possible
Other user is not transmitting
check
Other user is too close
check
There's interference from other users on the same
channel
agree to use a different channel
If your Binatone Adventurer develops a fault, first check the points
above. If you can't solve the problem, return the whole system as
follows;
While the unit is under Guarantee
1 Pack up all parts of your Adventurer, using the original packaging.
Remember to include the mains adapter.
2 Return the unit to the shop where you bought it, making sure you
take your sales receipt.
3 In the unlikely event that you need to return your Adventurer to our
Repair Centre while it is under Guarantee, please send your sales
receipt with it, There will be a 5 handling charge for repair under
Guarantee.
Repair after the Guarantee has expired
If the unit is no longer under Guarantee, first follow steps 1 as for
repair under Guarantee. Then...
2 Call our Service Department on 0845 345 9677 and ask for a
quotation of the repair charge and details of where to send your
Adventurer3 for repair.
3 Return your Adventure to the address given by the Service
Department, making sure you include your name and address, and
a cheque or postal order for the value of the repair charge.
solution
check;
Cannot change
channels
PMR is locked
check
Battery is low or not fitted correctly
In VOX mode,
the handset
transmits all
the time
Background noise is high
place
VOX sensitivity is too high
level
In VOX mode,
the handset
doesn't transmit
VOX sensitivity is too low
set it to a higher
level
Speak in a louder voice, nearer to the
microphone
Cannot charge
The batteries
Make sure the mains power lead is firmly plugged
into the charger jack.
Make sure the mains power adapter is plugged in,
and that mains power is switched on at the socket.
Use only 3.6V Ni-MH batteries, as supplied with
the unit. You may need to recharge the battery pack
after many hours of use.
This does not affect your statutory rights.
Press TALK button to confirm your setting.
Monitoring Two channels at once(Dual Watch)
1
Press MENU button for Seven times.
DCM appear on the display while " OF " is flashing.
8. Troubleshooting
Binatone Telecom plc operates a policy of continuous
product improvement, and so reserves the right to make
changes to the product and functions without notice.
move to a quieter
set it to a lower
Binatone Telecom plc operates a policy of continuous product improvement,and so reserves the right to make changes to the product and
functions without notice.
Binatone Help Line: 0845 345 9677
Binatone Help Line: 0845 345 9677
Binatone Help Line: 0845 345 9677
Binatone Help Line: 0845 345 9677