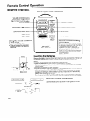
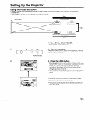
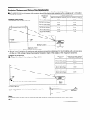
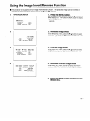
1
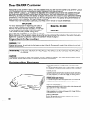
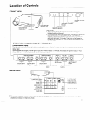
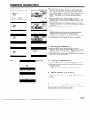
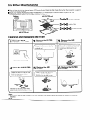
SHARR
LCD PROJECTOR
LCD-PROJEKTOR
PROJECTEUR LCD
VIDEOPROJEKTOR
PROYECTOR DE LCD
PROlElTORE LCD
LCD-PROJEKTOR
OPERATION MANUAL
BEDIENUNGSANLEITUNG
MODE D’EMPLOI
BRUKSANVISNING
MANUAL DE MANEJO
MANUALE DI ISTRUZIONI
GEBRUIKSAANWIJZING
l
l
l
l
l
l
l
ENGLISH
DEUTSCH
FRANGAlS
SVENSKA
ESPAfiOL
ITALIAN0
NEDERLANDS
This equipment
and 73/23/EEC
complies with the requirements
as amended by 93/68/EEC.
Dieses GerAt entsprlcht den Anforderungen
und 73/23/EWG mit Anderung 93/68/EWG.
of Directives 89/336/EEC
der EG-Richtlinlen
89/336/EWG
Ce mat&e1 r&pond aux exigences contenues dans les directives
89/336/CEE et 73/23/CEE modifikes par la directive 93/68/CEE.
Dit apparaat voldoet aan de elsen van de nchtlijnen
73/23/EEG, gewljzlgd door 93/68/EEG.
Dette udstyr overholder
tillzg nr. 93/68/EEC.
89/336/EEG
kravene I direktlv nr. 89/336/EEC
en
og 73/23/EEC
Quest’ apparecchio 6 conforme al requlsltl delle direttlve 89/336/EEC
73/23/EEC, come emendata dalla dlretttva 93/68/EEC.
e
Este equipamento obedece 3s exlg&nclas das directtvas 89/336/CEE
73/23/CEE, na sua versa0 corngida pela directiva 93/68/CEE.
e
Este aparato satrsface las exlgencias de las Dlrectlvas 89/336/CEE
73/23/CEE, modlflcadas por medlo de la 93/68/CEE.
Denna utrustning uppfyller kraven enligt riktlinjerna
73/23/EEC sA som kompletteras av 93/68/EEC.
89/336/EEC
och
Dette produktet oppfyller betingelsene
73/23/EEC i endrlngen 93/68/EEC.
89/336/EEC
og
i direktivene
Tarna lalte tayttaa direktiivlen 89/336/EEC
muutettu direktiivilla 93/68/EEC.
)a 73/23/EEC
vaatimukset,
med
y
joita on
Dear SHARP Customer
Welcome to the SHARP Family. We are pleased that you are now the owner of a SHARP Colour
LCD Projector built for outstanding quality, reliability and performance.
Every SHARP Colour LCD Projector is adjusted for a proper picture and has passed through
the most stringent quality control tests at the factory. We have prepared this OPERATION
MANUAL so that you have the ability to adjust the picture and colour to your personal viewing
preference. We sincerely hope that you will be delighted with the quality and performance of
your Colour LCD Projector for many years to come.
Please read the instructions carefully, and keep them handy for future reference,
IMPORTANT
For your assistance in reporting the loss or
theft of your Colour LCD Projector, please
record the Serial Number located on the rear
of the projector and retain this information.
The model number, power rating, and
warnings are displayed on the rear of the unit.
Before disposing of the packaging,
against the “Supplied Accessories”
Model No.: XV-380H
Serial No.:
please be sure that you have checked the contents of the carton thoroughly
listed in the operation manual on page 21.
Important Information
WARNING
=J%(
Intense light source, do not look into the beam or view it directly. Be especially
directly into the beam.
WARNING:
careful that children
do not look
TO REDUCE THE RISK OF FIRE OR ELECTRIC SHOCK, DO NOT EXPOSE THIS APPLIANCE
TO LIQUIDS.
CAUTION:
TO REDUCE THE RISK OF ELECTRIC SHOCK, DO NOT REMOVE CABINET.
ARE INSIDE. REFER SERVICING
TO QUALIFIED
SERVICE PERSONNEL.
NO USER-SERVICEABLE
PARTS
Outstanding Features
Allows easy projection of large screen, full-colour video
images.
l Can be projected
directly onto a video screen or white wall.
l Lightweight,
convergence-free
system for easy installation.
FLEXIBLE USE
In addition to the standard front projection mode, the menu
driven functions can be used to instantly reverse the image
(for rear projection), or invert the image (for ceiling mount
applications.)
POWER ZOOM AND FOCUS
l Provides
simple screen-size adjustments from either the
projector or the remote control.
l Screen projection
size adjusts from 25 to 200 inches.
HIGH
PICTURE
QUALITY
Each of the three LCD panels contains 309,120 pixels to
achieve exceptionally bright, high quality video images with
up to 500 line TV lines of resolution.
VARIABLE MASKING
Video projection in a choice of Normal (4:3), Vista (16:9) or
CinemaScope (21:9) mode.
BUILT-IN SPEAKER
Built-in 3w amplifier and speaker eliminates the need for
external audio components.
Contents
Important Information .................................................................................
Outstanding Features .................................................................................
Important Safeguards ................................................................................
Location of Controls ...................................................................................
Remote Control Operation ..........................................................................
Setting Up the Projector .............................................................................
Using the Image Invert/Reverse Function ..................................................
Connecting the Projector (VIDEO 1, VIDEO 2) ...........................................
Basic Operation of the Projector ................................................................
Adjusting the Picture ..................................................................................
Masking Adjustment ...................................................................................
Functions on the Projector ..........................................................................
Air Filter Maintenance ................................................................................
Lamp/Maintenance Indicators ...................................................................
Before Calling for Service ...........................................................................
Specifications .............................................................................................
Dimensions .................................................................................................
1
1
3
4
5
6
8
12
13
15
16
17
19
20
20
21
22
SPECIAL NOTE FOR USERS INTHE U.K.
The mains lead of this product is fitted with a non-rewireable (moulded) plug incorporating a 13A fuse. Should
the fuse need to be replaced, a BSI or ASTA approved BS 1362 fuse marked v or 8 and of the same rating
as above, which is also indicated on the pin face of the plug, must be used.
Always refit the fuse cover after replacing the fuse. Never use the plug without the fuse cover fitted.
In the unlikely event of the socket outlet in your home not being compatible with the plug supplied, cut off the
mains plug and fit an appropriate type.
DANGER: The fuse from the cut-off plug should be removed and the cut-off plug destroyed immediately
disposed
Under no circumstances should the cut-off plug be inserted elsewhere
a serious electric shock may occur.
To fit an appropriate plug to the mains lead, follow the instructions below:
IMPORTANT: The wires in the mains lead are coloured in accordance
Blue
: Neutral
Brown
: Live
l
The wire which is coloured
coloured black.
blue must be connected
The wire which is coloured
coloured red.
brown must be connected
Ensure that neither the brown nor the blue wire is connected
into a 13A socket outlet, as
with the following
As the colours of the wires in the mains lead of this product may not correspond
identifying the terminals in your plug, proceed as follows:
l
and
of in a safe manner.
code:
with the coloured
markings
to the plug terminal which is marked N or
to the plug terminal which is marked L or
to the earth terminal in your three-pin
plug.
Before replacing the plug cover make sure that:
l
If the new fitted plug contains a fuse, its value is the same as that removed from the cut-off plug.
l
The cord grip is clamped
over the sheath of the mains lead, and not simply over the lead wires.
IF YOU HAVE ANY DOUBT, CONSULT A QUALIFIED
ELECTRICIAN.
Important Safeguards
ATTENTION: Please read all of these instructions before you operate your
LCD
Projector for the first time. Save these instructions for future reference.
For your own protection
and prolonged
operation of your LCD Projector, be sure to read the following
“important Safeguards” carefully, before use.
This projector has been engineered and manufactured to ensure your personal safety. But IMPROPER
USE CAN RESULT IN POTENTIAL ELECTRICAL SHOCK OR FIRE HAZARDS. In order not to defeat the
safeguards incorporated into this LCD Projector, observe the following basic rules for its installation, use
and servicing.
1
Unplug the LCD Projector from the wall outlet
before cleaning.
2
Do not use liquid cleaners or aerosol cleaners.
Use a damp cloth for cleaning.
3
Do not use attachments
the LCD Projector manufacturer,
hazards.
4
Do not
example, near
laundry tub, in
etc. Never spill
not recommended by
as they may cause
use the LCD Projector near water; for
a bathtub, washbowl, kitchen sink,
a wet basement, near a swimming pool,
liquid into the projector.
5
Do not place the LCD Projector on an unstable
cart, stand, or table. The LCD Projector may fall, which
may cause serious injury to a child or an adult, and/or
serious damage to the unit.
6
Wall or Ceiling Mounting - The product should
be mounted to a wall or ceiling only as recommended
by the manufacturer.
7
LCD Projector equipment and
cart combinations
should be moved
with care.
Quick stops, excessive force, and
uneven surfaces may cause the
equipment and cart combination to
overturn.
ES
*
0
8
To ensure reliable operation of the LCD
Projector and to protect it from overheating, these
openings must not be blocked or covered. Slots and
openings in the cabinet back and bottom are provided
for ventilation.
9
The openings should never be covered with
cloth or other material. This LCD Projector should never
be placed near or over a radiator or heating vent. The
LCD Projector should not be placed in a built-in
installation such as a bookcase unless proper
ventilation is provided.
10
The LCD Projector should be operated only
from the type of power source indicated on the back of
the projector or in the specifications. If you are not sure
of the type of power supplied to your home, consult
your LCD Projector dealer or local power company.
11
Do not place the LCD Projector where the cord
will be abused by persons walking on it.
12
Follow all warnings
the LCD Projector.
and instructions
marked on
13
To prevent damage to the projector due to
lightning and power-line surges, unplug the projector
from the power outlet, wher not in use.
o-3
14
Do not overload wall outlets and extension
cords with too many products, because this can result
in fire or electric shock.
15
Never push objects of any kind into the LCD
Projector through the cabinet slots as they may touch
high-voltage points or cause a short circuit. This could
result in a fire or electric shock.
16
Do not attempt to service the LCD Projector
yourself. Opening or removing covers may expose you
to dangerous voltage or other hazards. Refer all
servicing to qualified service personnel.
17
Unplug the LCD Projector equipment from the
wall outlet and refer servicing to qualified service
personnel under the following conditions:
A.
When the power cord or plug is damaged or
frayed.
6.
If liquid has been spilled into the LCD Projector.
C.
If the LCD Projector has been exposed to rain
or water.
D.
If the LCD Projector does not operate normally
when you follow the operating instructions. Adjust only
those controls that are covered by the operating
instructions, as improper adjustment of other controls
may cause damage and will often require extensive
work by a qualified technician to restore the LCD
Projector to normal operation.
E.
If the LCD Projector has been dropped or the
cabinet has been damaged.
F.
When the LCD Projector exhibits a distinct
change in performance - this indicates a need for
service.
18
When replacement parts are required, be sure
the service technician has used replacement parts
specified by the manufacturer that have the same
characteristics as the original parts. Unauthorized
substitutions may result in fire, electric shock, or other
hazards.
About the Temperature Monitor
-jEMf?\
Function:
l If the projector
starts to overheat
due to set-up problems or a dirty
air filter, “TEMP.” will flash in the
upper-left corner of the picture. If
the temperature continues to rise, E
then the lamp will turn off, the
TEMPERATURE WARNING indicator will flash, and
after a 90-second cooling-off period the power will
shut off. Refer to page 20, “Maintenance
Indicators”,
when the “TEMP.” warning appears in the picture.
l The cooling
fan regulates the internal temperature,
and its performance is automatically controlled. The
sound of the fan may change during operation due to
changes in the fan speed.
Location of Controls
FRONT VIEW
POWER (ON/OFF)
button
POWER indicator
LAM’P REPLACEMENT
indicator
TEMPERATURE
WARNING indicator
REMOTE SENSOR
(intake vent)
SPEAKER
AIR FILTER
CAUTIONS:
l
l
OPERATION
Allow at least 10 cm of space between the cooling fan
(exhaust vent) and the wall.
If the cooling fan becomes obstructed, a protection device will
automatically turn off the projector lamp. This does not
indicate a malfunction. Remove the projector plug from the
wall outlet and wait 10 minutes. Then turn on the power by
plugging the cord back in. This will return the projector to its
normal mode.
PANEL ON SIDE OF PROJECTOR
Phosphorescent Display
The operation controls on the right side use a phosphorescent display for easy viewing. When exposed to surrounding
light, the phosphorescent
display will glow in the dark.
(Glow ratio)
When exposed to sunlight or other light of 500 Iux or more for about 10 minutes, the display will glow for about 1 hour,
(Note:-500 Iux = 1-l .5m directly under a 40W fluorescent light.)
I
ADJUSTMENT
(d/b) buttons
I
I
J
MUTk button
INPUf SELECT
ADJUSTMENT
ADJUSTMENT
button
(d/b) buttons
(V/A) buttons
T
MENU button
LENS ADJUSTMENT
VOLUME UP-DOWN
button
buttons
REAR VIEW
MAIN POWER switch
COMPOSITE
VIDEO
INPUT 1
Audio: RCA
Video: RCA
COMPOSITE
S-VIDEO INPUT 1
(4-pin mini DIN)
WIRED REMOTE
CONTROL INPUT
VIDEO INPUT 2
Audio: RCA
Video: RCA
COMPOSITE
VIDEO OUTPUT
DC 12V OUTPUT
Audio: RCA
Video: RCA
Note:
l
If a current of 200mA or more is drawn from the DC 12V OUTPUT jack, a protection
projector and leave it in Stand-by mode.
device will automatically
turn off the
Remote Control Operation
REMOTE CONTROL
REMOTE CONTROL SIGNAL TRANSMITTER
I
VOLUME UP-DOWN buttons
ADJUSTMENT (WA) buttons
(Can be used as ADJUSTMENT
(V/r) buttons when the MENU
button is pressed)
I
-
TRANSMIT indicator
-
POWER (ON/OFF) button
-
MUTE button
-
INPUT SELECT button
ON/OFF
ADJUSTMENT (4/b)
buttons
r
MUTE
LENS ADJUSTMENT button
MENU button
LIGHT button
INPUT
SELECT
Using the remote control
a dark room
Press the LIGHT button.
l This will cause
the operation
buttons to stay lit for about 5
seconds.
SHARP
LCD PROJECTOR
Remote control handling
precautions
Do not expose the remote control
to shocks, liquids or high humidity.
The remote control may not
operate normally if exposed to
direct sunlight or other intense
light sources. Should this happen,
reposition the light source or the
LCD Projector.
Inserting the Batteries
Remove the battery cover as shown and insert two AAA size batteries making sure
the polarity matches the (+) and (-) marks inside the battery compartment.
e
Press down -
c
2s
-air
in
t
close
Slide open
Batterjl cover
Notes:
Incorrect use of batteries may cause them to leak or burst.
l Insert the batteries with the (+) and (-) polarities as indicated.
l Remove
the batteries if the remote control will not be operated for an extended
period of time.
l Maintain the batteries in clean condition.
l Do not mix different brands of batteries. The life expectancy
of the new batteries
will be shortened and the old batteries may leak.
0 When the batteries have been used up, remove them immediately to prevent
leakage and damage. Leaked battery fluid may irritate the skin. Remove any
battery fluid by wiping with a cloth.
Due to storage conditions and the shelf life of the supplied batteries, they may
run out after a short time. Replace them with new batteries as soon as possible.
Use the remote control as shown in the figures on the left.
Max. distance: 7m
1
Setting Up the Projector
Using the Focus and Zoom
l
l
Zoom, Focus and Reversed/Inverted Image mode functions broaden your options for projector
placement.
See pages 7,9 and 10 for details on projector setup.
SIDE VIEW
Invert
image
Table setting
.
r
Zoom
1. Turn ON the MAIN POWER.
Press the MAIN POWER switch ON.
2
0
(0
<+I- 0 1
2. Turn on the power.
Press the POWER ON/OFF button on the projector
control to turn on the power.
0
or remote
I
POWER indicator
3. Press the LENS button.
3
l
l
-.........-.........=FOCUS=
l
When the LENS button on the remote control or LENS
ADJUSTMENT button on the projector is pressed, the LENS
adjustment mode is indicated for about 8 seconds.
if the LENS (ADJ) button is pressed while the mode is
indicated on the screen, the picture adjustment mode
changes as shown on the left.
You can adjust the picture as shown on the left by pressing
the ADJUSTMENT (4) or (b) buttons while in ADJUST
mode.
l
Adjust the focus until the picture on the screen is sharp.
l
The focus pattern appears on the screen.
l
The picture can be adjusted to the desired size within the
zoom lens range.
Projector Distance and Picture Size Relationship
n The motorized zoom lens allows adjustment to the image size within the projector’s range.
aFor optimum picture adjustment,
m from the screen.
the projector should be placed and adjusted within a distance of 1.4 m to 8.9
Projectron distance (L)
Picture size
(diag.)
Distance from screen
Picture size: 254 inches (100 cm)
I
Maxrmum protectron distance ) Minimum projectlon distance
8.9 m
508 cm (200 inches)
I381 cm (150 inches)
8.9 m
I
7.3 m
I
I
5.5 m
I
254 cm (100 inches)
5.9 m
3.6 m
203 cm (80 inches)
4.7 m
2.8 m
152 cm (60 inches)
3.5 m
2.1 m
102 cm (40 inches)
2.3 m
1.4 m
I
Lens Centre
.
Minimum L: 3.6 m
Maximum L: 5.9 m
I-
l
Distance between lens and screen: L
Above is an illustration of maximum and minimum projection distances for the XV-380H with a picture
of 254 cm (100 inches). Move the projector forward or back if the edges of the image are distorted.
Height of projector
I Adjust to match the setup configuration.
a-
Screen
Picture size
(diag.)
Distance from lens centre to
lower edge of screen (I-I)
508 cm (200 Inches)
38 cm
381 cm (150 Inches)
29 cm
254 cm (100 inches)
19 cm
203 cm (80 inches)
15 cm
152 cm (60 Inches)
17 cm
102 cm (40 Inches)
8cm
Lens centre
190
IH
Lower edge
of screen
Rack/
(white portion)
stand
l
Ceiling
Mount
When the projector is in the inverted position, use the
upper edge of the screen as the base line.
I
Note:
l
Optimal
o-7
image quality can be achieved
with the projector positioned
size
perpendicular
to the screen.
Using the Image Invert/Reverse
Function
n This projector is equipped with an image invert/reverse function. The projected
reversed by using the MENU button and the V/A and +I,
1
image can be inverted
or
buttons.
1. Press the MENU button.
ON-SCREEN DISPLAY
With the MENU screen displayed, press the V/A buttons to
select IMAGE ADJ. Then press the MENU button to display
the IMAGE ADJ. screen.
l The last MENU screen selected
is indicated for about 30
seconds.
IMAGE
ADJ.
bBLUE
SCREEN
REVERSE
INVERT
INPUT
DISPLAY
(OFF)
(OFF)
(OFF)
(ON)
AV:SEL.
MENU:END
4):ADJ.
2. Reversed Image Mode
In the IMAGE ADJ. menu, press the ‘I/A buttons to select
REVERSE. Then press the 4,
buttons to select ON. The
reversed image will appear.
. T;aA
(1TO)
(UO)
(790)
(UO)
U331132
SDAMI
3UJE
3lZR3V3RI
TR3VUI
YAJ92Ia
TUPUI
3. Inverted Image Mode
3
vA:2EI”4b:YDl'
IUbflrG
DIi3brYA
P3EUA:PUD
,IUhElfrt
tOU)
(OM)
IIEAEKZE
(O&k)
BI'AE ZCXEEU
IRYCE
YDl'
In the IMAGE ADJ. menu, press the V/A buttons to select
INVERT. Then press the 4/b buttons to select ON. The
inverted image will appear.
(O&k)
4. Reversed Inverted Image Mode
4
In the IMAGE ADJ. menu, set the REVERSE and INVERT
functions to ON. The reversed inverted image will appear.
(NO)
(NO)
(NO)
(da01
AYldSIQ
tIldN1
&X3ANI4
PSX3A3ti
N33XI3S
3fl?B
'PGY
3DYWI
5. Press the MENU button anytime to exit
IMAGE ADJ.
How to set up the projector and screen
n Using the invert and reverse functions makes the following setups possible.
Caution: When setting up the projector
l
Do not place it in humid or dusty places, or places where the air is sooty or full of cigarette smoke. If the lens,
mirror, or other optical components become dirty, the picture will blur or darken, making viewing difficult.
Do not expose to extreme heat or cold.
Operating temperature: 5°C to 40°C
Storage temperature: -20°C to 55°C
.. Do not tilt the projector more than 10”.
l
W Position the screen so that it is not in direct sunlight or room light. Light falling directly onto the screen washes
out colours, making viewing difficult. Close the curtains and dim the lights when using the screen in a bright or
sunny room.
W The best picture will be obtained when the projector is at a 90 degree angle to the screen. Position the projector
and screen as shown.
Example of a standard setup
SIDE VIEW
TOP VIEW
Lens centre
If the projector and screen are not centred properly,
the picture will be distorted, makino viewing difficult.
The projector lens should be
centred in the middle of the screen.
Example of a reversed image setup
0
0
By placing a mirror (normal flat type) in front of the lens and using the reverse function, the image reflected from
the mirror can be projected onto the screen.
Rear projection with a rear projection screen is also possible when using the reverse function.
Rear Projection
AUDIENCE SIDE
4---+
90”
i...
Mirror
The projector lens should be
centred in the middle of the screen.
R
I
I
If the projector and screen are not centred properly,
the picture will be distorted, making viewing difficult.
Example of a ceiling-mount setup
Before mounting the projector, be sure to contact your nearest Authorized Sharp Professional LCD Presentation
Products Dealer to obtain the manufacturer-recommended
ceiling installation unit and installation adaptor (sold
separately.) (AN-ElTKE Ceiling Mount Bracket, AN-TK201/AN-TK202
Extension Tube for AN-ElTKE)
SIDE VIEW
Upper edge of
screen (white \J
Hi
portion)
_190*
l
If the relative positions of the projector
Note: Contact your nearest Authorized
concerning setup.
and the screen are not properly adjusted, the picture will be distorted.
Sharp Professional
LCD Presentation
Products
Dealer for inquiries
Inverted Labeling for Ceiling Mount
l
When ceiling mounting
the projector, attach the supplied
inverted labels as shown.
Front
G&l 0
_____
Using the Level and Height Adjusters
l
When the projector stand is on an angle, use the adjusters on the bottom of the projector to adjust the vertical
angle.
Adjustments of up
to 5” can be made.
to 5” can be made.
Notes:
1) When adjustments are made with the adjusters, the picture may become distorted, depending on the
relative positions of the projector and the screen.
2) After adjusting, in some cases, all of the adjuster feet may not be resting on the mounting surface.
To prevent the projector from wobbling, adjust all four adjuster feet so that they firmly contact the
mounting surface.
Moving the Projector
Hold with both hands, using the hand grips located on
the sides of the projector. Note:
When moving the projector, always put on the lens cap
to prevent damage to the lens.
Caution:
Do not lift or carry the projector by the lens.
Lens Cap
O-1 1
Connecting the Projector (VIDEO IJIDEO
2)
To watch video playback with the projector connected to audio/video output equipment,
or Laser Disc Player, or to view on a separate monitor, make the following connections.
Always turn off the LCD Projector while connecting
projector and ,the equipment being connected.
l
to video equipment,
in order to protect both the
Note the following when using the S-VIDEO INPUT terminal:
l The S-VIDEO INPUT terminal
uses a video signal system in which the picture
and a luminance
signal to realize a higher-quality
such as a VCR
is separated
into a co101Jr
picture.
The S-VIDEO INPUT terminal has priority over the VIDEO INPUT terminals. Make the audio connectiol
the VIDEO INPUT audio terminals (left/right).
l
n The projector
is provided
with a terminal
cover to hide connecting
)
Attaching the terminal cover
cables.
Detaching the terminal cover
While pressing the 4 marked
areas, pull out to remove.
@ Push in the other 4 marked claw.
l
Lead the connecting cables out through the
upper or lower notch in the centre of the cover.
c
l
When the projector is ceiling mounted, invert the terminal cover before attaching.
7
via
Basic Operation of the Projector
1. Turn on the MAIN POWER.
Press the MAIN POWER switch ON.
2. Turn on the POWER.
Press the POWER button on the projector.
When the power is turned off by pressing the POWER (ON/
OFF) button, the POWER indicator will not turn off until the
l
fan has stopped running.
See page 20, “Lamp/Maintenance
Indicators”, for details.
Notes:
l When
the POWER indicator is not lit, the remote control
cannot be used to operate the projector.
l If the power
is turned on immediately
after it has been
I
Indicator off:
Main Power switch is set to off
Indicator lights red:
Standby status
Indicator lights green:
Projector lamp on
When the power is on, the LAMP
REPLACEMENT
indicator flashes
to show the operating condition
of the lamp.
Green: Lamp is ready
Flashing green: Warming up
Red: Change bulb
l
l
On-Screen
Display
LAUQVAOI
,EIIOLISH
DIUTSCH
SSQAIOL
IIEDERLAl9DS
turned off, it may take a short while before the lamp turns
on. (During this period the LAMP REPLACEMENT indicator
flashes.)
After the projector is unpacked and turned on for the first
time, a slight odour may be emitted from the exhaust fan.
This odour will disappear with use.
3. ON-SCREEN
DISPLAY in 8 languages
The on-screen display is set to English at the factory. The
language for the unit’s ON-SCREEN DISPLAY can be set to
English, German, Spanish, Dutch, Swedish, Italian, French or
Japanese.
sVwfsI[A
ITALIARO
rrnuqr1s
E*ti
l
Setting the ON-SCREEN
language
DISPLAY
1) Press the
2)
3)
1
4. Changing the system mode
The video input system mode is set to AUTO at the factory,
but it can be changed to a different mode.
1) Press the MENU button. The menu will appear on the
screen.
2) Press the ADJUSTMENT V/A buttons until the b mark is
set to “SYSTEM”.
Press the MENU button to display the system menu.
3) Press the ADJUSTMENT V/A buttons until the b mark
matches the video system desired and then press the
MENU button to set the system
SECAM
I I
PAL
I
1
VIDEO1
VIDEO1
lSECAM
*PAL
Note:
l
NTSC 3.58
NTSC 4.43
MENU button. The menu will appear on the
screen.
Press the ADJUSTMENT V/A buttons until the b mark is
set to “LANGUAGE”.
Press the MENU button to display the language menu.
Press the ADJUSTMENT V/A buttons until the b mark
matches the language desired, and then press the MENU
button to set the language. The ON-SCREEN DISPLAY is
now programmed to display in the language chosen.
In AUTO mode, “PAL”, “SECAM”, “NTSC 4.43” or “NTSC
3.58” is displayed on the screen for a few seconds when
the mode is changed with the INPUT SELECT button.
On-Screen Display
For viewing the picture
5. Select input.
Press the INPUT SELECT button to switch the picture input.
When you press the button, the current input mode is
displayed for about 4 seconds. If you press the button again
while the input mode is displayed, the mode changes as
shown on the left.
Confirm the selected input terminal, then press the INPUT
SELECT button.
6. Adjust the volume.
The number of displayed segments
increases or decreases as the
I
111..*
VOLUME
. . . . . . . . . .
Press the Volume Up-Down button on the projector or on the
remote control to adjust the volume.
MUTE
l Press the MUTE button to temporarily
turn off the sound.
l Press the button once again to turn the sound back on.
7. Turning off the power from the projector
or remote control
When switching the unit OFF, follow these steps:
1) Press POWER button on the front panel or remote control
to the OFF position.
2) Wait approximately 90 seconds for fans to shut off.
3) Press the MAIN POWER switch OFF. (Red button.)
4) Turn power point off and remove power lead from wall
socket.
After the POWER indicator lights red and the cooling fan runs for 90
will turn off, and the projector will return to
The power can be turned on again either from the projector or
remote control. When the power is turned on, the POWER indicator
and LAMP REPLACEMENT indicator light green.
Note:
l
When the POWER is off on the projector set, the power
cannot be turned on from the remote control.
O-14
-_
Adjusting the Picture
This projector’s
picture is factory preset to standard
settings. However, you can adjust it to suit your own
preferences
with the VIDEO ADJUSTMENT
buttons on the
projector
and the remote control.
l Five picture
modes can be adjusted:
“PICTURE”,
“BRIGHT”,
“COLOR”,
“TINT” and “SHARPNESS”.
Note:
l TINT
only appears in NTSC mode.
l
Adjust the Picture
1
On-Screen
7
ADJ. 6l STATVSl
VIDEO
,VIDxO
ADJ.
BACXaxOVND
uAsxma
IYAax
1. Use the MENU button to select the mode
to be adjusted.
Display
vsa
vsa
a
STATVSl
LXVSL
ADJ.
ADJ.
BYBTXRI
LAROVAQX
AW:SXL.~,:ADJ.
l
SIT
tNCXT
YBNVrNBxT
When the MENU button is pressed, the MENU mode is
indicated
for about 30 seconds.
Press the ADJUSTMENT
V/A buttons to select “VIDEO ADJ. 1_1 STATUS 1”) then
press the 4,
buttons to select the STATUS l-5 settings.
Press the MENU button after selecting
STATUS setting.
l
. . . 5
5
I
2. Press the ADJUSTMENT
BTATVSl
PICTVRI
-
0
I
::
l
l
..rSlL. 4,rADJ. NENVrlND
l
Description of Adjustment
1Selected item
1
~
STATVBl
0
-
8KARPNLI)S
ITATVIL
+
BRIOKT
-
AV:I)BL.4,:AD.T.YKNV:LND
..‘tsKL.
buttons.
To
4
Items
1
(
b
1
1
I
_
0
*
,
:
I
4,tADJ.
q/b
If the VIDEO ADJUSTMENT
T/A buttons are pressed while
the mode is indicated on the screen, the MENU mode
changes
as shown.
When the ADJUSTMENT
(4) or (b) buttons are pressed
while the mode you want to adjust is indicated,
the ” 0”
mark, which indicates
the adjustment
setting, can be
moved.
The adjustment
mode is indicated
for about 10 seconds.
l
I-
For less colour
COLOR
NKNVtEND
I
(
(
/
1
Press the MENU button
STATVS
TINT
AVrlKL.
l
-
ITATVIl
1
0
NENVrLND
TINT: NTSC
On-Screen
..rlBL.
exit
l
t
COLOR
4,zADJ.
I
4,rAD.J.
YKNfJrKND
only
Checking Picture Adjustments
Display
When video mode is
selected.
-
STATVSl
bPICTVRS
BRIOHT
COLOR
TINT
0
I
I
+
the MENU button
pressed, the MENU mode is
indicated
for about 30 seconds.
Press the ADJUSTMENT
vi
A buttons to select “VIDEO ADJ. 1-_1 STATUSl”, then press
the MENU button.
I
SEARPNESB
-
RLSBT
ATtSxL.
4brADJ.
XxNVrxND
l
l
TINT: NTSC only
l
l
Each time you press the ADJUSTMENT
‘I/A
buttons
the display is shown, the F mark will move to indicate
selected video status item for adjustment.
When the ADJUSTMENT
(b) buttons
”
while
the
Masking
Adjustment
On-Screen Display
NASKINO
,NORYAL
NODE1
Normal Mode
n The Masking function can be used to increase your
enjoyment of wide-screen pictures - such as laser disc
and videotaped movies - by eliminating video noise and
blacking out the top and bottom portions of the screen.
This projector offers you a choice of three modes: “Normal
Mode”, “Vista Mode”, and “Cinema- Scope/Letterbox
AD.,.
YODLl
..:
Mode”.
SLL.
XND
MEND:
Vista
YASKINO
Press the MENU button, While the MENU screen is
displayed, press the ADJUSTMENT T/A buttons to select
MASKING ADJ., and then press the MENU button. The
MASKING ADJ. screen will appear as shown on the left.
Press the V/A buttons to change the mode. Vista Mode IS
indicated by MODE 1 and CinemaScope Mode is indicatec
by MODE 2.
In Masking mode, the screen changes as shown.
Mnrip
ADJ.
NORYAL
bYODE
NODE2
SEL.
Av:
YXND:
NEXT
Notes:
l
CinemaScope
Mode
l
I
~ASKIHO
AD.,.
NORMAL
NODS1
bNODL7
l
When viewing, please be aware that use of this image
masking function may infringe on the legally protected
copyrights of the producer of the video software.
Video software recorded in one mode cannot be convertec
and viewed in another mode.
The image will only be masked off and not converted.
1. How to Adjust Masking
YASKINO
Press the MENU button. While the MENU screen is
displayed, press the ADJUSTMENT V/A buttons to select
“MASKING ADJ.“, and then press the MENU button. The
MASKING ADJ. screen will appear as shown on the left.
After selecting the mode, press the MENU button to displa:,
the ADJUSTMENT mode screen.
YASXINO
ADJ.
ADJ.
NORMAL
bYODE
MODI
..:
SEL.
IEND
: NEXT
2. Press the V/A
293
l
l
l
Adjusting
buttons.
Use the V/A buttons to choose the masked portion you
want to adjust as indicated by the yellow A or v mark.
Each time you press the button, the mark on the screen WI/
change as shown.
The A or v mark is displayed for about 30 seconds.
the upper masking
3. Adjust with the d/b
l
Adjusting
buttons.
Pressing the d/b buttons while the A or v mark appears
on the screen causes the masking to become thicker or
thinner.
the lower masking
To return to the factory preset settings
Press the power button OFF and unplug the AC cord while
the fan is still running. Plug the AC cord back in, and after 60
seconds press the power button back ON.
o-16
Functions on the Projector
Background level
The Background Level adjustment can be used to adjust
the picture white balance for the selected Video Input
Source.
Optimal image quality can be achieved by adjusting the
white portion of the picture to obtain the best colour for the
selected source.
Adjusting the BACKGROUND LEVEL
On-Screen Display
l
VIDEO
ADJ.
VIDSO
ADJ.
,SACXORODIID
STATUS1
m
STAtDSl
LXVBL
ADJ.
lASXI!#O
IMAOB
m
l
ADJ.
SYSTEM
LAIIQWAOB
l
I8lIW
t UBIT
l
BACXQX.
bRED
SLDX
UXSXT
AVzSXL.
LVL
4,rADJ.
,
,
0
+
.
4
MXllDrXIID
Press the MENU button.
Select BACKGROUND LEVEL with the V/A buttons. Then
press the MENU button to change to the picture indicated
on the left.
Select RED or BLUE with the V/A buttons.
Adjust the mode you want with the 4,
buttons.
To return to the factory preset mode, press the V/A
buttons to select RESET then press the 4,
buttons.
Press the MENU button to select the normal screen mode.
Note:
l The Background Level must be adjusted for each source
and is not stored in the status memory.
Using the Blue Screen Function
This projector is equipped with a Blue Screen function that
will turn the screen blue when the video input terminal is not
connected to anything, or the video component is turned off.
On-Screen Display
IMAO
ADJ.
,BLVB ICRESII
(OU)
ISVXR8E
(011)
IllVIRT
IllPVT DIEPLAY
(OPP)
(OR)
ATtSRL.
4,rAD$.
IXUV:EUD
Press the MENU button. While the MENU screen is
displayed, press the ADJUSTMENT V/A buttons to select
IMAGE ADJ. Then press the MENU button to display the
IMAGE ADJ. screen as shown. Press the ADJUSTMENT
V/A buttons to select “BLUE SCREEN”, and press the
ADJUSTMENT 4,
buttons to select ON or OFF Press the
MENU button to return to the normal screen.
When the Blue Screen function is on, the screen will turn
blue when no video signal is being input through the video
input terminal.
When the Blue Screen function is on, and no video signal is
input via the input terminal for more than 15 minutes, the
power is automatically turned off.
Five minutes and one minute before the power is turned off
the indicators appear as shown.
REMAIN SM
Notes:
l When the power is turned off, the POWER indicator will ligh*
red.
l To turn the power on again, press the POWER button to set
it to OFF, then press it again to set it to ON.
Using the On-Screen Display Override
Function
ADJ.
IHAOB
BLVB SCRIBW
RBVBRBX
IIIVSRT
bIRPVT
DISPLAY
to??)
(OFI)
(OPP)
(OFI)
AVrlBL.
YBIIV:BID
4b:ADJ.
The On-Screen Displays (“VIDEO l”, etc.) that appear during
input select can be turned off.
l Press the MENU button. While the MENU screen is
displayed, press the ADJUSTMENT V/A buttons to select
IMAGE ADJ. Then press the MENU button to display the
IMAGE ADJ. screen as shown. Press the ADJUSTMENT
V/A buttons to select “INPUT DISPLAY”, and press the
ADJUSTMENT 4,
buttons to select ON or OFF, then
press the MENU button.
l When OFF is selected, the On-Screen Display (“VIDEO l”,
etc.) will not be displayed during input select.
l To return to the normal screen, press the MENU button.
Air Filter Maintenance
n The air filter should be cleaned every 100 hours of use. Clean the filter more often when the projector is used in
a dusty or smoky location.
n Have your nearest Authorized Sharp Professional LCD Presentation Products Dealer replace the filter
(PFILD0030CEZZ)
when it is no longer possible
to clean it.
AIR FILTER unit
Bottom
3.4.5
FILTER PRESSER
3.4.5
AIR FILTER
20405.6
FILTER COVER
AIR FlLlkR unit
Cleaning and Replacing the Filter
Unplug the power cord.
Note:
l
Be sure the AIR FILTER COVER is securely installed. The power cannot be turned on unless it is correctly
installed.
GB-19
Lamp/Maintenance Indicators
Lamp
n The lamp has a finite operating life.
When the lamp has nearly reached the end of its operating life, the picture and colour quality
deteriorate. At this point, take your projector to the nearest Authorized Sharp Professional LCD
Presentation Products Dealer for repair.
Intense light hazard. Do not attempt to look into the aperture and lens while the projector is operating.
l
l
Maintenance Indicators
n The warning lights on the projector indicate problems inside the projector.
n There are two warning lights-a TEMPERATURE indicator which warns that the projector
is too hot, and a
LAMP replacement indicator which lets you know when to change the bulb.
If a problem occurs, either the TEMPERATURE indicator or the LAMP replacement indicator will light up
red, and the power will shut off. After turning off the power, follow the procedures given below.
I
1
Warning Indicator
1
MENT indi ca tor
TEMPERATURE indicator
-
Symptom
1
Problem
*Blocked
Possible Solution
air intake.
l
*Clogged air filter.
TEMPERATURE
indicator
l
The internal
temperature is
abnormally high.
*Cooling fan breakdown.
@Internal circuit failure.
l
l
LAMP REPLACEMENT
indicator
The lamp does not
light up.
l
Notes:
l
If the TEMPERATURE indicator light comes on, after servicing,
before turning the power back on. (At least 5 minutes.)
l
Relocate projector to a proper location.
Clean the filter.
(See GB-19.)
Take the projector to your nearest Authorized
Sharp Professional LCD Presentation Products
Dealer.
Carefully change the lamp.
Take the projector to your nearest Authorized
Sharp Professional LCD Presentation Products
please wait until the projector has cooled down completeiy
When the power is turned off and then turned on again, as during a brief rest, the LAMP replacement
triggered,
preventing
the power from going on. When this happens,
take the power
indicator
plug out of the AC outlet
may be
and put it back
in again.
Before Calling for Service
Check
Problem
No picture and no sound.
l
l
l
l
l
Sound is heard but no picture
appears.
l
Cables improperly connected to rear panel of the projector. (See GB-12.)
The BRIGHTNESS and PICTURE adjustments are set to mrnrmum postion.
Colour is faded or poor.
l
Check that the COLOR and TINT adjustments
Picture is blurred.
l
l
l
Picture appears
heard.
but no sound is
Maintenance
l
l
An unusual sound is occasionally
heard from the cabinet.
_
The projector power cord is not plugged into the AC wall outlet.
The MAIN POWER switch IS set to OFF.
The input is wrong. (See GB-14.)
Cables improperly connected to rear panel of the projector. (See GB-12.)
Remote control batteries have run down. (See G&5.)
indicator lights up.
_
l
l
(See GB-15.)
are correct. (See GB-15.)
~
~-
Adjust the focus. (See GB-6.)
The projection distance is too long or too short to allow for proper focus. (See GB-7.)
I
Cables improperly connected to rear panel of the projector. (See GB-12.)
Volume is set to minrmum. (See GB-14.)
If the picture is normal, the sound is due to cabrnet shrinkage caused by tempefature Changes. TbIs
will not affect operation or performance.
Refer to “Lamp/Maintenance
Indicators”
on GB-20.
m-20
’
i
I
f
I
Specifications
Product Type
LCD Projector
Model
XV-380H
Video system
PAL/SECAM/NTSC 358/NTSC 4.43
Display method
LCD panels x 3, RGB optical shutter method
Panel size
3.0” (4.5(H) x 6.2(W) cm)
Display method
Translucent TN liquid crystal panels
Drive method
TFT (Thin Film Transistor) Active Matrix panels
No. of pixels
309,120 dots x 3 panels
LCD panels
Lens
l-l.6
zoom lens, F3.6-4.6, f=t05-168 mm
Projection lamp
250 W Metal halide
Contrast ratio
1OO:l
Video input signal
RCA Connector: VIDEO, composite video, lVp-p, sync negative, 7512 terminated
RCA Connector: AUDIO, 142 mVrms, more than 47KR (stereo)
S-video input signal
It-pin mini DIN connector
Y (luminance signal): 1 Vp-p, sync negative, 75~ terminated
C (chrominance signal): burst 0.286 Vp-p, 75Q terminated
Video (monitor) output signal
RCA Connector: VIDEO, composite video lVp-p, sync negative, 75~ terminated
RCA Connector: AUDIO, 142 mVrms, more than 47KR (stereo)
Horizontal resolution
500 TV lines (video input)
Audio output
3W (monaural)
Speaker system
3” (8 cm) round
Rated voltage
AC 200-240V
Rated frequency
50/60 Hz
Power consumption
335w
Standby consumption
4.3 w
Operating temperature
5°C to 40°C
Storage temperature
-20°C to 55°C
Cabinet
Plastic
Dimensions (W x D x H)
500 x 447 x 201 mm projector only
500 x 520 x 201 mm incl. terminal cover
Weight
12.1 kg-projector only, 12.4 kg incl. terminal cover
Supplied accessories
Remote control unit, two AAA batteries, lens cover (installed), terminal cover, extra
air filter, inverting labels, AV cable, 21 pin RCA conversion adaptor
Replacement parts
Remote control (RRMCGl310CESA), Air filter (PFILD0030CEZZ), AV cable (QCNW3740CEZZ) 21 pin RCA conversion adaptor (QSOCZ0305CEZZ)
Our projector uses LCD (Liquid Crystal Display) panels. These very sophisticated panels contain 309,120 pixel (xRGB)
TFTs. (Thin Film Transistors), As with any high technology electronic equipment such as large screen TVs, video systems
and/or video cameras, there are certain acceptable tolerances that the equipment must conform to.
, Sharp’s acceptable
tolerances permit a total of six (6) inactive TFTs, which may result in illuminated
screen.
This will not affect the picture quality or the life expectancy of the unit.
*Specifications
are subject to change without notice.
(B-21
--
dots on the picture
Dimensions
Top View
L __
:
I
--
_-_--
:
!.__
Front View
Side View
.
418
.
I
I
213
“ Bottom View
’
[Units: mm]
@D-22