1
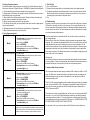
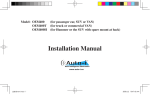
Electron 85/110A
By Century Helicopter Products
85/110A Brushless Speed Control #CNE485
Warning:
Electric motor systems can be dangerous! Electricity can heat wires and batteries causing
fires or severe burns. Follow the directions carefully! Model aircraft with high RPM motors
can hurt or even kill. Always fly at a sanctioned flying field. Never fly over or near people.
Even though the speed control is equipped with safety features caution must be used.
A. Introducing the Electron ESC
The Electron is a revolutionary electric speed controller dedicated for micro and full size
R/C applications. The Electron is the result of years of research and development. It is the
missing link that the electric community has been waiting for. The Electron has multiple,
complex, yet easy to program built-in functions, gentle to the gears and pilots/racers can
program the Electron in the field with ease and comfort.
D. Adding Connectors
The battery connects to the thick red/black wires. (ALWAYS CONNECT RED/RED BLACK/
BLACK) Examine the application for the speed controller to determine if any wire must be
shortened. Use wire strippers to expose enough wire on the speed controller to apply the
required connector. Use solder to connect the cylindrical brass motor connectors to the
three thick wires coming out of the right side.
B. Items needed to connect the Electron ESC
Wire cutters, Wire strippers, Soldering iron, solder & appropriate battery connector
E. Connecting the motor
The motor connects to the three thick leads coming from the. DO NOT CUT the motor wires
from the motor. Only shorten the wires on the ESC. There should be 3 wires extending from
the motor. Solder the appropriate connectors to these three wires coming from the ESC.
C. Features / Specs:
• Features Easy to Use: 4 Flying Modes
• Supports Quick Throttle Response
• Supports Linear Throttle Output
• Supports Stable RPM Control
• Supports Compatibility with Most Brushless Motors
• Supports High Speed Brushless Motors
• 2-Pole Brushless Motors up to 240,000rpm
• 6-Pole Brushless Motor up to 80,000rpm
• 12-Pole Brushless Motor up to 40,000rpm
• Built-in Heat Sink
• Built-in Throttle Calibration Function
• Built-in Soft Start Function for Helicopter
• Built-in Governor Function for Helicopter
• Built-in Auto Motor Timing Function
• Built-in World Famous Brand MOSFET with High Quality, Reliability & Low
Impedance Two Stage Protection Soft Cut then Hard Cut
• Built in SBEC
• Low Battery Protection for LiPo/LiIon Battery
• High Temperature Protection for ESC Body
• Ferrite Ring for Reduced Interference
ESC Specs:
PWM Frequency........................... 12Khz
BEC Continuous Output................. None
Hard Cut Voltage...... 2.6V per Li-Po Cell
High Temperature Protection
Soft Cut Temperature....... 110°C / 230°F
Hard Cut Temperature......120°C / 248°F
(If CNE480 utilizes anything beyond 6 cell Li-Po or 25V, the power source may cause seriContinuous / 15-Sec Peak Current
SBEC
Specs:
ous damage to the ESC and will not be covered
under
warranty)
CNE485................................. 85A / 110A
SBEC Output Voltage : 6V
Maximum Operation Voltage / Li-Po Cell
SBEC Continues Output Current : 3A
CNE485....... 10V ~ 42V (3S ~ 10S LiPo)
SBEC Peak Output Current : 5.5A
Low Battery Protection
Soft Cut Voltage....... 2.9V per Li-Po Cell
F. Reversing the motor
The motor turning direction can be reversed at any time by revering the two red/black power
wires connected to the motor. (DO NOT REVERSE POLARITY FROM THE BATTERY
CONNECTORS AT ANY TIME)
G. Connecting the receiver
Connect the lead with black/red/white wires to the throttle channel on the receiver observing
the polarity direction on the receiver (normally channel 3). Battery power will transfer to
the receiver from the speed controller. If you wish to disable the built in SBEC and run an
external receiver battery pack, simply pull the red wire out from the receiver connector using
a small pin or hobby knife.
H. Wiring diagram
Electron ESC
Brushless Motor
I. How it works
1.) Turn on your transmitter.
2.) Connect the main power to the Electron.
3.) You will hear 4 beeps once power is supplied to the Electron.
4.) The Electron will remain disarmed until the throttle stick is moved to the upright position
(The Electron has an 8 second slow spool up feature, this feature is a power saver and
to prevent the motor from accidentally powering up).
J. Entering Programming mode.
The Electron software is easy to program you can select 1) Soft start without governor 2)
Soft start with Governor 3) Regular Fast start. NO BRAKE 4) Regular fast start with Brake.
1.) Turn the transmitter on and move the throttle stick to the top position.
2.) Supply power to the Electron. After roughly 2 seconds, the Electron will emit a series of
tones indicating entry to program mode.
3.) Move throttle stick to the lowest position and the Electron will ask which mode or program you want to use based on the number of beeps.
4.) Select a mode by moving the throttle to the top position.
5.) The Electron will verify that you have activated a mode by the number of beeps pertaining to the mode selected.
6.) Disconnect power source from the electron once the Electron is programmed.
7.) Move throttle stick down and you are ready to fly!
K. Using Programming mode.
Soft start (heli) w/o governor
Mode 1
Soft start (heli) with governor
Mode 2
Fast start (airplane) No brake
Mode 3
Fast start (glider) with brake
Mode 4
30 second “Safe spool-up”
1.) Throttle stick UP
2.) Connect battery (this will be followed by a series of tones
indicating “programming mode”).
3.) Move throttle stick DOWN.
4.) Wait for ONE BEEP.
5.) Move throttle stick UP confirming selection.
6.) Unplug battery and move throttle stick DOWN and
reconnect battery to fly.
1.) Throttle stick UP
2.) Connect battery (this will be followed by a series of tones
indicating “programming mode”).
3.) Move throttle stick DOWN.
4.) Wait for TWO BEEPS.
5.) Move throttle stick UP confirming selection.
6.) Unplug battery and move throttle stick DOWN and
reconnect battery to fly.
1.) Throttle stick UP
2.) Connect battery (this will be followed by a series of tones
indicating “programming mode”).
3.) Move throttle stick DOWN.
4.) Wait for THREE BEEPS.
5.) Move throttle stick UP confirming selection.
6.) Unplug battery and move throttle stick DOWN and
reconnect battery to fly.
1.) Throttle stick UP
2.) Connect battery (this will be followed by a series of tones
indicating “programming mode”).
3.) Move throttle stick DOWN.
4.) Wait for FOUR BEEPS.
5.) Move throttle stick UP confirming selection.
6.) Unplug battery and move throttle stick DOWN and
reconnect battery to fly.
The Electron has a 30 second re initialization function (in soft start
modes only). This will be activated if the throttle is in the low position
for 30 seconds or more. This function will cause a “soft start” or slow
increase in throttle no matter how quickly the throttle is moved.
L. The First flight
2.) Turn on the transmitter
3.) Connect the main power battery (or activate battery switch) to the speed controller
4.) The speed controller will remain disarmed (will not work) until it sees minimum throttle.
Move the throttle stick to the lowest point and lower any throttle trim until you discover
the arming point on the throttle on the speed control.
5.) Fly!
M. Troubleshooting
Everything is hooked up correctly, the receiver & servos work, but throttle does not respond.
The Electron is not seeing “low stick” and is not arming. Try moving the throttle stick and
trims to low positions until the speed control arms. Observe any endpoint adjustments that
may also relate to the throttle. The throttle channel may need to be reversed in the transmitter to allow the proper throttle response.
Every time when throttle is at maximum the ESC cuts off after a moment, even with new
fully charged batteries.
Electron will turn off the motor if the battery voltage drops below the programmed voltage
safeguard. This is to prevent unexpected and erratic results. If the cutoff occurs on new fully
charged batteries the motor may be drawing too much current from the battery. This will
cause the battery voltage to drop very rapidly and initiate the safeguard. The motor may be
compromised in some way by too much resistance in the gearing or a prop or blades that
are too large for the motor. The battery being used may not be capable of supplying enough
power to the motor. Try other batteries.
Nothing works!
Check all the connections to ensure correct polarity and power supply. Also check transmitter for any inhibitors. If there is nothing else that can be done then call the dealer where you
purchased the Electron or Century directly. Please refer to the warranty section.
O. Important Radio Setup Information
Use a one-speed setup that has the gearing to allow the ESC to always run at 80% to 100%
output. The ESC acts as a throttle and will have to dissipate the energy that makes up the
difference between the input and output. If that difference is too large, then the ESC will
overheat and destroy itself.
The 80% to 100% output rule applies equally for standard and governor modes. In standard
mode, this implies that 80% to 100% of the power is being passed through the ESC all the
time. In governor mode, this implies that the ESC throttles the power to maintain 80% to
100% of the maximum RPM.
This means for your setup in normal flight mode, make sure you are not flying below an 80%
throttle curve. If you do, the ESC will be holding back power from your battery essentially
overheating and burning itself out. This is very important as a lot of beginners like to bring
the headspeed down by using a lower than 80% throttle curve. THIS WILL BURN OUT THE
ESC AND POSSIBLY CAUSE A FIRE! DO NOT DO THIS!
For your setup in idle up, you want to be above the 80% throttle curve mark at all times.
Typically, the way to fly an electric helicopter is to start out in normal mode and as soon
as you are in the air, switch over to idle up.
What does this mean at 0 degrees of collective? Will the ESC be doing significant throttling? Yes it will. If that’s the case, then you can’t spend too much time at that setting.
This is probably realistic, because if you were to stay at 0 degrees of collective, you’d
probably crash into the ground after 15 seconds.
Any time you make any changes to your transmitters end points, you must reprogram
the ESC. Refer to section J for programming instructions.
P. How do I do autorotations?
Shut down the motor completely. If you want to run a ‘trick’ setting, as long as you don’t
pull too much, for too long a time period, the ESC should do fine. THIS IS NOT REPLACEABLE UNDER WARRANTY IF THE ESC DESTROYS ITSELF THIS WAY. This is
up to self experimentation, checking ESC temps after an auto is in order here as the differences in set-ups (blades, gearing, power combo to name a few) makes it impossible
to provide a numerical value that can be applied across the board.
O. Contact Warranty Information
Your Electron ESC is warranted for 90 days from the original purchase to be free from
manufacturing and component defects. Warranty is only valid for the original purchaser
(warranty is non transferable). This warranty does not include misuse, neglect or tampering or any damage caused by improper wiring. Warranty does not cover damage caused
by overloading.
Warning:
Electric motor systems can be dangerous! Electricity can heat wires and batteries
causing fires or severe burns. Follow the directions carefully! Model aircraft with high
RPM motors can hurt or even kill. Always fly at a sanctioned flying field. Never fly over
or near people. Even though the speed control is equipped with safety features caution
must be used.
Century Helicopter Products
1740-C Junction Ave.
San Jose, CA 95112
Fax: 408-451-1156
www.centuryheli.com