1
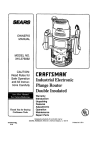
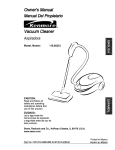
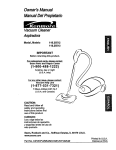
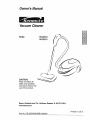
Owner's Manual
Vacuum Cleaner
Model
116,22512
116.22513
CAUTION:
Read and follow all
safety and operating
instructionsbefore first
use of this product°
Sears, Roebuck
www.sears.com
and Co., Hoffman
Estates, IL 60179 U.S.A.
Printed in U.S_A.
Part No. CO1ZBPKOOUO_-8192043
Before Using Your New Vacuum .......
2
KenmoreVacuum
Cleaner Warranty _ _ 2
Important Safety Instructions ................. 3
Parts and Features ..................
4-5
Assembly
Instructions
..............
6-7
Use ...............................
How to Start ........................
8
8
Vacuuming Tips ........................
Suggested Pile Height Settings .........
Attachments ........................
Attachment Use Chart ................
Performance Features ...............
9
9
10
10
11
Please read this guide. It will help you assemble
the safest and most effective way,
Canister Care
.......................
12
Bag Changing .....................
Cleaning Exterior and Attachments .....
Motor Safety Filter Changing ..........
Exhaust Filter Changing
..................
Power-Mate ® Care
...................
t2
t3
13
14
14
Light Bulb Changing ....................
15
Belt Changing and Brush Cleaning ..... 15-t6
Brush Servicing ..................
17
Brush Assembly ....................
17
Troubleshooting
Requesting
Or Service
.....................
Assistance
.................
18
Back Cover
and operate your new Kenmore vacuum in
For more information about vacuum cleaner care and operation, call your nearest Sears store,
You will need the complete model and serial numbers when requesting information. Your vacuum's model and serial numbers are located on the Model and Serial Number Plate,
Use the space below to record the model number and serial number of your new Kenmore
vacuum,
Model No.
Serial Noo
Date of Purchase
Keep this book and your sales check (receipt) in a safe place for future reference.
LIMITED
ONEYEAR
WARRANTY
ON KENMOREVACUUM
CLEANER
This warranty is for one year from the date of purchase, and includes only private household
vacuum cleaner use, During the warranty year, when this vacuum cleaner is operated and
maintained according to the owner's manual instructions, Sears will repair any defects in
material or workmanship free of charge
This warranty excludes vacuum bags, belts, light bulbs, and filters, which are expendable parts
and become worn during normal use.
For warranty service,
the United States.
return this vacuum cleaner to the nearest Sears Service
Center
in
This warranty applies only while this product is in use in the United States. This warranty gives
you specific legal rights, and you may also have other rights which vary from state to state,
Sears, Roebuck and Coo, D1817 WA, Hoffman Estates, IL 60179
WARNIN
Your safety is important to us. To reduce the risk of fire, electrical shock, injury
to persons or damage when using your vacuum cleaner, foltow basic safety precautions including the following:
Read this manual before assembling or
using your vacuum cleaner.
Use your cleaner only as described in this
manual Use only with Sears recommended
attachments.
To reduce the risk of electrical shock - Do
not use outdoors or on wet surfaces.
Disconnect electrical supply before servicing or cleaning out brush area. Failure to
do so could result in electrical shock or
brush suddenly starting.
Always turn cleaner off before connecting
or disconnecting the hose or Power-Mate®_
Always
turn cleaner off before unplugging_
Do not unptug by puffing on cord.. To
unplug, grasp the plug, not the cord.
Hold plug when rewinding onto cord reel.
Do not allow plug to whip when rewinding.
Do not use with damaged cord or plug.. If
cleaner is not working as it should, has
been dropped, damaged, left outdoors, or
dropped into water, return it to a Sears
Service Center.
Do not pull or carry by cord, use cord as a
handle, dose door on cord, or pull cord
around sharp edges or corners. Do not run
cleaner over cord_ Keep cord away from
heated surfaces.
Do not leave cleaner when plugged in.
Unplug from outlet when not in use and
before servicing.
Do not allow to be used as a toy. Close
attention is necessary when used by or
near children..
tured hose° The hose contains electrical
wires. Replace if cut or worn° Avoid picking
up sharp objects.
Do not use with any opening blocked; keep
free of dust, lint, hair and anything that may
reduce air flowo
Keep hair, loose clothing, fingers, and all
parts of body away from openings and moving parts_
gN
Do not use cleaner without dust bag and/or
_ters in place.
Always change the dust bag after vacuuming carpet cleaners or freshener, powders
and fine dust. These products clog the bag,
reduce airflow and can cause the bag to
burst. Failure to change bag could cause
permanent damage to the cleaner.
Do not use the cleaner to pick up sharp
hard objects, small toys, pins, paper clips,
etco They may damage the cleaner or dust
bag.
Do not pick up anything that is burning or
smoking, such as cigarettes, matches, or
hot ashes.
Do not use cleaner to pick up flammable or
combustible liquids (gasoline, cleaning fluids, perfumes, etc.), or use in areas where
they may be present, The fumes from these
substances can create a fire hazard or
explosion.
Use extra care when cleaning on stairs. Do
not put on chairs, tables, etc. Keep on floor.
Do not handle plug or cleaner with wet
hands.
You are responsible for making sure that
your vacuum cleaner is not used by anyone
unable to operate it properly.
Do not put any objects into openings_
Do not operate the cleaner with a punc-
Do not operate without exhaust
exhaust filter cover installed.
filter or
SAVE THESE INSTRUCTIONS
Proper assembly and safe use of your vacuum cleaner are your responsibilities. Your cleaner
is intended only for household use° Read this Owner's Manual carefully for important use and
safety information. This guide contains safety statements under warning and caution symbols_
Please pay special attention to these boxes and follow any instructions given. WARNING
statements alert you to such dangers as fire, electrical shock, burns and personal injury CAU.
TION statements alert you to such dangers as personal iniurv a£d/or property dama.qe_...............
3
k_,_t_4N
It is important to know your vacuum cleaner's
use. Review these before using your cleaner.
parts and features to assure its proper and safe
;_4--
Cord and
Plug Holder
Upper
Cord and
Cord Holder
Wand
_-- Power.Mate ®
Power Cord
Wand Swivel
o
o
Cord Holder
Belt
tn UoS,#20.5285
tn Canada #40110
POWER-MATEs
Pile Height Indicator
(Some Models)
Headlight and Lens
Bulb
Wand Quick
Release Pedal
(Some Models)
In U.S,Models)
#20.5240
(Some
In Canada #596181
. LlghtCover
Power.Mate ®
Model/Serial Numbers
Cleaner
(Not Shown)
(On Bottom)
1t!
Handle /
Release//
Pedal "
OverloadProtector
(ResetButton)
Pile Height Pedal
(Some Models)
4
HOSE
ATTACHMENTS
Power-Mate Jr,=
(Some Models)
3-Way On/Off Switch
Off/Bare Floor/Carpet
(Some Models)
Crevice
Toot
Speed
Control
Handle
1
IL-L-----J
Combination
Brush
(Some
Models)
Floor
Brush
t
Handi_Mate Jr.'_
(Some Models)
NOTE: All models have one set of
attachments in the canister, Some
models have an additional set,
which can be kept in the accessory
bag for garage use.
Hose Swivel
CANISTER
Attachment
Storage
Cord Rewind
Button
Exhaust Filter Cover
(Exhaust Filter Inside)
Canlster
Performance
Indicator
(Some Models)
Cord
Hood
Release
Motor Safety Filter
(Behind Dust Bag)
Bag HoMer
Dust Bag
In
#20-50558
in U.S,
Canada
#20.50555 ]_
ii,
ii,
,
i
n,l,lu,,i,,H,n
WARNING
Electrical
Shock Hazard
DO NOT plug into electrical supply
until assembly is complete, Failure
to do so could result in electrical
shock
Handle
or injury.
,,
,,,,,,
, ,,
,,, ,,,
,
, ,
,
Before assembling vacuum, check the
PACKING LIST on the cover of the separate
Repair Parts List. Use this list to verify that
you have received all the components of
your new Kenmore vacuum.
WANDS
Slide wands
together until
wand button
snaps into place,
Turn wand button
to the slotted area
of the wand swivelr
The swivel allows
you to turn the
handle to the left
side to reach farther under low
furniture.
Swivel -Wand
Cord
Holder f
Wand
Swivel
POWER-MATE ®
1. insert wands into Power-Mate ® until the
wand buttons snaps into place.
Wand
2. Connect PowerRaised
Area
Mate_plug and
cord as shown,
DO NOT force.
Raised area of
o_
__j
plug must be
toward hand,
3. Secure cord into
cord holder on
wand swivel.
To remove; Disconnect cord and step on
wand release pedal, then pull up on wands.
6
Wand
Button
CANISTER
Handle
1. Open the canister hood.
2. Check to see that the dust bag is properly in,stalledo See BAG CHANGING for
instructions,
3. Check to see that the motor safety filter is
properly installed,, See MOTOR SAFETY
FILTER CLEANING for instructions,
HOOD
It is normal for the canister hood to come off
when opened further than needed° Line up
the hinge slots, insert them, and close the
hood to replace it.
2. Insert handle into wand until lock
HOSE
1. Line up the
hose latch tab
and notch in
canister hood
and insert hose
into canister until
it snaps in place_
Latch
To remove: Lift
hose latch tab
button snaps in place° Be sure hose is
not twisted_
To remove: Press handle release button and pull up on handieo
To store: Disconnect
hose from wands
and canister to prevent stress on hose
during storage. Store hose in a loosely
coiled position so the hose covering is
not stressed.
upward and pull
up on hose°
Hose
F.
Hose
Latch Tab
Cover
Hood
Re_ase
Attachment
Storage
DustBag
HOW TO START
Pile Height
!
Indicator
Personal Injury and Product Damage
Hazard
• DO NOT plug in if switch is in ON
position. Personal injury or
damage could result.
Handle Release
Pedal
• The cord moves rapidly when
rewinding. Keep children away
and provide a clear path when
rewinding the cord to prevent
personal injury.
3. Lower wand from upright position by
pressing on the handle release pedal.
• DO NOT use outlets above
CAUTION
counters. Damage from cord to
items in surrounding area
could occur.
i
i1,111
_:
i
i
iiiii
i
DO NOT leave the Power-Mate ®
I
running in one spot in the upright
position for any length of time.
Damage to carpet may occur.
1. Pull cord out of
canister to desired
length. The cord
0_
will cord
the
not rewind
rewind until
button is pushed,
NOTE: To reduce the risk of electric shock,
this vacuum cleaner has a polarized plug,
one blade is wider than the other. This plug
will fit in a polarized outlet only one way. If
the plug does not fit fully in the outlet,
reverse the plug. If it still does not fit, contact a qualified electrician to install the proper outlet. Do not change the plug in any
way,
4. Select a pile height setting by pressing
the small pedal on the rear of the PowerMate% The pile height setting shows on the
indicator, See SUGGESTED PILE HEIGHT
SETTINGS.
Attention:
Refer to your carpet manufacturers cleaning recommendations.
Some
more delicate carpets may require that they
be vacuumed with the Power-Mate ® agitator
turned off, to prevent carpet damage.
5. Select a switch
position on the
handle.
2. Plug the polarized power cord into a 120
Volt outlet Iocated near the floor.
To rewind: Unplug the cleaner. Hold the
plug while rewinding to prevent damage or
injury from the moving cord. Push cord
rewind bar_
OFF
FLOOR - turns on the canister
motor only.
CARPET - turns on both the canister
the Power-Mate ® motors.
and
Suggested
sweeping
pattern.
Suction
Control
For best cleaning action, the Power-Mate ®
should be pushed straight away from you
and pulled straight back, At the end of each
pull stroke, the direction of the Power-Mate ®
shouid be changed to point into the next
section to be cleaned, This pattern should
be continued across the rug with slow, gliding motions,
NOTE: Fast,
Carpeted stairs need to be vacuumed
regularly° For best cleaning results, fu!ly
close the suction control.
jerky strokes do
not provide
complete cleaning
WARNING
Personal Injury Hazard
The hose swivel
allows the hose to
turn without moving
the canister. This is
helpful for cleaning
in small areas.
Check hose for
twisting before
pulling canister.
Use care if canister is placed on
stairs, if it falls, personal injury
or property damage could result.
For best cleaning results, keep the airflow passage open. Check each assembly area in HOW YOUR VACUUM
WORKS occasionally for clogs, Unplug
from outlet before checking.
•
CAUTION
To prevent tip over, never leave
Power-Mate ® on or in the upright
position.Turning
the handle to one
side will make the Power-Mate ®more
stable and less likely to tip over.
For best deep down cleaning, use the XLO
setting. However, you may need to raise the
height to make some jobs easier, such as
scatter rugs and some deep pile carpets,
and to prevent the vacuum cleaner from
shutting off. Suggested settings are:
HI - Shag, deep pile, or scatter rugs_
MED - Medium to deep pileo
LO - Low to medium pile.
XLO - Most carpets and bare floors.
ATTACHMENTS
1, To remove
wands from PowerMate ®, lock wands
in straight-up position_
ATTACHMENTS ON HANDLE
NOTE: If the
Power-Mate ® is
attached, turn
cleaner off
Handle
Button -_ U
Upper
_
Wand
V
If your model
B===
2. Press wand
Wand Quick
Release Pedal
release pedal
with foot and
am
pull the wands
straight up out of
Power-Mate ®,
The Power-Mate _' plug and cord do not have
to be removed to use attachments on the
wands.
has the optional feature of a handle release,
press it in similarly.
2. Slide attachments
ill
m
before removing
handle from
wands.,
1. Press lock
button, then pul!
to remove handie from wand,
ON WANDS
3. Put attach-ments on
wands as needed. See
chart below.
firm-
ly on handle as needed.
See chart below°
CLEANING
ATTACHMENT
Combination Brush
(Some Models)
Crevice Tool
(Some Models)
Floor Brush
(Some Models)
Between
Furniture* Cushions*
X
Drapes*
Stairs
X
X
Bare
Floors
Carpeted
FloorstRugs Walls
X
X
X
Power-Mate •
(Some Models)
Handi-Mate Jr. ®
(Some Models)**
Power-Mate Jr, ®
(Some Models)**
AREA
X
X***
x
X
X
x
X
x
*Always clean attachments before using on fabrics,. '" 3-way On!Off switch should be in FLOOR position
'** HandFMate Jr,®and Power-Mate Jr._ attachment instructions are tnciuded with the products * ** (Some Models)
Power-Mate switch should be in OFF position
NOTE= When separating wands, depress lqck button completely before p ullin_wands apart. If
wand lock button is difficult to depress push the two wanas more lightly [ogmner to _ine up
the ock button w th the hoe. Depress ock button and then pull wands apart.
10
PERFORMANCE
INDICATOR
Activebrushedge
cleanersareon both
sidesof the PowerMate®.Guideeither
sideof the PowerMate®alongbaseboardsor nextto
furnitureto help
removedirttrappedat
carpetedges,
SOME
MODELS
if the performance indicator turns entirely red
check for a full dust bag, or a clog in the
vacuum. See HOW YOUR VACUUM
WORKS
OVERLOAD PROTECTOR
The Power-Mate ®has
built-in protection against
motor and belt damage
should the brush jam. If
the brush slows down or
NOTE; The performance indicator may
turn red when using attachments or when
cleaning new carpet, due to reduced airflow by the attachments themselves or
............
_#;_.
#_F_'
_;,_,,_i_
new carpet fuzz filling the bag quickly.
,!,i_:,"._
POWER-MATE®STORAGE
....
SOME
MODELS
The lower wand has a "U" shaped flange in
the area where the power cord attaches_
The base has a "U" shaped slot near the
front caster.
stops, the overload
protector button pops up
and shuts off the PowerMateS° The canister motor
will continue to run,
The slot allows the
wands and PowerMate ®to be stored
with the canister to
To correct problem: See
TROUBLESHOOTING.
To reset: Push in the overload
button°
SUCTION
protector
conserve storage
space, The canister
must be stored on
end for this feature
to be used.
CONTROL
The suction
control allows
The wand will slip out of the slot as it is lifted up for use and will slide into the slot as it
is lowered for storage_
you to change
the vacuum
suction
suction
suction for
different fabric
and carpet weights Opening the control
decreases suction for draperies and
lightweight rugs, while closing the control
increases suction for upholsteries and
carpets.
THERMAL
This vacuum has a thermal protector which
automatically trips to protect the vacuum
from overheating
The thermal protector
turns the motor off automatically to allow the
motor to cool in order to prevent possible
damage to the vacuum°
WARNING
Personal
Injury
PROTECTOR
To reset: Turn off and unplug the vacuum
from the outlet to allow the vacuum to cool.
Hazard
Check for and remove any clogs. Also
check and replace any clogged filters.
Wait approximately
50 minutes and plug
the vacuum in and turn back on to see if
Always unplug the vacuum cleaner
before cleaning the brush area as
brush may suddenly restart. Failure
to do so can result in personal
injury.
the thermal protector has reset. In some
cases, the unit may suddenly restart. DO
NOT leave unattended.
11
Thevacuumcleanercreatessuctionthat
picksup dirt,Rapidlymovingair carries
the dirt to the dustbagthroughthe
airflow passages° The dust bag lets
the air pass through, while it traps
t,edirt
/S._.
_
,_.,,"
"
///
For best cleaning results, keep
_/"
the airflow passage open
/**_'
Check the starred areas
,/_y"
occasionally for ctogs_
i4y
Unplug from outlet
_
/
/_
_ _
\ _.
.k._,._
BAG CHANGING
_
Mofor
safety
Filter
\
Exhaus
Filter
7. The red bag mount will flip forward after
removing bag.
For best cleaning results, the dust bag
should be changed often. The performance
indicator (some models) will specify when
the dust bag needs to be changed or the
airflow is blocked. NOTE: See PARTS AND
8. Rotate red bag
mount down and
install bag into
slots per
intructions
FEATURES for Bag Number.
pushing down until
the cardboard tab
1. Unplug cord from
wall outlet,
locks into position
and the holes
2. Remove hose
from canister.
align, Tuck the bag
securely into the bag cavity so that none of it
is able to be pinched by the hood,
3. Pull hood release
out and up, then lift
canister hood.
9. Replace and latch canister hood,
10. Insert hose into canister.
4, Disengage
cardboard tab from
red bag mount by
pulling away and
"_j
lifting up_
-_
5. Pull bag out of
the red bag mount.
"_
11. Plug cord into wall outlet,
E
•
Mofor_
6. Check and
F,ter : / ///!// /////
replace, if
necessary, the
motor safety
_ter,
CAUTION
NEVER REUSE A DUST BAG.Very
fine materials, such as carpet freshener, face powder, fine dust, plaster,
soot, new carpet lint, etc. can clog
the bag and cause it to burst before
it is full and may cause damage to
vacuum motor. Change bag more
often when vacuuming these materials.
12
!.
1. Unplug cord from wall outlet, DO NOT
drip water on cleaner.
2. Clean exterior using a clean, soft cloth
that has been dipped in a solution of mild
liquid detergent and water, then wrung dry.
Wipe dry after cleaning.
CAUT,ON
Do not use attachments ifthey
are wet. Attachments used in
dirty areas, such as under a
refrigerator, should not be used
on other surfaces until they are
washed.They could leave marks.
3. To reduce static electricity and dust buildup, wipe outer surface of cleaner and
attachments.
,fill
1, Lift the rubber retainer
change when dirty.
.........................
and pull out
motor safety
_ter as
shown.
Electrical Shock Hazard
Unplug power cord from electrical
outlet. Do not operate the cleaner
without the motor safety filter. Be
sure the filter is dry and properly
installed to prevent motor failure
and/or electrical shock.
ill
2. Replace the filter, white side out,
by sliding it back
into place under
the ribs in the bag
cavity. Tuck filter in
so that it fits com-
i
Remove the bag as outlined in the BAG
CHANGING section.
MOTOR SAFETY
ELECTROSTATIC
FILTER
pletely under the
rubber retainer.
3. Replace the bag as outlined in the BAG
CHANGING section.
This white and grey filter must be replaced
when dirty. It should be replaced regularly
depending on use conditions. The filter
CANNOT be washed as it will lose its
dust trapping
!
ability,
NEVER REUSE A DUST BAG.Very
fine materials, such as carpet freshener, face powder, fine dust, plaster,
soot, new carpet lint, etc. can clog
the bag and cause it to burst before
it is full. Change bag more often
when vacuuming these materials.
iJl ILI_
13
E
•
Exhaust\'_
Filter
WARNING
_
_
Fire and/or Electrical Shock Hazard
becomes dirty,
remove it by
pulling straight up,
Do not operate with a clogged
exhaust filter or without the exhaust
filter or exhaust filter cover installed,
EXHAUST FILTER
HEPA
3o Place the new
filter into the motor
cover with the
The exhaust filter cartridge must be
replaced when dirty° Replace the filter when
the entire surface area is covered evenly.
The filter CANNOT be washed as it will
lose its dust trapping
2. When the
exhaust filter
Exhaust
Filter
grey edge down.
ability.
Replacement exhaust filters are available
through Sears Service Center under part
no. 86880. See "Requesting
Assistance
or Service"
4. Reinstall the
exhaust filter
cover by inserting the tab into
the slot in the
motor cover°
1, Pull out and up
on the exhaust filter
cover to remove
from the motor
cover and lay aside,
Press firmly to
snap exhaust filter cover into
place,
E
Always follow all safety precautions when
cleaning and servicing the Power-Mate ®.
•
WARNING
Electrical
Shock Or Personal Injury
Hazard
Disconnect electrical supply before
servicing or cleaning the unit,
Failure to do so could result in electrical shock or personal injury from
cleaner suddenly starting.
14
1. Remove light
cover by pressing
in and lifting both
sides as shown.
Push In
_
And Turn ["_._
-._..
2. Push in and turn
bulb counterclockwise to remove.
_---___t
3. Replace the bulb,,
__
higher than t5 Watts
(130V)o Close light
Bulb must
be
cover
until not
it snaps
in
places
_o_
NOTE: See PARTS AND FEATURES for
Bulb #.
E
Remove any dirt or debris in the belt path
area or in the brush roller area.
CAUTION
When you remove the end caps, a
small metal washer on each end
Carefully remove
any string or
debris located on
the agitator, end
caps, washers or
agitator shaft,
may come off. DO NOT lose these
two metal washers.
TO CLEAN AGITATOR:
NOTE: In order to keep cleaning efficiency
high and to prevent damage to your vacuum,
the agitator must be cleaned every time the
belt is changed.
IMPORTANT
Replace the washers and the end caps,
See the exploded view for correct
assembly.
The agitator must also be cleaned according
to the following schedule:
Vacuum
Use
Clean A_itator
Disconnect
HEAVY
-
every week
Check and remove hair, string and lint build®
up frequently in the Power-Mate
agitator
and end cap areas. If build-up becomes
®
excessive, disconnect Power-Mate
from
wand and follow the steps below_
(used daily)
MODERATE
-
every month
(used 2_3 times/week)
LIGHT -
every 2 months
(used I time/week)
15
cleaner from electrical
outlet.
TO REMOVE BELT
TO REPLACE BELT
1o Remove light cover
and light bulb as shown
under LIGHT BULB
CHANGING,
2. Unscrew the PowerMate ® cover screws_
3. Turn
Power-Mate ®
ever, To
1. Slide washers and brush supports onto
brush assembly.
remove cover,
insert
screwdriver at
cover tabs on
both sides
and twist to
release tabs.
2. Install
new belt
over motor
drive, then
over brush
MoOr
Ddve
sprocket,
Tab
NOTE: See
PARTS AND
FEATURES
for Belt #_
4. lurn PowerMate ® right side
up, Press handle
release pedal
and lower the
swivel Rotate
cover forward
from back until
Brush
Brush
Support
3. Snap brush
supports into
place on base,
Be sure brush
front snaps free.
supports are
not upside*
down,,
5. Carefully
insert and
lift
screwdriver
at each
brush
support to
free brush
from base,,
6. Remove
worn belt.
Brush Sprocket
4. Line up
front of cover
and base,
Rest cover
Brush
Support
on front edge
of base as
shown.
Cover
Base
7. SIide brush
supports off to
check and clean
5. Rotate cover
back. Press
brush support
areas, See
BRUSH
ASSEMBLY for
cover firmly until
side tabs snap
into place.
Replace cover
screws, light
bulb and light
cove r.
picture of
complete brush
assembly,,
16
E
_•
TO REPLACE BRUSH DOWEL
WARNING
.........................
1. Remove
Power-Mate ®cover, belt and
brush assembly, See "To Remove Belt" in
BELT CHANGING AND BRUSH
CLEANING..
Electrical Shock Or Personal Injury
Hazard
Disconnect electrical supply before
servicing or cleaning the unit.
Failure to do so could result in electrical shock or personal injury from
cleaner suddenly starting,
2. Remove brush supports, washers,
screws, end brush, brush sprocket pieces
from ends of brush assembly_
3. Reassemble brush assembly. To line up
screw holes in dowel, sprocket and end
brush, be sure the brush portion of end
brush lines up with brushes on brush
dowel
TO CHECK BRUSHES
are worn to the
level of the base
__.__=__IF
4. Replace belt, brush assembly, PowerMate®cover, light bulb and light cover. See
"To replace belt" in BELT CHANGING AND
BRUSH CLEANING.
support bars,
When brushes
replace the
brush dowel.
Base Support Bars
Brush
Sprocket
Flange
End
Brush
Screw
End
Cap
_Washer
Screw
End
Cap
Agitator
Unit
Brush Sprocket
17
i
Washer
Reviewthis charttofind do-it-yourself
solutionsforminorperformanceproblems.Any service
needed,otherthanthosedescribedin this owner'smanual,shouldbe performedby a Sears
authorizedservicerepresentative.
WARNING
Disconnect electricalElectrical
supply
Shock
before Hazard
servicing or cleaning the unit.
Failure to do so could result in electrical shock or personal injury.
Cleanerwon't start.
Poorjob of dirt
pick-up,
Cleaner starts but
cuts off.
Power-Mate=wlll not
run when attached,
Performance indicator,
some models, is red.
Cleaner picks up moveable
rugs -or., Power-Mate=
pushes too hard.
Light won't work,
Unpluggedat walloutfet.
2. Trippedcircuit breaker/blownfuse
at household service panel,
3+
Loosehose electrical connections
4. Trippedthermal
protector in
canister
2.
3.
4.
5.
6,
7,
8+
9.
10.
t.
Full or clogged dust bag
Cbgged airflow passages
Dirty filters.
Wrong pile height setting
Opensuction control
HoleInhose
Worn Power-Mate®brushes
Worn or broken bait,
Dirty brush or brush supports.
Canisterhood open.
Hoseor hoodefectrical conneclians
2_
Tripped overload proteclor in
Power-Mate®,,
3_
Tripped lhermal protector
incanister
Power-Mate"connections
unplugged,
2_
Worn or broken belt,
3o Dirtybrush or brush suppods.
4_ Trappedoverloadproteclor in
Power-MateTM
t-
Full
orclogged
dustbag.
2o Dirtyfitters,
3, Clogged eidlow passage
4. Certain attachment tools.
1,. Plug in firmly, push ON/OFFswitch to ON
2. Reset circuitbreaker or replacefuse
3, Reconnecthose ends, (page 7),
4, Reset thermalprotector,(page 11).
1, Change bag, (page13),
2. Clear aidiow passages, (page 13).
3, Clean!changefilters, Ipage 14, 15)
4. Adjust setting, (pageg),
5. Adjust control,(page 12)
6o Replace hose.
7. Change brushes, (page !8)
8 & 9, See BELT CHANGING AND BRUSH
CLEANING, (pages t6, 17)
10, Close and falch hood
1. Check connections, reconnect hose
ends, (page7)
2o Removeany items thatmay be caught
or jammed, then reset If cleaner starts
and stops again, clean brush and brush
supports, then reset, (pages 16, 17).
3. Reset thermal protector,(page ! I),
I, Plugin lirmly,
(page6).
2 & 3. See BELT CHANGINGAND BRUSH
CLEANING, (pages 16, 17).
4. Check brush area for excessive lint
build-upor jamming. Clean brush and
brush supports, then reset, (pages !6, 17)
I. Change bag, (page 13).
2. Cfearv'changefilters,(page I4, 15)
3, Clear clog from airflowpassage, (page 13)
4. This is normal,Redshould disappear
when tootis removed
Wrong pile height setting.
Suction toostrong
1. Adjust setting, (page9)
2, Opensuction control,(page 16)
BurnedoutFight
bulb.
1. Change light bulb, (page 16)
Cord won't rewind.
1. Dirty power cord
2. Cordjammed
1. CIean the powercord
2. Pullcut cord and rewind.
Cleanerleaves marks
on carpet.
1. Wrongvacuuming pattern,
1. See VACUUMINGTIPS, (page 9)
18
For
repair of major brand appliances in your own home...
no matter who made it, no matter who sold it!
1-800-4-MY-HOM E®
Anytime, day or night
(1_800-469-4663)
(UoS°Aoand Canada)
www.sears°com
www,sears.ca
For repair of carry-in products like vacuums, lawn equipment, and
electronics, call for the nearest Sears Parts and Repair Center.
1-800-488-1222
Anytime, day or night (U.S.A. only)
www, sears,com
For the replacement parts, accessories and owner's manuals
k
that you need to do-it-yourself,
1-800-366-PART
(1-800-366-7278)
call Sears PartsDirectSM!
6 a.m° - 11 p.m, 7 days a week
(U.S.A. only)
www,sears.comipartsdlrect
To purchase or inquire about a Sears Service Agreement
or Sears Maintenance
1-800-827-6655
(U.S.A.)
7 a.m. - 5 p.m., CST, Mort° - Sat.
Pare pedir servicio de reparacidn a
domicilio, y pare ordenar piezas:
1.-888-SU-HOGAR sM
(I-888-784-6427)
Agreement:
1-800-361-6665
(Canada)
9 a.m. - 8 p.m. EST, M -.. F, 4 p.m. Sat.
Au Canada pour service en franc,,ais:
1.800-LE-FOYER Mc
(1-800-533-6937)
wwwosears_ca
© Sears, Roebuck and Co,
® RegisteredTrademark/ -r_Trademark/ SMService Mark of Sears, Roebuckand Co.
®Marca Registrads1TMMarca de Fdbrica t SM Marcade Ssrvtcfode Sears,Roebuckand Co.
McMarquede commerce/ MDMarqued_pos_ede Sears,RoebuckandCo.