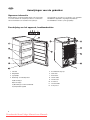
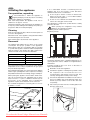
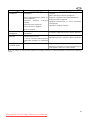
1
Gebruiksaanwijzing
Mode d’emploi
Gebrauchsanleitung
Instruction
book
Gefrierschrank
Frezer
Congelateur
Diepvriezer
cpy
cyaa
ZFT 410W
Downloaded from Fridge-Manual.com Manuals
NL
Lees deze gebruiksaanwijzing aandachtig door voordat u het apparaat installeert en in gebruik neemt. U vindt
hierin aanwijzingen m.b.t. de veiligheid, praktische informatie, informatie m.b.t. het milieu en tips. Als u het
apparaat volgens de aanwijzingen gebruikt, zal het naar volle tevredenheid werken.
M.b.v. onderstaande symbolen kunt u informatie makkelijk vinden:
Aanwijzingen m.b.t. de veilligheid
Aanwijzingen die belangrijk zijn voor uw veiligheid of voor het functioneren van het apparaat.
Praktische informatie
Informatie m.b.t. het milieu
Tips
Tips m.b.t. levensmiddelen en het bewaren daarvan.
Het symbool op het product of op de verpakking wijst erop dat dit product niet als huishoudafval mag
worden behandeld. Het moet echter naar een plaats worden gebracht waar elektrische en elektronische
apparatuur wordt gerecycled. Als u ervoor zorgt dat dit product op de correcte manier wordt verwijderd,
voorkomt u mogelijk voor mens en milieu negatieve gevolgen die zich zouden kunnen voordoen in geval
van verkeerde afvalbehandeling. Voor meer details in verband met het recyclen van dit product, neemt u
het best contact op met de gemeentelijke instanties, het bedrijf of de dienst belast met de verwijdering
van huishoudafval of de winkel waar u het product hebt gekocht.
Inhoudsopgave
Belangrijke aanwijzingen m.b.t. de veiligheid......3
Algemene aanwijzingen m.b.t. de veiligheid ..........3
Veiligheid van kinderen ......................................3
Vóór het in gebruik nemen .................................3
Veiligheidsmaatregelen voor isobutaan .................3
Aanwijzingen voor de gebruiker .........................4
Algemene informatie .........................................4
Beschrijving van het apparaat, belangrijkste
onderdelen......................................................4
Bedienings- en indicatiepaneel .......................5
Bedienen van het apparaat.................................5
In gebruik nemen .........................................5
Temperatuur instellen ....................................5
Invriezen .....................................................5
Bewaren .....................................................5
Praktische informatie.........................................6
Tips................................................................6
2
Downloaded from Fridge-Manual.com Manuals
Energie besparen .........................................6
Het apparaat en het milieu .............................6
Onderhoud......................................................6
Ontdooien ...................................................6
Reiniging en onderhoud ................................7
Als de koelkast niet in gebruik is .....................7
Problemen oplossen .........................................7
Aanwijzingen voor de installateur.......................7
Technische gegevens........................................8
Installeren van het apparaat................................8
Vervoer, uitpakken ........................................8
Reiniging.....................................................8
Opstelling....................................................8
Deurdraairichting omzetten.............................8
Elektrische aansluiting...................................9
Bewaartijdentabel .............................................9
NL
Belangrijke aanwijzingen m.b.t. de veiligheid
Algemene aanwijzingen m.b.t. de
veiligheid
Bewaar deze gebruiksaanwijzing goed en geef hem
door aan een evt. volgende eigenaar van het apparaat.
Dit apparaat is alleen bedoeld voor gebruik in het
huishouden, voor het bewaren van levensmiddelen en
dient volgens de voorschriften te worden gebruikt.
Reparaties aan dit apparaat, ook vervangen van
het aansluitsnoer, mogen alleen door Service
worden uitgevoerd. Daarbij mogen alleen originele
Service-onderdelen gebruikt worden. Onvakkundige
reparaties kunnen tot aanzienlijke risico's voor de
gebruiker leiden!
Het apparaat is alleen spanningloos als de stekker uit
het stopcontact is getrokken. Voordat u het apparaat
gaat reinigen, dient u het altijd spanningloos te
maken. Trek de stekker nooit aan het snoer, maar aan
de stekker zelf uit het stopcontact. Als het
stopcontact moeilijk bereikbaar is, schakel dan de
zekering in de huisinstallatie uit.
Het aansluitsnoer mag niet verlengd worden.
Zorg ervoor dat de stekker niet wordt
platgedrukt of beschadigd door de achterkant
van het koel/vriesapparaat.
- Een beschadigde stekker kan oververhit raken en
brand veroorzaken.
Plaats geen zware voorwerpen of het
koel/vriesapparaat zelf op het aansluitsnoer.
- Daardoor bestaat kans op kortsluiting en brand.
Trek de stekker niet uit het stopcontact door aan
het snoer te trekken, vooral niet als het
koel/vriesapparaat uit de nis wordt getrokken.
- Schade aan het snoer kan kortsluiting, brand en/of
een elektrische schok veroorzaken.
- Als het aansluitsnoer beschadigd is, moet het
worden vervangen door onze service-afdeling of
door een erkend installateur.
Als het stopcontact los zit, steek de stekker er
dan niet in.
- Daardoor bestaat kans op een elektrische schok of
brand.
Gebruik bij het schoonmaken, het ontdooien of het
uitnemen van diepvriesproducten of het
ijsblokjesbakje geen scherpe of puntige voorwerpen.
Die kunnen het apparaat beschadigen.
Zorg ervoor dat er geen vloeistoffen bij de
temperatuurregelaar, het schakelmechanisme en de
indicator komen.
Consumptie-ijs en ijsblokjes niet direct uit de
vriesruimte in de mond stoppen. IJs kan aan lippen
of tong vastvriezen en verwondingen veroorzaken.
Eenmaal ontdooide levensmiddelen mogen niet
opnieuw ingevroren worden, maar moeten zo snel
mogelijk geconsumeerd worden.
Kant-en-klare diepvriesproducten volgens de
aanwijzingen van de fabrikant van deze producten
bewaren.
Probeer niet het ontdooiproces te versnellen m.b.v.
elektrische verwarmingstoestellen of chemische
stoffen.
Downloaded from Fridge-Manual.com Manuals
Laat kunststof onderdelen niet met hete voorwerpen
in aanraking komen.
Geen bussen of flessen met brandbaar gas of vloeistof
in het apparaat bewaren. Explosiegevaar!
Geen koolzuurhoudende dranken, flessen en blikjes
in de diepvriezer bewaren.
Veiligheid van kinderen
Houd de verpakking uit de buurt van kinderen.
Kunststof folie kan verstikkingsgevaar opleveren.
Het apparaat is bedoeld voor gebruik door
volwassenen. Laat kinderen niet met het apparaat of
de bedieningselementen spelen.
Als u het apparaat afdankt, trek dan de stekker uit het
stopcontact, snijd het aansluitsnoer af (zo dicht
mogelijk bij het apparaat) en haal de deur eruit. U
verhindert daardoor, dat spelende kinderen een
elektrische schok krijgen of elkaar of zichzelf in het
apparaat opsluiten.
Dit apparaat is niet bedoeld voor gebruik door
kinderen, personen met verminderde lichamelijke,
zintuigelijke of geestelijke capaciteiten of een gebrek
aan kennis en ervaring, tenzij er toezicht is ingesteld
door de persoon die verantwoordelijk is voor hun
veiligheid of tenzij zij van deze persoon instructies
hebben gekregen over het gebruik.
Vóór het in gebruik nemen
Zet het apparaat tegen de muur om te voorkomen dat
u zich verbrandt aan warmte afgevende onderdelen
(compressor, condensor).
Trek altijd eerst de stekker uit het stopcontact
voordat u het apparaat gaat verplaatsen.
Let erop dat het apparaat niet op het aansluitsnoer
staat.
Rond het apparaat moet voldoende luchtcirculatie
zijn. Gebrek aan luchtcirculatie kan tot oververhitting
leiden. Volg daarom de aanwijzingen m.b.t. de
installatie.
Veiligheidsmaatregelen
isobutaan
voor
Waarschuwing
Het koelmiddel van het apparaat is isobutaan
(R 600a) dat in hoge mate brandbaar en explosief is.
Houd ventilatie-openingen in het apparaat of in het
inbouwmeubel vrij.
Gebruik geen mechanische apparaten of andere
middelen om het ontdooiproces te bespoedigen, die
niet door de fabrikant worden aangeraden.
Beschadig het koelcircuit niet.
Gebruik geen elektrische apparaten binnenin het
apparaat, tenzij ze door de fabrikant worden
geadviseerd.
Als u zich niet aan deze aanwijzingen houdt,
kan de fabrikant niet aansprakelijk worden
gesteld voor eventuele schade.
3
NL
Aanwijzingen voor de gebruiker
Algemene informatie
Dit apparaat is een huishoud-diepvriezer. Het is geschikt
voor het bewaren van diepvriesproducten, het invriezen
van levensmiddelen en het maken van ijsblokjes.
Het apparaat is geschikt voor gebruik in een bepaalde
klimaatklasse (bepaalde omgevingstemperaturen).
De klimaatklasse vindt u op het typeplaatje.
Beschrijving van het apparaat, hoofdonderdelen
1.
2.
3.
4.
Vriesvak
Bergvakken
Typeplaatje
Bediening- en indicatiepaneel
A) Groen lampje
B) Rood lampje
C) Geel lampje en invriesschakelaar
D) Temperatuurregelaar
4
Downloaded from Fridge-Manual.com Manuals
5.
6.
7.
8.
9.
10.
11.
12.
Dooiwaterafvoergootje
Stelvoeten
Deurrubber
Thermostaat
Luchtrooster
Condensor
Luchtcirculatie
Compressor
NL
Bedienings- en indicatiepaneel
Temperatuur instellen
Zie de hoofdstukken "In gebruik nemen", "Temperatuur
instellen" en "Invriezen" voor het gebruik van de
schakelaars en de indicators.
Op het paneel vindt u:
A) Groen lampje
Dit lampje brandt als het apparaat aangesloten is,
d.w.z. als de stekker in het stopcontact zit.
B) Rood lampje
Dit lampje geeft informatie over de temperatuur in
het apparaat.
Het gaat even branden als u het apparaat start, er
verse levensmiddelen in zet en als de
temperatuurregelaar op een lagere temperatuur is
gezet.
Het brandt constant als de temperatuur in het
apparaat te hoog is (te veel warme levensmiddelen
erin, deur is open blijven staan of deurrubber sluit
niet goed) of bij een evt. storing aan het apparaat.
C) Geel lampje en invriesschakelaar
Als deze schakelaar ingeschakeld staat (wordt
ingedrukt en brandt), werkt de compressor continu
en zorgt voor een zo koud mogelijke temperatuur
voor het invriezen.
D) Temperatuurregelaar
Deze dient voor instellen en wijzigen van de
temperatuur in het apparaat.
De thermostaat zorgt er automatisch voor dat de
ingestelde temperatuur wordt aangehouden en schakelt
regelmatig het apparaat kortere of langere tijd uit.
U kunt de temperatuurregelaar m.b.v. een geldstuk
verdraaien. Hoe meer u de regelaar rechtsom draait, hoe
intensiever er gekoeld wordt.
In het apparaat wordt een temperatuur van -18 °C of
kouder bereikt, als u de temperatuurregelaar volgens de
afbeelding instelt.
Als u de temperatuurregelaar uitschakelt (stand „0”), dan
onderbreekt u de werking van de compressor d.w.z. het
apparaat koelt niet meer.
De temperatuur in de vriezer is niet alleen afhankelijk van
de instelling van de temperatuurregelaar, maar ook van
de omgevingstemperatuur, vaak openen van de deur, de
hoeveelheid levensmiddelen enz.
Op de hoogste stand (bijv. tijdens een hittegolf)
werkt de compressor continu. Dit heeft geen
negatieve invloed op het functioneren van het apparaat.
Bedienen van het apparaat
In gebruik nemen
Steek de stekker in het stopcontact. Draai de
temperatuurregelaar (zie afb.). Het rode lampje gaat
branden, de compressor start en het apparaat begint te
koelen.
Als het rode lampje uitgaat, is de temperatuur laag
genoeg om diepvriesproducten te bewaren.
Invriezen
Het invriezen van verschillende producten moet na een
goede voorbereiding altijd plaatsvinden in het vriesvak.
Verplaats de ingevroren levensmiddelen van de bovenste
lade naar de andere twee laden. Voor maximale
vriesprestaties dient u de bovenste lade uit de vriezer te halen
en de in te vriezen levensmiddelen direct op de verdamper te
plaatsen. Als u kleinere hoeveelheden levensmiddelen wilt
invriezen hoeft u de lade niet te verwijderen
Schakel, vier uur voor het invriezen van kleinere
hoeveelheden levensmiddelen en ongeveer 24 uur voor
het invriezen van grotere hoeveelheden levensmiddelen,
de schakelaar van de vriezer in (springt omhoog en licht
op als de schakelaar wordt ingedrukt). Nu werkt de
compressor continu om de temperatuur te bereiken die
noodzakelijk is voor het invriezen van de levensmiddelen.
Plaats de in te vriezen levensmiddelen in de vriezer en
laat het apparaat ongeveer 24 uur zijn werk doen, zoals
hierboven staat beschreven.
Druk vervolgens nogmaals op de snelvriesschakelaar
(het gele lampje gaat uit en de schakelaar keert terug in
de originele stand).
Leg de vers ingevroren levensmiddelen in de bovenste
lade en plaats de lade in de normale stand in het
apparaat.
Bewaren
Na het invriezen kunt u de diepvriesproducten het beste
naar de bewaarvakken verplaatsen, zodat u weer ruimte
hebt in het invriesvak.
Indien u een groetere hoeveelheid levensmiddelen moet
opslaan, dan kunt de korven (behalve het onderste korf)
verwijderen, zodat het voedsel direct naar de rekken kan
worden gelegd.
Tussentijds invriezen heeft geen nadelige invloed op
reeds ingevroren producten.
Praktische informatie
Na openen en sluiten van de deur van de vriezer
ontstaat in het apparaat een vacuüm. Na sluiten van
de deur duurt het 2-3 minuten voordat u de deur
weer kunt openen.
5
Downloaded from Fridge-Manual.com Manuals
NL
Stel de vriezer zodanig in dat de binnentemperatuur
nooit warmer dan -18 °C wordt. Bij te hoge
temperaturen bederven de diepvriesproducten.
Controleer elke dag even of het apparaat goed
functioneert. Zo constateert u evt. storingen tijdig.
De lade in de afbeelding is geen accessoire-onderdeel
van het apparaat!
Tips
In dit hoofdstuk vindt u praktische tips om het apparaat zo
energiezuinig mogelijk te gebruiken. U vindt hier ook
informatie m.b.t. het milieu.
Energie besparen
Zet het apparaat liever niet in de zon of naast een
warmte afgevend apparaat.
Zorg ervoor dat de condensor en de compressor
voldoende ventilatie hebben. Bedek de ventilatieopeningen niet.
Doe levensmiddelen in een afgesloten schaaltje of in
vershoudfolie om onnodige rijpvorming te
voorkomen.
Zorg ervoor dat nog in te vriezen levensmiddelen niet
in aanraking komen met reeds ingevroren
levensmiddelen.
Open de deur niet onnodig en laat hem niet langer
open staan dan nodig is.
Laat warme levensmiddelen altijd eerst tot
kamertemperatuur afkoelen voordat u ze in het
apparaat zet.
Houd de condensor schoon.
Het apparaat en het milieu
Dit apparaat bevat, zowel in het koelcircuit als in het
isolatiemateriaal, geen gassen die de ozonlaag kunnen
aantasten. Het apparaat mag niet samen met huisvuil of
gesloopte apparaten weggegooid worden. Uit het
oogpunt van milieubescherming moeten afgedankte
koel- en vriestoestellen volgens de plaatselijke
regelingen op deskundige wijze verwerkt worden.
Informeer bij de gemeente naar de mogelijkheden in uw
woonplaats. Zorg ervoor dat het koelcircuit, vooral aan
de achterkant bij de warmtewisselaar, niet beschadigd
wordt.
De materialen met het symbool „
” zijn geschikt voor
recycling.
Als de ijsaanzetting zo dik is dat deze niet verwijderd kan
worden met de ijskrabber moet het apparaat worden
ontdooid. De frequentie waarmee dit gebeurd is
afhankelijk van het gebruik.
Hoe het apparaat te ontdooien:
Trek de stekker uit het stopcontact. Als de stekker niet
toegankelijk is zet dan de temperatuurregelknop op de
stand "0".
Haal de ingevroren levensmiddelen uit het apparaat en
plaats ze ingepakt in papier of doeken in een korf. Berg
ze indien mogelijk op een koele plaats op of plaats ze in
een vriesvak of vershoudvak van een koelkast.
Laat de deur open staan.
Veeg zo nu en dan het ontdooiwater met een doek of
spons bijeen in de richting van het afvoerkanaal, dat zich
onder in het apparaat bevindt. Dit ontdooiwater kan als
volgt worden verwijderd:
Zet een bak met voldoende hoogte voor het apparaat.
Steek de kunststof krabber overeenkomstig de
afbeelding in de ontdooiwaterafvoer. Het ontdooiwater
stroomt via de afvoer in de lade.
Onderhoud
Ontdooien
Het afvoergootje voor het vocht van de koelkamer in de
vorm van rijp en ijs hoort bij de werking van het apparaat.
Een dikke laag rijp en ijs heeft een isolerend effect, dit
leidt tot een verlaging van het koeleffect als de
temperatuur stijgt, een hoger energieverbruik, het niet
openen van het deurtje of klepje van het vriesvak als de
rijpvorming of ijsaanzetting te dik wordt en tot het stuk
gaan van de deur.
Met de meegeleverde ijskrabber is het mogelijk om
kleinere hoeveelheden rijp en ijs te verwijderen.
6
Downloaded from Fridge-Manual.com Manuals
Het ontdooiproces kan worden versneld door een pot of
bord met warm water op de koelplaat te plaatsen.
Veeg na het ontdooien de oppervlakken af en duw de
afvoer voor het ontdooiwater terug.
Sluit het apparaat op het stopcontact aan.
Zet de temperatuurregelknop op de middelste stand .
Plaats nadat het rode lampje uit is de levensmiddelen
weer in het apparaat.
NL
Reiniging en onderhoud
Trek de stekker uit het stopcontact.
Maak de koelkast leeg.
Ontdooien en schoonmaken zoals hiervoor beschreven.
De deur open laten om geurvorming te voorkomen.
U kunt de vriezer het beste tegelijk ontdooien en
schoonmaken.
Gebruik geen reinigingsmiddel of zeep.
Trek de stekker uit het stopcontact. De binnenzijde van
het apparaat met handwarm water schoonmaken en
droog wrijven.
Reinig het deurrubber met schoon water.
Steek na het reinigen de stekker weer in het stopcontact.
Stof en vuil die zich op de condensor en de achterkant
van de koelkast hebben afgezet, dient u één of twee maal
per jaar te verwijderen.
Problemen oplossen
Er kan soms een kleine storing optreden, die u zelf kunt
verhelpen. In de tabel vindt u informatie m.b.t. het
opheffen van zulke kleine storingen.
Als het apparaat aanstaat, is er soms wat geluid te horen
(compressor, circulatie). Dan is er geen sprake van een storing.
Wij willen u er nogmaals op wijzen dat het apparaat
met onderbrekingen werkt. Als de compressor
stopt, wil dat niet zeggen dat het apparaat niet werkt.
Daarom moet u altijd eerst de stekker uit het stopcontact
trekken, voordat u elektrische onderdelen aanraakt.
Als de koelkast niet in gebruik is
Als de koelkast langere tijd niet in gebruik is, gaat u als
volgt te werk:
Mogelijke oorzaak
Oplossing
De temperatuurregelaar is te laag ingesteld.
Voor het invriezen was de temperatuur niet laag
genoeg.
U hebt levensmiddelen met grote afmetingen in het
apparaat gezet.
U wilt te veel levensmiddelen tegelijk invriezen.
U hebt warme levensmiddelen in het apparaat
gezet,
De deur is niet goed gesloten.
De temperatuurregelaar is te hoog ingesteld.
Op een hogere stand instellen.
Het apparaat langer op een lagere temperatuur
zetten.
Levensmiddelen in porties verdelen.
De stekker zit niet in het stopcontact.
Er staat geen spanning op het stopcontact.
De temperatuurregelaar staat op stand „0”.
Het apparaat staat niet goed.
De aansluiting controleren.
Stopcontact controleren.
Stand van de temperatuurregelaar controleren.
Controleren of het apparaat stabiel staat (alle vier
voeten moeten op de vloer staan).
Probleem
Het apparaat koelt niet
voldoende.
Het apparaat koelt te
sterk.
Het apparaat koelt
helemaal niet.
Het apparaat maakt veel
geluid.
Minder levensmiddelen tegelijk invriezen.
Levensmiddelen eerst tot kamertemperatuur laten
afkoelen.
Controleren of de deur dicht is.
Op een lagere stand instellen.
Als u de storing aan de hand van de aanwijzingen niet kunt oplossen, neem dan contact op met Service.
Aanwijzingen voor de installateur
Technische gegevens
Model
ZFT 410 W
110
bruto-inhoud (l)
91
nuttige inhoud (l)
breedte (mm)
550
hoogte (mm)
850
612
diepte (mm)
Energieverbruik
(kWh/24 uur)
(kWh/jaar)
0,567
207
energie-efficiëntieklasse
A
invriesvermogen (kg/24 h)
12
max. bewaartijd bij stroomuitval (uur)
22
Neutrale stroomsterkte (A)
0,8
gewicht (kg)
39
7
Downloaded from Fridge-Manual.com Manuals
NL
Installeren van het apparaat
Vervoer, uitpakken
U kunt het apparaat het beste rechtop in de
originele verpakking vervoeren. Zie ook de
aanwijzingen op de verpakking.
Na elk transport mag het apparaat pas na ca. 4 uur
ingeschakeld worden.
Pak het apparaat uit en controleer het op
transportschade. Neem in geval van transportschade
contact op met de leverancier en sluit het apparaat niet
aan.
Naast een gas- of elektrisch fornuis 3 cm. Als de
afstand kleiner is, plaats dan een warmteisolerende plaat van 0,5 tot 1 cm dik tussen de
twee apparaten.
Naast een olie- of kolenkachel 30 cm.
De koelkast moet geheel tegen de muur staan.
Houd de minimale afstanden aan (zie afb.).
A: opstelling onder een keukenkastje
B: vrije opstelling
Reiniging
Verwijder het plakband waarmee de onderdelen in het
apparaat vastgezet zijn.
Neem de binnenkant van het apparaat met handwarm
water en wat mild reinigingsmiddel af. Gebruik een
zachte doek.
Wrijf daarna de binnenkant van het apparaat droog.
Opstelling
De omgevingstemperatuur heeft invloed op het
stroomverbruik. Daarom moet het apparaat op een plaats
staan waarvan de omgevingstemperatuur overeenkomt
met de klimaatklasse waarvoor het uitgevoerd is, zie
onderstaande tabel. De klimaatklasse vindt u op het
typeplaatje.
Klimaatklasse
Omgevingstemperatuur
SN
+10 ..,+32 °C
N
+16 ..,+32 °C
ST
+16 ..,+38 °C
T
+16 ..,+43 °C
Als de omgevingstemperatuur te laag is, kan de
temperatuur in de koelruimte te hoog worden.
Als de omgevingstemperatuur te hoog is, moet de
compressor langer werken, de temperatuur in de
diepvriezer stijgt en er wordt meer energie verbruikt.
Het apparaat moet waterpas staan. Daartoe kunt u de
stelvoeten (1) aan de voorzijde verstellen. De
afstandsringen (2) zijn onderdeel van de stelvoeten. Als
het apparaat waterpas moet worden gezet, kunnen deze
afstandsringen worden verwijderd.
Zet het apparaat niet direct in de zon of dicht bij een
verwarming of fornuis.
Is opstelling naast een warmtebron niet te vermijden, dan
moeten de volgende minimale afstanden worden
aangehouden:
8
Downloaded from Fridge-Manual.com Manuals
Deurdraairichting omzetten
Als dat handiger in het gebruik is, kunt u de
deurdraairichting van rechts naar links omzetten.
Ga als volgt te werk:
Trek de stekker uit het stopcontact.
Kantel het apparaat voorzichtig achterover en zorg
ervoor dat de compressor de vloer niet raakt. U kunt
dit het beste met twee personen doen.
Draai de stelvoeten aan beide zijden uit (2 stuks),
daarna de schroeven die de onderste
deurscharnieren vasthouden (2 stuks) en de schroef
aan de andere kant van het apparaat.
Zet de stift in de onderste deurscharnierplaat in de
richting van de pijl over.
Neem de deur los.
Draai de stift van het bovenste deurscharnier uit en
plaats hem aan de andere kant.
Bevestig de deur aan de stift van het bovenste
deurscharnier.
Bevestig de onderste deurschanieren op de andere
kant. Let erop dat de hoek van de deur parallel loopt
met de zijkant van de keukenkast.
NL
Draai dan de ene schroef in de vrijgekomen plaats
aan de andere kant, daarna de stelvoeten (2 stuks)
en zet het apparaat weer rechtop.
Zet de handgreep en de kunststof pluggen op de
andere kant over.
Zet het apparaat op z'n plek, zet het waterpas en
steek de stekker in het stopcontact.
Elektrische aansluiting
Deze koelkast is ontworpen voor 230-240 V AC (~) 50
Hz.
Het apparaat moet worden aangesloten aan een
volgens de voorschriften geďnstalleerd stopcontact
met randaarde. Als zo'n stopcontact niet aanwezig is,
laat het dan door een erkend installateur in de buurt
van de koelkast aanbrengen.
Dit apparaat voldoet aan de volgende EUrichtlijnen:
– 73/23/EEG
van
19.02.1973
(incl.
wijzigingsrichtlijnen) - laagspanningsrichtlijn
– 89/336/EEG
van
03.05.1989
(incl.
wijzigingsrichtlijnen - EMC-richtlijn
– 96/57 EEC - 96/09/03 (richtlijn energie-efficiëntie)
en latere aanvullingen
U kunt ook contact opnemen met Service. Een
servicetechnicus kan tegen betaling het deurscharnier
overzetten.
Bewaartijdentabel
Diepvriesproducten bewaren
Soort
groente
kant-en-klare producten
aardappelgerechten, pastagerechten
soep
fruit
vlees
consumptie-ijs
-18°C
12 maanden
6 maanden
12 maanden
6 maanden
12 maanden
5 maanden
3 weken
9
Downloaded from Fridge-Manual.com Manuals
FR
Avant l`installation et l`utilisation de l`appareil nous vous conseillons de procéder à la lecture complète
du mode d`emploi contenant des prescriptions de sécurité, des informations importantes et des conseils.
En respectant les prescriptions du mode d`emploi l`appareil fonctionnera convenablement et à votre
satisfaction.
Les symboles utilisés:
Prescriptions de sécurité
Les prescriptions et cautions de ce symbole servent à la protection de l`appareil et de votre
0personne.
Importantes instructions et informations
Informations pour la protection de l`environnement
Conseils pratiques
Vous trouverez ici des conseils pratiques concernant les aliments et leur stockage.
Le symbole sur le produit ou son emballage indique que ce produit ne peut être traité comme déchet
ménager. Il doit plutôt être remis au point de ramassage concerné, se chargeant du recyclage du
matériel électrique et électronique. En vous assurant que ce produit est éliminé correctement, vous
favorisez la prévention des conséquences négatives pour l'environnement et la santé humaine qui,
sinon, seraient le résultat d'un traitement inapproprié des déchets de ce produit. Pour obtenir plus
de détails sur le recyclage de ce produit, veuillez prendre contact avec le bureau municipal de votre
région, votre service d'élimination des déchets ménagers ou le magasin où vous avez acheté le
produit.
Sommaire
Informations importantes de la sécurité ..........11
Prescriptions générales de sécurité ...................11
Prescriptions de sécurité pour l`enfants.............11
Prescriptions de sécurité ....................................11
Prescriptions de sécurité pour isobutane ...........11
A l`attention de l`exploiteur ...............................12
Information générale ..........................................12
Désignation de l`appareil, ses parties
principales ..........................................................12
Commandes et signalisation .........................13
Mise en service..............................................13
Réglage de la température ............................13
Congélation....................................................13
Stockage ........................................................14
Renseignements et conseils utiles.....................14
Idées et suggestions ..........................................14
Comment économiser d`énergie: ..................14
10
Downloaded from Fridge-Manual.com Manuals
Armoire et environnement .............................14
Entretien .............................................................14
Décongélation................................................14
Nettoyage systématique ................................15
Appareil hors d`usage ...................................15
Dépannage.........................................................15
A l`attention de la personne qui mettra en
service l`appareil ................................................16
Caractéristiques techniques...............................16
Mise en marche de l`appareil ............................16
Livraison, désemballage ................................16
Nettoyage.......................................................16
La pose de l`appareil .....................................16
Changement du sens d`ouverture
de la porte......................................................17
Branchement électrique.................................17
Temps de stockage ................................................18
FR
Informations importantes de la sécurité
Prescriptions
sécurité
générales
de
Conservez ce mode d`emploi qui doit toujours
suivre l`appareil.
L`appareil n`est conçu que pour conserver les
aliments dans les conditions domestique ordinaires
suivant ce mode d`emploi.
Confiez toute réparation - y compris le
changement et la réparation du câble de
raccordement électrique - à l`atelier agréé. Les
pièces de rechange doivent être livrées par la
fabrique. Sinon, l`appareil peut s`endommager ou.
de dégâts matériaux ou de blessures humains
peuvent arriver.
L`appareil n`est hors de tension que dans le cas où
le câble d`alimentation est retiré de la prise secteur.
Retirez donc toujours la fiche du câble de la prise
(saisissant toujours la fiche et ne jamais tirant sur le
câble) avant de procéder au nettoyage ou à la
réparation Dans le cas où la prise secteur est en un
endroit difficilement accessible, déconnectez le
réseau électrique pour mettre l`appareil hors de
tension.
Ne rallongez jamais le câble d`alimentation!
Assurez-vous que la prise n'est pas écrasée ou
endommagée par l'arrière de l'appareil. Une
prise de courant endommagée peut s'échauffer
et causer un incendie.
- Ne placez pas d'objets lourds ou l'appareil sur le
câble d'alimentation (risque de court circuit et
incendie).
Ne débranchez pas l'appareil en tirant sur le
câble, particulièrement lorsque l'appareil est tiré
de son emplacement.
- Si le câble d'alimentation est endommagé ou
écrasé peut causer un court circuit, un incendie
et/ou une électrocution.
Important: En cas de dommage du câble
d’alimentation, il ne doit être remplacé que par
un professionnel qualifié.
- Si la prise murale est mal fixée, ne branchez pas
l'appareil (risque d'électrocution ou incendie).
N`utilisez pas des outils durs, pointus ou coupants
pour nettoyer, dégeler l`appareil, ou pour faire sortir
les aliments congelés, vous risquez de détériorer le
système réfrigérant.
Evitez la pénétration du liquide au régulateur de
température ou au dispositif commutateur et
indicateur.
Ne consommez pas de la glace et de la crème à la
glace immédiatement après les faisant sortir du
congélateur, elles peuvent causer de lésions et
engelures.
Ne recongelez pas l`aliment une fois décongelé,
consommez le plus tôt possible.
Respectez soigneusement les instructions du
fabricant concernant la durée de conservation au
cas des aliments à congélation rapide (mirelite).
Il est interdite de forcer le dégèlement par n`importe
quel appareil électrique ou agent chimique!
Ne touchez pas les parties en plastique de l`appareil
par pot chaud.
N`entreposez pas de gaz ou liquide inflammable
dans l`appareil, un danger de l`explosion existe.
Ne mettez pas de liquides gazeuses et boissons
embouteillées dans le compartiment de
congélation.
Prescriptions de sécurité pour
l`enfants
Ne laissez jamais les enfants jouer au matériel
d`emballage. La feuille en plastique peut causer
asphyxie.
L`appareil doit être manipulé par adultes. Ne laissez
pas les enfants jouer à l`appareil ou à ses parties de
réglage.
Si vous terminez d`utiliser l`appareil, retirez la fiche
secteur de la prise, coupez le câble de
raccordement (le plus proche de l`appareil) et
démontez la porte de l`appareil. Ainsi il devient
possible d`éviter que les enfants subissent de
l`électrocution ou un asphyxie dans l`appareil.
Cet appareil n'est pas destiné à être utilisé par des
enfants ou des personnes dont les capacités
physiques, sensorielles ou mentales, ou le manque
d'expérience et de connaissance les empêchent
d'utiliser l'appareil sans risque lorsqu'ils sont sans
surveillance ou en l'absence d'instruction d'une
personne responsable qui puisse leur assurer une
utilisation de l'appareil sans danger.
Prescriptions de sécurité
Posez l`appareil contre le mur pour éviter le risque
de tout contact avec les parties chaudes
(compresseur, condenseur) et prévenir les brûlures
éventuelles.
Avant le déplacement de l`appareil retirez la fiche de
la prise secteur.
Veillez à ce que le câble électrique ne reste pas
coincé sous l`appareil au cours de sa mise en place.
Assurez un courant d`air suffisant pour l`appareil
pour éviter son surchauffe. Suivez attentivement les
instructions de la mise en service.
Prescriptions
pour isobutane
de
sécurité
Mise en garde
L`isobutane (R 600a) constitue l`agent
réfrigérant de l`appareil, qui est plus intensément
inflammable et explosif.
Maintenir dégagées les ouvertures de ventilation
dans l`enceinte de l`appareil ou dans la structure
d`encastrement.
Ne pas utiliser de dispositifs mécaniques ou
autres moyens pour accélérer le processus de
dégivrage autres que ceux recommandés par le
fabricant.
Ne pas endommager le circuit de réfrigération.
Ne pas utiliser d`appareils électriques à
l`intérieur du compartiment destiné à la
conservation des denrées, à moins qu`ils ne
soient du type recommandé par le fabricant.
Respectez les prescriptions du mode du
mode d`emploi au point de vue de la
protection de la vie et des biens.
11
Downloaded from Fridge-Manual.com Manuals
FR
A l`attention de l`exploiteur
Information générale
La désignation officielle de l`appareil est
„congélateur domestique“. Il est donc capable de
conserver des aliments réfrigérés et congelés et apte
à la congélation domestique des marchandises dans
une quantité indiquée dans le mode d`emploi ainsi
que à la production de glaçon.
L`appareil est conforme aux prescriptions des
normes dans des limites des diverses classes
climatiques.
La lettre symbolisant la classe climatique se trouve
sur le plaque signalétique.
Description de l'appareil, pieces principales
1.
2.
3.
4.
Compartiment de congélation
Compartiments de stockage
Plaque signalétique
Commandes et témoins
A/ témoin vert
B/ témoin rouge
C/ témoin jaune et touche fonction continue
(congelante)
D/ bouton tournant régulateur de température
12
Downloaded from Fridge-Manual.com Manuals
5.
6.
7.
8.
9.
10.
11.
12.
Tuyau d'écoulement
Pieds réglables
Etanchement de porte
Régulateur de température
Grille d'aération
Condenseur
Direction du courant d`air
Compresseur
FR
Commandes et signalisation
Voir l`utilisation des commandes et de la
signalisation dans les chapitres „Mise en service”,
„Réglage de la température” et „Congélation”.
Eléments de la commande:
A) Témoin vert
Allume quand l`appareil est sous tension, c`est
que la fiche est mise dans la prise secteur.
B) Témoin rouge
Il est commandé par la température interne de
l`appareil.
Allume pendant une courte période quand
l`appareil se met en marche, quand aliment frais
est placé dedans, ou bien quand le bouton
régulateur de température est tourné vers les
températures plus basses.
Allume continuellement quand la température
interne de l`appareil est trop haute (surcharge
par l`aliment trop chaud, la porte est resté
ouverte ou l`étanchement de la porte est
détérioré) ou l`appareil est en panne.
C) Témoin jaune et touche congelante
Allume et sort quand la commande de la marche
continue est actionnée et le compresseur
fonctionne continuellement et assure la
température plus basse - réalisable par l`appareil
- nécessaire pour la congélation à l`intérieur de
l`appareil.
D) Bouton tournant régulateur de la température
Ajuste la température interne de l`appareil.
Réglage de la température
Le régulateur de la température en fonction de son
réglage arrête automatiquement la marche de
l`appareil, ensuite le remet en fonction assurant ainsi
la température désirée.
Son réglage devient possible par un mouvement de
rotation du bouton régulateur de température fait p.e.
à l`aide d`un coin. La rotation du bouton dans le sens
des aiguilles d`une montre intensifie le
refroidissement.
En ajustant le bouton selon la figure la température
atteindra les -18 °C ou moins.
La mise à la position de „0“ du bouton régulateur de
température arrête le compresseur et ainsi le
refroidissement en coupant le circuit électrique.
La fréquence de l`ouverture de la porte et la quantité
des aliments posés dans l`appareil influencent la
température interne du congélateur en dessus de la
position du régulateur et de la température ambiante.
Dans la position maximale du régulateur de
température - au cas d`une charge augmentée
ou d`une canicule - le compresseur peut
continuellement fonctionner. Ce régime n`est pas
nuisible.
Congélation
Mise en service
Insérez la fiche du câble secteur dans la prise
secteur.
Tournez le bouton tournant régulateur de la
température comme suivant la figure. Le témoin
s`allume, le compresseur se met en marche et le
refroidissement bientôt commence.
Quand le témoin s`éteint, la température sera
convenable et l`appareil sera apte à la conservation
des aliments congelés.
La congélation des différents produits doit toujours
être réalisée dans le compartiment de congélation
après préparation correcte.
Déplacez les aliments du tiroir supérieur vers les
deux autres tiroirs. Pour une congélation optimale,
retirez le tiroir supérieur et placez les aliments à
congeler directement sur l'évaporateur. Le retrait du
tiroir n'est pas nécessaire pour la congélation de
petits volumes d'aliments.
Appuyez sur le bouton de congélation pour l'activer
(il s'éjecte alors légèrement et une lumière s'allume)
4 heures avant de procéder à la congélation de
petites quantités d'aliments, et environ 24 heures
avant la congélation de grandes quantités
d'aliments. Le compresseur fonctionne alors de
façon continue afin d'atteindre la température
nécessaire pour la congélation.
Placez les aliments à congeler à l'intérieur du
congélateur et laissez l'appareil fonctionner pendant
24 heures environ, comme indiqué ci-avant.
13
Downloaded from Fridge-Manual.com Manuals
FR
Appuyez alors une nouvelle fois sur le bouton de
congélation rapide (la lumière jaune s'éteint et le
bouton revient sur sa position initiale).
Placez les aliments qui viennent d'être congelés
dans le tiroir supérieur et réintroduisez ce dernier
dans le congélateur.
Stockage
Il est conseiller de transmettre aux compartiments de
stockage les aliments congelés laissant ainsi de
place pour un nouveau procédé de congélation.
Une congélation répétée n`abîme pas les aliments
déjà emmagasiné.
Les annexes donnent de renseignements détaillés
concernant la pratique de stockage des divers
aliments.
Renseignements et conseils
utiles
Après l`ouverture et ensuite la fermeture de la
porte un vide se forme à l`intérieur de l`appareil
par suite de la température basse. Pour ouvrir de
nouveau la porte attendez environ 2-3 minutes à
l`égalisation de la pression interne.
Veillez à ce que l`appareil fonctionne dans une
telle position du régulateur de température qui ne
permet jamais la température interne
s`augmenter au-dessus de -18 °C, car à une
température plus haute les aliments congelés
peuvent s`endommager.
Il est conseillé de faire un contrôle quotidien pour
le but de détecter à temps une panne et de
prévenir l`endommagement des aliments
congelés.
Armoire et environnement
La matière isolante et l`agent de congélation de
l`armoire ne contiennent pas des gaz qui ne sont pas
nuisibles pour la couche d`ozone. Evitez tout
endommagement du système réfrigérant surtout à
l`arrière à proximité du système. Les autorités
municipales donnent de renseignement concernant
les endroits de l`élimination des appareils délabrés.
Les matières désignées utilisées dans cet appareil
sont réutilisables
.
Entretien
Dégivrage
La purge partielle de l'humidité du compartiment
réfrigérant sous forme de givre et de glace va de pair
avec le fonctionnement de l'appareil.
La glace et le givre épais ont un effet isolant. La
puissance frigorifique de l'appareil diminue donc à
mesure de l'augmentation de la température. L'énergie
nécessaire augmente. Lorsque le givre/la glace atteint
une certaine épaisseur, il devient impossible d'ouvrir la
porte du compartiment de congélation. Un
endommagement de la porte peut même se produire.
Il est possible de gratter et de retirer les couches peu
épaisses de givre et de glace à l'aide du grattoir
fourni.
Le bac illustré n'est pas fourni avec l'appareil.
Idées et suggestions
Ce chapitre vous donne des idées et suggestions à
l`utilisation de l`appareil pour diminuer la
consommation en énergie. Il donne encore
information sur l`environnement.
Comment
d`énergie:
économiser
Ne placez l`appareil à la proximité d`une source
de chaleur ou ne l`exposez pas au soleil.
Veillez à la bonne aération du compresseur et du
condenseur, n`obturez pas le passage du
courant d`air.
Enveloppez fermement les aliments dans des
feuilles plastiques ou d`aluminium ou mettez les
dans des récipients bien fermés pour éviter la
formation du blanc gel.
Evitez que les aliments placés dans le
compartiment de congélation entrent en contact
avec ceux y trouvant et déjà congelés.
N`ouvrez pas inutilement la porte et ne la laissez
pas ouverte trop longtemps.
Ne placez pas aliment chaux dans l`appareil,
laissez le se refroidir à la température ambiante.
Nettoyez régulièrement le condenseur.
14
Downloaded from Fridge-Manual.com Manuals
Lorsque la glace est trop épaisse pour permettre son
retrait à l'aide du grattoir, le dé
givrage de l'appareil s'avère nécessaire. La
fréquence de dégivrage varie en fonction de l'usage.
Procédure de dégivrage :
Débranchez l'appareil. Si la prise n'est pas
accessible, placez le bouton de régulation de
température sur la position "0".
Sortez les aliments congelés de l'appareil et placezles dans un panier tapissé de papier ou de tissu.
Stockez-les dans un lieu frais ou placez-les dans la
section réfrigérateur ou freezer d'un réfrigérateur.
Laissez la porte ouverte.
A l'aide d'un chiffon ou d'une éponge, dirigez de
temps en temps l'eau provenant de la fonte de la
glace vers les côtés de l'appareil. L'eau s'accumule
FR
alors dans le canal d'évacuation situé dans la partie
inférieure de l'appareil. Pour éliminer l'eau de ce
canal d'évacuation, procédez comme suit :
Placez un bac suffisamment profond devant
l'appareil. Insérez le grattoir en plastique dans
l'orifice d'évacuation d'eau de dégivrage, comme
illustré ci-après. L'eau de dégivrage s'écoule alors
dans le bac via l'orifice d'évacuation.
Après le débranchement de l`appareil lavez de l`eau
tiède et séchez soigneusement son intérieur.
Nettoyez l`isolation de la porte avec l`eau de conduit.
Ensuite remettez sous tension l`appareil.
Enlevez une ou deux fois par an la couche de
poussière couvrant la surface du condenseur au
fond de l`appareil.
Appareil hors d`usage
Procédez comme suite au cas d`une non utilisation
prolongée de l`appareil:
Débranchez l`appareil.
Enlevez de l`appareil les aliments y trouvants.
Exécutez la décongélation et le nettoyage suivant les
précédents.
Laissez un peu ouverte la porte pour éviter la
production d`odeur.
Pour accélérer le processus de dé
givrage, placez un pot ou un bol contenant de l'eau
chaude sur la plaque de refroidissement en forme
d'étagère.
Une fois le dégivrage terminé, essuyez les surfaces,
puis remettez en place le dispositif d'évacuation
d'eau de dégivrage.
Remettez l'appareil sous tension.
Positionnez le bouton de régulation de température
sur le réglage moyen et laissez l'appareil fonctionner.
Une fois le voyant rouge éteint, replacez les aliments
dans le congélateur.
Nettoyage systématique
Il est conseillé de lier le nettoyage de l`intérieur de
l`appareil à sa congélation.
N`utilisez pas au nettoyage des produits abrasifs ou
du savon.
Dépannage
Au cours du fonctionnement de l`appareil peuvent
arriver des petits incidents qui n`exigent pas l`appel
d`un expert. Le tableau suivant vous donne des
renseignements de les maîtriser vous-même et éviter
ainsi les dépenses inutiles.
Nous vous attirons l`attention à ce que le
fonctionnement de l`appareil produit quelques effets
phoniques (compresseur, circulation du liquide) qui ne
constituent pas de dégâts, ils appartiennent au
fonctionnement normal.
Nous vous attirons l`attention de nouveau à ce que
l`arrêt du compresseur ne signifie pas l`état hors
tension de l`appareil. Il est INTERDIT de toucher les parties
électriques de l`appareil avant le débrancher du réseau!
Remèdes
Incident
Cause
Refroidissement n`est
pas suffisant
Régulateur de température est mis à un degré
trop bas.
Sélection d`un degré plus haut
Avant la congélation l`appareil n`était pas
prérefroidi.
Exécuter un prérefroidissement convenable.
L`aliment mis dedans a de trop grandes
dimensions.
Couper en morceaux l`aliment.
Quantité trop grande des aliments à réfrigérer.
Mise une quantité d`aliments plus petite.
La porte n`est pas fermée correctement.
Vérifier la fermeture de la porte.
Régulateur de température est mis à un degré
trop haut.
Sélection d`un degré plus bas.
La fiche secteur n`est pas correctement
branchée.
Vérifier le branchement correct.
Refroidissement trop
fort
Il n`y a pas de
refroidissement
Il n`y a pas de tension dans la prise secteur.
L`appareil émet trop
de bruit
Vérifier la tension.
Régulateur de température est mis dans la
position de „0”.
Vérifier la position du régulateur.
Support insuffisant de l`appareil.
Vérifier l`emplacement stable (les quatre
pieds sur le sol).
Si les conseils restent sans succès avertissez un atelier de réparation spécialisé.
15
Downloaded from Fridge-Manual.com Manuals
FR
A l`attention de la personne qui mettra en service l`appareil
Caractéristiques techniques
Modèle
Volume brut (l)
Volume net (l)
Largeur (mm
Hauteur (mm)
Profondeur (mm)
Consommation en énergie:
(kWh/24h)
(kWh/an)
Classe d`énergie suivant la norme EU
Puissance réfrigérante (kg/24h)
Temps max. de stockage en cas d`une panne (h)
Intensité de courant électrique nominale (A)
Masse (kg)
ZFT 410 W
110
91
550
850
612
0,567
207
A
12
22
0,8
39
Mise en marche de
l`appareil
Livraison, désemballage
Faites livrer l`appareil dans son emballage
original, dans une position verticale et
respectez les signalisations sur l`emballage.
Après chaque livraison laissez reposer l`appareil
durant 4 heures sans le mettant en marche.
Désemballez l`appareil et vérifiez s`il n`y a pas de
traces d`endommagements. Si oui signalez les
immédiatement là où l`appareil a été acheté. Gardez
l`emballage endommagé.
L`augmentation de la température ambiante audessus de la limite supérieure se traduit dans
l`augmentation de la durée de fonctionnement du
compresseur, dans un dérangement de la
décongélation automatique, dans une augmentation
de la température dans l`espace réfrigérant enfin
dans une augmentation de la consommation en
énergie.
Nettoyage
Enlevez les bandes adhésives fixant contre tout
déplacement les éléments dans l`intérieur de
l`appareil.
Lavez l`intérieur de l`appareil par d`eau tiède et de
liquide vaisselle. Utilisez de chiffon mou.
Séchez l`intérieur de l`appareil après nettoyage.
La pose de l`appareil
La température d`ambiance influence la consommation
en énergie et le fonctionnement correcte de l`appareil.
Pour installer l`appareil prenez en considération que le
fonctionnement correcte de l`appareil ne sera possible
que dans les limites de température ambiante donné
dans le tableau ci-dessous.
Classe climatique
Température ambiante
SN
+10...+32 °C
N
+16...+32 °C
ST
+16...+38 °C
T
+16...+43 °C
Si la température ambiante baisse au-dessous de la
limite inférieure la température de l`espace
réfrigérant pourrait monter au-dessus de la
température prescrite.
16
Downloaded from Fridge-Manual.com Manuals
A la pose de l`appareil veillez à ce que sa position
soit horizontale. Réglez cette position à l`aide des
deux pieds réglables sur la partie inférieure avant
(1). Deux cales réglables (2) servent au réglage. Ces
cales sont déplacables.
N`exposez pas l`appareil aux rayons de soleil, ne
posez pas l`appareil à la proximité d`un foyer.
S`il est impératif de poser l`appareil dans la proximité
d`un chauffage au gaz ou à l`électricité respectez les
distances minimales suivantes:
en cas d`une distance de 3 cm ou moins
entreposez une plaque termiquement isolante
d`une épaisseur de 0,5 - 1 cm et non flammable
entre les deux appareils.
en cas d`un chauffage à l`huile ou au charbon la
distance doit être augmentée à 30 cm.
L`appareil est utilisable en le posant contre le mur.
Il faut respecter les distances minimales de la
figure au cours de la pose de l`appareil:
A: pose au-dessous d`une armoire murale
B: pose libre
Remettez le vis dans le trou devenu libre à
l`autre côté et les deux pieds réglables et
redressez l`armoir.
Remontez à l`autre côté la poignée et les
goupilles en plastique.
Changement du sens d`ouverture
de la porte
Il est possible de changer le sens d`ouverture de
droite à gauche au sens de gauche à droite de la
porte si l`installation ou le maniabilité l`exige.
Exécutez l`opération suivant les instructions cidessous:
Débranchez l`appareil.
Inclinez légèrement l`appareil en arrière de telle
manière que le compresseur ne touche pas le
sol. Appelez une deuxième personne qui
pendant le manoeuvre fixera solidement
l`appareil dans cette position.
Otez les deux pieds réglables (2 p) et les 2 vis de
fixation de la plaque porteuse inférieure de la
porte ensuite le vis à l`autre côté.
Déplacez la cheville dans la plaque porteuse de
la porte suivant la flèche.
Otez la porte
.
Dévissez la cheville supérieure porteuse de
porte et remettez à l`autre côté.
Reposez la porte sur la cheville supérieure
porteuse de porte.
Fixez la porteuse inférieure de porte en assurant
que le bord de la porte soit parallèle au côté de
l`armoire.
Remettez en place l`appareil, nivelez le et mettez
sous tension.
Faites appel à un atelier spécialisé le plus proche si
vous ne voulez pas exécuter les opérations cidessus. Les opérations seront exécuter contre un
remboursement.
Branchement électrique
Branchez l`appareil uniquement à un réseau de
tension alternative de 230-240 V et de fréquence
de 50 Hz.
Ne connectez la fiche secteur que dans une prise
secteur possédant d`une protection contre les
contacts accidentels (contact de sûreté). Si vous
ne possédez une prise convenable faites appel à
un technicien qui établira la prise nécessaire.
Cet appareil répond aux spécification des
directives suivantes:
73/23 EEC - 73/02/19 (Directive des petites
tensions) et ses amendements en vigueur
89/336 EEC - 89/05/03 (Directive EMC) et ses
amendements en vigueur.
96/57 CE - 03/09/96 (Directive concernant les
exigences
en
matière
de
rendement
énergétique) et ses amendements ultérieurs
17
Downloaded from Fridge-Manual.com Manuals
FR
Temps de stockage
Temps de stockage de marchandises congelées
Marchandise
Légumes:
haricots verts, petits pois, légume mixte, maïs, courge
Plat préfabriqué:
plats avec viande, avec garniture, légume en nature
Plat préfabriqué:
filet en roulade, jambonneau rôti, plat en gelée
Plats de pomme de terre, pâtes alimentaires:
purée de pomme de terre, pomme frite, boulette, gnocchi
Potages:
bouillon, soupe d`haricot vert, soupe de petits pois
Fruits:
cerise, griotte, crème de fruit, purée de marrons
Viandes:
poulet, canard, oie,
poisson en filet, thon
Glace, crème à la glace
-1 8 °C
12 mois
12 mois
6 mois
12 mois
6 mois
12 mois
5 mois
6 mois
3 semaines
La fabrique réserve tout droit de changement de production.
18
Downloaded from Fridge-Manual.com Manuals
DE
Bevor Sie Ihr Gerät anschließend in Betrieb nehmen, lesen Sie bitte zuerst die Gebrauchsanleitung durch, die
Sicherheitshinweise und wichtige Informationen enthält.
Nur so können Sie das Gerät sicher und zuverlässig nutzen und werden viel Freude daran haben.
Folgende Zeichen werden Ihnen helfen, sich in der Gebrauchsanleitung besser zurecht zu finden.
Sicherheitsvorschriften
Die Warnungen mit diesem Symbol dienen Ihrer Sicherheit und der Ihres Gerätes
Wichtige Hinweise und Informationen
Umwelthinweise
Bei diesem Symbol finden Sie Tips zur Lagerung von Lebensmitteln
Das Symbol auf dem Produkt oder seiner Verpackung weist darauf hin, dass dieses Produkt nicht als
normaler Haushaltsabfall zu behandeln ist, sondern an einem Sammelpunkt für das Recycling von
elektrischen und elektronischen Geräten abgegeben werden muss. Durch Ihren Beitrag zum korrekten
Entsorgen dieses Produkts schützen Sie die Umwelt und die Gesundheit Ihrer Mitmenschen. Umwelt und
Gesundheit werden durch falsches Entsorgen gefährdet. Weitere Informationen über das Recycling dieses
Produkts erhalten Sie von Ihrem Rathaus, Ihrer Müllabfuhr oder dem Geschäft, in dem Sie das Produkt
gekauft haben.
Inhalt
Wichtige Hinweise für Ihre Sicherheit .................20
Allgemeine Sicherheitsvorschriften ......................20
Für die Sicherheit Ihrer Kinder ............................20
Sicherheitsvorschriften für die Inbetriebnahme ......20
Informationen für Sicherheitsvorschriften
von Isobutan ...................................................20
Zum Betrieb des Gerätes ...................................21
Allgemeine Informationen......................................21
Bedienungselemente des Gerätes.......................21
Kontroll- und Bedienungselemente ..................22
So bedienen Sie Ihr Gerät..................................22
Inbetriebnahme ............................................22
Temperaturregelung ......................................22
Einfrieren ....................................................22
Lagerung.....................................................23
Wichtige Informationen und Ratschläge................23
Tips und Hinweise ............................................23
Und so können Sie Energie sparen: ................23
Geräte und Umgebung ..................................23
Instandhaltung..................................................23
Abtauen ......................................................23
Regelmäßige Reinigung.................................24
Außer Betrieb gesetztes Gerät ........................24
Fehlerbeseitigung .............................................24
Zu Händen von Inbetriebnahmer ........................25
Technische Daten .............................................25
Inbetriebnahme ................................................25
Transport, Auspacken ...................................25
Reinigung....................................................25
Standort......................................................25
Wechsel des Türanschlags.............................26
Elektrischer Anschluß ....................................26
Lagerzeittabelle ................................................27
19
Downloaded from Fridge-Manual.com Manuals
DE
Wichtige Hinweise für Ihre Sicherheit
Allgemeine Sicherheitsvorschriften
Sollten Sie Ihr Gerät einmal weitergeben wollen,
vergessen Sie bitte nicht, die Gebrauchsanleitungen
dazuzulegen.
Sie haben ein Gerät für den Haushalt erworben, und
es sollte auch nur zur Lagerung von Lebensmitteln
gebraucht werden.
Wartungen und Reparaturen (einschließlich
Verbesserung und Austausch der Netzleitung) nur
durch eine autorisierte Werkstatt durchführen
lassen. Für Reparaturen dürfen nur OriginalErsatzteile benutzt werden, anderenfalls könnte Ihr
Gerät beschädigt oder Sie selbst verletzt werden.
Das Gerät ist nur vom Netz getrennt, wenn Sie den
Netzstecker aus der Steckdose ziehen. Ziehen Sie
deshalb vor Reinigungen, Reparaturen oder
Abtauvorgängen den Netzstecker aus der Steckdose.
Nicht am Anschlußkabel ziehen, um das Gerät vom
Netz zu trennen! Wenn die Steckdose schwer zu
erreichen ist, schalten Sie das Stromnetz ab
(Sicherung herausnehmen).
Es ist verboten, das Netzkabel zu verlängern!
Bitte prüfen, dass das Netzkabel nicht von der
Geräterückseite eingeklemmt und beschädigt
wird. Ein beschädigtes Netzkabel kann
überhitzen und einen Brand verursachen.
- Keine schweren Gegenstände bzw. das Gerät
selbst auf das Netzkabel stellen. Kurzschluss- und
Brandgefahr!
Den Netzstecker nie am Kabel aus der
Steckdose ziehen, besonders wenn das Gerät
aus der Nische gezogen wurde. Eine
Beschädigung des
- Netzkabels kann Kurzschluss, Feuer und/oder
Stromschlag verursachen.
Ein beschädigtes Netzkabel muß durch eine
qualifizierte Fachkraft oder vom Kundendienst
ersetzt werden.
- Den Netzstecker niemals in eine lockere oder
beschädigte Steckdose stecken. Stromschlagund Brandgefahr!
Die Innenwände sind kratzempfindlich, deshalb sollten
Sie beim Reinigen nie Eiskratzer oder andere spitze
Gegenstände benutzen.
Achten Sie darauf, daß keine Flüssigkeiten mit dem
Temperaturregler, bzw. den Kontroll- und
Bedienelementen in Berührung kommen.
Durch Eis können Sie sich Verletzungen zufügen,
wenn Sie es unmittelbar nach dem Herausnehmen
verzehren.
Aufgetaute oder angetaute Produkte nicht erneut
einfrieren. Solche Produkte sollten Sie möglichst
schnell aufbrauchen.
Beachten Sie bitte bei Tiefkühlkost die Hinweise zur
Lagerzeit auf der Verpackung des Herstellers.
Keine Geräte mit elektrischem Antrieb bzw. Motor
oder Chemikalien zum Beschleunigen des Abtauens
anwenden!
Bewahren Sie keine heißen Töpfe in unmittelbarer
Nähe der Kunststoffteile des Gerätes auf.
Lagern Sie keine entflammbaren Gase und
Flüssigkeiten im Gerät, es besteht Explosionsgefahr.
20
Downloaded from Fridge-Manual.com Manuals
Im Gerät dürfen keine kohlensäurehaltigen Getränke
in Flaschen eingelagert werden.
Für die Sicherheit Ihrer Kinder
Ihre Kinder sollten nicht mit den Klebebändern und
Verpackungsmaterialien des Gerätes spielen, da
Lebensgefahr durch Ersticken besteht!
Das Gerät sollte ausschließlich von Erwachsenen
bedient werden. Achten Sie darauf, daß Ihre Kinder mit
dem Gerät oder dessen Bedienungselementen nicht
spielen.
Sollte das Gerät am Ende seine Lebensdauer außer
Betrieb gesetzt werden, so ziehen Sie den Netzstecker
aus der Steckdose, trennen Sie das Anschlußkabel
durch (möglichst nah am Gerät) und montieren Sie die
Tür ab. Dadurch verhindern Sie, daß sich spielende
Kinder selbst einsperren oder einen Stromschlag
erleiden.
Das Gerät darf von Kindern und Personen, deren
physische, sensorische oder geistige Fähigkeiten sowie
Mangel an Erfahrung und Kenntnissen einen sicheren
Gebrauch des Gerätes ausschließen, nur unter Aufsicht
oder nach entsprechender Einweisung durch eine
Person benutzt werden, die sicherstellt, dass sie sich
den Gefahren des Gebrauchs bewusst sind.
Sicherheitsvorschriften für die
Inbetriebnahme
Stellen Sie das Gerät mit der Rückseite an die Wand. Die
Wärme abgebenden Teile (Kompressor und Verflüssiger)
sollen die Wand nicht berühren.
Bevor Sie das Gerät verschieben, sollte der Netzstecker
aus in der Steckdose genommen sein.
Beim Aufstellen des Gerätes achten Sie darauf, daß es
nicht auf das Anschlußkabel gestellt wird.
Achten Sie auf ausreichende Belüftung des Gerätes.
Nicht ausreichende Belüftung hätte eine Erwärmung des
Gerätes zufolge. Um Ihrem Gerät die erforderliche
Belüftung zu sichern, befolgen Sie bitte die Hinweise für
die „Inbetriebnahme des Gerätes”.
Informationen für
Sicherheitsvorschriftenvon Isobutan
Warnung
Ihr Gerät enthält im Kältekreislauf Isobutan (R 600a); bei
diesem Stoff besteht Feuer- und Explosionsgefahr.
Belüftungsöffnungen der Geräteverkleidung oder des
Aufbaus von Einbaumöbeln nicht verschließen.
Zum Beschleunigen der Abtauung keine anderen
mechanischen Einrichtungen oder sonstige künstlichen
Mittel als die vom Hersteller empfohlenen benutzen.
Kühlkreislauf nicht beschädigen.
Keine
elektrischen
Geräte
innerhalb
des
Lebensmittellagerraumes betreiben, die nicht vom
Hersteller freigegeben sind.
Um Personen- und Sachschäden zu vermeiden,
halten Sie sich an die Sicherheitsvorschriften
der Gebrauchsanleitung. Für Schäden infolge von
Nichtbeachtung dieser Vorschriften haftet der
Hersteller nicht.
DE
Zum Betrieb des Gerätes
Allgemeine Informationen
Sie haben einen Gefrierschrank erworben.
Dementsprechend ist Ihr Gerät für die Lagerung von
tiefgekühlten Lebensmittel, zum Einfrieren von Waren
(Mengen sind in der Gebrauchsanleitung angegeben),
und zur Eiswürfelzubereitung geeignet.
Das Gerät entspricht den Normen der auf dem
Typenschild
angegebenen
Klimaklasse
unter
Berücksichtigung der dort aufgeführten Temperatur.
Gerätebeschreibung
1.
2.
3.
4.
Gefrierfach
Ablagefächer
Datenschild
Schalter- und Kontrollanlage
A.) Grüne Kontrollleuchte
B.) Rote Kontrollleuchte
C.) Gelbe Kontrollleuchte und Gefrierschalter
D.) Drehknopf zur Temperaturregelung
5.
6.
7.
8.
9.
10.
11.
12.
Tauwasserablauf
Verstellbare Füße
Türdichtungsprofil
Temperaturregler
Belüftungsgitter
Kondensator
Richtung der Luftzirkulation
Kompressor
21
Downloaded from Fridge-Manual.com Manuals
DE
Kontroll- und Bedienungselemente
Lesen Sie hierzu bitte noch die Abschnitte
"Inbetriebnahme",
"Temperaturregelung"
und
"Einfrieren".
A) Grüne Kontrollleuchte
Diese Leuchte leuchtet dann, wenn das Gerät unter
Spannung steht, also wenn der Stecker in die
Steckdose gesteckt ist.
B) Rote Kontrollleuchte
Sie leuchtet je nach der Innentemperatur des
Gefriergeräts.
Sie leuchtet kurz unmittelbar nach der ersten
Inbetriebnahme, beim Einlegen frischer Ware oder
wenn der Temperaturregler auf einen niedrigeren
Wert eingestellt ist.
Sie leuchtet länger, wenn die Temperatur im
Innenraum des Geräts zu hoch ist (bei Einlagerung
von zu viel Frischware, oder wenn die Tür zu lange
offen steht bzw. wenn das Türdichtungsprofil nicht
richtig schließt), oder wenn eine Betriebsstörung
des Gefriergerätes vorliegt.
C) Gelbe Kontrollleuchte und Gefrierschalter
Ist der Gefrierschalter gedrückt (nach Eindrückung
springt er etwas heraus und leuchtet), so ist der
Kompressor im Dauerbetrieb, und im Gefrierbereich
wird die kühlste Temperatur für das Einfrieren
gesichert, die im Gefrierbereich erreicht werden
kann.
D) Drehknopf zur Temperaturregelung des
Gefriergeräts
Dient zur Einstellung bzw. Änderung der
gewünschten Temperatur im Gerät.
So bedienen Sie Ihr Gerät
Inbetriebnahme
Stecken Sie den Netzstecker in die Steckdose.
Drehen Sie den Temperaturreglerknopf in die Richtung,
wie Sie es in der Abbildung sehen. Die rote Kontrollampe
leuchtet auf, der Kompressor läuft, und bald fängt das
Gerät an zu kühlen.
Die rote Kontrollampe erlischt, sobald die
Gefriertemperatur, die für die Lagerung tiefgekühlter
Ware geeignet ist, erreicht ist.
Temperaturregelung
Das Kühlaggregat muß nicht ununterbrochen laufen. Wenn
die Temperatur den eingestellten Wert erreicht hat, schaltet
der Thermostat es automatisch ab und später dann wieder
ein, die gewünschten Temperaturen werden damit erreicht.
Sie ist durch Drehen des Knopfes einzustellen. Sie
können den Regler z.B. mit einer Münze drehen. Mit
dem Uhrzeigersinn wird die Kühlung immer intensiver.
22
Downloaded from Fridge-Manual.com Manuals
Im Gerät ist eine Temperatur von -18 °C bzw. eine
niedrigere Temperatur zu erreichen, wenn Sie den
Temperaturreglerknopf so einstellen wie es in der
nachstehenden Abbildung zu sehen ist.
Sie können den Temperaturregler ausschalten, indem
Sie ihn auf „0” stellen. Der Kompressor und somit auch
die Kühlung wird eingestellt.
Außer von der eingestellten Temperatur und der
Außentemperatur wird die Temperatur im Gefrierschrank
auch von der Menge der eingelagerten Lebensmittel
sowie der Häufigkeit des Türöffnens beeinflußt.
In Höchsteinstellung des Temperaturreglers
- z.B. bei hohen Außentemperaturen - kann das
Kühlaggregat ununterbrochen laufen. Dadurh wird das
Gerät nicht beschädigt.
Einfrieren
Das Einfrieren unterschiedlicher Produkte sollte stets im
Gefrierfach nach einer entsprechenden Vorbereitung
erfolgen.
Gefrorenes Tiefkühlgut aus der obersten Schublade
entnehmen und auf die beiden anderen Schubladen
verteilen. Um die maximale Gefrierleistung zu erreichen,
die oberste Schublade herausnehmen und das
einzufrierende Tiefkühlgut direkt auf den Verdampfer
legen. Beim Einfrieren kleinerer Mengen ist eine
Herausnahme der Schublade nicht notwendig.
Schalten Sie den Schnellgefrier-Schalter (springt auf
Tastendruck auf und leuchtet) bei kleineren einzufrierenden
Mengen 4 Stunden zuvor ein, und 24 Stunden zuvor, wenn
Sie größere Mengen an Tiefkühlgut einfrieren möchten. Der
Kompressor arbeitet dann kontinuierlich, um vor dem
Einfriervorgang die erforderliche Temperatur zu erreichen.
Legen Sie das einzufrierenden Tiefkühlgut ein und lassen Sie
das Gerät circa 24 Stunden wie oben beschrieben laufen.
Drücken Sie dann den Schnellgefrier-Schalter erneut
(die gelbe Leuchte erlischt, und der Schalter kehrt in
seine ursprüngliche Position zurück).
Legen Sie das frisch eingefrorene Tiefkühlgut in die
entnommene obere Schublade zurück und setzen Sie
diese in Betriebsposition in das Gerät ein.
DE
Lagerung
Wir empfehlen Ihnen, die bereits tiefgekühlte Ware in die
Körbe zu legen. Somit schaffen Sie im Gefrierfach Platz
für frische, neu einzufrierende Ware.
Die bereits eingefrorene Ware wird durch Einfrieren
frischer Ware nicht beeinträchtigt.
Wenn größere Mengen an Lebensmitteln eingelagert
werden müssen, können die Ablagen bis auf die unterste
Ablage entfernt und das Gefriergut kann unmittelbar auf
den Regalen platziert werden.
Mehrere Informationen über Lagerzeit und Lagerart der
verschiedenen Lebensmittel finden Sie im bereits
erwähnten Anhang.
Wichtige Informationen und
Ratschläge
Nach dem Öffnen und Schließen der
Gefrierschranktür entsteht wegen der tiefen
Temperatur ein Vakuum. Wenn Sie nach dem
Schließen die Tür erneut öffnen wollen, warten Sie
2-3 Minuten bis der Druck ausgeglichen wird.
Ihre Tiefkühlkost erfordert eine gleichmäßige
Lagertemperatur von -18 °C. Achten Sie darauf, daß
die Temperatur des Innenraumes nicht über
-18 °C steigt. Eine höhere Temperatur reduziert die
Haltbarkeit Ihres Gefriergut.
Überzeugen Sie sich möglichst jeden Tag von der
einwandfreien Funktion des Gerätes, um eventuelle
Funktionsstörungen rechtzeitig zu merken und somit
ein Verderben der tiefgekühlten Lebensmittel zu
vermeiden.
Geräte und Umgebung
Sie haben ein Gerät erworben, dessen Kälte- und
Isolierkreislauf umweltverträglich ist und somit die
Ozonschicht der Erde in keinerlei Weise beschädigt.
Sollte Ihr Gerät am Ende seiner Lebensdauer aus Ihrem
Haushalt
entfernt
werden,
nehmen
Spermüllannahmestellen Ihr Gerät entgegen, und
entsorgen bzw. wiederverwerten seine verschiedene
Teile umweltverträglich. Achten Sie bitte darauf, daß der
Kältekreislauf nicht beschädigt wird.
Informationen über Spermüllannahmestellen erhalten Sie
bei den städtischen Ämtern.
Die wiederverwendbaren Teile des Gerätes sind mit
diesem Zeichen
gekennzeichnet.
Instandhaltung
Abtauen
Es ist eine normale Erscheinung beim Betrieb des
Gerätes, dass ein Teil der Feuchtigkeit im Innenraum
eine Frost-/Eisschicht bildet.
Eine dicke Eisschicht hat eine isolierende Wirkung, was
die Gefrierleistung mindert; das führt zu einem Anstieg
der Innentemperatur, des Energieverbrauchs, bei einer
bestimmten Stärke der Eisschicht zur Beeinträchtigung
der Schließung der Tür des Gefrierfaches,
gegebenenfalls zum Türbruch.
Es ist möglich, eine kleinere Eisschicht mit dem
beigefügten Kunststoffschaber zu entfernen.
Die Schale auf dem Bild ist kein Zubehör des Gerätes!
Tips und Hinweise
In diesem Abschnitt erhalten Sie nützliche Hinweise zur
Einsparung von Energie sowie zum Umweltschutz.
Und so können Sie Energie
sparen:
Standorte im Bereich direkter Sonneneinstrahlung
und Heizungsquellen sind zu vermeiden.
Achten Sie auf die ausreichende Belüftung des
Kompressors und Verflüssigers.
Verpacken Sie die Lebensmittel in luftdichtem
Material, um unnötige Reif- und Eisschichtbildung zu
vermeiden.
Vermeiden Sie bitte, daß frisch einzufrierende Ware
mit bereits eingefrorenen Produkten in Berührung
kommt.
Vermeiden Sie unnötiges und zu langes Öffnen der
Tür.
Lassen Sie die heißen Speisen vor dem Einlegen auf
Zimmertemperatur abkühlen.
Um hohe Leistung bei niedrigen Energieverbrauch
zu erzielen, muß der Verflüssiger regelmäßig
gereinigt werden.
Sollte die Eisschicht so dick sein, dass sie mit dem
Kunststoffschaber nicht mehr entfernt werden kann,
muss das Gerät abgetaut werden. Die Häufigkeit des
Abtauens hängt der Benutzung des Gerätes ab.
Abtauen:
Das Gerät vom elektrischen Netz trennen. Ist die
Steckdose nicht zugänglich, den TemperaturWahlschalter in Position "0" stellen.
Tiefkühlgut herausnehmen, in mehrere Lagen
Zeitungspapier einpacken und abgedeckt in einen Korb
legen. Dann das Tiefkühlgut an einem möglichst kühlen
Ort lagern, beispielsweise im Gefrierfach oder im
Kühlraum eines Kühlschrankes.
Lassen Sie die Tür offen.
Wischen Sie das Tauwasser immer wieder mit einem
Schwamm oder Tuch zur Seite, wo es sich in der
Ablaufrinne im Boden des Gerätes sammelt und wie folgt
entfernen lässt:
23
Downloaded from Fridge-Manual.com Manuals
DE
Eine entsprechend hohe Schale vor das Gerät stellen.
Den Kunststoffschaber wie in der Abbildung gezeigt als
Tauwasserablauf verwenden. Das Tauwasser läuft durch
den Auslass in den Behälter.
Die Türdichtung waschen Sie am besten mit klarem
Wasser ab.
Nach der Reinigung können Sie den Netzstecker wieder
in die Steckdose stecken.
Ein- bis zweimal jährlich sollten Sie auf der Rückseite des
Kühlschrankes den Staubbelag am Kondensator
entfernen.
Außer Betrieb gesetztes Gerät
Stellen Sie eine Schale oder einen Topf mit heißem
Wasser in das Gefrierfach, um den Abtauvorgang zu
beschleunigen.
Die nassen Oberflächen nach dem Abtauen
trockenreiben und den Tauwasser ablauf entfernen.
Gerät einschalten bzw. an die Stromversorgung
anschließen.
Den Temperatur-Wahlschalter in die mittlere Stellung
drehen und das Gerät so laufen lassen.
Nach dem Erlöschen der roten Leuchte das Tiefkühlgut
zurücklegen.
Regelmäßige Reinigung
Zweckmäßig ist es, den Gefrierschrank mit dem Abtauen
gleichzeitig zu reinigen.
Verwenden Sie bei der Reinigung bitte keine
Scheuermilch oder Seife.
Ziehen Sie den Netzstecker aus der Steckdose, und
wischen Sie das Gerät mit lauwarmem Wasser aus, und
anschließend gut trocken.
Problem
Das Gerät kühlt nicht
ausreichend.
Kühlraum ist zu kalt.
Das Gerät kühlt
überhaupt nicht.
Das Gerät ist zu laut.
Sollten Sie Ihr Gerät längere Zeit nicht brauchen, gehen
Sie wie folgt vor:
Trennen Sie das Gerät vom Netz.
Nehmen Sie die Lebensmittel heraus.
Reinigen Sie das Gerät auf die eben geschilderte Weise.
Lassen Sie die Türen offen, um Geruchsbildung zu
vermeiden.
Fehlerbeseitigung
Bei allen elektrischen Geräten können Störungen
auftreten, zu deren Beseitigung Sie nicht unbedingt den
Kundendienst benötigen. In der nächsten Tabelle wollen
wir Ihnen über diese Störungen ein paar Hinweise
geben, damit Sie von überflüssigen Reparaturkosten
verschont bleiben.
Wir machen Sie darauf aufmerksam, daß bei jedem
arbeitenden Kompressor-Aggregat Geräusche auftreten,
die teils vom laufenden Motor, teils vom Kältemittel, das
durch die Rohre strömt, herrühren. Das ist kein Fehler,
sondern ein Zeichen der normalen Funktion.
Wir möchten Sie noch einmal darauf hinweisen,
daß das Kühlaggregat nicht ununterbrochen
laufen muß. Wenn der Thermostat es also abschaltet,
und das Kälteaggregat nicht in Betrieb ist, so bleibt die
Stromversorgung dennoch gewährleistet. Berühren Sie
nicht die stromführen den Teile des Gerätes solange Ihr
Gerät an das Stromnetz angeschlossen ist!
Mögliche Ursachen
Der Temperaturregler ist falsch eingestellt.
(Eingestellte Wert ist zu niedrig.)
Vor dem Einfrieren wurde das Gerät noch nicht
ausreichend vorgekühlt.
Ein zu großes Stück Lebensmittel wurde
eingelagert.
Zu große Menge Frischware wurde auf einmal
eingelagert.
Warme Speisen wurden eingelagert.
Lösungen
Nehmen Sie eine höhere Einstellung am
Temperaturregler.
Lassen Sie das Gerät genügend vorkühlen.
Stückeln sie das eingelagerte Lebensmittel.
Kleinere Mengen auf einmal einlagern.
Lassen Sie die Lebensmittel vor dem Einlagern auf
Zimmertemperatur abkühlen.
Kontrollieren Sie, ob die Tür richtig geschlossen
Tür ist nicht richtig geschlossen.
ist.
Kühltemperatur ist falsch eingestellt. (Eingestellter Nehmen Sie eine niedrigere Einstellung.
Wert ist zu hoch.)
Kontrollieren Sie, ob der Netzstecker richtig in der
Netzstecker steckt nicht richtig in der Steckdose.
Steckdose ist.
Kontrollieren Sie, ob die Steckdose unter
Steckdose steht nicht unter Spannung.
Spannung steht.
Überprüfen
Sie
die
Einstellung
am
Temperaturregler ist auf „0” eingestellt.
Temperaturregler.
Kontrollieren Sie, ob das Gerät stabil auf den
Gerät steht nicht fest und eben.
Boden steht (alle vier Füße fest am Boden).
Wenn diese Hinweise keine Ergebnisse bringen, bitte den Kundendienst benachrichtigen.
24
Downloaded from Fridge-Manual.com Manuals
DE
Zu Händen von Inbetriebnahmer
Technische Daten
Model
Bruttoinhalt (L)
Nettoinhalt (L)
Breite (mm)
Höhe (mm)
Tiefe (mm)
Energieverbrauch (kWh/24Std)
(kWh/Jahr)
Energieeffizienzklasse
Gefriervermögen (kg/24Std)
Maximale Lagerzeit bei Störungen (h)
Nennstromstärke (A)
Gewicht (kg)
ZFT 410 W
110
91
550
850
612
0,567
207
A
12
22
0,8
39
Inbetriebnahme
Transport, Auspacken
Das
Gerät
sollte
stehend
und
in
Originalverpackung transportiert werden.
Nach jedem Transport muß das Gerät zur Beruhigung
des Kältekreislaufes ca. 4 Stunden ruhig stehen, bevor
es eingeschaltet wird.
Prüfen Sie zunächst, ob das Gerät unbeschädigt
angeliefert wurde. Sollten Sie Schäden feststellen,
benachrichtigen Sie umgehend den Händler, bei dem
Sie das Gerät gekauft haben. In diesem Falle bewahren
Sie das Verpackungsmaterial auf.
Sinkt die Raumtemperatur unter die untere Grenze, kann
ein ungewünschter Temperaturanstieg im Gefrierbereich
erfolgen.
Steigt die Raumtemperatur über die obere Grenze,
schaltet sich der Kompressor für längere Zeit ein, es
kann ein Temperaturanstieg im Innenraum entstehen
bzw. der Energieverbrauch erhöht werden.
Reinigung
Entfernen Sie alle Klebebänder, die die Zubehörteile des
Gerätes gegen Verrutschen gesichert haben.
Das Geräteinnere und alle Zubehörteile mit lauwarmem
Wasser reinigen, dem ein mildes Reinigungsmittel
zugesetzt werden kann. Benutzen Sie einen weichen
Lappen.
Nach der Reinigung wischen Sie das Geräteinnere
trocken.
Standort
Die Umgebungstemperatur hat eine Auswirkung auf den
Energieverbrauch und die einwandfreie Funktion des
Kühlgerätes.
Bei der Standortwahl sollten Sie darauf achten, das
Gerät in einem Raum mit einer Umgebungstemperatur in
Betrieb zu setzen die seiner Klimaklasse entspricht. Die
Klimaklasse ist dem Typenschild zu entnehmen.
Klimaklasse
Umgebungstemperatur
SN
+10 ... +32 °C
N
+16 ... +32 °C
ST
+16 ... +38 °C
T
+16 ... +43 °C
Das Gerät soll waagerecht auf dem Boden stehen. Dies
erreichen Sie mit den 2 verstellbaren Füßen (1) (vorne
unten). Zu den Füßen gehört jeweils eine Distanzscheibe
(2). Diese Scheiben können auch entfernt werden, wenn
es die Positionierung erfordert.
Standorte für das Kühlgerät im Bereich direkter
Sonneneinstrahlung oder unmittelbar neben einem Ofen,
Herd oder Heizungskörper sind zu vermeiden.
Wenn die Räumlichkeit dies nicht zuläßt, sollten Sie die
Mindestabstände zu solchen Geräten einhalten:
zu Gas- und Elektroherden
3 cm
Kann dieser Abstand nicht eingehalten werden, muß
eine 0,5-1 cm dicke nicht brennbare Isolierplatte
dazwischen gestellt werden.
zu Öl- und Kohleherden
30 cm
Das Kühlgerät ist so gefertigt, daß es bis zum Anschlag
an die Wand gestellt werden kann.
25
Downloaded from Fridge-Manual.com Manuals
DE
A:
B:
Beim Aufstellen müssen die Mindestabstände
eingehalten werden. (siehe Abb.)
Wenn das Kühlgerät unter einen Hängeschrank
aufgestellt wird
Wenn das Kühlgerät „frei” steht
Wechsel des Türanschlags
Nehmen Sie die Tür heraus.
Schrauben Sie den Bolzen in dem oberen Scharnier
raus, und setzen Sie ihn auf die andere Seite um.
Montieren Sie die Tür an dem oberen umgesetzten
Bolzen.
Befestigen Sie die untere Halterung auf der
gegenüberliegenden Seite, achten Sie aber darauf,
daß die Tür parallel zur Schrankkante sitzt.
Schrauben Sie jetzt die eine Schraube in die frei
gewordene Stelle auf der anderen Seite, und die
verstellbaren Füße (2 Stück). Stellen Sie das Gerät auf.
Setzen Sie den Türgriff um, und die Blindstopfen auf
der gegenüberliegenden Seite auch.
Positionieren Sie nun das Gerät, richten Sie es
waagerecht aus, und schließen Sie es an.
Sie können diesen Türwechsel auch von Fachleuten
durchführen lassen. Benachrichtigen Sie bitte die
Wenn der Türanschlag aus räumlichen Gründen
gewechselt werden muß, so besteht die Möglichkeit, den
Türanschlag auf die linke Seite zu montieren.
Der Türanschlag ist vom Werk aus rechtsseitig montiert.
Gehen Sie bitte in der Reihenfolge der nachstehenden
Beschreibung und Abbildungen vor:
Stellen sie sicher daß das Gerät vom Netz getrennt
ist (Netzstecker aus der Steckdose ziehen).
Kippen Sie das Gerät vorsichtig nach hinten, achten
Sie aber darauf, daß der Kompressor den Boden
nicht berührt. Nehmen Sie sich am besten eine
zweite Person zu Hilfe, die das Gerät festhält.
nächste Kundendienststelle. Die entstehenden Kosten
sind von Ihnen zu übernehmen.
Elektrischer Anschluß
Schrauben Sie die verstellbaren Füße (2 Stück) ab,
und entfernen Sie die untere Halterung, indem Sie
die 2 Schrauben auf der einen Seite und die 1
Schraube auf der anderen Seite abschrauben.
Setzen Sie den Bolzen in das Scharnier in der
Pfeilrichtung um.
26
Downloaded from Fridge-Manual.com Manuals
Das Gerät kann nur an ein, mit einer 230-240 V
Nennspannung und 50 Hz Nennfrequenz
versehenes
Netz
mit
Wechselspannung
angeschlossen werden.
Das Gerät muß an eine vorschriftsmäßig installierte
Schutzkontaktsteckdose angeschlossen werden.
Lassen Sie sich gegebenenfalls - von einem
qualifizierten - Elektriker in der Nähe des
Kühlschrankes eine Schutzkontaktsteckdose
vorschriftsmäßig installieren zu lassen.
Dieses Gerät entspricht der EG-Richtlinie
Niederspannung
- 73/23 EWG - 73/02/19 - und Elektromagnetische
Verträglichkeit
- 89/336 EWG - 89/05/03 in der jeweils aktuellen
Fassung.
- 96/57 EEC - 96/09/03 (Energieeffizienzrichtlinie)
und nachfolgende Neufassungen
DE
Lagerzeittabelle
Lagerzeit tiefgekühlter, eingefrorener Lebensmittel
Lebensmittel
Gemüse:
grüne Bohnen, grüne Erbsen, Mais, wasserhaltige,
rohe Gemüse (z.B. Kürbis)
Fertige Speisen:
Fleischgerichte, Eintöpfe
Fertige Speisen:
Rinderhack, Eisbeingulasch, Sülze usw.
Kartoffeln- und Nudelngerichte:
Kartoffelpüree, Knödel, Nockeln, Pommes Frites1
Suppen:
Fleischsuppe, Bohnensuppe, Erbsensuppe
Obstsorten:
Sauerkirsche, Kirsche, Stachelbeere, Obstcreme, Kastanienpüree usw.
Fleisch:
Geflügel (Hähnchen, Gans, Ente) und ihre Teile,
Fisch
Eiscreme, Eis
- 18 °C
12 Monate
12 Monatee
6 Monate
12 Monate
6 Monate
12 Monate
5 Monate
6 Monate
3 Wochen
Der Hersteller hält sich Änderungen des Produktes vor.
27
Downloaded from Fridge-Manual.com Manuals
GB
Before installing and using the appliance read this user's instruction book carefully. It contains safety
precautions, hints, information and ideas. If the refrigerator is used in compliance with the instructions written, it
will operate properly and provide you with greatest satisfaction.
The symbols below help you to find things more easily:
Safety precautions
Warnings and information at this symbol serve safety for you and your appliance.
Hints, useful information
Environmental information
Symbol for ideas
At this symbol ideas can be found according to food and its storing.
The symbol on the product or on its packaging indicates that this product may not be treated as household
waste. Instead it shall be handed over to the applicable collection point for the recycling of electrical and
electronic equipment. By ensuring this product is disposed of correctly, you will help prevent potential
negative consequences for the environment and human health, which could otherwise be caused by
inappropriate waste handling of this product. For more detailed information about recycling of this product,
please contact your local city office, your household waste disposal service or the shop where you
purchased the product.
Contents
Important safety information .............................29
General safety precautions ................................29
Precautions for child safety................................29
Safety precautions for installation .......................29
Safety precautions for isobutane ........................29
Instruction for the User .....................................30
General information..........................................30
Description of the appliance, main parts ..............30
Switch and indicator unit ...............................31
Handling the appliance .....................................31
Putting it into use .........................................31
Controlling the temperature ...........................31
Freezing .....................................................31
Storing .......................................................31
Some useful information and advice................32
Hints and ideas ...............................................32
How to save energy .....................................32
28
Downloaded from Fridge-Manual.com Manuals
The appliance and environment......................32
Maintenance ...................................................32
Defrosting...................................................32
Regular cleaning..........................................33
When the refrigerator is not in use ..................33
Trouble shooting ..............................................33
Instructions for the Installer ..............................33
Technical data .................................................34
Installing the appliance .....................................34
Transportation, unpacking .............................34
Cleaning.....................................................34
Placement ..................................................34
Change of door opening direction ..................34
Electrical connection....................................35
Storage time chart ...........................................35
GB
Important safety information
General safety precautions
Keep these instructions and they should remain at the
appliance when moving away or changing owner.
This appliance is designed for storing and freezing
food, domestic use according to these instructions
only.
Specialised companies that are qualified to do
so by the manufacturer must carry out service
and repairs including repairing and changing
the power cord. Accessory parts supplied by them
should be used only for repairing. Otherwise the
appliance can be damaged or can cause other
damage or injury.
The appliance is out of circuit only in that case if the
plug is removed from the socket. Before cleaning
and maintenance always unplug it (do not get it by
the cable). If the socket is difficult to reach, switch off
the appliance by cutting off the current.
Power cord must not be lengthened.
Make sure that the power plug is not squashed
or damaged by the back of the fridge/freezer.
- A damaged power plug may overheat and cause a
fire.
Do not place heavy articles or the fridge/freezer
itself on the power cord.
- There is a risk of a short circuit and fire.
Do not remove the power cord by pulling on its
lead, particularly when the fridge/freezer is
being pulled out of its niche.
- Damage to the cord may cause a short-circuit, fire
and/or electric shock.
- If the power cord is damaged, it must be replaced
by a certified service agent or qualified service
personnel.
If the power plug socket is loose, do not insert
the power plug.
- There is a risk of electric shock or fire.
When cleaning, defrosting, taking out frozen food or
ice tray do not use sharp, pointed or hard devices, as
they can cause damage to the appliance.
Be careful not to allow liquids to the temperature
control, switch gear and indicator respectively.
Ice and ice-cream can cause hurt if they are eaten
immediately after removal from the frozen food
compartment.
After dissolving frozen food must not be refrozen, it
must be used up as soon as possible.
Store pre-packed frozen food in accordance with the
frozen food manufacturer's instructions.
You must not make defrosting faster with any electric
heating appliance or chemicals.
Do not make hot pot touch the plastic parts of the
freezer.
Do not store flammable gas and liquid in the
appliance because they may explode.
Do not put carbonated drinks, bottled drinks and
bottled fruits into the freezer.
Precautions for child safety
Do not allow children to play with the packaging of
the appliance. Plastic foil can cause suffocation.
Adults must handle the appliance. Do not allow
children to play with it or its controlling parts.
If you are discarding the appliance pull the plug out
of the socket, cut the connection cable (as close to
the appliance as you can) and remove the door to
prevent playing children to suffer electric shock or to
close themselves into it.
This appliance is not intended for use by persons
(including children) with reduced physical sensory or
mental capabilities, or lack of experience and
knowledge, unless they have been given supervision
or instruction concerning use of the appliance by a
person responsible for their safety.
Safety precautions for installation
Put the appliance to the wall to avoid touching or
catching warm parts (compressor, condenser) to
prevent possible burn.
When moving the appliance take care of the plug not
to be in the socket.
When placing the appliance take care not to stand it
on the power cord.
Adequate air circulation should be around the
appliance, lacking this leads to overheating. To
achieve sufficient ventilation follow the instructions
relevant to installation.
Safety precautions for isobutane
Warning
The refrigerant of the appliance is isobutane (R600a)
that is inflammable and explosive to a greater extent.
Keep ventilation openings, in the appliance
enclosure or in the built-in structure, clear of
obstruction.
Do not use mechanical devices or other means to
accelerate the defrosting process, other than those
recommended by the manufacturer.
Do not damage the refrigerant circuit.
Do not use electrical appliances inside the food
storage compartments of the appliance, unless they
are of the type recommended by the manufacturer.
For the safety of life and property keep the
precautions of these user's instructions as the
manufacturer is not responsible for damages
caused by omission.
29
Downloaded from Fridge-Manual.com Manuals
GB
Instructions for the User
General information
The official designation of the appliance is home freezer.
According to this the appliance is suitable for storing
frozen and deep-frozen food, freezing products in
quantity given in the user's instructions at home and
making ice.
The appliance can meet the requirements of standards
between different temperature limits according to the
climate class. The letter symbol for climate class can be
found on the data plate.
Description of the appliance, main parts
1. Freezing compartment
5. Defrost water outlet
2. Storage compartments
6. Adjustable legs
3. Data plate
7. Door gasket
4. Switching and indicator unit
8. Temperature controller
A) Green indicator lamp
B) Red indicator lamp
9. Air grid
10. Condenser
C) Yellow indicator lamp and freezer switch
11. Direction of air flow
D) Temperature control knob
12. Compressor
30
Downloaded from Fridge-Manual.com Manuals
GB
Switch and indicator unit
For the usage of the switching and indicator unit see
chapters "Putting it into use", "Controlling the
temperature" and "Freezing".
Components of the appliance are as follows:
A) Green indicator lamp
This lamp lights when the appliance is under power,
i.e. the mains plug is in the mains socket.
B) Red indicator lamp
It lights up depending on the temperature inside the
appliance.
It lights for a short time when starting the appliance,
placing fresh food into it and when the temperature
control knob has been turned in direction to lower
temperatures.
It lights permanently when the temperature inside
the appliance is too high (overloaded with warm
food, door stayed open or the door seal does not
close properly) or possibly the appliance was
broken down.
C) Yellow indicator lamp and freezer switch
In the switched-on state of the switch (pops up and
lights by pressing) the compressor operates
continuously thus providing for the coldest interior
temperature - achievable by the freezer - needed for
freezing.
D) Temperature control knob
This knob is provided for setting and changing the
temperature inside the appliance.
Handling the appliance
Putting it into use
Put the plug into the mains socket. Turn the thermostatic
control knob according to the figure. This time the red
lamp starts giving light, the compressor starts and
cooling begins shortly.
When the red light goes out the temperature is sufficient
and the appliance is suitable for storing frozen and deepfrozen foods.
Controlling the temperature
The thermostatic controller interrupts the operation of the
appliance automatically for more or less time depending
on the setting then restarts it assuring the required
temperature.
Setting the thermostat knob can be done practically with
a coin. Turning the control knob clockwise cooling
becomes more and more intensive.
In the appliance -18 °C or lower temperature can be
reached if the thermostat knob is set according to the
figure.
The thermostat can be switched off („0” position), which
means breaking the circuit of the compressor i.e.
stopping cooling.
The temperature coming about in the freezer is effected
by not only the position of the thermostatic control and
the ambient temperature, but frequency of door openings
and the quantity of food put into it, etc.
In maximum position of the thermostat - in case of
increased demand e.g. during heatwaves - the
compressor may operate continually. This does not
cause damages to the appliance.
Freezing
Freezing different products should always be done in the
freezing compartment after proper preparation.
Move frozen food from the top drawer into the other two
drawers. For maximum freezing performance remove the
top drawer and then place the foods to be frozen directly
on the evaporator. In case of freezing smaller food
volumes you do not need to remove the drawer.
Switch on the freezer switch (pops up and lights by
pressing) 4 hours before freezing food of small quantities
and about 24 hours before freezing products of larger
quantities. This time the compressor operates continuously
to reach the temperature necessary for freezing.
Place in the foods to be frozen and let the appliance
operate for about 24 hours as written above.
Then push the fast freezer switch again (the yellow light
will go out and the switch turns to its original position).
Move the fresh frozen food into the top drawer and insert
the drawer in the appliance in its working position.
Storing
It is practical to replace frozen products into the storing
compartments after freezing has finished so that to make
room in the freezing compartment for another freezing.
In large quantities of food are to be stored, remove the
baskets except the lowermost one from appliance and
place food on the shelves.
Intermediate freezing does not deteriorate foods already
stored.
31
Downloaded from Fridge-Manual.com Manuals
GB
Some useful information and
advice
After opening and closing the door of freezer vacuum
will rise inside the appliance because of the low
temperature. So wait 2-3 minutes after closing the
door - if you want to open it again - while inner
pressure equalises.
Take care of operating the freezer at a position of
thermostatic control so that the inside temperature
can never go beyond -18 °C, since temperature
higher than this can deteriorate frozen foods.
It is practical to make sure of faultless operation of
the appliance daily so as to notice possible failure in
time and prevent deterioration of frozen foods.
door can be broken.
It is possible to scrape off and remove smaller frost and
ice with the enclosed ice scraper.
The tray in figure is not a piece of accessories to the
appliance!
Hints and ideas
In this chapter practical hints and ideas are given about
how to use the appliance to reach maximum energy
saving and there is environmental information about the
appliance as well.
How to save energy
Avoid putting the appliance in a sunny place and near
anything that gives off heat.
Be sure that the condenser and the compressor are
well ventilated. Do not cover the sections where
ventilation is.
Wrap products in tightly closing dishes or cling film to
avoid building up unnecessary frost.
Avoid products put in the freezer compartment to
touch foods already frozen.
Do not leave the door open longer than necessary
and avoid unnecessary openings.
Put warm foods into the appliance only when they are
at room temperature.
The condenser must be kept clean.
When ice coating is so thick that it can not be removed
with the frost scraper defrosting is necessary. Its
frequency depends on usage.
How to defrost it:
Disconnect the appliance from the electrical supply. If the
plug is not accessible turn the temperature control knob
to "0" position.
Take the frozen foods out of the appliance and put them
into a basket lined with paper or cloth. Store them in a
possibly cool place or replace them into a frozen or fresh
food compartment of a refrigerator.
Leave the door open.
Sweep off the melting water occasionally with a cloth or
sponge in direction of sides which gathers in the outlet
channel practically formed in the bottom of the appliance
and can be removed as follows:
Put a tray high enough in front of the appliance. Insert the
plastic scraper into the defrost water outlet according to
the picture. Defrost water will flow into the tray through
the outlet.
The appliance and environment
This appliance does not contain gasses which could
damage the ozone layer, in either its refrigerant circuit or
insulation materials. The appliance shall not be discarded
together with the urban refuse and rubbish. Avoid
damaging the cooling unit, especially at the rear near the
heat exchanger. Information on your local disposal sites
may be obtained from your municipal authorities.
The materials used on this appliance marked with the
sympol
are recyclable.
Maintenance
Defrosting
Bleeding part of the moisture of cooling chamber in form
of frost and ice goes with the operation of the appliance.
Thick frost and ice has an insulating effect, so it reduces
cooling efficiency as the temperature increases, it needs
more energy, at a certain thickness it does not allow the
door of the freezing compartment to open, possibly the
32
Downloaded from Fridge-Manual.com Manuals
Defrosting process can be made quicker by placing a pot
or dish filled with warm water to the cooling plate formed
as a shelf.
After defrosting wipe the surfaces and push defrost water
outlet back.
Apply voltage to the appliance.
Turn the temperature control knob to a medium position
and leave to run.
After the red light has gone out put the foods back.
GB
Regular cleaning
Trouble shooting
It is practical to clean the inside of the freezer and defrost
it at a time.
Household cleaner or soap must not be used.
After breaking the circuit wash the appliance using
lukewarm water and wipe it.
Clean the door gasket with clean water.
After cleaning apply voltage to the appliance.
It is recommended to remove the dust and dirt collected
on the back of the appliance and the condenser once or
twice a year.
During operation of the appliance some smaller but
annoying trouble can often occur, which does not require
calling a technician out. In the following chart information
is given about them to avoid unnecessary charges on
service.
We draw your attention that operation of appliance goes
with certain sounds (compressor- and circulating sound).
This is not trouble, but means normal operation.
We draw it to your attention again that the
appliance operates discontinuously, so the
stopping of compressor does not mean being no-current.
That is why you must not touch the electrical parts of the
appliance before removing it from the mains socket.
When the refrigerator is not in use
In case the appliance will not be used for a long time
follow these steps:
Remove plug from the mains socket.
Remove foods from the refrigerator.
Defrost and clean it as written before.
Leave the door open to avoid a build up of air inside.
Problem
Possible cause
The appliance does not Thermostatic control is set too low.
cool sufficiently
Before freezing the appliance was not precooled
sufficiently.
Large-sized food was put in.
Too many foods to be frozen were put in.
Warm foods were put in.
Door is not shut properly.
The appliance cools too The thermostatic control is set too high.
hard
Plug is not connected to the mains socket properly.
The appliance does not
cool at all
There is no voltage in the mains socket.
Thermostatic control is in „0” position.
The appliance is noisy
The appliance is not supported properly.
Solution
Set higher position.
Pre-cool the appliance for enough time.
Cut up food.
Put fewer foods to be cooled.
Put foods max. at room temperature.
Check if the door is shut.
Set lower position.
Check if the connection is proper.
Check if there is voltage.
Check setting of thermostatic control.
Check if the appliance stands stable (all the four
feet should be on the floor).
Inasmuch as the advice does not lead to result, call the nearest brand-mark service.
Instructions for the Installer
Technical data
Model
Gross capacity (l)
Net capacity (l)
Width (mm)
Height (mm)
Depth (mm)
Energy consumption
(kWh/day)
(kWh/year)
Energy class, according to EU Standards
Freezing capacity (kg/24h)
Rising time (h)
Rated power (A)
Weight (kg)
ZFT 410 W
110
91
550
850
612
0,567
207
A
12
22
0,8
39
33
Downloaded from Fridge-Manual.com Manuals
GB
Installing the appliance
Transportation, unpacking
It isrecommended to deliver the appliance in
original packaging, in vertical position considering
the protective warning on packaging.
After each transportation the appliance must not be
switched on for approx. 4 hours.
Unpack the appliance and check if there are damages on
it. Report possible damages immediately to the place you
bought it. In that case retain packaging.
Cleaning
Remove every adhesive tape, which ensure the parts not
to move in the appliance.
Wash the inside of the appliance using lukewarm water
and mild detergent. Use soft cloth.
After cleaning wipe out the inside of the appliance.
If it is unavoidable because of furnishing and the
appliance has to be stood near a cooker take these
minimum distances into consideration:
In case of gas or electric cooker 3 cm must be left,
when it is less put a 0,5 - 1 cm non-flam insulation
between the two appliances.
In case of oil or coal-fired stove the distance must be
30 cm since they give off more heat.
The refrigerator is designed to operate when it is totally
pushed to the wall.
When placing the refrigerator keep minimal
distances recommended in figure.
A: placing it under a wall-cupboard
B: placing it freely
Placement
The ambient temperature has an effect on the energy
consumption and proper operation of the appliance.
When placing, take into consideration that it is practical
to operate the appliance between ambient temperature
limits according to the climate class that is given in the
chart below and can be found in the data label.
Class of climate
SN
N
ST
T
Ambient temperature
+10 ... +32 °C
+16 ... +32 °C
+16 ... + 38 °C
+16 ... + 43 °C
If the ambient temperature goes below the lower data the
temperature of the cooling compartment can go beyond
the prescribed temperature.
If the ambient temperature goes beyond the upper data this
means longer operating time of the compressor, increasing
temperature in the freezer or increasing energy consumption.
When placing the appliance ensure that it stands level.
This can be achieved by two adjustable feet (1) at the
bottom in front. 1-1 piece of distance washers (2) are
accessories of the adjustable feet. If levelling the
appliance requires, these washers can be removed.
Do not stand the appliance on a sunny place or close to
a radiator or cooker.
34
Downloaded from Fridge-Manual.com Manuals
Change of door opening direction
Should the setting-up place or handling demand it, dooropening direction can be refitted from right-handed to
left-handed.
Following operations are to be done on the basis of
figures and explanations:
Break the circuit of the appliance.
Tilt back the appliance carefully being careful so that
the compressor can not touch the floor. It is
recommended to ask another person for help, who
can keep the appliance at this position safely.
Unscrew the adjustable feet situated on both sides (2
pieces), in addition the screws fixing the lower door
holders (2 pieces) and the screw on the other side
respectively.
Put over the pin in the lower door holding plate in the
direction of the arrow.
GB
Take the door off.
Unscrew the top door holding pin and put it on the
other side.
Fit the door to the top door holding pin.
Fix the bottom door holders on the other side being
careful that the edge of the door is parallel with the
side of cupboard.
Electrical connection
This refrigerator is designed to operate on a
230-240 V AC (~) 50 Hz supply.
The plug must be put into a socket with protective
contact. If there is no such, it is recommended to get
an electrician to fit an earthed socket in compliance
with standards near the refrigerator.
This appliance complies with the following E.E.C.
Directives:
- 73/23 EEC of 19.02.73 (Low Voltage Directive) and
subsequent modifications,
- 89/336 EEC of 03.05.89 (Electromagnetic
Compatibility
Directive)
and
subsequent
modifications.
- 96/57 EEC - 96/09/03 (Energy Efficiency
Directive) and its subsequent amendments
Then screw in the one screw in the place set free on
the other side as well as the adjustable feet (2
pieces) and set up the box.
Put over the handle and the plastic nails on the other
side.
Put the appliance to its place, set it level and apply
voltage to it.
In case you do not want to perform the procedures
above, call the nearest brand-mark service. Technicians
will accomplish the refitting expertly for charge.
35
Downloaded from Fridge-Manual.com Manuals
GB
Storage time chart
Storage time of deep-frozen and frozen products
Foods
Vegetables:
green beans, green peas, mixed vegetables, marrow, corn, etc.
Ready-cooked foods:
vegetable dish, trimmings, with meat, etc.
Ready-cooked foods:
sirloin steaks, stew from knuckle of ham, meat from pig pudding, etc.
Foods from potatoes, pasta:
mashed potato, gnocchi, dumpling, pasta filled with jam, chips
Soups:
meat-broth, soup from green beans, soup from green peas, etc.
Fruits:
sour cherry, cherry, gooseberry, fruit cream, mashed maroon
Meat:
chicken, duck, goose
fillets, tuna fish
Popsicle, ice-cream
-18°C
12 months
12 months
6 months
12 months
6 months
12 months
5 months
6 months
3 weeks
The manufacturer reserves the right to make any changes in the products.
36
Downloaded from Fridge-Manual.com Manuals
RU
. , !. " ! , # .
$% ! # :
& , , ! '# .
$!, (# %! .
$ # !, !!
. ) # # % # % . $ , )! % # %, !
, , %# % ! .* # % ! , ! #, )! .
$
) . .3
38
% . . . . . . . . . . . . . . . . . . . . . . . . .38
! . . . . . . . .38
! . . . . . . . . .38
! . . . .38
. . . . . . . . . . . . . . . . . .3
39
% . . . . . . . . . . . . . . . . . . . . . . . . .39
, ! . . . . . . . .39
+ . . . . . .40
. . . . . . . . . . . . . . . . . .40
) . . . . . . . . . . . . . . . . . . . . . . . . . .40
- ! . . . . . . . . . . . . . . .40
* . . . . . . . . . . . . . . . . . . . . .40
/ . . . . . .41
! . . . . . . . . . . .41
! . . . . . . . . . . . . . . . . . . . . . . . . . . .41
2 # . . . . . . . . . . . . .41
% . . . . . . . . .41
. . . . . . . . . . . . . . . . . . .41
5 . . . . . . . . . . . . . . . . . . . . .41
5# ! . . . . . . . . . . . . . . . . . . . .42
" ! 42
" - . . . . . . . . . . . . . . . . . . .42
% . . . . . . . . . . . . . . . . . .4
44
& ! . . . . . . . . . . . . . . . . . . . . . .44
- . . . . . . . . . . . . . . . . . . . . . . .44
&, . . . . . . . . .44
; . . . . . . . . . . . . . . . . . . . . . . . . . . . . . .44
5 . . . . . . . . . . . . . . . . . . . . . . .44
! . . . . . . . . . . . . . . . . . . .45
( . . . . . . . . . .46
&
. . . . . . . . . . . . . . . . . . . .4
46
37
Downloaded from Fridge-Manual.com Manuals
RU
) % + . # .
, ! .
5 ! ,
, ! ! # !
. > ! , ! !
. ) !
# .
! ' , # ! . , , ! ( '). " , , !
.
( .
- , ' .
- #.
$ ! ! .
- ! ! .
A# , !#
. + cpe .
- ! !
/
/ .
- !
% / !
cp # cpc# ! .
" x % 10 A, .
- ! .
! , ! ! , ! ! , # .
$ , ! ! .
" ! !, ! # .
A '
!, %.
/ #! ! ! #.
A ! % #! .
A ! # !
(, ).
A # #! . " !.
A #! ,
! .
38
Downloaded from Fridge-Manual.com Manuals
! A # .
#! # '.
& ! ! .
A # #
#.
" ! ! '
, ! ,
# , # , #! # ! .
> ( ) #! !
! ! %# #
% , % #.
! # #% (, )
#.
% , , !
! .
! ,
! ! . ) #. ;! , % .
!
) # # !!
(R 600a).
$ , ! ! ,
! ', ! !!.
A
# ,
!
! # #.
2 # ! .
A !
, #
#.
> '#
% , # %, ! ! .
RU
% «!
». ! # !
,
#
, , # .
.
+ # !.
, ! 1.
5.
)! ! 2.
6.
5#! 3.
D !
7.
- 4.
5 # 8.
&#
E) $# # 9.
B) $# # 10.
2
11.
A '# 12.
2
C) $# # ! )
'
D) #
39
Downloaded from Fridge-Manual.com Manuals
RU
+ 5 ! #! „)
”,
„&#”
„*”.
-!:
- !
A)
B)
C)
D)
$# # J #, , : ' ' $# # J # ! .
K ,
% , ' ! %
#.
#, ! !'
# ( # -
! , , % ), ! .
$# # ! ! (
! ! #) ,
#
- .
2 #
# ! .
)
) . #
. *#
! , .
2# ! #, # , % ! .
40
Downloaded from Fridge-Manual.com Manuals
5#! !
, !.
5# % !. # !.
) #, ,
-18°$ .
& !, # „0”. !
%.
& # , ! % !, ! !
! ! % ! # .
# # # , , ! - . ( ! .
*
5!
!
#
% #. !
! ! # # %. ;! !
!, ! % ! .
) ' L
! % .
) !# , ! ( M ) 4 , ', 24 - ' . )
# !, ! ,
.
!, %
, 24 , !'.
RU
* ! !# (! # !
M
).
! ! % % #
.
A ! ', , % !
!.
A ! ! , .
2 .
/ ' ! ! ! ! . ( # .
! ! ! .
" ' L ,
!, #,
! .
!
#, ! ! ! !, - !
.
2-3 ! !
! ! !.
) ! , ! ! !' 18°$, ! .
A , ! -
! .
! ) # ! !
#. * %
% % !.
% A % , !
! # #,
'% ! . !! # .
$ ! ,
, . % ! ! # ! .
!, ! # ! ! ( ) # !
! '#
.
5
5 %
#.
&! M %
, , , # !', %! ! ! .
" #, % ## #
.
), , !
2 #
; % !, ' # .
$ # ##
.
2 ! '
.
A
!
! .
-! ! # # .
2 ! ! , ! !
.
2# !, #
% , . "# #, .
2 ! :
)! # ' . " , #
! "0".
41
Downloaded from Fridge-Manual.com Manuals
RU
)! ! ! ! , !
# . / ! .
!.
) %
# ! ! , . ) , :
#
. ) ! !, . &
.
" ! " ! ! ## , %
:
)! !
5 ! !'.
# .
" - ) ! # , ! , ! ! . A !
! .
! % ' , ! ( #). ( .
, # , .
! !.
.
# ! .
#, # ! ,
! .
5# !
5 % ! ! .
A ! #! % .
! , ! # . )!
. .
5 % ! # 1-2 #.
42
Downloaded from Fridge-Manual.com Manuals
"% % ' , !,
, , , ! . , .
RU
A
A
) 5# .
.
*!
!
'#
.
* # .
*! ! !.
$' % ' '.
> !.
5# .
) .
) . 5#
„0”.
.
$ -
!
.
> .
5 ! .
2 ' .
! ! ! !.
, ! .
- .
) .
% ## .
# .
(
! ! ).
" ! # , ! # !
.
43
Downloaded from Fridge-Manual.com Manuals
RU
%
& !
/
ZFT 410 W
110
L ()
91
L ()
P ()
550
)! ()
850
612
K ()
#
()/)
()/#)
0,567
207
(# ( E($)
A
(#/)
12
) !' ! ()
22
A (A)
0,8
) (#)
39
- &, ! ,
.
# % 4 .
5 # .
"
!
!,
% . ) .
;
" % ! #
!, ! .
" % ! !' #
!, !
, ! !' !
#.
#
. $ #! (1), ! '! (2). - , % , ! #.
)! ! % . # .
* ! .
5
& % ! ! # . % , %
! ! #
(. !).
2
SN
N
ST
&
% !
+10…+32 °$
+16…+32 °$
+16…+38 °$
T
+16…+43 °$
44
Downloaded from Fridge-Manual.com Manuals
'! # .
A !. " # ! ! !, % ! # :
" #
, 3 , ,
#
RU
! % 0,5-1 .
" ! # , ! 30 , ! !! ' .
# # .
- , .
* # # , , ! !
.
* , #! (2 '.) .
! #' # .
, # .
! , !
.
E: ! '
+: +
- , ! #
, .
!
! .
* % ( ):
.
E , , !
. ! ! %, ! !
.
#! , % .
> # .
$ .
" ! ! ! !'
, ! #
. ( #.
45
Downloaded from Fridge-Manual.com Manuals
RU
( >! ! # 230-240 ) ( ~) 50 K
.
5, ! ! , %! . " # , ! , ! %% .
>! %
""$:
73/23 ""$ 19.02.73 ( #
)
%
,
89/336 ""$ 03.05.89 ( #
)
% ,
96/57 EEC 03.09.96 (> #
)
% .
&
) ! -1 8 °$
%:
! !, ! #, %! , ,
.
12 K! :
%! , #!, ! .
12 K! :
! , '! .
6 + , :
, , , !
12 $!:
, #! .
6 W!:
)', !, ! 12 :
, , #
!!, 5 6 3 ) !# # ! !.
46
Downloaded from Fridge-Manual.com Manuals
B/Za/32-1. (09.)
200383081
2009.07.09.
RU
47
Downloaded from Fridge-Manual.com Manuals
www.electrolux.com
200383081-01-09072009
933 012 625
Downloaded from Fridge-Manual.com Manuals