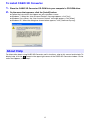
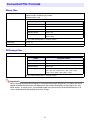
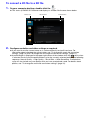
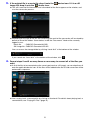
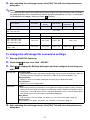
1
CASIO 3D Converter
(YA-D30)
User’s Guide
Be sure to keep all user documentation handy for future reference.
z Microsoft, Windows, and Windows Vista are registered trademarks or trademarks of Microsoft
Corporation in the United States and other countries.
z Macintosh, Mac OS and QuickTime are registered trademarks of Apple Inc. of the United States.
z ArcSoft and the ArcSoft logo are trademarks or registered trademarks of ArcSoft, Inc. in the
United States and other countries.
z Other company and product names may be registered trademarks or trademarks of their
respective owners.
z The contents of this User’s Guide are subject to change without notice.
z Copying of this manual, either in part or its entirety, is forbidden. You are allowed to use this
manual for your own personal use. Any other use is forbidden without the permission of CASIO
COMPUTER CO., LTD.
z CASIO COMPUTER CO., LTD. shall not be held liable for any lost profits or claims from third
parties arising out of the use of this product or this manual.
z CASIO COMPUTER CO., LTD. shall not be held liable for any loss or lost profits due to loss of
data caused by malfunction or maintenance of this product, or any other reason.
z The sample screens shown in this manual are for illustrative purposes only, and may not be
exactly the same as the screens actually produced by the product.
1
E
Contents
Introduction ..................................................................... 3
Installing CASIO 3D Converter ...............................................................3
Minimum system requirements.................................................................................... 3
To install CASIO 3D Converter .................................................................................... 4
About Help .............................................................................................4
Converting Files .............................................................. 5
Supported Original File Formats ............................................................5
Converted File Formats ..........................................................................6
To convert a 2D file to a 3D file.................................................................................... 7
To change the movie file conversion settings............................................................ 10
To change the still image file conversion settings ..................................................... 11
To create a new profile .............................................................................................. 12
To delete a user profile .............................................................................................. 13
Playing 3D Files ............................................................. 14
3D File Formats Supported for Playback .............................................14
Playing 3D Files Converted with CASIO 3D Converter ........................14
To open a 3D file for playback ................................................................................... 14
3D File Playback Settings.....................................................................16
2
Introduction
CASIO 3D Converter enables playback of 3D movies and 3D still images on your computer, and to
project them on a 3D CASIO projector. CASIO 3D Converter supports the following functions.
z Playback of 3D movies and 3D still images
z Conversion of standard 2D images and still images to 3D movies and still images
Important!
Use of separately available 3D glasses (YA-G30) is required for three-dimensional viewing of 3D
images played with CASIO 3D Converter and projected on a 3D CASIO projector.
Installing CASIO 3D Converter
Minimum system requirements
Operating Systems : Microsoft® Windows® 7 (32bit, 64bit), Windows Vista® SP2 (32bit, 64bit),
Windows® XP SP3 (32bit)
Computer
: IBM PC/AT or compatible that conforms to the following conditions.
z Windows® 7, Windows Vista®, or Windows® XP pre-installed
z CPU: Pentium® Dual-Core 1.86GHz or higher, or CPU recommended for operating system
being used
z Memory: 1GB minimum
z Display: Full-color display with resolution of at least 1024 × 768, which is supported by
above operating systems and the computer being used.
z Input device : Keyboard or other pointing device (mouse or equivalent device supported by
above operating systems)
z Any other requirements as recommended by the operating system you are using.
z Normal operation may not be possible under certain hardware configurations.
z Operation is not supported on a computer running Windows® 2000, NT, Me, 98SE, 98, 95, or 3.1, or
on a Macintosh or Mac OS computer.
z Operation on a computer upgraded to Windows® 7, Windows Vista®, Windows® XP from another
operating system is not guaranteed.
3
To install CASIO 3D Converter
1.
Place the CASIO 3D Converter CD-ROM into your computer’s CD-ROM drive.
2.
On the menu that appears, click the [Install] button.
z
z
z
z
Follow the instructions that appear on your computer screen.
Windows 7: When the “User Account Control” message appears, click [Yes].
Windows Vista: When, the “User Account Control” message appears, click [Allow].
Windows XP: When the dialog box shown below appears, click [Continue Anyway].
About Help
For information about using CASIO 3D Converter and its functions, refer to this manual and to help. To
display help, click the
button in the upper right corner of the CASIO 3D Converter window. On the
menu that appears, click “Help”.
4
Converting Files
CASIO 3D Converter can be used to convert 2D movie files and still-image files to 3D.
Supported Original File Formats
Movie Files
File Format
MP4, MOV, AVI, WMV
Video Decoders: MPEG4, H264, Motion JPEG
Audio Decoders: AAC, ADPCM
MPEG4, AAC, .mp4
MPEG4, AAC, .mov
MPEG4, ADPCM, .avi
H.264, AAC, .mp4
H.264, AAC, .mov
H.264, ADPCM, .mov
Motion JPEG, ADPCM, .avi
WMV
Video Resolution
224 × 168, 224 × 56, 224 × 64, 224 × 80, 336 × 96
320 × 240, 432 × 192, 448 × 336
512 × 384
640 × 480, 704 × 384, 720 × 480, 720 × 576, 848 × 400,
848 × 480, 1280 × 720, 1440 × 1080, 1920 × 1080
Frame Rate
30, 25, 24, 20, 15, 12.5
Audio Sampling Rate
24.0, 32.0, 40.0, 48.0, 11.025, 22.05, 44.1
Still-image Files
File Format
JPEG
5
Converted File Formats
Movie Files
File Format
AVI 3D (Side-by-side)
Video Encoder: ArcSoft H.264 Encoder
Audio Encoder: PCM
Video Resolution
Profile
Video Resolution
Small Size
320 × 240
Normal Quality
640 × 480
High Quality
1024 × 768
Wide Resolution
1280 × 720
User Settings
320 × 240, 640 × 480, 1024 × 768, 1280 × 720,
1920 × 1080
z The initial default profile is “Normal Quality”.
Frame Rate
30, 24, 15
Audio Sampling Rate
44.1
Still-image Files
File Format
3D JPS
Image Resolution
Profile
Image Resolution
Normal Quality
640 × 480
High Quality
1024 × 768
Wide Resolution
1280 × 800
User Settings
Custom, Same As Original, 320 × 240, 640 × 480,
720 × 480, 800 × 600, 1024 × 768, 1280 × 800,
1280 × 1024, 1600 × 900, 1920 × 1080
z The initial default profile is “Normal Quality”.
Important!
When viewing the projected image of a converted file through 3D glasses (YA-G30), the actual
degree of three-dimensionality will depend on the content and quality of the original file, and
other factors. In some cases, a converted image may not have any three-dimensionality at all
when compared with the original source file image.
6
To convert a 2D file to a 3D file
1.
On your computer desktop, double-click the
.
z This starts up CASIO 3D Converter and displays a window like the one shown below.
Device icon
2.
File list area
Profile button
Configure resolution and other settings as required.
z If you want to use the current setup as-is, advance directly to step 3 from here. For
information about changing the current setup, see “To change the movie file conversion
settings” (page 10) and “To change the still image file conversion settings” (page 11).
z A profile button is displayed in the upper right corner of the window while the
device icon
is selected. Each click of the profile button cycles the currently selected profile in the following
sequence: Normal Quality J High Quality J Small Size J Wide Resolution. Profile button
cycle will also include any user profiles that you have created and saved. For details about
profiles, see “To change the movie file conversion settings” (page 10).
7
3.
If the original file is a movie file, drop it onto the
image file, drop it onto the
device icon.
device icon. If it is a still
z This will cause the file information and a thumbnail of the file to appear on the window, and
start the conversion process.
z Depending on the type of file you are converting, the result of the conversion will be stored by
default to one of the folders shown below, inside the “Documents” folder of the currently
logged in user.
Movie file
: CASIO 3D Converter\AVI 3D\
Still image file: CASIO 3D Converter\JPG 3D\
You can access the storage folder by clicking “Local disk” at the bottom of the window.
If you cannot see “Local disk” at the bottom of the window, click
4.
.
Repeat steps 2 and 3 as many times as necessary to convert all of the files you
want.
z If all of the files to be converted are the same type (movie or still image), you can drop them all
onto the applicable device icon. All the files will be added to the file list and conversion will be
performed in sequence.
z You can play back a converted file by clicking its thumbnail. For details about playing back a
converted file, see “Playing 3D Files” (page 14).
8
5.
After you are finished, click the
window.
button in the upper right corner of the
z This will exit CASIO 3D Converter.
Note
You also could perform either of the following operations in place of step 3 of the above
procedure.
1 If the original file is a movie file, click “AVI 3D” under the
device icon. If it is a still image
file, click “JPG 3D” under the
device icon.
2 Drop the file you want to convert into the file list area of the CASIO 3D Converter window.
Or you could click
to display the “Open” dialog box, select the file you want to convert,
and then click [Open].
Or:
1 If the original file is a movie file, click the
device icon. If it is a still image file, click the
device icon.
z A plus (+) mark will appear in a device icon whenever the mouse pointer is located above it.
Click when you see the plus mark.
2 Use the “Open” dialog box that appears to select the file you want to convert and then click
[Open].
9
To change the movie file conversion settings
1.
Start up CASIO 3D Converter.
2.
Under the
3.
Click
want.
to display the Settings dialog box and then configure the settings you
[General] tab
Destination Path:
Storage destination of the movie file produced by the conversion. Initial default: CASIO
3D Converter\AVI 3D\, located in the “Documents” folder of the currently logged in
user.
[Browse] button:
Displays a “Browse For Folder” dialog box for specifying the destination folder.
[Locate] button:
Displays the current storage folder.
[Video] tab
Profile:
Select from among a preset profile or a user profile to configure resolution, quality, and
other settings for the converted movie file. The following are the available preset
profiles: Small Size (320 × 240), Normal Quality (640 × 480), High Quality (1024 × 768),
Wide Resolution (1280 × 720). For details about each profile, refer to the information
on the Settings dialog box.
[New] button:
Click to create a new user profile. For details, see “To create a new profile” (page 12).
[Delete] button:
Click to delete a user profile. For details, see “To delete a user profile” (page 13).
[Resample] tab
Adjust Aspect Ratio:
Select the adjustment method for a video image when the aspect ratio of the output
resolution specified by the profile does not match the aspect ratio of the original file.
Letterbox:
Maintains the original image aspect ratio by fitting the adjusted image to match it.
This option can result in black areas along the left and right, or top and bottom of
the converted image.
device icon, click “AVI 3D”.
Crop:
Maintains the original image aspect ratio by zooming the converted image vertically
or horizontally. As a result, part of the original image may be missing off of the sides
or top/bottom of the converted image.
Stretch:
Zooms the original image so it will fill the entire size of the converted image.
10
4.
After selecting the setting you want, click [OK]. This will close the preferences
dialog box.
Note
The following table shows the relationship between original file video resolution and converted
file video resolution when “Automatically choose the best resolution for my files.” is checked on
the dialog box that appears when you select
-[Options].
Original File
Converted File
Preset Profile
Small Size
Normal
Quality
User Setting Profile
320 × 240
640 × 480
224 × 168, 224 × 56, 224 × 64,
224 × 80, 336 × 96
High Quality
Wide
Resolution
–
1024 × 768
1280 × 720
1920 × 1080
320 × 240
320 × 240, 432 × 192, 448 × 336
320 × 240
512 × 384
320 × 240
640 × 480
640 × 480
640 × 480, 704 × 384,
720 × 480, 720 × 576,
848 × 400, 848 × 480
320 × 240
640 × 480
1024 × 768
1280 × 720, 1440 × 1080,
1920 × 1080
320 × 240
640 × 480
1024 × 768
1024 × 768
1280 × 720
1280 × 720
1920 × 1080
To change the still image file conversion settings
1.
Start up CASIO 3D Converter.
2.
Under the
3.
Click
want.
to display the Settings dialog box and then configure the settings you
[General] tab
Destination Path:
Storage destination of the still image file produced by the conversion. Initial default: CASIO 3D
Converter\JPG 3D\, located in the “Documents” folder of the currently logged in user.
[Browse] button:
Displays a “Browse For Folder” dialog box for specifying the destination folder.
[Locate] button:
Displays the current storage folder.
[Photo] tab
Profile:
Select from among a preset profile or a user profile to configure resolution, quality, and other
settings for the converted still image file. The following are the available preset profiles: Normal
Quality (640 × 480), High Quality (1024 × 768), Wide Resolution (1280 × 720). For details about
each profile, refer to the information on the Settings dialog box.
[New] button:
Click to create a new user profile. For details, see “To create a new profile” (page 12).
[Delete] button:
Click to delete a user profile. For details, see “To delete a user profile” (page 13).
4.
device icon, click “JPG 3D”.
After selecting the setting you want, click [OK]. This will close the preferences
dialog box.
11
To create a new profile
1.
Perform steps 1 through 3 under “To change the movie file conversion settings”
(page 10) or “To change the still image file conversion settings” (page 11) to
display the profile dialog box.
2.
Depending on the type of profile you want to create, click the [Video] tab (for a
movie) or the [Photo] tab (for a still image).
3.
Click [New].
z This will display the settings for a new profile.
New movie file conversion profile settings
4.
New still image file conversion profile settings
Configure resolution and other settings.
z For a movie file, you can configure settings for resolution, bit rate, frame rate, and 3D depth
only. The other settings are fixed at their displayed values.
5.
In the input box in the bottom line of the dialog box, enter a profile name and
then click [Save].
z The profile name you enter will appear in the “Profile” field.
6.
To exit the Settings dialog box, click [OK].
12
To delete a user profile
1.
Perform steps 1 through 3 under “To change the movie file conversion settings”
(page 10) or “To change the still image file conversion settings” (page 11) to
display the profile dialog box.
2.
Depending on the type of profile you want to delete, click the [Video] tab (for a
movie) or the [Photo] tab (for a still image).
3.
Click the “Profile” field and select the user profile you want to delete.
z Note that performing the next step will delete the selected user profile, without displaying a
confirmation message.
4.
If you really want to delete the selected user profile, click [Delete].
5.
To exit the Settings dialog box, click [OK].
Note
Preset profiles cannot be deleted.
13
Playing 3D Files
You can use CASIO 3D Converter to play back 3D files you converted with it, or to play back other 3D
files.
3D File Formats Supported for Playback
Movie Files
AVI 3D
3D WMV
3D MP4
3D AVI
(Side-by-side, Video: ArcSoft H.264; Audio: PCM)
(Side-by-side)
(Side-by-side, Video: H.264; Audio: AAC)
(3D video recorded with Fujifilm W1/W3)
Still-image Files
3D JPS
3D MPO (images captured with Fujifilm W1/W3)
Playing 3D Files Converted with CASIO 3D Converter
After you convert a 3D file with CASIO 3D Converter, it will remain in the file list area until you close it.
To play a 3D file in the list area, click its thumbnail. This will display the Viewer window and start 3D file
playback.
z To view an image in 3D while wearing the 3D glasses, make sure that you select the full screen view
of the viewer window. For details, see step 7 of the procedure under “To open a 3D file for
playback”.
z For details about playback operations for a 3D file that is not displayed in the file list area, see “To
open a 3D file for playback”.
To open a 3D file for playback
1.
Connect the COMPUTER IN terminal of a CASIO 3D projector to the RGB output
terminal of your computer.
2.
Turn on the projector.
3.
On the projector, enter the “3D input mode” and then select “Computer (RGB)”
as the input source.
z For more information about the 3D input mode, see the User’s Guide on the CD-ROM that
comes with the projector.
z If the CASIO 3D projector model you are using has more than one COMPUTER IN terminal,
the input source you select above should match the terminal you connect to. If you connected
the computer to the projector’s COMPUTER IN 2 terminal, you need to select “Computer 2
(RGB)” as the input source.
4.
On your computer, start up CASIO 3D Converter.
14
5.
If the 3D file you want to play back is a movie file, drop it onto the
icon. If it is a still image file, drop it onto the
device icon.
device
z If you want to play back multiple files of the same type (movie or still image), you can drop
them all onto the applicable device icon.
z 3D files you drop onto the icon are added to the CASIO 3D Converter window file list.
z If a 3D file is one you converted with CASIO 3D Converter, you can also drop it into the file list
area instead of a device icon. In this case, the application will automatically detect the file type
and add it to the file list.
6.
Click the thumbnail of the 3D file you want to play.
z This will display the Viewer window and start 3D file playback.
z The following buttons can be used on the Viewer window to control playback.
Pauses playback.
Starts (or restarts) playback.
Stops playback.
Plays back a 3D file in 2D mode. In 2D mode, the left-eye image will be displayed in the
left half of the screen, and the right-eye image will be on the right half.
Plays back a 3D file in 3D mode.
Displays the “3D Stereo Settings” dialog box. For more information, see “3D File
Playback Settings” (page 16).
15
7.
Click
in the lower right corner of the Viewer window.
z This changes the Viewer window to the full-screen view. The projected images from the
connected computer will appear in 3D if you view them using 3D glasses (YA-G30).
z To return from the full-screen view to the window view, double-click anywhere on the screen.
Important!
To view an image in 3D while wearing the 3D glasses, make sure that you select the full screen
view of the viewer window. Viewing in 3D is not supported while the window view (even if the
window view is maximized) is displayed for the Viewer window.
8.
To close the Viewer window, click the
button in the upper right corner.
z This returns to the CASIO 3D Converter window.
Note
z To remove a 3D file from the file list, close it by clicking the
button on the far right of the
file’s information on the file list.
z You also could perform either of the following operations in place of step 2 of the above
procedure.
1 If the playback file is a movie file, click “3D Video” under the
device icon. If it is a still
image file, click “3D Image” under the
device icon.
2 Drop the file you want to play back into the file list area of the CASIO 3D Converter window.
Or you could click
to display the “Open” dialog box, select the file you want to play
back, and then click [Open].
Or:
1 If the playback file is a movie file, click the
device icon. If it is a still image file, click the
device icon.
z A plus (+) mark will appear in a device icon whenever the mouse pointer is located above
it. Click when you see the plus mark.
2 Use the “Open” dialog box that appears to select the file you want to play back and then
click [Open].
3D File Playback Settings
Clicking
on the Viewer window displays the “3D Stereo Settings” dialog box, which you can use
to configure the settings described below.
Dialog Box Item
Description
Auto detecting 3D files.
Selecting the check box of this option configures the software to detect the 3D
file type automatically and then play back the file. If auto identify does not
produce the desired results, clear this check box, and specify the layout and
aspect ratio of your source file.
Which is the following layout of
your source file:
Specifies the layout of the playback 3D file.
Which is the following aspect ratio
of your source file:
Specifies the aspect ratio of the playback 3D file.
Swap Left/Right image when you
experience eyestrain in 3D mode
Swaps the display timing of the left image and right image of the playback 3D
file.
16
MA1104-A