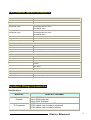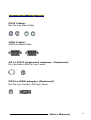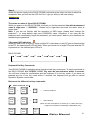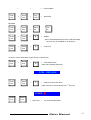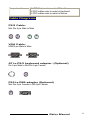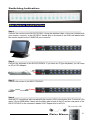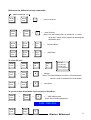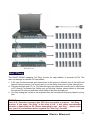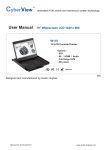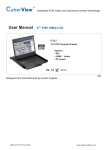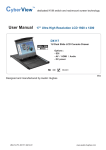
1
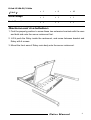
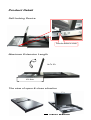
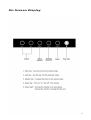
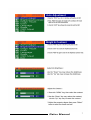
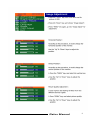
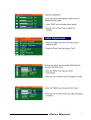
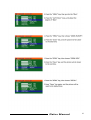
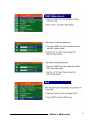
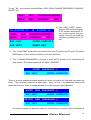
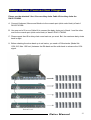
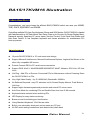
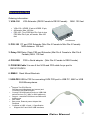
RALOY
RACKMOUNTCONSOLES
Slim 1U Rackmount
LCD Monitor
Optional KVM Switch
USER
MANUAL
www.RALOY.com
Copyright ® 2004 Raloy, Inc. All Right Reserved
Content
Specification……………….……………………………………………....3
Rackmount Installation…………….……….…………………..………..4
Product Detail………………………………………………………………5
On Screen Display…………………………………………...………..6
On Screen Display for KVM Operation…………………………...….13
RA15/17KVM8 Illustration……………………………………………….16
INTRODUCTION……………….……………………………….………….......16
FEATURES…………...…………………………………………………..…….16
PACKAGE CONTENTS……………...…………..………………………………17
TECHNICAL SPECIFICATIONS………..…………………………………….…….17
CONNECTOR DIAGRAMS……………………………………………...……….18
HARDWARE INSTALLATION…………………………….……………..…………19
USAGE……………………………………………………………..…………20
DAISY CHAIN CONNECTION DIAGRAM……………………………………….…23
HOT PLUG………………………………………………………..……………24
TROUBLESHOOTING……………………………………………………………24
ACCESSORIES……………………………………………………………………………25
RA17KVM16 Illustration…………………………………………………26
INTRODUCTION……………….……………………………………………....26
FEATURES…………...……………………………………………………..….26
TECHNICAL SPECIFICATIONS………..…………………….…………………….27
SYSTEM REQUIREMENT………………………………………………………….27
CABLE DIAGRAMS………………………………………….………………….28
HARDWARE INSTALLATION…………………………..………….………………29
USAGE………………………………………..………………………………31
DAISY CHAIN CONNECTION DIAGRAM……………………….…………………33
HOT PLUG……………………………………………………..………………34
TROUBLESHOOTING……………………………………………………………35
ACCESSORIES…………………………………………………………………36
Certifications & Services…………………...…………………………..37
Raloy Manual
2
Specification:
Model
RA15/17
RA15/17KVM8
RA15/17KVM16
Size:
1U 19” Rackmount type
Keyboard:
Notebook type, 105 Keys
Touchpad
Mouse:
Dimension:
444.5 * 44.5 * 550 mm 444.5 * 44.5 * 580 mm 444.5 * 44.5 * 590 mm
(17.5”*1.75”*21.6”) (17.5”*1.75”*22.8”) (17.5”*1.75”*23.2”)
Weight:
15 kg(33 lb)
15 kg(33 lb)
17.5 kg(33 lb)
Power Supply:
AC 100 / 240 V Auto
Switch or DC+48V
AC 100 / 240 V Auto
Switch
AC 100 / 240 V Auto
Switch
Rail with self-locking device
LCD back-light will be Turned-off when
The screen set is turned down
Protection:
Auto Power Switch
Operating Temperature:
0-50°C (32-122°F)
Folding Angle:
Up to 110°
Extension Length:
431.8mm(17”)
Display:
Diagonal Size:
15”
17”
1024×768
1280×1024
304.1 × 228.1 mm
337.9 × 270.3 mm
Contrast Ratio:
250:1
350:1
Brightness:
250 NTS
280 NTS
Frequency:
60Hz
60Hz
Color:
16.7M colors
16.7M colors
Control System:
OSD
OSD
Resolution:
Display Area:
Accessories:
Model
Extension Bracket:
Power cord:
RA15/17
RA15/17KVM8
RA15/17KVM16
×
2
×
2
×
2
×
1
×
1
×
1
Raloy Manual
3
D-Sub 15 VGA-PS/2 Cable
(3 in 1):
Screw Package:
User’s Manual:
×
1
×
8
×
16
×
1
×
1
×
1
×
1
×
1
×
1
Rackmount Installation
1. Find the property position to screw these two extension brackets with the ears
and both side onto the server rackmount first.
2. Lift & push the Raloy inside the rackmount, and screw between bracket and
Raloy with 4 screws.
3. Mount the front ears of Raloy main body onto the server rackmount.
Raloy Manual
4
Product Detail
Self-locking Device
Press the button to unlock
Maximum Extension Length
Up To 110∘
431.8mm
The view of open & close situation
Raloy Manual
5
On Screen Display
Raloy Manual
6
Auto Adjustment
Bright & Contrast
Raloy Manual
7
Image Adjustment
Raloy Manual
8
Color Adjustment
Raloy Manual
9
Raloy Manual
10
Language Selection
Reset
Raloy Manual
11
OSD Adjustment
Exit
Raloy Manual
12
On Screen Display for KVM Operation
When you pop up the OSD menu window go through the hot key, you will see the following
small window on your monitor.
a. The 1ST line bar is Bank no.
BANK : 1
01
SYSTEM
01
02 ☼SYSTEM
02 (
03 ☼SYSTEM
03
04 ☼SYSTEM
04
05 ☼SYSTEM
05
06
SYSTEM
06
07
07
08 ☼SYSTEM
08
SYSTEM
b. The 2nd block is your PC
system name list. You will find the
system number list from 01 to 8.
You can define your PC name in
maximum 8 characters. The
factory default names for all ports
is “SYSTEM 01”, to “SYSTEM
08“. Besides, the sun symbol “ ☼
“ near to the PC name represents
the PC system is powered on.
To use up arrow key “ y “ or down arrow key “ z “ to select port for destination PC name. After
you have selected the PC port already, you can press the ENTER Key to switch the PC port
you want immediately
©/ª: SELECT
PORT
To use “ PgUp “ key or “ PgDn” key for selecting previous or next Bank no. (or Box No.)
PgDn/PgUp: BANK
SELECT
To press “ INS” key for editing PC name. After finishing the edit, please press “ Enter “ key for
saving information.
ESC : QUIT
ENTER :COMPLETE
TAB : NEXT
INSERT :EDIT
Raloy Manual
13
To use “ Tab “ key to select items like Bank, OSD, SCAN, CHANGE PASSWORD, CONSOLE
ON/OFF, etc…
OSD : 1 0 SEC.
CHANGE PASSWORD
SCAN: 1 0 SEC.
15 ☼SYSTEM
15
16
CONSOLE
SYSTEM
ON/OFF
16
OSD : 1 0 SEC. ( CHANGE PASSWORD
SCAN: 1 0 SEC.
CONSOLE
ON/OFF
ESC : QUIT
ENTER :COMPLETE
TAB : NEXT
INSERT :EDIT
a. The “ OSD: 10 SEC” means
that the OSD windows display
or PC system name exists 10
sec. on your monitor. You can
modify it from 05 sec to 99 sec.
The factory default value is 10
sec..
b. The “ SCAN TIME” means that scan interval from one PC port to next PC port. The default
SCAN time is 10 sec and the maximum scan time is 99 sec.
c. The “ CHANGE PASSWORD” is for user to avoid all PC systems to be intruded by the
other person. The default password is 8 digits “ 00000000 “.
ENTER
ESC : QUIT
PASSWORD : █
ENTER : COMPLETE
There is an enter password window showed out when you select this item and then press the
Enter. The maximum password is eight digits. After you key in the password already and
press the Enter key, there is another window for confirming your typed password.
ENTER
NEW
ESC : QUIT
RETYPE
NEW
ESC : QUIT
PASSWORD : █
ENTER : COMPLETE
PASSWORD : █
ENTER : COMPLETE
You need to retype the password again for rechecking your previous key-in password is
Raloy Manual
14
matched or not.
NEW
PASSWORD
ESC : QUIT
COMPLETE
ENTER : COMPLETE
d. The “ CONSOLE ON/OFF “ means to manage the RA15/17KVM8. If you select
“ CONSOLE ON “, it means that any user can use the console. If you select “ CONSOLE
OFF “(factory default OFF state), it means that any user will not be allowed to use the
console unless you enter the password. When you enter the password already and pass
the RA15/17KVM8 authentication, the CONSOLE will be set to ON. After you finish
using RA15/17KVM8, please don’t forget to set CONSOLE ON state to OFF state.
Besides, if current CONSOLE is ON state and you reset RA15/17KVM8, the CONSOLE
will be set from ON state back to OFF state.
e. When you finish the setting up of PC name and exiting the OSD setting mode, you will find
the PC name showed at the up-left corner of monitor. Now, you can use “ESC” key to
clear the message right away if you don’t need it.
102
☼SYSTEM
02
f. If you want OSD returning back to factory default value, you can execute “SCROLL
LOCK”, “SCROLL LOCK”, “R” keys in this order. The Seven segment LEDs on the front
panel will be flashed during the refresh process.
ROM
REFLASH
When the OSD value back to default setting, the seven segment LEDs on the front panel
will stop flashing
Raloy Manual
15
RA15/17KVM8 Illustration
Introduction
Thank you for choosing RA15/17KVM8. RA15/17KVM8 can save your MONEY, TIME, SPACE,
EQUIPMENT and POWER.
Controlling multiple PCs from One Keyboard, Mouse and VGA Monitor. RA15/17KVM8 is
loaded with features such as 19” Rack Mount Size, Daisy Chain up to eight units, On Screen
Display Menu, Password security, Searching PC server name, Hot key Control, Front Panel
Push Button and Auto Scan Control. It has complete keyboard and mouse emulation for
simultaneous PCs boot-up process.
Features
z
8-port KVM switch for standard 19” rack mount design.
z
Support DOS, Win3.X, Win95/98/98SE/2000/ME/XP, WinNT, Netware, SCO Unix, HP Unix,
Linux
z
Hot Plug - Add PCs or Remove Connected PCs for Maintenance without Powering down
the RA15/17KVM8 or PCs.
z
High Video Quality - Up To 1024x768, Bandwidth: 200MHz
z
No Software Required - easy PC selection via On Screen Display Manual, Push Buttons,
Hot Keys
z
Support eight characters password protection and search PC server name
z
Auto Scan Mode for monitoring PCs and flexible Scan time from 5~99 seconds
z
Keyboard status restored when switching PCs
z
LED Display for easy status monitoring
z
Buzzer sound for switching port confirmation.
z
Compatible with standard PS/2 Keyboard, PS/2 Mouse, and VGA.
z
Built-in one extra daisy chain port and no waste any PC port
z
No DIP switch setting needed and auto detect daisy chain bank
Raloy Manual
16
Technical Specifications
Model No.
RA15/17KVM8
PC Port
8
Console Port
1
PC Port Connector
(All Female Type)
PS/2 Keyboard mini Din 6 pin
PS/2 Mouse Mini Din 6 pin
VGA HDDB 15pin
Daisy Chain Port Connector
(All Female Type)
PS/2 Keyboard mini Din 6 pin
PS/2 Mouse Mini Din 6 pin
VGA HDDB 15pin
PC selection
On Screen Display Menu, Hot Key, Push Button
7 segment LED
One Bank LED, Two PC Port LEDs
On Screen Display Control
Yes
Scan Intervals
5~99 Sec.
Keyboard Emulation
PS2
Mouse Emulation
PS2
VGA Resolution
1024x768(15”) ; 1280*1024(17”)
Bandwidth
200MHz
Daisy Chain MAX Level
8 levels
MAX PC Connection
120
Housing
Metal
Power
110/220 AC
Operation Temperature
0~40℃
Storage Temperature
-20 ~ 60℃
Humidity
0~90%, Non-Condensing
Size
19” Rack Mount / 1U
Weight (kg)
33lb
Dimension (cm)
23”(L) X 19(W) X 1U(H)
System Requirements
Specifications:
Model No.
Console
To Computers
RA15/17KVM8
Built-in VGA Monitor
Built-in PS/2 Keyboard
Built-in PS/2 Touchpad
8 HDB 15 pin male to male VGA cables
8 PS/2 cables male to male for Keyboard
8 PS/2 cables male to male for Mouse
Raloy Manual
17
Connector Diagrams
PS/2 Cable:
Mini Din 6 pin Male to Male
VGA Cable:
HDB15 pin Male to Male
AT to PS/2 keyboard adapter: (Optional)
Din 5 pin Male to Mini Din 6 pin Female
PS2 to DB9 adapter (Optional)
Mini Din 6 pin Female to DB 9 pin Female
Raloy Manual
18
Hardware Installation
Before installation, please make sure all of peripherals and computers have been turned off.
Step 1
Now the PC connections can be made with the monitor (VGA) connections first. Connect a
VGA cable (15-pin HDDB Male / Male) with the Male side to both of the PC and the rear panel
of the KVM switch to the connector labeled VGA. Repeat this for all PCs.
Step 2
Connect the first computer’s mouse cable to the RA15/17KVM8. If using a PS/2 cable, connect
one end to the PS/2 mouse port on the computer, and the other end to the PC1 PS/2 mouse
port on the back of RA15/17KVM8. If using a serial mouse cable (optional), connect one end to
a DB-9 serial port on the computer, and the other end to the PC1 DB-9 serial mouse port on the
back of the RA15/17KVM8. If you need Serial DB-9 to PS2 Mini Din 6 pin adapter, please
contact your supplier.
Step 3
Connect the first computer’s keyboard cable to the KVM Switch. Using another PS/2 cable connect one
end to PS/2 keyboard port on the computer, and the other end to the PC1 keyboard port on the back of
RA15/17KVM8. If your computer has an AT type keyboard port, you will need a PS/2 to AT keyboard
adapter.
Step 4
Double-check all of the connections. You can check the color of keyboard and mouse
connector to make sure the keyboard and mouse cables go to the correct ports.
Step 5
Repeat step 2 to 4 for the remainder of the computers.
Raloy Manual
19
Step 6
Attach the power supply to the RA15/17KVM8 unit and plug the other end into an electrical
receptacle. Now you will see the LED for Port 1 light up, and you will hear a beep.
Usage
The power on state of 8-port RA15/17KVM8:
When you power on the RA15/17KVM8, it will ask you for the password, the default password
value is eight zero –“ 00000000 “. Please key in eight zero and enter the same value at
retype field.
Note: If you are not familiar with the operation of OSD menu, please don’t change the
password – i.e. keep default eight zero (00000000) value. Otherwise, if you have set the
password and unfortunately forget the password, you need send it back to your distributor for
maintaining the password.
7-Segment LED Indication
:
When you select one of eight PC ports and this PC is shut down or this PC port is disconnected
to the PC, the selected port LED will flash. When you select one of eight PCs ports and this PC
is powered on, the selected port LED is lit.
RA15/17KVM8
1
2
3
4
5
6
7
8
Keyboard Hot Key Commands:
Yond RA15/17KVM8 by switching ports through simple key sequences. To send commands to
the RA15/17KVM8, the “SCROLL LOCK” key must be pressed twice within 2 seconds.
You will hear a beep for confirmation and the keyboard is in hot key mode. If you have not
pressed any key in hot key mode within 2 seconds, the keyboard will go back to normal
Operation System control state.
Below are the different hot key commands:
within 2 seconds
Scroll
Lock
+
Scroll
Lock
+
↑
=
Previous Channel
Scroll
Lock
+
Scroll
Lock
+
↓
=
Next Channel
(Note: You also could press “up arrow key” or “down arrow key”
longer time to speed up selecting the destination port)
Scroll
Lock
Scroll
Lock
Page
Up
Raloy Manual
20
+
Scroll
Lock
+
+
Scroll
Lock
+
Page
Down
=
Previous Bank
=
Next Bank
To select
Scroll
Lock
Scroll
Lock
+
+
Scroll
Lock
Scroll
Lock
+
Bank
No
+
B
Port
No
=
Beeper
(Note: The default Beeper function is ON and beeper
control is only for available for Scan Mode )
Scroll
Lock
+
Scroll
Lock
+
S
=
Auto Scan
To get out of Auto Scan Mode, Press any key or SPACE bar.
Scroll
Lock
+
Scroll
Lock
+
R
=
OSD default value
(Note: Not including password)
ROM
Scroll
Lock
+
Scroll
Lock
+
F
=
REFLASH
Search the same PC name
(Note: Search PC name starting from 1st PC port)
FIND:█
Scroll
Lock
+
Scroll
Lock
+ Space bar =
On Screen Display Menu
Raloy Manual
21
Example:
A. To access a computer attached to Port 6 of the fifth Bank. You can press through hot key as
below:
Scroll lock + Scroll lock + “5” + “0”
“ 6”
B. To access a computer attached from Bank 3 to Bank 4, You can press through hot key as
below:
Scroll lock + Scroll lock + Page Down
Notice:
Bank no. and Port no. Selection must be made using the numeric keys on the keyboard.
Numeric keys on the keypad are not available as a hot key command.
Raloy Manual
22
Daisy Chain Connection Diagram
Please use the attached 3 feet 3-in-one daisy chain Cable Kit to daisy chain the
RA15/17KVM8.
A. Connect Keyboard, Mouse and Monitor to the console port (white color block) of bank 1
RA15/17KVM8.
B. Use one end of 3-in-one Cable Kit to connect the daisy chain port of bank 1 and the other
end for the console port (white color block) of bank 2 RA15/17KVM8.
C. Please repeat item B to daisy chain more bank as you want. But, the maximum daisy chain
bank is eight.
D. Before chaining the slave bank up to six banks, you need a VGA extender (Model No.
VGA-100, Max. 100 feet ) between the fifth bank and the sixth bank to enhance the VGA
signal.
Raloy Manual
23
Hot Plug
The RA15/17KVM8 supports “Hot Plug“ function for easy addition or removal of PCs. The user
can arrange or maintain PCs as follows:
a. A PC can be disconnected and reconnected to the same or different port of the
RA15/17KVM8 unit without having to power it off as long as it is not the Daisy-chain port or
pass through port.
b. You may unplug the mouse or the keyboard from the console port and plug it back in at any
time.
NOTICE:
Some O.S. (Operation Systems) like SCO Unix are unable to support “ Hot Plug ”
function. If you apply “Hot Plug” to this kind of O.S., it will cause unpredictable
behavior or shut down the PC. Before attempting to use “ Hot Plug ” , please make sure
your O.S. and software driver supports the “Hot Plug” function.
Troubleshooting
1.
Ensure that all cables are well seated. Label all of cables with the number for each
respective computer to avoid confusion.
2.
The recommended VGA cable distance is 5 meters maximum without ghosting and
degradation. Normally, the cable length is based on driver capacity of your VGA card. If
you need longer VGA cable, please use VGA extender to accomplish your applications.
3.
The recommended PS2 cable distance is 5 meters maximum. Normally, the cable length is
based on driver capacity of your motherboard PS2 port. If you need longer PS2 cable,
please use PS2 extender to accomplish your applications.
4.
Don’t press any keys on the keyboard while the selected computer is booting up.
Otherwise, it might cause the keyboard error or keyboard is not detected at PC side.
5.
z
z
The computer boot up fine, but keyboard doesn’t work
Make sure the keyboard port works on the computer.
Try a independent keyboard with the computer
6.
z
z
z
z
z
The Mouse is not detected during PC boot up.
Make sure the mouse port works on the computer.
Try a independent mouse with the computer.
Avoiding moving the mouse or pressing the mouse buttons when switching ports.
Avoiding switching ports during shutting down the PC process.
When you switch one PC port to another PC port, the best scan time setting need to be set
at 5 sec. or more. Normally, the VGA monitor change one resolution mode to another will
take a few seconds.
Raloy Manual
24
7.
If forgetting the “ password ” you typed, please contact your supplier.
Accessories
Ordering information:
1. VGA-100
100 feet
•
•
•
VGA Extender (DB15 Female to DB15 Female)
Max distance:
VGA-100 - HDDB 15 pin to HDDB 15 pin,
All female, Max 100 feet.
PS2-100 - Two PS/2 Mini Din 6 pin to two
PS/2 Mini Din 6 pin, all female, Max 100
feet.
2. PS2-100
PC port PS2 Extender (Mini Din 6 Female to Mini Din 6 Female),
MAX distance: 100 feet
3. Daisy-100 Daisy Chain PS2 port Extender (Mini Din 6 Female to Mini Din 6
Female) MAX. 100 feet
4. PS2-DB9
PS2 to Serial adapter (Mini Din 6 Female to DB9 Female)
5. PS2KVM-Cable 3-in-one 6 feet VGA and PS2 cable for pc port to
RA15/17KVM16
6. RMB-2 Rack Mount Brackets
7. USB-PS2 USB to PS2 for converting KVM PS2 port to USB PC, MAC or USB
SUN
Microsystems.
•
•
•
•
•
•
•
Support Two PS/2 Device
Simultaneously(Keyboard and mouse) and
Converts to the USB Interface
Convert PS2 KVM switch Device to USB KVM
switch Devices (PC, iMAC or SUN platforms)
Support standard PS/2 Mouse and Microsoft
Intellimouse
Eas install
Bus power, External power Adapter Not
Required
Complies to USB 1.0 and 1.1 Specification
Support UHCI and OHCI USB Interfaces
Raloy Manual
25
RA15/17KVM16 Illustration
Introduction
Congratulations, you have chosen the efficient RA15/17KVM16 switch can save your MONEY,
TIME, SPACE, EQUIPMENT and POWER.
Controlling multiple PCs from One Keyboard, Mouse and VGA Monitor. RA15/17KVM16 is loaded
with features such as 19” Rack Mount Size, Daisy Chain up to 16 units, On Screen Display Menu,
Password security, Searching PC server name, Hot key Control, Front Panel Push Button and
Auto Scan Control. It has complete keyboard and mouse emulation for simultaneous PCs
boot-up process.
Features
z
16 ports RA15/17KVM16 is 19” rack mount size design.
z
Support Microsoft Intellimouse, Microsoft Intellimouse Explorer, Logitech Net Mouse or the
other fully compatible MS mouse.
z
Provide Console PS/2 to PC serial mouse conversion
z
Support DOS, Win3.X, Win95/98/98SE/2000/ME/XP, WinNT, Netware, SCO Unix, HP Unix,
Linux
z
Hot Plug - Add PCs or Remove Connected PCs for Maintenance without Powering Down
the RA15/17KVM16 or PCs.
z
Very High Video Quality - Up To 1920X1440, Bandwidth: 200MHz
z
No Software Required - easy PC selection via On Screen Display Manual, Push Buttons,
Hot Keys
z
Support eight characters password protection and search PC server name
z
Auto Scan Mode for monitoring PCs and flexible Scan time from 5~99 seconds
z
Keyboard status restored when switching PCs
z
LED Display for easy status monitoring
z
Buzzer sound for switching port confirmation.
z
Using Standard Keyboard, VGA, Mouse cable.
z
Built-in one extra daisy chain port and no waste any PC port
z
No DIP switch setting needed and auto detect daisy chain bank
Raloy Manual
26
Technical Specifications
Model No.
RA15/17KVM16
PC Port
16
Console Port
1
PC Port Connector
(All Female Type)
PS/2 Keyboard mini Din 6 pin
PS/2 Mouse Mini Din 6 pin
VGA HDDB 15pin
Console Port Connector
(All Female Type)
PS/2 Keyboard mini Din 6 pin
PS/2 Mouse Mini Din 6 pin
VGA HDDB 15pin
Daisy Chain Port Connector PS/2 Keyboard mini Din 6 pin
(All Female Type)
PS/2 Mouse Mini Din 6 pin
VGA HDDB 15pin
PC selection
On Screen Display Menu, Hot Key, Push Button
7 segment LED
One Bank LED, Two PC Port LEDs
On Screen Display Control
Yes
Scan Intervals
5~99 Sec.
Keyboard Emulation
PS2
Mouse Emulation
PS2
Mouse Conversion
(Only Console port to PC
port)
Console PS/2 to each PC port serial mouse
Resolution
1280×1024(17”) ; 1024×768(15”)
Bandwidth
200MHz
Daisy Chain MAX Level
8 levels
MAX PC Connection
128
Housing
Metal
Power
110/220 AC
Operation Temperature
0~40℃
Storage Temperature
-20 ~ 60℃
Humidity
0~90%, Non-Condensing
System Requirements
Specifications:
Model No.
Console side
RA15/17KVM16
One VGA Monitor
One PS/2 Keyboard
One PS/2 Mouse
Raloy Manual
27
Computer side
16 HDB 15 pin male to male VGA cables
16 PS/2 cables male to male for Keyboard
16 PS/2 cables male to male for Mouse
Cable Diagrams
PS/2 Cable:
Mini Din 6 pin Male to Male
VGA Cable:
HDB15 pin Male to Male
AT to PS/2 keyboard adapter: (Optional)
Din 5 pin Male to Mini Din 6 pin Female
PS2 to DB9 adapter (Optional)
Mini Din 6 pin Female to DB 9 pin Female
Raloy Manual
28
Switching Indication
Hardware Installation
Step 1
Connect the monitor to the RA15/17KVM16. Using the attached cable, or the one included with
your monitor, connect it to the HD DB-15 female port on the back of the KVM unit labeled with
the monitor symbol at the CONSOLE port connector.
Step 2
Connect the keyboard to the RA15/17KVM16. If you have an AT type keyboard, you will need
an AT to PS/2 adapter.
Step 3
Connect the mouse to the RA15/17KVM16.
Step 4
Now the PC connections will be made with the monitor (VGA) connections first. Connect a VGA
cable (15-pin HDDB Male / Male) with the Male side to both of the PC and the rear panel of the
RA15/17KVM16 to the connector labeled VGA. Repeat this for all PCs.
The rear side of PC
Raloy Manual
29
Step 5
Connect the first computer’s mouse cable to the RA15/17KVM16. If using a PS/2 cable,
connect one end to the PS/2 mouse port on the computer, and the other end to the PC1 PS/2
mouse port on the back of RA15/17KVM16. If using a serial mouse cable (optional), connect
one end to a DB-9 serial port on the computer, and the other end to the PC1 DB-9 serial mouse
port on the back of the RA15/17KVM16. If you need Serial DB-9 to PS2 Mini Din 6 pin adapter,
please contact your supplier.
The rear side of PC
Step 6
Connect the first computer’s keyboard cable to the RA15/17KVM16. Using another PS/2 cable
connect one end to PS/2 keyboard port on the computer, and the other end to the PC1
keyboard port on the back of KVM unit. If your computer has an AT type keyboard port, you will
need a PS/2 to AT keyboard adapter.
The rear side of PC
Step 7
Double-check all of the connections. You can check the color of keyboard and mouse
connector to make sure the keyboard and mouse cables go to the correct ports.
Step 8
Repeat step 5 to 7 for the remainder of the computers.
Step 9
Attach the power supply to the KVM unit and plug the other end into an electrical receptacle.
Now you will see the LED for Port 1 light up, and you will hear a beep. Switch on your monitor.
Raloy Manual
30
NOTICE:
Please be remind to plug in power adapter. Although the PCs connected to RA15/17KVM16
are able to support enough power to the stand alone switch, RA15/17KVM16 still needs a
power adapter for daisy chain more banks. If you forget to plug in power adapter on the status
of daisy chain, it may cause the unexpected status occurred.
Usage
The power on state of RA15/17KVM16 :
When you power on RA15/17KVM16, it will ask you the password, the default password
value is eight zero –“ 00000000 “. Please key in eight zero and enter the same value at
retype field.
Note: Before you are not familiar with the operation of OSD menu, please don’t change the
password – i.e. keep default eight zero (00000000) value. Otherwise, if you have set the
password and unfortunately forget the password, you need send it back to your distributor for
maintaining the password.
1
16
2
15
3
4
5
6
7
8
14
13
12
11
10
9
7-Segment LED Indication:
You can press the button in order like mentioned-above diagram.
When you select one of sixteen PC ports and this PC is powered on, the selected port LED is lit.
When you select one of sixteen PC ports and this PC is shut down or disconnected a PC, the
selected port LED will flash.
Reset Button (
(Bank Select) and
(Port Select) ):
To press both “select” button and “bank” button of master bank simultaneously can reset
RA15/17KVM16. This reset action will not only return RA15/17KVM16 back to initial state --Check the password, but also re-check all of slave banks which connected to mast
RA15/17KVM16.
If you add a new RA15/17KVM16 as a slave bank, please use reset button of master
RA15/17KVM16 to automatically assign a new ID to it. You can view this new slave bank go
through OSD menu. The PC ports of RA15/17KVM16 does not be reset by reset command.
Keyboard Hot Key Commands:
You can also conveniently command RA15/17KVM16 by switching ports through simple key
sequences. To send commands to RA15/17KVM16, the “SCROLL LOCK” key must be
pressed twice within 2 seconds. You will hear a beep for confirmation and the keyboard is in
hot key mode. If you have not pressed any key in hot key mode within 2 seconds (It means to
key in any key follows up “Scroll Lock” “Scroll Lock” key ), the keyboard will back to under
Operation System control state.
Raloy Manual
31
Below are the different hot key commands:
within 2 seconds
Scroll
Lock
Scroll
Lock
+
Scroll
Lock
Scroll
Lock
+
↑
+
=
=
↓
+
Previous Channel
Next Channel
(Note: You also could press “up arrow key” or “down
arrow key” longer time to speed up selecting the
destination port)
Scroll
Lock
Scroll
Lock
+
Scroll
Lock
Scroll
Lock
+
+
Page
Up
+
Page
Down
=
Previous Bank
=
Next Bank
To select PC port:
Scroll
Lock
Scroll
Lock
Scroll
Lock
+
Scroll
Lock
+
+
Bank
No
+
B
Port No.
1~4 (4 port)
1~8 (8 port)
1~16 (16 port)
Port
No
Beeper
=
(Note: The default Beeper function is ON and beeper
control is only for available for Scan Mode )
Scroll
Lock
Scroll
Lock
+
S
+
=
Auto Scan
To get out of Auto Scan Mode, Press any key or SPACE bar.
Scroll
Lock
+
Scroll
Lock
R
+
=
(Note: Not including password)
ROM
Scroll
Lock
Scroll
Lock
OSD default value
REFLASH
F
Raloy Manual
32
+
=
+
Search the same PC name
(Note: Search PC name starting from 1st PC port)
FIND:█
Scroll
Lock
+
Scroll
Lock
+
Space bar
=
On Screen Display Menu
Example:
a. To access a computer attached to Port 6 of the fifth Bank. You can press through hot key as
below:
Scroll lock + Scroll lock + “5” + “0” “ 6”
b. To access a computer attached from Bank 3 to Bank 4, You can press through hot key as
below:
Scroll lock + Scroll lock + Page Down
Notice:
Bank no. and Port no. selection must be made using the numeric keys on the
keyboard. Numeric keys on the keypad are not available as a hot key command.
Daisy Chain Connection Diagram
Please use the attached 3 feet 3-in-one daisy chain Cable Kit to daisy chain the
RA15/17KVM16.
a. Connect Keyboard, Mouse and Monitor to the console port (white color block) of bank 1
RA15/17KVM16.
b. Use one end of 3-in-one Cable Kit to connect the daisy chain port of bank 1 and the other
end for the console port (white color block) of bank 2 RA15/17KVM16.
z
Please repeat item B to daisy chain more bank as you want. But, the maximum daisy chain
bank is eight levels.
Raloy Manual
33
z
Before chaining the slave bank up to six banks, you need a VGA extender (Model No.
VGA-100, Max. 100 feet ) between the fifth bank and the sixth bank to enhance the VGA
signal.
Raloy Manual
34
Hot Plug
The RA15/17KVM16 supports “Hot Plug“ function for easy addition or removal of PCs. The
user can arrange or maintain PCs as follows:
c. A PC can be disconnected and reconnected to the same or different port of the KVM unit
without having to power it off as long as it is not the Daisy-chain port or pass through port.
d. The pass through port PC (i.e. The pass through port means the console port is connected
to PC directly) is powered on. Before you go hot plug function, please switch to this pass
through port to next port and then switch back to the pass through port.
e. You may unplug the mouse or the keyboard from the console port and plug it back in at any
time.
NOTICE:
Some O.S. (Operation Systems) like SCO Unix are unable to support “ Hot Plug ”
function. If you apply “Hot Plug” to this kind of O.S., it will cause unpredictable
behavior or shut down the PC. Before attempting to use “ Hot Plug ” , please make
sure your O.S. and software driver supports the “Hot Plug” function.
Raloy Manual
35
Troubleshooting
1. Ensure that all cables are well seated. Label all of cables with the number for each
respective computer to avoid confusion.
2. The recommended VGA cable distance is 5 meters maximum without ghosting and
degradation. Normally, the cable length is based on driver capacity of your VGA card. If you
need longer VGA cable, please use VGA extender (Model No. VGA-100, MAX. 100 feet ) to
accomplish your applications.
3. The recommended PS2 cable distance is 5 meters maximum. Normally, the cable length is
based on driver capacity of your motherboard PS2 port. If you need longer PS2 cable,
please use PS2 extender ( Model No. PS2-100, MAX. 100 feet ) to accomplish your
applications.
4. The Power Jack polarity is center positive and the power adapter need be DC12V, 1A or
DC9V, 1A.
5. Don’t press any keys on the keyboard while the selected computer is booting up. Otherwise,
it might cause the keyboard error or keyboard is not detected at PC side.
6. The computer boot up fine, but keyboard doesn’t work
z Make sure the keyboard works when directly plugged into the computer.
z Try a different keyboard, but use only 101, 102 or 104-key keyboard.
7. The Mouse is not detected during PC boot up.
z Make sure the mouse works when directly plugged into the computer.
z Make sure the mouse is a true PS/2 mouse. A combo mouse will work just as long as it is
set for PS/2 mode with the correct adapter. Try a different mouse.
z Avoiding moving the mouse or pressing the mouse buttons when switching ports.
z Avoiding switching ports during shutting down the PC process.
z When you switch one PC port to another PC port, the best scan time setting need to be set
to 5 sec. or more. Normally, the VGA monitor change one resolution mode to another will
take one or two seconds. So, the scan time is not recommended to below 5 seconds.
8. The power switch is off, but the switch still works fine or power adapter is unplugged from the
switch, but the switch still works fine.
RA15/17KVM16 unit draws the power source from power adapter and all PC’s PS2 port.
Some PC’s PS2 port can support enough power for the switch, but some PC’s PS2 port ( like
laptop, notebook computer…etc.) is unable to supply enough power for the switch. In order
to make sure the system can work steadily, please do not set power switch to off state or
remove the power adapter from the switch.
Although the PCs connected to RA15/17KVM16 unit are able to support enough power to
the stand alone switch, RA15/17KVM16 unit still needs a power adapter for daisy chain
more banks.
9. If forgetting the “ password ” you typed, please contact your supplier.
Raloy Manual
36
Accessories
Ordering information:
1. VGA-100
VGA Extender (DB15 Female to DB15 Female)
•
•
•
MAX. 100 feet
VGA-100 - HDDB 15 pin to HDDB 15 pin,
All female, Max 100 feet
PS2-100 - Two PS/2 Mini Din 6 pin to two
PS/2 Mini Din 6 pin, all female, Max 100
feet
VGA Extender
2. PS2-100 PC port PS2 Extender (Mini Din 6 Female to Mini Din 6 Female)
MAX distance: 100 feet
3. Daisy-100 Daisy Chain PS2 port Extender (Mini Din 6 Female to Mini Din 6
Female) MAX. 100 feet
4. PS2-DB9
PS2 to Serial adapter (Mini Din 6 Female to DB9 Female)
5. PS2KVM-Cable 3-in-one 6 feet VGA and PS2 cable for pc port to
RA15/17KVM16
6. RMB-2 Rack Mount Brackets
7. USB-PS2 USB to PS2 for converting KVM PS2 port to USB PC, MAC or USB
SUN Microsystems.
•
•
•
•
•
•
•
•
Support Two PS/2 Device
Simultaneously(Keyboard and mouse) and
Converts to the USB Interface
Convert PS2 KVM switch Device to USB KVM
switch Devices (PC, iMAC or SUN platforms)
Support standard PS/2 Mouse and Microsoft
Intellimouse
Eas install
Bus power, External power Adapter Not
Required
Complies to USB 1.0 and 1.1 Specification
Support UHCI and OHCI USB Interfaces
Raloy Manual
37
CERTIFICATES
FCC
This equipment has been tested and found to comply with Part 15 of the FCC Rules.
Operation is subject to the following two conditions:
(1) This device may not cause harmful interference
(2) This device must accept any interference received. Including interference that may cause
undesired operation.
CE – Certificate
This equipment is in compliance with the requirements of the following regulations: EN 55 022:
CLASS A
RMA Service
Thank you for purchasing our product again, our warranty is one-year parts &
labor. Please refer to our website for further details regarding our warranty policy.
If you have any problem about operating, please feel free to contact us via the
following ways:
ACME Portable Machines, Inc
1330 Mountain View Circle, Azusa
CA 91702
Sales or Info:
Tele: (626) 610-1888
Fax: (626) 610-1881
RMA:
Tele: (626) 610-1890
Fax: (626) 610-1882
Raloy Manual
38