1
Operation Manual
Table of Contents
Connecting and ejecting the device・
・・・ 2
Editing patches・
・
・
・
・
・
・
・
・
・
・
・
・
・
・
・
・
・
・
・
・
・・・ 4
Editing patch list・
・
・
・
・
・
・
・
・
・
・
・
・
・
・
・
・
・
・
・
・・・ 6
Managing patch groups・
・
・
・
・
・
・
・
・
・
・
・
・
・・・ 8
Other useful functions・
・
・
・
・
・
・
・
・
・
・
・
・
・
・
・・11
Troubleshooting・
・
・
・
・
・
・
・
・
・
・
・
・
・
・
・
・
・
・
・
・
・・12
Software License Agreement・
・
・
・
・
・
・
・
・・13
© ZOOM Corporation
Reproduction of this manual by any means, in whole or in part, is prohibited.
Edit&Share-Manual-E-5
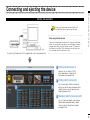
Connecting and ejecting the device
To launch this application manually, double-click
the Edit&Share shortcut icon on your desktop.
When using the Mac version
By connecting the device and PC, the application is launched automatically.
To launch this application manually, launch it from the Application
folder. This manual mainly describes using the Windows version of
the application. When using the Windows version, “PC” appears in
the Library, but on a Mac, “Mac” will appear instead. Please read
the instructions with this difference in mind.
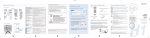
Connecting and ejecting the device
Starting the application
1 Editing patches(see p.4)
1
Here you can turn effects ON/OFF,
adjust parameters, change effects,
and rename and store patches .
2 Editing patch list(see p.6)
3
2
You can also copy, initialize and rename
patches, as well as move and reorder them,
update them on a connected device and
import and export them.
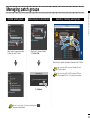
3 Managing patch groups(see p.8)
You can create new folders, copy, rename,
delete, move and reorder folders, update
them on a connected device and import
and export them.
2
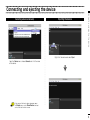
Connecting and ejecting the device
Ejecting the device
Connecting and ejecting the device
Selecting a device manually
Right-click the device and select Eject.
Open the Device menu, choose Connect and click the name
of the device.
If the name of the device does not appear, open
the Display menu, select Show Devices, and put
a check next to the device name.
3
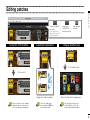
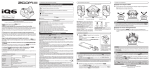
Editing patches
Note: This option only
appears for devices that
support this function.
Turning ON / OFF the effect
Adjusting the parameters
Set between
40–250 BPM
(beats per minute).
Open and close
the Editor.
Editing patches
Change the order of
the effects.
Changing the effect type
Click the effect name.
Click the switch.
Dragging the knobs up or down.
When using a device that supports
reordering, you can also move the
effects by dragging and dropping.
To turn the knob slowly,
push and hold the Shift key
as you drag the knob.
Select the effect from the pop-up menu.
You can also use the right-click
( on Mac, Ctrl key + Click ) on
the effect to perform operations.
4
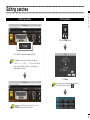
Editing patches
Storing patches
Editing patches
Renaming patches
Click the STORE button.
Click the patch name to rename the patch.
The following characters and symbols can be used.
! # $ % & ‘ () +, -. ; = @ [] ^ _ ` { } ~ A-Z, a-z, 0-9, (space)
Note: Upper number of characters can be entered,
depending on the model.
Click Store.
To change the save destination for the patches,
click on one of the triangle keys (
).
Depending on the device that you are using, click
STORE button to save the new name.
5
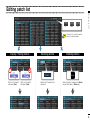
Editing patch list
radar
sort
Editing patch list
list
The patch list can only be edited
when in list or radar mode.
Copying / Pasting patches
1
Renaming patches
Initializing patches
2
Delete
Right-click the patch
and select Copy.
Right-click the patch
and select Paste.
Double-click the patch and
rename it.
Select the patch and press the Delete
key (on Mac, fn key + Delete key.)
6
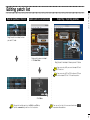
Editing patch list
Update a patch on a connected device
Editing patch list
Reorder patches in the list
Exporting / Importing patches
Drag the patch and drop it where
you want it to be.
Drag a patch group and drop it
in the User Area.
Drag the patch and drop it where you want it to be.
If you are using a G5, you can also import G3 and
G3X patches.
If you are using a G3 Ver.2.00 or later or G3X, you
can also import G3 Ver.1.12 or earlier patches.
Click Store.
To work with multiple patches, hold Shift key or Ctrl key
(on Mac, command key), and then click the patches.
You can use the right-click menu or action button (
to perform edit operations.
)
7
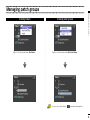
Managing patch groups
Right-click the icon and select New Folder.
Creating patch groups
Managing patch groups
Creating folders
Right-click the icon and select New Patch Group.
You can use the action button (
) to perform edit operations.
8
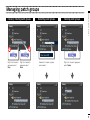
Managing patch groups
1
Right-click the patch
group and select
Copy.
Renaming patch groups
Deleting patch groups
Double-click the patch group
and rename it.
Right-click the patch group and
select Delete.
Managing patch groups
Copying / Pasting patch groups
2
Right-click the patch
group and select
Paste.
9
Managing patch groups
Update a patch group on a connected device
Drag the patch groups and drop
it where you want it to be.
Drag a patch group and drop it
in the User Area.
Exporting / Importing patch groups
Managing patch groups
Reorder patch groups
Drag the patch groups and drop it where you want it to be.
If you are using a G5, you can also import G3 and
G3X patch groups.
If you are using a G3 Ver.2.00 or later or G3X, you
can also import G3 Ver.1.12 or earlier patch groups.
Click Replace.
You can use the right-click menu or action button (
to perform edit operations.
)
10
Other useful functions
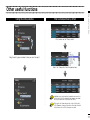
Filter sorted patches by effect
Other useful functions
Using the online patches
Click the box next to “Filter by effect.”
Drag the patch group and drop it where you want to copy it.
Select the filtered effect from the pop-up menu.
In addition, you can also place the pointer over an effect
in the list and click the magnifier that appears to narrow
the results to patches that include that effect.
Filter results will show only patches in which that effect
is ON. Moreover, changes to a patch will not be reflected
in the filter results until the changes are saved.
11
Troubleshooting
・Confirm that the device and PC are connected via the USB cable.
・Properly connect the guitar to the INPUT terminal, and the headphone
to the PHONE (or OUTPUT) terminal.
・To adjust the sound volume, turn the PATCH LEVEL knob in
Edit&Share.
・Adjust the Gain parameter and Level parameter of the amplifiers and
effectors used in Edit&Share.
・When adjusting the volume with an expression pedal, make sure that a
suitable volume setting has been set with the pedal.
・Adjust the master level of the device.
・Check the device settings.
● There is a lot of noise.
・Check the shielded cables that you are using for defects.
・Adjust the Gain parameter and Level parameter of the amplifiers and
effectors used in Edit&Share.
・Check the expression pedal settings. Depending on parameters assigned for the expression pedal, extreme changes to parameters
caused by operating the pedal may result in noise.
● The device is not recognized by the computer even though they
are connected by USB.
・Confirm that the OS you are using is supported.
・If the name of the device does not appear, open the Display menu,
select Show Devices, and put a check next to the device name.
・When the device list is improper, click Connect > Refresh from the
Device menu to update the list.
● The effector does not work.
・Confirm that the effector is turned on (LED is lit.) Edit&Share screen.
・Check whether the device has been bypassed.
● The device does not reply to Edit&Share while editing.
・Please restart Edit&Share if you computer have turned into sleep mode.
Note : Edit&Share does not support sleep mode. Please do not use
sleep mode.
● A setting value of an imported patch has changed
・When a patch created in G3 Ver.1.12 or earlier is imported into G3 Ver.2.00
or later, a maximum limit is applied to the time setting of delay effects. If
a patch with a delay time setting that exceeds maximum is imported, that
setting will be changed to the maximum value.
Troubleshooting
● No sound or very low volume.
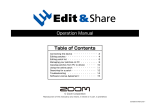
Maximum delay time limit applied to patches imported from G3 Ver.1.12 or
earlier into G3 Ver. 2.00 or later.
Effect type
Time setting before import
2501 or higher ×10 or more
2501 or higher ×10 or more
1251 or higher ×4 or more
2501 or higher ×10 or more
*TimeL/TimeR
1001 or higher ×4 or more
*DlyTime
1501 or higher ×6 or more
Time setting after import
2500
×10
2500
×10
1250
×4
2500
×10
1000
×4
1500
×6
12
Software License Agreement
・The copyrights and all the other rights of this Software, attached manuals and documents belong to ZOOM.
・Distributing, selling, leasing, renting, modifying, or reverse engineering the Software without permission is prohibited.
・Any use or application of this Software that may infringe the copyrights of a third party is prohibited. ZOOM will not assume responsibility if
the use of this Software infringes the copyrights of a third party.
・ZOOM accepts no liability for direct or indirect damage, or any claims made by a third party, that may result from the use of this Software.
ZOOM will not recover or provide compensation for the loss of data on the Customer's hard disk drive that may result from the use of the
Software.
・The specifications of the Software and the contents of this document are subject to change without notice.
*
*
*
*
Software License Agreement
ZOOM Corporation ( "ZOOM" ) grants the Customer ( "Customer" ) a nonexclusive and nontransferable license, subject to the conditions
stipulated below, to use the software program ( "Software" ) which is to be provided with the following terms of use.To use this Software, you
consent to be bound by the terms of this agreement.
Windows is registered trademarks or trademarks of Microsoft Corporation ( USA ) in the USA and other countries.
Mac and Mac OS are registered trademarks or trademarks of Apple Inc.( USA ) in the USA and other countries.
Any other trademarks and registered trademarks in this document belong to their respective owners.
All the trademarks and registered trademarks in this document are provided solely for the purpose of identification. There is no intent to infringe the copyrights of their respective
owners.
ZOOM Corporation
4-4-3 Kanda-Surugadai, Chiyoda-ku, Tokyo 101- 0062 Japan
13