1
Palmyra
WiFi Internet & FM Radio
Manual
MIR 1017
www.maninational.com
C A U TION
TO PREVENT FIRE OR SHOCK HAZARD, DO NOT USE THIS PLUG W ITH AN
EXTENSION CORD, RECEPTACLE OR OTHER OUTLET UNLESS THE BLADES
CAN BE FULLY INSERTED TO PREVENT BLADE EXPOSURE. TO PREVENT FIRE OR
SHOCK HAZARD, DO NOT EXPOSE THIS APPLIANCE TO RAIN OR MOISTURE.
The lightning flash with
arrowhead symbol, within
an equilateral triangle is
intended to alert the user
to the presence of insulated
'dangerous voltage' within
the product's enclosure
that may be of sufficient
magnitude to constitute a
risk of electric shock to
persons.
WARNING:
To reduce the risk of
electric shock, do not
remove cover (or back). No
user serviceable parts are
inside. Refer servicing to
qualified personnel.
The exclamation point
within an equilateral
triangle is intended to
alert the user to the
presence of important
operating and
maintenance (servicing)
instructions in the
literature accompanying
the appliance.
IMPOR TA N T SA FETY IN STR U C TION S
1). Read these instructions.
2). Keep these instructions.
3). Read all warnings.
4). Follow all instructions.
5). Do not use this device near water.
6). Clean only with dry cloth.
7). Do not block any ventilation openings.
8). Do not place the device near any heat sources such as radiators, heat registers, stoves
or other device.
9). Protect the power cord from being walked on or pinched particularly at plugs, convenience
receptacles, and the point where they exit the device.
10). Only use attachments or accessories specified by Mani National Corporation
11). Unplug this product during lightning storms or when unused for long periods of time.
12). Refer all servicing to qualified service personal. Servicing is required when the device
has been damaged in any way, such as power supply cord or plug is damaged, liquid has
been spilled or objects have fallen into the device, the device has been exposed to rain or
moisture, does not operate normally, or has been dropped.
13). This device should not be exposed to dripping or splashing water and no object filled
with liquids such as vases shall be placed near the device.
14). Do not overload the wall outlet. Use only power source as indicated.
15). Use replacement parts as specified by Mani National Corporation
16). No open flame sources, such as lighted candles, should be placed on or near the device.
17). Place in a stable location so it will not fall, which could cause product damage or body harm.
1
Welcome
Thank you for purchasing Palmyra Radio. Your Palmyra Radios designed as
a digital music radio to add to your existing Audio system and to provide you
with hours of music enjoyment with simple, convenient access to thousands
of Internet radio stations worldwide and furthermore music streaming options.
No matter whether you are in Zürich and want to listen to Brazilian music, or
select a genre such as classical music, hard rock or jazz, the Radiobrings you
home the radio station of your choice.
Table of contents
Welcome ........................................................................ . 2
Package contents ....................................................... . 4
Before you start ............................................... ............ 4
Features................................................................ . 5
Specifications ............................................................ . 5
Getting started .............................................................. . 6
Front panel ................................................................ . 6
Back panel................................................................. . 7
Remote control........................................................... . 7
Remote Functions...................................................... . 8
Menu Structure .......................................................... . 9
Turning on the Radio .................................................. . 10
Language selection............................. ........................ 10
Text entry ................................................................... 11
Connecting the Radio to the network ............................. 11
Establishing a wireless connection .......................... 12
Listening to the radio ................................................... . 14
Searching for a radio station ........................................ 14
Searching by genre ............................................... . 14
Searching by country/location ................................. 15
Searching by station name ...................................... 16
Searching by entering the address .......................... 17
Connecting to a station ............................................... .17
2
Adding a station to My Favorite.................................... . 18
Adding a currently played radio station..................... 18
Adding a radio station from the list .......................... 18
Managing My Favorite ................................................ 19
Other settings ............................................................. . 20
Configuration ........................................................... . 20
Network............................................................... . 20
Clock................................................................... . 20
Alarm................................................................... . 21
Language.............................................................. 22
light .............................................. ....................... 22
Sleep Timer ......................................................... . 22
Buffering ............................................................. . 22
Version Update .................................................... . 23
Reset .................................................................. . 23
User Helper ................................................................. . 24
Warranty ...................................................................... 25
How you can get service ............................................ . 26
Registering your device with Mani ............................... 26
3
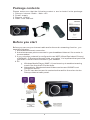
Package contents
Please make sure that the following content s are in cluded in the package:
1. Palmyra Internet Radio - Main unit
2. Power supply
3. Remote control
4. Radio User Manual
Before you start
Before you can use your internet radio and/or the music streaming function , you
need the following:
1. A broadband internet connection.
2. A wireless access point connected to your broadband internet. Via a router is
recommended.
3. If you r wireless network is configured to use WEP (Wired Equivalent Privacy)
or WPA (Wi - Fi Protected Access) data encryption, it is important that you know
your WEP or WPA code to connect to your network.
4. PC
Windows Media Player (WMP) 11 can be set up to enable streaming
music files from the PC to the radio.
Alternatively, Windows shared folders can be used if WMP is not
installed in the PC.
The PC can also be used to customise the radio’s favourites via the
Palmyra internet radio portal.
4
Features
Stand-alone device
Wireless/cable connection
Up-to-date list of more than 10,000 online stations
250 favorites
Radio alarm
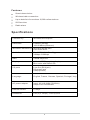
Specifications
Connectivity
Wireless access point
Data rates
54 Mbits (WLAN)
10/100 Mbits (Ethernet)
Wireless LAN security
WPA and WPA2-AES
64/128-bit WEP
Audio format decoder
Real/MP3/WMA/Flac/Ogg.
32Kbps~320Kbps
SNR
>90dB earphone
Display
128 x 64 FSTN graphics display
Blue color with white LED
I/O ports
Line Out (RCA jack)
DC power jack
USB(optional)
Language
English, France, German, Spanish, Portugal, Italy
AC power adapter
Input: AC 110-240V (50-60Hz)
Output: DC 9V/2000mA
Remote control
27 keys
Dimension
216 (L) x 135(W ) x 130 (H) mm
5
Ge tting sta r te d
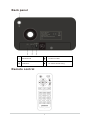
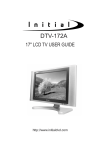
Front panel
Power button
Press to switch the device between
standby and on mode.
Enter button
Press to confirm your selection of a
menu option.
Up navigation button
Press to scroll up through menu items.
Press to enter text.
Down navigation button
Press to scroll down through menu items.
Press to enter text.
Left navigation button
Press to go back to the previous menu.
Right navigation button
Press to confirm your selection of an
option and go to the submenu.
Mode button
Press to Switch between (FM/Internet
Radio etc.)
FAV button
Press to display your favorites list.
Volume- button
Press to decrease the output volume.
Volume+ button
Press to increase the output volume.
Menu button
Press to return to the main menu
Preset button 1~5
Press to recall a preset radio station.
6
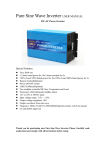
Back panel
FM Antenna
Audio Line Out
USB Port
9v-2A DC Power Plug
Remote control
7
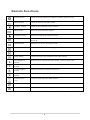
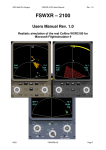
Remote Functions
Power button
Press to switch the device between standby and on mode.
Menu button
Press to return to the main menu.
Volume- button
Press to decrease the output volume.
Mute button
Press to mute the audio output.
Volume+ button
Press to increase the output volume.
Sleep button
Press to select a preset amount of time after which the device
shuts off.
Alarm button
Press to turn on/off the alarm clock.
Language button
Press to select a system language.
light button
Press to select a light mode.
Enter button
Press to confirm your selection of a menu option.
Up navigation
button
Press to scroll up through menu items. Press to enter text.
Down navigation
button
Press to scroll down through menu items. Press to enter text.
Left navigation
button
Press to go back to the previous menu
Right navigation
button
Press to confirm your selection of an option and go to the submenu.
Preset button
0~9
Press to recall a preset radio station.
Favorite button
Press to display your favorites list.
+Favorite button
Press to store the currently played radio station to your favorites list.
8
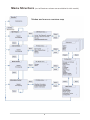
Menu Structure (not all features shown are available for this model)
Modes and menus overview map
9
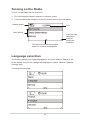
Turning on the Radio
To turn on the Radio for the first time:
1. Plug the supplied power adapter in a power outlet.
2. Connect the power adapter to the DC power jack on the rear panel.
Network status
Time
Menu options
The main menu contains four options
and the fi rst option is highlighted.
Press the right
navigation
button to
display the
submenu
Language selection
The Radio supports up to eight languages for the menu options. English is set
as the default, but you can change the language to France, German, Spanish,
Portugal, Italy.
To change the language:
10
1. From the main menu, select Configure > Language.
2. Press the up/down navigation button to scroll through the language
options and press the enter button to apply the selected language.
NOTE: The language selected applies to the Radio menus and system messages
only. The station names shown vary according to station locations.
Text entry
When you add the address of an online radio station or use a WEP key for
wireless network security, you need to enter text.
To enter upper/lower case letters, symbols, or numbers:
1. Press the up/down navigation button or rotate the volume knob
clockwise/counterclockwise to select a character from the following:
A a B b…Z z $ % & # _ ^ ~ ` “ ', . : ; ? ! * - + @ < = > { ¦ } [ \ ] ( / ) 0 1…9
2. Press the right navigation button to proceed to the next. Press the
enter button or the volume knob when done.
If you want to set your IP address and other IP parameters or set the time, date
and an alarm, follow the way described in Step 1 above to select numbers, and
then repeat Step 2 above.
Connecting the Radio to the network
Before enjoying online radio stations worldwide, you must first connect your
Palmyra Radio to the network via a wireless connection. Contact your Internet
service provider (ISP) for more information about setting up your wireless
Internet connection.
11
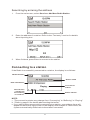
Establishing a wireless connection
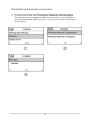
1. Set up your access point (AP) to receive/broadcast a wireless signal.
2. From the main menu, select Configure > Network > WiFi Configure.
The names of the receivable access points are listed. If you highlight a
network protected by WEP encryption, a key icon will show at the bottom
of the display.
12
3. Select a network you have access to. If the network is not secured by a
WEP key, press the enter button to make a connection. If it is locked, select
Enter WEP. Your WEP key is the same Wi-Fi password you use on a laptop
or PC to connect the Internet.
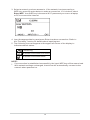
4. Input the appropriate key and press Enter to make a connection. Refer to
the “Text entry” section for details about inputting text.
5. The following icons will appear at the upper left corner of the display to
indicate network status:
Connecting
Wireless connection successful
Wireless connection failed
NOTE:
If a connection is established successfully, the input WEP key will be memorized.
With network settings unchanged, the device will automatically connect to the
network when powered on.
13
Lis t e ning to the r a dio
Searching for a radio station
The Adaptor has an up-to-date, well-classified list of online radio stations
worldwide. You can search for a station by music genre or the location of
the station. You can also go through the stations categorized in alphabetical
order or manually enter the address of a station.
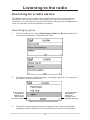
Searching by genre
1.
From the main menu, select Radio Station/Music > Genre, and a list of
music genres displays in alphabetical order.
2.
Press the up/down navigation button to highlight a genre. For example, if
you want to listen to jazz music:
Press the left
navigation
button to go
back to the
previous menu
Press the right
navigation
button to
display all of
the jazz stations
Jazz is the 23rd genre of all 53 genres
3.
Press the right navigation button to display all jazz stations available.
Highlight a station and press the enter button to connect to the station.
14
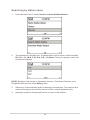
Searching by country/location
1.
From the main menu, select Radio Station/Music > Country/Location,
and a list of geographical regions displays in alphabetical order:
The list includes: Africa, Asia, Europe, Latin America, Middle East, North
America, Oceania/Pacific, and Internet only (for stations broadcasting
via the Internet only).
2.
Select a geographical region and then select a country in the region. A list of
stations located in the country display.
3.
Highlight a station and press Enter to connect to the station.
NOTE:
For countries that have a huge number of radio stations, the stations are
subclassified by name initial alphabetically.
If you select a language other than English, you will see the name of a country
where that language is spoken in the Radio Station/Music menu. Highlight the
country name and press Enter to display the stations located in this country.
15
Searching by station name
1.
From the main menu, select Service > Search Radio Station.
2.
The stations are divided into 10 categories by their name initial: 0-9, A-C,
D-F, G-I, J-L, M-O, P-R, S-U, V-Z, and Other. Select a category and a list
of stations displays.
NOTE: Stations with names in Japanese, Korean, Traditional Chinese, and
Simplified Chinese are in the Other group.
3.
Select any of the stations again to display more stations. The stations are
listed according to the first two letters of their names alphabetically.
4.
Highlight a station and press Enter to connect to the station.
16
Searching by entering the address
1.
From the main menu, select Service > Add New Radio Station.
2.
Enter the address of a station. Refer to the “Text entry” section for details
about inputting text.
3.
When finished, press Enter to connect to the station.
Connecting to a station
If the Radio is successfully connected to a station, the display is as follows:
Network status
Station name
Data information
Connection
status*
Vertical bars
indicate the
accessibility
to a station.
Buffer status**
NOTE:
*The connection status may change from “Connecting” to “Buffering” to “Playing.”
**Refer to page 22 for details about setting the buffer.
If you shift to other menus while connecting to a station, a countdown timer will
appear at the bottom right corner of the display. After a lapse of 10 seconds, the
system automatically shifts back to the station connected.
17
Adding a station to My Favorite
You can add a currently played radio station to My Favorite or set a station
as your favorite immediately after you found it on the list. The Radio has a
memory of 250 stations.
Adding a currently played radio station
1.
Press the +Favorite button on the remote control.
2.
The following icons will appear next to the network status icon to indicate
favorites status:
The station is being added to My Favorite.
The station has already been in My Favorite.
Favorites exceeds the maximum of 250.
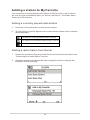
Adding a radio station from the list
1.
Search for a station using any of the first three methods mentioned in the
“Searching for a radio station” section.
2.
Highlight a station and press the right navigation button to display the
submenu as the following:
18
3.
Add to My Favorite: Select to add the station to your favorites list.
Auto Scan (Down)/(Up): Select to connect to the stations on the list
consecutively up/down from the highlighted station. Each station will
be played for 30 seconds during which you can add it to My Favorite by
pressing the +Favorite button.
Play: Select to connect to the station.
Refer to the table on page 18 for favorite's status.
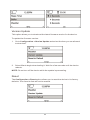
Managing My Favorite
The Adaptor saves up to 250 stations to My Favorite so that you can have quick
access to preset stations.
To manage your favorites list:
1.
Press mode into “Internet Radio” select My Favorite from the main menu.
A list of preset stations displays.
2.
Highlight a station on the list and press the right navigation button to display
the submenu as the following:
3.
Delete: Select to delete the station.
Shift Up/Down: Select to change the order of the preset stations.
Move the stations played the most frequently to the top 5 or 10 so
that you can press the preset buttons to switch to them.
Rename: Select to rename the station.
Play: Select to connect to the station.
You can also connect to a preset station by doing the following:
From your favorites list, highlight a station and press Enter to connect.
From any menus, press the preset button 0~9 on the remote control to
connect to the sixth to the tenth preset stations.
19
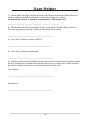
Ot he r s e t t ings
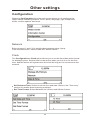
Configuration
Selecting Configuration from the main menu allows you to configure the
Radio setups including network, clock, alarm, language, light, sleep timer,
buffer, version update, and reset.
Network
Refer to page 11 and 12 for details about network setup. Upnp:
From the main menu, select mode into “Media Center”.
Clock
The Configuration > Clock option allows you to set the time/date and a format
for displaying time. Set the time for the device when you turn it on for the first
time, and the device will synchronize the clock as long as it is connected to the
network.
Set Date and Time: Select to set the time and date. Refer to the “Text entry”
section for details about inputting numbers.
Set Time Format: Select between the 12Hour and 24Hour format.
20
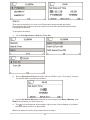
Alarm
This option allows you to turn on/off the alarm and program an alarm.
Pressing the Alarm button on the remote control also activates/deactivates
a programmed alarm.
To program an alarm:
1.
Go to Configuration > Alarm > Turn On.
2.
Select Set Alarm Time and enter values. Refer to the “Text entry” section
for details about inputting numbers.
3. Select Set Alarm Sound to choose a sound type from Beep, Melody, and
Radio (the station you last listen to).
4. The
icon will appear at the upper right corner of the display to indicate
that the alarm function is activated.
When the alarm sounds, press any button to stop it.
21
Language
Refer to page 10 and 11 for details about language selection.
Light
The Configuration > light option allows you to adjust the brightness of
the light. You can also shift the light mode by pressing the light button on
the remote control. Three modes are available:
Power Saving: Select to turn down the light.
Turn On: Select to turn on the light.
Sleep Timer
The Configuration > Sleep Timer option allows you to select a preset amount of
time after which the device shuts off. You can also set the sleep timer by pressing
the Sleep button on the remote control. When this function is activated, the XXX
icon will appear at the upper right corner of the display, XXX signifying the minutes
left. Six options are available: Turn Off, 15Minutes, 30Minutes,
60Minutes, 90Minutes and 120Minutes.
Buffering
The Configuration > Buffering option allows you to set the buffer to hold data
received for a certain amount of time. If you are connecting to a station, there
will be an icon signifying the buffer length you set (see the figure on page 18):
•
2Seconds:
•
4Seconds:
•
8Seconds:
22
Version Update
This option allows you to download the latest firmware version for the device.
To update the firmware version:
1.
Go to Configuration > Version Update and select the item you are allowed
to download.
2.
Select Yes to begin downloading it. Wait for a few seconds until the device
reboots.
NOTE: Do not turn off the device while the update is proceeding.
Reset
The Configuration > Reset option allows you to reset the device to its factory
defaults. Your favorite lists will not be erased.
23
User Helper
1). Write down the MAC address from the Palmyra Internet Radio Device
How to obtain the MAC address: From the main menu, select
Information Center > System Information > Wireless Info
______ : ______ :______: ______ : ______ : ______
2). Write down the Serial number of your Palmyra Internet Radio Device.
The serial number can be found on the back of the radio.
____________________________________
3). Your WiFi network name (SSID):
_____________________________________
4). Your WiFi network password:
_____________________________________
5). When you purchase a MANI brand devices you required to register them
online. Please go to www.maninanational.com to create your user account
and write down your account information for future use.
User Name:
_____________________________________
Password:
_____________________________________
24
Warranty
Mani warrants all Radio devices sold by Mani National Corporation
(each “Device”) to be free of defects in materials and workmanship,
subject to the following conditions:
The duration of Mani's warranty with respect to each Device is limited to
One (1) year from the date of sale to the original consumer purchaser.
No other express warranties are made with respect to any device.
All implied warranties, including warranties of merchantability and fitness
for a particular product are limited to the warranty period ser forth above.
This warranty is not transferable and applies only to the original consumer
purchaser of the device. Mani will, as its sole obligation under this warranty,
replace or repair, at its option, any device that does not conform to this warranty.
This limited warranty does not cover defects in appearance, cosmetic or
decorative items, including any non-operative parts. Under no circumstances
will Mani be liable for any loss of revenue, loss of profits or failure to realize
expected savings (collectively “Economic Loss”) under this warranty or any
implied conditions or warranty.
This limited warranty only extends to customers purchase the product in Canada.
Mani will not be responsible for damage resulting from any
1). Deviation from Mani's operating instructions as printed in Mani's User Guide
or on any packaging, labels or other literature provided with a device.
2). Setting up of a device in a manner which is inconsistent with Mani's written
instructions.
3). Alteration or modification of a device.
4). Abuse.
5). abnormal wear and tear.
6). Accident.
7). Commercial use.
8). Defects of malfunctions of which Mani is not advised with in ten (10) days
of the expiration of the limited warranty period.
9). Environmental conditions, including excessive temperature or humidity.
10). Improper storage.
11). Misuse.
25
12). Neglect.
13). Service by any entity other than a Mani authorized repair facility.
14). Use of the device in conjunction with non-Mani branded accessory.
15). Other improper application, installation or operation of this product.
How You Can Get Service
To obtain warranty service during the first thirty (30) days after the date of
purchase, you must return the product with original receipt to the original
place of purchase. To obtain warranty service during the first thirty (30)
days for devices purchased specially from w w w. ma n i n a ti o n a l .co m you
must contact the web-store directly at the number provided on your Invoice.
For devices for the remainder of the limited warranty period you must
contact Mani by phone at the customers service number listed at
w w w. ma n i n a ti o n a l .co m. If warranty service is needed at any time during
the warranty period, the purchaser will be required to furnish sales receipt/proof
of purchase indicating the date of purchase, amount paid and place of purchase.
Customers who fail to provide such proof of purchase will have the Device
returned to them or will be charged for the repair/replacement of any parts
(components). The customer is responsible for shipping the Device to an
authorized Mani Warranty Facility.
How Provincial Law Relates to the Warranty: Some provinces do not allow
limitations on the duration of implied conditions or warranties, or the exclusion
or the economic Loss. Thus, the above limitations or exclusions may not apply
to you. This warranty gives you specific legal rights. You may also have other
rights that may vary from province to province.
NO PERSON IS AUTHORIZED BY MANI NATIONAL CORPORATION TO
MODIFY OR ADD TO THIS LIMITED WARRANTY.
Registering Your Product with Mani
Start your journey of using Mani brand products happily. Please take a moment
to register your Device at w w w. ma n i n a ti o n a l .co m.
26
Mani National Corporation, 12 Smoothwater Terrace, Markham, ON, L6B-0E5,
CANADA. t: 416-570-1990 f: 905-472-0051
email enquires: [email protected]
27