1
mLAN Driver / mLAN Tools
for Mac OS X Installation Guide
ATTENTION
Software Licence Agreement
PLEASE READ THIS SOFTWARE LICENSE AGREEMENT ("AGREEMENT") CAREFULLY BEFORE USING THIS SOFTWARE.
YOU ARE ONLY PERMITTED TO USE THIS SOFTWARE PURSUANT TO THE TERMS AND CONDITIONS OF THIS AGREEMENT. THIS AGREEMENT IS BETWEEN YOU (AS AN INDIVIDUAL OR LEGAL ENTITY) AND YAMAHA CORPORATION
("YAMAHA").
BY DOWNLOADING, INSTALLING, COPYING, OR OTHERWISE USING THIS SOFTWARE YOU ARE AGREEING TO BE
BOUND BY THE TERMS OF THIS LICENSE. IF YOU DO NOT AGREE WITH THE TERMS, DO NOT DOWNLOAD, INSTALL,
COPY, OR OTHERWISE USE THIS SOFTWARE. IF YOU HAVE DOWNLOADED OR INSTALLED THE SOFTWARE AND DO
NOT AGREE TO THE TERMS, PROMPTLY DELETE THE SOFTWARE.
1. GRANT OF LICENSE AND COPYRIGHT
Yamaha hereby grants you the right to use one copy of the software program(s) and data (“SOFTWARE”) accompanying this Agreement.
The term SOFTWARE shall encompass any updates to the accompanying software and data. The SOFTWARE is owned by Yamaha and/
or Yamaha’s licensor(s), and is protected by relevant copyright laws and all applicable treaty provisions. While you are entitled to claim
ownership of the data created with the use of SOFTWARE, the SOFTWARE will continue to be protected under relevant copyrights.
• You may use the SOFTWARE on a single computer.
• You may make one copy of the SOFTWARE in machine-readable form for backup purposes only, if the SOFTWARE is on media
where such backup copy is permitted. On the backup copy, you must reproduce Yamaha's copyright notice and any other proprietary
legends that were on the original copy of the SOFTWARE.
• You may permanently transfer to a third party all your rights in the SOFTWARE, provided that you do not retain any copies and the
recipient reads and agrees to the terms of this Agreement.
2. RESTRICTIONS
• You may not engage in reverse engineering, disassembly, decompilation or otherwise deriving a source code form of the SOFTWARE
by any method whatsoever.
• You may not reproduce, modify, change, rent, lease, or distribute the SOFTWARE in whole or in part, or create derivative works of the
SOFTWARE.
• You may not electronically transmit the SOFTWARE from one computer to another or share the SOFTWARE in a network with other
computers.
• You may not use the SOFTWARE to distribute illegal data or data that violates public policy.
• You may not initiate services based on the use of the SOFTWARE without permission by Yamaha Corporation.
• Copyrighted data, including but not limited to MIDI data for songs, obtained by means of the SOFTWARE, are subject to the following
restrictions which you must observe.
• Data received by means of the SOFTWARE may not be used for any commercial purposes without permission of the copyright owner.
• Data received by means of the SOFTWARE may not be duplicated, transferred, or distributed, or played back or performed for listeners
in public without permission of the copyright owner.
• The encryption of data received by means of the SOFTWARE may not be removed nor may the electronic watermark be modified without permission of the copyright owner.
3. TERMINATION
This Agreement becomes effective on the day that you receive the SOFTWARE and remains effective until terminated. If any copyright
law or provisions of this Agreement is violated, the Agreement shall terminate automatically and immediately without notice from
Yamaha. Upon such termination, you must immediately destroy the licensed SOFTWARE, any accompanying written documents and all
copies thereof.
mLAN Driver / mLAN Tools for Mac OS X Installation Guide
1
4. DISCLAIMER OF WARRANTY ON SOFTWARE
You expressly acknowledge and agree that use of the SOFTWARE is at your sole risk. The SOFTWARE and related documentation are
provided "AS IS" and without warranty of any kind. NOTWITHSTANDING ANY OTHER PROVISION OF THIS AGREEMENT,
YAMAHA EXPRESSLY DISCLAIMS ALL WARRANTIES AS TO THE SOFTWARE, EXPRESS, AND IMPLIED, INCLUDING
BUT NOT LIMITED TO THE IMPLIED WARRANTIES OF MERCHANTABILITY, FITNESS FOR A PARTICULAR PURPOSE
AND NON-INFRINGEMENT OF THIRD PARTY RIGHTS. SPECIFICALLY, BUT WITHOUT LIMITING THE FOREGOING,
YAMAHA DOES NOT WARRANT THAT THE SOFTWARE WILL MEET YOUR REQUIREMENTS, THAT THE OPERATION OF
THE SOFTWARE WILL BE UNINTERRUPTED OR ERROR-FREE, OR THAT DEFECTS IN THE SOFTWARE WILL BE CORRECTED.
5. LIMITATION OF LIABILITY
YAMAHA’S ENTIRE OBLIGATION HEREUNDER SHALL BE TO PERMIT USE OF THE SOFTWARE UNDER THE TERMS
HEREOF. IN NO EVENT SHALL YAMAHA BE LIABLE TO YOU OR ANY OTHER PERSON FOR ANY DAMAGES, INCLUDING, WITHOUT LIMITATION, ANY DIRECT, INDIRECT, INCIDENTAL OR CONSEQUENTIAL DAMAGES, EXPENSES, LOST
PROFITS, LOST DATA OR OTHER DAMAGES ARISING OUT OF THE USE, MISUSE OR INABILITY TO USE THE SOFTWARE,
EVEN IF YAMAHA OR AN AUTHORIZED DEALER HAS BEEN ADVISED OF THE POSSIBILITY OF SUCH DAMAGES. In no
event shall Yamaha's total liability to you for all damages, losses and causes of action (whether in contract, tort or otherwise) exceed the
amount paid for the SOFTWARE.
6. THIRD PARTY SOFTWARE
Third party software and data ("THIRD PARTY SOFTWARE") may be attached to the SOFTWARE. If, in the written materials or the
electronic data accompanying the Software, Yamaha identifies any software and data as THIRD PARTY SOFTWARE, you acknowledge
and agree that you must abide by the provisions of any Agreement provided with the THIRD PARTY SOFTWARE and that the party providing the THIRD PARTY SOFTWARE is responsible for any warranty or liability related to or arising from the THIRD PARTY SOFTWARE. Yamaha is not responsible in any way for the THIRD PARTY SOFTWARE or your use thereof.
• Yamaha provides no express warranties as to the THIRD PARTY SOFTWARE. IN ADDITION, YAMAHA EXPRESSLY DISCLAIMS ALL IMPLIED WARRANTIES, INCLUDING BUT NOT LIMITED TO THE IMPLIED WARRANTIES OF MERCHANTABILITY AND FITNESS FOR A PARTICULAR PURPOSE, as to the THIRD PARTY SOFTWARE.
• Yamaha shall not provide you with any service or maintenance as to the THIRD PARTY SOFTWARE.
• Yamaha is not liable to you or any other person for any damages, including, without limitation, any direct, indirect, incidental or consequential damages, expenses, lost profits, lost data or other damages arising out of the use, misuse or inability to use the THIRD PARTY
SOFTWARE.
7. GENERAL
This Agreement shall be interpreted according to and governed by Japanese law without reference to principles of conflict of laws. Any
dispute or procedure shall be heard before the Tokyo District Court in Japan. If for any reason a court of competent jurisdiction finds any
portion of this Agreement to be unenforceable, the remainder of this Agreement shall continue in full force and effect.
8. COMPLETE AGREEMENT
This Agreement constitutes the entire agreement between the parties with respect to use of the SOFTWARE and any accompanying written materials and supersedes all prior or contemporaneous understandings or agreements, written or oral, regarding the subject matter of
this Agreement. No amendment or revision of this Agreement will be binding unless in writing and signed by a fully authorized representative of Yamaha.
Special Notices
• The software and this manual are the exclusive copyrights of Yamaha Corporation.
• Use of the software and this manual is governed by the license agreement which the purchaser fully agrees to upon breaking the seal of
the software packaging. (Please read carefully the Software Licensing Agreement at the beginning of this manual before installing the
application.)
• Copying of the software or reproduction of this manual in whole or in part by any means is expressly forbidden without the written consent of the manufacturer.
• Yamaha makes no representations or warranties with regard to the use of the software and documentation and cannot be held responsible for the results of the use of this manual and the software.
• Future upgrades of application and system software and any changes in specifications and functions will be announced separately.
• The screen displays as illustrated in this manual are for instructional purposes, and may appear somewhat different from the screens
which appear on your computer.
• Apple, Mac and Macintosh are trademarks of Apple Inc., registered in the U.S. and other countries.
• FireWire and the FireWire symbol are trademarks of Apple, Inc., registered in the U.S. and other countries. The FireWire logo is a
trademark of Apple, Inc.
• The company names and product names in this manual are the trademarks or registered trademarks of their respective companies.
mLAN Driver / mLAN Tools for Mac OS X Installation Guide
2
What is mLAN Driver / mLAN Tools?
The mLAN Driver / mLAN Tools enable you to use various mLAN devices such as 01X, i88X, mLAN16E and MY16-mLAN
connected to your computer via an IEEE1394 cable. The following items are included in the mLAN Driver / mLAN Tools.
• mLAN Driver
mLAN Driver enables you to transfer the audio/MIDI signals between the computer and mLAN device.
• mLAN Auto Connector
This software application enables you to make or change connections between a Macintosh computer and an mLAN device.
Making a connection is easy. Just select a desired device from the Devices list, then specify the number of channels.
• mLAN Graphic Patchbay
This software application enables you to make or change channel connections between multiple mLAN devices, or between a
Macintosh computer and multiple mLAN devices, through the use of a mouse and a convenient graphical user interface.
Please visit:
http://www.mlancentral.com for further information on all mLAN related products
http://www.yamahasynth.com for further specific information on Yamaha mLAN products
http://www.01xray.com for further information on the Yamaha 01X/mLAN16E and i88X
http://www.yamahaproaudio.com for further information on the MY-16 mLAN interface card
mLAN Driver / mLAN Tools for Mac OS X Installation Guide
3
System Requirements
The system requirements below are necessary for using mLAN Driver/mLAN Tools.
• The system requirements below may differ slightly depending on the particular operating system.
• For details on system requirements for other DAW software, refer to the respective owner’s manual.
• For information about the system requirements and latest information of mLAN Driver/mLAN Tools, check the web site below.
http://www.yamahasynth.com/
OS:
Mac OS X 10.4 or later
Hard Disk: Free disk space of 100 MB or more; high-speed hard
disk
Recommended system requirements (*1)
• Connecting a single mLAN device to a computer peer-to-peer
CPU:
G5 1.8GHz Dual (or higher), or Core Solo 1.5GHz
(or higher)
Memory:
1 GB or more
• Connecting a computer and three mLAN devices in an mLAN
network:
CPU:
Intel Core 2 Duo 2.16 GHz or higher (when the
Latency is less than 5 msec)
Intel Core Duo/Core 2 Duo 2 GHz or more (when
the Latency is less than 7msec)
Memory:
1 GB or more
Minimum system requirements (*1)
CPU:
Memory:
G4 1 GHz or higher
512 MB or more
Recommended system requirements
(Connecting a single mLAN device to a computer peer-to-peer)
Sampling rate/resolution of 44.1kHz/24-bit
15 audio playback tracks
2 audio recording tracks
16 MIDI playback tracks
MIDI Remote Control / Automation
3 Sends for Plug-in Software Effects
9 Inserts for Plug-in Software Effects
2 channels for the Plug-in Software Synthesizer
Latency of 5 msec or less
Recommended system requirements
(Connecting a computer and three mLAN devices)
Sampling rate/resolution of 44.1kHz/24-bit
Audio Driver 32In/32Out (total)
MIDI Driver 4In/5Out (total)
16 audio playback tracks
2 audio recording tracks
16 MIDI playback tracks
32 MIDI recording tracks
Minimum system requirements
*1 The recommended and minimum system requirements
listed here are defined by the conditions and workloads of
your DAW system. The conditions below should serve as a
rough guide as to your particular system requirements.
These may differ depending on the particular DAW software you are using.
Sampling rate/resolution of 44.1kHz/16-bit
15 audio playback tracks
MIDI Remote Control / Automation
3 Sends for Plug-in Software Effects
9 Inserts for Plug-in Software Effects
No Plug-in Software Synthesizer
Latency of about 50msec
mLAN Driver / mLAN Tools for Mac OS X Installation Guide
4
Installation of mLAN Driver / mLAN Tools
Follow the steps below to connect the mLAN device to the computer.
1 Updating the firmware of the mLAN device, if required.
2 Preparing to install
3 Starting up the Installer
Updating the firmware of the mLAN device
Please check with the hardware manufacturer as to whether or not: 1) your mLAN device supports Mac OS X 10.4 or later (10.4.4
or later on an Intel-based Mac), 2) it can be used with mLAN Driver / mLAN Tools, and 3) its firmware must be updated. Information on supported products requiring the firmware update can be found on http://www.mlancentral.com.
For Yamaha 01X, i88X, mLAN16E (for MOTIF ES) and MY16-mLAN, no firmware update is required.
Precautions when using the mLAN connection
• When using the mLAN connection, make sure to disable any energy saving features on the computer (such as Suspend,
Sleep, Standby or Pause).
• When connecting the S200 mLAN devices such as the Presonus FIREstation, the data rate of the entire mLAN connection
system may be S200 (200Mbps). Please check the data rate of each mLAN device, S200 or S400 by referring to the rear
panel or the manual of each mLAN device.
• It is recommended that the S200 mLAN device is connected at the last point in your mLAN connection chain, such as “computer (S400) – 01X (S400) – FIREstation (S200)”.
Preparing to install
1
Make sure that the power to the mLAN device is turned off.
2
Disconnect all MIDI cables connecting MIDI devices to the MIDI IN/OUT of the mLAN device.
3
Using an IEEE1394 cable, connect the mLAN device directly to the FireWire connector of the computer
(without using a hub), and disconnect all other FireWire-connected devices from the computer.
4
Start the computer and log on to the Administrator account.
5
Exit any open applications and close all open windows.
mLAN Driver / mLAN Tools for Mac OS X Installation Guide
5
Starting up the Installer
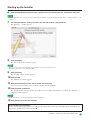
6
After the downloaded compressed file is properly extracted, double-click the “mLAN Tools.mpkg” file.
• If the computer OS does not satisfy the system requirements, the dialog box appears indicating that this software cannot be installed on your
computer.
7
8
If a dialog box appears asking if you want to install the software, click [Continue].
The “Welcome…” window appears.
Click [Continue].
The “Select a Destination” window appears.
• This step may not be necessary depending on the particular version of the operating system.
• Only the boot disk can be selected for the installer.
9
Click [Continue].
The “Installation Type” window appears.
10 Click [Install].
The “Authenticate” window appears.
11 Enter the Administrator name and password, then click [OK].
A message appears prompting you to restart the computer after the installation.
12 Click [Continue Installation].
The “Install” window appears indicating the installation progress. When the installation is complete, the “Finish Up” or
“Summary” window appears.
• Installation cannot be canceled after clicking [Continue Installation].
13 Click [Restart] to restart the computer.
When canceling the installation
If you’ve cancelled an installation before it is complete, the software may not have been installed properly. To install the software properly, resume the procedure from Step 6.
mLAN Driver / mLAN Tools for Mac OS X Installation Guide
6
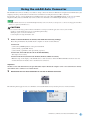
Using the mLAN Auto Connector
The mLAN Auto Connector enables you to make or change connections between a Macintosh computer and an mLAN device just
simply by selecting a desired device from the Devices menu then executing the Connect to Mac command.
If you wish to use two or more mLAN devices simultaneously and connect their audio/MIDI channels one by one, use mLAN
Graphic Patchbay instead of mLAN Auto Connector. For more information on mLAN Graphic Patchbay, see page 12.
• Do not use mLAN Auto Connector and mLAN Graphic Patchbay at the same time. If you attempt to do so, the later booting application will be
unable to recognize any mLAN devices.
CAUTION
• Never execute the following operations while the mLAN Driver is being used with the application software (such as DAW).
- Starting or exiting mLAN Auto Connector or mLAN Graphic Patchbay.
- Turning the power on/off to the mLAN devices.
- Connecting/disconnecting the FireWire cable.
1
Power on the mLAN device or devices, then make the necessary settings.
Please keep in mind that only the Macintosh computer can be the wordclock master.
Yamaha 01X:
(1) Press the [UTILITY] button on the panel of the 01X.
(2) Press knob [3] (“W.CLK” menu).
(3) Press knob [1] (“Enable”) then press knob [8] (“Yes”).
Yamaha i88X, mLAN16E (installed in the MOTIF ES/S90ES):
The setup is not necessary.
Yamaha MY16-mLAN (installed in the DM2000, DM1000, 02R96 and 01V96):
Make the setup on the display of the mLAN device so that Card slot to which the MY16-mLAN is inserted is set to the
wordclock master. For details, refer to the manual of each device.
Important:
On this version of the mLAN Driver, keep in mind that only the Macintosh computer can be a wordclock master and any
other mLAN device cannot be a wordclock master.
2
Double-Click the icon illustrated below to start the mLAN Auto Connector.
The following menu appears. You can confirm the connected mLAN devices by selecting “Devices” menu as follows.
mLAN Driver / mLAN Tools for Mac OS X Installation Guide
7
Preferences Menu
3
Select “Preferences” from the mLAN Auto Connector menu, then set the Sample Rate of the mLAN
Driver.
You can select the desired Sample Rate from the pop-up menu as illustrated below.
• For information about the available Sample Rate, please refer to the manual for your mLAN device.
• When connecting the multiple mLAN devices, only the Sample Rates supported by all the mLAN devices can be selected. When using Yamaha
01X (44100, 48000, 88200 and 96000) and Presonus FIREstation (44100 and 48000), only 44100 and 48000 can be selected.
mLAN Driver / mLAN Tools for Mac OS X Installation Guide
8
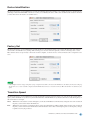
Devices Menu
4
After selecting [Device] menu, select the desired mLAN device then [Properties].
The following dialog appears, letting you set the amount of audio channels for the mLAN device. Depending on your mLAN
device, the special menu (like “Enable Monitoring Channels” below) may be indicated in the dialog.
When using the Yamaha 01X, for example, the parameters on the dialog box work as follows:
• Input Channels (Mac → 01X)
Determines the amount of audio channels transmitted from the computer to the 01X.
• Enable Monitoring Channels
Determines whether or not the audio signal is transmitted to the mLAN stereo/monitor channel of the 01X.
• Output Channels (Mac ← 01X)
Determines the amount of audio channels transmitted from the 01X to the computer.
When setting the Input Channels to “8 Channels” and setting the Enable Monitoring Channels to “On” with the 01X, Channels 1 –
8 of audio signals from the computer will be connected to the mLAN Input channels 1 – 8 (Input 9 – 16) of the 01X and channels
9 and 10 of audio signals from the computer will be connected to the mLAN Stereo In (Monitor In) of the 01X.
5
Select “Connect to Mac” from the Devices menu.
Connection (virtually) between the selected mLAN device and the computer is completed, letting you transfer audio signals
and MIDI messages between them.
Also, once the above instructions are completed, the mLAN Driver is made active on the Core Audio/Core MIDI system of the
computer.
mLAN Driver / mLAN Tools for Mac OS X Installation Guide
9
Saving/Recalling the setup with the mLAN Auto Connector
The connection setup in the mLAN Auto Connector will be saved automatically without any specific operation. When using the
next time, you can recall the connection setup just only by starting the mLAN Auto Connector (without the specific operation like
“Connect to Mac”).
• The connection setup in the mLAN Auto Connector will be saved (or overwritten) automatically as the two files listed below. These files can be
deleted if you want to set up connection from scratch.
/User/(Account name)/mLAN/mainsave.mlc
/User/(Account name)/mLAN/backupsave.mlc
(“(Account name)” indicates the account name when installed.)
• If the FireWire (IEEE1394) cable was disconnected or the power was turned off during the previous session, the message shown below may
appear meaning that the previous connection setup cannot be recalled. When this occurs, click [Close] then select [01X] → [Connect to Mac]
from the Devices menu in the mLAN Auto Connector.
Model Nickname
The Properties dialog of each mLAN device lets you change the model nickname. You can assign any nickname (up to 32 characters) to distinguish the selected device from the other devices. You cannot use two-byte characters (such as Japanese or Chinese
characters).
mLAN Driver / mLAN Tools for Mac OS X Installation Guide
10
Device Identification
The Properties dialog of each mLAN device features the [Identify] button that enables you to identify the device. Click and hold
[Identify] to flash the mLAN LED on the device so that you can identify the device. This can be useful in studio situations in which
you have more than one instance of a similar device.
Factory Set
The Properties dialog of each mLAN device features the Factory Set function, letting you reset the mLAN setup of the selected
device back to the default factory settings. This can help you to resolve issues that prevent you from connecting a device to the
Mac after the device was previously connected to another computer, or where a device connection has become corrupted via software.
• If the computer enters an energy saving mode (sleep or suspend mode) while connected to the mLAN device, the Factory Set may not work properly. If such a case occurs, restart the computer, start the mLAN Auto Connector, execute the Connect to Mac function then execute Factory Set
again.
Transition Speed
The Properties dialog of each mLAN device features the Transition Speed parameter, letting you control how the wordclock frequency of the mLAN device (as slave) is synchronized with that of the mLAN device (as master) when the wordclock frequency of
the master device is changed.
Slow: When this is selected, the wordclock frequency of the slave mLAN device will be slowly changed to the same wordclock
frequency as that of the master mLAN device.
Fast: When this is selected, the wordclock frequency of the slave mLAN device will be quickly changed to the same wordclock
frequency as that of the master mLAN device. The drawback to this is that even though response to the frequency change
is quick, noise may be produced.
mLAN Driver / mLAN Tools for Mac OS X Installation Guide
11
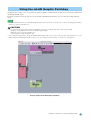
Using the mLAN Graphic Patchbay
Graphic Patchbay enables you to use a graphic user interface (GUI) to establish mLAN channel connections between a Macintosh
and multiple mLAN devices.
For details on instructions about setup, refer to the manual of mLAN Graphic Patchbay you can call up from “Help: Manual”
menu.
• Do not use mLAN Auto Connector and mLAN Graphic Patchbay at the same time. If you attempt to do so, the later booting application will be
unable to recognize any mLAN devices.
CAUTION
• Never execute the following operations while the mLAN Driver is being used with the application software (such as DAW).
- Starting or exiting mLAN Auto Connector or mLAN Graphic Patchbay.
- Turning the power on/off to the mLAN devices.
- Connecting/disconnecting the FireWire cable.
• After completing setup and before exiting the mLAN Graphic Patchbay, make sure to save the connection setup of the mLAN devices as a file.
When starting the mLAN Graphic Patchbay next time, you can recall the previously last setup of connection by opening the file.
Screen sample of mLAN Graphic Patchbay
mLAN Driver / mLAN Tools for Mac OS X Installation Guide
12
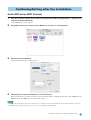
Confirming/Setting after the installation
Audio MIDI setup (MIDI Devices)
1
2
3
4
From the hard disk to which OS is installed (usually Macintosh HD), click [Application] → [Utilities] then
double-click [Audio MIDI Setup].
“Audio MIDI Setup” window appears.
Click [MIDI Devices], then confirm that the MIDI Driver is shown as “mLAN Network.”
Double-click [mLAN Network].
“mLAN Network Properties” window appears.
Click [Ports] then confirm the MIDI ports of the mLAN Driver.
When using the 01X, for example, the window shows the Yamaha 01X as an mLAN Network device with 5 MIDI IN, and 5
MIDI OUT ports. The MIDI ports are named “01X:1, 01X:1, ....”
• If updating the mLAN Tools from an older version, it may occur that the previous “mLAN Network” may be dimmed and the separate new
“mLAN Network” may appear. If such a case occurs, remove the dimmed “mLAN Network.”
mLAN Driver / mLAN Tools for Mac OS X Installation Guide
13
For Digital Performer:
Before using the DAW software, make the following settings beforehand.
1
2
3
Select [Application] → [Utilities] → [Audio MIDI Setup] to call up the Audio MIDI Setup window.
The MIDI Driver is shown as “mLAN Network.”
Click [Add Device] icon to add a new external devices to the Audio MIDI Setup window.
The new external devices require as many MIDI ports as for the device you intend to use.
Connect each MIDI input/output plugs of the MIDI Driver into the input/output plugs of the new external MIDI device.
Examples:
Yamaha 01X:
Yamaha i88X:
Yamaha mLAN16E (MOTIF ES/S90ES):
Yamaha MY16-mLAN:
Add five new external devices and connect them to the mLAN Driver.
Add one new external device and connect it to the mLAN Driver.
Add four new external devices and connect them to the mLAN Driver.
Add one new external device and connect it to the mLAN Driver.
• Entering the device name on the Properties of the new external device makes it easy to operate the device with your DAW software.
• This setting may be unnecessary for the latest version of your DAW software.
mLAN Driver / mLAN Tools for Mac OS X Installation Guide
14
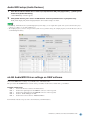
Audio MIDI setup (Audio Devices)
1
2
From the hard disk to which OS is installed (usually Macintosh HD), click [Application] → [Utilities] then
double-click [Audio MIDI Setup].
“Audio MIDI Setup” window appears.
Click [Audio Devices], then select “mLAN Network” from the pull-down menu in [Properties For].
In the [Audio Input] and [Audio Output] fields, the current audio settings are shown.
• By selecting “mLAN Network” for [Default Output] in System Settings, you can output audio signals of the system sound and audio player
software (e.g., iTunes, etc,.) from the mLAN device.
• The sampling frequency cannot be changed from the [Audio Devices] window. Change the sampling frequency in the mLAN Auto Connector
or mLAN Graphic Patchbay.
mLAN Audio/MIDI Driver settings on DAW software
In the Audio/MIDI Driver settings of your DAW, select “mLAN Network.”
The port of the mLAN MIDI Driver is shown as the port number in the format “model name : port number.”
Example: Yamaha 01X
01X : 1
Used for the Remote Control to the DAW software.
01X : 2
01X : 3
01X : 4
01X : 5
Used for the input/output via the MIDI-A connector on the rear panel.
Used for the input/output via the MIDI-B connector on the rear panel.
Used for “Studio Manager for 01X.”
Used for the Scene Control or “Multi Part Editor.”
For information about each port, refer to the manual of your mLAN device.
mLAN Driver / mLAN Tools for Mac OS X Installation Guide
15
Setting the driver I/O buffer size (latency)
Audio signals may not be played back or recorded properly (for example, noise may be produced) while using the DAW software. Such a problem may be solved by adjusting the audio buffer size which can be adjusted on the Audio Driver window of
the DAW.
The higher buffer size reduces the load of the computer CPU but produces latency (time lag) during recording/playback. The
smaller buffer size may result in noise or the sound cutting off.
Make sure to set the I/O buffer size to an appropriate value depending on the speed of your computer, the CPU power available
in DAW, etc.
Special Note when using the MY16-mLAN
Yamaha MY16-mLAN provides the “01V” mode and “Other” mode. When using the 01V to which the MY16-mLAN
installed, make sure to set the MY16-mLAN to “01V” mode. For instructions, refer to the Owner’s Manual of the MY16mLAN. When using any other devices (such as DM2000, DM1000. 02R96, and 01V96), set the MY16-mLAN to the “Other”
mode.
mLAN Driver / mLAN Tools for Mac OS X Installation Guide
16
Uninstalling the Software
To uninstall mLAN Driver / mLAN Tools, you must remove the following folders and files from the boot disk (usually Macintosh
HD).
/Application /mLAN Tools/
/System/Library/Extensions/Yamaha1394AudioDriver.kext
/System/Library/Frameworks/mLANEnablerFramework.framework
/System/Library/Frameworks/mLANQtFramework.framework
/Library/Application Support/mLAN/
/Library/Audio/MIDI Drivers/Yamaha1394MIDI.plugin
/Library/Receipts/1394AudioDriver.pkg
/Library/Receipts/1394MIDIPlugIn.pkg
/Library/Receipts/mLANEnablerFramework.pkg
/Library/Receipts/mLANQt.pkg
/Library/Receipts/mLANAutoConnector.pkg
/Library/Receipts/mLANGraphicPatchbay.pkg
/Library/Receipts/01XHAL.pkg
/Library/Receipts/Presets.pkg
/Library/Receipts/i88XHAL.pkg
/Library/Receipts/mLAN16EHAL.pkg
/Library/Receipts/MY16mLANHAL.pkg
/Library/Receipts/NCP08HAL.pkg
/User/(Account name)/mLAN/
/User/(Account name)/Library/Preferences/com.yamaha.autoconnector.plist
/User/(Account name)E/Library/Preferences/com.yamaha.mLAN.GraphicPatchbay.plist
• “(Account name)” indicates the account name when installed.
mLAN Driver / mLAN Tools for Mac OS X Installation Guide
17
Troubleshooting
No sound is heard, or the sound is too faint.
Settings on the computer
• The volume settings within your application must be set to appropriate levels.
• Make sure that the mLAN Auto Connector or mLAN Graphic Patchbay is active. (See pages 7 and 12.)
• Make sure that other settings of the mLAN Driver are appropriate. (See “Unable to transfer/receive audio data or MIDI data.”)
Setting on the mLAN device and other external devices
•
•
•
•
•
Make sure that the speakers or headphones are connected correctly.
Make sure that the power to your amplifier and other external devices are turned on.
The volume of all connected tone generators and playback devices must be set to appropriate levels.
Make sure that a signal from an external device or the DAW is being sent to the input of the mLAN device.
Make sure that the cable connecting the mLAN device and the external device is not damaged.
The sound is distorted.
Settings on the computer, mLAN device and other external devices
• Make sure that audio was recorded at an appropriate level.
• Make sure that the cable connecting the mLAN device and the external device is not damaged.
Noise.
Settings on the computer
• Make sure that your computer satisfies the system requirements. Refer to “System Requirements” (page 4).
• Make sure that the latency setting of the driver is appropriate. Refer to “Setting the driver I/O buffer size (latency)” (page 16).
• Make sure that the sampling frequency is appropriate. A high sampling frequency may be the cause of noise, depending on the computer’s capacity and speed. Refer to “Preferences Menu” (page 7).
• If your computer’s hard disk is slow, problems may occur during recording and playback.
• Try increasing the computer’s memory capacity.
• Quit all applications that are running in the background, when you use mLAN Driver. If such software is running, driver operation
may become unstable and create noise. When you are not using mLAN Driver, you can start up these applications again.
Connecting the mLAN devices
• The FireWire cable may be damaged. Cables that do not satisfy S400 standards may cause noise.
• There may be a noise-inducing device (such as a device containing a power inverter, etc.) near the FireWire cable. Move the cable
away from any possible sources of noise.
Setting on the mLAN devices and other external devices
• There may be a noise-inducing device (such as a device containing a power inverter, etc.) near cables connecting the mLAN device
or an external device. Move the cables away from any possible sources of noise.
The computer processing speed is too slow.
The computer’s CPU meter indicates a heavy processing load.
Playback response is delayed.
Insufficient tracks for recording or playback.
Settings on the computer
• Make sure that your computer satisfies the system requirements. Refer to “System Requirements” (page 4).
• If you are not using mLAN Driver, you can reduce the load on the computer by disabling mLAN Auto Connector or mLAN Graphic
Patchbay. Refer to pages 7 and 12.
An application, such as a DAW, fails to recognize mLAN Driver (audio/MIDI).
Settings on the computer
• Make sure that the mLAN Auto Connector or mLAN Graphic Patchbay is active. (See pages 7 and 12.)
• Make sure that other settings of the mLAN Driver are appropriate. (See “Unable to transfer/receive audio data or MIDI data.”)
mLAN Driver / mLAN Tools for Mac OS X Installation Guide
18
Unable to transfer/receive audio data or MIDI data.
Settings on the computer
• The mLAN Driver may not have been installed or set up correctly.
• Make sure that the mLAN Auto Connector or mLAN Graphic Patchbay is active. (See pages 7 and 12.)
• When transferring/receiving audio data, make sure to set the bi-directional connection (mLAN device ↔ computer). Only one direction (only mLAN device → computer or only computer → mLAN device) may result in improper playback.
Connecting the mLAN device
• Make sure that the FireWire cable is connected properly, and that the power to the mLAN device has been turned on. Disconnect the
FireWire cable once, then insert it again.
• There may be a loop connection. Check the cabling to make sure that none of the devices are connected in a loop.
Example of loop connection
computer
computer
mLAN device
mLAN device
FireWire-equipped device
If FireWire devices other than the mLAN devices are connected to the computer, disconnect all FireWire devices from your computer, and try connecting a single mLAN device to your computer.
• There may be multiple FireWire interfaces installed on the computer. Since the mLAN Driver supports only the standard interfaces,
use only the standard FireWire interface of your computer and remove other FireWire interfaces.
Unable to transfer/receive MIDI data or Program changes.
Settings on the computer, mLAN device and other external devices
• In music applications, such as a DAW, make sure the correct MIDI ports have been selected. If you set the MIDI Devices on [Audio
MIDI Setup] in Utilities, the MIDI ports will be shown from an application as the name set within [Audio MIDI Setup]. Select the
appropriate MIDI ports.
• Make sure the transmission and reception channels of each device or an application (such as a DAW) match.
• Make sure the MIDI settings of the mLAN device are appropriate.
• Make sure that the power to the transmitting and receiving devices is turned on.
Connecting the mLAN device
• Make sure that the FireWire cable is connected properly.
• Make sure that the FireWire cable is not damaged.
Cannot use other connected Firewire devices correctly.
• Exit the mLAN Auto Connector or mLAN Graphic Patchbay. ( See pages 7 and 12.)
• For information on audio problems such as no sound or excess noise, refer to the Troubleshooting in the manual of the mLAN device.
U.R.G., Pro Audio & Digital Musical Instrument Division, Yamaha Corporation
© 2002 Yamaha Corporation