1
SAFETY AND OPERATING MANUAL
BladeRunner® X2 WX572
10
9
11
8
7
12
5
6
20
1
2
4
3
14
13
15
A2
A1
17
18
B2
B1
1
2
1
2
19
B3
3
4
2
C
1
D1
D1
C
2
1
E1
D2
1
2
E2
1
2
F
G1
G1
F
OFF
ON
G2
G3
H1
H2
I1
I2
I1
I2
J
K
16
L1
L2
L3
L4
L3
L4
M
N
O
P
19
e
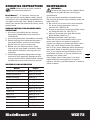
1. ON SWITCH
2. OFF SWITCH
3. STABILIZER BRACKET
4. BLADE STORAGE
5. MITER GAUGE
6. TABLE INSERT
7. GUARD KNOB
8.GUARD
9. VACUUM PORT
10. GUARD ARM
11.GUARD ARM CLAMP KNOB
12.RIP FENCE
13.FENCE SLOT
14.MITER SLOT
15.BLADE RELEASE
16. VACUUM ADAPTER (See Fig. K )
17.BOLT (See Fig. A1)
8
18. GUARD ARM ASSEMBLY KNOB (See Fig. A1)
19.BLADE (See Fig. B2)
20.BLADE HOLDER
BladeRunner® X2 WX572
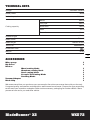
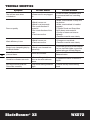
TECHNICAL DATA
Voltage
230-240V~50/60Hz
Rated power
650W
No load speed
Cutting capacity
3000/min
Wood
40mm
PVC pipe
30mm
Aluminum
10mm
Steel
Ceramic
Stroke Length
3mm
10mm
19mm
Blade shank
T-shank
Blade length
100mm or less
Table size
Protection class
Weight
400X430mm
/ll
6.7Kg
9
ACCESSORIES
Miter gauge
1
Rip Fence 1
Blades:
Wood cutting blade
1
Aluminum cutting blade
1
Steel cutting blade
1
Ceramic Tile Cutting Blade
1
Scrolling Blade
1
Vacuum Adapter 1
Blade Grip
1
We recommend that you purchase your accessories from the same store that sold you the tool.
Use good quality accessories marked with a well-known brand name. Choose the type according
to the work you intend to undertake. Refer to the accessory packaging for further details. Store
personnel can assist you and offer advice.
BladeRunner® X2 WX572
SAFETY INSTRUCTIONS
WARNING! When using electric tools
basic safety precautions should always
be followed to reduce the risk of fire, electric
shock and personal injury including the
following.
Read all these instructions before attempting
to operate this product and save these
instructions.
This appliance is not intended for use by
persons (including children) with reduced
physical, sensory or mental capabilities, or
lack of experience and knowledge, unless they
have been given supervision or instruction
concerning use of the appliance by a person
responsible for their safety.
Children should be supervised to ensure that
they do not play with the appliance.
10
SAFE OPERATION
1. Keep work area clear
- Cluttered areas and benches invite injuries.
2. Consider work area environment
- Do not expose tools to rain.
- Do not use tools in damp or wet locations.
- Keep work area well lit.
- Do not use tools in the presence of
flammable liquids or gases.
3. Guard against electric shock
- Avoid body contact with earthed or
grounded surfaces {e.g. pipes, radiators,
ranges, refrigerators).
4. Keep other persons away
- Do not let persons, especially children, not
involved in the work touch the tool or the
extension cord and keep them away from
the work area
5. Store idle tools
- When not in use, tools should be stored
in a dry locked-up place, out of reach of
children.
6. Do not force the tool
- It will do the job better and safer at the
rate for which it was intended.
7. Use the right tool
- Do not force small tools to do the job of a
heavy duty tool.
- Do not use tools for purposes not
intended; for example do not use circular
saws to cut tree limbs or logs.
BladeRunner® X2 8. Dress properly
- Do not wear loose clothing or jewellery,
they can be caught in moving parts.
- Non-skid footwear is recommended when
working outdoors.
- Wear protective hair covering to contain
long hair.
9. Use protective equipment
- Use safety glasses.
- Use face or dust mask if working
operations create dust.
10.Connect dust extraction equipment
- If the tool is provided for the connection of
dust extraction and collecting equipment,
ensure these are connected and properly
used.
11.Do not abuse the cord
- Never yank the cord to disconnect it from
the socket Keep the cord away from heat,
oil and sharp edges.
12.Secure work
- Where possible use damps or a vice to
hold the work. It is safer than using your
hand.
13.Do not overreach
- Keep proper footing and balance at all
times.
14.Maintain tools with care
- Keep cutting tools sharp and clean for
better and safer performance.
- Follow instruction for lubricating and
changing accessories.
- Inspect tool cords periodically and if
damaged have them repaired by an
authorized service facility.
- Inspect extension cords periodically and
replace if damaged.
- Keep handles dry, clean and free from oil
and grease.
15.Disconnect tools
- When not in use, before servicing and
when changing accessories such as
blades, bits and cutters, disconnect tools
from the power supply.
16.Remove adjusting keys and wrenches
- Form the habit of checking to see that keys
and adjusting wrenches are removed from
the tool before turning it on.
17.Avoid unintentional starting
- Ensure switch is in “off” position when
plugging in.
WX572
18.Use outdoor extension leads
- When the tool is used outdoors, use only
extension cords intended for outdoor use
and so marked.
19.Stay alert
- Watch what you are doing, use common
sense and do not operate the tool when
you are tired.
20 - Check damaged parts
- Before further use of tool, it should be
carefully checked to determine that it will
operate properly and perform its intended
function.
- Check for alignment of moving parts,
binding of moving parts, breakage of parts,
mounting and any other conditions that
may affect its operation.
- A guard or other part that is damaged
should be properly repaired or replaced
by an authorized service centre unless
otherwise indicated in this instruction
manual.
- Have defective switches replaced by an
authorized service centre.
Do not use the tool if the switch does not
turn it on and off.
21.Warning
- The use of any accessory or attachment
other than one recommended in this
instruction manual may present a risk of
personal injury.
22.Have your tool repaired by a qualified
person
- This electric tool complies with the
relevant safety rules. Repairs should only
be carried out by qualified persons using
original spare parts, otherwise this may
result in considerable danger to the user.
23.If the replacement of the supply cord
is necessary, this has to be done by
the manufacturer or his agent in order
to avoid a safety hazard.
BladeRunner® X2 ADDITIONAL SAFETY
INSTRUCTIONS FOR BLADE
RUNNER
1. Safety precautions
1) Do not use saw blades which are damaged
or deformed;
2) Replace the table insert when worn;
3) Connect the machine to a dust-collecting
device when sawing wood and tile;
4) Do not operate the machine when the door
or guard protecting the saw blade is open;
5) Do not clean the saw blade whilst it is in
motion;
6) Wear suitable personal protective
equipment, when necessary, this could
include:
- Hearing protection to reduce the risk of
induced hearing loss;
- Respiratory protection to reduce the risk of
inhalation of harmful dust;
- Gloves for handling the saw blade and
rough material.
2. Safe operation
1) When straight cutting against the fence use
a push stick;
2) During transportation the saw blade guard
should be fully down and close to the
table;
3) When bevel-cutting with the table inclined,
place the guide on the lower part of the
table;
4) When cutting round timber use a suitable
holding device to prevent twisting of the
workpiece;
5) Lifting and transportation positions shall
clearly be indicated on the tool;
6) Do not use guarding for handling or
transportation;
7) Adjust the adjustable guard as close to the
workpiece as practicable;
8) Adjust the guard as close as possible to
the piece to be cut;
9) Make sure the workpiece is firmly contact
with the work table. Never lift it by your
hands;
10) Never adjust or assemble the rip fence or
mitre gauge when the machine is working.
WX572
11
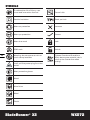
SYMBOLS
12
To reduce the risk of injury, user
must read instruction manual
Ceramic tile
Double insulation
Teeth per inch
Wear ear protection
Incorrect
Wear eye protection
Correct
Wear dust mask
Lock
RCM mark
Unlock
Warning: do not expose to rain or
use in damp locations
Tighten Guard and Guard Arm
firmly down onto material, don’t
raise up the Guard Arm when
cutting.
Before any work on the machine
itself, pull the power plug from the
outlet
Wear protective gloves
Wood
Aluminium
Metal
Plastic
BladeRunner® X2 WX572
OPERATING INSTRUCTIONS
NOTE: Before using the tool, read the
instruction book carefully.
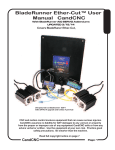
BladeRunner®— A compact, easy-to-use
table-top tool for cutting wood, metal, plastic,
and ceramic tile. Lightweight and portable for
use right at the work area. Blade is stationary
while user moves the material for easier, more
precise work.
BEFORE PUTTING THE MACHINE INTO
OPERATION
1. All covers and safety devices have to
be properly fitted before the machine is
switched on.
2. It must be possible for the blade to run freely.
3. When working with wood that has been
processed before, watch out for foreign
bodies such as nails or screws etc.
4. Before you turn ON the switch, make
sure that the saw blade is correctly fitted
and that the machine’s moving parts run
smoothly.
5. If the cutting operation will produce a high
amount of dust, especially hazardous dust
such as ceramic tile or treated wood, connect
an effective vacuum to the vacuum port (9).
ASSEMBLY AND OPERATION
Action
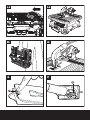
MAINTENANCE
WARNING:
Remove the plug from the socket before
carrying out any adjustment, servicing or
maintenance.
To insure proper operation and extend tool
life, prevent dust from accumulating under the
table insert (5).
a) Be sure to use a vacuum or dust extractor
for dusty cutting operations such as
ceramic tile. (See Fig. N)
b) If dust accumulates, remove the Table Insert
by lifting the latch (e). (See Fig. O)
c) Vacuum out the dust in and around the
Blade Holder. (See Fig. P)
d) Reattach the Table Insert securely.
There are no user serviceable parts in your
power tool. Never use water or chemical
cleaners to clean your power tool. Wipe clean
with a dry cloth. Always store your power
tool in a dry place. Keep the motor ventilation
slots clean. Keep all working controls free of
dust. If you see some sparks flashing in the
ventilation slots, this is normal and will not
damage your power tool.
If the supply cord is damaged, it must be
replaced by the manufacturer, its service
agent or similarly qualified persons in order to
avoid a hazard.
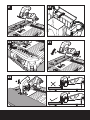
Figure
Guard arm installation
See Fig. A1,A2
Blade installation
See Fig. B1-B3
Blade changing
See Fig. C
Stabilizer bracket adjustment
See Fig. D1,D2
Guard adjustment
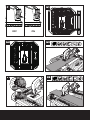
See Fig. E1,E2
On/off safety switch
See Fig. F
Rip cut
See Fig. G1-G3
Cross cut
See Fig. H1,H2
Miter cut
See Fig. I1,I2
Internal cut
See Fig. J
Dust collection
See Fig. K
Store the accessories
See Fig. L1,L2,L3,L4
Carrying
See Fig. M
BladeRunner® X2 WX572
13
TROUBLE SHOOTING
Symptom
14
Possible Causes
Possible Solution
Tool will not start when
switched on.
• Power cord is not plugged
in.
• Check to make sure power cord
is connected well into a working
outlet.
Poor cut quality
• Blade is worn out.
• Blade is set incorrectly
•Too much vibration in
material.
•Too much vibration of the
saw.
• Feed rate too fast.
• Make sure the blade is sharp and
not broken.
• Make sure the blade is installed
properly.
• Tighten Guard and Guard Arm
firmly down onto material.
• Clamp or fasten saw base to
tabletop.
• Feed the material more slowly.
Work efficiency is low.
• Blade is worn out.
• Feed rate too fast.
• Change to a new blade.
• Feed the material more slowly.
Blade is not clamped tightly by
the Blade Holder.
• Blade is not inserted into
place fully.
• Use blade grip to push the blade as
far into the blade holder as possible
before letting go of Blade Release.
Blade Release button cannot be
pressed down.
• Dust accumulates.
• Clean the dust around the Blade
Release button.
Guard Arm vibrates too much.
• Screws fixing the Guard
Arm on the work table are
loose.
• Tighten the screws as shown in
Fig A1.
Rip Fence cannot slide into
Fence Slot smoothly.
• Rip Fence locking knob too
tight.
• Loosen the Rip Fence locking
knob.
BladeRunner® X2 WX572
www.worx.com
Copyright © 2014, Positec. All Rights Reserved.
2BSJ04APK11000A1