1
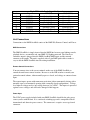
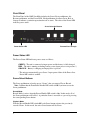
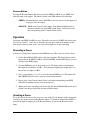
DMX OverRide User’s Guide ™ (This page intentionally left blank) ii Every effort has been made to assure the accuracy of the information contained in this manual, and the reliability of the Alcorn McBride DMX OverRide™ hardware and software. Errors can sometimes go undetected, however. If you find one, please bring it to our attention so that we can correct it for others. Alcorn McBride welcomes comments and suggestions on the content and layout of its documentation. Applications described herein are for illustrative purposes only. Alcorn McBride Inc. assumes no responsibility or liability for the use of these products, and makes no representation or warranty that the use of these products for specific applications will be suitable without further testing or modification. Alcorn McBride products are not intended for use in applications where a malfunction can reasonably be expected to result in personal injury. Customers using or selling Alcorn McBride products for use in such applications do so at their own risk, and agree to fully indemnify Alcorn McBride for any damages resulting from such improper use or sale. This publication was created using Microsoft Word 2000 for Windows XP, Version 9.0.4119 SR-1. Camera-ready art and illustrations were produced using Corel DRAW!, Version 8.0 DMX OverRide™ is a trademark of Alcorn McBride Inc., all rights reserved. Copyright 2009 Alcorn McBride, Inc. All rights reserved. Hardware Design: Jim Carstensen Firmware Design: Jim Carstensen Documentation: John Conley, Jim Carstensen Mechanical Design: Martin Chaney Document Number 110-103486.50 Alcorn McBride Inc. 3300 S. Hiawassee, Suite 105 Orlando, Florida 32835 (407) 296-5800 FAX: (407) 296-5801 Internet: http://www.alcorn.com e-mail: [email protected] iii Table of Contents Welcome!............................................................................................................................ 1 Getting Started .................................................................................................................... 1 Battery Connection ......................................................................................................... 1 Rear Panel ....................................................................................................................... 2 Rear-Panel DIP Switch Settings ................................................................................. 2 Unit Connections ........................................................................................................ 3 Front Panel ...................................................................................................................... 4 Power Status LED....................................................................................................... 4 Scene Select Buttons................................................................................................... 4 Resume Button............................................................................................................ 5 Operation............................................................................................................................. 5 Recording a Scene........................................................................................................... 5 Recalling a Scene............................................................................................................ 5 Auto Resume Mode .......................................................Error! Bookmark not defined. Applications ........................................................................................................................ 7 Worklights or Maintenance Lighting.............................................................................. 7 Emergency Lighting*...................................................................................................... 7 Special Purpose Lighting ................................................................................................ 7 Simple DMX Controller ................................................................................................. 7 Tell Us About Your Application! ................................................................................... 7 Troubleshooting Guide ....................................................................................................... 8 Specifications*.................................................................................................................... 8 iv Welcome! Thank you for purchasing the Alcorn McBride DMX OverRide™. The DMX OverRide allows you to take manual control of your DMX network. In normal operation it simply feeds through your DMX stream. But activate any of its remote inputs or pushbuttons, and it automatically overrides the streams with any of three pre-programmed looks. That makes the DMX OverRide ideal for fire alarm lights, work-light presets, manual Blackouts, and much more. A simple press of the Resume button or remote input returns the unit to normal feedthrough operation. A switch on the rear of the unit enables or disables DMX input termination, and the DMX output is re-buffered to maintain DMX signal integrity. The DMX OverRide can also protect against DMX data problems by automatically switching to a preset look when a dropout is detected, and it can even maintain a preset DMX output in the event of a Control System power failure by using its built-in rechargeable battery*. Getting Started Let’s get your DMX OverRide installed and up and running. Unpack the unit and verify you have all the hardware and documentation. You should have the following: 1. DMX OverRide unit 2. DMX Patch Cable 3. This User’s Manual Battery Connection If your installation requires the use of the DMX OverRide’s backup battery, you’ll need to open the top cover of the unit and plug it in. The unit ships from the factory with the battery disconnected. Remove the screw located in the upper center of the front panel. The top cover is hinged to the rear of the unit. Plug the battery into the battery connector. It is keyed and clearly marked “BATTERY” with a sticker. (WARNING: Do not plug the battery into any other jumper or connector on the PCB or else it will damage the product.) Replace the cover and screw. At this point, depending on whether or not the Battery Enable DIP switch is turned on, some LEDs on the front panel may be lit. The battery is good for over an hour of backup operation, and it charges in one to two hours. * The DMX OverRide™ is not intended for emergency egress or other life safety applications. By setting lighting to a known state it can assist in the response to unexpected events, but it is not a replacement for batterybacked emergency lighting fixtures. The DMX OverRide is not safe to use for applications involving life safety, such as controlling pyrotechnics or laser-lighting where audience or performer safety is involved. 1 Rear Panel The rear panel of the DMX OverRide includes the DMX Input and Output connectors, the configuration DIP switches, and the Power connector. Power Connector DMX Input Configuration Configuration DMX In DMX Out Remote Input Connections Rear-Panel DIP Switch Settings If possible, it’s a good thing to make sure the rear-panel DIP switches are set the way you want before installing into the rack. The DMX OverRide rear panel contains two banks of DIP switches. In many cases, you can leave these switches in their factory-default positions, but if you need to change anything here’s how each switch works. Left DIP Switch Bank - DMX Configuration Position Function (ON = Down) Front Panel Lock – Turn ON to disable the Front Panel Scene Buttons. 1 Power Loss Detect – Turn ON to cause the unit to go to Scene 2 upon power 2 failure. The Scene 2 look will remain when power is restored. Battery Enable – Enables the internal battery. 3 Record Enable – Turn this switch ON to record DMX Scenes 1, 2, and 3. 4 DMX Dropout Recovery Enable – If this switch is ON, Scene 1 is 5 automatically activated if DMX drops out while in Resume mode. DMX Dropout Auto Resume Mode – The unit will automatically return to 6 Resume mode once DMX is restored if this switch is ON. When this switch is OFF, a Channel #512 value sequence input from the lighting controller of 0% - 75% - 25% - 100%, followed by any value other than 100% on Channel #512 will cause a return to Resume mode (see note on Resume Code Feature). DMX Dropout Delay – Turning ON this switch will cause the unit to ignore 7 DMX dropouts shorter than approximately one second and delay the automatic switch to Scene 1 when the Dropout Recovery Enable switch is ON. Termination - This switch enables the 110-ohm DMX input termination. 8 2 Position 1 2 3 4 5 6 7 8 Right DIP Switch Bank - Input Configuration Input OFF (UP) ON (DOWN) SCENE1 Voltage Input Contact Closure SCENE2 Voltage Input Contact Closure SCENE3 Voltage Input Contact Closure RESUME Voltage Input Contact Closure SCENE1 Normally Closed Normally Open SCENE2 Normally Closed Normally Open SCENE3 Normally Closed Normally Open RESUME Normally Closed Normally Open Unit Connections Connections to the DMX OverRide consist of the DMX I/O, Remote Control, and Power. DMX Connections The DMX OverRide is simply inserted into the DMX line between your lighting console, playback device, or controller and your DMX-512 lighting network. The console or controller output is plugged into the DMX OverRide DMX input, and the network connects to the output. The unit is supplied with a 5-pin DMX patch cable to make it easy to add the DMX OverRide into an existing installation. Remote Control Connections You can connect wires to the screw terminals on the rear of the DMX OverRide to control the unit from a remote location. Be sure to set the DIP switches to match your particular control scheme, either normally-open or -closed, and voltage or contact-closure input. The remote inputs operate with momentary activation (either momentarily closing with a normally-open, or momentarily opening with a normally-closed configuration). Voltage level input in voltage mode is any voltage between 5 to 24VDC. The inputs are protected against reverse voltages and will not be damaged if this happens. Power Input The 5VDC power supply included with your DMX OverRide should be the only power source you use with the unit. It is a universal switching type and is compatible with all international and domestic power sources. The connector is a captive screw-type barrel connector. 3 Front Panel The Front Panel of the DMX OverRide includes the Scene Select pushbuttons, the Resume pushbutton, and the Power LED. Each pushbutton also turns Green, Red, or Orange to indicate a particular operational mode or status. The color of the Power LED indicates power status. Scene Selection Buttons Power Status LED Resume/Pass-Through Power Status LED The Power Status LED indicates power status as follows: GREEN – The unit is connected to input power and the battery is fully charged. RED – The unit is running on backup battery power (input power is not present.*) ORANGE – Battery is charging and input power is present. * The unit can automatically go to Scene 2 upon power failure if the Power Loss Detect DIP switch is enabled. Scene Select Buttons The Scene pushbuttons select the preset “Scenes” that you want to Play or Record. Note: Confirm that the Front Panel Disable DIP switch is Off if you want to use the Scene pushbuttons. Record Mode Record Mode is active when the Record Enable DIP switch is On. In this mode, all of the Scene pushbuttons will be Red. A particular Scene is recorded as a preset by pressing the corresponding Scene button. Playback Mode With the Record Enable DIP switch Off, each Scene button activates the previouslyrecorded Scene. In this mode, the active Scene button will be Green. 4 Resume Button Pressing the Resume Button will always cause the DMX OverRide to pass DMX data from the input to the output. The button’s multi-color LED indicates the following: GREEN – Resume Mode is active and DMX is actively detected on the input and being passed to the output. ORANGE – DMX is not detected on the input. If the Dropout Enable mode is activated with the rear-panel DIP switch, Scene 1 will activate and the corresponding Scene 1 button will be Green. Operation Operating your DMX OverRide is easy! Basically you just feed it DMX and record your 3 presets or “Scenes”. Once you’ve done that you can press each of the buttons on the front panel to activate each scene, or use the remote inputs to do the same thing. Recording a Scene A Scene is a single-frame snapshot of the DMX universe. Here’s how to record a Scene. 1. Set the Record Mode DIP switch to the down-position. The Scene buttons on the front panel of the DMX OverRide will all turn RED, and the DMX input is passed directly to the DMX output. 2. Set your DMX universe to the desired preset. For house-lights or maintenance this might be all channels at 100%. For emergency lighting you might choose to run just the exit lights to 100%. 3. Press a scene button (1, 2, or 3) to store the current DMX preset. The button will turn GREEN while the data is written to nonvolatile memory. 4. Repeat steps 2 and 3 for the other Scenes, each time commanding your DMX controller or lighting console to the desired preset. 5. When you’re done recording your Scenes flip the Record Enable DIP switch up to disable recording and place the unit into playback mode. Recalling a Scene To recall a Scene all you need to do is press one of the 3 Scene buttons on the front panel, or activate one of the corresponding Remote inputs. To return to normal where DMX is passed from input to output, press the Resume button, or activate the Resume remote input. 5 Resume Code Feature For applications where you would like your lighting console (or lighting programmer) to resume the lighting without being in front of the DMX OverRide, you can use the Resume Code feature. To do so, the first step is to verify that DIP switch number 6 is OFF. If the DMX OverRide is in an override mode, the console can return the unit to Resume mode by setting channel number 512 to the following values (in order): 0% ⇒ 75% ⇒ 25% ⇒ 100%, followed by any value other than 100% This unique pattern will allow you to resume DMX feedthrough from your console without interfering with the normal operation of your lighting. 6 Applications Here are some ideas of how the DMX OverRide can be used in your installation. Worklights or Maintenance Lighting Many times the person who’s in charge of running the lighting console isn’t around when it comes time to clean the place, or do some work on the theatre. Set up a Work Light preset where the house lights and other general lighting are activated by recording this preset to Scene 2 or 3. That way anybody who needs to do some maintenance at night can bring up the house lights without knowing how to bring up the entire lighting-control system. As part of your facility’s normal start-up routine, simply press the Resume button or have your control system activate the Resume remote input. Emergency Lighting* The standard Emergency Lighting system in your installation can be augmented by your DMX controlled lighting by activating a Scene from the DMX OverRide to command specific fixtures to turn on, lighting the way out. Special Purpose Lighting Let’s say that during the day you need to have the lighting console control your lights, and at night you sometimes have special events (dinner or cocktail parties, etc.) that just require a static lighting look. With a simple push of a button the DMX OverRide can set this nighttime lighting mood without the need to mess with the lighting console. The next day the console (or building control system) can take over by commanding the DMX OverRide to Resume Mode and take back control of the lights. Simple DMX Controller Say your lighting program only requires 3 presets. Well, use the DMX OverRide! Store the presets into each of the 3 Scenes and when you’re done, remove the expensive lighting console and operate your show using the remote inputs. Tell Us About Your Application! If you come up with a unique application for the DMX OverRide, we’d love to hear about it! Send us an email at [email protected]. * The DMX OverRide™ is not intended for emergency egress or other life safety applications. By setting lighting to a known state it can assist in the response to unexpected events, but it is not a replacement for batterybacked emergency lighting fixtures. The DMX OverRide is not safe to use for applications involving life safety, such as controlling pyrotechnics or laser-lighting where audience or performer safety is involved. 7 Troubleshooting Guide Troubleshooting Guide Symptom 1) No Front Panel display or LEDs Cause(s) a) Input power not connected. Solution(s) a) Check Power connections b) Replace or Connect Battery b) Battery Dead or disconnected 2) Previous scene not restored after power is cycled 3) Resume button keeps flashing orange. a) Scene selected by rear inputs that are not in the proper position. a) Open scene selection input or close it depending on switch configuration b) Switch configuration incorrect b) NO or NC verify switch configuration a)It is possible that your DMX input is dropping out intermittently. a) Check cabling. Check DMX source. b)DMX input not terminated. 4) No DMX Output a) Mis-wired or loose DMX cables/connections. b) Turn on DMX termination DIP switch. a) Confirm DMX connections are secure. b) Plug DMX input cable into output cable to verify. 5) Power LED is always orange or blinking a) Battery can no longer be recharged or is defective. a) Please contact factory for a replacement battery. Specifications* DMX Standard – USITT DMX512/1990 Power – 5 VDC at 0.5 Amps max, AC Adapter included Operating Temperature – 0°C (32°F) to 70°C (140°F), free air circulation Operating Environment – 0-90% relative humidity, non-condensing Size – 19” W x 1.75” H x 11” D (48.3 cm W x 4.4 cm H x 28 cm D) Weight – 7 lbs, 3.1 Kg Compliance – CE, UL, CSA, WEEE, RoHS *Specifications are subject to change without notice 8