1
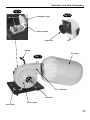
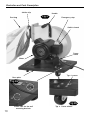
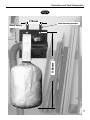
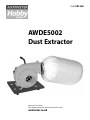
Code 501262
AWDE5002
Dust Extractor
Axminster Tool Centre,
Unit 10 Weycroft Avenue, Axminster, Devon EX13 5PH
axminster.co.uk
Index of Contents
Page No
Index of Contents
Declaration of Conformity
What’s in the Box
General Instructions for 230V Machines
Specific Safety for Dust Extractors
Specification
Assembly
Identification and Parts Description
Illustration and Parts Description
Routine Maintenance
Parts Breakdown
Parts List
Notes
02
02
03
04
05
06
07
08
09-10-11
12
13
14
15
Declaration of Conformity
Copied from CE Certificate
The undersigned, P. Seidel authorised by
Laizhou Planet Machinery Co., Ltd 989 North Lai
Zhou Road Laizhou, Shandong 261400 P.R. China
declares that this product
Model number FM230
Dust Collector
manufactured by Laizhou Planet Machinery Co. is
in compliance with the following standards or
standardisation documents in accordance with
Council Directives
EN 55014-1 :2000+A1+A2
EN 61000-3-2 :2000+A2
EN 61000-3-3 :1995+A1
EN 55014-2 :1997+A1
Low Voltage Directive 73/23/EEC
Amended by the Directive 93/68/EEC
symbols below advise that you follow the correct
Warning The
safety procedures when using this machine.
Fully read manual
and safety instructions
before use
02
Ear protection
should be worn
Eye protection
should be worn
Dust mask
should be worn
HAZARD
Motor gets hot
What’s in the Box
Model Number:
FM230
1 No. Dust Extractor, ready mounted on the base plate
1 No. Dust Bag
1 No. Handle
1 No. Outlet Duct and Gasket
1 No. Inlet Grill
2 No. Wall Mounting Brackets
1 No. Jubilee Clip
4 No. Castor Wheels
1 No. Instruction Manual
03
General Instructions for 230V Machines
Good Working Practices/Safety
The following suggestions will enable you to observe good working practices, keep yourself and
fellow workers safe and maintain your tools and equipment in good working order.
!
WARNING!!
KEEP TOOLS AND EQUIPMENT OUT
OF THE REACH OF YOUNG CHILDREN
Mains Powered Tools and Machines
Primary Precautions
These machines are supplied with a moulded 13
Amp. Plug and 3 core power cable. Before using the
machine inspect the cable and the plug to make
sure that neither are damaged. If any damage is
visible have the damaged item inspected/repaired
by a suitably qualified person.
If it is necessary to replace the plug, it is preferable
to use an ‘unbreakable’ type that will most resist
damage. Only use a 13 Amp plug, and make sure
the cable clamp is tightened securely. Fuse as
required.If extension leads are to be used, carry out
the same safety checks on them, and ensure that
they are correctly rated to safely supply the current
that is required for your machine. Remember, most
machines or tools have handles or holding
positions, the power cable is not one of them.
Work Place/Environment.
The machine is not designed for use outside. Keep
the machine clean; it will enable you to more easily
see any damage that may have occurred. Clean the
machine with a damp soapy cloth if needs be, do
not use any solvents or cleaners, as these may
cause damage to any plastic parts or to the
electrical components.
Keep the work area as uncluttered as
is practical, this includes personnel
as well as material. Under no
circumstances should CHILDREN be
allowed in work areas.
!
It is good practice to leave the machine unplugged
until work is about to commence, also make sure to
unplug the machine when it is not in use, or
04
unattended. To avoid inadvertent ‘start up’; if your
machine is not fitted with a NVR system, ensure the
switch is always returned to the OFF position. Once
you are ready to commence work, remove any tools,
objects or items that could inadvertently get ‘sucked
up’ by the machine (if any) and place safely out of
the way.
Re-connect the machine, ensuring the power cable
is not ‘snagged’ or routed where it could be tripped
over as you move about the workshop; it is not too
close to an unguarded heat source, or is laid over or
around a sharp edge.
If the work you are carrying out is liable to generate
flying grit, dust or chips, wear the appropriate safety
clothing, goggles, gloves, masks etc. If the work
operation appears to be excessively noisy, wear
ear-defenders. If you wear your hair in a long style,
wearing a cap, safety helmet, hairnet, even a
sweatband, will minimise the possibility of your hair
being caught up in the rotating parts of the machine,
likewise, consideration should be given to the
removal of rings and wristwatches if these are liable
to be a ‘snag’ hazard. Consideration should also be
given to non-slip footwear, etc.
DO NOT work with cutting or boring tools of any
description if you are tired, your attention is
wandering or you are being subjected to distraction.
A deep cut, a lost fingertip or worse; is not worth it!
DO NOT use this machine within the designated
safety areas of flammable liquid stores or in areas
where there may be volatile gases. There are very
expensive, very specialised machines for working in
these areas, THIS IS NOT ONE OF THEM. Above
all, OBSERVE…. make sure you know what is
happening around you, and USE YOUR
COMMON SENSE.
Specific Safety for Dust Extractors
DO NOT use this machine as a vacuum cleaner,
try to keep the waste medium to wood by
products. Do not uplift workshop floor debris
(stones, nails, screws, paper etc., etc).
Be aware that wood dust is an explosive
medium.
and a very firm feel means that the bag is
clogged and the air is having difficulty passing
through the cloth).
DO NOT allow any ‘naked light’ source to
occur anywhere near the machine. This
includes cigarettes, matches, etc, and do not
place the machine near any unprotected light
bulbs, that could possibly get broken.
The bag can be cleaned, but one of the
simplest methods is to turn the bag inside
out, and beat it as though it were a carpet.
Similarly, empty the bag as often as possible
(and is practical); as the bag fills up there is
less free area of the bag to allow the air to flow
through, again reducing the efficiency of the
machine.
The suction force is generated by a high
speed fan unit. This has the potential to
amputate fingers, grab loose clothing (ties
etc.,) and ‘bat’ large chips etc, at high speeds.
Keep all guarding in place, and if access to the
fan becomes necessary (due to blockage etc.,)
disconnect the machine from the mains supply
and ensure the fan has come to a complete
stop before putting your hands anywhere near
to it.
Be aware that in dry air periods or areas, the
movement of the air through the machine can
generate static electric fields. These are not
normally a problem as the machine is bonded
together via its construction, and the whole is
earthed back through the electrical supply;
problems can occur with isolated items, such
as stands or hosing that are insulated from the
ground (standing on rubber feet?, suspended
in the air? etc).
If you are not using ‘clear’ extraction hose,
periodically remove the hose to check that the
inlet to the machine is not getting restricted.
(The safety guard grill of the inlet duct can be
particularly irksome in this way, as long strand
shavings etc., can wrap around the grill fret.)
Keep the dust bag clean. The machine relies
on its ability to ‘blow’ air through the dust bag,
to generate good suction. If the cloth of the
bag starts to clog, this reduces the air flow and
hence the machine becomes less efficient. (A
good indicator is the speed at which the bag
inflates and how firm it feels; quick inflation
If possible, try to connect everything together
electrically, to eliminate static shocks.
!
NOTE!!
(Use the integral metal coil in flexible
plastic hosing to connect units together)
Try to route the power cable and the hosing
away from busy walkways.
DO NOT allow the inlet to become ‘dead
ended’, or block or restrict the outlet, this puts
undue work on the motor and can lead to
overheating.
DO NOT FIT PLASTIC WASTE BAGS TO
THIS MACHINE
05
Specification
Model
Product Code
Rating
Power
Air Flow
Hose Diameter
Bag Capacity
Overall L x W x H
Weight
06
AWDE5002
501262
Hobby
0.75kW (230V, 1ph)
840m³/hr @ 100mm
100mm
37 litres
380 x 1,100 x 410mm
22kg
Assembly
Please read through the Section entitled Identification and Description of Parts, this will enable
you to more readily identify those parts of the machine to which we will be referring.
Please Note that with the exception of the jubilee clip for attaching the dust bag; all the
nuts, bolts, fasteners etc, for assembling the various components together are
pre-positioned in the machine or the component.
Having unpacked your AWDE5002 machine and all its components, please check against the
‘What’s in the box’ on page 4. If any parts are missing please contact our sales personnel straight
away using the numbers listed in the catalogue. Having unpacked the machine and checked it
over please dispose of any unwanted packaging in a responsible manner.
Assembling the extractor. Place the base plate with the ready assembled fan housing and motor
mounting onto the bench. Locate the handle, note that the fixing bolts washers etc., are already
located in the handle. Offer the handle up to the rear face of the fan housing and introduce the
bolts into the holes with the anchored nuts behind them. Tighten securely. Locate the outlet duct
and its gasket. Remove the 6 off nut, bolt and washer sets from the component and using the
same fastenings secure the duct and its gasket to the rectangular flange. Tighten securely.
Later models have a separate inlet safety grill. Make sure this is fitted correctly.
IT is suggested that the fitting of the dust bag is left until last, as it can get in the way during the
following operations.
The AWDE5002 as a movable appliance
Locate the four off castor wheels. Locate their mounting positions on the base plate and remove
the nuts, washers and screws. Fix the castors to the base plate using the forementioned
fastenings and tighten securely. (See figs 2 & 2b)
The AWDE5002 as fixed equipment
Locate the wall mounting brackets and fasten to the wall, using wall plugs and screws. The
position of the wall brackets need to be 172mm (centre to centre) with the ‘hook’ of the brackets
at least 1100mm above the floor. See Fig 3
Fitting the Dust Bag
Locate the jubilee clip and the dust bag. Push the opening of the dust bag through the jubilee
clip and onto the outlet duct. Push the mouth of the bag as far as possible onto the duct. Slide
the jubilee clip over the neck of the bag and fasten securely.
Dust Extraction Hosing
The hosing for this model is purchased separately. The hosing required is the 100mm diameter
size. Fitting the hose is similar to fitting the dust bag, utilising a large jubilee or hose clip to hold
the hose securely on the inlet duct.
07
Identification and Parts Description
Base plate
(See fig 2)
Pressed steel plate that carries the fan unit and the motor bolted to it. It
has numerous holes bored or cut into it, these are to mount the castor
wheels (if you elect to make the machine movable) or the cutout slots for
the wall mounting brackets if you elect to have it wall mounted.
Fan housing
(See fig 1)
Mainly circular metal box with a rectangular outlet duct. The face of the
box has a large circular access plate with the inlet duct extruded at its
centre. This plate is bolted to the fan housing over a gasket to form a
good seal.
Motor
(See fig 2)
Single phase 230V 50Hz motor rated at 750W. The NVR assembly is
fastened to the side of the motor casing.
Handle
(See fig 1)
Bent steel tube with a rubber hand grip fitted over one end and flattened
and bored at the other end to accept the two bolt fastenings that secure
the handle to the back of the fan housing.
Outlet duct
(See fig 1b)
Moulded 120mm diameter duct with integral grill to which the dust bag is
fitted. The dust bag is held in position by a large jubilee clip. The duct is
bolted to the fan housing over a rubber gasket to form as tight a seal as
possible to prevent ‘air spillage’.
Inlet duct
(See fig 1)
Formed 100mm diameter duct with integral grill on the front of the fan
housing access cover plate. The connecting hose from the machine is
positioned here and secured by jubilee clip et al.
N.B. Later models have the inlet grill as a separate item, to enable easier
access for cleaning.
Wall mounting
(See fig 3)
The kit provides two formed metal brackets, that can be used to mount the
extractor on a wall, clear of the floor.
08
Illustration and Parts Description
Fig 1a
Emergency stop
NVR Switch
Fig 1b
Switch shroud
Outlet duct
Handle
Dust bag
Fig 1
Fan housing
Inlet duct
Access plate
Base plate
09
Illustration and Parts Description
Jubilee clip
Handle
Fig 2
Dust bag
Emergency stop
Switch shroud
Power
cable
Motor
Typ. 4 screws
Base plate
Fig 2a
Fig 2b
Cutout slots for the wall
mounting brackets
10
Typ. 4 Castor wheels
Illustration and Parts Description
Fig 3
172mm
Wall mounting bracket
1100mm
100mm hosing
11
Routine Maintenance
!
DISCONNECT THE MACHINE FROM THE MAINS SUPPLY
Weekly
•Check the inlet and outlet ducts, remove any accumulated debris.
•Check the inlet hoses for splits and cracks, repair as necessary.
•Check the bag for wear and tear, especially around the neck at the jubilee clip. If wear or
fraying is occurring, move the position of the jubilee clip slightly.
•Check the motor for dust, sawdust, shavings etc, build up. If this has occurred, blow out with
L.P. air or clean with a vacuum cleaner. (If ‘blowing out’ remember to wear eye protection and
dependent on the type of dust, consideration should be given to face masking).
Monthly
•Carry out the weekly checks.
•Dependent on usage consider ‘beating’ the bag to effect de-clogging.
12
Parts Breakdown
13
Parts List
14
Notes
15
Please dispose of packaging for the product in a responsible manner. It is suitable for recycling.
Help to protect the environment, take the packaging to the local recycling centre and place into the
appropriate recycling bin.
Only for EU countries
Do not dispose of electric tools together with household waste material. In observance of
European Directive 2002/96/EC on waste electrical and electronic equipment and its
implementation in accordance with national law, electric tools that have reached the end of
their life must be collected separately and returned to an environmentally compatible recycling
facility.