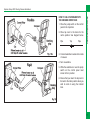
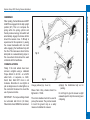
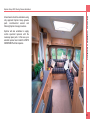
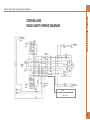
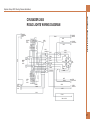
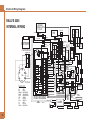
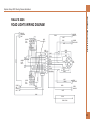
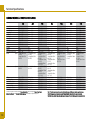
1
Owners Handbook 2005 Touring Caravans Contents WELCOME & INTRODUCTION GENERAL SAFETY PREPARING FOR THE ROAD Loading Pre-Tow Checklist & Hitch Up Towing & Driving SITE ARRIVAL CONNECTING SERVICES Water Gas Electricity SAFETY Ventilation Fire Safety SECURITY EQUIPMENT USE Control Panels Pressurised Water Systems CUSTOMER OBLIGATION Refrigerator Servicing Oven, Hob & Grill CARAVAN CONSTRUCTION Smoke Alarm Main Components Thetford Cassette Toilet EQUIPMENT LISTS Air Conditioning ELECTRICAL WIRING DIAGRAMS Rooflights Windows Blinds & Flyscreens TV & Radio Antenna Doors Bed Make Up CARE & MAINTENANCE Care of your Caravan Maintenance of you Caravan STORAGE WARRANTY CODE OF PRACTICE Water Ingress Contens Explorer Group 2005 Touring Caravan Handbook TECHNICAL SPECIFICATIONS FREQUENTLY ASKED QUESTIONS General Questions Towing Topics Technical Related Questions Parts Related Questions Warranty Related Questions Abbreviations Used Glossary of Terms INDEX ANNUAL SERVICE RECORD Truma Space Heater Individual Model Information Taps Vin No. 1 Welcome & Introduction WELCOME & INTRODUCTION Congratulations on choosing an Explorer Group Touring Caravan. This Owner's Handbook has been prepared for your guidance to help you derive the greatest amount of pleasure from the use of your caravan and your leisure time. We strongly recommend that you read this guide thoroughly so that you are fully conversant with all the caravan's features, equipment and systems. Additional information and detailed appliance instruction manuals are also contained in your Owner's Information Pack. Your new Explorer Group caravan has been designed as a luxury recreational vehicle and is intended for recreational use only. It is not intended for business use or for permanent habitation. The Explorer Group accepts no liability if the caravan is used for any purpose other than recreational/holiday use. 2 Your caravan is designed to be towed behind a normal motorcar. Additional care should be exercised when towing with a 4x4 because of the 'off-road' nature of the suspension. (Explorer caravans should not be towed behind commercial vehicles). When selecting a towing vehicle it is recommended that you consult the Caravan Towing Code, which is also included in your Owner's Information Pack. By following the instructions provided in this handbook and maintaining your caravan in a first class roadworthy condition, you are sure to have many years of carefree use. To ensure the very best quality and reliability all touring caravan designs and new developments are rigorously tested. Therefore the Explorer Group Ltd will accept no liability or uphold the warranty if the caravan is altered or modified in such a way that would adversely affect the reliability. Please Note: It is a condition of your warranty that the caravan is serviced by an Approved Retailer or Service Centre once every twelve months, and that the service record in the back of this guide, is maintained in accordance with the instructions. Approved Retailers will be able to supply any replacement parts for your caravan, should the need arise, along with any accessories you may require. Please note that it is not possible to purchase replacement parts direct from The Explorer Group Limited. Changing market and supply situations may prevent us from maintaining the exact specification details in this guide and we therefore reserve the right to alter specifications as materials and conditions demand. Enjoy your new caravan. MODEL YEAR Touring caravans are designated by their model year. The 2005 model year runs from 1st September 2004 to 31st August 2005. General Safety In order for you to get the most out of your new Explorer Group caravan it is necessary for you to be aware of the following. 1. Do not obstruct ventilators. 2. Inspect the flexible gas hose regularly for deterioration and renew as necessary, with approved type, and in any case no later than the expiry date stated on the hose. 3. It is recommended that you provide a dry powder fire extinguisher complying with ISO 7165 of at least 1KG capacity by the exit door and a fire blanket next to the cooker. Ensure you read the 'advice to occupier label' fitted to your caravan. 4. Never use portable cooking or heating equipment inside your caravan. Do not use your fitted cooking equipment as heating at any time. 5. Never allow modification to your gas or electrical system unless qualified persons carry them out. All modification to the gas system should be carried out by a CORGI registered gas fitter. Any modifications carried out on the electrical system should be 4 carried out by an electrician on the roll of the NICEIC or be a member of the ECA. 6. Never exceed your caravans Maximum Technical Permissible Laden Mass. 7. Never exceed the caravan or your cars maximum nose weight whichever is the lower. 8. Care shall be taken against the risk of falling out when children, especially under 3 years of age, use the upper bunk. 9. Ensure heavy and large items are secured before towing your new caravan to reduce the risk of damage being caused while the caravan is in motion. 10. Turn off all gas appliances and turn off the gas supply before towing your caravan. 11. Do not leave children under 14 years of age unattended in your caravan. 12. When your caravan is connected to your towing vehicle it should be level or slightly nose down. An excessive nose down attitude or a nose up attitude could lead to instability when towing. 13. When your caravan is loaded to its MTPLM and the weight distributed in accordance with the towing code, your caravan is designed to be towed at a maximum speed of 130kmh / 80mph. However, your attention is drawn to the fact that in the UK the maximum speed allowed for towing a caravan is 100kmh / 60mph. 14. It is illegal to tow your caravan whilst it is occupied. Important: Your attention is drawn to the notice affixed in the caravan advising on fire prevention, ventilation and what to do in case of fire. Preparing For The Road PREPARING FOR THE ROAD • Do not stow tins, bottles or heavy items in overhead lockers when towing. Before venturing out on to the road with your touring caravan, it is important that you prepare correctly. • Loose articles should be stowed securely to avoid movement and possible damage. LOADING Always lower and secure the jockey wheel and the four corner steadies with the brace provided before entering the caravan. This will ensure that the caravan does not tip up when you are inside. Please Note: Corner steadies should not be used as a jacking device. Do not overload your caravan in excess of the permissible total weight (MTPLM). Please refer to the technical specification for your particular model shown in Section 15 of this handbook. INTERNAL LOADING & CHECKS When loading your caravan it is advisable to distribute items evenly over the axle and as low as possible to optimize road holding and achieve the best possible braking effect. Do not overload on one side as this will cause the caravan to lean and affect the road holding and stability. 6 Once fully loaded with your equipment you should ensure that: • All lockers and cupboard doors are closed and secured. EXTERNAL LOADING & CHECKS • Gas cylinders should only be stored, correctly positioned, and secured in the gas bottle locker. The gas should be turned off. • The leisure battery is stored and secured in the battery locker box, set into the tray provided and secured. • All bunks are secure (if appropriate). • Any external connections (battery chargers, connecting cables etc), should be disconnected and stowed. • The main dining table is stored in its transit position. • Check that all exterior locker doors are secure and locked. • If any fresh food is stored in the fridge that it is set for 12v operation and that the door is locked. • Secure and lock the caravan door. • All windows and rooflights are fully closed and locked. Never tow with windows on night setting. • Leave all curtains and blinds open to prevent damage in transit. If your caravan has a rear window this may aid visibility. PRE-TOW CHECKLIST & HITCH-UP Having loaded the touring caravan and secured the lockers and main entrance door: • Check touring caravan wheel nuts, tyre pressures and tyre condition. • Ensure the jockey wheel is down, in good contact with the ground, clamp tightly secured, and the caravan hand brake is fully on. • Wind up the corner steadies. • Reverse the car up to the caravan or, in the case of a small caravan, manoeuvre the caravan up to the car's tow ball. The support load and possible additional loading of the drawbar serves to cause the ball coupling to close automatically and the side securing lugs (1) are parallel in relation to the securing surfaces on the housing • Make sure the jockey wheel height is sufficient for the hitch head to clear the towing vehicles tow ball. • Manoeuvre the hitch head over the tow ball and lower the jockey wheel using the winding handle, until the hitch head opening sits comfortably over the tow bar ball. Depending on which hitch head is fitted to your touring caravan, follow the appropriate hitch head operation instructions: NORMAL HITCH HEAD OPERATION With the hitch head opening sat comfortably over the tow bar ball, the downward pressure of the supporting load is normally sufficient for the locking device to engage automatically. WINTERHOFF STABILISER - HITCH HEAD OPERATION Coupling - The opened ball coupling is placed on the coupling ball of the towing vehicle Activating the stabiliser - Here, the operating lever must be pushed down out of its closed position to the stop. In doing so, the spring assembly which generates the pressing force via the friction pads onto the ball coupling is tensioned. Upon completion of this operation, the Preparing for the Road Explorer Group 2005 Touring Caravan Handbook operating lever is roughly parallel to the axis of the drawbar. It is possible to drive with the stabiliser deactivated, for example, when manoeuvring. 7 Preparing For The Road Switching the stabiliser off - Pull the operating lever slowly upwards in order to turn off the stabiliser. If not used for any lengthy period of time the caravan should be parked with the ball coupling closed. For this purpose, lift up the open operating lever and at same time pull the ball socket (movable element with friction pad (Fig 8 Arrangement of the Friction Pads - BPW Booklet) forward or press the safety ball into the ball space and slowly close the operating lever. Please note: The WS3000 ball couplings can be locked both in coupled and disconnected condition with the ROBSTOP WS3000 by using the hole on the side of the housing. Disconnection - Disconnect the lighting plug and contact-breaking cable turn off stabiliser, simultaneously pull back and lift the operating lever such that the side securing lugs swing over the securing surfaces and the operating lever can be moved to the open position. The caravan can now be uncoupled from the towing vehicle with the aid of the jockey wheel. Note: when uncoupling, the overrun device must be released i.e. the bellow is stretched. 8 Checking the stabiliser - When the caravan has been hooked up and the stabiliser activated, the condition of the friction linings can be checked. The wear indicator located on the top of the operating lever displays a bar graph marked with + and - symbols. The ball coupling is set at the factory such that the pin visible in the oblong hole is positioned under the + symbol on the bar graph when new friction pads have been fitted. ONCE THE HITCH HEAD IS CLOSED: • Inspect the hitch. The hitch jaw must fully enclose the ball-head and be locked. Check the coupling head fastenings at regular intervals for firm seating. • Wind up the jockey wheel until the wheel supports locate into the cut out sections at the base of the winding section. • Raise and secure the jockey wheel using the clamp. The jockey wheel should be parallel to the direction of travel at all times (locate the jockey wheel into the cut out provided in the aframe faring). Construction - Usually a thin steel cable, possibly plastic coated, and fitted with a means of attachment to connect to the towing vehicle. • Secure the breakaway cable to the traction vehicle. Operation - The cable should be able to pull tight to engage the caravan's brakes without any hindrance to its action, if the main coupling of the caravan separates from the towing vehicle. It should never become taut during normal use. WARNING: The 'break-away' cable must be secured around the towing bar assembly and not round the ball-head. USE OF YOUR CARAVANS BREAKAWAY CABLE UK LAW requires that all caravans with brakes (e.g. caravans, horse boxes, car transporters etc), built on or after 1st October 1982, are fitted with a safety device to provide protection in the unlikely event of the separation of the main coupling while in motion. It's also a legal requirement to use the breakaway cable whenever it's provided. The purpose of the breakaway cable is to apply the caravan's brakes if it becomes separated from its towing vehicle. The cable assembly is designed to part, allowing the caravan to come to a halt away from the towing vehicle. CORRECT PROCEDURE FOR USE: • Check cable assembly for damage. If in doubt contact your dealer or service agent. • Make sure the cable runs as straight as possible, and goes through a cable guide underneath the caravan coupling. • Determine whether or not you have a designated attachment point (a feature of the tow bar which has been identified by the tow bar supplier as being for the attachment of a breakaway cable). WHERE A DESIGNATED ATTACHMENT POINT IS PROVIDED ON THE TOW BAR • Pass the cable through attachment point and clip it back on itself (Figure 1 below); or • Attach the clip directly to the attachment point (Figure 2 below). Note -this must be specifically permitted by the caravan manufacturer's guidance as the clip may not be sufficiently strong. Fig. 1 Fig. 2 Preparing for the Road Explorer Group 2005 Touring Caravan Handbook Fig. 3 WHERE NO DESIGNATED ATTACHMENT POINT IS PROVIDED ON THE TOW BAR FIXED BALL - loop the cable around the neck of the tow ball. If you fit the cable like this use a single loop only (Figure 3 above). DETACHABLE BALL - You must contact the tow bar supplier for advice. 9 Preparing For The Road OTHER MEANS OF ATTACHMENT Alternatively, it may be possible to attach the cable assembly to a permanent part of the tow bar structure with the approval of the tow bar supplier, or to an accessory sold for the purposes of breakaway cable attachment. WHEN THE BREAKAWAY CABLE IS ATTACHED CHECK TO ENSURE • That the cable cannot snag in use on the caravan hitch, jockey wheel or any accessories e.g. a stabiliser, bumper shield, cycle carrier etc. • That there must be sufficient slack in the cable to allow the towing vehicle and caravan to fully articulate without the cable ever becoming taut and applying the brakes. • That it is not so slack that it can drag on the ground. Leave it too loose, and the cable may scrape along the ground, and be weakened so that it fails before doing its job! • Plug in the electrical connections from the tow car. 10 • Ensure that the correct vehicle licence / registration plate is attached to the rear of the touring caravan. • Check that all tail-lights, brake lights, road lights and indicators work correctly. • Release the parking brake on the caravan and adjust all rear and side view mirrors from the driving seat before setting off. For peace of mind, you may wish to check the state of the cable by positioning the caravan and towing vehicle at extreme angles before setting off. If having followed this advice, you feel you cannot achieve a satisfactory cable arrangement, consult your caravan or tow bar supplier or service agent. TOWING AND DRIVING SETTING OFF Let the clutch in smoothly. Allow more engine speed to produce the power to move the additional weight of the caravan. Please also refer to The Caravan Towing Code which is included in your Owner’s Information Pack. Avoid wear and tear on clutch and transmission by taking extra care. REVERSING It is advisable to have a second person available when reversing the caravan. Start practising by choosing a left-hand bend for ease. Reverse slowly, turning the wheel, initially the opposite way to the direction you want the caravan to go. Change gears smoothly. Try not to jerk the clutch. CARAVAN HANDLING Allow for the caravan being wider than the car. Do not bump kerb with caravan wheels. Now the front of the caravan is nudged out and is moving the rear in the intended direction. Take care not to hit the van with the car! Midway through the manoeuvre, when the caravan is correctly angled, slow to crawl and gradually apply opposite lock. Make the car follow the caravan round then finally straighten up. Proficiency at reversing can only be achieved with practice. Preparing for the Road Explorer Group 2005 Touring Caravan Handbook When passing other vehicles, allow more than the normal clearance for driving solo. Allow longer to get up speed to pass. SPEED LIMITS Normal road towing: 50mph Motorways (including dual carriageways): 60mph Allow for the vehicle being twice its normal length. Do not suddenly swing out. Carry out all manoeuvres as smoothly as possible. Use nearside wing mirror to check caravan has cleared when overtaking. 11 Site Arrival SITE ARRIVAL CHECK SITE REGULATIONS On arrival at a camp site, you should always check the site regulations. This will help avoid any unnecessary conflict with site management and other site users. SELECTING A PITCH Carefully select where you wish to place your caravan. The site should be as level as possible, preferably not under or near trees, well drained and away from possible boggy areas. Consider how you will move the caravan when it is time to leave the site. On sloping ground it is better to pitch facing downhill, especially during wet weather. SIDE TO SIDE OR LATERAL LEVELING A quick glance at your pitch should tell you if you are likely to need side to side leveling i.e. leveling across the axle. On uneven ground lateral levelling is accomplished by the use of a leveller jack or ramp and a spirit level placed 'across' the caravan floor. 12 Leveller Jack - Place the leveller jack, folded flat, in front of the wheel needed to be raised to level the axle. Tow the caravan onto the leveller jack and adjust the height until the spirit level shows that the caravan is laterally level. Place a spirit level parallel to the axle on the A-frame or just inside the caravan door. It helps to have two people at this point. One should drive the car very slowly forward moving the caravan wheel up the ramp, and the other should indicate when the spirit level bubble is in the middle. Whichever method you use, once level, apply the caravan handbrake and chock the caravan wheel if necessary. Lower the jockey wheel to ground level before unhitching. (See index uncoupling) You should then park your car, usually next to the caravan furthest away from the door side. Ramp - Reverse onto your pitch about a foot further back than you wish to end up. Then place the leveling ramp in front of the wheel that needs to be raised. (On upward facing pitches when the hydraulically damped drawbar of the hitch becomes fully extended, it will be necessary to compress the drawbar slightly in order to achieve a 'clean' unhitching). With the caravan brake on, reverse the towing vehicle about 2.54cm (1 inch) to release hitch lock tension and using the jockey wheel adjustment, unhitch the caravan as previously described. FRONT & BACK OR FORE & AFT LEVELING This should be done only when the lateral leveling is complete. PARKING ON A REVERSE-SLOPING SITE OR STEEP HILL For successful parking on a reverse slope or steep hill, the operator need only apply the handbrake with one hand while gently but purposely inching the caravan a small distance backwards with the other. Place the spirit level pointing front to back just inside the caravan door or on the Aframe, then raise or lower the jockey wheel until the caravan is horizontally level. If there is a significant front to back slope, you may need to place a block under the jockey wheel. Next, wind down the corner steadies onto load spreaders (blocks of wood a minimum of 15.25cm (6 inches) square or 'Big Foot' steady attachments) until they are firmly set against the ground. It is possible on very uneven sites that when fully extended blocks may be required under the corner steadies to achieve this. CAUTION: Never enter the caravan without first lowering the four corner steadies with the brace provided. Site Arrival Explorer Group 2005 Touring Caravan Handbook WARNING: If the handbrake is NOT fully applied to the last tooth (i.e. vertical) and is set to some lesser position than the full vertical, then problems will almost certainly arise after the caravan has been uncoupled from the towing unit. Corner steadies should not be used as a jack. Take care not to lift the caravan wheels. It is important that the caravan is correctly levelled to ensure the correct working of the refrigerator, cooker etc. Now that your caravan is level, place the caravan step in front of the door ensuring that it is stable and safe to use. 13 Connecting Services WATER WATER PUMP CONNECTION The pump system has been designed so that it can not be fitted incorrectly. Place a suitable waste water container e.g. Wastemaster, under the main drain outlet. RAISE THE LID AND CLEAN BOTH THE WATER SOCKET AND THE PLUG OF THE PUMP ASSEMBLY. Prior to operation of the water heater, ensure water is flowing from the hot tap. Remove the container's sealer cap and put in a safe place - not on the ground as this may contaminate your water supply the next time you use it, and place the submersible pump into the fresh water container, ensuring it is fully submerged before operating the system. Align the plug and push the pump assembly into the socket. This makes both the water and electric connections. Turn the top security clip anti-clockwise and the bottom security clip clockwise to lock the plug into place. Your caravan will be supplied with either a Truma Crystal or a Truma Compact water inlet and submersible water pump (refer to Equipment Lists section to confirm). Follow the relevant instructions below to connect a water supply to your caravan. Once you have filled your fresh water container e.g. Aquaroll, from a suitable water supply, return to the caravan and stand the water container upright close enough to the water inlet. For information on using a waterline with an onboard tank see index. 14 Finally put the 'pump' switch on the control panel to 'on' and turn the cold tap on until water flows. To remove the pump assembly from the water inlet, release the security clips and pull the hose adaptor by using the finger grips provided. 4. To change the filter cartridge. Turn the cartridge anti clockwise to remove. 5. Ensure that the new cartridge is fully tightened in the holder. If the cartridge is difficult to fit smear the ring with vegetable oil. c. After sterilising the system at the start of the season it is recommended that a new filter cartridge should be fitted TRUMA CRYSTAL FILTER CARTRIDGE 1. After fitting a new filter cartridge it is recommended that the system is flushed through for approx. 30 seconds to remove any harmless particles of carbon, Connecting Services Explorer Group 2005 Touring Caravan Handbook 2. It is suggested that the filter cartridge should be replaced after approx. 30 days of caravanning. After such time the carbon filter will become less effective, Do not remove by pulling the hose or electric cable. TRUMA CRYSTAL ROUTINE MAINTENANCE 1. Ensure that the 0-ring seal on the hose adaptor and socket are free from dirt. 2. To aid fitting of the plug assembly smear the 0-ring with vegetable oil. 3. To help protect the electrical connections smear both the male and female terminals with petroleum jelly. TRUMA CRYSTAL STERILISING a. When cleaning the Water system at the start or the end of the season it is advisable to use a sterilising fluid e.g. Chempro SDP or similar. It is recommended that for this operation an old filter is fitted as the fluid reduces the effectiveness of a now filter. 3. Always ensure that the filter cartridge is fully tightened in the holder. If fitting of the new filter cartridge is difficult smear the 0-ring with vegetable oil. b. Flush the system thoroughly to remove the effective fluid traces. 15 Connecting Services TRUMA CRYSTAL - HOW TO PREPARE YOUR WATER SYSTEM FOR WINTER USE During winter caravanning it is desirable to keep the water container within the caravan to prevent freezing. This can be achieved by fitting a Compact Housing unit inside the caravan in a location where it is convenient to store a Container, e.g. the washroom or under the sink etc. This should only be done by an Approved Explorer Retailer or Service Centre as your warranty will be affected. TRUMA CRYSTAL - NOTES 1. Never allow the pump to run dry. Always ensure that the pump is submerged in the water or the life of the pump will be reduced. 2. Before winter storage the water system must be completely drained and the filter cartridge removed to avoid any retained water within the filter freezing. The filter hole may be sealed with an old filter end cap or left open but do ensure that the lid is firmly closed. See Index - Draining Down The Water System. 16 3. Clean the water system at the start and end of the season with sterilising fluid (see notes under sterilising). 4. If the pump fails to deliver water the most likely cause will be air in the system. Switch off the pump and shake the pump assembly in the water. Then switch on again. And/or the filter cartridge is not fully tightened. Ensure that the filter cartridge is screwed fully into its holder. HOW TO USE A WATERLINE WITH THE INBOARD WATER TANK 1. Place the pump switch on the control panel to the 0 position. 2. Place tap next to the tank into the centre position. See diagram below. Pipe Tap Pipe Connecting Services Explorer Group 2005 Touring Caravan Handbook 3. Connect waterline to water inlet on side of caravan. 4. Turn on waterline 5. While the waterline is in use the pump switch on the control panel must remain in the 0 position. 6. Ensure that you return the tap next to the tank to the inline position when you wish to return to using the inboard tank. 17 Connecting Services DRAINING DOWN YOUR WATER SYSTEM 1. It is essential that you drain down your caravan water system when it is not in use. This is most important during winter months to protect against frost damage. 2. Disconnect the water pump and switch of power supply. 3. Remove the water heater fuse from the switch spur and store in a safe place. 4. Open the safety drain valve on the water heater located next to the water heater. 5. Open all taps and remove all plugs from sinks and showers. Lever operated taps should have the lever put into the up position. 6. Open the drain outlets on the outside of your caravan. 7. If an inboard water tank is fitted ensure that the drain tap on the tank is open. 8. Adjust the level of the caravan to ensure that the drain outlet is at the lowest point of the caravan. This will 18 aid the flow of water to ensure all water is drained off. 9. After 30 minutes level the caravan and prepare it for storage if necessary. GAS Your caravan is designed to operate using either propane or butane liquefied petroleum gas at 30M/bar. Gas can be obtained from your caravan dealer. Your caravan is designed to accept a maximum 2 x 7.5kg gas bottles. TYPES OF GAS BUTANE Butane is supplied in the U.K. in Green or Blue bottles. All these have a male left hand thread except for Camping Gaz, which has a special female right hand, Calor 7.5 kg bottles have a special clip-on connection. Continental bottles usually have a male left hand thread which is similar, but not identical, to UK butane. Butane is suitable for use at temperatures down to 2°C but will not work below that. PROPANE Propane is supplied in red, or partly red bottles which have a female left hand threaded connector. It is strongly recommended that only CORGI approved gas fitters carry out any work on your caravan's gas installation. Scandinavian countries use the same connector. HOSES You should only connect to this regulator using an approved high-pressure hose of length not exceeding 450mm from the gas cylinder to the regulator. These approved high pressure hosed are available from your Explorer Group Retailer. These hoses are connected using screw thread fittings, which will make a seal if connected and tightened using a spanner. Germany or Austria supply propane with a male connection. Propane will work at temperatures as low as –40°C and is therefore suitable for all winter caravanning. CONNECTION Make sure that heating and cooking appliances and gas cylinders are switched off. Connecting Services Explorer Group 2005 Touring Caravan Handbook Your new Explorer Group Caravan has been fitted with a fully approved gas regulator designed to operate at a gas pressure of 30Mbar. Your regulator is fitted with a test point, which is accessed via the inlet at the side of the regulator. This access point is only for carrying out gas pressure tests and should not be used for any other purpose. 19 Connecting Services Each gas Appliance is connected to its own gas isolation tap. These are identified on the tap via a label. Below is a key to identify each label. To operate the tap the Arrow on the tap shows the direction of flow for the gas. The arrow should be pointing towards the appliance for the appliance to operate. There will be a small label next to the bank of taps under the cooker which is also reproduced below: Water Heater GAS SAFETY ADVICE In the event of a suspected gas leak the gas must be turned off using the isolation valve on the gas bottle. A Competent gas Fitter should then check the system before it is used reused. Regularly check flexible gas hose, joints and connections for tightness. Finally, make sure that each gas appliance is working efficiently to the recommendations of the appliance manufacturers. See Index - Ventilation Space Heater FACTS ABOUT LPG LPG is not poisonous. Fridge Bi-products are harmless. Cooking Appliance LPG is dangerous if all air and oxygen is excluded. (Ventilation holes must be clear at all times). Hob LPG has been given a smell by the manufacturers in order to identify leaks. Gas On/Off 20 The gas is heavier than air and therefore sinks to the lowest point. WARNING: Aerosols and highly flammable liquids must not be stored in the compartment behind, or adjacent to, any gas appliance. Some industrial LPG appliances operate at high pressure and require a ‘high pressure’ regulator. This often has an adjusting handle on it. NEVER use such a regulator on a caravan. AWNING SPACES AND LPG APPLIANCE EXHAUST There is no danger of pollution of an enclosed awning space from the LPG exhaust from a refrigerator venting into it. Space heaters may produce sufficient exhaust to pollute the awning space, if it is totally enclosed, from a general comfort, smell and hygiene point of view. In extreme cases there could be a build up of carbon dioxide to a dangerous level. Caravan owners are advised to allow some fresh air circulation in the awning space when such appliances are in use. LPG GAS SYSTEM The Explorer Group does not recommend the use of any external cylinders. All cylinders in use should be within the gas locker provided. If you wish to utilise a larger cylinder and have this outside the gas locker then the connecting hose must not exceed 750mm. GAS BARBECUE POINT Your caravan may be fitted with a gas barbecue point. It is recommended that no flammable material is stored or placed with 300mm of any open flame. Your attention is also drawn to the fact that the surface of the Space Heater in your caravan will get hot when in use. Simply lift up the flap, unplug the red plastic end cap and connect the appliance in accordance with the gas barbecue manufacturer's instructions. You are advised not to use any additional gas appliances outside your caravan unless it is a Gas Bar-B-Q connected via the Bar-B-Q point supplied with your caravan. ALWAYS use the appliance in the open air. Please ensure that you have read the operating instructions for each gas appliance contained in your Owners Information Pack. The gas barbecue point, when fitted, is situated on the nearside towards the front. This point is for use with a gas barbecue only. Connecting Services Explorer Group 2005 Touring Caravan Handbook CAUTION! Do not use a gas barbecue inside the awning. There will be an isolation valve fitted next to the Barbecue point. This is an automatic valve, which cannot be operated unless a connection has been made to the Barbecue point. Do not apply any force to this value. Please ensure that any gas hose left unconnected is protected from dirt or other foreign bodies entering the hose. 21 Connecting Services ELECTRICITY off by ensuring your caravan mains isolating switch on the MCB is in the 'OFF' position. ELECTRICITY MAINS SUPPLY Your caravan's main electrical installation is designed to run on a 230v 50hz AC supply. 6. The MCB main electricity supply switch should be put in the 'ON' position. 7. Check the Residual Current Device is working be pressing the test button. Reset, and then check the refrigerator and water heater are switched to mains operation. ON ARRIVAL AT CARAVAN SITE 1. Before connecting the caravan installation to the mains supply, check that: ON LEAVING CARAVAN SITE 1. Switch 'OFF' at the caravan mains isolating switch. (a)The mains supply is suitable for your installation and appliances, i.e. whether it is AC or DC and whether it is at the correct voltage and frequency. 22 2. Remove the male plug from the site supply. (b)Your installation will be properly earthed. Never accept a supply from a socket outlet or plug having only two pins, or from a lighting outlet. 3. Remove any cover to the electricity inlet provided on the caravan, and insert the female connector of the flexible orange supply cable. (c)Any residual current device (earth leakage circuit breaker) in the mains supply to the caravan has been tested within the last month. In case of doubt, consult the site owner or their agent. 4. Locate the site supply and remove any cover from the socket outlet provided at the supply point. Insert the male plug at the other end of the flexible orange supply cable. Switch on the main switch at the site supply point (if appropriate). 2. Make sure that the switch at the site supply point is off and that all electrical equipment in the caravan is switched 5. Place any surplus cable under the caravan. Ensure that the surplus cable is not coiled up as it could overheat. 3. Disconnect the female plug from the caravan and store the cable in an appropriate locker. Electrical Warning. Attention: Always disconnect the electrical connector between the towing vehicle and the caravan before connecting a Mains (LV) supply to the caravan and before charging the caravan battery by any other means. OVERSEAS ELECTRICAL CONNECTION NOTE: Connection to a mains voltage supply OVERSEAS requires particular attention. MALE CABLE PLUG Care must be taken when connecting supplies abroad since the supplies can be of REVERSE POLARITY. The significance of REVERSE POLARITY is that when equipment is switched off, it may not be electrically isolated. The only certain way of making equipment safe is to unplug it. A means of checking the polarity of the mains supply when overseas is useful. Connecting Services Explorer Group 2005 Touring Caravan Handbook There are available several proprietary makes of equipment for the purpose. If it can be achieved, it is preferable to connect live to live, and neutral to neutral to maintain full electrical protection. CHECK all caravan equipment is set-up to accept the site supply before actually switching on. FEMALE CABLE COUPLER 23 Connecting Services BATTERY INSTALLATION If you wish to install a leisure battery please ensure that it is placed on the battery tray supplied with your caravan. Then place the tray in the battery locker fitted to the side of your caravan. Connect the battery to the clamp fittings connected to the connection leads within the battery box. The Explorer Group recommends that you use sealed for life leisure batteries of a minimum rating off 40 ampere-hours at 20h discharge rate. BATTERY MAINTENANCE Your leisure battery should be maintained in accordance with the manufactures instructions. For information on the automatic charging system in your caravan please refer to 'Automatic Charging System' in the index. Do not charge your leisure battery with any charger other than that supplied. Failure to comply may cause damage to your battery. If you remove your leisure battery, ensure that it is not placed on a cold surface as the battery will deteriorate more rapidly than if stored at a suitable temperature 24 GENERATORS / CHARGER All electrical equipment fitted in your new caravan can be run from either a controlled generator or charger whose output is maintained between 11v and 14v. MAINS UNIT The Mains Unit replaces the conventional fusebox. Similar, but larger ones are often fitted in new houses. The unit gives overload and earth leakage protection for the 230v electrical supply in your caravan. At least once every 3 years, the caravan electrical installation should be inspected and tested, and a report on its condition obtained, as prescribed in the Regulations for Electrical Installations, published by the Institute of Electrical Engineers. For normal operation all switches on the unit need to be in the ON position. The switches on the left of the unit are known as MCBs (miniature circuit breakers). These take the place of the conventional fuse but are more convenient. In case of difficulty, consult an approved electrical installation contractor (who may be the local electricity board). It is dangerous to attempt modifications and additions yourself. Lampholder-plugs (bayonet- cap adaptors) should not be used under any circumstances. In the event of a fault the MCB 'trips' i.e. automatically moves to the OFF position. After elimination of the fault the MCB can be re-set by switching to the ON position (against the spring pressure in an upwards direction). If an earth fault develops, or a person was to touch a live piece of equipment, the leakage of current to earth should immediately operate the RCD (residual current device) and 'trip' the main switch, to the OFF position. This switch is only re-settable after elimination of the fault. provides a maximum output of 10 amps and on some continental sites the available output may be as low as 5 amps. If your loading exceeds the site supply it may trip the site circuit breaker. Please check the available mains output with your site operator. The following items need to be added together if used simultaneously. 230V Mains equipment typical consumption figures: RESETING THE RCD To re-set, operate the switch as for MCBs. Periodically the RCD should be checked by operating the test button marked 'T'. The unit should immediately switch to the OFF position. If the unit does not switch off then a qualified electrician should be consulted. If the unit does switch off, the test is complete and the switch can be re-set restoring the supply back to normal. NOTE: It is possible that all of the 230V mains electrical equipment may not be able to be operated simultaneously. A typical UK caravan site mains hook-up point AUTOMATIC CHARGING SYSTEM The battery charger will operate automatically when the caravan is connected to the mains outlet on a caravan site. The 12V system, with the exception of the 12V fridge and battery charging, will not operate when the caravan is connected to the towing vehicle. Connecting Services Explorer Group 2005 Touring Caravan Handbook • Fridge 0.50 amps • Charger 0.50 amps • Water heater 3.9 amps • Blown air heaters 8.5 amps • Colour TV 2.50 amps • Microwave 10.00 amps • Air conditioning 4.00 amps • Your caravan will be fitted with a Power Centre II or BCA Leisure charging and power distribution unit. 25 Safety VENTILATION All caravans manufactured by the Explorer Group Limited are ventilated at both high and low level in accordance with BSEN 721 Safety Ventilation. The fixed ventilation points fitted in your caravan must not be blocked under any circumstances as your safety may depend upon them. It is advisable that the fixed ventilation points are checked and cleaned (where necessary) on a regular basis. HIGH-LEVEL VENTILATION This is always provided by fixed ventilation within the fitted roof skylight. All roof skylights fitted by Explorer Group provide fixed free area ventilation. These roof skylights should be cleaned annually by use of a small brush to remove any dust that may have accumulated around the mesh fitted. On some roof skylights the mesh can be easily removed to aid cleaning. On fan-assisted roof skylights it is essential that the roof skylight be switched off prior to cleaning. 26 LOW-LEVEL VENTILATION Low level ventilation is provided under the front chest of drawers, except in an Lshape layout, where it can be found either in the nearside or offside bed box. The exact position can be identified via the white plastic cover used to prevent the ventilation from being obstructed. In order to clean the ventilator, remove the cover by undoing the two screws and clean using a small brush. It is essential that the cover is replaced once cleaning is complete. VENTILATION IN SEPARATE BEDROOMS In caravans with sleeping areas separated via a solid door, separate ventilation is required and is provided via a roof skylight at high level and a ventilator at low level within a bed box. GAS DISPERSAL HOLES All appliances and gas unions have a gas dispersal hole nearby. It is essential that these are not blocked or made ineffective. Petrol/Diesel Fumes The fitting of a tail pipe to your exhaust will reduce the possibility of fumes entering your caravan through the front fixed ventilation points. FIRE FIRE EXTINGUISHERS It is recommended that a 1 kg (2lb) minimum capacity dry powder fire extinguisher be carried inside your caravan at all times. A fat pan fire must not have an extinguisher aimed at it, but must be smothered with a fire blanket. IN CASE OF FIRE 1. Get everyone out of the caravan as quickly as possible using whichever exit is quickest including windows. Do not stop to collect any personal items. FIRE RETARDANT FOAMS Under the Condition of the Consumer Protection Act 1987, the manufacturer has a responsibility to ensure that their product is as safe as possible. Fire Safety Explorer Group 2005 Touring Caravan Handbook With this in mind all caravans are equipped with either Combustion Modified High Resilient (C.M.H.R.) foam cushions or sprung mattresses. These foams are very much safer from a fire point of view than those previously used. In addition all upholstery is made of fire retardant fabric. 2. Raise the alarm. Call the fire brigade. 3. Turn off gas container valve if safe to do so. 27 Security Theft Deterrant, Prevention and Security of Your Touring Caravan Security of your touring caravan is taken very seriously at The Explorer Group. That is why we have provided a combination of standard features and optional extras designed to deter and prevent thieves from stealing your property. And in the unlikely event that they should succeed, aid the identification and speedy recovery of your property and assist in the prosecution of the thief. CARAVAN THEFT The theft of a caravan can occur in the most unlikely circumstances; from a motorway service area, even from an owner's driveway. Secure all windows and doors when your caravan is unoccupied, even if only for a short length of time. MICROTAG© NEW Supplied as standard with every Explorer Group touring caravan, MicroTag© is an innovative and technologically advanced property tracing 28 system that can be easily applied to all your valuables. Marking your property with Microdots not only deters theft, but will also help lead to the successful prosecution of the thief and the recovery of your stolen valuables. Please consult the instructions provided inside the Microtag box. ROBSTOP WS3000 Why Use Microdots? - In order for the Police to successfully prosecute, it is necessary to identify the true owner of stolen property. Marking your property with Microdots is the easiest way to ensure your valuables are quickly identified. You can Microdot all kinds of property against theft including your touring caravan, motor vehicles, televisions, bicycles, jewellery, in fact anything of value to you, that will also be of value to a thief. In the event of theft the police can locate the MicroDot by using an ultra violet light. The MicroDots are then read using a MicroDot reader, or a conventional microscope. Each MicroDot is laser etched with a freephone helpline and your own unique number which is registered on the International Security Register which is manned 24 hours a day, 365 days a year. The Robstop WS3000 hitchlock is made of high-grade steel alloy with a cylinder lock. It is very simple to operate and prevents unauthorised coupling and disconnection. It also prevents dismantling of the coupling itself. The safety ball covers the ball head room of the WS3000 creating an additional means of protection (Available as an optional extra or from your retailer) Explorer Group 2005 Touring Caravan Handbook The rear corner steadies on all Explorer touring caravans have a special cowling that allows for the precise positioning of a security bolt. Once the corner steadies are down, the bolt is put in place and padlocked. This prevents the potential thief from being able to lift the corner steadies making it extremely difficult to tow the vehicle away. owners are advised to purchase good quality, extended loop padlocks in order to secure them. CRIS - THE CARAVAN REGISTRATION AND IDENTIFICATION SCHEME - VIN CRiS is the national register of UK manufactured touring caravans and was established by the National Caravan Council (NCC) in conjunction with HPI Ltd. All Explorer caravans are recorded on the CRiS database by their unique 17 digit Vehicle Identity Number (VIN). This VIN and the caravan description are recorded on the Touring Caravan Registration Document, which is sent by CRiS to the caravan's registered keeper. Make a note of this number in the space provided at the front of this guide and make a separate note of the number to keep safe at home. CRiS issues Touring Caravan Registration Documents which are the equivalent of the log books issued by the DVLA for cars - the Touring Caravan Registration Document confirms the name of the registered keeper, the VIN and full vehicle description. Shortly after purchasing this caravan you should receive your Touring Caravan Registration Document. It will be sent by post to your home address. Security ANTI-WIND CORNER STEADIES WINDOW ETCHING & CHASSIS MARKING The VIN number is stamped onto the chassis of the touring caravan and etched onto all of the windows acting as a further deterrent. Your Touring Caravan Registration Document will include a 17 character VIN (Vehicle Identification Number), shown in the top right -hand corner. This 17 character VIN will be die- stamped into the caravan drawbar and chemically etched on up to a maximum of 10 eye level windows. To protect yourself and your touring caravan, never leave the Registration Document in the caravan. For security reasons keep it in a safe place. If you sell the caravan please follow the instructions on the Touring Caravan Registration Document. 29 Security If you do not receive a Touring Caravan Registration Document, lose it, or any of the details recorded are incorrect, please contact: CRIS - Dolphin House, New Street, Salisbury, Wiltshire, SP1 2TB Telephone: 01722 411430 ELECTRONIC TAGGING In conjunction with the CRiS registration scheme, all Explorer touring caravans are electronically tagged during manufacture for added security and ease vehicle identification. The security tag containing the individual identity of your caravan is concealed within the caravan body and can only be read by using a special decoder. YOUR LOCAL POLICE CAN OBTAIN THE USE OF A DECODER BY CONTACTING C.R.I.S. ON TELEPHONE NO. 01722 411430. EXPLORER PROTECT - AUTOWATCH ALARM SYSTEM - (NEW DESIGN) The Explorer Protect system is fitted as standard on the Rallye, Crusader and Buccaneer range (optional extra on Omega and Odyssey, Corona and Avanté). Manufactured by Autowatch, The Explorer Protect system is designed to give years of trouble free operation. Made with only the highest quality components and using state of the art technology you can be assured that your caravan has the best electronic protection available. Each caravan alarm is installed with a Passive Infrared Detector (PIR), a wireless sensor that detects movement in the caravan and transmits a radio signal to the alarm module. If the alarm is on the siren will sound, and a leg sensor, fully sealed against dust and water, this detects if the corner stabilising leg is being raised or lowered and transmits a coded radio signal to the alarm. Additional sensors can be purchased from your retailer to enhance security. See section below for operation or consult the manufacturers instructions provided in the Owners Information Pack. 30 ADDITIONAL SECURITY Consider fitting any device which might deter or prevent intrusion by thieves. For example: A wheel lock will prevent towing of the caravan and removal of the wheel. FREE CRIME PREVENTION advice about securing your caravan, protecting your valuables, property marking, either at home or whilst on site, can be obtained from the Crime Prevention Officer through your local Police Station. EXPLORER PROTECT AUTOWATCH 650 CARAVAN ALARM BASIC OPERATION ARMING THE SYSTEM. • Briefly press (large) arm/disarm button. • Single chirp. • Awning light seconds. illuminates for 30 • Settling time of 15 seconds before responding to triggers. • Single intermittent flash of status LED (every 2 seconds). • All sensors triggered will result in siren sounding for 30 seconds, • Or until reset by arm/disarm button. pressing the DISARMING THE SYSTEM. • Briefly press the (large) arm/disarm button. • Double chirp. • Awning light illuminates briefly on and off and then on again for 30 seconds. • LED off. PANIC ALARM. • Press and hold the small panic button on the transmitter for two seconds. • The siren will sound for thirty seconds, unless reset by pressing any of the transmitter buttons. EMERGENCY DISARM. • Insert a touch-key briefly into the socket. The alarm will turn off. SILENT ARM AND DISARM. • Press the small button briefly followed by a press on the arm/disarm button. • The alarm will arm/disarm without chirps. SENSORS Each caravan alarm is installed with a Passive Infrared Detector (PIR) and a leg sensor. Additional sensors can be purchased from your dealer to enhance security. PASSIVE INFRA RED SENSOR. The wireless PIR sensor will detect movement in the caravan and transmit a radio signal to the alarm module, if the alarm is on the siren will sound. LEG SENSOR. The leg sensor will detect the corner stabilising leg being raised or lowered and transmit a radio signal to the alarm. The leg sensor is fully sealed against dust and water and has a battery life expectancy of three years. When the battery becomes exhausted, the sensor will need to be replaced. ENHANCED FEATURES ARMING THE SYSTEM IN “AT HOME” MODE. In the 'at home' mode, any sensor that is programmed to be isolated, such as the PIR sensor, will not trigger the alarm. Other sensors, such as the leg sensor, will trigger the siren. Security Explorer Group 2005 Touring Caravan Handbook Arm as normal followed by a second press on the arm/disarm button within 2 seconds. Normal "on" tone followed by "at home" tone indicating isolation is active. Settling time of 15 seconds before responding to triggers. Armed in the isolation mode will be indicated by a double flash intermittently of the LED. The “at home” sensors will be isolated, other sensors will trigger the siren for 30 seconds. ARMING THE SYSTEM IN TEST OR BUZZ MODE. In the buzz mode the siren will sound a short tone when a sensor is triggered instead of sounding for 30 seconds. It is advisable to test all the sensors 31 Security periodically to ensure they are working. If the battery in the sensor is low the tone will change to a low frequency tone as a warning. Note that a PIR will not transmit within 20 seconds of the last trigger to conserve battery power. Ensure that you wait for at least this time before testing the sensor again. Arm the alarm with a long push on the arm/disarm button. "On" indication will be followed by the test mode tone. LED will illuminate permanently. Settling time of 5 seconds before responding to triggers. Tone of response will also indicate battery low. It is also possible to enter test mode and isolate the "at home" sensors. Arm the alarm with a long push followed by a second short push. The "on" tone will be followed by the test tone and then the "at home" tone. SWITCH OFF CHIRPS PERMANENTLY. Insert touch-key for ten seconds. The LED turns on continuously for the first 5 seconds and rapid flashes for the next 5 seconds after which one audible beep is heard followed by a double beep, this single and double beep sequence is repeated. If you want audible indication, remove touch-key after a single beep is heard. If you don't want audible indication, remove touch-key after a double beep is heard. Ensure that you wait for at least this time if you passed the PIR to enter program mode. LEARNING A NEW TOUCH-KEY OR TRANSMITTER. RECEPTACLE AND TOUCH-KEY (two supplied) STATUS LED RECEPTACLE PROGRAMMING Programming any additional sensors, transmitters or touchkeys can only be done with an existing touchkey. The quantity of devices that can be stored is as follows. Remote control Transmitters 4 Touchkeys 4 Sensors (PIR and leg sensors) 12 An attempt to program an accessory in excess of the above number will result in overwriting the first accessories code. 32 Note that a PIR will not transmit within 20 seconds of the last trigger to conserve battery power. TOUCH-KEY With the alarm disarmed insert a valid touch-key into the receptacle. After 5 seconds the LED will flash rapidly indicating that you are in learn mode remove the touch-key. Momentarily insert the new touch-key or transmit with the new transmitter. Once the new code is recognised by the alarm a short beep will sound. Insert the original touch-key, a double beep will confirm that the code has been stored. The LED will flash rapidly again and additional sensors, transmitters or touchkeys can be introduced Make sure that you install the new batteries correctly (avoid reversing the polarity). The LED will flash rapidly again and additional transmitters or touch-keys can be introduced. To exit learn mode briefly insert the touchkey used to enter program mode, or wait for 15 seconds. To exit learn mode briefly insert the touchkey used to enter program mode, or wait for 15 seconds. CHANGING SENSOR ZONES. If a sensor needs to be changed from the "at home" zone to the "away" zone, or visa versa enter program mode as above. LEG SENSOR. The leg sensor is fully sealed against dust and water and has a battery life expectancy of three years. When the battery goes flat the sensor will need to be replaced. Test the batteries using the test/buzz mode. LEARNING A NEW SENSOR. With the alarm disarmed insert a valid touch-key into the receptacle. After 5 seconds the LED will flash rapidly indicating that you are in learn mode remove the touch-key. Trigger the new sensor, once the new code is recognised by the alarm a short beep will sound. If the sensor is to be programmed into the "at home zone" confirm by pressing the small panic button on the transmitter. If the sensor is to always fire the alarm confirm by pressing the large arm/disarm button. The alarm will beep twice to verify that the code has been stored. When the LED flashes trigger the sensor to be changed. The siren will beep. Confirm the desired zone by pressing the small panic button for "at home" or the large arm/disarm for "away" zone. BATTERIES PIR SENSOR. The PIR is powered by two CR2032 Lithium batteries, which will power the sensor for two years with normal usage of the caravan. Test the batteries using the test/buzz mode. To replace the batteries remove the front cover of the sensor and remove the batteries. Security Explorer Group 2005 Touring Caravan Handbook BATTERY BACK-UP. The alarm unit incorporates a 7.5 Amperehour, 12-volt GEL CELL battery. This battery is charged from the caravan charger and the main 12-volt battery. The alarm incorporates circuitry to minimise damage to this battery if the caravan is left for an extended period, but periodic charging will prolong the life of both batteries. The back up battery may be disconnected at delivery to prevent damage during storage - verify this with your dealer. To access the battery back up remove the two screws on the alarm module and open the cover. Plug the leads onto the battery if disconnected noting that the red wire is positive and the black wire is negative. 33 Security REMOTE TRANSMITTER. REMOTE CONTROL TRANSMITTERS (two supplied) LARGE BUTTON (arm/ disarm, etc.) SMALL BUTTON (remote ‘panic’, etc.) batteries, observing the correct polarity as marked on the inside of the remote casing. DO NOT LEAVE BATTERY REPLACEMENT TO THE LAST MOMENT. BATTERY LOW INDICATION. The LED on the touch-key receptacle will indicate battery low while the alarm is off. One flash - main caravan battery is low. Two flashes - battery back up battery is low If the main battery in the caravan is flat the time that the awning light is illuminated when arming and disarming will be reduced from 30 seconds to 5 seconds. The status of the sensor batteries can be tested in the test/buzz mode. ALARM MODULE AND HOUSING The remote control battery life is between three and five years. When the batteries eventually need replacement, the LED on the remote will flash when you depress either button instead of illuminating continuously as normal. The remote control uses two lithium CR1220 batteries, which are available from most camera shops. D 34 RE To change the batteries, undo the two Phillips screws on the back of the remote. Place the remote on a flat surface with the button and LED facing upwards. Gently separate the two halves to expose the batteries. Remove the old batteries and insert the new 650 ALARM MODULE BACK-UP BATTERY BLACK Equipment Use CONTROL PANELS This unit also contains a 12v socket and TV aerial connection. A mains 230v socket is also fitted to this unit. ELECTRICAL CONTROL PANELS Your Explorer Group Touring caravan will be fitted with one of the following electrical control panels. The Avanté and Corona are also fitted with a 12V master switch, which is positioned near the exterior door. AVANTÉ & CORONA ODYSSEY & OMEGA CRUSADER & RALLYE SINGLE AXLE MODELS Crusader Black - Rallye Biege Avanté Black - Corona Biege The right hand control panel operates the water pump by pressing the switchmarked pump down. Whilst the pump is running the bottom neon light marked pump run will illuminate. The top neon light will give a battery condition reading when the power is switched on. A green light indicates that the battery is fine this will change to amber and then red as the battery discharges. 36 Odyssey Black - Omega Beige The control panel operates the main 12V system via the master switch. This switch is in the on position when the 'I' symbol is depressed. It also gives a voltage reading for the battery when the master switch is in the 'on' position. The pump switch when in the 'on' position indicated by the 'I' symbol will allow the submersible pump to run and provide water to the taps and shower unit. The control panel operates the main 12V system via the master switch. This switch is in the on position when the 'I' symbol is depressed. It also gives a voltage reading for the battery when the master switch is in the 'on' position. The pump switch when in the 'on' position indicated by the 'I' symbol will allow the submersible pump to run and provide water to the taps and shower unit. CRUSADER & RALLYE TWIN AXLE & ALL BUCCANEER MODELS Crusader Black - Rallye & Buccaneer Biege SPACE HEATER AND WATER HEATER CONTROLS This unit contains both the controls for the Ultraheat space heater and the Ultrastore water heater. Full details on how to operate the Ultraheat space heater and the Ultrastore water heater are contained in the Truma manuals supplied within your Owner's Information Pack and under the relevant section of this handbook. PLEASE NOTE: You must ensure all replacement bulbs are of the correct rating - see Index - Equipment Lists. Equipment Use Explorer Group 2005 Touring Caravan Handbook These models are fitted with an additional inboard water tank switch and will be marked water. When this switch is depressed it will change the needle display to show the level of water in the water tank. These models are also fitted with a 3 position switch for the pump control. In the top position the water can be fed from the outside pump to fill the water tank. In this position the taps and shower will not work. The middle position is off totally. The bottom position switches on the internal pump to feed the taps and shower. LIGHT SWITCH MASTER All internal lights can be switched off/on from the main switch by the main caravan entrance door. 37 Equipment Use TRUMA SPACE HEATER Your caravan is fitted with a Truma space heater. Heater operation is basically possible with gas only, electricity only or simultaneously with electricity and gas. When used simultaneously the electrical unit will switch itself off before overheating occurs as a result of the stronger gas burner. When using electrical only we recommend to set the fan control on position 3 (manual or auto), remembering to set the output level to 2000W (ensure that the fuse protection for the power supply of the camp site is sufficient). If more than 2000W are required (heating up/cold temperatures) you must refer back to using gas operation, as the 230V electric heater is for secondary use only. To ensure an even and rapid warm air distribution as well as lower surface temperatures on the heating unit, we do recommend that you always operate the heater with a running Trumavent warm air system. 38 OPERATING IINSTRUCTIONS Always observe the operating instructions and important operating notes prior to starting. The caravan owner is responsible for correct operation of the appliance. GAS HEATER - IMPORTANT OPERATING NOTES 1. Underfloor combustion air intakes must be kept clear of dirt and snow slush. 2. Before switching on the heater in winter, clear all snow from the cowl. Refer to manufacturer's operating instructions for winter use. serious damage from overheating. Do not place flammable objects near the heater. Please follow these guidelines in the interest of your own safety. 5. Due to the design, the heater cladding will become hot during operation. The operator is obliged to ensure that due care is taken to protect third parties (small children in particular). GAS HEATER OPERATING INSTRUCTIONS 3. Inspect the exhaust duct and all connections at regular intervals, and always in the event of blowback (misfire). Never place any object on the exhaust duct, since this could result in damage. 4. Never allow the warm air outlet on the heater to be obstructed in any way. For instance never hang washing on or in front of the heater to dry. Misusing your heater in this way could cause a = Control knob Thermostat) b = Integrated control switch for the Trumavent fan TEB c = Pressure igniter (model Trumatic S 3002 P) d = Automatic ignition device with battery compartment (model Trumatic S 3002/S 5002) e = Remote ignition display (special accessory) f = Window to check flame g = Thermostat sensor h = Name plate (remove cover) GAS HEATER - OPERATION WITH THE PIEZO IGNITOR (S 3002 P ONLY) 1. Turn on gas cylinder and open quickacting valve in the gas supply line. operating the piezo ignitor rapidly until the flame ignites. 3. Keep the control knob pressed down for a further 10 seconds to allow the safety pilot to operate. GAS HEATER - OPERATION WITH THE AUTOMATIC IGNITOR (S 3002/S 5002) 1. Turn on gas cylinder and open quickacting valve in the gas supply line. 4. Observe through the inspection window for a further 10 seconds so as to check that the flame has not been extinguished due to air in the line caused by a change of gas cylinder). 2. Turn control knob (a) to thermostat setting 1 - 10 and press it down as far as the stop. Ignition takes place automatically (ignition sparking audible) until the flame ignites. Always wait at least 2 minutes before at tempting to re-ignite, otherwise there is a risk of blowback (misfiring). This also applies if a working heater goes out and has to be re-lit. Keep the control knob pressed down for a further 1 0 seconds to allow the safety pilot to operate. If air has got into the gas line, it may take up to two minutes before gas is available for combustion. During this period, the operating handle should be kept pressed down and the pressure igniter constantly actuated until the flame appears. 2. Turn control knob (a) to thermostat setting 1 - 1 0 and press it down as far as the stop. At the same time keep 5. To ensure even and rapid warm air distribution as well as lower surface temperatures on the heating unit we recommend that you operate the heater with a running T air system. Equipment Use Explorer Group 2005 Touring Caravan Handbook In the event of a fault always wait 2 minutes before attempting to reignite. If the flame goes out again, re-ignition occurs immediately during the closing time of the safety pilot approximately 30 seconds). If there is no flame, the automatic ignitor continues to operate until the control knob (a) is switched to 'O'. 39 Equipment Use If there is air in the gas supply line, it can take up to two minutes until there is gas available for combustion. During this time hold the control knob down until the flame lights. 3. To ensure even end rapid warm air distribution as wel as lower surface temperatures on the heating unit, we recommend that you operate the heater with a running - Trumavent warm air system. GAS HEATER - ROOM THERMOSTAT An average room temperature of about 22°C can be achieved without blower operation with a thermostat setting of 3-5. For operation with blower, we recommend a thermostat setting of 4-8. The exact thermostat setting must be determined in each case, depending on how much heat is needed and the design of your vehicle. The thermostat probe is underneath the heater. Please note that the thermostat will be adversely affected by cold draughts from refrigerator vents, gaps below doors, etc. or by a deep-piled carpet. Always be sure 40 to avoid problems of this kind, otherwise satisfactory temperature control cannot be guaranteed. Gas Heater - Switching Off 4. When operating a brand new heater for the first time (or after it has been idle for a lengthy period) you may temporarily notice a slight smoke and smell. We advise running the heater at full power and thoroughly ventilating the room. Turn the control switch to '0' (the automatic ignition will switch off at the same time). CONTROL PANEL WITH THERMOSTAT If the unit is not used for a relatively long period of time, close off the quick-action gate valve on the gas pipe and gas bottle. ELECTRIC HEATER - IMPORTANT OPERATING NOTES 1. Due to the design, the heater front case will become hot during operation. The operator is obliged to ensure that due care is taken to protect third parties (small children in particular). 2. The heaters hot air outlet should under no circumstances become blocked. 3. Never hang clothes or similar in front of or on top of the heater to dry. This could cause serious damage to the heater as a result of overheating. Do not place inflammable materials near the heater. Please observe these instructions for your own safety. ELECTRIC HEATER - SWITCHING ON Before switching on, ensure that the fuse protection for the power supply of the camp site is sufficient for the selected power setting (b) (see Technical Data provided in the Owners Information Pack) Important: The electric supply cable for the caravan must be fully unwound with any excess stored uncoiled to prevent overheating. Please note: Your Truma Space Heater front is now attached using 2 screws. These screws must be removed prior to removal of the Space Heater front. These screws can be seen when looking into the fire through the air vents. Equipment Use Explorer Group 2005 Touring Caravan Handbook 1. To switch on, turn the rotary switch to the desired output leveI (b). 2. Set rotary control knob (c) to the desired room temperature. The thermostat setting on the control panel (1-9) must be determined individually depending on the heating requirement and the size of caravan. For an average room temperature of about 23oC, we recommend a thermostat setting of about 6 - 8. ELECTRIC HEATER - SWITCHING OFF Switch the heating system off at the rotary switch (a). 41 Equipment Use TAPS KITCHEN TAPS. Your new Explorer Group Caravan will be fitted with the Reich Trend mixer tap. OPERATION For correct operation of the tap swivel the spout to the desired position over the sink. Lift the control lever to activate the pump and allow water to flow simultaneously. To adjust the temperature, swivel the lever to the left to increase the temperature and to the right to reduce the temperature. 42 BATHROOM TAPS AND SHOWERS. CRUSADER, RALLYE, OMEGA & ODYSSEY The Crusader, Rallye, Omega and Odyssey are fitted with the Reich Kama mixer tap with retractable shower. OPERATION The taps are operated in the same manner as the Kitchen tap. PLEASE NOTE A. The water temperature could be very high so do not lift the lever with the tap turned to the full left position. B. For winter storage and to prevent frost damage the tap swivel must be left in the centre up position. AVANTÉ AND CORONA The Avanté and Corona caravan will be fitted with either the Whale Elegance tap and shower combination tap or (those models with tip-up sink basins) a separate Whale Elegance tap and Whale Elegance shower unit. Equipment Use Explorer Group 2005 Touring Caravan Handbook OPERATION These taps are operated by turning the separate hot and cold taps. To get the desired water temperature turn on both hot and cold taps. PLEASE NOTE A. When only the hot water tap is turned on the temperature of the water can be very high. B. For winter storage the taps must be left in the fully open position. CLEANING OF ALL TAPS It is recommended that a non-abrasive damp cloth be used for cleaning the Elegance taps and showers. 43 Equipment Use REFRIGERATOR OVEN HOB & GRILL For full operational instructions for your particular fridge, refer to refrigerator manufacturer's instructions supplied with the appliance. For full operational instructions, refer to oven or hob & grill manufacturer's instructions supplied with the appliance. When the caravan is on tow, the refrigerator should only be operated electrically, i.e. from the 12v battery in the towing vehicle and not by means of the bottled gas. The refrigerator can be run on 230v or LP gas at any time. Changing between these modes of operation is carried out by means of the controls shown on the relevant control panel on the fridge. CAUTION! - Only use one source of energy at a time. WARNINGS! 1. Caustic pastes, abrasive cleaning powders, coarse wire wool and hard implements will damage the surface. 2. All pans should be mounted centrally over the burners, even when cooling, to protect adjacent walls. 3. Do not lower the glass cover until hob has cooled down. 4. Glass lids may shatter when heated. Turn off all burners and grill before shutting the lid. 5. Accessible parts may be hot when the grill and oven are in use. Young children should be kept away. 6. Do not use grill or oven as a space heater. 44 SMOKE ALARM The smoke alarm fitted to your caravan is approved for use in caravans. NOTE: A different smoke alarm to the one illustrated may be fitted (subject to availability) but it still meets the criteria above. For further information on use of the alarm, battery replacement, testing, etc., refer to the manufacturer's literature contained in the Owner's Information Pack. Equipment Use Explorer Group 2005 Touring Caravan Handbook The National Caravan Council (NCC) requires that all new or used touring caravans sold by its members be fitted with a smoke alarm featuring an alarm silence facility. WARNING! Test smoke alarm operation after caravan has been in storage, before each trip and at least once per week during use. 45 Equipment Use THETFORD CASSETTE TOILET Your caravan is fitted with a cassette toilet. For full operational instructions, refer to the cassette toilet instruction manual in your Owner's Information Pack. EMPTYING THE TOILET 1. Open outer locker door and release bottom or base catch securing cassette. 2. Remove cassette, ensuring the flap is in the closed position (it is useful to use a trolley for taking waste tanks to the disposal point). 3. Take the cassette to a chemical toilet waste disposal point, remove cap and place safely away from emptying point. 6. When you get back to your caravan, add chemical solution as instructed. Replace cap and fold arm away. 7. Slide back into locker until catch locks. 8. Close and lock door. WARNING! • Cold Weather Use - to prevent freezing during cold weather use, add antifreeze to the toilet system fresh water tank. Use a non-toxic (propyleneglycol) type of antifreeze. Refer to chart on container to obtain level of protection. • Warmer weather or longer intervals between emptying the waste tank may require additional toilet fluid. Use only Thetford toilet fluid to achieve the best results. 4. Press air release button near handle before you tilt the tank to empty contents Caution: Never add toilet fluid directly into toilet bowl. 5. Rinse well and then leave some water in and replace cap. • Do not use strong household detergents or cleaners that contain chlorine, solvents or acid contents. • High Altitude and Hot Weather Use with large temperature differences and 46 changing heights during towing, over pressure can start to build up in the waste holding tank, causing contents to splash upward upon opening the valve blade if opened too fast. AIR CONDITIONING WARNING! Never place your hands or other objects within the air inlet openings BLIZZARD 1500 AIR CONDITIONING UNIT (WHERE FITTED) Starting and Function Selection 1. Internal temperature thermostat. MAINTENANCE To ensure trouble-free running it is recommended that the unit be cleaned once or twice a year by a qualified service agent. control 2. Two speed fan switch. 3. On button (push to ON position). 4. To increase the cooling from the unit, turn the red/blue control knob to the blue section. To reduce the cool air, turn towards the red sector. 5. Push button '3' to switch OFF (release to OFF position). 6. To adjust airflow direction pull down the front brown vent from a small flap located in its centre. . ATTENTION! Never obstruct the air inlets and outlets. The air conditioning compressor runs during the refrigerating phase, if switched on and off at once it may get damaged. Therefore it is very important to wait at least 3 minutes before attempting to switch it on again. Equipment Use Explorer Group 2005 Touring Caravan Handbook Demount the external cover and clean the heat exchangers (evaporator and condenser) with a brush or compressed air. Remove any dirt. Check that water trap holes are not clogged. N.B.18°C is the minimum temperature that the thermostat is set to for the air conditioner to start its cycle. 47 Equipment Use ROOFLIGHTS Your caravan is fitted with at least one type of the following rooflights. Please note: Do not change the direction of the fan unless it has been switched off ‘O’ position and the blades have stopped rotating. 2. To open in the intermediate position: a) Open the toggle catches on either side of the glass (see 1a). b) Grasp the metal bar in the middle, snap it out of its holder, swivel down and press the glass dome outwards. (Glass dome is opened automatically after approx. 150mm by the two gas springs.) THE HEKI 2 & HEKI DUETTE LUXUS ROOFLIGHT 1. To open to the tilted position: 48 c. Swivel the metal bar towards the glass dome and snap into its holder. d. To close the glass dome, proceed with steps (a-c) in reverse order. THE OMNIVENT (12V) ROOFLIGHT The Omnivent is a double-glazed rooflight constructed from a synthetic ultra-violet screened material. Its side-operating mechanism allows a completely free central opening with built-in fixed ventilation when closed. It operates as an extractor fan and air intake fan. (Glass dome is held by the two gas springs after approx. 150mm). a. Press the knob in the toggle catches on either side of the glass and turn through approx. 90°. b. Grasp the metal bar in the middle, snap it out of its holder, swivel down and press the glass dome upwards. c) Open both fasteners and swivel the metal strap toward the intermediate position and pull the glass dome down until the metal strap is stopped by the fasteners. d) To close, proceed with steps (a-d) in reverse order. 3. To open in the ventilation position: a) Open the toggle catches on either side of the glass (see 1a). b) Using both hands on the two toggle catches, press the glass dome up about 2cm and fasten the toggle catches in the corresponding setting. c) To close, proceed with steps (a-b) in reverse order. 4. Closing the blinds: a) Take hold of the end rod (without rocker) in the recessed grip and engage in the opposite end rod (with rocker). b) Select the required position (blackout/flyscreen) by moving both joined end rods together. Caution: In extremely bright sunshine, the blackout blind must only be closed two-thirds, and the pane must be set in the continuous airing' position. • Do not stand on the acrylic glass dome. • Close HEKI 2 completely before moving off. • Do not leave your caravan when HEKI 2 is open. • Please consult your supplying dealer if you have any problems or defects. • Remove any snow/ice or dirt before opening the roof. • Do not open when it rains or when there is a strong wind. CARE INSTRUCTIONS Clean the acrylic glass pane with soap suds and plenty of water, or use the Seitz special cleaner. 5. OPENING THE BLINDS: a) Move blind (end rod with rocker) right to the outside. Use talcum to care for the rubber seals. b) Hold the recessed grip with one hand; with the other hand, press the rocker and move the blind back (do not let it recoil). The 12-month guarantee becomes null and void if these instructions are not followed. MIDI HEKI ROOFLIGHT To open, push the large central button. Whilst depressed, slide the bar to the desired position and locate into the stops provided. MINI HEKI The Mini Heki rooflight will generally be fitted in washroom areas. The operation is identical to that of the Midi Heki Rooflight. Equipment Use Explorer Group 2005 Touring Caravan Handbook STANDARD MPK ROOFLIGHT The MPK 400 x 400 rooflight is generally fitted in washroom areas. Lowering the flyscreen then pressing the black control rod in towards the centre of the rooflight then while the rods are depressed push upwards, this opens the rooflight. Only use water and mild soap suds to clean the blinds. 49 Equipment Use WINDOWS Your caravan will be fitted with either Polyplastic, Seitz flush windows, or a mixture of both. POLYPLASTIC WINDOW OPENING In order to open the Polyplastic window it is only necessary to move the catch upwards and release the catch from the backing plate. SEITZ WINDOW OPENING In order to open the Seitz window you must depress the button on the catch before moving the catch. Failure to do so will lead to the catch breaking. 50 BLINDS & FLYSCREENS BLINDS Pull blind down by its centre catch. Do not pull down by one side of the blind. This will inevitably lead to problems. Do not allow blinds to spring back freely. Always control them by hand. FLYSCREENS To operate the flyscreen, either pull the screen fully down, fully up or across, dependant on type of window fitted, and clip into place on the blind/frame. To release, unclip from the blind/frame. If a cross bar is fitted, gently pull the crossbar downwards towards you and allow the tension of the spring to roll up the flyscreen. Where a cross bar is not fitted, disconnect from the blind catch and release gently. WINTERISATION/STORAGE The blind/flyscreen should not be left in the down position when the caravan is not in use or throughout the winter as the memory of the mechanism may be lost. DOOR FLYSCREEN (IF FITTED) The exterior door flyscreen can be opened or closed from both inside and outside of the caravan and does not restrict door openings. NOTE Your caravan may be fitted with flat fitting Seitz windows. The window catch is fitted with a security button and to open the window this button needs to be pressed in before the catch can be turned. Equipment Use Explorer Group 2005 Touring Caravan Handbook When opening or closing the door flyscreen use the finger grip provided which is near the centre, do not use the top or bottom, as this will cause snagging of the flyscreen fabric and uneven running. N.B. Again, as with the blind and flyscreen cassettes, DO NOT allow the flyscreen to be released uncontrollably, as this will cause damage to the mechanism. Also, take care not to trap your fingers. It is recommended that blinds are not in the closed position whilst the caravan is moving. 51 Equipment Use MANU Operating the System 1. Switch ON the Power Pack and the red LED will illuminate. 2. Check the gain control switch is set to the normal NML position (switch UP). See Interference 2 over the page for use. 3. Push the Antenna Dome into position, ensuring it is properly seated in the Mounting Foot. Secure by tightening the two grub screws with the Allen Key. 9. Should the cable need to be lengthened, use only RF100 specification cable and high quality coaxial plugs and couplers which are available from our Vision Plus Range through our dealers or directly from ourselves. Removing the Pinnacle Dimensions: Diameter - Antenna Dome Diameter - Mounting Foot Height - Overall Height - No Pinnacle Height - No Antenna Dome Power Pack * 315mm 185mm 280 mm 180 mm 50 mm 115 x 70 x 50mm Gain figures must not be judged in isolation. A greater figure does not mean a better picture. Status is designed for optimum performance Conforms to the European Directive 89/336/EEC 04-2064/5 Model 04-2064/10 Model Frequency Range Amplifier Gain Gain Adjustment Flatness Noise Figure Output Impedence Output Power Supply Power Consumption TV lead 5 metres Coaxial cable 10 metres Coaxial cable UHF 470-860 MHz VHF 40-230 MHz FM 88-108 MHz 18 db* 15 db ± 2 db 3 db 75 ohms 98 dbuv 12-24 v DC 35 ma 2 metres This may be necessary should you wish to reduce the overall height of the antenna by 90 mm. 1. Simply unscrew the Pinnacle and remove. The antenna is designed to remain watertight without the Pinnacle. 2. To replace, simply screw in and tighten BY HAND. 3. IMPORTANT - The Pinnacle is an integral part of the antenna and critical to its performance. When in use always ensure the Pinnacle is fitted. Removing the Antenna A permanently fitted Status may be removed if there are severe height restrictions, leaving only the Mounting Foot in place. 1. Unplug the antenna from the Power Pack. On the Adapter loosen the two grub screws and lift off whilst carefully feeding out the coaxial cable with plug attached. 2. Push the Blanking Cap supplied into place to cover the central hole. Angle Adjustment Only relevant if Status is mounted on a sloping surface. Level fixing is very important to ensure optimum performance. 1. To adjust the angle, remove the Antenna Dome from the Mounting Foot and turn the Antenna Dome upside down. 12 - 24vDC 52 2. With a screwdriver loosen the Central Bolt, adjust the Adapter to the desired angle and re-tighten the central bolt. 5. Screw A and D together to complete the assembly. 8. Do not add excessive lengths of coaxial cable, this will cause increased signal losses. Should you experience problems please refer to the information over the page. OPERATION & GUIDELINES 6. Do not allow the cable to come into contact with any hot surfaces as this could melt the air-spaced insulation of the cable. 4. Push on item C up to B and secure the central core by tightening the small grub screw. Be careful not to over tighten, which could sever the wire. 7. Keep away from fluorescent lighting. 3. Turn on your television set and tune in. This may be necessary at all new locations. OMNI DIRECTIONAL TV ANTENNA 5. Do not run coaxial cable next to mains cable, leave a minimum distance of 120mm to prevent interference. FM Radio Connection Status is designed to receive FM radio when connected to a car-style radio. 1. This will require a coaxial car radio plug, a coaxial plug and a length of coaxial cable, which are available from our Vision Plus Range through our dealers or directly from ourselves. 2. Assemble the cable and plugs, as described on the Vision Plus packaging, and route the cable from the Radio to the Power Pack. Please follow the points carefully in Routing the Coaxial Cable and Connecting the Coaxial Plug described below. 3. Once the cable has been installed, plug into the TV-FM socket of the Power Pack and into your Radio. Connecting the Coaxial TV Plug Should the coaxial plug need to be removed, please note how it comes apart and reassemble as follows:1. Prepare the cable by removing 16mm of white outer sheath to expose the braided copper wire. 2. Next, remove 10mm of the exposed braided copper wire and the central air-spaced insulation to expose the single central core. 3. Feed the screw cap A and the pronged clamp B over the cable. Pull back evenly the copper braiding over the pronged clamp as shown. Routing the Coaxial Cable IMPORTANT IT IS CRITICAL THAT NONE OF THE COPPER BRAIDING IS TOUCHING THE CENTRAL CORE. Coaxial Cable is quite fragile and must be handled with care. Please comply with the following, as failure to do so will severely affect performance. # 1. Should the coaxial plug be removed, it is very important that it is refitted correctly as described below. 2. Do not crush, kink or over-bend the coaxial cable which has a minimum bend radius of 25mm. 3. Any excess cable should be removed and MUST NOT be coiled. 4. Avoid increasing the number of connections or breaks in the coaxial cable as they will reduce performance, especially in weak signal areas. 2 YEAR GUARANTEE UPON PURCHASE, PLEASE CUT OUT THIS SECTION, COMPLETE THE DETAILS ON THE REVERSE SIDE AND POST TO: GRADE UK LIMITED Finch Close Lenton Lane Industrial Estate NOTTINGHAM NG7 2NN MWC MANU Travelling Removing the Antenna DO NOT TRAVEL:With the Antenna raised With the Antenna set for vertical signals With the Telescopics extended When travelling adjust the antenna so that it points to the rear of the vehicle to reduce the possibility of damage when travelling. The RED SPOT on the bottom of the mast indicates the front of the Antenna. A permanently fitted Status can be easily removed leaving only the Mounting Foot and rubber gaiter. 1. Unplug the antenna from the Power Pack. 2. Loosen the Mast Locking Collar and Wall Bracket* and lift off whilst feeding out the mast and cable. 3. Push the Blanking Cap supplied into place. IMPORTANT - The Blanking Cap is a temporary seal and is not recommended for long term use. Operating the System DIRECTIONAL TELEVISION & FM RADIO ANTENNA Dimensions: Antenna Dome Length 530mm Width-telescopics in 340mm width-telescopics out 1045mm Mounting Foot Diameter 122mm Height Overall 150 mm Height No Antenna Dome 50 mm Power Pack 115 x 70 x 50mm * Gain figures must not be judged in isolation. A greater figure does not mean a better picture. Status is designed for optimum performance Conforms to the European Directive 89/336/EEC * Frequency Range Antenna Forward Gain Amplifier Gain Gain Adjustment Flatness Noise Figure Output Impedence Output Power Supply Power Consumption TV lead UHF 470-860 MHz VHF 40 -230 MHz FM 88 -108 MHz 7db 18 db* 15 db ± 1.5 db 3 db 75 ohms 98 dbuv 12-24 v DC 35 ma 2 metres Firstly determine the approximate location of the nearest transmitter and whether the signals are horizontally or vertically polarised. For assistance ask your site operator or check other antennas in the vicinity. 1. Loosen the Mast Locking Collar and Wall Bracket* and raise the antenna. Turn the mast to direct the Antenna towards the TV transmitter. The RED SPOT on the bottom of the mast indicates the front of the Antenna. 2. When receiving vertically polarised signals, rotate the Winder anti-clockwise to cant the antenna through 900. DO NOT over tighten or use undue force on the winder. DO NOT cant for vertically polarised signals with the TELESCOPICS EXTENDED 3. Switch ON the Power Pack and the red LED will illuminate. 4. Check the gain control switch is set to normal NML. See Problem 2, over the page for use. 5. Tune your Television into the strongest signal. You may need to adjust the direction of the mast to achieve the best picture quality. 6. Secure by tightening the Mast Locking Collar and Wall Bracket*. VHF Television Reception (Overseas Only) 12 - 24vDC 1. Extend the two telescopic antennas. 2. Tune your Television into the strongest signal. You may need to adjust the direction of the Antenna to achieve the best picture quality. 3. For fine tuning of VHF you may also need to adjust the length of the telescopics. IMPORTANT VHF TV transmissions are ONLY horizontally polarised. FM Radio Connection Status is designed to receive FM radio when connected to a car-style radio. 1. This will require a coaxial car radio plug, a coaxial plug and a length of coaxial cable, which are available from our Vision Plus Range. 2. Once the cable has been installed, plug into the TV-FM socket of the Power Pack and into your Radio. IMPORTANT You DO NOT need to extend the telescopics for FM radio reception. Routing the Coaxial cable Coaxial Cable is quite fragile and must be handled with care. Please comply with the following as failure to do so will severely affect performance. 1. Should the coaxial plug be removed, it is very important that it is refitted correctly as described below. 2. Do not crush, kink or over-bend the coaxial cable which has a minimum bend radius of 25mm. 3. Any excess cable should be removed and MUST NOT be coiled. 4. Avoid increasing the number of connections or breaks in the coaxial cable as they will reduce performance, especially in weak signal areas. 5. Do not run coaxial cable next to mains cable, leave a minimum distance of 120mm to prevent interference. 6. Do not allow the cable to come into contact with any hot surfaces as this could melt the air-spaced insulation of the cable. 7. Keep away from fluorescent lighting. 8. When installing the coaxial cable, Do not feed through by pulling on the coaxial plug. Equipment Use Explorer Group 2005 Touring Caravan Handbook 9. Do not add excessive lengths of coaxial cable.This will result in increased signal losses and a reduction in picture quality. 10. Should the cable need to be lengthened, use only RF100 specification cable and high quality coaxial plugs and couplers which are available from our Vision Plus range through our dealers or directly from ourselves. Connecting the Coaxial TV Plug Should the coaxial plug need to be removed, please note how it comes apart and reassemble as follows:1. Prepare the cable by removing 16mm of white outer sheath to expose the braided copper wire. 2. Next, remove 10mm of the exposed braided copper wire and the central air-spaced insulation to expose the single central core. 3. Feed the screw cap A and the pronged clamp B over the cable. Pull back evenly the copper braiding over the pronged clamp as shown below. IMPORTANT IT IS CRITICAL THAT NONE OF THE COPPER BRAIDING IS TOUCHING THE CENTRAL CORE. 4. Push on item C up to B and secure the central core by tightening the small grub screw. Be careful not to over tighten, which could sever the wire. 5. Screw A and D together to complete the assembly wire. * Wall Bracket is only supplied # with the long mast model 2 YEAR GUARANTEE UPON PURCHASE, PLEASE CUT OUT THIS SECTION, COMPLETE THE DETAILS ON THE REVERSE SIDE AND POST TO: GRADE UK LIMITED Finch Close Lenton Lane Industrial Estate NOTTINGHAM NG7 2NN 530 53 Equipment Use FAULT FAULTFINDING FINDING The following are some of the key areas we suggest you check which generally solve the most common problems encountered with the operation of the Status antenna. Coaxial Plugs It is critical that all coaxial plugs in the system are fitted correctly. Using the diagram and procedure described over the page, please check each individual plug ensuring it is wired correctly. Secondly please ensure only quality plugs have been used. Coaxial Cable COMMON INTERFERENCE PROBLEMS & POSSIBLE REMEDIES illuminates the fault lies with either the coaxial plug or the coaxial cable, please refer to these areas described earlier. If the LED is still not lit, contact our office for further assistance. Short Hook Up Test This test isolates parts of your system leaving only the TV and the Status antenna linked directly together. Firstly, unplug the coaxial plugs from the TV-FM sockets of the Power Pack which will be connected to a TV outlet socket. Sharp bends, kinks and hot surfaces can easily damage coaxial cable and should be avoided. An inspection of the cable routing is recommended to ensure all is correct. Coaxial cable, if placed in close proximity to electrical cables, transformers or other pieces of electrical equipment, may pick up electrical interference causing picture quality to deteriorate, especially in poor reception areas. Excess cable should be removed and NOT coiled as this may cause picture distortion. With your TV fly lead, connect your TV direct to the Power Pack, plugging into one of the TV-FM sockets. Gain Control Switch Antenna Dome Coaxial Cable This switch should be set to the normal NML position for general use. The Low setting may be used when situated close to TV transmitters where strong signals may be affecting the quality of the picture. (see Interference 2). Red LED Light Should the red LED on the Power Pack not light, first try unplugging the cable connected to the Antenna Dome from the ANT-IN socket. If the LED then Ensure the antenna dome is plugged directly into the ANT-IN socket of the Power Pack and switch on. Tune in your TV for the strongest signal. If the picture quality is improved the fault lies with the wiring of the system between the Power Pack and the TV outlet socket. Check the routing of the coaxial cable from the Antenna Dome to the Power Pack. Check to ensure there are no kinks or trapped cable or if there are loops of surplus cable which could be affecting performance. This is the type of picture you will see when the TV signal is reflected from something in your locality. The something may be a local building or landmark. Your antenna is receiving both the direct signal and the reflected signal from the same transmitter. Remedy This produces a Snowy picture which can be caused if you are too far away from the TV transmitter, such as in a remote area, positioned in a valley, or if there is a building, hill or other obstruction blocking the signal. Each TV transmitter has a defined service area where reception will be good. Beyond that boundary is a fringe area where the TV signal will be weaker and the reception quality poorer. 2. TV Signal too strong The above pictures demonstrate a typical example of electrical interference. This type of interference is commonly caused by electrical appliances, such as fans, electric shavers, fluorescent lights. Other forms of interference can produce a zig-zag pattern similar to that described in Interference 2 which may be caused by inverters, charging units etc. Should you still be experiencing difficulties and require assistance, please do not hesitate to contact us. Purchase Date Dealer Name Your Name Address Address Remedy Check the points covered in Fault Finding. In some instances, this type of interference can be overcome by switching off the relevant appliances. This can produce severe picture distortion like a zig-zag style pattern. This can be caused when you are too close to a transmitter or picking up strong radio transmissions from another source such as CB radio. Also electrical interference can cause similar effects (see Interference 4 below). Remedy Postcode 54 Turn the Gain Control Switch on the Power Pack to LO. Secondly check the points covered in Fault Finding. Postcode 4. Electrical Interference Firstly determine whether you are in a poor reception area. Secondly check the points covered in Fault Finding . Customer Help Line Serial Number Adjust the direction of the Antenna or try to move to a better position away from the obstruction. Unfortunately it may not always be possible to isolate Directional antennas from the cause of the problem. Remedy # (Located on reverse of Power Pack) 3. Ghosting 1. Weak TV Signal GRADE UK LIMITED Finch Close, Lenton Lane Industrial Estate, NOTTINGHAM NG7 2NN Tel: 0115 986 7151. Fax: 0115 986 7011 email: [email protected] www.gradeuk.co.uk DOORS EXTERIOR DOORS The exterior door can be secured to the side of the caravan by pushing the button as illustrated. Release by turning in either direction shown. To comply with European Standards, the exterior door lock must not be replaced with a double dead lock. INTERNAL DOORS The washroom door is fitted with a twoposition push button lock. From the outside, push once to lock. Push again to release. From the inside of the washroom you will need to pull the handle towards yourself to lock the door. To release the lock from inside the washroom, pull the catch outwards again until the catch disengages. MAGNETIC CATCHES Magnetic catches work on contact with the metal plate on the rear of the door. Simply close the door until the magnet engages and holds the metal plate. Pulling the door towards you with a moderate force will be sufficient to disengage the magnetic catch and open the door. Equipment Use Explorer Group 2005 Touring Caravan Handbook 55 Equipment Use 56 SPRUNG HINGES SLIDING DOORS Overhead lockers will use sprung hinges. These are suitably strong enough when closed to securely retain the door and prevent it from opening in transit. Pulling the handle towards you whith moderate force is sufficient to open the locker door and hold it in the open position. Solid sliding doors are fitted with a sprung metal catch which holds a metal pin in place. This pin will retain the door in transit. To release, lift the sprung metal catch until the pin is free from the retaining hole. BED MAKE UP FRONT DOUBLE BED The two front single beds can be easily converted into a double bed by pulling out the bed slats, stored beneath the chest of drawers or stored in the bed slat box at the front of the caravan. Arrange seat cushions appropriately. Diagram 1 On L-shaped layout, the bed frame is pulled out from underneath the rearfacing seat. Arrange the seat cushions appropriately. Diagram 2. BUNK BEDS Please follow diagram 3 to assemble. 1. All high level beds will take a maximum weight of 75kg (12 stone). When in use, the high level beds must have the bunk safety boards in place as shown in the diagram. Touring Caravans have to be manufactured with a lightweight construction and therefore the beds are not designed to be knelt, sat or stood upon without all the bed cushions in place. Equipment Use Explorer Group 2005 Touring Caravan Handbook 2. Removal of sofa back rest cushions will provide single beds. 3. 57 Care & Maintenance CARE OF YOUR CARAVAN This section of the guide is devoted to the care, cleaning and general preservation of your caravan in order to retain its showroom condition. CLEANING Under no circumstances should an abrasive or harsh cleaner be used. Do not use a pressure wash as this can disturb mastic seals. Exterior Painted Body Part of the exterior of your caravan, usually the side walls, is acrylic finished aluminium, which is extremely durable and easy to clean. It is recommended that a proprietary brand wash and wax shampoo with plenty of cold water is used. GLASS FIBRE REINFORCED PLASTIC GRP is a light, durable and astonishingly tough constructional material which can be fabricated into all manner of products. It may be translucent, opaque or coloured, flat or shaped, thin or thick. 58 The exposed surface of a GRP component on a caravan is always a gel coat surface. This gives the laminate its colour and surface finish. The gel coats used are made to the highest standards to give optimum performance in gloss retention and UV stability. GRP components need to be washed, waxed and taken care of like a car. Chemicals and dirt can collect during storage, and the gel coat can be stained or marked when chemicals combine with rain or dew. Most stains or marks can be removed with mild dishwashing detergent, but more stubborn marks may require a (fine grit) rubbing compound such as T-cut. To help keep your GRP components looking almost like new, it is wise to wash the parts monthly (or more frequently) using mild dishwashing detergent, but avoid using strong alkaline (e.g. trisodium phosphate) or acidic cleaners or abrasives. Waxing the components once or twice a year with a good grade paste wax will help to maintain the colour and finish. A significant benefit of using GRP components is the ability to repair most scratches or damage that may be inflicted upon the panel. GRP components are tough, but like any other products they can be damaged. Excessive pressure or impact to the face or reverse of the component can cause the gel coat to crack. This does not mean the entire panel is damaged and the standard industry method of dealing with such a crack is to apply a minor repair. Any scratches or nicks that occur in normal use can usually be removed with rubbing compound. If the scratch is too deep, then (fine grade) wet sandpaper may be used followed by rubbing compound and finally wax. One of the characteristics of GRP is the way light may be transmitted through the component. If the component is viewed from the gel coat side it will appear opaque and of a solid colour. However, if viewed from the reverse side with a strong light source behind the laminate, some light will be transmitted. This is normal for components of this thickness. ACRYLIC WINDOWS Your caravan is fitted with shatter resistant acrylic windows. To preserve their clarity and unblemished transparency it is essential that the following cleaning instructions are strictly adhered to: Road grit, dust, sand, flies, lime tree secretions, bird droppings etc., should be washed off using plenty of cold water. Any remaining dirt should be washed off using a soft cloth and warm water. Under NO circumstances should any abrasive cleaning agents, household detergents or proprietary cleaning fluids be used. Wash the window again using only cold water and dry off with a chamois leather. PLEASE NOTE: Should scratches appear on the acrylic windows these can often be removed with an acrylic polish, i.e. ICI perspex polish. Gentle polishing with a liquid metal polish, i.e. Brasso may also have the desired effect – consult your retailer BEFORE attempting to remove any but the slightest scratch. ABS - A FRAME COVER, WHEEL SPATS & PANELS To preserve the appearance of all ABS panels and fittings road grit, dust, sand, flies, lime tree secretions, bird droppings etc., should be washed off using plenty of cold water. Any remaining dirt should be washed off using a soft cloth and warm water. Under NO circumstances should any abrasive cleaning agents, household detergents or proprietary cleaning fluids be used. Wash the ABS material again using only cold water and dry off PLEASE NOTE: Under no circumstances should alcohol, spirit or solvent-based liquids be used on GRP or ABS plastic panels as these substances may react with the material and cause visible damage. INTERIOR WALLS Your caravan interior walls will only require a wipe over with a damp cloth, using a mild detergent, to keep them in a ‘showroom’ condition. FURNITURE Treat your caravan furniture as you would the furniture in your home. Polish wood surfaces sparingly with a good quality wax or spray polish. Use a damp cloth to clean melanate laminated surfaces. CARPETS, UPHOLSTERY AND CURTAINS Vacuum clean carpets and upholstery to ensure a long life. Marks on cushions can be removed using a mild upholstery shampoo with the minimum of water. Curtains should be dry cleaned only. Care & Maintenance Explorer Group 2005 Touring Caravan Handbook SHOWER ROOM AND WASH BASIN FITTINGS These should be cleaned using a non abrasive household cleaner. Always put the cold water into the hand basin before adding the hot in order to preserve the finish of the thermoplastic formed basin. WATER SYSTEMS The water systems, and in particular storage tanks, in caravans are susceptible to contamination by bacteria if care is not taken with their use and cleaning. The symptoms caused by bacterial contamination are not purely limited to gastro-intestinal diseases, but may also 59 Care & Maintenance manifest themselves as ear, nose, throat, eye or skin infections. It is therefore important that you carry out the following procedure prior to using the caravan each time, even if you boil or filter all water you use for drinking. WATER CONTAINERS 1. All water remaining in any water container should be disposed of so that the container is empty. 2. The outside of external water containes should be thoroughly cleansed and washed down to remove any dirt, dust or other contaminant. Water at a suitably hot temperature containing an appropriate detergent is recommended for this purpose. Water should then be put into the container, swirled round, then emptied out. 3. All containers should then be totally filled with water containing an appropriate disinfectant / sterilant solution and allowed to stand for the recommended contact time (e.g. Milton for 15 minutes). 60 4. The solution should be emptied from the container. 5. The opening of the any container should be cleaned thoroughly with an appropriate pre-prepared wipe impregnated with a disinfectant / sterilant. 6. External containers should be inverted whilst stored overnight (if possible). 7. Containers must be filled with mains water only and mains water only should be used for the above cleaning procedure. 8. On no account should garden hoses be used to fill water tanks. WATER SYSTEMS 1. Drain down the system. (Open all taps to allow air in, enabling the system to drain quickly.) See Index - Draining Down The Water System. 2. Remove any water filters fitted, and replace with a short length of hose or empty filter cartridge (this will ensure the filter is not affected by the disinfectant/sterilant solution). 3. Fill the system by using the pump with a disinfectant/sterilant solution. (Check that the solution at full strength appears at all taps/showers). Allow to stand for the recommended period of time. 4. Drain the system down completely. 5. Thoroughly clean the outside of all taps/connectors with a cloth soaked in the disinfectant/sterilant. 6. Flush the system through with clean drinking water until no traces of disinfectant/sterilant can be detected at any tap. 7. Replace the filter. Suitable sterilising chemicals are available from your Explorer Group Retailer, accessory shop, chemists, or home-brew shops. It is not, however, recommended to use bleach or sodium metabisulphide. MAINTENANCE OF YOUR CARAVAN BPW CHASSIS MAINTENANCE INSTRUCTIONS The following maintenance instructions relate to BPW Rubber axles, torsion bar axles, overrun hitches and chassis. They are a constituent part of the warranty conditions. Adhere to the pertinent operating instructions of the vehicle manufacturer or respectively of the other vehicle component manufacturers. Execution of the maintenance work in accordance with the prescribed intervals is essential in order to maintain the operating safety and roadworthiness of the vehicle. The elimination of any defects found or the replacement of any worn parts should be assigned to a BPW after-sales service workshop, wherever the vehicle user does not have at its disposal appropriately skilled in-company workers and the necessary technical facilities. When fitting spare parts only genuine BPW parts may be used, in order that the type approval retains its validity in accordance with national and international regulations. The type approval lapses if parts used on a vehicle are altered, the properties of which are prescribed, having been clearly established by means of a test procedure or, the operation of which is able to cause danger to other road users. According to Section 19, Subsection 2 of the StVZO (German Highway Code), this applied to axles, wheel brakes and the entire braking system. All essential parts of the wheel brake are defined in the EC test report, complete with BPW drawing numbers. It is not allowed to change these. BASIC PRINCIPLES NEVER OVERLOAD AXLES, BRAKES OR CHASSIS stowed over the axle and as low as possible to optimize road holding and achieve the best possible braking effect. • Ensure that wheels and tyres are not overloaded so much that wheels are out of alignment or tyres are centrifugally unbalanced. Care & Maintenance Explorer Group 2005 Touring Caravan Handbook • No over stressing of the hitch or suspension system due to foolish or aggressive driving or mishandling. Avoid subjecting the axles to any impacts or jolting. Adapt your driving speed at all times to the road conditions and the load condition of the trailer. This applies particularly when negotiating bends. OPERATING INSTRUCTIONS WHICH SHOULD ALSO BE ADHERED TO BY THE DRIVER THEREFORE: • Do not overload your vehicles in excess of the permissible total weight. - PRIOR TO EACH RUN - • No one-sided loading as due to this the caravan or trailer will lean to one side. This is particularly so in the case of caravans, where the load should be • Wheel fastening INSPECTIONS • Tyre pressure/tyre condition • Operation of lighting and braking systems. 61 Care & Maintenance • Raise and secure drawbar jockey wheel. The jockey wheel should be parallel to the direction of travel at all times. • Inspect the hitch. The hitch jaw must fully enclose the ball-head and be locked. Check the coupling head fastenings at regular intervals for firm seating. • Secure the breakaway cable to the traction vehicle. • Release parking brake before setting off. IN THE CASE OF A NEW VEHICLE - After the first run under load conditions and no more than 32km (20 miles) • Check wheel bolts for firm seating using a torque wrench.The same applies after each wheel change. For wrench settings see index - Tyre Wear & Damage We wish you a safe journey! 62 HANDLING (OPERATION) COUPLING AND UNCOUPLING The trailer hitch (ball-head hitch) on your BPW chassis is design-tested. The maximum load, supported at the coupling point must be complied with and has the added safety feature of “Click On” when fully located on the towing ball. Lower drawbar jockey wheel to the ground. Reverse the car up to the trailer or, in the case of a small trailer, manoeuvre the trailer up to the car’s trailer coupling. COUPLING: Open coupling jaw by pulling lever H vigorously upwards in the direction of the arrow until lever locks open. Lower the opened hitch onto the ball-head vehicle coupling and the lever will automatically release. Closing and locking are carried out automatically. Connect the breakaway cable and electrical plug to the traction vehicle. Crank jockey wheel fully upwards and secure. Release parking brake before setting off. Visual check: the ball-head may no longer be visible in coupled condition. UNCOUPLING: Lower the jockey wheel down. Disconnect breakaway cable and electrical plug. Pull lever H vigorously upwards in the direction of the arrow and hold. Wind down jockey and lift the trailer off the ballhead of the traction vehicle. Then secure the trailer by applying the parking brake. WS 3000 SAFETY COUPLING SINGLE-LEVER SYSTEM The single-lever system, designed by WINTERHOFF for coupling and stabilising, provides for swift, effortless handling: COUPLING Place the open ball coupling device on the grease-free ball. By exerting downward pressure - in most cases the drawbar load will be sufficient - the ball coupling device and the lock will close automatically. STABILISING Continue to push the lever down to the stop to activate the stabiliser UNCOUPLING Slowly pull the coupling lever upwards to deactivate the stabiliser. Continue to pull the coupling lever up and, at the same time, briefly push down the lock to the stop and remove the open ball coupling device, in this position, from the ball. MAINTENANCE WORK 1. Check wheel bolts for firm seating after the first run under load conditions, likewise after each wheel change Tighten wheel bolts crosswise using a torque wrench to the tightening torque in compliance with the table. TIGHTENING TORQUES OF WHEEL BOLTS Spanner widths (mm) Thread Care & Maintenance Explorer Group 2005 Touring Caravan Handbook Tightening Torques 17 (19) M 12x1,5 80-90 Nm 19 M 14x1,5 10-120 Nm 24 M 18x1,5 270-280 Nm 2. Check brake play, if necessary readjust - after the first run under load conditions, then every 2000-3000 kilometres (1240 to 1860 miles) The check is carried out visually on the stroke (x) of the overrun hitch. As soon as this reaches more than 50 mm (2 inch) when the brakes are applied sharply, adjust the wheel brakes. 63 Care & Maintenance 3. Check brake lining wear - every 5000 kilometres (3100 miles). The brake lining wear is dependent on the style of driving. Careful driving saves brake linings and tyres. As soon as a brake lining has been worn to a thickness of 1 mm, the brake shoe has to be replaced. Stiff or stretched brake springs, the coils of which are no longer closed tightly together, must also be replaced. For visual check re-insert the plug (arrow) out of the brake plate. ADJUSTING THE WHEEL BRAKES - every 2000-3000 kilometres (1240 to 1860 miles) of travel Jack up the trailer. Release the overrun hitch and handbrake lever and brake linkage (free from tension). Lock the swivel cams of the wheel brake from the outside by means of auxiliary tool (item A, pin Ø 4 mm) through the tracing bore. Tighten the adjusting nuts (item C) on wheel brakes with a screwdriver (item B) or a wrench by using the adjusting bolt 64 (item D) until the wheel locks up. Centre the brake shoes by actuating the parking brake several times. Version 1: Turn the adjusting bolt backwards until the wheel is running free in direction of travel (approx. 1 full turn of the adjusting bolt). Version 2: Turn back the adjusting nut by approx. 3–5 teeth until there is no more braking effect when turning the wheel forward. Check the position of the balance bar with parking brake actuated. Parallel position of balance bar = identical clearance of wheel brakes. Readjust the necessary. brake adjustment, if To test, slightly tighten the parking brake and check identical brake torque on left and right side of wheels. Remove locking (pin Ø 4 mm) of swivel cams. Adjust brake rod free from clearance and force. All balance bars must be at right angles to the brake rod. Tighten all counternuts of the brake linkage. Check coupling head - initially, then every 5000 kilometres (3100 miles) or annually. 4. Check lateral play of wheel 6. Check coupling head for wear and correct operation. bearing -every 5000 kilometres (3100 miles) Check the wear indicator (drive within the “+” range only). Jack up the trailer, release brakes. Turn wheels manually and shake. Check the coupling head fastenings (1) at regular intervals for firm seating. ECO Compact bearings - every two years 7. Check drawbar, handbrake, lever, spring actuator, deviation lever, linkage and all moveable parts as to movability - initially, then every 5000 kilometres (3100 miles) or annually. ECO Compact bearings are recognizable by their cylindrical cap shape and the sign “ECO”. ECO Compact bearings comply with the state of the art. They are maintenance-free due to permanent lubrication and are designed for large mileages. quickly If noticeable bearing play is felt, the ECO Compact bearing should be replaced ECO hub bearings are simply extracted by means of the integrated axle nut. 5. Check hub caps for firm seating - every 2000-3000 kilometres (1240 to 1860miles) The brakes accessible. are more Tightening torque: 280 Nm (No bearing play adjustment) Care & Maintenance Explorer Group 2005 Touring Caravan Handbook Check the screwdriver. firm seating with a 65 Care & Maintenance LUBRICATION 1. Lubricate the coupling head regular intervals Oil the coupling head at regular intervals at the points indicated. Grease the contact points of the ball of the towing vehicle. Caution: If using a stabiliser lead ie, Winterhoff “WS 3000”) the towing ball must be free of grease and oil. 2. Drawtubes-bushes on the housing of the overrun hitch - initially, every 2000-3000 km (1240 to 1860 miles)s, then every 5000 km (3100 miles)Apply general purpose grease via the grease nipples until fresh grease can be seen emerging by the bushes. 3. Deviation lever - initially, every 20003000 km, (1240 to 1860 miles), then every 5000 km (3100 miles). If fitted, apply general purpose grease via the grease nipple until fresh grease can be seen emerging by the bush. 66 If grease nipples are not fitted, then apply oil to the deviation lever bush. 4. Lubricate all moving parts and pivot pins at the overrun hitch - initially, every 2000-3000 km, (1240 to 1860 miles) then every 5000 km (3100 miles). Care & Maintenance Explorer Group 2005 Touring Caravan Handbook 67 Care & Maintenance 68 BPW Chassis Care & Maintenance Explorer Group 2005 Touring Caravan Handbook 69 Care & Maintenance The carrier is of extra strong, lightweight construction and zinc plated for all weather protection. It is easy to fit and accepts all conventional wheel sizes. TYRES Please refer to your caravan specification sheet which is contained within this handbook for information regarding tyre pressures and axle loads. SPARE WHEEL CHASSIS MOUNTED Each caravan chassis has a set of punched holes immediately behind the axle to enable fitting of a spare wheel carrier. To gain access to your spare wheel lift the spare wheel carrier up and lift up the locking mechanism. Then move the mechanism to the horizontal position and the spare wheel carrier will be free to move over the mechanism and allow the spare wheel to drop to the floor to be removed. To replace the spare wheel simply reverse the operation making sure that the quick release mechanism has been fully pushed down to create a positive lock. 70 PRESSURES It is customary for manufacturers to mark tyres with load and inflation data. This information relates to the use of the tyre on cars. It is dangerous to drive with under inflated tyres. The pressures (cold) recommended by the manufacturers should be regarded as a minimum. Pressure checks, including those on the spare tyre, should be made with the tyres cold and using an accurate pressure gauge. The checks should be carried out before each journey and at regular intervals during storage. TYRE WEAR AND DAMAGE The legal requirements for tread depth on motor vehicle tyres applies also to caravans. Similarly, it is not permitted to mix cross-ply and radial tyres on the same axle. A redundant tyre must be replaced by one of the same size and construction. Wheels should be balanced and changed round occasionally to equal wear and prolong the life of the tyres. A tyre should be renewed if a blister, rupture or cut exposing the casing is detected. If the tyre has suffered violent impact (e.g. against a kerb), it should be examined by a specialist as soon as possible. Note: It is customary for tyre manufacturers to mark tyres with load and inflation data. It is important to understand that this information relates only to the use of tyres on cars. Explorer Group 2005 Touring Caravan Handbook CHANGING A WHEEL Finally, if the road wheels have been removed, re-tighten using a calibrated Torque Wrench to 92 Nm - on all M12 wheel bolts - in sequence, i.e. North, South, East, West NOT clock or anti clockwise. Remember to over tighten is just as dangerous as to under-tighten, as this can distort the wheel rims. Avoid the use of power wrenches. IMPORTANT - The torque settings should be re-checked after 50 km (20 miles). Wheel bolts should NEVER be lubricated. Care & Maintenance HANDBRAKE When parking, the handbrake lever MUST ALWAYS be engaged into the fully upright position (90°). This is to compress the spring within the spring cylinder and thereby create an energy store which will automatically engage the brakes further should the caravan move. If difficulty is experienced in this operation, try easing the caravan backwards with one hand while engaging the handbrake fully with the other. This manoeuvre should not be attempted on a rearwards facing slope. In this case wheel chocks should be used combined with the handbrake. Changing a Wheel (Figs. 13 and 14) Please Note: Alloy wheels should be tightened to 115Nm The corner steadies must not be used to jack up the caravan. They can be lowered to touch the ground only as a safety measure to stabilise the caravan. (a)Apply the handbrake fully as for parking. Do not forget to give the caravan a slight rearwards push to stop the reversing lever collapsing. 71 Care & Maintenance (b)Slacken off the wheel bolts on the wheel to be changed. (c)Jack up the caravan with the jack under either the axle tube or the axle mounting plate. DO NOT USE THE CHASSIS AS A JACKING POINT. If there is lack of ground clearance because of a flat tyre, gently move the caravan onto some ramping boards. After the bolts have been screwed in as far as possible by hand, each bolt should be tightened gradually in sequence. The wheels of the trailer will not rotate during tightening as they are held by rigid by the wheel hub brake unit. (e)Remove the wheel bolts and remove the redundant wheel. ALWAYS USE THE CORRECT BOLTS TO SECURE THE WHEEL. A corner steady brace is not to be used for the next step. (f) Fit the new wheel and refit the wheel bolts. 72 (h)Lower the caravan to the ground. The torque settings should be rechecked after the first 50 km (20 miles) of use, and every 5000 km (3100 miles) thereafter. NB: If you upgrade fromsteel to alloy wheels you must ensure you use the correct bolts for the new wheel. (d)Support the weight of the caravan on axle stands or ramping boards. Lower the corner steadies. Before fitting a new wheel, examine it for distortion or other damage. Ensure that all mating surfaces are clean and dry, including bolt/nut seats. (g)Raise the corner steadies. Take the weight of the caravan onto the jack and remove the axle stands or ramping boards. For 5 stud caravans wheel bolts should be tightened in a similar order as for 4 stud ensuring that the torque is applied evenly around the wheel. Using an or suitable socket wrench, sequentially tighten the steel bolts to a torque of 92NM following the procedure shown above. Should alloy wheels be fitted, the steel bolts need to be tightened to 115NM. Explorer Group 2005 Touring Caravan Handbook For more information concerning the chassis and undergear please refer to the BPW handbook contained within your Owner’s Information Pack. Care & Maintenance JACKING Under no circumstances should the corner steadies be used to jack up the unit. When it is necessary to jack up, use a bottle, screw or scissor type jack (P/No. 3566858) one with an axle shaped head is recommended. Place the jack plate under the axle tube as near as possible to the main longitudinal member. The maximum mass which the jockey wheel and its clamping mechanism are capable of withstanding is: Part 205678 - 150kg Part 205736 - 200kg - Wheel dia. 240mm. Lubrication (Fig. 16) Lubricate the Jockey Wheel Lightly oil the wheel axle and screw thread. Lubricate the Brake Linkage Lightly oil all moving parts. Lubricate the Corner Steadies Lightly oil the screw and pivot pins. Fig. 16 73 Care & Maintenance 74 Care & Maintenance Explorer Group 2005 Touring Caravan Handbook 75 Storage STORAGE If the caravan is to be stored for any length of time, especially over the winter period, the following operations are recommended: Remove all linens, blankets, cushions, clothes, mattresses, etc. which could be affected by damp conditions. Clean the caravan inside and out as detailed in the previous section. Drain the water system (see index). Ensure all windows, roof lights and doors are correctly fastened. Check fixed ventilation apertures are not obstructed. Check that the site you have chosen to store the caravan is open, fairly high and dry and if possible not exposed to gales etc. If this proves impossible it is recommended that the caravan chassis is anchored to the ground. Jack up the caravan (use bottle or screw jack, do NOT use the corner steadies) so that the wheels are clear of the ground. Support the caravan axle with wooden blocks, axle stands or similar so that when 76 the jacks are removed the wheels remain clear of the ground. Lower the corner steadies to 'just' site the caravan. Cover the tyres to prevent deterioration. Release the handbrake Security: Lowering and locking the corner steadies and removing the wheels reduces the risk of caravan theft. CARAVAN COVERS Caravan covers may be used to protect your new Explorer Group Caravan provided that the cover used is of a breathable type. Ensure that the point of the status aerial is removed and that the cover is well tied down. Your caravan must be ventilated every 4 to 6 weeks if it is to be stored with a cover in place. POWER DRAIN "In order to reduce any drain on your Leisure Battery while your caravan is being stored you should ensure that the Main control switch on the Refrigerator is set to the 0 position Note: Do not work under the caravan unless the corner steadies are down and the axle is supported. Should the caravan be stored for a prolonged period of time it is strongly recommended that the caravan is fully serviced before the commencement of use. Your retailer will ensure that your caravan is safe, secure and ready for your enjoyment. Note: Caravans stored for any length of time should not have the handbrake or brakes applied. The wheels should be chocked or wedged and the handbrake released. The hitch head should be checked to see that it is fully extended and that there is no load on the braking system. Warranty WARRANTY 3-YEAR MANUFACTURER'S WARRANTY Subject to the following conditions, your caravan is supplied with a manufacturer's warranty for 3 years from the original date of purchase, at no additional cost to you the customer. We sincerely hope you will never have cause to complain about your caravan. However, if you do have a problem then please contact your retailer so they can report this through our warranty system. We are confident they will do their utmost to resolve any problems to your complete satisfaction. The retailer from whom the caravan is purchased is liable for warranty repairs. Any other approved retailer or Service Centre may carry out work at his own convenience and/or discretion, but is not obliged to do so. 78 PARTS COVERED BY THIS WARRANTY FOR YEARS 1 - 3 Subject to the specific exclusions in years 2 and 3 set out below all original components of the caravan, including permanently fitted equipment, forming part of the manufacturer's original specification. SPECIFIC EXCLUSIONS FOR YEARS 2 & 3 Tyres, batteries, plastic windows, glass, exterior paint work, bright work and all similar trim and finish, soft furnishings, carpets and floor coverings. Entertainment/communication systems and connected equipment. Adjustment of blinds, hinges, catches, stays and doors. Replacement bulbs, fluorescent tubes, fuses and electrical connections; GRP, ABS and PVC poducts including A-frame covers, wheel spats and shower trays. Natural movement of internal doors and furniture. Normal wear and tear/servicing items and other components subject to routine maintenance. EXPLORER GROUP 3-YEAR MANUFACTURER'S WARRANTY IS SUBJECT TO THE FOLLOWING CONDITIONS: 1. The duration of the warranty is 36 months from the original date of purchase. 2. That the original construction of the caravan has not been tampered with or repaired other than by Explorer Group or an approved retailer or Service Centre. 3. That an "annual" service, damp and safety check has been carried out by an approved retailer or Service Centre. The first service is due 60 days either side of the anniversary of the original date of purchase. The interval between services must not exceed 14 months. 4. That original VAT service invoices are retained as proof that annual service and inspections have been carried out. 5. No work should be commenced under the terms of the warranty unless prior authorisation is obtained from Explorer Group. 6. Explorer Group reserves the right to inspect the caravan before any work commences. 7. No liability will be accepted for damage caused by fair wear and tear, wilful damage, negligence, abnormal working conditions, intrusion of foreign or harmful matter, overheating, freezing, failure to follow Explorer Group instructions, misuse or alteration or repair of the caravan without Explorer Group prior approval. 8. Caravans covered by this warranty shall not be put out to hire, reward, or any other commercial use or used in any timed race. 9. That the caravan shall be used only for its ordinary and intended purpose and shall not be subjected to any condition which could reasonably be foreseen to cause or result in damage or excessive wear and tear. 10. That only private cars or 4x4 type vehicles substituting as private cars, shall have towed the caravan. 11. That no liability arises from this warranty for transport costs to and from the place of remedial work or consequential cost relating to transportation. No liability arises out of this warranty for any indirect, special or consequential loss or damage (whether for loss of profit, use, contract, goodwill, or otherwise), costs, expenses or other claims for compensation howsoever arising. Warranty Explorer Group 2005 Touring Caravan Handbook 12. No liability will be accepted for any accidental or fire damage or any loss incurred by accident or fire. 13. The unexpired period of the 3-year warranty is assignable to second and subsequent owners during the 3-year period. The new owner should contact Explorer Group with proof of ownership, service history and their payment of £25 to have their details recorded in our database. This warranty does not affect the purchaser's statutory rights. This warranty shall be governed and construed in accordance with the laws of England and the parties irrevocably submit to the exclusive jurisdiction of the courts of England. 79 Code of Practice - Water Ingress CODE OF PRACTICE WATER INGRESS At Explorer we want our customers to be sure that, in buying one of our caravans, you are buying the very best. We would like you to continue to believe this for a long time after you have made your purchase. We are confident that our new caravans, built with innovative manufacturing techniques and tested materials, make water ingress concerns unnecessary. We are so confident of our new caravans that we follow a 'Code of Practice' which gives certain guarantees to our customers, both consumers and retailers, of financial reimbursement for remedial work costs should problems occur. THE CODE The code applies to all new Explorer Group products manufactured after 1st September 1998. 80 All customers with documentary proof of annual services by an approved Explorer Group retailer or Service Centre, will be paid in full for the costs of remedial work due to water ingress. This is valid for up to 5 years from the original date of purchase of a new product. Customers without a full service history may receive up to 100% of the costs of remedial work for water ingress damage in year 2 of ownership, up to 75% in year 3, up to 50% in year 4 and up to 25% in year 5. Each case will be examined on its own merit. Explorer will decide the amount of contribution towards the remedial work costs. Customers exchanging their current Explorer Group model for a new Explorer Group model will not have the value of their part exchange reduced due to potential water ingress issues, providing that there is documentary evidence that the caravan has been annually serviced and that it is less than 5 years old. CONDITIONS ATTACHED TO THE CODE • Work may only be undertaken after approval by Explorer (depending upon individual circumstances). • Explorer will pay the costs of remedial work, only after approved work has been carried out. • The Code is not retrospective. Caravans traded-in prior to implementation of the Code are not covered. • In the case of dispute, The Caravan Club will agree with Explorer, the appointment of an independent arbitrator. Explorer Group will pay for the costs of arbitration subject to the consumer paying a £100 deposit. • If the arbitrator finds in favour of the customer, then the deposit will be returned. If the arbitrator finds in favour of Explorer, the customer will lose their deposit. • Where the arbitrator awards a sum of money less than an offer made by Explorer Group, which has already been rejected by the customer, then their deposit is forfeited. • The arbitrator's decision is final and both parties must agree to abide by the decision. Customer Obligation - Servicing SERVICING It is a condition of your warranty that your caravan must have an "annual" service, damp and safety check and this should be carried out by an Explorer Group approved retailer or Service Centre, in accordance with NCC guidelines. Proof of this will be required in the event of a warranty claim. Failure to do so will invalidate your warranty. The first service is due 60 days either side of the anniversary of the original date of purchase. The interval from purchase date to the first service and the intervals between services must not exceed 14 months. Your caravan requires servicing for safety, efficiency and to protect the investment you have made. Whether the caravan is used for short trips or continental long range touring, regular servicing is necessary and will ensure continued enjoyment of your caravan. Your retailer will carry out your service using the latest techniques and 82 equipment (a list of the items to be inspected, tested and adjusted appears on the Service Vouchers at the rear of this handbook), and should provide you with the service document as proof of regular maintenance. As with motor vehicle service documents, not only will the proof of regular servicing enhance your caravan resale value, but in the unlikely event of any defect appearing at some later date - a properly serviced and documented caravan history will enable your retailer to rapidly assess and, where appropriate, carry out the necessary remedial work. MAINS ELECTRICS It is recommended that you have your Mains Electrics System inspected by an NICEIC approved contractor every 3 years. SPARE PARTS Should you require any replacement parts for your caravan it is necessary that you contact the retailer from whom you purchased the caravan or any Explorer Group approved retailer and give the following information which will help in identifying the required component: a) Model and make of caravan b) VIN number c) Description of required part ALL PARTS MUST BE ORDERED AND SUPPLIED THROUGH AN APPROVED RETAILER. REMEDIAL WORK Explorer together with its suppliers, are continually undertaking extensive research into testing, remedial work procedures and materials such as sealants, adhesives, gaskets and tapes. Therefore if for any reason your new caravan is damaged or requires remedial work then only an approved Explorer Group Retailer or Service Centre should undertake such work. All such work should be undertaken using only approved Explorer Group genuine parts recommended sealant and following Explorer Group procedures. Explorer will also undertake to supply certain specialist repairers with the necessary spare parts. In this case, your selected repairer must contact the PARTS DEPARTMENT with all enquiries. Customer Obligation - Servicing Explorer Group 2005 Touring Caravan Handbook 83 Caravan Construction - Main Components MAIN COMPONENTS The following is a brief description of the main components used in your caravan. More comprehensive descriptions can be found in the equipment manufacturers literature held in the Owner's Information Pack. BPW CHASSIS BPW are one of the largest producers of caravan chassis in Europe. The chassis is galvanised special steel fitted with neidhart axles and suspension system. For 2003 models the Expolorer Group Limited are utilising the new BPW V-TEC Chassis System. Note: Holes should not be drilled into the chassis. When purchasing a stabiliser, consult your retailer who will advise on the correct type to fit. 84 BRAKING SYSTEM The Braking System comprises a rodoperated overrunning device with expander mechanism and adjuster box. An automatic reversing system with a spring loaded reverse lever is attached to the adjuster box. The system also incorporates a link device, which gives added safety to the handbrake operation when parking on a reverse slope or steep hill. Brake adjustment instructions are given in the maintenance section of this guide. BODY SHELL Caravan bodies are constructed from the highest quality materials. The floor is constructed from a W B P plywood sandwich, impregnated with anti- damp and rot compounds and adhesives. The walls comprise an insulated foam sandwich having pre-coated aluminium exterior surface and vinyl coated plywood interior finish. Wooden framing is positioned within the sandwich to add strength. The very latest 'state of the art' presses are employed to produce the extremely well insulated, robust, yet lightweight sections. Windows are all of a double glazed acrylic construction and the door frames are extruded aluminium. The gas bottle locker is an integral moulded glass fibre or acrylic capped ABS construction for strength and lightness. Each caravan is fitted, as standard, with an awning channel as an integral part of the near- and/or off-side aluminium roof and body side moulding. If it is found necessary to fit additional attachments, care must be taken to ensure that any holes which are drilled in the outside of the body are correctly sealed. Awnings which employ rubber sucker attachments rather than screw fixings are recommended. On NO account should screw threads longer than 5/8th inch (15mm) be permitted to enter the shell sandwich (from inside). Ensure that all screws are of the self tapping type. No screw or any other object should be permitted to enter the ceiling of your new caravan. THERMAL INSULATION AND HEATING CLASSIFICATION All caravans manufactured by the Explorer Group Limited are classified as Grade 2, in accordance with BSEN 1645 part 1, for thermal Insulation and heating. This will allow the Interior temperature to be maintained at 20°C when the exterior ambient temperature is 0°C. Caravan Construction - Main Components Explorer Group 2005 Touring Caravan Handbook 85 Equipment Lists AVANTÉ/CORONA 86 ODYSSEY AND OMEGA FRIDGE THETFORD N80P FRIDGE ELECTROLUX 7270 HEATER TRUMA ULTRAHEAT PIEZO HEATER TRUMA ULTRAHEAT AUTO INTERNAL BLOWN AIR SYST YES INTERNAL BLOWN AIR SYST YES WATER HEATER TRUMA ULTRASTORE WATER HEATER TRUMA ULTRASTORE SINK & DRAINER ARGENT STAINLESS SINK & DRAINER ARGENT STAINLESS OVEN UNIT MIDI OVEN UNIT MIDI HOB UNIT ARGENT STAINLESS HOB UNIT ARGENT STAINLESS TAPS KITCHEN REICH CHROME (TREND) TAPS KITCHEN REICH CHROME (TREND) SHOWER EQUIPMENT WHALE WHITE SHOWER EQUIPMENT REICH CHROME TAPS VANITY WHALE WHITE (+TREND 472/540) TAPS VANITY REICH CHROME (TREND) WATER FILTER/PUMP COMPACT & MAXI WATER FILTER/PUMP CRYSTAL & MAXI 12V FLUORESCENT LIGHTS LUMO 1 (8 WATT) CROWN (9 WATT) 12V FLUORESCENT LIGHTS LUMO 1 (8 WATT) CROWN (9 WATT) 12V READING DOWN LIGHTS ZOE EYEBALL (10 WATT) 12V READING DOWN LIGHTS ZOE EYEBALL (10 WATT) BCA MAINS WALL LIGHTS 20 WATT BCA MAINS WALL LIGHTS 20 WATT CONTROL PANELS ELECTRIC FITTINGS BCA CLIPSAL (BEIGE CORONA/BLACK AVANTE) CONTROL PANELS BCA ELECTRIC FITTINGS CLIPSAL (BEIGE OMEGA/BLACK ODYSSEY) CASSETTE BLINDS SEITZ SERIES 2000 CASSETTE BLINDS SEITZ 2000 FRONT WINDOWS TOILET THETFORD TOILET THETFORD ROTATABLE CRUSADER, RALLY AND BUCCANEER FRIDGE ELECTROLUX 7291 HEATER TRUMA ULTRAHEAT AUTO INTERNAL BLOWN AIR SYST YES WATER HEATER TRUMA ULTRASTORE SINK & DRAINER ARGENT STAINLESS OVEN UNIT MIDI HOB UNIT TAPS KITCHEN ARGENT STAINLESS REICH CHROME RALLYE/CRUSADER (TREND) BUCCANEER (SOFT GOLD) SHOWER EQUIPMENT TAPS VANITY REICH CHROME REICH CHROME(PELIKAN RALLYE / CRUSADER / KAMA BUCCANEER) WATER FILTER/PUMP CRYSTAL / MAXI & W/LINE 12V FLUORESCENT LIGHTS LUMO 1 (8 WATT) CROWN (9 WATT) 12V READING DOWN LIGHTS ZOE EYEBALL (10 WATT) BCA MAINS WALL LIGHTS 20 WATT CONTROL PANELS ELECTRIC FITTINGS BCA CLIPSAL (BEIGE RALLYE & BUCCANEER / BLACK CRUSADER) CASSETTE BLINDS SEITZ 2000 FRONT WINDOWS TOILET THETFORD ELECTRONIC Equipment Lists Explorer Group 2005 Touring Caravan Handbook 87 Electrical Wiring Diagrams CHARGER POWER SUPPLY 12 VOLTS AUXILIARY BATTERY BLACK 4.0MM + BL 2.5MM + WHI/BRN - WHI/BRN OR WHI/BRN GRN GRN BATT 15 A FRIDGE 15 A 15 CAR A LIGHTS 10 1 A LIGHTS 10 A 2 AUX 1 1A OR RED COLOUR CODE RD = RED WHI = WHITE BL/BRN = BLUE BROWN WHI/BRN = WHITE/BROWN GR/OR = GREEN/ORANGE GRN = GREEN OR = ORANGE RD/BL = RED/BLUE BL = BLUE YEL = YELLOW RD/BRN = RED/BROWN 88 GRN RED MAINS INPUT WHI/BRN NEGS LINKED RED4.0mm GREEN 2.5mm BL/BRN 2.5mm BL/BRN 2.5mm RD/BRN 4.0mm PUMP 10 A AUX 2 10 A BL/BRN 1.5mm RD/BRN 2.5mm AUX 3 5A RED 1.0mm AUX 4 5A RD/BL 1.0mm AUX 5 5A GRN 1.0mm AUX 6 5A GRN/OR 1.5mm 230V WHI/BRN FRIDGE BLK RD 4.0mm BLK BLK WHI/BRN 6 WAY FROM 'S' PLUG OR 12V BLK RED4.0mm BL/BRN BL/BRN BL/BRN BL/BRN 2.5mm BL/BRN 2.5mm WHI/BRN LIGHT LIGHT LIGHT BUNK LIGHT BUNK LIGHT AWNING LIGHT VANITY BL/BRN 1.5mm SINK AVANTÉ 2005 INTERNAL WIRING 12V AUX GR/OR BLUE PUMP SHOWER WHI/BRN BL/BRN 1.5mm RD/BRN 4.0mm BROWN AVANTÉ RCD WHI/BRN _ 230V + WATER FUSE SPUR LIGHTS 230V RED 4.0MM MCB BLACK CAR FRIDGE WHITE - 6 A 10A MASTER ON/OFF SWITCH WHI/BRN - CONNECTING HOUSINGS + WHI/BRN RED CAR REV RED FRIDGE GREEN YELLOW OUTPUT + - 12V HEATER TWIN WHITE CONTROL PANEL BATTERY INDICATION PUMP SWITCH AVANTÉ 2005 AVANTÉ ROAD LIGHTS WIRING DIAGRAM ROAD LIGHTS WIRING DIAGRAM BLACK 9 WAY CONNECTOR GREEN WHITE WHITE BLUE WHITE GREEN NUMBER PLATE LIGHTS BLACK YELLOW RED BROWN WHITE BLUE FOG FLASH TAIL STOP REV GREEN BROWN RED Y/B YELLOW/BLACK OFFSIDE SIDE MARKER LIGHT 3 BLUE OFFSIDE TAIL LIGHTS NEARSIDE FRONT LIGHTS WHITE WHITE NEARSIDE TAIL LIGHTS BLUE FOG YELLOW FLASH BLACK TAIL RED STOP Y/B REV NEARSIDE SIDE MARKER LIGHT WHITE BROWN OR VIA ROOF HARNESS Electrical Wiring Diagrams Explorer Group 2005 Touring Caravan Handbook BLACK 2 1 YELLOW RED BROWN WHITE BROWN 7 6 4 5 12N PLUG OFFSIDE FRONT LIGHTS YELLOW FROM 12S PLUG BLACK 89 Electrical Wiring Diagrams CHARGER POWER SUPPLY 12 VOLTS AUXILIARY BATTERY BLACK 4.0MM + BL 2.5MM + WHI/BRN - WHI/BRN OR WHI/BRN GRN GRN BATT 15 A FRIDGE 15 A 15 CAR A LIGHTS 10 1 A LIGHTS 10 A 2 AUX 1 1A OR RED COLOUR CODE RD = RED WHI = WHITE BL/BRN = BLUE BROWN WHI/BRN = WHITE/BROWN GR/OR = GREEN/ORANGE GRN = GREEN OR = ORANGE RD/BL = RED/BLUE BL = BLUE YEL = YELLOW RD/BRN = RED/BROWN 90 GRN RED MAINS INPUT WHI/BRN NEGS LINKED RED4.0mm GREEN 2.5mm BL/BRN 2.5mm BL/BRN 2.5mm RD/BRN 4.0mm PUMP 10 A AUX 2 10 A BL/BRN 1.5mm AUX 3 5A RED 1.0mm AUX 4 5A RD/BL 1.0mm AUX 5 5A GRN 1.0mm AUX 6 5A GRN/OR 1.5mm RD/BRN 2.5mm 230V WHI/BRN FRIDGE BLK RD 4.0mm BLK BLK WHI/BRN 6 WAY FROM 'S' PLUG OR RCD 12V BLK RED4.0mm BL/BRN BL/BRN BL/BRN BL/BRN 2.5mm BL/BRN 2.5mm WHI/BRN LIGHT LIGHT LIGHT BUNK LIGHT BUNK LIGHT AWNING LIGHT VANITY BL/BRN 1.5mm SINK WHI/BRN BL/BRN 1.5mm RD/BRN 4.0mm BROWN CORONA 12V AUX GR/OR BLUE PUMP SHOWER WHI/BRN _ 230V + WATER FUSE SPUR LIGHTS 230V RED 4.0MM MCB BLACK CAR FRIDGE WHITE - - 6 A 10A MASTER ON/OFF SWITCH WHI/BRN CONNECTING HOUSINGS + WHI/BRN RED CAR REV RED FRIDGE GREEN YELLOW OUTPUT + - 12V HEATER TWIN WHITE CONTROL PANEL BATTERY INDICATION PUMP SWITCH CORONA 2005 INTERNAL WIRING CORONA 2005 CORONA ROAD ROADLIGHTS LIGHTSWIRING WIRINGDIAGRAM DIAGRAM BLACK 9 WAY CONNECTOR GREEN WHITE WHITE BLUE WHITE GREEN NUMBER PLATE LIGHTS BLACK YELLOW RED BROWN WHITE BLUE FOG FLASH TAIL STOP REV GREEN BROWN RED Y/B YELLOW/BLACK OFFSIDE SIDE MARKER LIGHT 3 BLUE OFFSIDE TAIL LIGHTS NEARSIDE FRONT LIGHTS WHITE WHITE NEARSIDE TAIL LIGHTS BLUE FOG YELLOW FLASH BLACK TAIL RED STOP Y/B REV NEARSIDE SIDE MARKER LIGHT WHITE BROWN OR VIA ROOF HARNESS Electrical Wiring Diagrams Explorer Group 2005 Touring Caravan Handbook BLACK 2 1 YELLOW RED BROWN WHITE BROWN 7 6 4 5 12N PLUG OFFSIDE FRONT LIGHTS YELLOW FROM 12S PLUG BLACK 91 Electrical Wiring Diagrams CHARGER POWER SUPPLY BLACK 4.0MM WHI/BRN + - WHI/BRN WHI/BRN BL 2.5MM CAR RED REV FRIDGE GREEN YELLOW BLACK CAR FRIDGE WHITE YEL RD WHI/BRN GRN 1 6 GRN 2 7 4 92 BLK 3 5 OR WHI 12 S PLUG OR BATT 15 A FRIDGE 15 A CAR 15 A LIGHTS 10 A 1 LIGHTS 10 A 2 AUX 1 1A GREEN 2.5mm BL/BRN 2.5mm BL/BRN 2.5mm RD/BRN 4.0mm BLK BLK RED GRN RED PUMP 10 A AUX 2 10 A NEGS LINKED WHI BL/BRN 1.5mm RD/BRN 2.5mm AUX 3 5A RED 1.0mm COLOUR CODE AUX 4 5A RD/BL 1.0mm RD = RED WHI = WHITE WHI/BRN = WHITE/BROWN BL/BRN = BLUE BROWN GR/OR = GREEN/ORANGE GRN = GREEN OR = ORANGE RD/BL = RED/BLUE BL = BLUE YEL = YELLOW RD/BRN = RED/BROWN AUX 5 5A GRN 1.0mm AUX 6 5A OR 1.5mm WHI/BRN WHI/BRN YEL YEL MAINS INPUT ROOF FAN BLK BLK 230V FRIDGE 12V REVERSING LIGHT RED4.0mm BL/BRN BL/BRN BL/BRN WHI/BRN LIGHT LIGHT VANITY LIGHT BL/BRN 1.5mm BUNK LIGHT SINK BUNK LIGHT BL/BRN 2.5mm BL/BRN 2.5mm AWNING LIGHT RD/BRN 4.0mm GRN 12V AUX HOB IGN OR 1.5mm BLUE PUMP SHOWER WHI/BRN BL/BRN 1.5mm BROWN FUSE HOUSING WHI/BRN RD 4.0mm RED4.0mm RCD WHI/BRN 6 WAY BLOCK 6 WAY FROM CAR OR MCB WHI/BRN OR 1.5mm LIGHTS 230V RED 4.0MM + 6 A 10A GRN/BRN 2.5mm + BATTERY - BLACK CAR FRIDGE WHITE RED FUSE SPUR FIRE OR 1.5mm -WHI/BRN CONNECTING HOUSINGS OUTPUT + CAR RED REV FRIDGE GREEN YELLOW 12 VOLTS WHI/BRN FUSE SPUR _ WATER 230V + HEATER 12V TWIN WHITE CONTROL PANEL GRN/BRN MASTER SWITCH ODYSSEY 2004 INTERNAL WIRING ODYSSEY 2005 INTERNAL WIRING GRN/BL PUMP RUN LED PUMP SWITCH ODYSSEY ODYSSEY2005 2004 ROAD LIGHTS ROAD LIGHTSWIRING WIRINGDIAGRAM DIAGRAM WHEN FITTED BLACK 9 WAY CONNECTOR GREEN WHITE WHITE BLUE WHITE GREEN NUMBER PLATE LIGHTS BLACK YELLOW RED BROWN WHITE BLUE FOG FLASH TAIL STOP REV GREEN BROWN RED Y/B YELLOW/BLACK OFFSIDE SIDE MARKER LIGHT 3 BLUE OFFSIDE TAIL LIGHTS NEARSIDE FRONT LIGHTS WHITE WHITE NEARSIDE TAIL LIGHTS BLUE FOG YELLOW FLASH BLACK TAIL RED STOP Y/B REV NEARSIDE SIDE MARKER LIGHT WHITE BROWN Electrical Wiring Diagrams Explorer Group 2005 Touring Caravan Handbook BLACK 2 1 YELLOW RED BROWN WHITE BROWN 7 6 4 5 12N PLUG OFFSIDE FRONT LIGHTS YELLOW FROM 12S PLUG BLACK 93 Electrical Wiring Diagrams + BATTERY RED 4.0MM BLACK 4.0MM + OR 1.5mm WHI/BRN + - WHI/BRN WHI/BRN BL 2.5MM CAR RED REV FRIDGE GREEN YELLOW BLACK CAR FRIDGE WHITE YEL RD WHI/BRN GRN 2 7 4 WHI 12 S PLUG OR RED4.0mm GREEN 2.5mm BL/BRN 2.5mm BL/BRN 2.5mm RD/BRN 4.0mm BLK BLK RED GRN RED PUMP 10 A AUX 2 10 A BL/BRN 1.5mm RD/BRN 2.5mm RED 1.0mm COLOUR CODE AUX 4 5A RD/BL 1.0mm RD WHI WHI/BRN BL/BRN = RED = WHITE = WHITE/BROWN = BLUE BROWN AUX 5 5A GRN 1.0mm AUX 6 5A OR 1.5mm GRN OR RD/BL BL YEL RD/BRN = GREEN = ORANGE = RED/BLUE = BLUE = YELLOW = RED/BROWN = GREEN/ORANGE NEGS LINKED WHI WHI/BRN YEL 230V GRN/BRN 2.5mm FRIDGE BLK 12V BLK REVERSING LIGHT BL/BRN BL/BRN BL/BRN 2.5mm BL/BRN 2.5mm RED4.0mm LIGHT WHI/BRN LIGHT LIGHT BL/BRN BUNK LIGHT BUNK LIGHT AWNING LIGHT VANITY BL/BRN 1.5mm SINK RD/BRN 4.0mm GRN PUMP SHOWER OR 1.5mm WHI/BRN BL/BRN 1.5mm WHI/BRN 12V AUX _ WATER 230V + HEATER 12V HOB IGN OR 1.5mm TWIN WHITE BLUE BROWN FUSE SPUR CONTROL PANEL GRN/BRN FUSE HOUSING OMEGA 2004 INTERNAL WIRING OMEGA 2005 INTERNAL WIRING YEL MAINS INPUT ROOF FAN WHI/BRN WHI/BRN RD 4.0mm AUX 3 5A GR/OR 94 AUX 1 1A BLK 3 5 15 A FRIDGE 15 A 15 CAR A LIGHTS 10 1 A LIGHTS 10 A 2 BATT GRN 1 6 OR RCD WHI/BRN 6 WAY BLOCK 6 WAY FROM CAR OR MCB WHI/BRN BLACK CAR FRIDGE WHITE RED 6 A 10A FUSE SPUR FIRE - CONNECTING HOUSINGS WHI/BRN CAR RED REV FRIDGE GREEN YELLOW OUTPUT + - LIGHTS 230V CHARGER POWER SUPPLY 12 VOLTS MASTERGRN/BL SWITCH PUMP RUN LED PUMP SWITCH OMEGA 2005 ODYSSEY 2004WIRING DIAGRAM ROAD LIGHTS ROAD LIGHTS WIRING DIAGRAM WHEN FITTED BLACK 9 WAY CONNECTOR GREEN WHITE WHITE BLUE WHITE GREEN NUMBER PLATE LIGHTS BLACK YELLOW RED BROWN WHITE BLUE FOG FLASH TAIL STOP REV GREEN BROWN RED Y/B YELLOW/BLACK OFFSIDE SIDE MARKER LIGHT 3 BLUE OFFSIDE TAIL LIGHTS NEARSIDE FRONT LIGHTS WHITE WHITE NEARSIDE TAIL LIGHTS BLUE FOG YELLOW FLASH BLACK TAIL RED STOP Y/B REV NEARSIDE SIDE MARKER LIGHT WHITE BROWN Electrical Wiring Diagrams Explorer Group 2005 Touring Caravan Handbook BLACK 2 1 YELLOW RED BROWN WHITE BROWN 7 6 4 5 12N PLUG OFFSIDE FRONT LIGHTS YELLOW FROM 12S PLUG BLACK 95 Electrical Wiring Diagrams BLACK 4.0MM WHI/BRN + WHI/BRN - WHI/BRN BL 2.5MM BLACK CAR FRIDGE WHITE CAR RED REV FRIDGE GREEN YELLOW YEL RD OR GRN 2 7 BLK 3 5 4 OR WHI 12 S PLUG AUX 1 1A BL/BRN 2.5mm RD/BRN 4.0mm RED PUMP 10 A AUX 2 10 A RD/BRN 2.5mm COLOUR CODE AUX 4 5A RD/BL 1.0mm RD WHI AUX 5 5A GRN 1.0mm GRN OR RD/BL BL YEL RD/BRN = GREEN = ORANGE = RED/BLUE = BLUE = YELLOW = RED/BROWN 2.5mm AUX 6 5A 1 AMP FUSE OR 1mm 12V OR 1.5mm YEL BL/BRN 2.5mm BL/BRN 12V AUX GRN VANITY BL/BRN 1.5mm SINK _ GRNOR 1.5mm HOB IGN OR 1.5mm PUMP SHOWER WHI/BRN FUSE SPUR WATER 230V +HEATER 12V TOILET WHI/BRN TWIN WHITE BLUE CONTROL PANEL GRN/BRN ALARM SIREN LIGHT LIGHT WHI BL/BRN 1.5mm RD/BRN 4.0mm WHI/BRN LIGHT BUNK LIGHT BUNK LIGHT AWNING LIGHT 2.5mm YEL WHI 1mm RED4.0mm BL/BRN BL/BRN BL/BRN BROWN FUSE HOUSING FRIDGE BLK OR 1.5mm WHI/BRN BL/BRN 1.5mm RED 1.0mm = RED = WHITE 230V GRN/BRN REVERSING LIGHT GREEN 2.5mm BL/BRN 2.5mm BLK GRN WHI/BRN WHI/BRN WHI MAINS INPUT ROOF FAN BLK RED4.0mm BLK RED WHI/BRN NEGS LINKED RD 4.0mm AUX 3 5A WHI/BRN = WHITE/BROWN BL/BRN = BLUE BROWN GR/OR = GREEN/ORANGE 96 15 A FRIDGE 15 A 15 CAR A LIGHTS 10 1 A LIGHTS 10 A 2 BATT GRN 1 6 OR WHI/BRN WHI/BRN 6 WAY BLOCK 6 WAY FROM CAR RCD WHEN FITTED LIGHTS 230V RED 4.0MM MCB WHI/BRN OR 1.5mm BLACK CAR FRIDGE WHITE + BATTERY + 6 A 10A FUSE SPUR FIRE CONNECTING HOUSINGS OUTPUT CHARGER POWER SUPPLY 12 VOLTS + WHI/BRN RED CAR RED REV FRIDGE GREEN YELLOW CRUSADER 2005 CRUSADER INTERNAL WIRING 2004 INTERNAL WIRING WHI MASTER SWITCH WATER SWITCH PUMP RUN LED PUMP GRN/BL SWITCH WHEN FITTED WATER TANK LEG SENSOR AWNING LIGHT CRUSADER 2005 OMEGA 2004 ROAD ROADLIGHTS LIGHTSWIRING WIRINGDIAGRAM DIAGRAM NEARSIDE SIDE MARKER LIGHT WHEN FITTED NEARSIDE INDICATOR WHITE BLACK 9 WAY CONNECTOR GREEN WHITE WHITE BLUE WHITE GREEN NUMBER PLATE LIGHTS BLACK YELLOW RED BROWN BLACK WHITE BROWN 2 1 YELLOW RED BROWN WHITE BLUE FOG FLASH TAIL STOP REV GREEN BROWN RED Y/B YELLOW/BLACK OFFSIDE SIDE MARKER LIGHT 3 BLUE OFFSIDE TAIL LIGHTS NEARSIDE FRONT LIGHTS WHITE WHITE NEARSIDE TAIL LIGHTS BLUE FOG YELLOW FLASH BLACK TAIL RED STOP Y/B REV YELLOW Electrical Wiring Diagrams Explorer Group 2005 Touring Caravan Handbook WHITE BROWN GREEN WHITE 7 6 4 5 12N PLUG OFFSIDE FRONT LIGHTS OFFSIDE INDICATOR BLACK YELLOW FROM 12S PLUG 97 Electrical Wiring Diagrams CHARGER POWER SUPPLY 12 VOLTS BLACK 4.0MM WHI/BRN + - WHI/BRN WHI/BRN BL 2.5MM RD BLACK CAR FRIDGE WHITE CAR RED REV FRIDGE GREEN YELLOW YEL WHI/BRN GRN 2 7 3 5 4 98 15 A FRIDGE 15 A 15 CAR A LIGHTS 10 1 A LIGHTS 10 A 2 BATT GRN 1 6 OR AUX 1 1A BLK OR WHI 12 S PLUG BL/BRN 2.5mm RD/BRN 4.0mm BLK RED RED PUMP 10 A AUX 2 10 A BL/BRN 1.5mm RD/BRN 2.5mm RED 1.0mm COLOUR CODE AUX 4 5A RD/BL 1.0mm RD WHI WHI/BRN BL/BRN GR/OR GRN OR RD/BL BL YEL RD/BRN AUX 5 5A GRN 1.0mm AUX 6 5A OR 1.5mm 1 AMP FUSE OR 1mm 230V GRN/BRN 2.5mm FRIDGE BLK 12V REVERSING LIGHT BL/BRN BL/BRN BL/BRN BL/BRN 2.5mm BL/BRN 2.5mm RD/BRN 4.0mm RED4.0mm WHI/BRN LIGHT LIGHT LIGHT BUNK LIGHT BUNK LIGHT AWNING LIGHT WHI VANITY BL/BRN 1.5mm SINK _ WATER 230V +HEATER GRNOR 1.5mm 12V HOB IGN OR 1.5mm BLUE TOILET CONTROL PANEL GRN/BRN YEL WHI ALARM SIREN FUSE SPUR WHI/BRN TWIN WHITE YEL WHI 1mm PUMP SHOWER WHI/BRN 12V AUX GRN BROWN FUSE HOUSING MAINS INPUT ROOF FAN WHI/BRN WHI/BRN WHI OR 1.5mm WHI/BRN BL/BRN 1.5mm AUX 3 5A = RED = WHITE = WHITE/BROWN = BLUE BROWN = GREEN/ORANGE = GREEN = ORANGE = RED/BLUE = BLUE = YELLOW = RED/BROWN NEGS LINKED BLK GREEN 2.5mm BL/BRN 2.5mm BLK GRN WHI/BRN RD 4.0mm RED4.0mm RCD WHI/BRN 6 WAY BLOCK 6 WAY FROM CAR OR MCB WHI/BRN OR 1.5mm WHEN FITTED MASTER SWITCH LIGHTS 230V RED 4.0MM + 6 A 10A FUSE SPUR FIRE BLACK CAR FRIDGE WHITE + BATTERY WHI/BRN RED CAR RED REV FRIDGE GREEN YELLOW OUTPUT + - CONNECTING HOUSINGS RALLYE 2005 RALLYE 2004 INTERNAL WIRING INTERNAL WIRING WATER SWITCH PUMP RUN LED PUMP GRN/BL SWITCH WHEN FITTED WATER TANK LEG SENSOR AWNING LIGHT RALLYE 2005 RALLYE 2003 ROAD LIGHTS WIRING ROAD LIGHTS WIRING DIAGRAM DIAGRAM NEARSIDE SIDE MARKER LIGHT WHEN FITTED NEARSIDE INDICATOR WHITE BLACK 9 WAY CONNECTOR GREEN WHITE WHITE BLUE WHITE GREEN NUMBER PLATE LIGHTS BLACK YELLOW RED BROWN BLACK WHITE BROWN 2 1 YELLOW RED BROWN WHITE BLUE FOG FLASH TAIL STOP REV GREEN BROWN RED Y/B YELLOW/BLACK OFFSIDE SIDE MARKER LIGHT 3 BLUE OFFSIDE TAIL LIGHTS NEARSIDE FRONT LIGHTS WHITE WHITE NEARSIDE TAIL LIGHTS BLUE FOG YELLOW FLASH BLACK TAIL RED STOP Y/B REV YELLOW Electrical Wiring Diagrams Explorer Group 2005 Touring Caravan Handbook WHITE BROWN GREEN WHITE 7 6 4 5 12N PLUG OFFSIDE FRONT LIGHTS OFFSIDE INDICATOR BLACK YELLOW FROM 12S PLUG 99 Electrical Wiring Diagrams CHARGER POWER SUPPLY 12 VOLTS BLACK 4.0MM OR 1.5mm WHI/BRN + - WHI/BRN WHI/BRN BL 2.5MM RD BLACK CAR FRIDGE WHITE CAR RED REV FRIDGE GREEN YELLOW YEL WHI/BRN GRN 2 7 3 5 4 100 15 A FRIDGE 15 A 15 CAR A LIGHTS 10 1 A LIGHTS 10 A 2 BATT GRN 1 6 OR AUX 1 1A BLK OR WHI 12 S PLUG BL/BRN 2.5mm RD/BRN 4.0mm BLK RED RED PUMP 10 A AUX 2 10 A RD/BRN 2.5mm BL/BRN 1.5mm AUX 3 5A RED 1.0mm AUX 4 5A RD/BL 1.0mm RD WHI WHI/BRN BL/BRN GR/OR GRN OR RD/BL BL YEL RD/BRN AUX 5 5A GRN 1.0mm AUX 6 5A OR 1.5mm 1 AMP FUSE OR 1mm FRIDGE 12V REVERSING LIGHT BL/BRN BL/BRN BL/BRN BL/BRN 2.5mm BL/BRN 2.5mm RD/BRN 4.0mm GRN RED4.0mm WHI/BRN LIGHT LIGHT LIGHT BUNK LIGHT BUNK LIGHT AWNING LIGHT WHI VANITY BL/BRN 1.5mm SINK _ WATER 230V +HEATER GRNOR 1.5mm 12V HOB IGN OR 1.5mm BLUE TOILET CONTROL PANEL GRN/BRN YEL WHI ALARM SIREN FUSE SPUR WHI/BRN TWIN WHITE YEL WHI 1mm PUMP SHOWER WHI/BRN 12V AUX BROWN FUSE HOUSING 230V GRN/BRN 2.5mm BLK OR 1.5mm WHI/BRN BL/BRN 1.5mm COLOUR CODE = RED = WHITE = WHITE/BROWN = BLUE BROWN = GREEN/ORANGE = GREEN = ORANGE = RED/BLUE = BLUE = YELLOW = RED/BROWN WHI/BRN WHI/BRN WHI MAINS INPUT ROOF FAN BLK GREEN 2.5mm BL/BRN 2.5mm BLK GRN WHI/BRN NEGS LINKED RD 4.0mm RED4.0mm RCD WHI/BRN 6 WAY BLOCK 6 WAY FROM CAR OR MCB WHI/BRN WHEN FITTED MASTER SWITCH LIGHTS 230V RED 4.0MM 6 A 10A FUSE SPUR FIRE + BLACK CAR FRIDGE WHITE + BATTERY WHI/BRN RED CONNECTING HOUSINGS OUTPUT + - CAR RED REV FRIDGE GREEN YELLOW BUCCANEER 2005 BUCCANEER INTERNAL WIRING 2004 INTERNAL WIRING WATER SWITCH PUMP RUN LED PUMP GRN/BL SWITCH WHEN FITTED WATER TANK LEG SENSOR AWNING LIGHT BUCCANEER CRUSADER 2004 OMEGA 20042005 ROAD DIAGRAM ROADLIGHTS LIGHTSWIRING WIRING DIAGRAM LIGHTS WIRING DIAGRAM NEARSIDE NEARSIDE SIDE SIDEMARKER MARKER LIGHT LIGHT BLACK BLACK WHITE WHITE 9 9WAY WAY CONNECTOR CONNECTOR WHITE WHITE WHITE WHITE BROWN BROWN BLACK BLACK NEARSIDE NEARSIDE FRONT LIGHTS FRONT LIGHTS GREEN GREEN WHITE WHITE WHITE WHITE BLACK BLACK YELLOW YELLOW RED RED BROWN BROWN YELLOW/BLACK YELLOW/BLACK OFFSIDE OFFSIDE TAIL LIGHTS TAIL LIGHTS NEARSIDE INDICATOR WHITE WHITE WHITE NUMBER NUMBER PLATE PLATE LIGHTS LIGHTS FOG FOG FLASH FLASH TAIL TAIL STOP STOP REV REV OFFSIDE SIDE OFFSIDE MARKER SIDE LIGHT MARKER LIGHT WHEN WHEN FITTED FITTED GREEN GREEN BLUE BLUE BLUE BLUE GREEN GREEN BROWN BROWN RED RED Y/BY/B WHITE WHITE NEARSIDE NEARSIDE TAIL TAIL LIGHTS LIGHTS BLUE BLUE FOG YELLOW YELLOW FLASH BLACK BLACK TAIL RED RED STOP Y/B Y/B REV YELLOW Electrical Wiring Diagrams Explorer Group 2005 Touring Caravan Handbook BLUE BLUE 3 3 2 4 BLACK 2 4 12N 12N BLACK 7 PLUG 7 PLUG 5 1 5 1 6 6 YELLOW YELLOW RED RED BROWN BROWN WHITE WHITE BROWN BROWN GREEN GREEN WHITE OFFSIDE OFFSIDE FRONT LIGHTS FRONT LIGHTS OFFSIDE INDICATOR YELLOW YELLOW FROM 12S PLUG FROM 12S PLUG 101 Technical Specifications AVANTÉ TECHNICAL SPECIFICATIONS 2005 362 472 Number of Berths Interior Length Exterior body length Shipping Length Overall Width Overall Height Maximum Headroom Interior Width Wheel Rim Tyre Size Tyre Pressure Brake Size Awning Sizes Ground to Ground Bed Sizes Option 1 2 3683mm / 12'1" 4504mm / 14'9.5" 5484mm 18'00" 2148mm / 7'0.5" 2726mm / 8'11" 1908mm / 6'3" 2032mm / 6'8" 5.5J x 14 195/70 R 14 91 32psi 200/50 8187mm / 26'10.5" 1 x Single 1830 x 673mm 6’0” x 2’2.5” 1 x Single 1830 x 673mm 6’0” x 2’2.5” Bed Sizes 1 x Double 1980 x 1420mm 1 x Double 1980 x 1420mm 6’6” x 4’8” 6’6” x 4’8” M.T.P.L.M. Mass inRunning Order Essential Habitaion Equipment Maximum User Payload Maximum Hitch Weight Optional Equipiment payload Option 2 1100kgs / 21.61cwt 914kgs / 17.95cwt 62kgs / 1.22cwt 186kgs / 3.65cwt 100kgs / 1.96cwt 31kgs / 0.61cwt 2 4560mm / 14'11.5" 5381mm / 17'8" 6361mm / 20'10.5" 2148mm / 7'0.5" 2726mm / 8'11" 1908mm / 6'3" 2032mm / 6'8" 5.5J x 14 195/70 R 14 95 39psi 200/50 9064mm / 29'9" 1 x Single 1830 x 673mm 6’0” x 2’2.5” 1 x Single 1830 x 673mm 6’0” x 2’2.5” 1240kgs / 24.35cwt 1044kgs / 20.5cwt 62kgs / 1.22cwt 196kgs / 3.85cwt 100kgs / 1.96cwt 31kgs / 0.61cwt 475 505 5 4550mm / 14'11" 5371mm/ 17'7.5" 6351mm / 20'10" 2148mm / 7'0.5" 2726mm / 8'11" 1908mm / 6'3" 2032mm / 6'8" 5.5J x 14 195/70 R 14 95 39psi 200/50 9054mm / 29'8.5" 1 x Double 1980 x 1240mm 6’6” x 4’1” 1 x Double 1830 x 1139mm 6’0” x 3’9” 1 x Single 1650 x 570mm 5’5” x 1’10.5” 5 5009mm / 16'5" 5830mm / 19'1.5" 6810mm / 22'4" 2148mm / 7'0.5" 2726mm / 8'11" 1908mm / 6'3" 2032mm / 6'8" 5.5J x 14 165 R 14 97 58psi 200/50 9513mm / 31'2.5" 1 x Single 1830 x 673mm 6’0” x 2’2.5” 1 x Single 1830 x 673mm 6’0” x 2’2.5” 1 x Double 1980 x 1135mm 6’6” x 3’9” 1 x Single 1848 x 570mm 6’1” x 1’10.5” 4 5344mm / 17'6.5" 6165mm / 20'3" 7145mm / 23'5.5" 2148mm / 7'0.5" 2726mm / 8'11" 1908mm / 6'3" 2032mm / 6'8" 5.5J x 14 165 R 14 97 59psi 200/50 9848mm / 32'4" 1 x Single 1830 x 673mm 6’0” x 2’2.5” 1 x Single 1830 x 673mm 6’0” x 2’2.5” 1 x Single 1800 x 630mm 5’11” x 2’1” 1 x Single 1632 x 570mm 5’4” x 1’10.5” 1 x Double 1980 x 1420mm 6’6” x 4’8” 1 x Double 1980 x 1135mm 6’6” x 3’9” 1 x Single 1848 x 570mm 6’1” x 1’10.5” 1 x Double 1980 x 1420mm 6’6” x 4’8” 1 x Single 1800 x 630mm 5’11” x 2’1” 1 x Single 1632 x 570mm 5’4” x 1’10.5” 1365kgs / 26.81cwt 1133kgs / 22.25cwt 62kgs / 1.22cwt 232kgs / 4.55cwt 100kgs / 1.96cwt 31kgs / 0.61cwt 1360kgs /26.71cwt 1135kgs / 22.29cwt 62kgs / 1.22cwt 225kgs / 4.42cwt 100kgs / 1.96cwt 31kgs / 0.61cwt 1275kgs / 20.05cwt 1049kgs / 20.6cwt 62kgs / 1.22cwt 226kgs / 4.44cwt 100kgs / 1.96cwt 31kgs / 0.61cwt 524 534 540 556 636 4 5486mm / 18'00" 6307mm / 20'8.5" 7287mm / 23'11" 2286mm / 7'6" 2726mm / 8'11" 1908mm / 6'3" 2170mm / 7'1.5" 5.5J x 14 175 R 14 99 58psi 200/50 9990mm / 32'9.5" 1 x Double 2054 x 1332mm 6’9” x 4’4” 1 x Double 1860 x 1340mm 6’1” x 4’5” 4 5414mm / 17'9" 6235mm / 20'5.5" 7215mm / 23'8" 2286mm / 7'6" 2726mm / 8'11" 1908mm / 6'3" 2170mm / 7'1.5" 5.5J x 14 165 R 14 97 59psi 200/50 9918mm / 32'6.5" 1 x Single 2129 x 710mm 6’11.5” x 2’4” 1 x Single 2113 x 710mm 6’11” x 2’4” 1 x Double 1950 x 1274mm 6’5” x 4’2” 6 5436mm / 17'10" 6257mm / 20'6.5" 7237mm / 23'9" 2286mm / 7'6" 2726mm / 8'11" 1908mm / 6'3" 2170mm / 7'1.5" 5.5J x 14 175 R 14 99 61psi 200/50 9940mm / 32'7.5" 1 x Single 1830 x 673mm 6’0” x 2’2.5” 1 x Single 1830 x 673mm 6’0” x 2’2.5” 1 x Single 1800 x 630mm 5’11” x 2’1” 1 x Single 1632 x 570mm 5’4” x 1’10.5” 2 x Single 1830 x 610mm 6’0” x 2’0” 1 x Double 1980 x 1420mm 6’6” x 4’8” 1 x Single 1800 x 630mm 5’11” x 2’1” 1 x Single 1632 x 570mm 5’4” x 1’10.5” 2 x Single 1830 x 610mm 6’0” x 2’0” 6 6125mm / 20'1" 6946mm / 22'9.5" 7926mm / 26'00" 2286mm / 7'6" 2726mm / 8'11" 1908mm / 6'3" 2170mm / 7'1.5" 5.5J x 14 175/65 R 14 82 32psi 200/50 10629mm / 34'10.5" FRONT 2 x Single 1830 x 745mm 6’0” x 2’5” OR 1 x Double 2107 x 1420mm 6’11” x 4’8” AND REAR 2 x Single 1830 x 670mm 6’0” x 2’2.5” 2 x Single 1680 x 580mm 5’6” x 1’11” 1415kgs / 27.79cwt 1188kgs /23.33cwt 62kgs / 1.22cwt 227kgs / 4.46cwt 100kgs / 1.96cwt 31kgs / 0.61cwt 1400kgs / 27.5cwt 1173kgs / 23.04cwt 62kgs / 1.22cwt 227kgs / 4.46cwt 100kgs / 1.96cwt 31kgs / 0.61cwt 1440kgs / 28.28cwt 1194kgs / 23.45cwt 62kgs / 1.22cwt 246kgs / 4.83cwt 100kgs / 1.96cwt 31kgs / 0.61cwt FRONT 2 x Single 1830 x 745mm 6’0” x 2’5” OR 1 x Double 2107 x 1420mm 6’11” x 4’8” AND REAR 1 x Double 1974 x 1420mm 6’6” x 4’8” 2 x Single 1680 x 580mm 5’6” x 1’11” 1705kgs / 33.49cwt 1452kgs / 28.52cwt 62kgs / 1.22cwt 253kgs / 4.97cwt 100kgs / 1.96cwt 31kgs / 0.61cwt A manufacturing tolerance has been added to Mass in Running Order before calculating the Maximum User Payload. Note 1: Please take care to ensure that you have allowed for the masses of all items you intend to carry in the caravan. Maximum User Payload includes Essential Habitation Equipment, Personal Effects and Optional Equipment. Note 2: Warning under no circumstances must the Technical Permissible Laden Mass of the caravan be exceeded. Note 3: All data is calculated using metric weights and measurements. The imperial figures quoted are conversions thereof. 102 ODYSSEY TECHNICAL SPECIFICATIONS 2005 432 Number of Berths Interior Length External body length Shipping Length Overall Width Overall Height Maximum Headroom Interior Width Wheel Rim Tyre Size Tyre Pressure Brake Size Awning Sizes Ground to Ground Bed Sizes Option 1 Bed Sizes M.T.P.L.M. Mass inRunning Order Essential Habitaion Equipment Maximum User Payload Maximum Hitch Weight Optional equipiment payload 2 4314mm / 14'2" 5146mm / 16'10.5" 6126mm / 20'1" 2148mm / 7'0.5" 2726mm / 8'11" 1908mm / 6'3" 2032mm / 6'8" 5.5J x 14 195/70 R 14 95 38psi 250/40 8560mm / 28'1" 1 x Single 1880 x 675mm 6’2” x 2’2.5” 1 x Single 1880 x 675mm 6’2” x 2’2.5” Option 2 1 x Double 1984 x 1480mm 6’6” x 4’10” 1260kgs / 24.75cwt 1078kgs / 21.17cwt 62kgs / 1.22cwt 182kgs . 3.58cwt 100kgs / 1.96cwt 24kgs / 0.47cwt 505 482 2 4828mm / 15'10" 5660mm / 18'8" 6640mm / 21'9.5" 2148mm / 7'0.5" 2726mm / 8'11" 1908mm / 6'3" 2032mm / 6'8" 5.5J x 14 195/70 R 14 95 42psi 250/40 9074mm / 29'9" 1 x Single 1880 x 675mm 6’2” x 2’2.5” 1 x Single 1880 x 675mm 6’2” x 2’2.5” 1 x Double 1984 x 1480mm 6’6” x 4’10” 1325kgs / 26cwt 1138kgs / 22.33cwt 62kgs / 1.22cwt 187kgs / 3.67cwt 100kgs / 1.96cwt 24kgs / 0.47cwt 5 5344mm / 17'6" 6176mm / 20'3" 7156mm / 23'6" 2148mm / 7'0.5" 2726mm / 8'11" 1908mm / 6'3" 2032mm / 6'8" 5.5J x 14 175 R 14 99P 64psi 250/40 9590mm / 31'5.5" 1 x Single 1880 x 675mm 6’2” x 2’2.5” 1 x Single 1880 x 675mm 6’2” x 2’2.5” 1 x Double 1984 x 1207mm 6’6” x 3’11.5” 1 x Single 1822 x 570mm 5’11.5” x 1’10.5” 1 x Double 1984 x 1480mm 6’6” x 4’10” 1 x Double 1984 x 1207mm 6’6” x 3’11.5” 1 x Single 1822 x 570mm 5’11.5” x 1’10.5” 1475kgs / 28.97cwt 1253kgs . 24.61cwt 62kgs / 1.22cwt 2.22kgs / 4.36cwt 100kgs / 1.96cwt 24kgs / 0.47cwt 524 4 5344mm / 17'6" 6176mm / 20'3" 7156mm / 23'6" 2148mm / 7'0.5" 2726mm / 8'11" 1908mm / 6'3" 2032mm / 6'8" 5.5J x 14 175 R 14 99P 61psi 250/40 9590mm / 31'5.5" 1 x Single 1880 x 675mm 6’2” x 2’2.5” 1 x Single 1880 x 675mm 6’2” x 2’2.5” 1 x Single 1800 x 635mm 5’11” x 2’1” 1 x Single 1655 x 570mm 5’5” x 1’10.5” 1 x Double 1984 x 1480mm 6’6” x 4’10” 1 x Single 1800 x 635mm 5’11” x 2’1” 1 x Single 1655 x 570mm 5’5” x 1’10.5” 1450kgs / 28.48cwt 1238kgs / 24.32cwt 62kgs / 1.22cwt 212kgs / 4.16cwt 100kgs / 1.96cwt 24kgs / 0.47cwt 524L 534 540 4 5344mm / 17'6" 6176mm / 20'3" 7156mm / 23'6" 2148mm / 7'0.5" 2726mm / 8'11" 1908mm / 6'3" 2032mm / 6'8" 5.5J x 14 175 R 14 99P 61psi 250/40 9590mm / 31'5.5" 1 x Double 2007 x 1334mm 6’7” x 4’4” 1 x Single 1800 x 635mm 5’11” x 2’1” 1 x Single 1655 x 570mm 5’5” x 1’10.5” 4 5486mm / 18'0" 6318mm / 20'9" 7298mm / 23'11.5" 2286mm / 7'6" 2726mm / 8'11" 1908mm / 6'3" 2170mm / 7' 1.5" 5.5J x 14 175 R 14 99P 65psi 250/40 9732mm / 31'11" 1 x Double 2124 x 1342mm 6’11.5” x 4’5” 1 x Double 1860 x 1300mm 6’1” x 4’3” 4 5414mm / 17'9" 6246mm / 20'6" 7226mm / 23'8.5" 2286mm / 7'6" 2726mm / 8'11" 1908mm / 6'3" 2170mm / 7' 1.5" 5.5J x 14 175 R 14 99P 65psi 250/40 9732mm / 31'11" 1 x Single 2130 x 710mm 7’0” x 2’4” 1 x Single 2113 x 710mm 6’11” x 2’4” 1 x Double 1950 x 1274mm 6’5” x 4’2” 1425kgs / 27.99cwt 1213kgs / 23.83cwt 62kgs / 1.22cwt 212kgs / 4.16cwt 100kgs / 1.96cwt 24kgs / 0.47cwt 1525kgs / 29.9cwt 1312kgs / 25.77cwt 62kgs / 1.22cwt 213kgs / 4.18cwt 100kgs / 1.96cwt 24kgs / 0.47cwt 1515kgs / 29.76cwt 1302kgs / 25.58cwt 62kgs / 1.22cwt 213kgs / 4.18cwt 100kgs / 1.96cwt 24kgs / 0.47cwt A manufacturing tolerance has been added to Mass in Running Order before calculating the Maximum User Payload. Note 1: Please take care to ensure that you have allowed for the masses of all items you intend to carry in the caravan. Maximum User Payload includes Essential Habitation Equipment, Personal Effects and Optional Equipment. Note 2: Warning under no circumstances must the Technical Permissible Laden Mass of the caravan be exceeded. Technical Specifications Explorer Group 2005 Touring Caravan Handbook Note 3: All data is calculated using metric weights and measurements. The imperial figures quoted are conversions thereof. 103 Technical Specifications CRUSADER TECHNICAL SPECIFICATIONS 2005 HURRICANE Number of Berths Interior Length Exterior body length Shipping Length Overall Width Overall Height Maximum Headroom Interior Width Wheel Rim Tyre Size Tyre Pressure Brake Size Awning Sizes Ground to Ground Bed Sizes Option 1 Bed Sizes 2 4828mm / 15'10" 5660mm / 18'7" 6640mm / 21'9.5" 2286mm / 7'6" 2600mm / 8'6.5" 1908mm / 6'3" 2170mm / 7' 1.5" 5.5J x 14 165 R 14 97 59psi 250/40 9074mm / 29'9" 1 x Single 1880 x 710mm 6’2” x 2’4” 1 x Single 1880 x 710mm 6’2” x 2’4” Option 2 1 x Double 2054 x 1480mm 6’9” x 4’10” M.T.P.L.M. Mass in Running Order Essential Habitation Equipment Maximum User Payload Maximum Hitch Weight Optional equipment payload 1400kgs / 27.5cwt 1228kgs / 24.12cwt 62kgs / 1.22cwt 172kgs / 3.38cwt 100kgs / 1.96cwt 3kgs / 0.05cwt AURORA TYPHOON 4 5344mm / 17'6" 6176mm / 20'3" 7156mm / 23'6" 2286mm / 7'6" 2600mm / 8'6.5" 1908mm / 6'3" 2170mm / 7' 1.5" 5.5J x 14 175 R14 99 65psi 250/40 9590mm / 31'5.5" 1 x Single 1880 x 710mm 6’2” x 2’4” 1 x Single 1880 x 710mm 6’2” x 2’4” 1 x Single 1800 x 635mm 5’11” x 2’1” 1 x Single 1655 x 570mm 5‘5” x 1’10.5” 4 5414mm / 17'9" 6246mm / 20'6" 7226mm / 23'8.5" 2286mm / 7'6" 2600mm / 8'6.5" 1908mm / 6'3" 2170mm / 7' 1.5" 5.5J x 14 185 R 14 102 61psi 250/40 9732mm / 31'11" 1 x Single 2130 x 710mm 7’0” x 2’4” 1 x Single 2113 x 710mm 6’11” x 2’4” 1 x Double 1950 x 1274mm 6’5” x 4’2” SUPER SIROCCO 4 6325mm / 20'9" 6998mm / 22'11" 8132mm / 26'8" 2286mm / 7'6" 2600mm / 8'6.5" 1908mm / 6'3" 2170mm / 7' 1.5" 5.5J x 14 175/65 R 14 82 36psi 200/50 10571mm / 34'8" 1 x Double 2112 x 1334mm 6’11” x 4’4.5” 1 x Double 1860 x 1300mm 6’3” x 4’3” 1 x Double 2054 x 1480mm 6’9” x 4’10” 1 x Single 1800 x 635mm 5’11” x 2’1” 1 x Single 1655 x 570mm 5’5” x 1’10.5” 1525kgs / 29.96cwt 1328kgs / 26.08cwt 62kgs / 1.22cwt 197kgs / 3.86cwt 100kgs / 1.96cwt 3kgs / 0.05cwt SIROCCO 5 6325mm / 20'9" 6998mm / 22'11" 8132mm / 26'8" 2286mm / 7'6" 2600mm / 8'6.5" 1908mm / 6'3" 2170mm / 7' 1.5" 5.5J x 14 175/65 R 14 82 36psi 200/50 10571mm / 34'8" 1 x Single 1880 x 710mm 6’2” x 2’4” 1 x Single 1880 x 710mm 6’2” x 2’4” 1 x Double 2054 x 1325mm 6’9” x 4’4” 1 x Single 1962 x 570mm 6’5.5” x 1’10.5” 1 x Double 2054 x 1480mm 6’9” x 4’10” 1 x Double 2054 x 1325mm 6’9” x 4’4” 1 x Single 1962 x 570mm 6’5.5” x 1’10.5” 1560kgs / 30.64cwt 1363kgs / 26.77cwt 62kgs / 1.22cwt 198kgs / 3.89cwt 100kgs / 1.96cwt 3kgs / 0.05cwt 1875kgs / 36.83cwt 1599kgs / 31.41cwt 95kgs / 1.69cwt 276kgs / 5.42cwt 100kgs / 1.96cwt 31kgs / 0.61cwt 1875kgs / 36.83cwt 1599kgs / 31.41cwt 95kgs / 1.69cwt 276kgs / 5.42cwt 100kgs / 1.96cwt 31kgs / 0.61cwt SUPER STORM 6 6325mm / 20'9" 6998mm / 22'11" 8132mm / 26'8" 2286mm / 7'6" 2600mm / 8'6.5" 1908mm / 6'3" 2170mm / 7' 1.5" 5.5J x 14 175/65 R 14 86 38psi 200/50 10571mm / 34'8" 2 x Single 1880 x 710mm 6’2” x 2’4” AND 2 x Single 1830 x 690mm 6’0” x 2’3” 2 x Single 1705 x 570mm 5’7” x 1’10.5” OR 1 x Double 2014 x 1430mm 6’7” x 4’8” 2 x Single 1705 x 570mm 5’7” x 1’10.5” 1 x Double 2054 x 1480mm 6’9” x 4’10” AND 2 x Single 1830 x 690mm 6’ x 2’3” 2 x Single 1705 x 570mm 5’7” x 1’10.5” OR 1 x Double 2014 x 1430mm 6’7” x 4’8” 2 x Single 1705 x 570mm 5’7” x 1’10.5 1925kgs / 37.81cwt 1639kgs / 32.19cwt 95kgs / 1.69cwt 286kgs / 5.62cwt 100kgs / 1.96cwt 31kgs / 0.61cwt STORM 4 6325mm / 20'9" 6998mm / 22'11" 8132mm / 26'8" 2286mm / 7'6" 2600mm / 8'6.5" 1908mm / 6'3" 2170mm / 7' 1.5" 5.5J x 14 175/65 R 14 82 36psi 200/50 10571mm / 34'8" 1 x Single 1830 x 710mm 6’0” x 2’4” 1 x Single 1830 x 710mm 6’0” x 2’4” 1 x Double 1970 x 1340mm 6’5.5” x 4’5” 1 x Double 2054 x 1430mm 6’9” x 4’8” 1 x Double 1970 x 1340mm 6’5.5” x 4’5” 1875kgs / 36.83cwt 1609kgs / 31.60cwt 95kgs / 1.69cwt 266kgs / 5.22cwt 100kgs / 1.96cwt 31kgs / 0.61cwt A manufacturing tolerance has been added to Mass in Running Order before calculating the Maximum User Payload. Note 1: Please take care to ensure that you have allowed for the masses of all items you intend to carry in the caravan. Maximum User Payload includes Essential Habitation Equipment, Personal Effects and Optional Equipment. Note 2: Warning under no circumstances must the Technical Permissible Laden Mass of the caravan be exceeded. Note 3: All data is calculated using metric weights and measurements. The imperial figures quoted are conversions thereof. 104 CORONA TECHNICAL SPECIFICATIONS 2005 362 472 Number of Berths Interior Length Exterior body length Shipping Length Overall Width Overall Height Maximum Headroom Interior Width Wheel Rim Tyre Size Tyre Pressure Brake Size Awning Sizes Ground to Ground Bed Sizes Option 1 2 3683mm / 12'1" 4504mm / 14'9.5" 5484mm 18'00" 2148mm / 7'0.5" 2726mm / 8'11" 1908mm / 6'3" 2032mm / 6'8" 5.5J x 14 195/70 R 14 95 39psi 200/50 8187mm / 26'10.5" 1 x Single 1830 x 673mm 6’0” x 2’2.5” 1 x Single 1830 x 673mm 6’0” x 2’2.5” Bed Sizes 1 x Double 1980 x 1420mm 1 x Double 1980 x 1420mm 6’6” x 4’8” 6’6” x 4’8” M.T.P.L.M. Mass inRunning Order Essential Habitaion Equipment Maximum User Payload Maximum Hitch Weight Optional Equipiment payload Option 2 1100kgs / 21.61cwt 914kgs / 17.95cwt 62kgs / 1.22cwt 186kgs / 3.65cwt 100kgs / 1.96cwt 31kgs / 0.61cwt 2 4560mm / 14'11.5" 5381mm / 17'8" 6361mm / 20'10.5" 2148mm / 7'0.5" 2726mm / 8'11" 1908mm / 6'3" 2032mm / 6'8" 5.5J x 14 195/70 R 14 95 39psi 200/50 9064mm / 29'9" 1 x Single 1830 x 673mm 6’0” x 2’2.5” 1 x Single 1830 x 673mm 6’0” x 2’2.5” 1240kgs / 24.35cwt 1044kgs / 20.5cwt 62kgs / 1.22cwt 196kgs / 3.85cwt 100kgs / 1.96cwt 31kgs / 0.61cwt 475 505 5 4550mm / 14'11" 5371mm/ 17'7.5" 6351mm / 20'10" 2148mm / 7'0.5" 2726mm / 8'11" 1908mm / 6'3" 2032mm / 6'8" 5.5J x 14 165 R 14 97 58psi 200/50 9054mm / 29'8.5" 1 x Double 1980 x 1240mm 6’6” x 4’1” 1 x Double 1830 x 1139mm 6’0” x 3’9” 1 x Single 1650 x 570mm 5’5” x 1’10.5” 5 5009mm / 16'5" 5830mm / 19'1.5" 6810mm / 22'4" 2148mm / 7'0.5" 2726mm / 8'11" 1908mm / 6'3" 2032mm / 6'8" 5.5J x 14 165 R 14 97 59psi 200/50 9513mm / 31'2.5" 1 x Single 1830 x 673mm 6’0” x 2’2.5” 1 x Single 1830 x 673mm 6’0” x 2’2.5” 1 x Double 1980 x 1135mm 6’6” x 3’9” 1 x Single 1848 x 570mm 6’1” x 1’10.5” 4 5344mm / 17'6.5" 6165mm / 20'3" 7145mm / 23'5.5" 2148mm / 7'0.5" 2726mm / 8'11" 1908mm / 6'3" 2032mm / 6'8" 5.5J x 14 175 R 14 99 58psi 200/50 9848mm / 32'4" 1 x Single 1830 x 673mm 6’0” x 2’2.5” 1 x Single 1830 x 673mm 6’0” x 2’2.5” 1 x Single 1800 x 630mm 5’11” x 2’1” 1 x Single 1632 x 570mm 5’4” x 1’10.5” 1 x Double 1980 x 1420mm 6’6” x 4’8” 1 x Double 1980 x 1135mm 6’6” x 3’9” 1 x Single 1848 x 570mm 6’1” x 1’10.5” 1 x Double 1980 x 1420mm 6’6” x 4’8” 1 x Single 1800 x 630mm 5’11” x 2’1” 1 x Single 1632 x 570mm 5’4” x 1’10.5” 1365kgs / 26.81cwt 1133kgs / 22.25cwt 62kgs / 1.22cwt 232kgs / 4.55cwt 100kgs / 1.96cwt 31kgs / 0.61cwt 1360kgs /26.71cwt 1135kgs / 22.29cwt 62kgs / 1.22cwt 225kgs / 4.42cwt 100kgs / 1.96cwt 31kgs / 0.61cwt 1275kgs / 20.05cwt 1049kgs / 20.6cwt 62kgs / 1.22cwt 226kgs / 4.44cwt 100kgs / 1.96cwt 31kgs / 0.61cwt 524 534 540 556 636 4 5486mm / 18'00" 6307mm / 20'8.5" 7287mm / 23'11" 2286mm / 7'6" 2726mm / 8'11" 1908mm / 6'3" 2170mm / 7'1.5" 5.5J x 14 165 R 14 97 59psi 200/50 9990mm / 32'9.5" 1 x Double 2054 x 1332mm 6’9” x 4’4” 1 x Double 1860 x 1340mm 6’1” x 4’5” 4 5414mm / 17'9" 6235mm / 20'5.5" 7215mm / 23'8" 2286mm / 7'6" 2726mm / 8'11" 1908mm / 6'3" 2170mm / 7'1.5" 5.5J x 14 175 R 14 99 61psi 200/50 9918mm / 32'6.5" 1 x Single 2129 x 710mm 6’11.5” x 2’4” 1 x Single 2113 x 710mm 6’11” x 2’4” 1 x Double 1950 x 1274mm 6’5” x 4’2” 6 5436mm / 17'10" 6257mm / 20'6.5" 7237mm / 23'9" 2286mm / 7'6" 2726mm / 8'11" 1908mm / 6'3" 2170mm / 7'1.5" 5.5J x 14 175/65 R 14 82 32psi 200/50 9940mm / 32'7.5" 1 x Single 1830 x 673mm 6’0” x 2’2.5” 1 x Single 1830 x 673mm 6’0” x 2’2.5” 1 x Single 1800 x 630mm 5’11” x 2’1” 1 x Single 1632 x 570mm 5’4” x 1’10.5” 2 x Single 1830 x 610mm 6’0” x 2’0” 1 x Double 1980 x 1420mm 6’6” x 4’8” 1 x Single 1800 x 630mm 5’11” x 2’1” 1 x Single 1632 x 570mm 5’4” x 1’10.5” 2 x Single 1830 x 610mm 6’0” x 2’0” 6 6125mm / 20'1" 6946mm / 22'9.5" 7926mm / 26'00" 2286mm / 7'6" 2726mm / 8'11" 1908mm / 6'3" 2170mm / 7'1.5" 5.5J x 14 175/65 R 14 82 32psi 200/50 10629mm / 34'10.5" FRONT 2 x Single 1830 x 745mm 6’0” x 2’5” OR 1 x Double 2107 x 1420mm 6’11” x 4’8” AND REAR 2 x Single 1830 x 670mm 6’0” x 2’2.5” 2 x Single 1680 x 580mm 5’6” x 1’11” 1415kgs / 27.79cwt 1188kgs /23.33cwt 62kgs / 1.22cwt 227kgs / 4.46cwt 100kgs / 1.96cwt 31kgs / 0.61cwt 1400kgs / 27.5cwt 1173kgs / 23.04cwt 62kgs / 1.22cwt 227kgs / 4.46cwt 100kgs / 1.96cwt 31kgs / 0.61cwt 1440kgs / 28.28cwt 1194kgs / 23.45cwt 62kgs / 1.22cwt 246kgs / 4.83cwt 100kgs / 1.96cwt 31kgs / 0.61cwt Technical Specifications Explorer Group 2005 Touring Caravan Handbook FRONT 2 x Single 1830 x 745mm 6’0” x 2’5” OR 1 x Double 2107 x 1420mm 6’11” x 4’8” AND REAR 1 x Double 1974 x 1420mm 6’6” x 4’8” 2 x Single 1680 x 580mm 5’6” x 1’11” 1705kgs / 33.49cwt 1452kgs / 28.52cwt 62kgs / 1.22cwt 253kgs / 4.97cwt 100kgs / 1.96cwt 31kgs / 0.61cwt A manufacturing tolerance has been added to Mass in Running Order before calculating the Maximum User Payload. Note 1: Please take care to ensure that you have allowed for the masses of all items you intend to carry in the caravan. Maximum User Payload includes Essential Habitation Equipment, Personal Effects and Optional Equipment. Note 2: Warning under no circumstances must the Technical Permissible Laden Mass of the caravan be exceeded. Note 3: All data is calculated using metric weights and measurements. The imperial figures quoted are conversions thereof. 105 Technical Specifications OMEGA TECHNICAL SPECIFICATIONS 2005 432 Number of Berths Interior Length External body length Shipping Length Overall Width Overall Height Maximum Headroom Interior Width Wheel Rim Tyre Size Tyre Pressure Brake Size Awning Sizes Ground to Ground Bed Sizes Option 1 Bed Sizes M.T.P.L.M. Mass inRunning Order Essential Habitaion Equipment Maximum User Payload Maximum Hitch Weight Optional equipiment payload 2 4314mm / 14'2" 5146mm / 16'10.5" 6126mm / 20'1" 2148mm / 7'0.5" 2726mm / 8'11" 1908mm / 6'3" 2032mm / 6'8" 5.5J x 14 195/70 R 14 95 38psi 250/40 8560mm / 28'1" 1 x Single 1880 x 675mm 6’2” x 2’2.5” 1 x Single 1880 x 675mm 6’2” x 2’2.5” Option 2 1 x Double 1984 x 1480mm 6’6” x 4’10” 1260kgs / 24.75cwt 1078kgs / 21.17cwt 62kgs / 1.22cwt 182kgs . 3.58cwt 100kgs / 1.96cwt 24kgs / 0.47cwt 505 482 2 4828mm / 15'10" 5660mm / 18'8" 6640mm / 21'9.5" 2148mm / 7'0.5" 2726mm / 8'11" 1908mm / 6'3" 2032mm / 6'8" 5.5J x 14 195/70 R 14 95 42psi 250/40 9074mm / 29'9" 1 x Single 1880 x 675mm 6’2” x 2’2.5” 1 x Single 1880 x 675mm 6’2” x 2’2.5” 1 x Double 1984 x 1480mm 6’6” x 4’10” 1325kgs / 26cwt 1138kgs / 22.33cwt 62kgs / 1.22cwt 187kgs / 3.67cwt 100kgs / 1.96cwt 24kgs / 0.47cwt 5 5344mm / 17'6" 6176mm / 20'3" 7156mm / 23'6" 2148mm / 7'0.5" 2726mm / 8'11" 1908mm / 6'3" 2032mm / 6'8" 5.5J x 14 175 R 14 99P 64psi 250/40 9590mm / 31'5.5" 1 x Single 1880 x 675mm 6’2” x 2’2.5” 1 x Single 1880 x 675mm 6’2” x 2’2.5” 1 x Double 1984 x 1207mm 6’6” x 3’11.5” 1 x Single 1822 x 570mm 5’11.5” x 1’10.5” 1 x Double 1984 x 1480mm 6’6” x 4’10” 1 x Double 1984 x 1207mm 6’6” x 3’11.5” 1 x Single 1822 x 570mm 5’11.5” x 1’10.5” 1475kgs / 28.97cwt 1253kgs . 24.61cwt 62kgs / 1.22cwt 2.22kgs / 4.36cwt 100kgs / 1.96cwt 24kgs / 0.47cwt 524 4 5344mm / 17'6" 6176mm / 20'3" 7156mm / 23'6" 2148mm / 7'0.5" 2726mm / 8'11" 1908mm / 6'3" 2032mm / 6'8" 5.5J x 14 175 R 14 99P 61psi 250/40 9590mm / 31'5.5" 1 x Single 1880 x 675mm 6’2” x 2’2.5” 1 x Single 1880 x 675mm 6’2” x 2’2.5” 1 x Single 1800 x 635mm 5’11” x 2’1” 1 x Single 1655 x 570mm 5’5” x 1’10.5” 1 x Double 1984 x 1480mm 6’6” x 4’10” 1 x Single 1800 x 635mm 5’11” x 2’1” 1 x Single 1655 x 570mm 5’5” x 1’10.5” 1450kgs / 28.48cwt 1238kgs / 24.32cwt 62kgs / 1.22cwt 212kgs / 4.16cwt 100kgs / 1.96cwt 24kgs / 0.47cwt 524L 534 540 4 5344mm / 17'6" 6176mm / 20'3" 7156mm / 23'6" 2148mm / 7'0.5" 2726mm / 8'11" 1908mm / 6'3" 2032mm / 6'8" 5.5J x 14 175 R 14 99P 61psi 250/40 9590mm / 31'5.5" 1 x Double 2007 x 1334mm 6’7” x 4’4” 1 x Single 1800 x 635mm 5’11” x 2’1” 1 x Single 1655 x 570mm 5’5” x 1’10.5” 4 5486mm / 18'0" 6318mm / 20'9" 7298mm / 23'11.5" 2286mm / 7'6" 2726mm / 8'11" 1908mm / 6'3" 2170mm / 7' 1.5" 5.5J x 14 175 R 14 99P 65psi 250/40 9732mm / 31'11" 1 x Double 2124 x 1342mm 6’11.5” x 4’5” 1 x Double 1860 x 1300mm 6’1” x 4’3” 4 5414mm / 17'9" 6246mm / 20'6" 7226mm / 23'8.5" 2286mm / 7'6" 2726mm / 8'11" 1908mm / 6'3" 2170mm / 7' 1.5" 5.5J x 14 175 R 14 99P 65psi 250/40 9732mm / 31'11" 1 x Single 2130 x 710mm 7’0” x 2’4” 1 x Single 2113 x 710mm 6’11” x 2’4” 1 x Double 1950 x 1274mm 6’5” x 4’2” 1425kgs / 27.99cwt 1213kgs / 23.83cwt 62kgs / 1.22cwt 212kgs / 4.16cwt 100kgs / 1.96cwt 24kgs / 0.47cwt 1525kgs / 29.9cwt 1312kgs / 25.77cwt 62kgs / 1.22cwt 213kgs / 4.18cwt 100kgs / 1.96cwt 24kgs / 0.47cwt 1515kgs / 29.76cwt 1302kgs / 25.58cwt 62kgs / 1.22cwt 213kgs / 4.18cwt 100kgs / 1.96cwt 24kgs / 0.47cwt A manufacturing tolerance has been added to Mass in Running Order before calculating the Maximum User Payload. Note 1: Please take care to ensure that you have allowed for the masses of all items you intend to carry in the caravan. Maximum User Payload includes Essential Habitation Equipment, Personal Effects and Optional Equipment. Note 2: Warning under no circumstances must the Technical Permissible Laden Mass of the caravan be exceeded. Note 3: All data is calculated using metric weights and measurements. The imperial figures quoted are conversions thereof. 106 RALLYE TECHNICAL SPECIFICATIONS 2005 482 Number of Berths Interior Length Exterior body length Shipping Length Overall Width Overall Height Maximum Headroom Interior Width Wheel Rim Tyre Size Tyre Pressure Brake Size Awning Sizes Ground to Ground Bed Sizes Option 1 Bed Sizes 2 4828mm / 15'10" 5660mm / 18'7" 6640mm / 21'9.5" 2286mm / 7'6" 2600mm / 8'6.5" 1908mm / 6'3" 2170mm / 7' 1.5" 5.5J x 14 165 R 14 97 59psi 250/40 9074mm / 29'9" 1 x Single 1880 x 710mm 6’2” x 2’4” 1 x Single 1880 x 710mm 6’2” x 2’4” Option 2 1 x Double 2054 x 1480mm 6’9” x 4’10” M.T.P.L.M. Mass in Running Order Essential Habitation Equipment Maximum User Payload Maximum Hitch Weight Optional equipment payload 1400kgs / 27.5cwt 1228kgs / 24.12cwt 62kgs / 1.22cwt 172kgs / 3.38cwt 100kgs / 1.96cwt 3kgs / 0.05cwt 524 4 5344mm / 17'6" 6176mm / 20'3" 7156mm / 23'6" 2286mm / 7'6" 2600mm / 8'6.5" 1908mm / 6'3" 2170mm / 7' 1.5" 5.5J x 14 175 R14 99 65psi 250/40 9590mm / 31'5.5" 1 x Single 1880 x 710mm 6’2” x 2’4” 1 x Single 1880 x 710mm 6’2” x 2’4” 1 x Single 1800 x 635mm 5’11” x 2’1” 1 x Single 1655 x 570mm 5 ‘5” x 1’10.5” 540 4 5414mm / 17'9" 6246mm / 20'6" 7226mm / 23'8.5" 2286mm / 7'6" 2600mm / 8'6.5" 1908mm / 6'3" 2170mm / 7' 1.5" 5.5J x 14 185 R 14 102 61psi 250/40 9732mm / 31'11" 1 x Single 2130 x 710mm 7’0” x 2’4” 1 x Single 2113 x 710mm 6’11” x 2’4” 1 x Double 1950 x 1274mm 6’5” x 4’2” 634 4 6325mm / 20'9" 6998mm / 22'11" 8132mm / 26'8" 2286mm / 7'6" 2600mm / 8'6.5" 1908mm / 6'3" 2170mm / 7' 1.5" 5.5J x 14 175/65 R 14 82 36psi 200/50 10571mm / 34'8" 1 x Double 2112 x 1334mm 6’11” x 4’4.5” 1 x Double 1860 x 1300mm 6’3” x 4’3” 1 x Double 2054 x 1480mm 6’9” x 4’10” 1 x Single 1800 x 635mm 5’11” x 2’1” 1 x Single 1655 x 570mm 5’5” x 1’10.5” 1525kgs / 29.96cwt 1328kgs / 26.08cwt 62kgs / 1.22cwt 197kgs / 3.86cwt 100kgs / 1.96cwt 3kgs / 0.05cwt 635 5 6325mm / 20'9" 6998mm / 22'11" 8132mm / 26'8" 2286mm / 7'6" 2600mm / 8'6.5" 1908mm / 6'3" 2170mm / 7' 1.5" 5.5J x 14 175/65 R 14 82 36psi 200/50 10571mm / 34'8" 1 x Single 1880 x 710mm 6’2” x 2’4” 1 x Single 1880 x 710mm 6’2” x 2’4” 1 x Double 2054 x 1325mm 6’9” x 4’4” 1 x Single 1962 x 570mm 6’5.5” x 1’10.5” 1 x Double 2054 x 1480mm 6’9” x 4’10” 1 x Double 2054 x 1325mm 6’9” x 4’4” 1 x Single 1962 x 570mm 6’5.5” x 1’10.5” 1560kgs / 30.64cwt 1363kgs / 26.77cwt 62kgs / 1.22cwt 198kgs / 3.89cwt 100kgs / 1.96cwt 3kgs / 0.05cwt 1875kgs / 36.83cwt 1599kgs / 31.41cwt 95kgs / 1.69cwt 276kgs / 5.42cwt 100kgs / 1.96cwt 31kgs / 0.61cwt 1875kgs / 36.83cwt 1599kgs / 31.41cwt 95kgs / 1.69cwt 276kgs / 5.42cwt 100kgs / 1.96cwt 31kgs / 0.61cwt 636 6 6325mm / 20'9" 6998mm / 22'11" 8132mm / 26'8" 2286mm / 7'6" 2600mm / 8'6.5" 1908mm / 6'3" 2170mm / 7' 1.5" 5.5J x 14 175/65 R 14 86 38psi 200/50 10571mm / 34'8" 2 x Single 1880 x 710mm 6’2” x 2’4” AND 2 x Single 1830 x 690mm 6’0” x 2’3” 2 x Single 1705 x 570mm 5’7” x 1’10.5” OR 1 x Double 2014 x 1430mm 6’7” x 4’8” 2 x Single 1705 x 570mm 5’7” x 1’10.5” 1 x Double 2054 x 1480mm 6’9” x 4’10” AND 2 x Single 1830 x 690mm 6’ x 2’3” 2 x Single 1705 x 570mm 5’7” x 1’10.5” OR 1 x Double 2014 x 1430mm 6’7” x 4’8” 2 x Single 1705 x 570mm 5’7” x 1’10.5 1925kgs / 37.81cwt 1639kgs / 32.19cwt 95kgs / 1.69cwt 286kgs / 5.62cwt 100kgs / 1.96cwt 31kgs / 0.61cwt 640 4 6325mm / 20'9" 6998mm / 22'11" 8132mm / 26'8" 2286mm / 7'6" 2600mm / 8'6.5" 1908mm / 6'3" 2170mm / 7' 1.5" 5.5J x 14 175/65 R 14 82 36psi 200/50 10571mm / 34'8" 1 x Single 1830 x 710mm 6’0” x 2’4” 1 x Single 1830 x 710mm 6’0” x 2’4” 1 x Double 1970 x 1340mm 6’5.5” x 4’5” Technical Specifications Explorer Group 2005 Touring Caravan Handbook 1 x Double 2054 x 1430mm 6’9” x 4’8” 1 x Double 1970 x 1340mm 6’5.5” x 4’5” 1875kgs / 36.83cwt 1609kgs / 31.60cwt 95kgs / 1.69cwt 266kgs / 5.22cwt 100kgs / 1.96cwt 31kgs / 0.61cwt A manufacturing tolerance has been added to Mass in Running Order before calculating the Maximum User Payload. Note 1: Please take care to ensure that you have allowed for the masses of all items you intend to carry in the caravan. Maximum User Payload includes Essential Habitation Equipment, Personal Effects and Optional Equipment. Note 2: Warning under no circumstances must the Technical Permissible Laden Mass of the caravan be exceeded. Note 3: All data is calculated using metric weights and measurements. The imperial figures quoted are conversions thereof. 107 Technical Specifications BUCCANEER TECHNICAL SPECIFICATIONS 2005 CARIBBEAN Number of Berths Interior Length Exterior body length Shipping Length Overall Width Overall Height Maximum Headroom Interior Width Wheel Rim Tyre Size Tyre Pressure Brake Size Awning Sizes Ground to Ground Bed Sizes Option 1 Bed Sizes M.T.P.L.M. Mass in Running Order Essential Habitaion Equipment Maximum User Payload Maximum Hitch Weight Optional equipment payload Option 2 4 5344mm / 17'6" 6031mm / 19'9.5" 7151mm / 23'5.5" 2286mm / 7'6" 2600mm / 8'6.5" 1908mm / 6'3" 2170mm / 7' 1.5" 5.5J x 14 185 R 14 102 64psi 250/40 9590mm / 31'5.5" 1 x Single 1880 x 710mm 6’2” x 2’4” 1 x Single 1880 x 710mm 6’2” x 2’4” 1 x Single 1800 x 635mm 5’11” x 2’1” 1 x Single 1655 x 570mm 5’5” x 1’10.5” 1 x Double 2054 x 1480mm 6’9” x 4’10” 1 x Single 1800 x 635mm 5’11” x 2’1” 1 x Single 1655 x 570mm 5’5” x 1’10.5” 1625kgs / 31.92cwt 1378kgs / 27.07cwt 87kgs / 1.57cwt 247kgs / 485cwt 100kgs / 1.96cwt 28kgs / 0.55cwt ARGOSY CLIPPER 4 5414mm / 17'9" 6101mm / 20'0" 7221mm / 23'8.5" 2286mm / 7'6" 2600mm / 8'6.5" 1908mm / 6'3" 2170mm / 7' 1.5" 5.5J x 14 185 R 14 102 64psi 250/40 9732mm / 31'11" 1 x Single x 2130 x 710mm 7’ x 2’4” 1 x Single 2113 x 710mm 6’11” x 2’4” 1 x Double 1950 x 1274mm 6’5” x 4’2” 4 5707mm / 18'8.5" 6357mm / 20'10.5" 7527mm / 24'8.5" 2286mm / 7'6" 2600mm / 8'6.5" 1908mm / 6'3" 2170mm / 7' 1.5" 5.5J x 14 185 R 14 102 65psi 200/50 9953mm / 32'8" 1 x Double 2054 x 1388mm 6’9” x 4’6.5” 1 x Single 1880 x 800mm 6’2” x 2’7.5” 1 x Single 1880 x 800mm 6’2” x 2’7.5” SCHOONER 4 6325mm / 20'9" 6998mm / 22'11" 8132mm / 26'8" 2286mm / 7'6" 2600mm / 8'6.5" 1908mm / 6'3" 2170mm / 7' 1.5" 5.5J x 14 175/65 R 14 82 36psi 200/50 10571mm / 34'8" 1 x Double 2112 x 1334mm 6’11” x 4’4.5” 1 x Double 1860 x 1300mm 6’1” x 4’3” CARAVEL 4 6325mm / 20'9" 6998mm / 22'11" 8132mm / 26'8" 2286mm / 7'6" 2600mm / 8'6.5" 1908mm / 6'3" 2170mm / 7' 1.5" 5.5J x 14 175/65 R 14 82 36psi 200/50 10571mm / 34'8" 1 x Single 1830 x 710mm 6’ x 2’4” 1 x Single 1830 x 710mm 6’ x 2’4” 1 x Double 1970 x 1340 6’5.5” x 4’5.5” 1 x Double 2054 x 1430mm 6’9” x 4’8” 1 x Double 1970 x 1340mm 6’5.5” x 4’5” 1625kgs / 31.92cwt 1378kgs / 27.07cwt 87kgs / 1.57cwt 247kgs / 485cwt 100kgs / 1.96cwt 28kgs / 0.55cwt 1622kgs / 31.86cwt 1401kgs / 27.47cwt 87kgs / 1.57cwt 221kgs / 4.34cwt 100kgs / 1.96cwt 28kgs / 0.55cwt 1875kgs / 36.83cwt 1648kgs / 32.37cwt 87kgs / 1.57cwt 227kgs / 4.46cwt 100kgs / 1.96cwt 0 1875kgs / 36.83cwt 1640kgs / 32.21cwt 87kgs / 1.57cwt 235kgs / 4.61cwt 100kgs / 1.96cwt 0 A manufacturing tolerance has been added to Mass in Running Order before calculating the Maximum User Payload. Note 1: Please take care to ensure that you have allowed for the masses of all items you intend to carry in the caravan. Maximum User Payload includes Essential Habitation Equipment, Personal Effects and Optional Equipment. Note 2: Warning under no circumstances must the Technical Permissible Laden Mass of the caravan be exceeded. Note 3: All data is calculated using metric weights and measurements. The imperial figures quoted are conversions thereof. 108 Frequently Asked Questions (FAQs) GENERAL QUESTIONS Q: WHERE CAN I OBTAIN YOUR LATEST BROCHURE? A: Our latest brochures are available from Approved Retailers or can be viewed and printed from the downloads section on our website www.explorer-group.co.uk. A request form can also be completed should you wish to receive a printured copy of our latest brochures. Q: CAN I PURCHASE INSURANCE FOR MY TOURING THROUGH THE EXPLORER GROUP? A: The Explorer Group now offers an online vehicle insurance quotation scheme for any make or model of touring caravan. This is also applicable to vehicles that were not manufactured by The Explorer Group. For further information and to request a quotation, please visit our website www.explorer-group.co.uk Q: CAN I COME TO THE FACTORY TO PURCHASE TOURING CARAVANS DIRECT? A: Our caravans are only available 110 through our Approved Retailer network. Q: WHERE RETAILER? IS MY NEAREST A: Please refer to our Find A Retailer section on our website- www.explorergroup.co.uk, or telephone 01207 699 000 and ask for Customer Services. Q: AT WHICH RETAILER CAN I VIEW THE LATEST MODELS? A: The Find A Retailer section on our website will show which brands and model types each Retailer sells. You will need to contact the Retailer directly to find out if they have a particular model in stock, or on order. Q: CAN I PURCHASE A HANDBOOK AND HOW MUCH DOES IT COST? A: Some of the most recent handbooks are available to view in the Downloads section on our website. Printed copies can also be purchased at a cost of £10.00. We can accept payment by credit or debit card and you should contact us by telephoning 01207 699 000 and ask for Customer Services. Alternatively please send a cheque made payable to "The Explorer Group Ltd" to Customer Services, The Explorer Group, Explorer House, Delves Lane, Consett, Co Durham, DH8 7PE. Your covering letter should give details of your caravan including the VIN/Conversion number and your name/address to which we will post your handbook. Please be advised that original handbooks are not always available and you may receive a photocopy. Q: WHY IS THE HANDBOOK NOT SPECIFIC TO MY MODEL? A: Many of the components used in the manufacture of our caravans are identical throughout our model ranges, so we produce a generic handbook, which covers all models manufactured for that season. If the literature supplied with your caravan does not answer your question then please contact your Retailer for further assistance. Q. I REQUIRE TECHNICAL OR OTHER INFORMATION, WHO CAN HELP ME? A. The majority of information you require is available through your Explorer Group Retailer. Should you need to contact Explorer Group Customer Services, then please quote the serial number of your caravan, along with your full name and address if a written reply is required. Q - CAN YOU TELL ME THE SECOND HAND PRICE OF MY CARAVAN? A - Unfortunately as a manufacture we are not involved in the second hand market. You should try to contact a Retailer, Camping and Caravaning Club and/or the Caravan Club. They should be able to give some indication of market value. Frequently Asked Questions (FAQs) Explorer Group 2005 Touring Caravan Handbook 111 Frequently Asked Questions (FAQs) TOWING TOPICS Q: WHAT MAXIMUM WEIGHT OF CARAVAN CAN I TOW? A: That depends upon the kerb weight of your tow car. Best practice is usually to limit the actual laden weight being towed to no more than 85% of the tow car kerb weight. Your car manufacturer's manual should quote your maximum towing limit and its recommended nose weight. Q: WHAT IS NOSE WEIGHT, WHY DOES IT MATTER AND HOW CAN I CHECK IT? A: Nose weight is the download on a tow bar caused by the weight of your caravan when hitched. Remember this is not the maximum weight of your caravan, as the weight is distributed between the axle wheels (2 or 4) and the jockey wheel. For all Explorer Group caravans built since year 2000, our maximum nose weights are 100kgs, prior to that year they deviated between 75kgs and a maximum of 100kgs. Check yours by supporting the coupling head on your 112 bathroom scales, ensuring that your caravan is level at all times. Q: WHAT, IF ANY, SPECIAL EQUIPMENT IS NEEDED ON MY CAR BY LAW, TO TOW A CARAVAN? A: A towing bracket with a 50mm tow ball, 12N electrics socket and 12S electrics socket and a third number plate to go on the back of your caravan are all legal requirements. With effect from 1 October 1982, UK law also requires that a safety device be fitted to a permanent part of the tow bar structure. This is to provide protection in the event of separation of the main coupling whilst in motion and a breakaway cable must also be used where fitted. In addition, extended towing mirrors are highly recommended because you must have an adequate view to the rear of your towing unit. Q: HOW CAN I AVOID EXCESSIVE CARAVAN SNAKING WHEN I TOW AND WHAT SHOULD I DO IF IT STARTS? A: The Explorer Group has extensively tested our chassis and we are confident of its stability. However, many other factors can influence your towing unit. When loading your caravan put heavy items low down and mainly over the axle(s). You should not stow tins, bottles or heavy items in overhead lockers, during towing. Everything else should be distributed evenly around your caravan, front and back, and each side of the centreline. Make sure to end up with a suitable nose weight. Should snaking start, if at all possible don't brake and don't compensate by steering into the swings. Just ease up on the accelerator and allow your speed to gradually decrease until the snaking subsides. TECHNICAL RELATED QUESTIONS Q: WHAT ARE THE SPECIFIED WEIGHTS FOR MY CARAVAN? A: Your caravan, MTPLM, MIRO, Essential Habitation Equipment, Maximum User Payload, Maximum Hitch Weight and Optional Equipment Payload can all be found by looking in the latest model section, or the 'Product Archives' on our website or referring to the relevant Technical Specification section of this handbook. Q: WHAT ARE THE CORRECT TYRE SIZES/PRESSURES FOR MY CARAVAN? A: Tyre pressures for Explorer Group caravan can be found by looking in the latest model section, or the Product Archive section on our website or by referring to the relevant Technical Specification section of this handbook. Q: WHAT IS THE CORRECT AWNING SIZE FOR MY CARAVAN? A: Ground to ground awning measurements for Explorer Group caravans can be found by looking in the latest model section, the Product Archive section on our website or by referring to the relevant Technical Specification section of this handbook. However, if that information cannot be found then we would suggest that the physical measurement should be obtained by threading a piece of string through the awning channel from ground to ground, and then by measuring the string. Your awning manufacturer will then advise on the nearest size of awning appropriate for your measurement. Q: CAN I FIT A BICYCLE RACK/TOP BOX/AIR CONDITIONING TO MY CARAVAN? A: It may be possible to fit accessories to your caravan but this will depend upon the internal construction of the roof/walls and whether they can support the weight of the accessory. If it is possible your Retailer will be able to advise you, or alternatively they will obtain confirmation and a drawing where necessary, from The Explorer Group. Please note that weight of any accessories will reduce your User Payload allowance. Q: HOW DOES MY CONTROL PANEL WORK? A: Please consult the literature supplied with your caravan, as it is a sophisticated electronic component. If you have any problems with the control panel then please inform your Retailer. If they are unable to resolve your problems then they will consult with us, or our supplier for further advice. Frequently Asked Questions (FAQs) Explorer Group 2005 Touring Caravan Handbook 113 Frequently Asked Questions (FAQs) Q: HOW DOES MY LEISURE BATTERY AND ELECTRICAL SYSTEM WORK? A: The battery charger will operate when connected to the mains outlet on a caravan site. The 12V system, with the exception of the 12V fridge and battery charging, will not operate when your caravan is connected to your towing vehicle. If you encounter problems please ensure that you have checked your leisure battery is fully charged and that all fuses are OK. Are other electrical appliances working? Please note that when towing, your leisure battery will receive a trickle charge from your "car" battery, but this is not sufficient to fully charge a discharged leisure battery. Q: MY INTERIOR LIGHTS ARE NOT WORKING, WHAT DO I DO? A: It is possible that all of the 230V mains electrical equipment may not be operated simultaneously. A typical UK caravan site mains hook-up point provides a maximum output of 10 amps and on some continental sites, this may be as low as 5 amps. So, for example if you operate a colour TV (2.50 amps), Blown air heater (4.80 amps), water heater (2.75 amps) and interior lights, you may overload your 114 system by using too many appliances at the same time. Switching off other appliances should allow your lights to work. PLEASE NOTE: Internal lights will not work whilst, when hitched up, the tow car engine is running. PARTS RELATED QUESTIONS Q: WHERE CAN I GET SPARE PARTS FOR MY CARAVAN? A: We do not supply spare parts direct to the public at present, but our network of Retailers will be able to source most parts you require. For details of your nearest Explorer Group Retailer please refer to our Find A Retailer section on our website or call 01207 699 000 for assistance. In addition there are companies that buy up old stock and they may be able to assist you. Their details can usually be found in the advertiser sections of the popular caravan/motorhome press. Q. HOW MANY YEARS WILL SPARE PARTS BE AVAILABLE FOR MY CARAVAN? A. In accordance with NCC guidelines, introduced in September 2003, The Explorer Group will endeavour to supply spare parts for a caravan, for up to 8 years before current caravan production. However, this is dependent upon parts availability from our suppliers. Q. WHY DON'T YOU STOCK PARTS AT THE EXPLORER GROUP FACTORY? A. Due to the volume of models we produce it is not possible for us to maintain stock levels of every individual component used in our manufacturing process. We do stock commonly requested items, but some items must be made to order to ensure their pristine condition on delivery. Q. THERE HAS BEEN A DELAY IN RECEIVING PARTS, WHO CAN HELP ME? A. We do not advise customers to contact The Explorer Group directly, as you will not have the unique sales order identification number that will be required to trace your order. Your Explorer Group Retailer has a dedicated account handler who they can consult about any aspect of their parts order. Please ask your Retailer to consult our Parts Department for this information. Frequently Asked Questions (FAQs) Explorer Group 2005 Touring Caravan Handbook Q. WHAT IF THE PARTS ARE NO LONGER AVAILABLE? A. Where an original part is no longer available, we will advise a suitable alternative if it is available. 115 Frequently Asked Questions (FAQs) WARRANTY RELATED QUESTIONS Q. DOES MY CARAVAN HAVE A WARRANTY? A. Our warranty arrangements are as follows: If the original date of purchase is on or after 1 September 02, your caravan conversion is supplied with a 3 year manufacturer's warranty, details of which can be found in your owner's handbook. In addition, there is also a 5-year water ingress Code of Practice. If the original date of purchase is before 1 September 02 your caravan conversion was supplied with a 1 year manufacturer's warranty and a 2 year extended warranty underwritten by MB&G Insurance. The Explorer Group paid for the extended warranty on receipt of the completed proposal form, from the Retailer. You should have a copy of this form within your extended warranty policy booklet. The 5-year water ingress Code of Practice may also apply depending on the original date of purchase 116 All warranties are dependant upon compliance with the relevant terms and conditions, particularly regarding annual servicing. Full details are supplied in the owners' literature pack. regarding annual servicing must be adhered to. Q. CAN I EXTEND THE WARRANTY OF MY CARAVAN? A. Yes, if you bought before 1 September 02. After this date, the 3-year Explorer Group warranty cannot be extended, but most Retailers offer comprehensive packages and these are sold as an insurance-based policy. Please consult your nearest Retailer or MB&G Insurance for further advice. A. In order to protect your investment and to comply with the warranty conditions, you must have your caravan serviced annually. We strongly recommend that you continue to have your caravan professionally serviced, even after the warranty has expired. Q. IS THE WARRANTY TRANSFERABLE TO SUBSEQUENT OWNERS? A. The warranty can be transferred to subsequent owners, for a payment of £25. For caravans purchased on or after 1 September 02, your cheque should be forwarded to The Explorer Group quoting the serial number of your caravan. For purchases before 1 September 02, please contact MB&G Insurance. In order for the warranty to be transferred, the relevant terms and conditions, particularly Q. DOES MY CARAVAN NEED TO BE SERVICED EVERY YEAR? Q: CAN I TAKE MY TOURING CARAVAN FOR AN ANNUAL SERVICE AT A RETAILER OR SERVICE CENTER, OTHER THAN WHERE I PURCHASED IT? A: Customers can take their touring caravan to any approved Explorer Group Retailer or Service Centre, providing that the Retailer or Service Centre agrees to do this work. Q. WHO CAN SERVICE MY CARAVAN? A. We would always recommend that an approved Explorer Group Retailer, or Service Centre undertakes the annual service. However, we will accept services completed by a Jones Vening approved company. Q. WHO CAN CARRY OUT WARRANTY WORK ON MY CARAVAN? A. Your supplying Retailer is obliged to undertake your warranty work. However, any approved Explorer Group Retailer or Service Centre can undertake the work, but this is at their discretion. Q. I AM HAVING TROUBLE BOOKING MY CARAVAN FOR ITS SERVICE, IN LINE WITH THE REQUIREMENTS. WHAT TIMESCALE IS ACCEPTABLE? A. If the original date of purchase is on or after 1 September 2002, we will allow a delay of 10 weeks after your service is due, but subsequent annual services should still be undertaken as close as possible to the anniversary of the original date of purchase. If the original date of purchase was before 1 September 2002, you will need to contact MB&G Insurance, details of which can be found in your extended warranty policy booklet. Q. I HAVE A PROBLEM WITH MY CARAVAN, WHO CAN HELP ME? A. We would always recommend that you contact your supplying Retailer, or if this is not convenient, your local Explorer Group retailer or Explorer Group Approved Service Centre, so that an inspection can take place, and the necessary course of action agreed. Q. I AM UNHAPPY WITH THE SERVICE I HAVE RECEIVED FROM MY RETAILER, WHERE DO I GO FROM HERE? A. We would recommend that you write to your Retailer, detailing your problems and requirements, requesting a response explaining how they will resolve your complaint. A copy of your letter can also be forwarded to The Explorer Group Customer Relations Manager, quoting the serial number of your caravan. Frequently Asked Questions (FAQs) Explorer Group 2005 Touring Caravan Handbook Please be assured that we will assist your Retailer in resolving any problems. 117 Frequently Asked Questions (FAQs) ABBREVIATIONS USED 118 ABS Description AC Alternating Current BS British Standards CC Caravan Club CCC Camping and Caravanning Club GRP Glass Fibre Reinforced Plastic NM Newton Meters HZ Hertz I cycle per second NW Nose weight ISO International Standards Organisation OEP Optional Equipment Payload KG Kilogram PEP Personal Effects Payload KPH Kilometres per hours PSI Pounds per square inch. LI Load Index RCD Residual Current Device LPG Liquefied Petroleum Gas V Volt Litres VIN Vehicle Identification Number CM Centimetres LTRS CMHR Combustion Modified High Resilient Mbar Milibar MCB Miniature Circuit Breaker CORGI Confederation of Gas Installers MIRO Mass In Running Order CRIS Caravan Registration and Identification scheme. MM Millimetres MPH Miles per Hour DC Direct Current MTPLM ECA Electrical Contractors Association Maximum Technical Permissible Laden Mass NCC National Caravan Council NICEIC National Inspection Council for Electrical Installation Contracting EHEP Essential Habitation Equipment Payload EN European Norms GLOSSARY 12N & 12S Between towing vehicle and caravan there can be one or two electrical jack plugs. The black plug and socket is called the 12N and supplies power to the caravan rear fog light, indicators, stop lights and riding lights and an earth return. The second plug and socket can be coloured white or light grey. This is called the 12S and supplies power for the caravan’s reversing lights, fridge, battery charger and interior lights and has two earth connections. Because the 12S plug is virtually a mirror image of the 12N plug the 12N plug can’t be plugged in to the 12S socket or vice a versa. A FRAME The triangular part at the front of the caravan’s chassis, in between the main body and the hitch. Also called the drawbar. ABS An acronym for anti-lock braking system. ACTUAL LADEN WEIGHT The total weight of the caravan when loaded ready for use by the end user. AQUAROLL Brand name used generically for a water container that rolls so you don’t need to lift it. AWNING A tent-like structure of fabric over a supporting framework, which can be attached to the side of caravan. BATTERY CHARGER Required to keep a leisure battery charged. Most caravans include a charging facility which operates via the mains hook-up, and also has the ability to recharge from the towcar’s alternator while travelling. BERTH(S) Sleeping place - Refers to the number of people a caravan can accommodate for sleeping. BLOWN AIR HEATING A method of heating the living quarters of a caravan by use of a fan pushing air out through a number of outlets. BREAKAWAY CABLE A thin steel cable linking the caravan handbrake to the vehicles tow bar- In the event of the caravan becoming detached from the car, the cable will pull the caravan handbrake on before snapping. BUNK BED A sleeping place, usually higher up than a conventional bed. Often (but not always) this can be folded or removed to provide additional living space. BUTANE Liquefied Petroleum Gas (LPG) which usually comes in blue cylinders. Most commonly used in the UK, although a switch to propane is advised in severely cold weather conditions. CALOR The main supplier of propane (red) gas cylinders and significant seller of butane (blue) gas. Frequently Asked Questions (FAQs) Explorer Group 2005 Touring Caravan Handbook CAMPINGAZ Trade name of Butane gas. CASSETTE BLIND A roller blind which is fitted as part of the window assembly, often along with a flyscreen, thus giving a neat installation. CASSETTE TOILET (CHEMICAL LOLLET) A form of chemical toilet found in modern caravans, where the waste holding tank can be accessed and emptied from, outside. 119 Frequently Asked Questions (FAQs) CHEMICAL TOILET Most modern caravans have them, with more upmarket models having a fully plumbed-in flushing version. CONTROL PANEL Used as the description for the panel of electrical switches and gauges governing 12V and mains electricity systems. CORNER STEADIES The winding device built into each corner of a caravan chassis that is used to stabilise the body once set up on a pitch. COUPLING HEAD See hitch. CRiS The Caravan Registration and Identification Scheme. A voluntary scheme which registers caravans in a similar manner to how motor vehicles are registered. Allows you to check the legitimate right to ownership of the seller of a secondhand caravan, and helps in the recovery of stolen caravans. DINETTE A popular style of seating arrangement where two seats or settees face each other across a table. 120 EARTH LEAKAGE CIRCUIT BREAKER ELCB Earth leakage circuit breaker – see residual current device (RCD) ELCB Earth Leakage Circuit Breaker. More normally termed RCD. END KITCHEN A common term used to describe floorplans which put the kitchen across the rear, usually adjacent to a caravan door on one side and washroom on the other. ESSENTIAL HABITATION EQUIPMENT Those items and fluids required for the safe and proper functioning of the equipment for habitation as defined by the manufacturer of the caravan. This includes items such as the leisure battery and gas cylinders, plus water contained in the water heater etc. FLYSCREENS Mesh fittings for windows doors and roofvents, to keep out insects etc. FREE-STANDING TABLE A table which, because of its leg design, can be used inside or outside. FULL SERVICE PITCH A pitch which has individual provision for fresh water supply and waste water disposal, in addition to mains electricity and in some cases TV aerial connection. GAS CYLINDER A portable, pressurised container for the storage at LPG. GAS CYLINDER LOCKER Compartment on the caravan for the storage of gas cylinders. GAS DROP OUT HOLES Part of the ventilation. LPG is heavier than air, so holes through the floor below gas-powered appliances allow any leakage of gas to exit the habitation area. GREY WATER Waste water from sink/shower. GROSS TRAIN WEIGHT Also known as Combined Weight. The maximum permitted weight of an outfit as speciifed by the towcar manaufacturer. GROSS VEHICLE WEIGHT (GVW) The weight ol the vehicle laden to its maximum, as defined by the manufacturer. See also MTPLM. GRP Glass-reinforced plastic, but more commonly known as glass fibre (not fibreglass, which is a trade name). HANDBOOK Owners manual, a guide to the workings of your caravan. HARDSTANDING A pitch which has a hard surface made of gravel, asphalt, concrete etc, instead of grass. HITCH The mechanism which allows a caravan to be attached to a tow ball. HITCH LOCK A security device that prevents the caravan hitch being used. HOOK-UP A facility on a pitch for connection to mains electricity. INGRESS Usually meaning water ingress, a possible problem where water seeps in at the joins, usually as a result of worn sealant. JACK A device for raising the vehicle so that a wheel can be changed, for instance. Not to be confused with corner steadies, which although they are sometimes referred to as ‘corner jacks’ are steadying, not lifting devices. JOCKEY WHEEL The small front wheel attached to the caravan A-frame used to support the forward end of the caravan, when detached from the towing vehicle. KERB WEIGHT The empty weight of a motor vehicle as defined by the manufacturer. LAYOUT Interior design. Where furniture units are placed in relation to each other. LEISURE BATTERY Sometimes termed auxiliary battery. Supplies the power for the caravan electrical systems. LEVEL The process of ensuring that a caravan is level when sited on a pitch. Important for comfort and also to ensure the correct functioning of the fridge and water systems. LPG Liquid Petroleum Gas, i.e. butane or propane. L-SHAPED A term where the seating area of a caravan is indeed L-shaped. MAINS HOOK-UP A campsite facility where you can plug into a mains electricity supply. MAXIMUM HITCH HEIGHT The maximium height at which the hitch should be connected to a towing vehicle MAXIMUM PERMISSIBLE TOWING WEIGHT The maximum weight that the towing vehicle is allowed to tow. Frequently Asked Questions (FAQs) Explorer Group 2005 Touring Caravan Handbook MAXIMUM USER PAYLOAD The maximium payload available for the user inculding essential habitional equipment. MIRO - MASS IN RUNNING ORDER Weight of the caravan equipped to the manufacturer’s standard specification. i.e. the condition in which it leaves the factory. Note that this does not include any part of the user payload, including the essential habitation equipment. 121 Frequently Asked Questions (FAQs) MTPLM - MAXIMUM TECHNICALLY PERMISSIBLE LADEN MASS The techical maximum permissable laden weight of the caravan which must not be exceeded.. NATIONAL CARAVAN COUNCIL The only trade association representing manufacturers, retailers and suppliers within the caravan industry. NOSEWEIGHT The weight exerted on the towbar. Special scales are available from accessory shops for measuring this weight. NUMBER PLATE Caravans must display a legal number plate showing the same registration mark as their towing vehicle. OPTIONAL EQUIPMENT PAYLOAD The payload required for equipiment to enabkle the caravan to be used for habitation purposes. OUTFIT The caravan and its towing vehicle considered as a unit. OWNERS’ CLUB A group of people who usually own the same brand of caravan and enjoy meeting up for rallies. 122 PAYLOAD The amount you can put into a caravan. Specifically the difference between the Maximum Technical Permissible Laden Mass (MTPLM) and the Mass In Running Order (MIRO). PDI Pre-Delivery Inspection. PITCH A designated area of a caravan site allocated for the use of one outfit. Most sites will be arranged with defined pitches. PROPANE Gas used in colder conditions. Usually supplied in red cylinders. RCD Residual Current Device. Part of the electrical system which will ‘trip’ if there is an electrical fault. REGULATOR Safety device fitted between the gas cylinder and the gas system of a caravan, which controls the pressure of gas being released from the cylinder. ROAD LIGHTS The external lights used while the vehicle is travelling. ROOF LIGHTS See Roof Vent. ROOF VENT An opening unit in the ceiling which lets in light and air. These vary in size, but the best ones will have integral blinds and flyscreens. Also called rooflights. SEMI-RIGID PIPEWORK Usually, a reference to the water system; infinitely preferable to cheaper convoluted piping which can act as a trap for germs and smells. SINGLE AXLE A caravan with a single pair of wheels on one axle. See also twin axle. SLATS Sometimes used for beds. Improves ventilation to mattress cushions. SPACE HEATER Type of heating equipment for the living quarters. Modern units fitted offer gas and mains-operation. SPEED RATING The maximum speed at which a tyre may be used, as marked on its sidewall. STABILISER A safety device which helps prevent instability by controlling the ease with which the caravan hitch can pivot about the tow ball. STEADY WINDER A handle for operating the corner steadies. TORQUE WRENCH A form of spanner used to set nuts and bolts to a specified degree of tightness. Recommended for adjustment of wheel fixings on caravans. TOWING LIMIT See manufacturer’s braked towing limit and manufacturer’s unbraked towing limit. TOWING MIRRORS \Additional rear vision mirrors added to a towing vehicle to provide a greater width of view to see past a caravan. TRAIN WEIGHT The maximum permissable combined weight of towcar and touring caravan. TWIN AXLE A caravan with two pairs of wheels, on two axles which are located close together. These are usually the larger, heavier caravans, where the second axle helps carry the greater weight more easily, and also makes a longer caravan more stable to tow. See also single axle. USER PAYLOAD The weight of all items carried in the caravan. U-SHAPED SETTEE Usually a reference to seating that literally is ‘U’ shaped. VEHICLE KERBWEIGHT The weight of the towcar often indicated in the manufacturers specifications.. WARRANTY Terms and conditions that spell out your rights with regard to servicing, repair or replacement of parts as provided by the manufacturer. WILD CAMPING Term used for staying overnight away from a campsite. Illegal in many countries, but permission may be granted by individual landowners. Frequently Asked Questions (FAQs) Explorer Group 2005 Touring Caravan Handbook VIN - VEHICLE IDENTIFICATION NUMBER The manufacturer’s unique serial number for an individual vehicle. Cars and motor caravans should carry a VIN. Caravans are not obliged to, but most of those sold in recent years in the UK do as a result of the CRiS voluntary registration scheme. 123 Index A Abbreviations Used ABS A-Frame Cover Cleaning 59 ABS Panels Cleaning ABS Wheel Spats Cleaning Acrylic Window Cleaning Air Conditioning Air Conditioning Fitting Alarm System – Arming Alarm System – Basic Operation Alarm System – Batteries Alarm System – Battery Back-Up Alarm System – Changing Sensor Zones Alarm System – Disarming Alarm System – Emergency Disarm Alarm System – Learning A New Sensor Alarm System – Leg Sensor Alarm System - Passive Ifra Red Sensor Alarm System – Programming Alarm System – Remote Transmitter Alarm System – Sensors Alarm System – Silent Arm And Disarm Annual Service Annual Service Record Anti-Wind Corner Steadies Automatic Charging System Automatic Igniter – Gas Heater 124 118 59 59 58 47 113 30 30 33 33 33 31 31 33 31 31 32 34 31 31 128 126 29 25 39 Autowatch Alarm System Avanté – Equipment List Avanté Electrical Control Panels Avanté Internal Wiring Diagrams Avanté Road Light Wiring Diagram Avanté Technical Specification Awning Size Awning Spaces/Ventilation 30 86 36 88 89 102 113 20 B Bathroom Taps 42 Battery Installation 24 Battery Maintenance 24 Bed Make Up 57 Bicycle Rack Fitting 113 Body Shell 84 BPW Chassis 84 BPW Chassis Maintenance 61 BPW Rubber Suspension Axles – Lubrication & Maintenance 68 Brakes – Adjustment 64 Braking System 84 Breakaway Cable – Correct Use 9 Breakaway Cable – No Designated Attachment Point 9 Breakaway Cable – Other Means Of Attachment 10 Breakaway Cable Attachment Point 9 Breakaway Cable On Detachable Ball 9 Breakaway Cable On Fixed Ball 9 Brochures 110 Buccaneer – Equipment List 87 Buccaneer Electrical Control Panels 37 Buccaneer Internal Wiring Diagrams 100 Buccaneer Road Light Wiring Diagram 101 Buccaneer Technical Specification 108 Bulbs – Replacement 37 Bunk Beds 57 Butane 19 C Caravan Breakaway Cable – Use Of Caravan Covers Caravan Handling Caravan Insurance Caravan Registration And Identification Scheme – VIN Caravan Servicing Caravan Theft Caravan Warranty Caravan Weight Care Of Rooflights Carpet Cleaning Cassette Toilet Changing A Wheel Charger Cleaning Cleaning Taps Code Of Practice – Water Ingress Contents Corner Steadies 9 76 11 110 29 117 28 116 113 49 59 46 71 24 58 43 80 1 71 Corona – Equipment List 86 Corona Electrical Control Panels 36 Corona Internal Wiring Diagrams 90 Corona Road Light Wiring Diagram 91 Corona Technical Specification 105 Coupling Head – Lubrication & Maintenance 67 CRiS 29 Crusader – Equipment List 87 Crusader Electrical Control Panels 36 Crusader Internal Wiring Diagrams 96 Crusader Road Light Wiring Diagram 97 Crusader Technical Specification 104 Curtain Cleaning 59 Customer Relations Manager 117 Electronic Tagging Equipment Lists Explorer Protect Exterior Doors External Loading & Checks D Diesel Fumes Door Flyscreen Doors Double Bed Draining Down Your Water System G Gas Gas Barbecue Point Gas Connection Gas Dispersal Holes Gas Heater Operation Gas Hoses Gas Safety Advice General Safety Generators Glossary Of Terms Grill GRP Cleaning E Electric Heater Operation Electrical Connection – Overseas Electrical Control Panels Electrical System Electrical Wiring Diagrams Electricity Electricity Mains Supply 26 51 55 57 18 40 23 36 114 88 22 22 F Feder 13 Pin Plug And Socket Fire Fire Extinguishers Fire Retardant Foams Fitting Accessories Flyscreens Frequently Asked Questions Furniture Cleaning 30 86 30 55 6 75 27 27 27 113 51 110 59 19 21 19 26 38 19 20 4 24 119 44 58 H Handbook Purchase Handbrake Heki 2 Rooflight Heki Duette Luxu Rooflight Hitch Head Coupling Hitch Head Operation - Normal Hitch Head Operation Winterhoff Stabiliser Hitch Head Uncoupling Hitch-Up Hob How To Use A Waterline With The Inboard Water Tank I Interior Light Fault Interior Wall Cleaning Internal Doors Internal Loading & Checks 110 71 48 48 62 7 Index Explorer Group 2005 Touring Caravan Handbook 7 62 6 44 17 114 59 55 6 J Jacking Jeager 13 Pin Plug And Socket 72 75 K Kitchen Taps 42 125 Index 126 L Latest Models Leisure Battery Leveler Jack Leveling Ramps Leveling Your Caravan Light Switch Master Loading LPG LPG Exhaust LPG Gas System Lubrication – Brake Linkage Lubrication – Corner Steadies Lubrication – Coupling Head Lubrication - Deviation Lever Lubrication – Drawtube Bushes Lubrication – Jockey Wheel Lubrication – Pivot Pins 110 114 12 12 12 37 6 20 20 21 73 73 66 66 66 73 66 M Magnetic Catches Main Components Mains Electrics - Servicing Mains Unit Maintenance Maintenance Of Air Conditioning Maximum Tow Weight Microtag Midi-Heki Rooflight Mini-Heki Rooflight Model Year 55 84 82 24 61 47 112 28 49 49 2 MPK Rooflight Multicon 13 Pin Plug And Socket N Nearest Retailer New Vehicle Care Nose Weight O Odyssey – Equipment List Odyssey Electrical Control Panels Odyssey Internal Wiring Diagrams Odyssey Road Light Wiring Diagram Odyssey Technical Specification Omega – Equipment List Omega Electrical Control Panels Omega Internal Wiring Diagrams Omega Road Light Wiring Diagram Omega Technical Specification Omnivent Oven P Panic Alarm Parking Brake Parts – Warranty Cover Petrol Fumes Piezo Ignitron - Gas Heater Pin Plug And Socket Polyplastic Windows Operation Power Drain 49 75 110 61 112 86 36 92 93 103 86 36 94 95 106 48 44 31 71 78 26 39 75 50 76 Prepare Your Water System For Winter Use Preparing For The Road Pre-Tow Checklist Propane 16 6 6 19 R Rallye – Equipment List Rallye Electrical Control Panels Rallye Internal Wiring Diagrams Rallye Road Light Wiring Diagram Rallye Technical Specification RCD – Resetting Refrigerator Remedial Work Retailer Special Editions Reversing Your Caravan Robstop WS3000 Roof Blinds Rooflights Room Thermostat – Gas Heater 87 36 98 99 107 25 44 82 131 11 28 49 48 40 S Second Hand Values Seitz Window Operation Selecting A Pitch Service Record Servicing Servicing Servicing Setting Off 111 50 12 129 82 116 117 11 Shower Room Cleaning Shower Tap Single-Lever System Site Arrival Site Arrival – Electrical Connection Site Departure – Electrical Disconnection Sliding Doors Smoke Alarm Snaking Space Heater Controls Spare Parts Spare Parts And Availability Spare Wheel Special Editions Speed Limits Sprung Hinges Stabiliser Activation Stabiliser Coupling Stabiliser Disconnection Stabiliser Switching Off Stabilising Status Aerial 315 Status Aerial 530 Storage Storage - Blinds & Flyscreens Storage - Caravan Covers T Taps Technical Specifications 59 42 63 12 22 22 56 45 112 37 82 115 70 131 11 56 7 7 8 8 63 52 53 76 51 76 42 102 Thermal Insulation And Heating Classification Thermostat Thetford Cassette Toilet Tightening Torques Of Wheel Bolts Tightening Wheel Bolts Top Box Fitting Towing And Driving Towing Topics Transferring The Warranty Truma Crystal Filter Cartridge Truma Crystal Routine Maintenance Truma Crystal Sterilising Truma Space Heater Operation TV Aerial Tyre Pressure Tyre Pressures Tyre Sizes Tyre Wear And Damage Tyres U Upholstery Cleaning V Ventilation – Bedrooms Ventilation – High Level Ventilation – Low Level VIN Number Volta 85 40 46 63 71 113 11 112 116 15 15 15 38 52 70 113 113 70 70 59 26 26 26 129 13 W Warranty Warranty Extension Warranty Terms And Conditions Wash Basin Cleaning Water Water Container Cleaning Water Heater Controls Water Ingress Water Pump Connection Water System Cleaning Welcome & Introduction Wheel Bolts Window Blinds Window Etching And Marking Windows Winterhoff Stabiliser Activation Winterhoff Stabiliser Coupling Winterhoff Stabiliser Disconnection Winterhoff Stabiliser Switching Off Winterisation - Caravan Covers Winterising - see Draining Down Your Water System Winterization - Blinds & Flyscreens WS3000 Safety Coupling 12N & 12S Socket And Plug Wiring Diagram 13 Pin Plug And Socket 3 Year Manufacturers Warranty 7 Pin Plug And Socket 78 116 79 59 14 60 37 80 14 59 2 72 51 29 50 7 7 8 8 76 Index Explorer Group 2005 Touring Caravan Handbook 18 51 63 74 75 78 74 127 Annual Service Record SERVICE DOCUMENTS TOURING CARAVANS - ANNUAL SERVICE RECORD In order to take full use of your Explorer Group Warranty it is essential that your caravan is serviced within the time scale laid down in the warranty terms and conditions. See Index - Warranty Terms & Conditions. Whether you use your caravan for short journeys or for touring at home or abroad, regular servicing will help to ensure that you can enjoy it to the full.The Annual Service offered by your retailer will include the following work and it is our recommendation you have your caravan serviced to this standard annually, in accordance with the National Caravan Council recommendations. The retailer will complete the record in this guide to show the work has been carried out. SECTION (A) CHASSIS 1. 2. 3. 4. 5. 6. 7. 8. 9. 10. 11. Brakes Suspension Axles and Hubs Tyres and pressures Wheel nuts Towing hitch and reverse Jockey wheel Breakaway chain Corner steadies Adjusted and lubricated Fully operational SECTION (B) EXTERIOR 1. 2. 3. 4. 5. Exterior panels Windows Rooflights Entrance door/Door Locks Wheel boxes 6. 7. 8. 9. 10. 11. 12. Mouldings Gas bottle and Fairing Ventilators Paintwork All seals, mouldings etc. Damp test Striping etc. SECTION (C) INTERIOR 1. 2. 3. 4. 5. 6. 7. 8. 9. 10. 11. Wall panels Furniture Curtains/Blinds/Flyscreen Mattresses Carpet Doors and Drawers All hinges and catches Ventilators Water pumps Hoses and sink plugs Hot water system 12. 13. 14. 15. 16. 17. 18. Cold water system Window hinges and stays Cassette Toilet Shower Shower Tray Central Heating Damp Test SECTION (D) ELECTRICAL 1. 2. 3. 4. 5. 6. 7. 8. 9. 10. Reflectors All interior lights/Road lights Water pump and switches Refrigerator Distribution Unit Charging Unit Junction Box/Strip Wiring and supports Trailer connecting plugs sockets Overall tests ext. lights 11. 12. 13. Awning lights Electronic Ignition (Hob) 230v System where applicable SECTION (E) GAS INSTALLATION 1. 2. 3. 4. 5. 6. 7. Hotplate Oven Refrigerator Heater Leak tested Water heated Fully operation SECTION (F) FINAL Road Test CARE WARRANTY Your caravan is covered by the 3 year warranty, it is a condition of this warranty that a service and safety check is carried out by your caravan retailer at least once a year (12 months from the date of purchase) in accordance with the National Caravan Council recommendations. 128 ANNUAL SERVICE RECORD CARAVAN MODEL VEHICLE IDENTIFICATION NUMBER YEAR 1st SERVICE 2nd SERVICE 3rd SERVICE DATE: DATE: DATE: RETAILER'S STAMP RETAILER'S STAMP RETAILER'S STAMP I/We certify that an annual service has been carried out in accordance with the manufacturers’ and National Caravan Council recommendations. I/We certify that an annual service has been carried out in accordance with the manufacturers’ and National Caravan Council recommendations. I/We certify that an annual service has been carried out in accordance with the manufacturers’ and National Caravan Council recommendations. 4th SERVICE 5th SERVICE 6th SERVICE DATE: DATE: DATE: RETAILER'S STAMP RETAILER'S STAMP RETAILER'S STAMP I/We certify that an annual service has been carried out in accordance with the manufacturers’ and National Caravan Council recommendations. I/We certify that an annual service has been carried out in accordance with the manufacturers’ and National Caravan Council recommendations. I/We certify that an annual service has been carried out in accordance with the manufacturers’ and National Caravan Council recommendations. Annual Service Record Explorer Group 2005 Touring Caravan Handbook 129 Annual Service Record 130 7th SERVICE 8th SERVICE 9th SERVICE DATE: DATE: DATE: RETAILER'S STAMP RETAILER'S STAMP RETAILER'S STAMP I/We certify that an annual service has been carried out in accordance with the manufacturers’ and National Caravan Council recommendations. I/We certify that an annual service has been carried out in accordance with the manufacturers’ and National Caravan Council recommendations. I/We certify that an annual service has been carried out in accordance with the manufacturers’ and National Caravan Council recommendations. 10th SERVICE 11th SERVICE 12th SERVICE DATE: DATE: DATE: RETAILER'S STAMP RETAILER'S STAMP RETAILER'S STAMP I/We certify that an annual service has been carried out in accordance with the manufacturers’ and National Caravan Council recommendations. I/We certify that an annual service has been carried out in accordance with the manufacturers’ and National Caravan Council recommendations. I/We certify that an annual service has been carried out in accordance with the manufacturers’ and National Caravan Council recommendations. 13th SERVICE 14th SERVICE 15th SERVICE DATE: DATE: DATE: RETAILER'S STAMP RETAILER'S STAMP RETAILER'S STAMP I/We certify that an annual service has been carried out in accordance with the manufacturers’ and National Caravan Council recommendations. I/We certify that an annual service has been carried out in accordance with the manufacturers’ and National Caravan Council recommendations. I/We certify that an annual service has been carried out in accordance with the manufacturers’ and National Caravan Council recommendations. 2005 EXPLORER GROUP RETAILER SPECIAL EDITIONS PARENT MODEL RETAILER SPECIAL PARENT MODEL RETAILER SPECIAL AVANTÉ AMBER ELUSION FIRESTORM KNIGHTSBRIDGE QUEENSFERRY ANTIGUA/BARBADOS/ BERMUDA/JAMAICA/TOBAGO XSCAPE CORONA AMAZON CONNOISSEUR MAGNUM RAMBLER SHIRAZ ODYSSEY SUNSEEKER ASHINGTON/CHILTINGTON/ GOODWOOD/AMBERLEY OMEGA LIBERTE MAGNUM CLASSIC PENTARA Retailer Special Editions Explorer Group 2005 Touring Caravan Handbook ALL EXPLORER GROUP RETAILER SPECIALS ARE BASED ON OUR CURRENT BASE MODELS. FOR DETAILS ON THE EQUIPMENT FITTED AND HOW TO OPERATE THEM PLEASE CHECK UNDER THE BASE MODEL DETAILS IN THE MAIN PART OF THIS HANDBOOK, FOR EXAMPLE IF YOU HAVE PURCHASED AN ELUSION THEN THE SPACE HEATER FITTED WILL BE OPERATED IN THE SAME MANNER AS THE SPACE HEATER FITTED IN THE STANDARD AVANTÉ. 131 All the illustrations and descriptive matter in this guide are intended to give a general idea of the caravan. Changing market and supply situations may prevent the manufacturer from maintaining the exact specifications and details in this handbook and we therefore reserve the right to alter specifications and materials as conditions demand. Retailers are independent of the manufacturer and have absolutely no authority to bind the manufacturer by any express or implied undertaking or representation. Explorer House, Delves Lane, Consett, Co Durham. DH8 7PE Tel : 01207 699000 Fax : 01207 699001 Web : www.explorer-group.co.uk