1
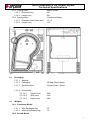
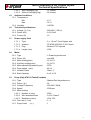
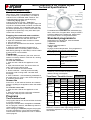
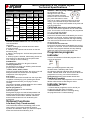
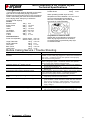
Terra Condenser & Air Vented Dryers
Technical Specifications
Contents
1 Technical Specifications for Vented / Condenser Dryer
2 Terra Electronic Clothes Dryer Project
3 Terra Condenser Dryer Working Principle
4 Terra Vented Dryer Working Principle
5 Dryer Programme Tables
5.1 Terra (Base) Timed Vented Dryer
5.2 Terra Vented dryer
5.3 Terra (Base) Timed Condenser Dryer
5.4 Terra Condenser Dryer with Senso
Type 866A0
Type 876A1
Type 866C01
Type 876C11/876C 12 (TankUp)
6 Door reversebility
1. Technical Specifications for Vented / Condenser Dryer:
1.1.
Product Definitions :
1.1.1. Producer
: Arçelik A.Ş.
Tuzla - İstanbul / TÜRKİYE
:Terra Air Vented VDE Codes :
1.1.2 Model
Dryers Type CONTROL
Air Vented Sensor
VDE
Codes Customer
876A1 BEKO DEUTSCHLAND
BEKO FRANCE
BEKO PLC
CIS-E.EUROPE-SPAIN
FAGOR BRANDT
ISRAEL
WEST EUROPE /
DENMARK
W. EUROPE / BELGIUM
BEKO SPAIN
Base / Timed 866A0
MEA
W. EUROPE
ARÇELİK PAZARLAMA
WEST EUROPE
BEKO DEUTSCHLAND
BEKO DEUTSCHLAND EBREGENZ
BEKO FRANCE
CIS-E. EUROPE SPAIN
FAGOR BRANDT
ISRAEL
BEKO SPAIN
MEA
FAR EAST
CHINA
BEKO PAZARLAMA
Brand
BEKO
BEKO
BEKO
BEKO
FLAVEL
FLAVEL
BEKO
EDESA
FAGOR
BEKO
Customer
Code :
DV 1560
DV 1560 X
DRVS 62 W
DRVS 62 S
TDF 162 W
TDF 162 S
DV 1560
SE 60 E
SFF 62
DV 1560 X
BEKO
DV 1560
BEKO
DV 1560 X
SAIVOD
STE 6
ECRON
EV 1960
SINGER
SD 5500
FRIAC DE LUXE DK 6116E
ARÇELİK
1660 KT
BEKO
DV 1160
SMEG
AS61E
ALTUS
TA 1000
BEKO
BEKO
BEKO
EDESA
FAGOR
BEKO
ANSONIC
SINGER
EUROPA
BEKO
BEKO
DV 1160
DV 1160
DV 1160
SE 60 T
SFE 60
DV 1161 X
SA 6
SD 5400
ED 116
DV 1160
D 60KB
1
Terra Condenser & Air Vented Dryers
Technical Specifications
:Terra Condenser VDE Codes
Condenser
Sensor
876C11 ARÇELİK PAZARLAMA
BEKO DEUTSCHLAND
BEKO PLC
CARREFOUR
CIS- EAST EUROPE
SPAIN
FAGOR BRANDT
WEST EUROPE /
DENMARK
WEST EUROPE /
BELGIUM
BEKO SPAIN
BEKO PAZARLAMA
SPAIN
WEST EUROPE
876C12 WEST EUROPE
BEKO DEUTSCHLAND EBREGENZ
BEKO FRANCE
BEKO PLC
CIS- EAST EUROPE
SPAIN
EBREGENZ
FAGOR BRANDT
WEST EUROPE /
DENMARK
Base / Timed 866C01 WEST EUROPE
BEKO DEUTSCHLAND
CARREFOUR
CIS EAST EUROPE SPAIN
FAGOR BRANDT
BEKO SPAIN
SPAIN
WEST EUROPE
1.1.3 Capacity (Dry load)(kg)
1.1.4 Numbers of Programme (Qty)
1.2.
ARÇELİK
ALTUS
BEKO
FLAVEL
FLAVEL
BEKO
BLUESKY
BEKO
BEKO
EDESA
FAGOR
BEKO
2760 KT
TK 1201
DRCS66W
TDF 166 W
TDF 166 S
DRCS66S
BSLE 06
DC 1560
DC 1560
SE 60 CBE
SFF 62 CB
DC 1560
BEKO
DC 1560 X
BEKO
DC 1560 XS
SAIVOD
STE 6C
ECRON
EC 1960
BEKO
D 60 K
BRU
ES 1560 C
FRIAC DE LUXE DKC 6316E
SMEG
AS63CS
Atlas
KT 135/06
BEKO
BEKO
BEKO
BEKO
DCU 1560 X
DCU 1560 X
DRCS68W
DRCS68S
BEKO
ALTUS
FAGOR
FAGOR
DCU 1560
TK 1200
SFF 62 C
SFE 62 C
BEKO
SMEG
BEKO
ALTUS
BLUESKY
DCU 1560
AS62C
DC 1160
TK 1100
BSLC 826
BEKO
DC 1160
EDESA
SE 60 CB
FAGOR
SFF 60 CB
ANSONIC
SA 6TC
BRU
ES 1160 C
FRIAC DE LUXE DKC 6216E
:6
: max 11
Dimensions
1.2.1. Height (mm)
1.2.2. With (mm)
1.2.3. Depth (mm)
: 850
: 595
: 540
2
Terra Condenser & Air Vented Dryers
Technical Specifications
1.2.4. Venting hose
1.2.4.1. Diameter(mm)
1.2.4.2. Length (cm)
1.2.5. Draining hose
1.2.5.1. Diameter Outer/Inner (mm)
1.2.5.2. Length (cm)
1.3.
1.4.
:Vented model
:100
:200
: Condenser Model
: 13 / 9
: 122
Packaging
1.3.1.1. Material :
1.3.1.2. Packaging
1.3.1.3. Reinforcement
: PE bag (Shrink-pack)
: Polystro-foam / Wood
1.3.1.4. Dimensions :
3.3.1.4.1.
Height (mm)
3.3.1.4.2.
With (mm)
3.3.1.4.3.
Depth (mm)
: 890
: 660
: 585
Weights
:
1.4.1. Condenser Model
1.4.1.1. With Packaging (kg)
1.4.1.2. Without Packaging (kg)
: 37
: 35
1.4.2. Vented Model
3
Terra Condenser & Air Vented Dryers
Technical Specifications
1.4.2.1. With Packaging (kg)
1.4.2.2. Without Packaging (kg)
1.5. Ambient Conditions
1.5.1. Temperature:
Min.
Max.
1.5.2. Humidity
1.6. Technical specifications
1.6.1. Voltage (V / Hz)
1.6.2. Power (kW)
1.6.3. Current (A)
1.7.
: 220-240 V / 50 Hz
: 2,0-2,2 kW
: 10
Type
Isolation
Plug
Length (mm)
: 3 x 1.5 mm2 Cord Copper wire
: TS 9760 H05V2V2-F 3G1,5mm2
: Earthed, PVC injected
: 1605
Motor
1.8.1.
1.8.2.
1.8.3.
1.8.4.
1.8.5.
1.8.6.
1.8.7.
1.8.8.
1.9.
: 5° C
: 35° C
: %95 RH
Power supply Cord
1.7.1.1.
1.7.1.2.
1.7.1.3.
1.7.1.4.
1.8.
: 31 Vented
: 29 Vented
Type
Power (W)
Main winding(ohm)
Auxiliary winding(ohm)
Motor speed(6 kg loaded) (rpm)
Drum speed (rpm)
Isolation Class
Start Capacitor
: 1 Phase Asynchronous
: max 250
: 21,5± 7%
: 21,5± 7%
: 2750
: 48 ± 4
: Class : F
: 8 mF ± %5
Pump (Only 876C12 TankUP models)
1.9.1. Type
1.9.2. Power ( W )
1.9.3. Voltage/ Frequency
1.9.4. Speed
1.9.5. Main winding
1.9.5.1. Number of turns
1.9.5.2. Wire diameter/Class
1.9.5.3. Resistance (ohm)
1.9.6. Flow rate (I / min)
1.9.7. Pump Head
(m)
: Shaded Pole Asynchronous
: 26
: 230-240 V 50Hz,
: 2300 rpm
: 2300
: 0,212 / Class F
: 125± 10%
:3-4
:1
4
Terra Condenser & Air Vented Dryers
Technical Specifications
1.10. Heater
1.10.1.
Type
: Open flat wire
1.10.2.
Nominal Power&Voltage ( W ) : at 230V 2000 ± %5
1.10.3.
Resistance (ohm)
: 1400 W 1.level (86,44 ohm± %5)
: 600 W 2.level (37,04 ohm± %5)
Safety Note: If the one thermostat or Heater NTC is defective, also please check the
motor is running, fan is not broken and V-belt is Ok ,and filter is clean; before starting the
appliance.
Security Thermostat (On heater)
1.10.4.
: 135°C +6,5°C (130°C VENTED)
Thermostat (near Heater)
NTC (near Heater; with Sensor)
: 110°C (100°C VENTED)
(ohm) : at 25° C, 19 500
1.11. Drum Thermostat
Drum NTC (with Sensor model)
: 78°C (63°C VENTED)
(ohm) :at 25° C, 19 500
1.12. Housing :
3.11.1. Material
: Sheet steel
3.11.2. Finish
: Acrylic Powder paint in Oven
1.13. Drum :
1.13.1.
Material
1.13.2.
1.13.3.
1.13.4.
1.13.5.
1.13.6.
1.13.7.
Volume ( l )
Drying speed
( rpm )
Door max. dimension (mm)
Process Air flow rate (m3/h)
Cooling Air flow rate (m3/h)
Maximum Load Capacity
Cotton (kg)
Delicates , Synthetics (kg)
: Hot dip Galvanized corrosion
resistant sheet steel
: 110
: 48±4
: max. 390
:180
:300-330
:
:6
:3
1.14. Control System Specifications :
1.14.1.
1.14.2.
1.14.3.
1.14.4.
1.14.5.
On/off switch
Door switch
Overflow switch
(Condenser model only)
Condenser security switch
Suppressor Filter
:250 V, 16 (4)A
: 250 V, 3 (1)A or 16(4)A
866C01
: 0,15 µF
876C11 & 876 C 12
: 0,47 µF
: 250 V, 16 (4)A
: 250 V, 16 (4)A
:
5
Terra Condenser & Air Vented Dryers
Technical Specifications
1.14.6.
Program Timer
: Electronic Control Board
220 -240V , 50 Hz
866C01
:295
876C11 & 876 C 12
: 295
1.15. Auxiliary Functions (Qty)
1.15.1.
Buzzer cancel or
1.15.2.
Low heat
: max 1
2 Terra Electronic Clothes Dryer Project
First the increasing demand of dryers business in Europe, second needed a cheap model in our
product range and decreasing price in electronic production made this project reasonable.
Due to the safety regulations it is better to design all the product range with Electronic.
5 different types of dryer will be launched with this Terra Electronic Clothes Dryer project.
Production Code
VDE Code
1. Terra Time based Air Vented Clothes Dryer
DV
1160
866A0
2. Terra Air Vented Clothes Dryer with sensor
DV
1560
876A1
3. Terra Condenser Clothes Dryer
DC
1160
866C01
4. Terra Condenser Clothes Dryer with sensor
DC
1560
876C11
5. Terra Condenser Clothes Dryer with sensor (Tank Up) DCU 1560
876C12
3 Terra condenser Dryer Working Principle
(Condenser Models)
Working principle for a condenser dryer
The big difference compared to the venting dryer is, that the condenser dryer has two air
circuits.
One hot air circuit in closed circulation. The air coming out from the drum has, after
taking over the humidity from the laundry, a relative humidity near to 100%.
This hot and humid air passes a condenser, cooled by air. In the beginning, cooling is
done without condensation, till the saturation temperature of the mix water-steam is reached.
When this temperature is reached, cooling is assisted by condensation and the water is
recuperated in a tank which has to be drained by the consumer at the end of the cycle.
A fan circulates the saturated air at the outlet from the condenser to the heating element.
At the contact with the resistance, the air is heating up and enter again to the drum.
A cool air circuit, where the ambient air is heated up passing the condenser and being in
contact with the hot air in the condenser tubes. This air is evacuated through the dryer body.
The used exchanger is an air-air condenser with crossed circuits, which are perpendicular each
to other. The condenser contains tubes and can be removed easily from the dryer. These tubes
are passed by the hot air circuit and are cooled by the cool air circuit at their outside.
6
Terra Condenser & Air Vented Dryers
Technical Specifications
This type of dryer permits to dry laundry without having humid air in the room. The Dryer
machine is configured to operate at 230V AC. Voltage and current requirements are specified
on the rating plate located upper side of the door opening.
Motor
Cooling fan
Condenser
water tank
Process fan
Condenser
2.1 Terra Vented dryer Working
principle
The ambient air is heated passing the
resistance and pass the drum where he « loads »
humidity. Humid and hot air is evacuated(vented) by
the fan located in the outlet.
During drying phase, the drum is rotating at a
speed that gives a fully occupancy of the laundry in
the drum. The motor is running also the fan(not only
the drum), to evacuate the hot and humid air from
the drum.
Air vented dryer uses ambient air. It take the air and
pump through heater area. Heated air, coming from
the back side of drum meets with the clothes. As
shown the picture air goes to the process fan
through the lint filter area. This air with the
temperature of 45-55 C and with the humidity.
Lint
Filter
The Dryer machine is configured to operate at 230V
AC. Voltage and current requirements are specified
on the rating plate located upper side of the door
opening.
7
Terra Condenser & Air Vented Dryers
Technical Specifications
3 Installation, Programme's and User Manual
The proper location
For drying the appliance requires a sufficient supply of clean, cool room air. Operate the appliance only in well
ventilated, low dust rooms. Do not block or cover the appliance's vent slots. Do not operate appliance in locations
where there is a danger of freezing. Some parts contain water and may be damaged by frost.
The floor must have a sufficient load bearing capacity! If, for example, you are stacking a washer and the dryer,
this combination can – when loaded –reach a total weight of 160 kg.
Important:
•
Place appliance on an even an level floor only.
•
Do not stand appliance on the power cable.
•
Keep at least 1 cm distance to walls or other furniture.
Technical Specifications / Energy Consumption Condenser models
Load capacity (dry weight)
- Cottons
- Synthetics
- Fluff/Refresh
Dimensions
• Height / height for built-under installation
• Width - Depth / depth for built-under
installation
• Height adjustment of feet
Weight, unpacked
Consumption 1)
•
•
•
Cottons linen cupboard dry 2) 3)
Cottons ironing dry 2)
Synthetics linen cupboard dry 2)
max. 6.0 kg
max. 3.0 kg
max. 6.0 kg / 3.0 kg
85.0 cm / 82.0 cm
59.5 cm 54 cm
0.5 cm
approx. 35 kg
for spinning
speed
800 min-1
800 min-1
1000 min-1
Energy
For Condenser
: 3.84 kWh
: 3.40 kWh
: 2.00 kWh
Technical Specifications / Energy Consumption Air Vented Models
Weight, unpacked
Consumption 1)
-
- Cottons linen cupboard dry 2) 3)
- Cottons ironing dry 2)
- Synthetics linen cupboard dry 2)
approx. 29 kg
for spinning
speed
1000 min-1
1000 min-1
600 min-1
Energy
For AV
: 3.39 kWh
: 2.90 kWh
: 1.80 kWh
Energy
For Condenser
: 3.84 kWh
: 3.40 kWh
: 2.00 kWh
1) Standard values, determined under standard conditions. Depending on spin speed, textile type and ambient
conditions a deviation of up to 10% is possible.
2) Test programme according to DIN EN 61121.
3) Standard programme for energy identification label.
Preparation and start
1. Sort the laundry according to cottons,
synthetics, etc.
2. Put laundry in the drum and close the
door.
3. Turn the appliance on by pressing On/Off button
4. Set the selector desired time.
5. Press the Start /Pause/Cancel button.
Program starts and indicator is on.
Canceling a program
Do not turn appliance off during the
heating phase (process indicator
is on). Risk of heat accumulation!
1. First stop the running program press the
>Start /Pause/Cancel< button.
2. Then press start button for 2 seconds to
cancel the program
3. Set the program selector to Freshen up.
4. Press the Start /Pause/Cancel button.
5. Wait for the program cycle to end.
Adding more laundry
This makes only sense at the beginning of a drying
cycle, otherwise the result will be a mixture of not
quite dry and too much dried textiles.
1. Press Start /Pause/Cancel button. Start/Stop
indicator will flash.
2. Put laundry in the drum and close the door.
3. Press the >Start /Pause/Cancel < button.
Start/Stop indicator will be on.
Program end
The program cycle is completed when the indicators
End/Anti-Creasing and Clean filter are illuminated.
Throughout the anti-crease stage the indicator
End/Anti-Creasing flashes. The program can then be
8
Terra Condenser & Air Vented Dryers
Technical Specifications
ended at any time.
1. Set the On/Of button off position.
2. Open door, remove laundry, check tumble for
foreign objects.
3. After every drying cycle :
Clean the fluff filter (see “Fluff filter“).
4. When required
• Adjust feet until the appliance is level and does
not rock. Checking with a spirit level is
recommended.
Important:
• Adjust by the feet only, do not use wooden
wedges or similar. Never remove the feet!
Clean housing and fascia using a soft cloth and a
mild soap; wipe dry with a soft cloth. Do not use
scrubbers and scouring powders! They will damage the
plastic and painted body parts.
When the door is opened during the program, the
program will be paused automatically and the light on
the start button will flash. The start button must be
pressed again to continue the program.
Changing the program
When changing to a different program
the running program must be stopped first.
To do so the >Start /Pause/Cancel<
button must be pressed for 2 sec. in
order to cancel program.
Laundry final drying
Two rubber friction pads are supplied with your
tumble dryer in case required to stop the appliance
moving on a slippery or smooth surface.
To fit friction pads underneath the height adjustable
front feet, gently tilt the tumble dryer backwards as
shown in the diagram and push the pads firmly on the
feet. Check that the product is level and re-adjust
leveling if required.
If the dryness level is not satisfactory
Set the program selector to one of
the timed program 40min, 20min or
10min. In order to reach right dryness
level you can use additional final drying.
Leveling
Cleaning the Fluff Filter :
:Fluff balls are rubbed off by wearing the clothes - not by drying. When drying, these fluff balls are trapped in the
fluff filter. Normally, laundries are much more worn out by everyday usage and washing compared to drying. It is
absolutely necessary to clean the fluff filter after every drying cycle:
To clean the fluff filter:
1. Open the door.
2. Pull out the fluff filter.
9
Terra Condenser & Air Vented Dryers
Technical Specifications
The Programme times are described below:
The Programme times for the Air Vented type
White/colored cottons
Programme
Linen cupboard dry
Long wearing cotton and linen textiles
Ready to Iron
Easy-care
Load
6 kg
3 kg
6 kg
3 kg
Select ‘’Low Heat’’ button
Synthetics (polyester, polyamide);
mixed fabrics (with cotton)
Linen cupboard dry
600 rpm
3 kg 60’- 80’
1.5 kg 40’-60’
The Programme times for the Condenser type
White/coloured cottons
Programme
Linen cupboard dry
Long wearing cotton and linen textiles
Ready to Iron
Easy-care
Spun at
800-900 1000-1200
rpm
rpm
130’
110’
80’-110’
60’- 80’
110’
80’-110’
60’- 80’
40’- 60’
Load
6 kg
3 kg
6 kg
3 kg
Select ‘’Low Heat’’ button
Synthetics (polyester, polyamide);
mixed fabrics (with cotton)
Linen cupboard dry
800 rpm
40’-60’
20’-40’
Spun at
800-900 1000-1200
rpm
rpm
150’
130’
80’-100’
60’- 80’
130’
100’-130’
60’- 80’
60’- 80’
600 rpm
3 kg 100’-130’
1.5 kg 30’-60’
800 rpm
60’-80’
30’-60’
Important Safety Information
It is most important that this instruction book should be retained with the appliance for future reference.
Should the appliance be sold or transferred to another owner, or should you move house and leave the
appliance, always ensure that the book is supplied with the appliance in order that the new owner can get
know the functioning of the appliance and relevant warnings. These warnings have been provided in the
interest of safety. You must read them carefully before installing or using appliance.
INSTALLATION
• This appliance is not intended for commercial use it
is a household clothes tumble dryer.
• This appliance is heavy. Obtain assistance when
moving it.
• Any electrical work required to install this appliance
should be carried out by a qualified electrician or
competent person.
• Care must be taken to ensure that the appliance
does not trap electrical supply cable.
• The machine never situated on a carpeted floor,
please adjust the fee t in order to allow air to circulate
freely.
• If the tumble dryer placed on a washing machine,
must be used stacking kit. (optional accessory)
• This tumble dryer is designed to be vented to the
open air. It should have its own ventilation system
which should not be joined with any other ventilation
system connected to any other appliance.
CHILD SAFETY
• This appliance is designed to be operated by adults.
• Children should not be allowed to tamper with the
controls or play with the product.
• Pets and children are known to climb into tumble
dryers. Please check your drum before use.
• Keep all packaging well away for children.
OPERATION SAFETY POINTS
• Do not overload the Dryer. (See program chart)
• Clothes which are dripping wet should not be
placed in the dryer. Spin them again in the washing
machine.
• As some bulky duvets and eiderdowns should be
dried in large commercial machines because of their
bulk, check with the manufacturer of the item if it is
suitable for drying in a domestic machine, even if the
dry weight of items is within the limit advised.
• Please make sure that no gas lighter have
accidentally
been left in pockets of garments to be tumble dried.
Danger of Explosion
•Never tumble dry items that have been in contact
with inflammable solvents(petrol, methylated spirits,
dry cleaning fluid and the like). As these substance
are volatile, they could cause an explosion. Tumble
dry only items washed with water.
Risk of Fire :
• Items that have been spotted or soaked with
vegetable or cooking oil constitute a fire hazard and
should not be placed in the tumble dryer.
• In order to avoid danger of fires caused by
excessive drying, do not use to dry the following
items:
10
Terra Condenser & Air Vented Dryers
Technical Specifications
• Cushion, quilts and similar stuffed items (These
items accumulate heat)
• Items containing the rubber foam or materials
similar to rubber foam.
• Leave the door slightly ajar when the dryer is not
being used. This allow the seal to be preserved.
• Clean the fluff filter after using tumble dryer. To
prevent fire risk, do not use the dryer if the fluff filter
is damaged.
• Never attempt to repair the appliance yourself! You
could endanger your own life and the life of other
users!
Only authorized electricians, such as our service
technicians, are permitted to repair electric
appliances.
Electrical connection
•Connect the appliance to a properly installed
earthed outlet, protected by a fuse of adequate
capacity.
Make sure that you have an earthed power outlet
socket rated at 13 amps (min.). (Max.16 amps.)
Voltage 230V ~ 50 Hz
Connected load 2200 W
Fuse protection 10A
Attention!
If you use your machine as built-in, the socket must
be reachable after installation, or a separate switch
(which can disconnect the two poles) must be used in
the installation.
For a permanent connection, a master switch with at
least 3mm contact clearance must be used.
Connect the power cord to the appropriate electrical
socket with an equivalent current rating indicated on
the rating plate at the front of the machine inside the
front door.
Electrical requirements
Before you insert the plug into the wall socket make
sure that the voltage and the frequency shown in the
rating label corresponds to your electricity supply.
We recommend that this appliance be connected to
the mains supply via a suitable switched and fused
socket in a readily accessible position.
Connect the appliance to a properly installed earthed
outlet, protected by a fuse of adequate capacity.
Important:
•The connection must conform to the applicable
regulations in your country and of your local
Electricity Board.
•The power cable plug must be accessible after
installation.
•For a firmly fixed connection a master switch with at
least 3 mm contact clearance must be used.
Note down the appliance’s model and identification
number from the rating label, in case you need help
from customer service.
•The stated voltage must match with your mains
voltage.
• Connection by extension cables or trailing sockets
is not permitted.
• When connecting to the mains, make sure the
On/Off button is in Off position.
Important
• The connection must conform to the prevailing
regulations in your country and those set by your
local
Electricity Board.
•The power cable plug must be accessible after
installation.
A damaged power cable must be replaced by an
authorized qualified electrician. Until the appliance
has been repaired it must not be operated!
Note down the appliance’s model and identification
number from the identification plate showing the
voltage in case you need help from Customer
Service.
•The voltage shown must match your mains voltage.
•The appliance must not be connected via extension
cables or multiple sockets.
Disposal
Where to leave the packaging?
The plastic wrapping must not get into the hands of
children! Risk of suffocation!
The packaging is made of materials which can be
recycled.
•Separate the packing material by type:
– Styropor® parts and plastic wrapping
go to a valuable substance collection point;
– battens go into bulky refuse.
The packaging is not to be disposed of
in the regular household refuse!
What to do with the old appliance?
Dispose of your old appliance in an environmentally
friendly manner.
•Ask your dealer or your local refuse collection
service how to best dispose of your old appliance.
Before giving the appliance into bulky refuse,
disconnect it from the mains, cut off the power cable
and disable the door lock – so children will not be
endangered.
Installation
The proper location
For drying the appliance requires a sufficient supply
of clean, cool room air.
Do not operate the appliance together with furnaces
(gas-, oil-, coal-fired) or fireplaces. The airflow may
aspirate their exhaust fumes, withdraw oxygen and
extinguish flames.
Poisoning hazard!
Operate the appliance only in well ventilated, low
dust rooms. Do not block or cover the appliance’s
vent slots.
The floor must have a sufficient load bearing
capacity! If, for example, you are stacking a washer
and the dryer, this combination can
– when loaded – reach a total weight of 160 kg.
Important:
•Place appliance on an even and level floor only.
•Do not stand appliance on the power cable.
•Keep at least 1 cm distance to walls (at rear
side 2 cm) or other furniture.
•Do not restrict the floor clearance
through deep pile carpets, strips of wood or
similar.
In order for quiet and stable operation, the machine
should be located correctly and leveled. Your
machine comes with adjustable feet. If the machine is
11
Terra Condenser & Air Vented Dryers
Technical Specifications
unstable, loosen the plastic screw or unscrew the
adjustable foot until the machine is leveled perfectly.
Air Vented Models Only:
Your machine comes with single (100 mm diameter
and 2 meter long flexible air ventilation hose.
Connect the flexible air ventilation hose, using the
given adaptors. For proper operation, the hose
should not be hard bent.
Before any operation of the machine
check the following:
–
–
–
–
Is the flexible air ventilation hose properly
installed?
Is the machine plugged into the mains outlet?
Has the fuse been checked?
Is the front door closed?
Vent exhaust air out of doors!
The appliance has one exhaust outlets at the
rear.
The exhaust air should not be simply led
into the room, since the high humidity may
cause long term damage to walls and furniture.
•Connect the vent tube with the straight to
the exhaust air outlets.
It is not
recommended to install vent hose like shown on the
picture.
The vent tube
– can be run through an open window install
to the outside;
– can be connected to a wall-mount vent.
The exhaust air must not be led into flues or
chimneys of fireplaces. Check with your chimney
sweeper or heating engineer.
• Instead of the vent tube vent pipes can be used.
The diameter should be at least 10 cm. engineer.
• Tube or pipe, respectively, should be routed in the
straightest and most direct path outdoors, i.e. with the
fewest number of elbows and turns, as these
hamper airflow.
Fix adapter by pushing into machine. Connect hose by screwing.
• The maximum length of a straight routed tube/pipe
is given in the chart below.
• For each elbow and other obstructions the
respective value shown is to be deducted from the
maximum length.
Hose
Pipe
4.0 m
5.0 m
1 elbow 45°
-1.0 m
- 0.3 m
1 elbow 90°
-1.8 m
- 0.6 m
Max. length
less...
1 elbow 90° short turn
1 wall-mount vent *
- 2.7 m
-2.0 m
- 2.0 m
* with automatic louvers
12
Terra Condenser & Air Vented Dryers
Technical Specifications
Condenser Models Only:
Condensed water container
When drying, water is separated from airstreams
of the moist laundry (“condensate”). This water is
collected in the condensed water container. The
condensed water container needs emptying
– after every drying cycle, or
if during the drying cycle the > Tank Full <
indicator flashes; in that case the program stops. Do
not pull the condensed water container out while the
program is running. The condensed water can also
be drained permanently by means of the drain hose
supplied into a siphon trap or any other drain (see
“Drain hose connection”).
Emptying the condensed water container:
1. Pull condensed water container carefully out off
the housing; hold the rear with the other hand.
2. Open the condensed water container’s closure.
3. Pour the water out.
4. Remove any fluff balls from the closure, if present.
Close the closure.
5. Slide the condensed water container fully in.
Condensed water is no drinking water! However,
after filtering (through a coffee filter) it can be used in
a steam ironer or air humidifier.
Condenser
In the air cooler (“Condenser”) the moist, warm air
stream is cooled by drawn-in cold room air, causing
the water to separate.
To clean the condenser:
1. Open the door. Wait for the appliance to cool
down.
2. Open service door latch. The service door will
open. Then turn the locking level
3. Pull the condenser out at the handle.
4. Rinse condenser – vertically and horizontally
thoroughly under running water. Let water drain
thoroughly.
5. Push condenser – with the lettering embossed at
the edge facing up – fully in, then fix the locking level.
6. Close the service door.
Sensor ribs
At the front , on the inside of the drum are moisture
sensors, signaling to the appliance when the textiles
are dry.
To clean the sensor ribs:
1. Open the door. Wait for the appliance to cool
down.
2. Wipe all sensor ribs with a soft cloth moistened
with vinegar. Wipe dry with a soft cloth
Programs
Time selection knob
The program selector can be turned either clockwise
or counter-clockwise.
Pushing the On/Off button, the appliance is turned
on ; the program, however, will start only when the
>Start< button is pressed.
When changing to a different program the program
must be; stopped first; in that case the Start/Stop/
Cancel button must be pressed for 2 sec. in order to
cancel program.
For detailed information about the individual drying
times, refer to the “Program table”. Always choose a
program suitable for the textile type. Observe the
care symbols shown on the garment labels!
Standard programme's
Depending on the textile type, several standard
programme's are available:
– Cottons:
Drying at high temperature.
– Easy - care:
Drying at reduced temperature. Time programme's
offers different drying levels to be chosen.
Drying level
Result
Extra dry*
thick, multi-layer textiles
dried ready for the linen
cupboard
Linen cup-board
dry
regular textiles: dried
ready for the linen cupboard
Ironing dry
requiring regular ironing
* only for White/colored cottons
Select drying level only as high as absolutely
necessary. This will treat the textiles with care and
limits the energy consumption.
Remained
Terra Base / Timed Air Vented
moisture %
Dryness Dry
Level Load
Initial
moisture
amount % Duration
min.
max.
3,0 Kg
Cotton
Cupboard
6,0 Kg
Dry
60%
70%
60%
70%
60 min.
80 min.
100 min.
130 min.
-5%
-5%
-3%
-3%
5%
5%
3%
3%
3,0 Kg
60%
70%
60%
70%
40 min.
60 min.
80 min.
100 min.
4%
4%
8%
8%
20%
20%
16%
16%
Cotton
Iron Dry
6,0 Kg
Synthetic
40%
60 min. -3%
3%
Cupboard 3,0 Kg
Dry
50%
80 min. -3%
3%
The program of 130' is Energy declaration program of
EN61121, in order to reach right energy class this
programme adjusted as 128'+2' (Airing), total duration is
130 minutes.
13
Terra Condenser & Air Vented Dryers
Technical Specifications
Terra Base / Timed Condenser
Dryness Dry
Level Load
Initial
moisture
amount % Duration
Remained
moisture %
min.
max.
3,0 Kg
Cotton
Cupboard
6,0 Kg
Dry
60%
70%
60%
70%
80 min.
100 min.
130 min.
150 min.
-5%
-5%
-3%
-3%
5%
5%
3%
3%
3,0 Kg
60%
70%
60%
70%
60 min.
80 min.
100 min.
130 min.
4%
4%
8%
8%
20%
20%
16%
16%
Cotton
Iron Dry
6,0 Kg
Synthetic
40%
80 min. -3%
3%
Cupboard 3,0 Kg
Dry
50%
100 min. -3%
3%
Tumble dry only textiles labeled accordingly. For
extreme sensitive textiles the use of a laundry bag
is recommended.
Application:
1. Before loading dryer all small and fresh stains
must be removed.
2. Introduce 1 to 4 pieces into the drum or first into
the laundry bag.
3. Select a time program. And low heat option should
be chosen.
4. When program is finished, take laundry pieces out
from the drum or the laundry bag and place them
over a hanger to avoid creasing.
Fluff/Refresh:
For refreshing or airing, for all types of fabrics.
Timed programme’s
For final drying or airing your washing several timed
programme’s are available.
– 60min, 40min, 20min, 10min
Drying at a reduced temperature; the drying cycle will
always end after the chosen time has elapsed,
irrespective of the drying level.
Anti-crease
If the textiles cannot be removed from the dryer after
completion of the drying cycle, pressing this button
will separate and smooth your drying to reduce
creasing.
Throughout this anti - crease stage the drum rotates
briefly every 60 seconds for 2 hours.
Special programme’s
A special programme is also available:
Delicate Program
Extra gentle drying at an reduced temperature and
limited programme duration of approx. 20 minutes.
Textiles such as fine textiles, delicate underwear
and accessories like scarf can be dried by this
programme.
Buzzer Cancel(Only sensor models)
At programme end and
throughout the anti-crease
stage (see above) a buzzer
sounds. If this is inconvenient to
you, press this button to mute.
There is no need to press the button for the next
drying cycle, because the dryer remembers this
setting. You may remove the textiles at any time and
end the programme.
Child-lock (Both sensor and Timed models)
With the child lock the appliance can be made childproof. This function can be set during the programme
or in non-usage and standby.
To activate the child lock:
Press and hold both buttons indicated by the arrows
for approx. 3 seconds, until the child lock activated
and one of the progress indicator will begin flashing.
The child lock will deactivate all the buttons except
the On/Off button.
To deactivate the child lock:
Press and hold both buttons indicated by the arrows
for approx. 3 seconds, until the child lock deactivated
and one of the progress indicator will stop flashing.
Child lock does not prevent opening the door.
Programme progress
indicator
This row of indicators indicate the progress of the
running programme.
When you set a programme and press
the start button, Start/Stop and one of
the indicators will light indicating that the program
started. Flashes while Child -lock is active. When the
programme is running, one of the indicators is
illuminated indicating approximate remain time.
End/Anti-Creasing
– is illuminated when the programme end is reached
flashes while the anti-crease stage is active.
Indicator lamps
Clean Fluff Filter
– is illuminated at programme end to remind you
to clean the fluff filter (see “Fluff filter”).
If Clean Fluff Filter indicator is flashing during
the programme see “Trouble shooting”.
Optional Functions
Low Heat (Only Timed models)
Low-Heat button reduces the heating power to the
lower values. This function should be used for
Synthetic and delicates. When you select this option,
make sure that low-Heat indicatory is on.
14
Terra Condenser & Air Vented Dryers
Technical Specifications
Single Sheet
Double Sheet
The right amount
• The maximum load capacity depends on the textile
type and the corresponding drying programme.
Please note the information given in the “Programme
Table”! Overloading the drum has an adverse effect
on the drying result. Always try to utilise the
maximum load capacity.
Clothes
Blouse Cotton
150 g 5 oz
Dress Cotton
500 g 1 lb 2 oz
Others
350 g 12 oz
Jeans
700 g 1 lb 6 oz
10 nappies
1000 g 2 lb 3 oz
Shirt Cotton
300 g 10 1/2 oz
Others
200 g 7 oz
T-Shirt
125 g 4 1/2 oz
Household Items
Duvet Cover(Double) Cotton 1500 g 3 lb 5 oz
Others 1000 g 2 lb 3 oz
Large Tablecloth
700 g 1 lb 6 oz
Small Tablecloth
250 g 9 oz
Tea Towel
100 g 3 1/2 oz
Bath Towel
700 g 1 lb 6 oz
Hand Towel
350 g 12 oz
350 g
500 g
1 lb 2 oz
12 oz
When operating tumble dryer the room
temperature must be between +5 C and +35 C.
It is not recommended to load above
this level. Overloading the Tumble dryer
may result in clothing damage.
For guidance on maximum loads
please refer to the Operation Instructions !
When drying large items such as sheets,
we recommend you periodically stop dryer
to redistribute load.
Before Calling Service / Trouble Shooting
If you notice…
check…
Appliance cannot be turned on or programme does
not start
• Programme selected? Start< button pressed? • Door properly
closed? • Power cable plug plugged in? • Mains fuse has blown in
your home. • Condenser service door opened? Close properly
and check the locking latches?
• Child lock activated? If fault persists: unplug, wait a few seconds
before • plugging in again. • Condenser service door opened?
Close properly and check the locking latches?
Anti-crease stage is active (duration 2 hours).Turn appliance
off and take the laundry out.
Programme end reached. Turn appliance off and take the
laundry out.
• Door is opened? Press the >Start< button. • Did a power failure
occur? Press the >Start< button. • Condenser service door
opened? Close properly and check the locking latches?
Appliance does not react to input
Indicator ‘End (or ‘0’)’ flashes (for 2h)
Indicator ‘End (or ‘0’)’ is on.
Programme stops without apparent reason
Drum interior light (depending on model) does not
work
Laundry too moist or drying time too long
Indicator Tank Full is on
Textiles are shrunk, felted, damaged
•
Lamp faulty? Contact customer service.
Drum overloaded? See “Programme table”. Make sure of
good ventilation. •Check vent slots. Check vent tube and wall
mount vent, if necessary. •Clean fluff filter, Clean drum ribs.
Finish dry with a suitable timed programme. • Check mains
supply voltage ?
• Drain the tank and push the start button.
Dry only textiles labeled suitable for tumble drying. Dry only
with a programme suitable for the particular textile type.
4. Component of Dryers
15
Terra Condenser & Air Vented Dryers
Technical Specifications
Mechanical Parts (Dynamic System):
The main motor is attached to the chassis with four special self threaded screws. In Order to
drive drum a poly-v belt is used between the motor pulley and drum. There was used a elastic
belt . The drum is made of galvanized sheet steel. The drum group is mounted into the front
bearing house and rear bearing steel bracket, which is located rear panel. The heater is
mounted to the rear panel with one screws.
Attention : It is advised that the Elastic Poly-V belt will be assembled max 3 times. Due
to damage on the belt on assembling, after 3 times please change the Poly-V belt also.
Temperature Sensor NTC (Sensor Model only)
Two NTC temperature sensor are used on electronic controlled dryers, one is located after the
door filter, other is located in the heater.
As the temperature of the surrounding of NTC increases, its resistance decreases. At fixed
temperature, NTC will always have a specified resistance within the tolerances. With the aid of
this principle it becomes possible to have an operation without using a mechanical thermo-stop.
The heater operates until the desired temperature is reached. In this way, the selected program
completes properly each time in accordance with the program set and auxiliary function neither
selected and is nor influenced by air temperature etc.
Humidity sensor:
Humidity level will be measured by the resistance of clothes. With this property of the humidity
sensor, it is possible to check and control the humidity level precisely. It is driven by micro.
Heater:
The open flat wire type heater is completely driven by the 2 relays. A mechanical manual
resettable thermostat is used on these dryers heater, in order to provide IEC safety rules
accordingly. This manual resettable thermostat cut the heater power at 160°C. This thermostat
can be resetted at –35°C only, so it is not advised to use after a failure.
A 2000-watt 2 circuit open Wire type heater is used. There are two thermo-fuses on the heater.
If the heater runs without airflow, safety thermostat cut off, and thus this heater cannot be used
again. The heater is energized only when there is air flow, every time heater relays will be on
after 2 seconds of the fan movements. When the desired temperature is reached, electronic
control card reads the resistance of NTC and if the prescribed resistance (and hence
temperature) is reached, the heater is switched off.
Safety Note: If the one thermostat or Heater NTC is defective, also please check the motor is
running, fan is not broken and V-belt is Ok ,and filter is clean; before starting the appliance.
Door lock:
Locking and unlocking mechanism of the door lock used in the Dryer is a mechanical type of the
door lock. When the door pushed, the lock is locked and the door is closed. When the pull from
the handle of the door, it will be open with a force. Maximum opening force should be less than
70 N.
16
Terra Condenser & Air Vented Dryers
Technical Specifications
Door Micro switch :
The main power is connected over the door switch to the motor and main board. When the door
is open, the contacts of the motor are open, so the motor is stopped. or when the door is closed,
but the dryer will not operate, according to the EN&IEC safety rules you have to press the Start
button.
Program apparatus:
The programmer is an electronic card. The electronic card controls the dryer main motor at
constant speed and drives the pump by a relays . Manage the program steps. At the sensor
model read the temperature from NTC and humidity level from the sensor system, and decide
activate or deactivate heater. Heater is also driven from the relay of the electronic card. All of
the electronic components of the dryer are managed by electronic card.
Terra Base /Timed Electronic Cards and sockets
Programming socket
Card
Power
supply (L)
Card power
supply (N)
Heater 2
(600 W)
Door
switch
Motor
CW
Heater 1
(1400 W)
Overflow
switch
Motor
CCW
TERRA SENSOR ELECTRONIC PCB CHART:
Sensor socket
Programming
socket
17
Terra Condenser & Air Vented Dryers
Technical Specifications
Main motor:
The main motor is two pole Asynchronous motor which runs approx. 2750 rpm. and is equipped
by run 8 mF capacitor. motor. It is controlled by a electronic card. Also the motor reverse
directions are adjusted by the relay. It has some pulley/belt reduction mechanism, which
decrease of the speed 3 times.
Main winding
Auxiliary
winding
Common
Auxiliary
winding
Start
capacitor
Main
winding
Pump Motor (Condenser model only) :
It is a shaded pole Asynchronous motor. The electronic card controls the pump via relay.
Overflow Micro switch (Condenser model only) :
When the water container tank is full, then water overflow through a hose to the pump area.
There is a float, when the water comes there it activates the overflow switch, which is paused
the program, Tank full LED is illuminated and when selected a buzzer sounds; empty the water
and press the start button in order to continue the drying processes.
18
Terra Condenser & Air Vented Dryers
Technical Specifications
5
Dryer Programme Tables:
5.1 Terra Vented 866A0 / Timed Base Dryers Programme Steps:
Programme
120 min
100 min
80 min
60 min
40 min
20 min
10 min
Airing
Steps
Motor Profiles
MH5
Heater
User selection
Duration (sn)
Heating 1
Steps No:
P1
Heating 2
P2
MH3
User selection
6600
Airing
P3
MH2
IS0
300
Anti-Creasing
P4
MH4
IS0
0
Heating 1
P1
MH5
User selection
90
Heating 2
P2
MH3
User selection
5010
Airing
P3
MH2
IS0
300
Anti-Creasing
P4
MH4
IS0
0
Heating 1
P1
MH5
User selection
90
Heating 2
P2
MH3
User selection
3810
Airing
P3
MH2
IS0
300
Anti-Creasing
P4
MH4
IS0
0
Heating 1
P1
MH5
User selection
90
Heating 2
P2
MH3
User selection
3210
Airing
P3
MH2
IS0
300
Anti-Creasing
P4
MH4
IS0
0
Heating 1
P1
MH5
User selection
0
Heating 2
P2
MH3
User selection
2400
Airing
P3
MH2
IS0
300
Anti-Creasing
P4
MH4
IS0
0
Heating 1
P1
MH5
User selection
0
Heating 2
P2
MH3
User selection
1500
Airing
P3
MH2
IS0
300
Anti-Creasing
P4
MH4
IS0
0
Heating 1
P1
MH5
User selection
0
Heating 2
P2
MH3
User selection
300
Airing
P3
MH2
IS0
300
Anti-Creasing
P4
MH4
IS0
0
Heating 1
P1
MH5
IS0
0
Heating 2
P2
MH3
IS0
300
Airing
P3
MH2
IS0
300
Anti-Creasing
P4
MH4
IS0
0
Total Duration
(sn)
3600
10500
5400
4200
3600
2700
1800
600
600
HEATING PROFILE :
IS0
NO HEATING
ISL
1400 W HEATING
ISH
2000 W HEATING
Motor running durations (sn)
Clockwise / Anti-clockwise
_CW _MOff _ACW _MOff
//MH2
100
2
5
2
//MH3
180
2
5
2
//MH4
4
60
4
60
//MH5
600
0
0
0
19
Terra Condenser & Air Vented Dryers
Technical Specifications
5.2 Terra VENTED (876A1) dryer with Sensor Program Steps :
Programmes
Steps
Time Limits
Humidity
Control
Motor
Profile
Heater
Levels
Drum
Tempera
ture
limits
Hum_6
Hum_m3
Hum-No
MH3
MH3
MH2
MH4
ISH
ISH
IS0
IS0
65°C
Heating1 phase
Heating2 phase
Airing phase
Anti-Creasing phase
Duration
Code
S11
S10
S3
S2
Step Duration
(min)
75
60
5
120
Cotton Cupboard Dry
0. Step
1. Step
2. Step
3. Step
Heating1 phase
Heating2 phase
Airing phase
Anti-Creasing phase
S11
S9
S3
S2
75
40
5
120
Hum_6
Hum_0
Hum-No
MH3
MH3
MH2
MH4
ISH
ISH
IS0
IS0
65°C
Cotton Ready to Iron
0. Step
1. Step
2. Step
3. Step
Heating phase
Heating2 phase
Airing phase
Anti-Creasing phase
S11
S6
S3
S2
75
20
5
120
Hum_12
Hum_12
Hum-No
MH3
MH3
MH2
MH4
ISH
ISH
IS0
IS0
65°C
Delicates / prog4
0. Step
1. Step
2. Step
3. Step
Heating1 phase
Heating2 phase
Airing phase
Anti-Creasing phase
S4
S5
S3
S2
10
15
5
120
Hum_6
Hum_0
Hum-No
MH2
MH2
MH2
MH4
ISL
ISL
IS0
IS0
40°C
Airing / prog 5
0. Step
1. Step
2. Step
3. Step
Heating1 phase
Heating2 phase
Airing phase
Anti-Creasing phase
S1
S3
S3
S2
0
5
5
120
Hum_m3
Hum_m3
Hum-No
MH3
MH3
MH2
MH4
ISL
ISL
IS0
IS0
60°C
Time program 60' / prog 6
0. Step
Heating1 phase
1. Step
Heating2 phase
2. Step
Airing phase
3. Step
Anti-Creasing phase
S8
S7
S3
S2
30
25
5
120
Hum_m3
Hum_m3
Hum-No
MH3
MH3
MH2
MH4
ISL
ISL
IS0
IS0
65°C
Time program 40' / prog 7
0. Step
Heating1 phase
1. Step
Heating2 phase
2. Step
Airing phase
3. Step
Anti-Creasing phase
S6
S5
S3
S2
20
15
5
120
Hum_m3
Hum_m3
Hum-No
MH3
MH3
MH2
MH4
ISL
ISL
IS0
IS0
65°C
Time program 20'/ prog 8
0. Step
Heating1 phase
1. Step
Heating2 phase
2. Step
Airing phase
3. Step
Anti-Creasing phase
S4
S3
S3
S2
10
5
5
120
Hum_m3
Hum_m3
Hum-No
MH3
MH3
MH2
MH4
ISL
ISL
IS0
IS0
65°C
Time program 10' / prog 9
0. Step
Heating1 phase
1. Step
Heating2 phase
2. Step
Airing phase
3. Step
Anti-Creasing phase
S1
S3
S3
S2
0
5
5
120
Hum_m3
Hum_m3
Hum-No
MH3
MH3
MH2
MH4
ISL
ISL
IS0
IS0
65°C
Synthetic Ready to Iron / prog 10
0. Step
Heating1 phase
1. Step
Heating2 phase
2. Step
Airing phase
3. Step
Anti-Creasing phase
S10
S8
S3
S2
60
30
5
120
Hum_12
Hum_12
Hum-No
MH3
MH3
MH2
MH4
ISH
ISL
IS0
IS0
60°C
Cotton Extra Dry
0. Step
1. Step
2. Step
3. Step
Total
Durations
(minutes)
140
120
100
30
10
60
40
20
10
95
Synthetic Cupboard Dry / prog 11
0. Step
Heating1 phase
S10
60
Hum_12
MH3
ISH
1. Step
Heating2 phase
S9
40
Hum_6
MH3
ISL
2. Step
Airing phase
S3
5
Hum-No
3. Step
Anti-Creasing phase
S2
120
MH2
IS0
MH4
IS0
65°C
105
HEATING PROFILE :
20
Terra Condenser & Air Vented Dryers
Technical Specifications
IS0
NO HEATING
ISL
1400 W HEATING
ISH
2000 W HEATING
*Empty Drum logic , after max 2 minutes Dryer skip the steps and goes to the Airing phase.
*Low heat-high heat button and buzzer cancel are optional. (depend on the models) .
*Anti-Creasing mode duration is 2 hour’s.
Drying
Ready to Iron
Cupboard Dry
Airing
End
Filter Blocked
Tank Full
Ready to
Cupboard
Drying
Iron
Dry
Airing / End
+
+
+
+
X
According to the Program Step related leds are on.
According to the Program Step related leds are on.
Start
+
+
+
+
+
X
Auxiliary
function
+/+/+/+/+/+/+/-
Filter
+
-
Tank
+
Drum movement Step Durations (sn)
Movement directions
_CW
_MOff
_ACW
_MOff
//MH2
100
2
5
2
//MH3
180
2
5
2
//MH4
4
60
4
60
5.3 TERRA 866C01 TYPE (BASE) TIMED CONDENSER PROGRAMME TABLE
Program
140 min
130 min
100 min
80 min
60 min
30 min
10 min
Heating 1
Heating 2
Airing
Anti-Crease
Heating 1
Heating 2
Airing
Anti-Crease
Heating 1
Heating 2
Airing
Anti-Crease
Heating 1
Heating 2
Airing
Anti-Crease
Heating 1
Heating 2
Airing
Anti-Crease
Heating 1
Heating 2
Airing
Anti-Crease
Heating 1
Phase
Motor Profile
Heater
Profile
P1
P2
P3
P4
P1
P2
P3
P4
P1
P2
P3
P4
P1
P2
P3
P4
P1
P2
P3
P4
P1
P2
P3
P4
P1
MH5
MH3
MH4
MH2
MH5
MH3
MH4
MH2
MH5
MH3
MH4
MH2
MH5
MH3
MH4
MH2
MH5
MH3
MH4
MH2
MH5
MH3
MH4
MH2
MH5
User Selection
User Selection
IS0
IS0
User Selection
User Selection
IS0
IS0
User Selection
User Selection
IS0
IS0
User Selection
User Selection
IS0
IS0
User Selection
User Selection
IS0
IS0
User Selection
User Selection
IS0
IS0
User Selection
Total
Time
Time(sec) (min)
0
8400
300
7200
0
7800
300
0
0
5700
300
7200
0
4500
300
7200
0
3300
300
7200
0
1500
300
7200
0
145
135
100
80
60
30
10
21
Terra Condenser & Air Vented Dryers
Technical Specifications
Airing
P2
P3
P4
P1
P2
P3
P4
Heating 2
Airing
Anti-Crease
Heating 1
Heating 2
Airing
Anti-Crease
MH3
MH4
MH2
MH5
MH3
MH4
MH2
User Selection
IS0
IS0
IS0
IS0
IS0
IS0
300
300
7200
0
300
300
7200
10
IS0 : Heater Off
"User Selection"
is set by Heater
High/Low
Auxiliary Button
5.4 Terra Condenser Sensor Dryer 876C11/876C 12 (TankUp)
Heating Profile :
IS0NO HEATER
ISL1400 W HEATER
ISH2000 W HEATER
5.4…Terra Condenser Sensor Dryer 876C11&12 Programme Table
Programme
Cottons Extra Dry
0. Step
1. Step
2. Step
3. Step
Phase
Phase
time
Phase
Humidity
Motor Motor
code duration Conditions Profile Profile
Heating1 fazı
Heating2 fazı
Airing phase
Anti-Creasing phase
S12
S10
S3
S2
85
60
5
120
Nem_6
Nem_m3
N/A
MH3
MH3
MH3
MH4
High
High
Off
Off
Heating1 fazı
Heating2 fazı
Airing phase
Anti-Creasing phase
S11
S13
S3
S2
75
65
5
120
Nem_6
Nem_0
N/A
MH3
MH3
MH2
MH4
High
High
Off
Off
Heating1 fazı
Heating2 fazı
Airing phase
Anti-Creasing phase
S11
S8
S3
S2
75
30
5
120
Nem_12
Nem_12
N/A
MH3
MH3
MH2
MH4
High
High
Off
Off
Heating1 fazı
Heating2 fazı
Airing phase
Anti-Creasing phase
S4
S7
S3
S2
10
25
5
120
Nem_6
Nem_0
N/A
MH2
MH2
MH2
MH4
Low
Low
Off
Off
Heating1 fazı
Heating2 fazı
Airing phase
Anti-Creasing phase
S1
S3
S3
S2
0
5
5
120
Nem_m3
Nem_m3
N/A
MH3
MH3
MH2
MH4
Low
Low
Off
Off
Heating1 fazı
Heating2 fazı
Airing phase
Anti-Creasing phase
S8
S7
S3
S2
30
25
5
120
Nem_m3
Nem_m3
N/A
MH3
MH3
MH2
MH4
Low
Low
Off
Off
Total
Time
(min)
150
Cottons Ready to Wear
0. Step
1. Step
2. Step
3. Step
145
Cottons Ready to Iron
0. Step
1. Step
2. Step
3. Step
110
Delicate / prog4
0. Step
1. Step
2. Step
3. Step
40
Airing / prog 5
0. Step
1. Step
2. Step
3. Step
10
Time programmes 60' / prog 6
0. Step
1. Step
2. Step
3. Step
60
22
Terra Condenser & Air Vented Dryers
Technical Specifications
Time programmes 40' / prog 7
0. Step
1. Step
2. Step
3. Step
Heating1 fazı
Heating2 fazı
Airing phase
Anti-Creasing phase
S6
S5
S3
S2
20
15
5
120
Nem_m3
Nem_m3
N/A
MH3
MH3
MH2
MH4
Low
Low
Off
Off
Heating1 fazı
Heating2 fazı
Airing phase
Anti-Creasing phase
S4
S3
S3
S2
10
5
5
120
Nem_m3
Nem_m3
N/A
MH3
MH3
MH2
MH4
Low
Low
Off
Off
Heating1 fazı
Heating2 fazı
Airing phase
Anti-Creasing phase
S1
S3
S3
S2
0
5
5
120
Nem_m3
Nem_m3
N/A
MH3
MH3
MH2
MH4
Low
Low
Off
Off
Heating1 fazı
Heating2 fazı
Airing phase
Anti-Creasing phase
S11
S9
S3
S2
75
40
5
120
Nem_12
Nem_12
N/A
MH3
MH3
MH2
MH4
High
Low
Off
Off
0. Step
Heating1 fazı
S11
75
Nem_12
MH3
High
1. Step
Heating2 fazı
S9
40
Nem_6
MH3
Low
2. Step
Airing phase
S3
5
N/A
MH2
Off
3. Step
Anti-Creasing phase
S2
120
MH4
Off
40
Time programmes 20'/ prog 8
0. Step
1. Step
2. Step
3. Step
20
Time programmes 10' / prog 19
0. Step
1. Step
2. Step
3. Step
10
Synthetics Ready to Iron / prog 10
0. Step
1. Step
2. Step
3. Step
120
Synthetics Ready to Wear / prog 11
6
120
Door reversebility
1. Unplug the dryer.
2. Open the door.
3. Turn the contact pin in the upper part of door by 90° into the anti-clockwise
direction and remove it.
4. Unscrew the 2 screws of each door hinge and remove the door.
5. Removing the door lock: Using a flat screwdrivers release the snap-fitted
door lock.
6. Remove 2 blind cover for the hinges and one for the door-lock on the
opposite side.
7. Reverse the door: Fasten the door on the desired side with 4 screws. Fix
the contact pin into the top side of the door by turning 90° into the
clockwise direction.
8. Insert the door lock system on the opposite side of the hinge fixation and
be sure it is snap-fitted.
23