1
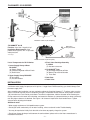
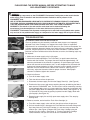
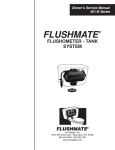
Owner’s Service Manual
501-B Series
FLUSHOMETER - TANK
SYSTEM
501-B
FLUSHMATE® 501-B SERIES
(D)
(E)
(H)
❷
(C)
(F)
(B)
❶
(A)
❸
(I)
❹
(G)
Model M-101526-F (for two piece)
FLUSHMATE® 501-B
Function: Less than 1.6 gpf/6.0 Lpf
Installation Requirements: Cold
potable water system, min. 20 psi static
water pressure*
❺
Bolt Plate –
for one-piece toilet
*max. 80 psi
❻
Drain Valve –
for one-piece toilet
Model M-102540-F (for one piece)
List of Components for 501-B Series:
1. Lower Supply Group w/Hose
BL100504
(A) Supply Shank
(B) Pressure Regulator w/Back Check
(C) Relief Valve
2. Upper Supply Group BU100505
(D) Air Inducer
(E) Vacuum Breaker
3. Flush Valve Cartridge Assembly
C-100500
(F) Actuator w/setscrew
4. FLUSHMATE® Tank
(G) Discharge Extension w/Drain
(H) Name Plate w/Serial Number
(I) Flush Rod
5. Bolt Plate
6. Drain Valve
INSTALLATION
Please follow the toilet manufacturer’s installation instruction for installing the fixture. Note that the toilet requires
a minimum water supply line pressure of 20 psi for a 1.6 gpf fixture. Before attaching, you should always flush
the water supply lines.
After completing the installation, you are required to adjust the Cartridge Actuator (F). To adjust, make sure the
water is turned on and the vessel is completely charged. The Actuator needs to be set at the proper clearance,
1/8” from either the Flush Rod or push button. To make this adjustment, hold the Actuator while loosening the
Phillips setscrew in the center of the Actuator, and rotate the Actuator up (counterclockwise) or down (clockwise)
until the proper clearance is obtained. See Figure 1 for clearance required for flush-handle fixture. Tighten
setscrew after adjusting the Actuator.
Additional notes:
• Water supply requirement: Cold potable water system.
• Should your toilet continuously run-on after installing, refer to section #1 under Troubleshooting.
• You may be required to initially flush the toilet a few times to properly charge the system.
• Should your fixture develop a leak between the tank and bowl, please refer to the fixture manufacturer’s
installation instructions.
-2-
PLEASE READ THE ENTIRE MANUAL BEFORE ATTEMPTING TO MAKE
ANY ADJUSTMENTS OR REPAIRS.
WARNING:
• When replacing components on the FLUSHMATE® Flushometer-Tank System, make certain that the
water supply valve is turned off and the toilet has been flushed to relieve pressure in the
FLUSHMATE® tank.
• USE OF PETROLEUM-BASED LUBRICANTS OR CORROSIVE CLEANING PRODUCTS CONTAINING
CHLORINE, SUCH AS HOUSEHOLD BLEACH, DROP-IN BLOCKS OR TABLETS, OR DISINFECTANTS,
THAT ARE APPLIED INSIDE THE CHINA HOLDING TANK WILL VOID YOUR FLUSHMATE®
WARRANTY. The exterior of the tank and the entire bowl can be cleaned following the
manufacturer’s recommendations or in the same fashion as any other toilet.
• FLUSHMATE® Flushometer-Tank Systems are designed to be used with a cold potable water system
only and use of non-potable water supply or a tempered or hot water supply will void your warranty.
TROUBLESHOOTING
A) Condition: Water runs and will not shut off
Figure 1
A run-on condition may be caused by insufficient water pressure, an improperly
adjusted Flush Valve Cartridge, or a clogged inlet screen. Refer to “Installation
Requirements” for recommended minimum pressure. (See “Points to Remember” for
a simple method to determine whether your water pressure is adequate). Check water
pressure, marginal pressure can cause any of these conditions. If sufficient water
pressure has been verified and the toilet continues to run-on, the following steps may
be required:
1. Make sure the water supply valve is fully open.
Figure 2
2. Check the Actuator adjustment. The Flush Rod (I) or push button should not
interfere with the Actuator. The proper clearance should be approximately 1/8”
when the push button or flush-handle is stationary. On push button type fixtures,
loosen the setscrew on the Actuator (see F on the component list) and rotate the
Actuator up (counterclockwise) or down (clockwise) until the proper clearance is
obtained. For flush-handle fixtures, observe the clearance. (See Figure 1) If
necessary, adjust the Actuator to allow for proper clearance. When proper
clearance is obtained, tighten the setscrew.
3. Check Inlet Screen
a. Turn off the water supply valve.
b. Flush the toilet to relieve the pressure.
Figure 3
c. Disconnect the water supply line from the Supply Shank (A). (See Figure 6)
d. Examine the inlet screen and remove anything that may be blocking the flow of
water into the FLUSHMATE® tank. The inlet screen can be removed by inserting
a small pointed object (such as a large paperclip or the blade of a penknife) into
the lower Supply Shank and working the inlet screen loose. (See Figures 7a, 7b,
7c) Reinstall the inlet screen by pushing it upward into the Supply Shank with
your fingertip. (See Figure 7d)
Figure 4
e. Reattach water supply line and fully open water supply valve. Test setup by
flushing toilet.
4. Remove, examine, and reinstall the Flush Valve Cartridge (3).
a. Turn off the water supply valve and flush the toilet to relieve the pressure.
Figure 5
b. On flush-handle fixtures, disengage the Flush Rod from the handle linkage and
flip it away from the Flush Valve Cartridge. It is not necessary to loosen the
retainer clips. (See Figure 3) Remove the Flush Valve Cartridge using the
handles of a pair of pliers. (See Figure 2). Turn the Flush Valve Cartridge
counterclockwise until you can lift it out of the FLUSHMATE® tank.
-3-
c. Examine the exposed O-rings on the Flush Valve Cartridge for obstruction or
damage. If the O-rings are damaged, the Flush Valve Cartridge should be
replaced. Clean any debris from the O-ring before re-installing. (See Figure 4)
Figure 6
d. Insert the Flush Valve Cartridge into the FLUSHMATE® tank and thread it
clockwise into place until one (1) black thread (on the FLUSHMATE® tank) is
showing above the Flush Valve Cartridge. (See Figure 5) Fully open the water
supply valve and continue to thread the Flush Valve Cartridge clockwise, 1/4
turn at a time, pausing briefly between each 1/4 turn, until the water stops
running into the toilet bowl and the FLUSHMATE® tank pressurizes.
e. Test setup by flushing toilet. Reinstall Flush Rod and handle linkage.
B) Condition: Weak, incomplete, sluggish, or no flush
Inadequate water pressure, an improperly adjusted Flush Valve Cartridge, a clogged
inlet screen, or insufficient air draw may cause a weak, sluggish, or no flush condition.
Figure 7a
1. Make sure that the water supply valve is fully open.
2. Check for proper actuation adjustment, see Condition A-2, “Water runs and will not
shut off.”
3. Turn off the water supply valve.
4. Flush the toilet to relieve the pressure.
5. Disconnect the water supply line from the Supply Shank (A). (See Figure 6)
Figure 7b
a. Examine the inlet screen and remove anything that may be blocking the flow of
water into the FLUSHMATE® tank. The inlet screen can be removed by inserting
a pointed object (such as a large paperclip or the blade of a penknife) into the
lower Supply Shank and working the inlet screen loose. (See Figures 7a, 7b, 7c)
The inlet screen easily snaps back into position by pushing it upward into the
Supply Shank with your fingertip. (See Figure 7d)
6. Examine the Air Inducer (D) for obstruction or damage. (See Figure 8)
Figure 7c
a. Make sure the water supply valve is turned off and the toilet has been flushed to
relieve the pressure.
b. Remove the Air Inducer Cap. (See Figure 9)
c. Remove the Duckbill Valve from the Air Inducer Cap. (See Figure 10) The flat
“lips” of Duckbill Valve should open fully when the square sides are squeezed
together. (See Figure 11) Rinse any obstruction or mineral deposits from the
Duckbill Valve. If the Duckbill Valve is damaged, it must be replaced.
d. Insert the Duckbill Valve into the Air Inducer housing. (See Figure 12)
Figure 7d
e. Put the Air Inducer Cap back on, and tighten finger-tight only. (See Figure 13)
f. Reconnect the water supply line and fully open water supply valve.
7. Check Air Inducer for sufficient air draw. Place a small amount of water (two to
three drops) over the hole on top of the Air Inducer Cap (See Figure 14) and flush
the toilet. If the Air Inducer is working properly, the water will be drawn in. (See
Figure 15)
Figure 8
8. Check the Flush Valve Cartridge for leaks. Pour a small amount of water into the
Cartridge housing area. (See Figure 16) If bubbles are coming from the center or
the edge of the Flush Valve Cartridge, it should be replaced.
Figure 9
-4-
Condition: Vacuum Breaker Leaking
If the Vacuum Breaker (E) is leaking, it is likely that the water pressure is insufficient
or that there is insufficient flow due to a plugged inlet screen in the lower Supply
Shank. The recommended static pressure for the 501-B Series is between 20 psi
and 80 psi.
Note:
Figure 10
If the trouble-shooting steps listed in this manual do not resolve your problem, contact
FLUSHMATE® Consumer Services at 800-533-3460 or email [email protected].
Please be prepared to provide the serial number and date of installation of your
FLUSHMATE® system.
WINTERIZING
1. Turn off the water supply valve and flush the toilet to relieve the pressure.
Figure 11
2. Place a bucket under the lower Supply Shank (A) and disconnect the water supply
line, allowing the water to drain into the bucket.
3. Push down on the Actuator and pull it up momentarily to allow air into the vessel.
4. Follow the fixture manufacturer’s instructions for winterizing the bowl.
5. Do not put antifreeze or any other chemical agents in the china holding tank or in
the FLUSHMATE® Tank.
Figure 12
POINTS TO REMEMBER
• When replacing components on the FLUSHMATE® Flushometer-Tank System,
make certain that the water supply valve is turned off and the toilet has been
flushed to relieve pressure in the FLUSHMATE® tank.
•
Figure 13
WARNING: USE OF PETROLEUM-BASED LUBRICANTS OR CORROSIVE
CLEANING PRODUCTS CONTAINING CHLORINE, SUCH AS HOUSEHOLD
BLEACH, DROP-IN BLOCKS OR TABLETS, OR DISINFECTANTS THAT ARE
APPLIED INSIDE THE CHINA HOLDING TANK WILL VOID YOUR FLUSHMATE®
WARRANTY.
• Water supply requirement: Cold potable water system.
• The Flush Valve Cartridge can be removed by inserting the handles of a pair of
pliers into the top of the Flush Valve Cartridge and turning counterclockwise.
• With each flush, a small amount of water may be emitted from the upper supply
group. A drain at the base of the FLUSHMATE® system will eliminate most of this
water. Depending on usage, you may see some residual water (less than 1”) in the
china holding tank. This is a normal occurrence.
Figure 14
• Replacement parts are readily available by contacting Consumer Services at
800-533-3460 or by visiting the “Where to Buy” section of our website,
www.flushmate.com, or purchase online at www.eflushmate.com.
If you would like additional information or require technical assistance, please contact
FLUSHMATE® Consumer Services at 800-533-3460, or visit our website,
www.flushmate.com. For faster service, please be prepared to provide the serial
number and date of installation of your FLUSHMATE® system.
Figure 15
For support outside the United States, visit our local contact website at
www.flushmate.com/localcontact.
Figure 16
-5-
ATTENTION OWNER
THESE ARE THE TERMS OF YOUR WARRANTY
Effective August 15, 2004, FLUSHMATE® (the “Company”) warrants the FLUSHMATE® (flushometer tank)
operating system (the “unit”) to be free of defects in material and workmanship for a period of ten (10) years from
the date of installation on original components and includes a lifetime limited warranty on the FLUSHMATE® tank.
The Company promises to replace any part of this product that proves, upon our inspection and within ten (10)
years from date of installation, to be defective in material or workmanship. All labor and transportation costs or
charges incidental to warranty service are to be borne by the purchaser-user.
This warranty is subject to the following:
Specific Conditions to Warranty
1. A warranty registration card has been fully completed and mailed by the purchaser (the “user”) to the
Company within thirty (30) days of the date of installation. Product may also be registered online at
www.flushmate.com or by calling 800-533-3460.
2. The unit has been subject to proper installation, operation and maintenance as outlined in the installation
instructions that were supplied with the unit. Note carefully that this warranty is voided if the unit is installed
and operated subject to water supply line pressures greater than 80 psi (static) or less than 20 psi (static) for
the Series 501-B.
3. Service and repairs may only be performed by authorized representatives of the Company or by others upon
specific approval by the Company. Unauthorized repairs or alterations shall specifically void the warranty.
4.
WARNING: USE OF PETROLEUM-BASED LUBRICANTS OR CORROSIVE CLEANING PRODUCTS
CONTAINING CHLORINE, SUCH AS HOUSEHOLD BLEACH, DROP-IN BLOCKS OR TABLETS, OR
DISINFECTANTS THAT ARE APPLIED INSIDE THE CHINA HOLDING TANK WILL VOID YOUR
FLUSHMATE® WARRANTY.
5. Proof of purchase is required.
6. FLUSHMATE® systems manufactured prior to August 15, 2004 have a shorter warranty period based on the
serial number. Call FLUSHMATE® to verify.
Exclusions
IN NO EVENT SHALL THE COMPANY BE LIABLE FOR INCIDENTAL OR CONSEQUENTIAL DAMAGES,
FOR DAMAGES RESULTING FROM IMPROPER INSTALLATION, OR FOR DAMAGES CAUSED BY
NEGLECT, ABUSE OR ALTERATION. THE USE OF GENERIC, “KNOCK-OFF” REPLACEMENT PARTS
WILL VOID OWNERS WARRANTY. ALL IMPLIED WARRANTIES, INCLUDING ANY IMPLIED WARRANTY
OF MERCHANTABILITY OR FITNESS FOR ANY PARTICULAR PURPOSE ARE LIMITED TO A PERIOD OF
TEN (10) YEARS FROM DATE OF INSTALLATION.
Some states do not allow limitations on the duration of an implied warranty and some states do not allow
exclusions or limitations regarding incidental or consequential damages so the above limitations may not apply to
you. This warranty gives you specific legal rights and you may have other rights, which vary from state to state.
No person is authorized to change, add to, or create any warranty or obligation other than that set forth herein.
To obtain warranty service, contact Consumer Services toll free (USA & CANADA) 800-533-3460 or write to us at:
Scan using your smartphone to
view troubleshooting videos or visit:
http://flushmate.com/Troubleshoot/
Installation Date __________________________________________________________________________________________________
Serial Number ____________________________________________________________________________________________________
© FLUSHMATE Division
FLU6144.8
-6-
0115