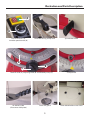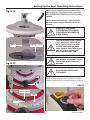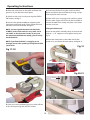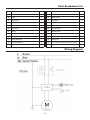
1
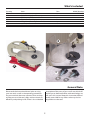
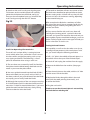
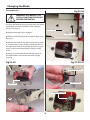
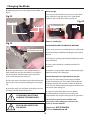
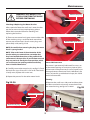
AXMINSTER Code 508294 Hobby SERIES RSS16E Variable Speed Scroll Saw AT&M: 04/09/2014 Index of Contents Index of Contents 02 Declaration of Conformity 02 What’s Included 03 General Notes 03 Introduction04 General Safety Instructions for 230V Machines 04-05 Additional Safety Instructions for Scroll Saw 05-06 Specification06 Initial Assembly 06-07 Mounting the Scroll Saw 07 Illustration and Parts Description 08-09-10-11 Setting Up the Saw 12-13 Operating Instructions 13-14-15 Changing the Blade 16-17-18 (Standard Blades) 16 (Pinned Blades) 17-18 Maintenance19-20 Parts Breakdown/List 21-22-23 Wiring Diagram 23 Declaration of Conformity Copied from CE Certificate Manufactured by Qingdao D&D Electromechanical Technologies Co., Ltd. is in compliance with the standards determined in the following Council Directive. The undersigned, T. Fuhrmann Authorised by Qingdao D&D Electromechanical Technologies Co., Ltd. 23rd FL., D&D Fortune Centre No. 182-6 Haier Road Qingdao, Shandong 266000 P.R. China. 2006/42/EC 2006/95/EC (Low Voltage Directive) Model Number: RSS16GA (Scroll Saw) Warning Fully read manual and safety instructions before use Ear protection should be worn The symbols below advise that you follow the correct safety procedures when using this machine. Eye protection should be worn 2 Dust mask should be worn HAZARD Motor gets hot What’s Included Quantity Item Part Model Number RSS16GA 1 No RSS16E Hobby Scroll Saw A Blade comes fully assembled but not tensioned 1 No Blade Guard B 2 No M5 x 10mm Butterfly Screw Knobs and flat washers C 1 No Manual B A C General Note Please read the Instruction Manual prior to using your new tool; as well as the operating procedures for your new tool, there are numerous hints and tips to help you to use the tool safely and to maintain its efficiency and prolong its life. There is also a detailed description of the parts of your scroll saw, which will enable you to become familiar with terminology we will use in this manual. Keep this Instruction Manual readily accessible for any others who may also be required to use the tool. 3 Introduction Perfect for the hobby user who wants a more advanced scroll saw, the RSS16E is a machine that will allow you to take on more advanced projects. Based around a cast iron base with cast alloy body and table, it’s not too heavy to move and the integrated handle makes this an easy task. Several features make this scroll saw stand out: variable motor speed giving a good cutting range for many tasks, easy blade changing plus it can take both pinned and un-pinned blades in the same blade holders. The table tilts both ways up to 45° with a geared hand knob. A clever flexible stalk combines a blower nozzle and LED work light to keep the work clear and illuminated. There is a hinge out blade tray for convenient blade storage. A 35mm dust outlet allows connection to a small vacuum extractor and a wrap-around eye shield is supplied. Rubber feet are provided for bench or worktable use; however, for best performance we do recommend bolting the machine to either a steel stand or sturdy workbench. This would be a good choice of machine to let your hobby skills grow. General Safety Instructions for 230V Machines Good Working Practices/Safety your machine, make sure it is fastened down and stable before use. The machine is not designed for sub-aqua operation, do not use when or where it is liable to get wet. If the machine is set up in the open, and it starts to rain (unusual though this would be in U.K.), cover it up or move it into the dry. If machine has got wet; dry it off as soon as possible, with a cloth or paper towel. The following suggestions will enable you to observe good working practices, keep yourself and fellow workers safe and maintain your tools and equipment in good working order. WARNING! KEEP TOOLS AND EQUIPMENT OUT OF THE REACH OF YOUNG CHILDREN Do not use 230V a.c. powered machines anywhere within a site area that is flooded or puddled, and do not trail extension cables across wet areas. Primary Precautions Keep the machines clean; it will enable you to more easily see any damage that may have occurred. The machine is supplied with a moulded 13 Amp. Plug and 3 core power cable. Before using the tool inspect the cable and the plug to make sure that neither are damaged. If any damage is visible have the tool inspected /repaired by a suitably qualified person. If it is necessary to replace the plug, it is preferable to use an ‘unbreakable’ type that will resist damage on site. Only use a 13 Amp plug, make sure the cable clamp is tightened securely. Fuse at 5 Amp. It is also good practice to use switched outlets. If extension leads are to be used, carry out the same safety checks on them, and ensure that they are correctly rated to safely supply the current that is required for your machine. Keep the work area as uncluttered as is practical, this includes personnel as well as material. Under no circumstances should CHILDREN be allowed in work areas. It is good practice to leave the machine unplugged until work is about to commence, also make sure to unplug the machine when it is not in use, or unattended. Always disconnect by pulling on the plug body and not the cable. Once you are ready to commence work, remove all tools used in the setting operations (if any) and place safely out of the way. Re-connect the machine. Work Place/Environment Always mount the machine on a flat, level, stable surface. There are several methods of achieving this, bolting the machine directly to a ‘good solid workbench’, bolting the machine to a sturdy base board that can be clamped to the ‘good solid workbench’; create an independent entity by bolting the machine to its own stand. However you mount Make sure you are comfortable before you start work, balanced, not reaching etc.. If the work you are carrying out is liable to generate 4 General Safety Instructions for 230V Machines Do not store materials above or near a machine, such that it is necessary to stand on the machine to reach them. flying grit, dust or chips, wear the appropriate safety clothing, goggles, gloves, masks etc., and if the work operation appears to be excessively noisy, wear ear-defenders. If you wear your hair in a long style, wearing a cap, safety helmet, hairnet, even a sweatband, will minimise the possibility of your hair being caught up in the rotating parts of the tool, likewise, consideration should be given to the removal of rings and wristwatches, if these are liable to be a ‘snag’ hazard. Consideration should also be given to non-slip footwear, etc.. HANDLE WITH EXTREME CARE Whenever transporting or installing machinery, and always use a lifting tool. AVOID ACCIDENTAL STARTING. Ensure the switch is OFF before plugging in to mains. BE AWARE that accidents are caused by carelessness due to familiarity. ALWAYS concentrate on the job in hand, no matter how trivial it may seem. Do not work with cutting tools of any description if you are tired, your attention is wandering or you are being subjected to distraction. A deep cut, a lost fingertip or worse; is not worth it! Do not use this machine within the designated safety areas of flammable liquid stores or in areas where there may be volatile gases. There are very expensive, very specialised machines for working in these areas, THIS IS NOT ONE OF THEM. NEVER LEAVE MACHINE RUNNING UNATTENDED. Turn the power OFF. Do not leave machine until it comes to a complete stop. MAKE WORKSHOP CHILDPROOF. Cover the saw adequately when not in use to prevent children from damaging themselves by tampering with it. Check that blades are the correct type and size, are undamaged and are kept clean and sharp, this will maintain their operating performance and lessen the loading on the machine. Above all, OBSERVE…. make sure you know what is happening around you, and USE YOUR COMMON SENSE. NEVER STAND ON THE MACHINE. Serious injury could occur if the machine is tipped or if a cutting tool is accidentally contacted. Additional Safety Instructions for Scroll Saw 1. Wear safety goggles as protection against flying wood chips and saw dust. In many cases, a full face shield is even better protection. A dust mask is also recommended to keep saw dust out of your lungs. 7. Make sure the blades’ teeth are pointing down, toward the table, and that the blade tension is correct. 8. When cutting a large piece of material, support it at the height of the table. 2. The scroll saw must be bolted securely to a stand or workbench. If the saw has a tendency to move during certain operations, bolt the stand or workbench to the floor. 9. Do not feed the work piece through the blade too fast. Feed only as fast as the blade will cut. 3. A solid wood workbench is stronger and more stable than a workbench with a plywood table. 10. Keep your fingers away from the blade. Use a push stick as you near the end of the cut. 4. This scroll saw is for indoor use only. 11. Take care when cutting a work piece which is irregular in cross section. Moulding for example must lie flat, and not ‘rock’ on the table as it is being cut. A suitable support must be used. 5. Do not cut pieces of material which are too small to be held by hand. 6. Clear the work table of all objects except the work piece (tools, scraps .rulers etc.) before turning the saw on. 12. Take care when backing off a work piece from the blade, as the blade may bind in the ‘kerf. In this 5 Additional Safety Instructions for Scroll Saw event, switch OFF the machine and disconnect from the supply. Wedge open the kerf, and withdraw the work piece. 16. Set up the machine and make all adjustments with the power OFF, and disconnected from the supply. 13. Switch off the saw, and make sure the blade has come to a complete stop before clearing sawdust or off-cuts from the table. 17. DO NOT operate the machine with the covers off. They must all be in place and securely fastened when performing any operation 14. Make sure there are no nails or foreign objects in the part of the work piece to be sawn. 18. Be sure to use the correct blade size and type. 19. Use ONLY approved replacement saw blades. Contact your local Axminster Tool Centre for advice. The use of inferior blades may increase the risk of injury. 15. Be extra cautious with very large or small, or irregularly shaped work pieces. Specification Code508294 ModelRSS16E RatingHobby Power 100W 230V Throat 406mm Stroke 15mm Cuts per Minute 400-1,600/min Max Depth of Cut 50mm Table Size 270 x 410mm Table Tilt 0°-45° L & R Dust Extraction Outlet 35mm Overall L x W x H 600 x 270 x 400mm Weight14kg Initial Assembly holes in the arms. While holding the guard in place introduce the two butterfly knobs (C) through the guard assembly and into the supporting arms, lightly tighten to lock the guard (B) in position, see figs 01-02-03 Having unpacked your scroll saw and its accessories please dispose of any unwanted packaging properly. The cardboard packaging is biodegradable. please dispose of any unwanted packaging properly . The polythene, POLYSTYRENE and card is recyclable . Fig 01 Your scroll saw is fully assembled, except for the Blade Guard assembly. Locate the guard (B) and the two butterfly screw knobs and flat washers (C). Place a flat washer over the M5 threaded knobs, slot the guard over the outside edges of the guard supporting arms and offer up the two elongated holes with the threaded B C 6 Initial Assembly Fig 02-03 C B NOTE: The guard can be adjusted by loosening the two butterfly knobs (C) and sliding the guard assembly (B) up or down to accommodate different timber thicknesses. don’t overtighten as the guard is only plastic! Mounting the Scroll Saw It is strongly recommended that you mount the machine to a workbench or to a purpose built scroll saw stand. A pad between the saw and the workbench/stand is also recommended to reduce vibration. Ensure you use flat washers between the bolt head and mounting holes, see figs 04-05-06. Fig 05-06 NOTE: Fretsaw Stand Only. You may need to add a larger sub-table (MDF or Plywood plate) to give extra support to larger models. Fig 04 Scroll saw Mounting Holes 7 Illustration and Parts Description ON/OFF buttons Bearing bushes Variable speed control Guard supporting arms Adjustable guard Table Table scale pointer Motor brush port Spare blade holder Table tilt butterfly clamp Lower blade access door Table tilt scale 8 Illustration and Parts Description A B ON/OFF buttons (A) Variable speed control (B) Blade tensioning clamp lever Spare blade holder A C B Table tilt scale (A), Adjusting knob (B) and Butterfly clamp (C) Air delivery tube ( Place near work piece) Scroll saw guard 9 Scale pointer Lower blade holder access door Illustration and Parts Description Carrying handle Guard butterfly clamp Air delivery tube Table insert Scroll saw chassis Motor brush port Table tilt control knob Dust extraction outlet Scroll saw mounting hole 10 Illustration and Parts Description Table tilt control clamp Scroll saw table tilted to 45˚ Upper blade holder Table tilt control knob Lower blade holder Lower rocker arm and motor assembly 11 Table insert Dust extraction outlet Setting Up the Saw The scroll saw comes with the blade assembled but not tensioned and the table tilted. Please follow the instruction below to set up your scroll saw. Tensioning the Blade Lift up the blade tensioning clamp lever (A) and turn it clockwise to tension the blade, see fig 07. Check that the blade is sufficiently tensioned by pinging the blade, see fig 08 then press down the tensioning lever to lock the setting, see fig 09 NOTE: If the lever doesn’t lock down, release the tension slightly by turning the lever anti-clockwise then try again. WARNING! DO NOT OVERTIGHTEN THE BLADE OTHERWISE THE BLADE WILL BREAK. Setting the Table 1) Loosen the table tilt butterfly clamp (B) and rotate the table by turning the control knob (C) until the table is level, see fig 10-11. 2) Place an engineer’s square on the table and place it up-against the blade and check that the blade is perpendicular (90˚) to the table, making sure that the square is not in contact with any of the teeth, see fig 12-13. 3) If adjustment is required, rotate the table until the blade is perpendicular to the table, then re-tighten the butterfly clamp (B), see fig 14. 4) Check that the scale pointer is pointing at 0˚degrees on the scale. If not, loosen the Phillips screw and adjust until correct, re-tighten the screw, see fig 15. Fig 10-11 Fig 07-08-09 Anti-Clockwise (Release Tension) A Clockwise (Tension) B Checking the blade tension Press down lever to lock the tension 12 C Setting Up the Saw/ Operating Instructions NOTE: If you are new to scroll saws, there will be a learning period, a period to learn the saw itself, and a period to learn how the wood and saw work together. Fig 12-13 Expect some blade breakages, scroll saw blades are fairly fragile, compared to blades found on a bandsaw. WARNING! Under no circumstances should CHILDREN be allowed in work areas. Blade check that everything is secure, that the blade is tight and all non essential items have been cleared away from the work area. Connect a dust extraction unit to the dust extraction outlet on the SCROLL saw. Engineer’s square SEE THE SYMBOLS ON PAGE TWO FOR wearing the correct safety protection when using this machine. Fig 14-15 PLUG IN and switch on the mains 1) Before turning on the scroll saw make sure the variable speed control is turned down low, see fig 16. B Fig 16 Adjusting screw Scale Pointer 13 Continues Over... Operating Instructions 2) Place the work piece on the table and lower the guard so its just above the work piece. 3) Switch on the scroll saw by pressing the ‘GREEN ON’ button, see fig 17. 4) Increase the speed to 400rpm, supporting the work piece with both hands slowly guide the work piece forward into the blade, see fig 18. NOTE: You must guide the wood into the blade SLOWLY, because the teeth are very small, and it cuts ONLY on the downward stroke. If you push the wood into the blade too rapidly, you can easily break the blade. NOTE: If you find the blade is struggling to cut through, increase the speed by turning the variable speed knob. 6) If you have finished using the scroll saw, clean above and below the work table and using a damp cloth wipe the scroll saw over. 7) If the scroll saw is not going to be used for a period of time, smear a light coat of oil over the work table to prevent the table from rusting and place a dust sheet over the scroll saw. Tilting the table to 45˚ 1) Loosen the table’s butterfly clamp and rotate the table to + /- 45˚ degrees and re-tighten clamp, see fig 19. 2) Place the work piece on the table and set the guard so it’s just above the work piece, see fig 20-21 Fig 19 Fig 17-18 Fig 20-21 Guard Work piece 5) Once you have completed your cut, switch off the scroll saw by pressing the red ‘OFF’ button. 14 Operating Instructions 3) Switch on the scroll saw by pressing the green ‘ON’ button, set the variable speed and carefully guide the work piece into the blade, see fig 22. Once you have completed your cut, switch off the scroll saw by pressing the red ’OFF’ button. 4) The teeth on the blade will wear out sooner or later. The blade must therefore be replaced often to obtain the best cutting results. A blade will stay sharp for half an hour to 2 hours of continuous running, depending on the material being cut. Fig 22 5) Be aware that the blade has a tendency to follow the grain of the wood. You can compensate for this by watching the grain carefully and guiding the wood past the saw blade. 6) If you are not familiar with scroll saws, there will naturally be a learning period - a period to learn the saw itself, and a period to learn how the wood and saw work together. Expect some blade breakages, scroll saw blades are fairly fragile not the same types of blade you find on a handsaw or circular saw. Cutting Intricate Patterns One capability a scroll saw has that other saws do not, is cutting intricate patterns inside a work piece. To do this, you should adopt the following procedure. Scroll Saw Operating Characteristics The scroll saw’s unique ability is cutting intricate curves which other saws cannot do. A scroll saw can also be used for straight line cutting such as cross cuts, ripping and bevels. The following is a list of points to remember when using a scroll saw. 1. Drill a 1/4” hole in the middle of the work piece, in a area which will not be a part of the finished object. 2. Switch off and unplug the machine from the supply. 1) The saw does not cut wood by itself. You feed the work piece into the blade, letting the blade cut the wood as you move the piece ahead. 3. Remove the blade from the machine. (See pages 16-17). 4. Place the work piece on the table, with the 1/4” hole over the access hole in the table. 2) You must guide the wood into the blade SLOWLY, because the teeth are very small, and cut ONLY on the down stroke. If you push the wood into the blade too rapidly, you can easily break the blade. 3) Although the capacity of the saw accepts wood up to 2” thick, better results are obtained with wood no more than 1” thick. For wood thicker than 1”, you must guide the wood into the blade very slowly, taking care not to bend or twist the blade. 5. Replace the blade, through the hole in the work piece, (with the teeth pointing downwards), and re-tension the blade. 6. Plug the saw back in. Check to ensure that the work piece is not touching the blade before switching ON. 15 Changing the Blade Fig 25-26 Standard Blades WARNING! DISCONNECT THE SCROLL SAW FROM THE MAINS BEFORE CONTINUING. 1) Lift up the blade tensioning clamp lever and rotate until the tension on the blade has been released, see fig 7 on page 12. Access door 2) Remove the table insert, see fig 23. Phillips screw 3) Remove the blade guard (B) and place safely aside, see fig 24. 4) Beneath the table to the side of the machine there is an access door, using a Phillips screwdriver loosen the right hand screw and slide the door away to gain access to the lower blade holder assembly, see fig 25-26. 5) Using a 3mm Hex Key loosen the Hex screws on the blade holders and remove the blade, see figs 27-28-29. Fig 23-24 Fig 27-28-29 Upper blade holder 3mm Hex key Table insert Lower blade holder B 16 Changing the Blade Clear away any tools around the work area. PLUG IN and switch on the mains. 6) Clean both blade holders and remove any compacted crud before fitting a new blade. 11) Start the scroll saw and check everything running correctly. If all OK, switch off the saw. If not repeat steps 1-10. 7) Check sawblade for flaws (cracks, broken teeth, bending) before installation. Pin Blades The scroll saw will accept pin blades, to fit see instruction below. WARNING! Do not use faulty sawblades. WARNING! DISCONNECT THE SCROLL SAW FROM THE MAINS BEFORE CONTINUING. MAKE SURE THE TEETH ARE POINTING IN THE CUTTING DOWN DIRECTION! 8) Lower the blade down through the table insert hole and into the lower housing. Insert the blade between the slot in the upper blade holder, see fig 30 and re-tighten the Hex screw to secure the blade in position see fig 27. Repeat for the lower blade holder. 1) Repeat steps 1-5 on the previous page to remove the standard blade and clean both blade holders. 9) Re-tension the blade by turning the tensioning lever clockwise then press down the lever to lock the tension. 3) Make sure the teeth are pointing down lower the pinned blade down through the table insert hole and into the lower housing. 10) Close the access door below the table, replace the table inset and re-attach the blade guard assembly (B). 4) Insert the blade between the slot in the lower blade holder so that the pins on the end of the blade engage into the cradles recess, see fig 31. 2) Check pinned sawblade for flaws (cracks, broken teeth, bending) before installation. Fig 30 Fig 31 Hex screw Cradle recess Blade holder slot Blade holder Blade Blade pin Hex screw 17 Continues Over... Changing the Blade 5) Repeat the process for the upper blade holder, see fig 32. Fig 32 Blade storage If you have several blades you can, easily store them away safely by using the scroll saw’s spare blade holder to the side of the machine, see fig 34. Fig 34 Cradle recess Spare blade holder Blade pins Blade Notes on Saw Blades Fig 33 BLADES BREAK FOR FIVE PRINCIPAL REASONS Blade tensioning lever 1. Too much tension or too little tension on the blade. 2. Overworking the blade by feeding the work piece too fast. 3. Twisting or bending the blade by feeding the work piece off-centre. 4. Over use, the blade has reached the end of its useful life. 6) Make sure that the pins are seated correctly in both cradles. Re-tension the blade by turning the tensioning lever clockwise then press down the lever to lock the tension, see fig 33. 5. Maximum cutting depth 50mm and exceeding the depth for which it was designed. 7) Close the access door below the table, replace the table insert and re-attach the blade guard assembly (B). The scroll saw will accept a wide variety of blade widths and thicknesses. The width of the blade, the thickness of the blade and the number of teeth per inch (TPI) are determined by the type of material and size of the radius being cut. 8) Start the scroll saw and check everything running correctly. If all OK, switch off the saw. Clear away any tools around the work area. PLUG IN and switch on the mains. How to determine the right blade for the job As a general rule, select the narrowest blades recommended for intricate curve cutting and widest blades for straight and large curve operations. See our full range of scroll saw blades and accessories in our catalogue or contact us by phone or visit our website. Telephone: 03332 406406 Online: axminster.co.uk 18 Maintenance WARNING! DISCONNECT THE SCROLL SAW FROM THE MAINS BEFORE CONTINUING. Remove the plug Checking & Replacing the Motor Brushes After a period of time the scroll saw’s motor brushes are due to wear and may need replacing, please follow the instruction below for checking and replacing the brushes. Fig 37 1) There are two motor brush ports one on either side of the machine, using a small flat head screwdriver remove one of the motor’s brush access plugs and place safely aside, see fig 35-36. Remove the motor brush Note: Be careful when removing the plug, the motor brush is sprung loaded. NOTE: Take careful note of the orientation of the brushes when you remove them, remember that they have bedded themselves to the profile of the commutator in that position. If you fit them reversed they may not be in exactly the same position, which can cause excessive sparking and heat until they have re-bedded themselves. 2) Carefully remove the motor brush, see fig 37. Check the brush for signs of wear If it’s O.K. re-fit. If the brush is badly worn, replace with a new one. 3) Repeat the process for the other motor brush. General Maintenance The motor is permanently lubricated. Do not try to oil the motor bearings or service any internal parts of the motor. If the power cord is worn, frayed, cut or damaged, contact Axminster Tools & Machinery. Do not try to patch it up with electrical tape, this could lead to more trouble. Cleaning Fig 35-36 1) Remove the scroll saws side panel and base plate and blow out the dust that may accumulate inside the motor housing, see figs 38-39-40-41 Fig 38 Flat head screwdriver Screw Motor brush plug Side panel 19 Screw Continues Over... Maintenance Fig 39-40-41 Rocker arm Rocker Arm Bearing Bushes After a period of use it is recommended to lightly oil the upper and lower rocker arm bearings, see fig 42. Lower blade holder Fig 42 Motor assembly Dust extraction outlet Bearing bushes Base plate 2) An occasional light coat of oil on the table to prevent surface rust is recommended. 3) Occasionally wipe the machine over with a damp cloth. 4) If the scroll saw is not going to be used for a period of time, smear a light coat of oil over the work table and place a dust sheet over the saw. 20 Parts Breakdown/List 21 Parts Breakdown/List Part Description Qty 41 Strain Relief 1 1 Variable Speed Control Knob 1 42 Cable 1 2 Switch 1 43 Pan Head Tapping Screw ST4.2x8 9 3 Cross Recessed Pan Head Screw M4x10 4 44 Cable clamp 5 4 Switch Plate 1 45 Arm Housing right 1 5 Ferrite Ring 2 47 Cross Recessed Pan Head Screw M5x40 5 6 Variable Speed Control 1 48 Cross Recessed Pan Head Screw M4x8 1 7 Blade Guard Adjustment Knob 2 49 Cross Recessed Pan Head Screw M5x50 1 10 Blade 1 50 Cross Recessed Pan Head Screw M5x30 1 15 Hex Socket Set Screw 1 51 Saw Dust Blower&LED 1 16 Arm Housing left 1 52 PCB Box Cover 1 17 Oil Bushing 4 53 PCB 1 18 Arm Upper 1 54 Cross Recessed Pan Head Screw M5x8 12 19 Hinge bolt 2 20 Blade Tension Set 1 55 PCB Box 1 56 Base 1 21 Blade Tension Knob 1 22 Sping-type straight pins-Slotted ø 3×16 1 23 Big Washer 8 1 24 Tension Pole 1 25 Sping-type straight pins-Slotted 4×25 1 26 Tensioning lever 1 27 Sping-type straight pins-Slotted ø 4×16 4 28 Blade Adapter clamp 2 29 Hex Socket Cap Head Screw M4x20 2 30 Spring 2 31 Blade Adapter 2 32 Hex Socket Cap Head Screw M5x30 2 33 Spring Washer 5 12 34 Link Board 1 35 Hex Nut M5 3 36 Arm Lower 1 37 Spacer 2 38 Bellows 1 39 Pan Head Tapping Screw ST4.2x13 2 40 Bellows Lock 1 22 58 Hex Socket Cap Head Screw M6x12 4 59 Spring Washer 6 11 60 Hex Nut M6 2 61 Rivets 2 62 Plate Cover 1 63 Blade Storage 1 64 Throat Plate 1 65 Table 1 66 Hex Socket Cap Head Screw M6x30 2 67 Scale Support 1 68 Hold Set 1 69 Scale Indicator 1 70 Cross Recessed Pan Head Screw M5x10 4 71 Table Lock Knob 1 72 Disc cover 1 73 Knob 1 74 Revolve Gear 1 75 Threaded Shaft 1 76 Hex Socket Cap Head Screw M5x20 1 77 Bearing Retainer 2 Parts Breakdown/List 78 Radial Spherical Plain Bearing 1 91 Cross Recessed Pan Head Screw M4x10 2 79 Bearing 625ZZ 1 92 Blade Guard Support 1 80 Link 1 93 Blade Guard 1 81 Big Spacer 1 94 Dust Port 1 82 Eccentric 1 95 Hex Socket Cap Wrench S4 1 83 Hex Socket Set Screw M8x8 1 96 Washer ø 6 3 84 Base Foot 4 97 Hex Nut M10 1 85 Moter 1 98 Washer ø 10 1 86 soleplate 1 99 spring 1 87 Back Plate Cover 1 100 Hex Socket Cap Wrench S3 1 88 Tooth Washer 4 4 101 Washer ø 5 2 89 Hex Bolt M6x20 4 102 Cross Recessed Pan Head Screw M5x6 6 90 small Cover 1 104 Hex Nut M6 2 Wiring Diagram 23 The Axminster guarantee is available on Hobby, Trade, Industrial, Engineer, Air Tool & CNC Technology Series machines It’s probably the most comprehensive FREE guarantee ever- buy with confidence from Axminster! So sure are we of the quality, we cover all parts and labour free of charge for three years! • Look for the icon and put your trust in Axminster • No registration necessary - just keep your proof of purchase • Optional Service Plan for Industrial Series machinery Great value & easy-to-use, perfect for use at home Solid, reliable machines designed for daily use Top performers with class leading features and build quality for use in busy workshops Quality, precision machines for the workshop or education Small machines for the home engineer Compressors and tools for home or workshop use; durable and great value Free Three Year Guarantee on Axminster Hobby, Trade and Industrial Series woodworking and engineering machines, Axminster Air compressors and Air Tools, and bench top grinders - no registration necessary just proof of purchase. We will repair or replace at our discretion and will collect only from a UK mainland address, irrespective of the original delivery address. The Guarantee assumes that you have bought the correct machine for the required operation, in accordance with our guidelines; have operated and maintained it in accordance with the instruction manual; and that all cutting machines will be used with a blade which is sharp and serviceable at all times. It does not cover consumable items purchased with the original product, including original blades or abrasives. Precision CNC machines for industry and education Normal wear and tear; misuse, abuse and neglect are excluded and the machine should not have been modified in any way. Please do not attempt to service the product without first contacting us; we are happy to guide you but failure to do so may invalidate the guarantee. The Guarantee is transferable from owner to owner in the first three years but you must have original proof of purchase. Should we need to replace a machine in the first three years the guarantee will still continue to be effective from the original purchase date. Full Terms and Conditions can be found at axminster.co.uk/terms This guarantee does not affect your statutory rights. For more information visit axminster.co.uk/3years Please dispose of packaging for the product in a responsible manner. It is suitable for recycling. Help to protect the environment, take the packaging to the local recycling centre and place into the appropriate recycling bin. Only for EU countries Do not dispose of electric tools together with household waste material. In observance of European Directive 2002/96/EC on waste electrical and electronic equipment and its implementation in accordance with national law, electric tools that have reached the end of their life must be collected separately and returned to an environmentally compatible recycling facility. Axminster Tools & Machinery Ltd Weycroft Avenue, Axminster, Devon EX13 5PH axminster.co.uk