1
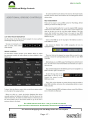
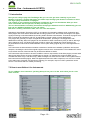
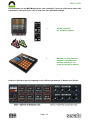
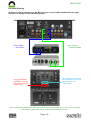
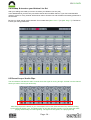
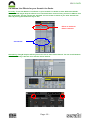
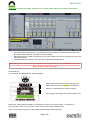
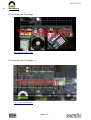
BY DJ RAZY
THE BRIDGE – TUTORIAL
HOW TO DJ WITH THE BRIDGE
by DJ RAZY
Version 1.0
Copyright 2012 © by DJ RAZY – SERATO / RANE – ABLETON LIVE
Page - 1 -
BY DJ RAZY
„A portal is a transitionary device of sight or sound that
functions as a sort of third gravitating body between the this
and the that, pulling us toward itself, allowing us to bridge into
the unknown from the known.“
- Roy H. Williams -
Page - 2 -
BY DJ RAZY
Contents
Page
1.
2.
3.
4.
5.
6.
7.
8.
9.
10.
Overview
4
1.1 Introduction about Serato / Rane / Ableton Live / Scratch Live / The Bridge
1.2 What is The Bridge and how can I use it?
4
5
System requirements
6
2.1 Software
2.2 Hardware
6
6
Activate The Bridge
7
3.1 Settings for Serato
3.2 Settings for Ableton Live
7
7
MIDI-Controller
8
4.1 Controller Overview
4.2 Settings for Serato
4.3 Specific Directions
8
9
9
MIDI-Mapping
10
5.1 Settings for Serato
5.2 Settings for Ableton
10
11
How to DJ with The Bridge
12
6.1 Overview in Scratch Live
6.2 Playback & Beatgrid
6.3 Additional Bridge Controls
13
14
17
Ableton Live – Instruments & VST(i) Plugins
18
7.1 Introduction
7.2 How to use Ableton Live Instruments
7.3 How to use VST(i) Plugins
18
18
19
How to DJ with The Bridge 2.0
20
8.1 Required Qualifications
8.2 Audio Routing
8.3 Software & Hardware Settings
8.4 Buildup & structure your Ableton Live Set
8.5 Record Loops / Audio clips
8.6 Ableton Live Effects for your Scratch Live Decks
20
22
23
24
24
25
Showcase
27
9.1 The Bridge
9.2 The Bridge 2.0
27
27
Credits
28
Page - 3 -
BY DJ RAZY
1.
Overview
1.1 Introduction about Serato / Rane / Scratch Live / Ableton Live / The Bridge
What is Serato?
Serato creates world leading audio software for professional DJ's
and musicians. Serato is based in New Zealand and has partnerships
highly regarded hardware, software, and record industry companies
worldwide.
What is Rane?
Since 1981 musicians, DJ's, contractors and integrators have chosen
Rane Corporation as an established innovator in problem-solving pro
audio tools, affordably priced with unequalled reliability and customer
service. Rane’s primary marketplaces are DJ (performance, club,
mobile & recording) and Commercial (room-combining, paging and
associated systems) featuring innovative analog and digital audio
products for each category
What is Scratch Live?
Scratch Live is a vinyl emulation software application created
by New Zealand based Serato Audio Research, distributed by
and licensed exclusively to Rane Corporation. Since its debut
in May 2004, Scratch Live has become Serato's main product
focus, and as such, Scratch Live is often referred to simply as
"Serato" within the DJ and music scene.
Scratch Live allows manipulation and playback of
digital audio files (mp3, wav, aiff, ogg and non-DRM aac)
using traditional vinyl turntables or CD players via special
timecode vinyl records or CD's. It seeks to cross the divide
between the versatility of digital audio and the tactile control
of vinyl turntablism and has become the industry's dominant
digital DJ'ing tool.
What is Ableton Live?
Ableton Live is a loop-based software music sequencer and
DAW for OS X and Windows by Ableton. In contrast to many
other software sequencers, Live is designed to be an instrument
for live performances as well as a tool for composing and
arranging. It is also used for mixing of tracks by DJ's, as it
offers a suite of controls for beatmatching, crossfading, and
other effects used by turntablists, and was one of the first music
applications to automatically beat match songs.
What is The Bridge?
The Bridge gives you turntable-style control of your own multitrack
productions. Simply drag an Ableton Live Set to a deck in Scratch Live and
use your turntables or CDJ to control the transport. Scratch Live enhances
your productions with deck control, mixing, nudging and DJ style looping,
while you can remix, mute/solo tracks, use virtual instruments, change drum
patterns, manipulate audio, tweak effects and launch loops on the fly in
Ableton Live.
Update: With my definition of The Bridge 2.0 it is also possible to record and
play audio loops directly from Scratch Live into Ableton Live. That means you
can record new melodies, scratches and beats from each of your decks – on
the fly! You can also use the Ableton Live effects on your DJ decks.
Page - 4 -
BY DJ RAZY
1.2 What is The Bridge and how can I use it?
You have also red the main description of The Bridge on the Page before. Now I will show you the different
ways to use it for your performance. We will start from zero.
So here we go:
There are 3 different ways to use The Bridge:
Perfect your Mixtapes
Record your Serato DJ performance as an Ableton
Live Set, complete with song placement and fader
movements. Then use Live’s collection of effects,
instruments and production tools to edit, enhance
and polish your mix.
(Please note that I will NOT explain that function in this tutorial, because I don't use
it. For more information about that check the Ableton Live and Serato homepage!)
Perform your Beats
Load an Ableton Live set on one of your decks. The
Bridge brings tight synchronization and remote
control of Ableton Live to Serato Scratch Live’s
interface.
That means you are allowed to play your normal Ableton Live sets through your Rane Interface / DJ Mixer.
You can sync it to your Scratch Live Decks and you have the full overview of the most Ableton Live
parameters.
The Bridge 2.0
This is my definition of using The Bridge with another
audio interface. I know that some of you guys already use it
too, but I needed a name for what I will explain.
In my opinion it makes The Bridge more interesting
and it is a great and powerful weapon that can beat
everything else on the DJ market.
That means you are allowed to play your normal Ableton Live Sets through a second audio interface. You
can sync it to your Scratch Live decks and you have the full overview of the most Ableton Live parameters.
Further you can record each of your decks as an audio loop directly in Ableton Live. You can also use it to
bring the Ableton Live effects on your Scratch Live DJ decks.
Page - 5 -
BY DJ RAZY
2.
System Requirements
2.1 Software
•
•
Serato Scratch Live 2.1.1
Ableton Live 8.2
Mac
•
•
•
Windows
Intel Core 2 Duo 2.33 GHz
4 GB RAM
OSX 10.5.8 or higher (10.6.4 recommended)
•
•
•
Intel Core 2 Duo 2.4 GHz
4 GB RAM
XP SP3, Vista SP2 or Win 7 SP 1
Note: These are the minimum specifications to run The Bridge, for the best performance and for professional
use I would recommend a higher spec computer and always the latest software updates!
Note: The Bridge is not supported by Ableton Live Lite, Ableton Live Intro, Ableton Live Akai Professional
APC edition and Ableton Live Launchpad edition.
2.3 Hardware
We have to differentiate between The Bridge and The Bridge 2.0.
For The Bridge:
You need to own Rane/SSL hardware, but don't
need an additional soundcard. Ableton Live's
output is routed to the Rane/SSL hardware.
(Rane SL1, SL2, SL3, SL4, TTM57SL, Sixtyone,
Sixtytwo, or Sixtyeight.)
For The Bridge 2.0:
You need to own Rane/SSL hardware. Further
you need a second Audio Interface with at least
one stereo input and one stereo output!
(Rane SL1, SL2, SL3, SL4, TTM57SL, Sixtyone,
Sixtytwo, Sixtyeight.)
The second audio interface can be chosen total free, except another Rane soundcard.
You need one soundcard which is not manufactured by Rane.
Page - 6 -
BY DJ RAZY
3.
Activate The Bridge
3.1 Settings for Serato
First, go to Setup – Plugins – The Bridge and ENABLE it.
Then go back and open Ableton Live. The Bridge plugin will automatically work. For the future it
doesn't matter which program you will open first.
3.2 Settings for Ableton
The Ableton Live settings are automatically done.
Now you can chose your Ableton Live output in Scratch Live
Note: In this example I used a Rane SL-3 box. With other Rane hardware you can chose other
outputs!
L = Left Deck
R = Right Deck
A = Aux Output
Page - 7 -
BY DJ RAZY
4.
MIDI-Controller
4.1 Controller Overview
Now I show you the most popular MIDI-Controller for Ableton Live.
Don't worry, I will not bore you with technical specifications that you already know! I only write facts about
the controller and what is special about each of them.
Novation Launchpad
The Novation Launchpad is a very cool all-rounder. It has every function
that you need to control Ableton Live.
The special about this controller is the multi switchable program mode.
You can start / stop audio clips, mute, solo and record your channels.
Fade the panning, channel volume, effects, instruments, give it your own
mappings and even control Max for Live!
I own two of them, and I love them!
Price: About 145 $ / 155 €
Akai APC 20
The Akai APC 20 allows you to play and stop audio clips.
You can also record, mute or solo your channels.
MIDI-Mappings are also possible. With the fader you have a bit
smoother control of your channel volume or fader mappings.
Also a cool controller I own.
Price: About 175 $ / 188 €
Akai APC 40
The Akai APC 40 is a controller giant!
You can control most of Ableton's parameters without
switching any user modes!
If you plan to play complex live sets, control every fxparameter and instrument – this is your controller!
I play and remix on the fly, so i don’t need that giant. But it is
also pretty cool! Lot's of DJ's already use it – with good reason!
Price: About 268 $ / 399 €
Page - 8 -
BY DJ RAZY
4.2 Settings for Serato
First be sure that your main controller for Ableton Live is DISABLED in Scratch Live!
All your other controller should be ENABLED if you want to use them in one or both programs.
If not enable or disable it in one of the programs.
Note this:
4.3 Specific directions
Page - 9 -
BY DJ RAZY
5.
MIDI-Mapping
5.1 Settings for Serato
You have to activate the MIDI-Button in Scratch Live.
Then chose the function which you want to map.
This can be a simple function on your deck …
… or a function in the MIDI Panel
Page - 10 -
BY DJ RAZY
5.2 Settings for Ableton
You have do decide your device into Ableton Live
Turn the Input / Output on
Activate the learn button...
… and learn the functions like you would do in Scratch Live.
Everything will shown on the left side and can be re-edited.
Note: For the Novation Launchpad, the Akai APC 20 & 40 and a few other controller you don't need a
MIDI-Mapping!This is just an example how it works! These controllers run plug & play with Ableton
Live! But if you don't like the standard mapping you can edit it of course! If you have problems with
the mapping check out the Ableton Live manual.
Page - 11 -
BY DJ RAZY
6.
How to DJ with The Bridge
In this chapter I will explain you how to DJ with The Bridge. Everything you need is just your Rane
soundcard. I used the SL-3 Box and I have chosen the aux output for Ableton Live.
With my TTM 56S Mixer it is no problem to run it through the aux input.
Other DJ Mixer may have that too or a third, fourth or fifth channel, where you are able to use it for
The Bridge. Try it out!
Note: You have many possibilities with The Bridge. No one can show you all the ways you could go.
But I tried to summarize the biggest functions in this whole tutorial.
Page - 12 -
BY DJ RAZY
6.1 Overview in Scratch Live
Check out the next few pages from the original Serato The Bridge manual. It is a great introduction!
Page - 13 -
BY DJ RAZY
6.2 Playback & Beatgrid
Page - 14 -
BY DJ RAZY
Page - 15 -
BY DJ RAZY
Page - 16 -
BY DJ RAZY
6.3 Additional Bridge Controls
The official manual ends here – lets go on with our tutorial!
(If you need more information download the manual from www.serato.com)
For advanced deejaying with The Bridge follow the next chapter!
Page - 17 -
BY DJ RAZY
7.
Ableton Live – Instruments & VST(i)
7.1 Introduction
Now you are ready to play with The Bridge. But you can even get more creativity in your sets!
Ableton is not only a sampler that plays your audio loops through your Scratch Live decks. It owns
also high quality instruments and plugins.
The number of your instruments and effects are different. If you own the Ableton Suite you have
more instruments like the Operator, the Amp and many more.
Your are also allowed to use VST(i) instruments and plugins with both versions. Additionally you can
buy and use Add-Ons like Max for Live and others.
But what is a VST(i) instrument? Well, here is a short description:
Steinberg's Virtual Studio Technology (VST) is an interface for integrating software audio synthesizer and
effect plugins with audio editors and hard-disk recording systems. VST and similar technologies use digital
signal processing to simulate traditional recording studio hardware with software. Thousands of plugins exist,
both commercial and freeware, and VST is supported by a large number of audio applications.
VST plugins are generally run within a Digital Audio Workstation, providing the host application with
additional functionality. Most VST plugins can be classified as either instruments (VSTi) or effects, although
other categories exist. VST plugins generally provide a custom GUI, displaying controls similar to the
physical switches and knobs on audio hardware. Some (often older) plugins rely on the host application for
their UI.
VST instruments include software simulation emulations of well-known hardware synthesizer devices and
samplers, emulating the look of the original equipment and its sonic characteristics. This enables VSTi users
to use virtual versions of devices that may be otherwise difficult to obtain.
VST instruments require notes to be sent via MIDI in order to output audio, while effect plugins process audio
data (some effect plugins do require a MIDI input too though, for example they might use MIDI sync to
modulate the effect in sync with the tempo). MIDI messages can often also be used to control parameters of
both instrument and effect plugins. Most host applications allow the audio output from one VST to be routed
to the audio input of another VST (known as chaining). For example, output of a VST synthesizer can be
sent to a VST reverb effect for further processing.
7.2 How to use Ableton Live Instruments
To use a Ableton Live instrument just drag & drop it into your Live Set. It will show you as a new
audio channel.
Page - 18 -
BY DJ RAZY
7.3 How to use VST(i) Plugins
You can use it it in the same way as an Ableton Live instrument. Just drag & drop it into your Ableton
Live Set. It will shown as a new audio channel.
We learned that a VST(i) plugin could be everything, an instrument, an effect, a sampler and much
more. So chose it with care.
My favorite and one of the most public VST(i) Plugins is Maschine from Native Instruments.
Note: VST(i) Plugins are normally synced to Ableton Live. That means they are also synced
to Scratch Live when you hit the sync button in the software! The tempo holds on if you
beatmatch your tracks, even if you do big jumps like 50 or more BPM. But don’t forget to
synchronize Ableton Live to your new track which is correctly beatgridded!
Page - 19 -
BY DJ RAZY
8.
How to DJ with The Bridge 2.0
Now this is the most interesting part I think. But also the most complex!
So let me explain what The Bridge 2.0 exactly is.
The basics are similar to the normal Bridge setup. But we don’t use the audio output from
an SL-Box! We have to use a second audio interface.
That means it doesn’t matter if you have only a 2-Deck Serato Box like the SL-1, SL-2 or
the TTM 57SL. It works as great with them as with the SL-3, SL-4 and the new Rane Mixers!
The reason is that we only need the channels that we really been using in our normal DJ
setup. In this situation 2 decks!
This will also work with more than 2 decks in the same way!
8.1 Required Qualifications
Let me list what you have to own at least to DJ with The Bridge 2.0:
•
•
•
Mixer with Send / Return – each channel should be single directed
through your send output
Second audio interface – FireWire or USB 2.0 or higher
Novation Launchpad / Akai APC 20 / 40
What I additionally use:
•
•
•
•
Novation Dicer
Akai LPD 8
Vestax VFX-1
NI Maschine
My second Audio Interface:
•
Echo AudioFire 2
(I tried the NI Audio Kontrol 1 USB-Soundcard before. It works also well. But a MacBook has
only two USB-Ports and in my opinion I have much lesser latency’s with connecting my
second interface right into the FireWire Port of the MacBook than run the USB Port through
a USB-Hub. Maybe it works faster with a new MacBook Pro. I own a 2k11 13'' MacBook Pro!)
Page - 20 -
BY DJ RAZY
Let me explain you my MIDI-Mappings for each controller. If you use it like me its pretty selfexplanatory. If not just give it a try or map your own individual settings.
=
=
All that controller
are standard mapped!
Maschine is also standard
mapped for the Maschine
Software which you run
as an VST plugin in Ableton
And here I will show you my mapping for the different parameters in Ableton and Serato:
Page - 21 -
BY DJ RAZY
8.2 Audio Routing
At first you have to connect your DJ Mixer and your second audio interface into the right
direction. I'll explain it in the following graphic:
FlexFX SEND
→ Audio INPUT
Audio OUTPUT
→ FlexFX RETURN
The FlexFX buttons activate
the deck which you will route
through Ableton Live
- one or both !
The Dry/ Wet fader
regulates the volume
that comes back from
Ableton Live.
Note: All that is also possible with other mixers which have an good quality send / return. You can mix like
that with every Rane mixer that is actually in the product assortment !
Page - 22 -
BY DJ RAZY
8.3 Software & Hardware Settings
Switch to Ableton live and chose switch your interface from „Serato“ to CoreAudio (Mac) or ASIO (Win).
After that chose your stereo input and your stereo output.
Now you are able to route your audio signals through Ableton Live! The main work is done so far.
Tip: Check out the latency between the „original signal“ and the signal that you route through Ableton Live.
The signal should be at least the same when you pull the dry & wet fader to the right. If not, the latency is too
high.
Reduce your sampling-rate from 48 kHz into 44,1kHz. You can also chance the global latency.
Page - 23 -
BY DJ RAZY
8.4 Buildup & structure your Ableton Live Set
After your settings are made you have to checkout your Ableton Live Set (.als)
In the Standard ALS you have only one audio channel and one MIDI channel. If you don’t need the MIDI
channel, remove it. Every channel will be shown also in Scratch Live and will take unnecessary placement in
the overview.
Be sure you have enough audio channels. If not create them (Mac: Cmd + T) or (Win: Strg + T). Feel free to
include your VST(i) Instrument.
8.5 Record Loops / Audio Clips
The record button activates the audio channel where the signal is running through. Activate it on the channel
where you wish to record your audio loop.
After that just press the button on your Launchpad / APC in this channel and the loop starts recording,
synchronized to Ableton Live. The Button lights up red, after pressing it again you loop stops and starts
playing automatically from the beginning. The light turns into green, for a playing live clip.
Page - 24 -
BY DJ RAZY
8.6 Ableton Live Effects for your Scratch Live Decks
First way: To use the Ableton Live effects on your Scratch Live decks we have different methods.
First, we could drag & drop the effects to our send and return channel. Every channel in Ableton Live
has send knobs. Two per channel are standard. You can create as much as you want. Activate the
effect by turning the knobs from dry to wet.
Effect on the Send /
Return channels
Send knobs
Second way: Drag & drop the effects you want to use to each audio channel. You can scroll between
the effects directly in Scratch Live with the device buttons.
Page - 25 -
BY DJ RAZY
Third way: Group all your audio channels into one group. After that use the effects on the whole
group.
•
•
•
For using Ableton Lives effects on your deck(s) chose the deck(s) you wish and activate them with
the FlexFX button. Now the signal will run through Ableton.
After that hit the sync button for that deck (if you want to effect more than one deck be sure you have
well beatmatched!)
Activate the effect you want to use in the way I explained the pages before.
Note: Ableton Live will not save your ALS automatically! Be sure you save it BEFORE you used it
for your remix session in Scratch Live. After saving you won't have to restructure your ALS every
time you want to use The Bridge!
One last advice:
Try to visualize The Bridge like the following graphic:
Serato and your DJ performance are always your
master plan! The user is The King of The Bridge!
Ableton Live will always be synced to Serato
VST(i) plugins will always be synced to Ableton Live
We're done. Read it again and again, try everything out, give it your personal note... and have fun :)
I know its hard to learn, but in the end, it worth. You will never want something else.
If you want to, watch my videos on the following pages and get some inspiration.
Page - 26 -
BY DJ RAZY
9.
Showcase
9.1 Showcase with The Bridge
https://vimeo.com/29307370
9.2 Showcase with The Bridge 2.0
https://vimeo.com/38289181
Page - 27 -
BY DJ RAZY
10.
Credits
All pictures are property of Ableton Live, Serato, the Rane Cooperation, Novation, Akai, Korg, Native
Instruments and Echo. I got them from the Ableton Live Homepage, the Serato Homepage, Wikipedia
and Google.
I thank all these company’s for their hard work. Without them, the DJ market would not be the same
like now.
Special thanks to Ableton and Serato for this awesome partnership.
It is the greatest product on the market!
For questions feel free to contact me at:
[email protected]
www.facebook.com/djrazy
www.facebook.com/djrazyfanpage
THANK YOU FOR READING THIS TUTORIAL !
Page - 28 -