1
Preparations
Operations
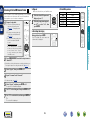
DRA-N5
NETWORK RECEIVER
Information
Owner’s Manual
nSAFETY PRECAUTIONS
RISK OF ELECTRIC SHOCK
DO NOT OPEN
CAUTION:
TO REDUCE THE RISK OF ELECTRIC SHOCK, DO NOT REMOVE
COVER (OR BACK). NO USER-SERVICEABLE PARTS INSIDE.
REFER SERVICING TO QUALIFIED SERVICE PERSONNEL.
The exclamation point within an equilateral triangle is intended
to alert the user to the presence of important operating
and maintenance (servicing) instructions in the literature
accompanying the appliance.
WARNING:
TO REDUCE THE RISK OF FIRE OR ELECTRIC SHOCK, DO NOT
EXPOSE THIS APPLIANCE TO RAIN OR MOISTURE.
HOT SURFACE. DO NOT TOUCH.
Hot
surface
mark
The top surface over the internal heat sink may become hot
when operating this product continuously.
Do not touch hot areas, especially around the “Hot surface
mark” and the top panel.
14.Refer all servicing to qualified service personnel.
Servicing is required when the apparatus has been damaged in any way,
such as power-supply cord or plug is damaged, liquid has been spilled or
objects have fallen into the apparatus, the apparatus has been exposed to
rain or moisture, does not operate normally, or has been dropped.
15.Batteries shall not be exposed to excessive heat such as sunshine, fire or
the like.
CAUTION:
To completely disconnect this product from the mains, disconnect the plug
from the wall socket outlet.
The mains plug is used to completely interrupt the power supply to the unit
and must be within easy access by the user.
I
1.COMPLIANCE INFORMATION
Product Name: Network Receiver
Model Number: DRA-N5
This product contains FCC ID: ZQO-CX8703B
This product complies with Part 15 of the FCC Rules. Operation is
subject to the following two conditions: (1) this product may not cause
harmful interference, and (2) this product must accept any interference
received, including interference that may cause undesired operation.
Denon Electronics (USA), LLC
(a D&M Holdings Company)
100 Corporate Drive
Mahwah, NJ 07430-2041
Tel. (201) 762-6665
2.IMPORTANT NOTICE: DO NOT MODIFY THIS PRODUCT
This product, when installed as indicated in the instructions contained in
this manual, meets FCC requirements.
Modification not expressly approved by DENON may void your authority,
granted by the FCC, to use the product.
3.CAUTION
•To comply with FCC RF exposure compliance requirement, separation
distance of at least 20 cm must be maintained between the antenna of
this product and all persons.
•This product and its antenna must not be co-located or operating in
conjunction with any other antenna or transmitter.
4.NOTE
This product has been tested and found to comply with the limits for
a Class B digital device, pursuant to Part 15 of the FCC Rules. These
limits are designed to provide reasonable protection against harmful
interference in a residential installation.
This product generates, uses and can radiate radio frequency energy and,
if not installed and used in accordance with the instructions, may cause
harmful interference to radio communications. However, there is no
guarantee that interference will not occur in a particular installation. If this
product does cause harmful interference to radio or television reception,
which can be determined by turning the product OFF and ON, the user
is encouraged to try to correct the interference by one or more of the
following measures:
•Reorient or relocate the receiving antenna.
•Increase the separation between the equipment and receiver.
•Connect the product into an outlet on a circuit different from that to
which the receiver is connected.
•Consult the local retailer authorized to distribute this type of product or
an experienced radio/TV technician for help.
Information
CAUTION:
Read these instructions.
Keep these instructions.
Heed all warnings.
Follow all instructions.
Do not use this apparatus near water.
Clean only with dry cloth.
Do not block any ventilation openings.
Install in accordance with the manufacturer’s instructions.
Do not install near any heat sources such as radiators, heat registers,
stoves, or other apparatus (including amplifiers) that produce heat.
9. Do not defeat the safety purpose of the polarized or grounding-type plug. A
polarized plug has two blades with one wider than the other. A grounding
type plug has two blades and a third grounding prong. The wide blade or the
third prong are provided for your safety. If the provided plug does not fit into
your outlet, consult an electrician for replacement of the obsolete outlet.
10. Protect the power cord from being walked on or pinched particularly at
plugs, convenience receptacles, and the point where they exit from the
apparatus.
11. Only use attachments/accessories specified by the manufacturer.
12. Use only with the cart, stand, tripod, bracket, or table
specified by the manufacturer, or sold with the apparatus.
When a cart is used, use caution when moving the cart/
apparatus combination to avoid injury from tip-over.
13. Unplug this apparatus during lightning storms or when
unused for long periods of time.
Operations
The lightning flash with arrowhead symbol, within an equilateral
triangle, is intended to alert the user to the presence of
uninsulated “dangerous voltage” within the product’s enclosure
that may be of sufficient magnitude to constitute a risk of
electric shock to persons.
1.
2.
3.
4.
5.
6.
7.
8.
FCC INFORMATION (For US customers)
Preparations
CAUTION
IMPORTANT SAFETY
INSTRUCTIONS
IC Information (For Canadian customers)
This product contains IC: 2581A-CX8703B
This product complies with RSS-210 of Industry Canada. Operation is
subject to the following two conditions: (1) this product may not cause
harmful interference, and (2) this product must accept any interference
received, including interference that may cause undesired operation.
This Class B digital apparatus complies with Canadian ICES-003.
2.CAUTION
For Canadian customers:
This Class B digital apparatus complies with Canadian ICES-003.
II
z
z
z
z
Wall
zzFor proper heat dispersal, do not install this unit in a confined
space, such as a bookcase or similar enclosure.
•More than 12 in. (0.3 m) is recommended.
•Do not place any other equipment on this unit.
Information
•Avoid high temperatures.
Allow for sufficient heat dispersion when installed in a rack.
•Handle the power cord carefully.
Hold the plug when unplugging the cord.
•Keep the unit free from moisture, water, and dust.
•Unplug the power cord when not using the unit for long periods of time.
•Do not obstruct the ventilation holes.
•Do not let foreign objects into the unit.
•Do not let insecticides, benzene, and thinner come in contact with the unit.
•Never disassemble or modify the unit in any way.
•Ventilation should not be impeded by covering the ventilation openings
with items, such as newspapers, tablecloths or curtains.
•Naked flame sources such as lighted candles should not be placed on
the unit.
•Observe and follow local regulations regarding battery disposal.
•Do not expose the unit to dripping or splashing fluids.
•Do not place objects filled with liquids, such as vases, on the unit.
•Do not handle the mains cord with wet hands.
•When the switch is in the OFF (STANDBY) position, the equipment is not
completely switched off from MAINS.
•The equipment shall be installed near the power supply so that the power
supply is easily accessible.
•Do not keep the battery in a place exposed to direct sunlight or in places
with extremely high temperatures, such as near a heater.
Operations
To reduce potential radio interference to other users, the antenna
type and its gain should be so chosen that the equivalent isotropically
radiated power (e.i.r.p.) is not more than that permitted for successful
communication.
WARNINGS
Preparations
1.PRODUCT
nCAUTIONS ON INSTALLATION
nNOTES ON USE
Preparations
Getting started
Thank you for purchasing this DENON product. To ensure proper operation, please read these owner’s manual carefully before using the product.
After reading them, be sure to keep them for future reference.
Contents
Preparations··············································································4
Information··············································································42
Information···················································································43
Part names and functions····························································43
iPod······························································································47
USB memory device····································································47
Network audio·············································································48
Explanation terms········································································49
Troubleshooting···········································································51
Specifications···············································································54
Information
Connections····················································································5
Connecting the speakers·······························································5
Connecting an analog device·························································6
Connecting a digital device····························································6
Connecting to a home network (LAN)···········································7
Connecting the power cord···························································8
Setup·······························································································9
Menu map·····················································································9
Setting the first setup [Quick Setup]···········································10
Setting the general [General]·······················································10
Setting the network [Network]····················································15
Operations···············································································20
Operations····················································································21
Preparations·················································································21
Operations possible during playback···········································21
Network audio playback·······························································23
Favorite function ·········································································29
iPod playback···············································································30
USB memory device playback·····················································33
Listening to AUX ·········································································34
AirPlay function············································································35
Remote play function··································································37
Web control function···································································38
Other functions············································································40
Operations
Getting started···············································································1
Accessories···················································································2
Main features················································································2
Cautions on handling·····································································2
Remote operation ·········································································3
1
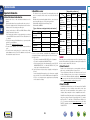
Accessories
Main features
Cautions on handling
qQuick setup guide.................................................................... 1
wCD-ROM (Owner’s manual)..................................................... 1
eSafety Instructions................................................................... 1
rWarranty (for North America model only)................................. 1
tService network list.................................................................. 1
yPower cord............................................................................... 1
u Remote control (RC-1175)........................................................ 1
i R03/AAA batteries.................................................................... 2
y
u
High quality & high power in a compact body
Supports internet radio and music streaming
Supports AirPlay® (vpage 35)
DLNA ver. 1.5 support for audio networks
Wi-Fi network capability with built-in diversity
antenna, and is certified under WMM (Wi-Fi Multi
Media) for efficient wireless connectivity
Easy wireless connection is possible by pressing
the WPS button
“Denon Remote App” compatibility for performing
basic unit operations with an iPad®, iPhone or
Android smartphone
3 Line OELD
(Organic Electroluminescence Display)
Auto Standby mode for save the energy
2
Information
iPod auto detect and charge even after CEOL
piccolo switches to standby mode
Operations
Equipped with a dock connector for connecting
an iPod® or iPhone® directly to this unit
•Before turning the power switch on
Check once again that all connections are correct and that there are
no problems with the connection cables.
•Power is supplied to some of the circuitry even when the unit is
set to the standby mode. When going on vacation or leaving home
for long periods of time, be sure to unplug the power cord from the
power outlet.
•About condensation
If there is a major difference in temperature between the inside of
the unit and its surroundings, condensation may form on parts inside
the unit, causing it to fail to operate properly.
If this happens, let the unit sit for an hour or two with the power
turned off and wait until there is little difference in temperature
before using the unit.
•Cautions on using mobile phones
Using a mobile phone near this unit may result in noise. If that
occurs, move the mobile phone away from the unit when it is in use.
•Moving the unit
Turn off the power and unplug the power cord from the power
outlet. Next, disconnect the cables connected to other system units
before moving the unit.
•About care
•Wipe the cabinet and control panel clean with a soft cloth.
•Follow the instructions when using a chemical cleaner.
•Benzene, paint thinner or other organic solvents as well as
insecticide may cause material changes and discoloration if brought
into contact with the unit, and should therefore not be used.
Preparations
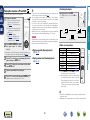
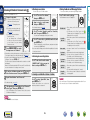
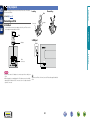
Check that the following parts are supplied with the product.
Remote operation
nnOperating range of the remote control
Point the remote control at the remote sensor when operating it.
nnInserting the batteries
q Remove the remote
control’s rear cover.
wSet two R03/AAA batteries in
the battery compartment in the
indicated direction.
Denon Remote App
Denon Remote App is a unique application developed for the iPhone,
iPod touch and Android smartphone. This application enables you to
control DENON network devices that are connected to your home
network. Install the App onto your iPhone, iPod touch or Android
smartphone to control this device.
iPod
18:46
CEOL piccolo
Player
View
Operations
Approx. 23 ft/7 m
30°
30°
Preparations
About the remote control
Internet Radio
e Put the rear cover back on.
NOTE
Favorites
Internet Radio Music Server
USB
NOTE
•The set may function improperly or the remote control may not
operate if the remote control sensor is exposed to direct sunlight,
strong artificial light from an inverter type fluorescent lamp or
infrared light.
•When using 3D video devices that transmit radio communication
signals (such as infrared signals etc) between the various units
(such as the monitor, 3D glasses, 3D transmitter unit etc), the
remote control may not operate due to interference from those
radio communication signals. If this occurs, adjust the direction and
distance of the 3D communication for each unit, and check that the
remote control operation is not affected by these signals.
3
iPod
Digital In
Sleep Timer
iPod Player
15
•Bidirectional communication is performed.
•The Denon Remote App can be downloaded for free from the iTunes
Store.
Information
•Insert the specified batteries in the remote control.
•Replace the batteries with new ones if the set does not operate
even when the remote control is operated close to the unit. (The
supplied batteries are only for verifying operation. Replace them
with new batteries at an early date.)
•When inserting the batteries, be sure to do so in the proper direction,
following the q and w marks in the battery compartment.
•To prevent damage or leakage of battery fluid:
•Do not use a new battery together with an old one.
•Do not use two different types of batteries.
•Do not attempt to charge dry batteries.
•Do not short-circuit, disassemble, heat or dispose of batteries in
flames.
•Do not keep the battery in a place exposed to direct sunlight or in
places with extremely high temperatures, such as near a heater.
•If the battery fluid should leak, carefully wipe the fluid off the inside
of the battery compartment and insert new batteries.
•Remove the batteries from the remote control if it will not be in use
for long periods.
•Used batteries should be disposed of in accordance with the local
regulations regarding battery disposal.
•The remote control may function improperly if rechargeable batteries
are used.
Preparations
Here, we explain the connections and basic operation methods for this unit.
F Setup vpage 9
Operations
F Connections vpage 5
Preparations
Preparations
Information
4
NOTE
•Do not plug in the power cord until all connections have been
completed.
•When making connections, also refer to the operating instructions of
the other components.
•Be sure to connect the left and right channels properly (left with left,
right with right).
•Do not bundle power cords together with connection cables. Doing
so can result in humming or noise.
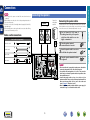
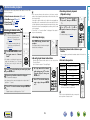
Connecting the speakers
Subwoofer
with built-in
amplifier
Speakers
(L)
(R)
Carefully check the left (L) and right (R) channels and + (red) and –
(black) polarities on the speakers being connected to this unit, and be
sure to interconnect the channels and polarities correctly.
cable, then either twist the core wire
tightly or terminate it.
Audio cable (sold separately)
Subwoofer cable
w
q
w
Speaker cable
L
L
R
R
IN
the speaker terminal
2 Turn
counterclockwise to loosen it.
the speaker cable’s core wire to
3 Insert
the hilt into the speaker terminal.
the speaker terminal clockwise
4 Turn
to tighten it.
NOTE
•Disconnect this unit’s power plug from the power outlet before
connecting the speakers. Also, turn off the subwoofer.
•Use speakers with an impedance of 4 to 16 Ω. The protection
circuit may be activated if speakers with an impedance other
than specified are used.
•Connect the speaker cables so they do not stick out of the
speaker terminals. The protection circuit may be activated if the
wires touch the rear panel or if the + and – sides touch each
other (vpage 49 “Protection circuit”).
•Never touch the speaker terminals while the power supply is
connected. Doing so could result in electric shock.
5
Information
Optical cable
q
Operations
off about 0.03 ft/10 mm of
1 Peel
sheathing from the tip of the speaker
Cables used for connections
Audio cable
Connecting the speaker cables
Preparations
Connections
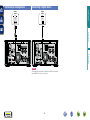
Connecting an analog device
Connecting a digital device
Digital
device
AUDIO
AUDIO
AUDIO
OUT
L
R
OPTICAL
OUT
R
L
R
Operations
L
Preparations
Analog
device
Information
NOTE
Other digital audio signals than 2 channel linear PCM cannot be input
through DIGITAL IN connector of this unit.
6
Connecting to a home network (LAN)
Wireless LAN
nnEthernet cable (CAT-5 or greater recommended)
Computer
Internet
Modem
Wired LAN
Cables used for connections
Cable (sold separately)
Ethernet
cable
Computer
Modem
zzThis unit comes with a built-in Wi-Fi antenna.
Internet
To WAN side
To LAN port
To LAN port
NOTE
If there is any obstacle, communications may be disrupted. If this
happens, place the relevant devices in a place where there is no
obstacle.
LAN port/
Ethernet
connector
Required system
nnBroadband internet connection
nnModem
Device that connects to the broadband circuit and conducts
communications on the Internet.
A type that is integrated with a router is also available.
nnRouter
For connections to the Internet, contact an ISP (Internet
Service Provider) or a computer shop.
When using this unit, we recommend you use a router equipped
with the following functions:
•Built-in DHCP server
This function automatically assigns IP addresses on the LAN.
•Built-in 100BASE-TX switch
When connecting multiple devices, we recommend a switching
hub with a speed of 100 Mbps or greater.
•When using with a wireless LAN, prepare a broadband router
with built-in access point.
•When using a WPS (Wi-Fi Protected Setup) compatible router,
easy wireless connection is possible by pressing this unit’s WPS
button (vpage 17).
7
•A contract with an ISP is required to connect to the Internet.
•No additional contract is needed if you already have a broadband
connection to the Internet.
•The types of routers that can be used depend on the ISP. Contact an
ISP or a computer shop for details.
•DENON assumes no responsibility whatsoever for any
communication errors or troubles resulting from customer’s network
environment or connected devices.
•This unit is not compatible with PPPoE. A PPPoE-compatible router
is required if you have a contract for a type of line set by PPPoE.
•Do not connect an Ethernet connector directly to the LAN port/
Ethernet connector on your computer.
•To listen to audio streaming, use a router that supports audio
streaming.
Information
Router
NOTE
•If you have an Internet provider contract for a line on which network
settings are made manually, make the settings at “Network connecting
(when “DHCP” setting is “Off”)” (vpage 15).
•With this unit, it is possible to use the DHCP and Auto IP functions
to make the network settings automatically.
•When using this unit with the broadband router’s DHCP function
enabled, this unit automatically performs the IP address setting and
other settings.
When using this unit connected to a network with no DHCP function,
make the settings for the IP address, etc., at “Network connecting
(when “DHCP” setting is “Off”)” (vpage 15).
•When setting manually, check the setting contents with the network
administrator.
Operations
Router with
access point
To WAN side
•Use only a shielded STP or ScTP LAN cable which is available at
retailer.
•Some flat type Ethernet cables are easily affected by noise.
We recommend using a normal type cable.
Preparations
•This unit lets you play via your home network (LAN) music files
stored on a computer and music content such as that from Internet
radio and online services.
•You can update by downloading the latest firmware from the
DENON website.
For more information, see “Update” (vpage 12).
•See “Setting the network [Network]” (vpage 15) for more
information on network setting.
Connecting the power cord
Preparations
When all of the connections are completed, insert the power plug into
the power outlet.
Operations
Power cord
(supplied)
To household power outlet
(AC 120 V, 60 Hz)
Information
8
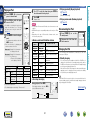
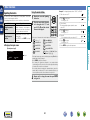
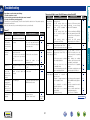
Menu map
Setting items
Quick Setup
[Setup]
Quick Setup
:enter
Performs the network settings using a Wizard style window.
For details on the operations, see the separate “Quick setup guide”.
Quick Setup
Page
–
General
:back
Alarm
Clock
Speaker Optimization
Language
Auto-Standby
Firmware
Network
[Setup]
Network
Network Information
Network Control
Friendly Name
Update
Notification
Add New Feature
Settings
DHCP (On) or DHCP (Off)
When making
IP Addressz
wired
Subnet Maskz
connection
Gatewayz
Primary DNSz
Wired Setup
Secondary DNSz
Proxy
Test Connection
When
Auto-Scan
Making Wi-Fi
WPS (Wi-Fi Protected Setup)
connection
Manual
zDisplayed when the “DHCP” setting is “Off” (vpage 15).
nnTo back to the top of the menu, during menu
operation
Press TOP MENU.
9
10
11
12
12
12
12
13
14
–
19
19
15
15
15
15
15
15
15
15
16
15
17
17
17
18
Information
:back
Sets the timer playback.
Sets the current time
Sets the optimum playback properties of the speakers SC-N5, sold separately.
Sets the language.
Sets the unit power to standby when the unit is not in use.
Updates the firmware.
Set the Update and Upgrade notification on/off.
Displays new functions that can be downloaded, and upgrades functions.
Displays various information about the network.
Performs the ON/OFF settings for the network function when in standby mode.
Edits a name displayed on the Internet.
Performs the settings for a wired or wireless LAN.
Performs the settings for a wired LAN.
Performs the DHCP setting.
Performs the IP address setting.
Performs the subnet mask setting.
Performs the gateway setting.
Performs the primary DNS setting.
Performs the secondary DNS setting.
Performs the proxy setting.
Performs the wired LAN connection.
Performs the wireless LAN connection setting.
Selects and sets the wireless connections from the access point list.
Sets the wireless connection using WPS (Wi-Fi Protected Setup).
Sets the wireless connection manually.
Operations
[Setup]
:enter
Description
:back
General
:enter
Detailed items
Preparations
Setup
•For details on “Quick Setup” operations, see the separate
“Quick setup guide”.
•If you cancelled “Quick Setup” menu or changed the network
environment, perform “Setup” – “Quick Setup”.
Setting the general [General]
1
NOTE
Press SETUP.
Turns on the Menu settings mode
and the Menu appears on the display
(vpage 9 “Menu map”).
Use ui and ENTER to select
2 “General”
– “Alarm”, then press
ENTER or p.
Alarm
This device can playback using the alarm playback (everyday alarm,
once alarm).
•This unit’s alarm does not support exit time settings for alarm
playback.
When the once alarm and everyday alarm are both
set (sleep timer is not set)
•Automatically starts playback at the earlier alarm start time set for
either of the alarms.
If the current time is not set, enter alarm setting mode to get time
setting mode.
nnSetting the everyday alarm and once alarm
•Everyday alarm (“Everyday”)
Playback starts at the set times each day.
•Once alarm (“Once”)
Playback starts once only at the set times.
Favorite
iPod
USB
ui to select “Volume”, then press ENTER or
8 Use
p.
ui to select the volume “0 – 60”, then press
9 Use
ENTER or p.
10 Press POWER X to set the power to standby.
Alarm standby mode is set, and the power indicator lights
orange.
10
Perform the operations at “Alarm” (vpage 10).
•When set to “OFF”, time operation is disabled, but the alarm
settings remain unchanged.
nnTo check the alarm settings
Perform the operations at “Alarm” (vpage 10).
nnTo change the alarm settings
Perform the operations at “Alarm” (vpage 10).
nnTo change the setting while setting the alarm
Press o.
The setting returns to the previous step. Display the setting you
want to change, then make the desired setting.
Information
nnAlarm operation when the time settings for
alarms overlap
3
ui to select “Set Time”, then press ENTER or
4 Use
p.
Use ui to select “hours” – “minutes” for the alarm
5 start
time, then press ENTER or p.
6 Use ui to select “Source”, then press ENTER or p.
ui to select the input source, then press ENTER
7 Use
or p.
nnSetting the alarm to on or off
Operations
Setting the general [General]
Use ui to select the alarm mode, and use o p to
select “On” or “Off” then press ENTER.
•If the unit or remote control is not operated for 90 minutes or more
when the alarm is set to on, the standby mode is activated.
•When using alarm playback on an iPod touch or iPhone, set the iPod
touch or iPhone to “Sleep” mode. If the power is switched off using
the power off operation, alarm playback cannot be used.
For details on the “Sleep” mode of the iPod touch or iPhone, see the
instruction manuals of the products or related web pages.
Preparations
Setting the first setup
[Quick Setup]
Setting the general [General]
You can automatically adjust the clock of this unit using the Internet.
To use this function, the unit must be connected to the Internet.
nnSetting the Time Zone
When changing the time zone, use the following procedure to
select your local standard time (time zone).
2
Use ui and ENTER to select
“General” – “Clock” – “AutoAdjust” – “Time Zone”, then
press ENTER or p.
Turns on the Menu settings mode
and the Menu appears on the display.
(vpage 9 “Menu map”)
“Time Zone” menu appears.
nnSetting the current time (Manual Adjust)
(24-Hour Display)
1
1 Press SETUP.
Use the following procedure to set DST if the DST system is used
in your country.
Press SETUP.
Turns on the Menu settings mode and
the Menu appears on the display.
Use ui and ENTER to select
2 “General”
– “Clock” – “AutoAdjust” – “DST”, then press
ENTER or p.
“Select DST” menu appears.
Use ui to select “Off (0H)” or “On (+1H)”, then
3 press
ENTER or p.
Use ui and ENTER to select “Auto-Adjust” –
4 “Adjust
Now”, then press ENTER or p.
The setting is entered.
Adjust”, then press ENTER or p.
3 Use ui to set the “hours”.
4 Press ENTER or p.
5 Use ui to set the “minutes”.
6 Press ENTER or p.
nnAuto Adjust
Use the following procedure to automatically adjust the clock.
Turns on the Menu settings mode
and the Menu appears on the display
(vpage 9 “Menu map”).
Use ui and ENTER to select
2 “General”
– “Clock” – “AutoAdjust” – “Adjust Now”, then
press ENTER or p.
The operation to receive the current
time starts.
•The current time is displayed for several seconds when it is
received successfully.
•If the current time is not received successfully, “Connection
Failed” appears.
11
Checking the current time when the power is on
Press CLOCK.
Press once more and the display returns to its original condition.
Checking the current time when the power is set to
standby
Press CLOCK.
The current time is displayed for 30 seconds.
NOTE
•The time cannot be set when in the standby mode. Turn on the
power first.
•The time setting is canceled if the power cord is disconnected. Set
the time again.
Information
The setting is entered.
Use ui and ENTER to select
2 “General”
– “Clock” – “Manual
The current time is set.
3
Use ui and ENTER to select “Auto-Adjust” –
1 Press SETUP.
4 “Adjust
Now”, then press ENTER or p.
Use ui to select your time zone, then press ENTER
or p.
Turns on the Menu settings mode
and the Menu appears on the display
(vpage 9 “Menu map”).
Operations
1
Press SETUP.
nnSetting the DST (Daylight Saving Time)
Preparations
Clock
Setting the general [General]
Auto-Standby
Firmware
An optimizing filter suited for the properties of the speakers (SC-N5)
can be used.
When this unit is in the stop state and there is no input signal and
operation for 30 minutes, it automatically enters the standby mode.
For the input source “AUX:Analog In” only, when no operation is
performed for eight hours, this unit automatically enters the standby
mode.
•The default setting is “Off”.
nnUpdate
2
Use ui and ENTER to
select “General” – “Speaker
Optimization”, then press
ENTER or p.
Turns on the Menu settings mode
and the Menu appears on the display
(vpage 9 “Menu map”).
“Speaker Optimization” menu appears.
ui to select “On”, then
3 Use
press ENTER or p.
The response is optimized for the speakers (SC-N5, sold
separately).
Off
The response is flat.
Turns on the Menu settings mode
and the Menu appears on the display
(vpage 9 “Menu map”).
Use ui and ENTER to select
2 “General”
– “Auto-Standby”,
then press ENTER or p.
“Select Auto-Standby” menu appears.
Use ui to select “On”, then
3 press
ENTER or p.
The setting is entered.
NOTE
Sets the language for display the menu.
•The factory language setting is “English”.
1 Press SETUP.
ui and ENTER to select
2 Use
“General” – “Firmware” –
“Update”, then press ENTER or
p.
Check For Update Check for firmware updates. You can also check
approximately how long it will take to complete
an update.
Use ui and ENTER to select
2 “General”
– “Language”, then
press ENTER or p.
/ Français / Español
12
Execute the update process.
•If updating fails, the set automatically retries, but if updating is still
not possible, one of the messages shown below is displayed. If
the display reads as shown below, check the settings and network
environment, then update again.
Display
Updating fail
Login failed
Server is busy
Connection fail
Download fail
Turns on the Menu settings mode
and the Menu appears on the display
(vpage 9 “Menu map”).
English
Turns on the Menu settings mode
and the Menu appears on the display
(vpage 9 “Menu map”).
Update Start
In the following situations, the Auto-standby function does not operate.
•When the source is “iPod” (Remote mode) or “AirPlay”.
Language
1 Press SETUP.
Description
Updating failed.
Failure to login to server.
Server is busy. Wait a while then try again.
Failure in connecting to server.
Downloading of the firmware has failed.
Information
On
1 Press SETUP.
•In order to update the firmware, the environment and settings
required for connecting to broadband internet are needed
(vpage 7).
•Perform the firmware update operation after at least 2 minutes has
elapsed since turning this unit’s power ON.
Operations
1
Press SETUP.
Preparations
Speaker Optimization
Setting the general [General]
Firmware can be updated using the “Web control function”
(vpage 38).
“Web control function” (vpage 38) settings must be
completed in advance on a PC belonging to the same network.
For information on obtaining update files, please contact our
customer service center.
1
3
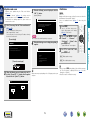
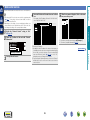
When the following screen is displayed, click the
“OK” (e) button.
Updating will begin.
Warning:
Once started,the upload process cannot be interrupted or adorted,
in order to ensure the integrity of the Digital Media Player.
Are you sure you want to proceed?
e
NOTE
Do not operate the unit while updating is in progress.
GThe web displayH
4
FIRMWARE
Firmware upload status: 100% completed.
q
file, and click the “Upload” (w) button.
The upload process finished successfully.
Please close this.
Button names may vary depending on the OS language used on your
computer.
Firmware
Upload new firmware
“Notification” – “Update”, then
press ENTER or p.
“Update Notification” menu appears.
Choose File
Upload
q
w
13
On
Display update message.
Off
Do not display update message.
•When you press ENTER during display of the notification message,
the “Check for Update” is displayed. (Refer to page 12 for more
information on “Update”.)
•Press o to erase the notification message.
Information
New Firmware:
xxx.fw
the following screen is displayed by the PC,
2 When
click the “Choose File” ( ) button, select the update
ui and ENTER to select
2 Use
“General” – “Firmware” –
Use ui to select “On”, then
3 press
ENTER or p.
Firmware
GThe unit’s screen displayH
Turns on the Menu settings mode
and the Menu appears on the display
(vpage 9 “Menu map”).
When the following screen is displayed, updating is
complete.
Please wait...
Now,go to the new IP displayed in the body.
If do not move the page within 1 minute,please refer to IP.
1 Press SETUP.
Operations
The PC will display the following screen.
Wait for approximately 1 minute.
You can also gain access by entering the IP address shown by
the unit into a web browser.
OK
Update
Displays a notification message on this unit’s menu screen when the
latest firmware is released with “Update”.
Connect to broadband Internet (vpage 7) when using this
function.
Firmware
Click r from step 5 for the “Web control function”
(vpage 38).
nnNotification
Preparations
nnUpdate on web screen
Setting the general [General]
1 Press SETUP.
Turns on the Menu settings mode
and the Menu appears on the display
(vpage 9 “Menu map”).
“Notification” – “Upgrade”, then
press ENTER or p.
“Upgrade Notification” menu appears.
Use ui to select “On”, then
3 press
ENTER or p.
Display upgrade message.
Off
Do not display upgrade message.
1 Press SETUP.
Turns on the Menu settings mode
and the Menu appears on the display
(vpage 9 “Menu map”).
ui to select “General”
2 Use
– “Firmware” – “Add New
Feature”, then press ENTER or
p.
Upgrade Status
Upgrade Start
Display a list of the additional functions provided
by the upgrade.
Execute the upgrade process.
•If the upgrade is not successful, an error message identical to
those in “Update”(vpage 12) will appear on the display. Check
the settings and network environment, then update again.
Upgrade ID
•When you press ENTER during display of the notification message,
the “Add New Feature” is displayed. (Refer to page 14 for more
information on “Add New Feature”.)
•Press o to erase the notification message.
•Do not turn off the power until updating or upgrading is completed.
•Even with a broadband connection to the Internet, approximately
20 minutes is required for the updating/upgrading procedure to be
completed.
•Once updating/upgrade starts, normal operations on this unit cannot
be performed until updating/upgrading is completed.
•Furthermore, updating/upgrading the firmware may reset the backup
data for the parameters, etc. set for this unit.
•If the update or upgrade fails, remove and re-insert the power cord.
“Update Retry” appears on the display and update restarts from
the point at which update failed. If the error continues despite this,
check the network environment.
The ID number shown on this screen is needed
when carrying out the procedure.
See the DENON website for details about updates.
When the procedure is complete, “Registered” is displayed and
updates can be carried out. If the procedure has not been carried out,
“Not Registered” is displayed.
14
•Information regarding the “Update” function and “Add New
Feature” will be announced on the DENON web site each time
related plans are defined.
•When usable new firmware is released with “Update” or “Add New
Feature”, a notification message is displayed on the menu screen.
When you do not want to be notified, set “Update” (vpage 13)
and “Upgrade” (vpage 14) to “Off”.
Information
On
•In order to add new functions, the environment and settings
required for connecting to broadband internet are needed
(vpage 7).
•Perform the add new feature operation after at least 2 minutes has
elapsed since turning this unit’s power on.
Operations
Use ui and ENTER to select
2 “General”
– “Firmware” –
nnAdd New Feature
Preparations
Upgrade
Display a notification message on this unit’s menu screen when
downloadable firmware is released with “Add New Feature”.
Connect to broadband Internet (vpage 7) when using this
function.
[Notes concerning use of “Update” and
“Add New Feature”]
Setting the network [Network]
Use this procedure to configure the wired LAN settings.
nnNetwork connecting
(when “DHCP”settings are “On”)
When using this unit with the broadband router’s DHCP function
enabled, this unit automatically performs the IP address setting
and other settings.
Connect the ETHERNET cable
(vpage 7 “Connecting to a
home network (LAN)” – “Wired
LAN”).
Press POWER X to turn
2 power
to the main unit.
3 Press SETUP.
on
“DHCP (On)” menu appears.
“Wait for the network to connect...” is displayed, and the unit
starts connecting to the LAN.
•When the connection is made successfully, “Connected!” appears.
•If the connection cannot be established, “Connection Failed” is
displayed. Perform steps 1 – 6 again.
You may need to set the network connection manually, depending
on the provider you use. To set the connection manually, use the
setting procedure of “Network connecting (when “DHCP” settings
are “Off”)”.
nnNetwork connecting
(when “DHCP” setting is “Off”)
This section explains the settings when connecting this unit to a
network that does not have a DHCP function.
To configure the settings manually, check the setting details with
your network administrator.
Perform steps 1 – 4
1 “Network
connecting
of the
(when
“DHCP” settings are “On”)”
procedure and select “Off” in
step 5.
Operations
1
5
ui to select “Test Connection”, then press
6 Use
ENTER or p.
Use ui to select “On”, then press ENTER or p.
Preparations
Connecting wired LAN
“DHCP (Off)” menu appears.
ui to select “IP Address”,
2 Use
then press ENTER or p.
“Enter IP Address” menu appears.
uip or 0 – 9 to input the
3 IPUseaddress
and press ENTER.
Use uip or 0 – 9 to input the address for
4 “Subnet
Mask”, “Gateway”, “Primary DNS”, and
Use ui and ENTER to select
4 “Network”
– “Settings” –
“DHCP (On)”, then press ENTER
or p.
“Secondary DNS”.
ui to select “Test Connection”, then press
5 Use
ENTER or p.
“Select DHCP” menu appears.
“Wait for the network to connect...” is displayed, and the unit
starts connecting to the LAN.
•When the connection is made successfully, “Connected!” appears.
•If the connection cannot be established, “Connection Failed” is
displayed. Perform steps 1 – 4 again.
15
Information
Turns on the Menu settings mode
and the Menu appears on the display
(vpage 9 “Menu map”).
Setting the network [Network]
Configure these settings to connect to the internet via a proxy
server.
1
Press SETUP.
Turns on the Menu settings mode
and the Menu appears on the display
(vpage 9 “Menu map”).
ui and ENTER to select
2 Use
“Network” – “Settings” –
“Setup Proxy” menu appears.
3
If “Proxy(On)” appears, go to
step 5.
If “Proxy(Off)” appears, press
ENTER or p.
“Setup Proxy” menu appears.
ui to select “Address” or “Name”, then press
7 Use
ENTER or p.
“Enter Proxy Address” or “Enter Proxy Name” menu appears.
uip or 0 – 9, +10 to input the address or name,
8 Use
then press ENTER.
“Setup Proxy” menu appears.
9 Use ui to select “Port”, then press ENTER or p.
uip or 0 – 9 to input the port, then press
10 Use
ENTER.
“Enter Proxy Port” menu appears.
Operations
“Proxy”, then press ENTER or
p.
ui to select “Address” or “Name”, then press
6 Use
ENTER or p.
Preparations
nnProxy settings
The Proxy settings are completed.
“Select Proxy” menu appears.
Information
4 Use ui to select “On”, then press ENTER or p.
Use ui to select “Proxy (Address)” or “Proxy
5 (Name)”,
then press ENTER or p.
“Setup Proxy” menu appears.
“Select Type” menu appears.
16
Setting the network [Network]
Use this procedure to configure the wireless LAN settings.
nnAuto-Scan (Wireless LAN)
If a LAN cable is connected, remove it.
Use ui and ENTER to select
3 “Network”
– “Settings” – “AutoScan”, then press ENTER or p.
The access point you have set is
displayed.
4
Use ui to select the access
point, and then press ENTER or
p.
•If the access point is not detected
automatically, configure it manually
(vpage 18 “Manual Settings”).
•The types of characters that can be input are as shown below.
GLower case charactersH
abcdefghijklmnopqrstuvwxyz
GUpper case charactersH
ABCDEFGHIJKLMNOPQRSTUVWXYZ
GSymbolsH ! “ # $ % & ‘ ( ) z + , - . / : ; < = > ? @ [ \ ] ^ _ ` { | } ˜
GNumbersH 0123456789 (Space)
•When no security settings have been used in the Internet
connection settings, this step is not necessary.
By just pressing the WPS button on your router and this unit, the
wireless LAN connection settings are made.
•Before turning this unit on, make sure that an Ethernet cable is
not connected to this unit. If a cable is connected, have this unit
enter the power standby mode and disconnect the cable.
•After the unit is turned on, it takes approximately 30 seconds for
the WPS button on this unit to be available.
1 Press the WPS button of the router.
2 Press WPS on the rear panel.
•When connection is established with access point, “Connected!”
is displayed.
•If the connection cannot be established, “Connection Failed” is
displayed. Perform steps 1 – 2 again.
Information
Turns on the menu settings mode
and the menu appears on the display
(vpage 9 “Menu map”).
Use uio p or 0 – 9, +10 to input the “Password” (encryption
key) and press ENTER or p. Enter the same encryption key as
used for the access point.
nnWPS Settings (Push-button method)
Operations
1
2 Press SETUP.
Press POWER X to turn on
power to the main unit.
5
If there is an encryption setting for the access point
you selected in step 4, enter same encryption key as
used for the access point. (If there is no encryption
setting, proceed to step 6.)
Preparations
Connecting wireless LAN
“Wait for the network to connect...” is displayed, and the unit
starts connecting to the LAN.
6 orUsepi. to select “Test Connection”, then press ENTER
“Wait for the network to connect...” is displayed, and the unit
starts connecting to the network.
•This unit performs automatic network setup due to the DHCP
function.
NOTE
If the router uses WEP, WPA-TKIP or WPA2-TKIP encryption,
connection is not possible using the WPS button. In this case, connect
using “Auto-scan” or “Manual”.
17
Setting the network [Network]
nnManual Settings
1 Press SETUP.
1 Press SETUP.
Use ui and ENTER to select
2 “Network”
– “Settings” – “WPS
ui and ENTER to select
2 Use
“Network” – “Settings” –
Turns on the Menu settings mode
and the Menu appears on the display
(vpage 9 “Menu map”).
Turns on the Menu settings mode
and the Menu appears on the display
(vpage 9 “Menu map”).
“Manual”, then press ENTER or
(Wi-Fi Protected Setup)” – “PIN
code”, then press ENTER or p.
p.
Use ui to select “SSID”, then
3 press
ENTER or p.
uio p or 0 – 9, +10 to input
4 Use
the name of the wireless network
ui to select the access point
3 Use
whose PIN code you want to
display, and press ENTER or p.
(SSID), then press ENTER.
PIN code number is displayed.
•The types of characters that can be input are as shown below.
with
access
point,
GLower case charactersH
abcdefghijklmnopqrstuvwxyz
GUpper case charactersH
ABCDEFGHIJKLMNOPQRSTUVWXYZ
GSymbolsH ! “ # $ % & ‘ ( ) z + , - . / : ; < = > ? @ [ \ ] ^ _ ` { | } ˜
GNumbersH 0123456789 (Space)
5 Use ui to select “Security”, then press ENTER or p.
• WEP / WPA(TKIP) / WPA(AES) / WPA2(TKIP) / WPA2(AES)
Select the encryption method according to the encryption setting
of the access point you are using.
7 Use ui to select “Password”, then press ENTER.
uio p to enter the encryption key, and press
8 Use
ENTER.
Enter the same encryption key as used for the access point.
•When no security settings have been used in the Internet
connection settings, this step is not necessary.
•When connecting to a “WEP” encrypted network, set the access
point “Default Key” to “Key 1”.
9 orUsepi. to select “Test Connection” and press ENTER
“Wait for the network to connect...” is displayed, and the unit
starts connecting to the network.
•This unit performs automatic network setup due to the DHCP
function.
NOTE
This unit is not compatible with WEP (TSN) encryption system.
18
Information
When connection is established
“Connected!” is displayed.
• None Select if not encrypted. Can also be used even without
encryption, through we recommend encryption for improved
security.
Operations
The access point you have set is
displayed.
4 Set this PIN code to the register.
to select following items, then press ENTER
6 orUsepui
.
Preparations
nnWPS Settings (PIN code method)
Setting the network [Network]
nnNetwork Control
Set the network function On/Off during standby.
1
Press SETUP.
Turns on the Menu settings mode
and the Menu appears on the display
(vpage 9 “Menu map”).
ENTER or p.
“Network Control” menu appears.
Use ui to select “On”, then
3 press
ENTER or p.
On
Suspend network function during standby. It will take
slightly longer till the network connection is completed.
•The minimum amount of power is consumed when in
standby (Power consumption: 0.3 W).
•This is the default setting.
4 Press SETUP.
The display returns to normal.
1 Press SETUP.
Turns on the Menu settings mode
and the Menu appears on the display
(vpage 9 “Menu map”).
ui to select “Network”
2 –Use“Friendly
Name”, then press
ENTER or p.
“Friendly Name” menu appears.
p is pressedH
3-1 GWhen
Choose from preset names.
Use ui to select a name, then
press ENTER.
Preset names
Current friendly name / DENON DRA-N5 / AV Room /
Bedroom / Dining Room / Family Room / Guest Room /
Kids Room / Kitchen / Living Room / Office /
CEOL piccolo (Default)
ENTER is pressedH
3-2 GWhen
Edit a friendly name.
•For character input, see page 40.
nnResetting the friendly name to the default
setting
In step 3-1, select “CEOL piccolo (Default)” and press
ENTER.
19
Information
Off
Network is on during standby. Main unit operable with a
network compatible controller. Shortens the time before
the network connection is completed.
•When “Network Control” is set to “On”, the power
display lights red.
•More power is consumed when in standby (Power
consumption: 3 W).
The Friendly Name is the name of this unit displayed on the
network (Maximum 63 characters).
Operations
Use ui to select “Network” –
2 “Network
Control”, then press
nnFriendly Name
Preparations
Other network settings
Operations
Here, we explain functions and operations that let you make better use of this unit.
F Operations possible during playback vpage 21
Operations
F Preparations vpage 21
Preparations
Operations
F Network audio playback vpage 23
F Favorite function vpage 29
F USB memory device playback vpage 33
F Listening to AUX vpage 34
F AirPlay function vpage 35
F Remote play function vpage 37
F Web control function vpage 38
F Other functions vpage 40
20
Information
F iPod playback vpage 30
This section provides information on operations of playback
procedures.
Preparations
Operations possible during playback
Selecting the input source
Adjusting the master volume
Turning the power on
nnSelecting the input source using the main unit
Press POWER X.
1 Press SOURCE.
2 Press ui to select the input source.
Use VOLUME df to adjust the
volume.
The volume level is displayed.
The display changes to the input source selection screen.
GVariable rangeH
0
–
60
The input source is switched each time the button is pressed.
Favorite
Call
Internet
Radio
Music
Server
Setup
Turning the power to standby mode
Press POWER X.
The unit enters standby mode.
•Power indicator
Standby : Off
Network Control – “On” : Red
iPod charge standby : Red
Alarm standby : Orange
NOTE
Power continues to be supplied to some of the circuitry even when the
power is in the standby mode. When leaving home for long periods of
time, unplug the power cord from the power outlet.
nnCompletely turning off the power
SiriusXM
AUX:Analog
In
AUX:Digital
In
USB
iPod
With the unit, you can play back music files stored on your iPhone/
iPod touch and music from iTunes (vpage 35 “AirPlay function”).
nnSelecting the input source using the remote
control
Press the input source select button
(INTERNET RADIO, ONLINE MUSIC,
MUSIC SERVER, iPod, AUX, USB).
•The desired input source can be selected
directly.
•The input source is switched as follows
each time AUX is pressed.
AUX:Digital In
AUX:Analog In
Unplug the power cord from the wall outlet.
21
You can also do this by turning VOLUME on the main unit.
Information
•When you turn on the power of this unit for the first time after
purchasing it, the “Quick Setup” menu starts up. For details on
“Quick Setup” operations, see the separate “Quick setup guide”.
•If you cancelled “Quick Setup” menu or changed the network
environment, perform “Setup” – “Quick Setup”.
Pandora®
Operations
The power indicator lights white and the
power turns on.
Preparations
Operations
Operations possible during playback
Turning off the sound temporarily
Switching the display’s brightness
SDB TONE to select the
1 Press
tone parameter to be adjusted.
Press MUTE :.
Press DIMMER.
SDB
Bass
S. Direct
2
Treble
Balance
Use o p to adjust the “SDB”,
“Bass”, “Treble” or “Balance”.
Bass
Emphasize the +10 dB bass sound.
On – Off
GSelectable modesH
Treble
Adjusts the treble sound.
–10dB – +10dB
GVariable rangeH
Balance
Adjusts the left/right volume balance.
L6 – Center
GVariable rangeH
– R6
Press o when you want to adjust the left channel, p
when you want to adjust the right channel.
S.Direct
The tone is not adjusted.
To cancel, press MUTE : again.
The mute mode is also canceled when VOLUME df is pressed.
100%
Setting the sleep timer
Off
Use this function to automatically switch the power to the standby
mode after a specific amount of time (minutes).
The sleep timer can be set to up to 90 minutes, in steps of 10 minutes.
Press SLEEP during playback and
select the setting time.
•Press the button to select the setting time.
•After about 3 seconds, the setting is
entered and the display returns to as it was
before.
nnCanceling the sleep timer
Either press SLEEP to select “Sleep1OFF” or press POWER X.
nnTo check the time remaining until the sleep
timer is activated
Press SLEEP.
GDefault settingsH
•SDB : Off
•Bass : 0dB
•Treble : 0dB
•Balance : Center
22
75%
50%
25%
If you operate the buttons when the display’s brightness is set to
“Off”, the display temporarily lights at “25%” brightness level.
Listening with headphones
Plug the headphones (sold separately) into
•The sound from the speakers is automatically cut off.
.
NOTE
To prevent hearing loss, do not raise the volume level excessively
when using headphones.
Information
Adjusts the bass sound.
–10dB – +10dB
GVariable rangeH
•The display brightness is adjusted each time DIMMER is pressed
as shown below.
Operations
•To make other tone adjustments at this time, press SDB TONE.
•If no operation is performed for 5 seconds, the adjustment is
retained and the normal display reappears.
SDB
The “MUTING” is displayed.
Preparations
Adjusting the tone
Network audio playback
nn About the internet radio function (vpage 48)
nn About Music server (vpage 48)
nn About Pandora® (vpage 48)
nn About SiriusXM (vpage 48)
Listening to internet radio
Press INTERNET RADIO to switch
the input source to “Internet
Radio”.
•For details on selecting the input source
using the unit buttons, see “Selecting
the input source using the main unit”
(vpage 21).
nnSwitching the display
p.
uip or 0 – 9, +10 to
2 Use
input the characters, then press
ENTER.
•For character input, see page 40.
Press INFO during Internet radio
reception.
The broadcast station information and signal
format bit rate are displayed.
nnRegistering internet radio stations as your
favorites
You can register your favorite broadcast stations in Favorite List
(vpage 29).
nnRecently played internet radio stations
Recently played internet radio stations can be selected from
“Recently Played”.
Up to 20 stations stored in “Recently Played”.
On a top menu of the internet
ui to select the item you want to play, then
1
radio station, press ui to select
3 Press
press ENTER or p.
“Recently Played”, then press
Repeat step 3 until the station list is displayed.
ENTER or p.
4
ui to select the item you
2 Press
want to play, then press ENTER
or p.
Press ui to select the station, then press ENTER or
5 p.
nnInternet radio operation
Operation buttons
Function
FAVORITE ADD
Registration to the Favorite list
FAVORITE CALL
Call from the Favorite list
1/3
SETUP
uio p
ENTER
SEARCH
Stop
Menu
Cursor operation (Up/Down/Left/Right)
Enter
Character searchz
The station list is displayed.
•Any characters that cannot be displayed are replaced with “.”
(period) or “ ” (space).
z
Press SEARCH, then press ENTER to select the
first letter you want to search mode.
Playback starts once buffering reaches “100%”.
If the list is not in alphabetical order, you may not be
able to perform a character search.
23
Information
2
q Check the network environment,
then turn on this unit’s power
(vpage 21 “Turning the power
on”).
w If settings are required, make the
“Setting the network [Network]”
(vpage 15).
Press ui to select “Search by
1 Keyword”,
then press ENTER or
Operations
1
Prepare for playback.
•There are many Internet radio stations on the Internet, and the
quality of the programs they broadcast as well as the bit rate of the
tracks varies widely.
Generally, the higher the bit rate, the higher the sound quality, but
depending on the communication lines and server traffic, the music
or audio signals being streamed may be interrupted. Inversely, lower
bit rates mean a lower sound quality but less tendency for the sound
to be interrupted.
•“Server Full” or “Connection Down” is displayed if the station is
busy or not broadcasting.
nnSearching stations by keyword
(Alphabetic strings)
Preparations
Follow this procedure to play Internet radio stations or music files
stored on a computer.
Network audio playback
Here, we apply the settings to share music files stored on a PC and
NAS on the network.
nnSharing media stored in PC
If you are using a media server, be sure to apply this setting first.
When using Windows Media Player 12
(Windows 7)
NOTE
Perform this procedure after changing the control panel display to
“Category”.
PC’s “Control Panel”, select “Network
1 Inand theInternet”
– “Choose homegroup and sharing
options”.
select “Choose media streaming options”.
24
media controller, and then click “Allow”.
5 Click “OK” to finish.
Sharing media stored in NAS
Change settings on the NAS to allow this unit and other devices (PCs
and mobile devices) used as media controllers to access the NAS. For
details, see the owner’s manual that came with the NAS.
Information
3
“Allowed” in the drop-down list for “Media
4 Select
programs on this PC and remote connections...”.
5 Click “OK” to finish.
Select “Allowed” in the drop-down list for “CEOL
piccolo”.
1 Start up Windows Media Player 11 on the PC.
2 Select “Media Sharing” in the “Library”.
the “Share my media” check box, select “CEOL
3 Click
piccolo”, and then click “Allow”.
3, select the icon of the device
4 As(otheryouPCsdidandin step
mobile devices) you want to use as a
Operations
the “Stream my pictures, music, and videos
2 Select
to all devices on my home network” check box and
When using Windows Media Player 11
Preparations
Applying media sharing settings
Network audio playback
Use this procedure to play music files or playlists.
1
Prepare for playback.
Press MUSIC SERVER to switch
2 the
input source to “Music
Server”.
ui to select the server including the file to be
3 Press
played, then press ENTER or p.
ui to select the search item or folder, then
4 Press
press ENTER or p.
5 Repeat step 4 until the file is displayed.
6 Press ui to select the file, then press ENTER or p.
During playback, Press INFO.
•The display switches each time INFO is
pressed.
Artist name
Album name
NOTE
Particularly when you play back large music files, depending on your
wireless LAN environment, the playback sound may be interrupted. In
this case, make the wired LAN connection.
nnPlaying repeatedly (Repeat playback)
(vpage 33)
nnPlaying random order (Random playback)
(vpage 33)
File type/Bit rate
nnMusic server operation
Operation buttons
8 9
1/3
SETUP
uio p
ENTER
SEARCH
Function
Auto search (cue)
Playback / Pause
Menu
Cursor operation (uio p) /
Auto search (cue, ui)
Enter
Character searchz1
REPEAT
Repeat playback (vpage 33)
RANDOM
Random playback (vpage 33)z2
z1Press SEARCH, then press ENTER to select the
first letter you want to search mode.
z2 When playing files stored on a computer using
the random play function, when a track has
finished playing, the next track is selected at
random from all of the tracks on the computer.
For this reason, the same track may be played
back to back.
Playback starts once buffering reaches “100%”.
•If the list is not in alphabetical order, you may not be able to perform
a character search.
•Depending on the server being used, some functions may be limited.
25
Information
•For details on selecting the input source using the unit buttons, see
“Selecting the input source using the main unit” (vpage 21).
•Connections to the required system and specific settings must be
made in order to play music files (vpage 7).
•Before starting, you must launch the computer’s server software
and set the files as server contents. For details, see the operating
instructions of your server software.
•The order in which the tracks/files are displayed depends on
the server specifications. If the tracks/files are not displayed in
alphabetical order due to the server specifications, searching by the
first letter may not work properly.
•WMA Lossless files can be played when using a server supporting
transcoding, such as Windows Media Player Ver. 11 or later.
Operations
q Check the network environment,
then turn on this unit’s power
(vpage 21 “Turning the power
on”).
w If settings are required, make the
“Setting the network [Network]”
(vpage 15).
e Prepare the computer
(vpage 24 “Applying media
sharing settings”, vpage 48
“About Music server”).
nnSwitching the display
Preparations
Playing files stored on a PC and NAS
Network audio playback
nnCreating a new station
nnGiving Feedback and Managing Stations
Pandora is only available in the U.S.
ui to select “New Station”,
1 Use
then press ENTER or p.
a track or artist name,
2 Input
then press ENTER or p.
Press p while a track is playing.
1
Prepare for playback.
ONLINE MUSIC to switch
2 Press
the input source to “Pandora”.
If you have a Pandora account, use ui to select “I
3 have
a Pandora account”, then press ENTER or p.
4 Input “Email address” and “Password”.
•For character input, see page 40.
5
After inputting the “Email address” and “Password”,
select “login”, then press ENTER or p.
The Pandora menu screen is displayed.
I like this track
ui to select “Search by artist” or “Search by
3 Use
track”, then press ENTER or p.
You can search and display a list by track or artist.
4
Use ui, select a file (e.g. D&M2) from the list, and
press ENTER or p.
I don’t like
this track
“Radio” is added to the end of a filename, and your new station
is created (e.g. D&M2 Radio).
•Your new station will play music with similar qualities to the artist
or track you entered.
nnListening to an existing station
Use ui and select the radio station
(“D&M2 Radio”) that you want to
listen to, and press ENTER or p.
Listening to created radio stations at random
Use ui to select “Quick Mix”, then
press ENTER or p.
Created radio stations are selected at
random, and tracks are streamed.
If the “Email address” and “Password” match, the top menu
for Pandora is displayed.
NOTE
Press TOP MENU to cancel the input.
26
Create station
Bookmark
this artist
Bookmark
this track
I’m tired of
this track
Delete this
station
•Press when you like the track that is being
played.
•It will return to the Play Screen. And
(Thumbs up) icon is displayed. (The icon is not
displayed on the next track.)
•Press when you don’t like the track that is being
played.
•It will return to the Play Screen. And
(Thumbs down) icon is displayed. (The icon is
not displayed on the next track.)
•Creates a Station for the Track or Artist being
played.
•Bookmarks the artist currently being played.
•You can check on a computer or iPhone etc.
•For details, see the Pandora web page.
•Bookmarks the track currently being played.
•You can check on a computer or iPhone etc.
•For details, see the Pandora web page.
•Press when you don’t like the track that is being
played.
•The track will not be played for 1 month.
•Press when you want to delete the station that
is being played.
NOTE
•You can Skip up to 6 Tracks that are being played back within 1 hour.
•You can create up to 100 Stations (radio stations).
Information
•For details on selecting the input source using the unit buttons, see
“Selecting the input source using the main unit” (vpage 21).
•If you do not have a Pandora account, press i to select “I am new
to Pandora”, then press ENTER or p.
The URL needed to activate Pandora and the activation code will
be displayed.
Browse to the Pandora activation URL from your PC and follow the
on-screen instructions for creating a new account.
•For character input, see page 40.
You can personalize your stations by providing feedback.
Operations
q Check the network environment,
then turn on this unit’s power
(vpage 21 “Turning the power
on”).
w If settings are required, make the
“Setting the network [Network]”
(vpage 15).
e Complete step 4 and obtain a
Pandora account.
•If you already have a Pandora
account, you do not need to obtain
a new account. Use your existing
Pandora account.
You can create up to 100 radio stations.
Preparations
Listening to Pandora® internet radio
Network audio playback
Disassociate this unit from your Pandora account.
1
the popup menu appears,
2 When
use ui to select “Yes”, then
While the Pandora top menu is
displayed, press o.
press ENTER.
nnPandora operation
Operation buttons
1/3
9
1/3 ENTER
SETUP
Function
Playback
Auto search (cue)
Stop
Menu
uio p
Cursor operation / Auto search (cue, i)
ENTER
Enter
Operations
nnSwitching the display
Preparations
nnSign out
During playback, press INFO.
•The file type/bit rate, artist name and album
name are displayed.
Information
27
Network audio playback
nnSign out
Over 130 channels of the SiriusXM programming you love, including
commercial-free music plus sports, talk, news and entertainment.
Listen anywhere on your computer or smartphone.
1
the popup menu appears,
2 When
use ui to select “Yes”, then
1 Prepare for playback.
While the SiriusXM top menu is
displayed, press o.
press ENTER.
nnSwitching the display
During playback, press INFO.
•The file type/bit rate, station name and
album name are displayed.
nnSiriusXM operation
Operation buttons
1/3
1/3 ENTER
SETUP
Function
Playback
Stop
Menu
uio p
Cursor operation
ENTER
Enter
Operations
Information
q Check the network environment,
then turn on this unit’s power
(vpage 21 “Turning the power
on”).
w If settings are required, make the
“Setting the network [Network]”
(vpage 15).
e Access the following website from
your PC and obtain a SiriusXM
account.
http://www.siriusxm.com
•If you already have a SiriusXM
account, you do not need to obtain
a new account. Select “Sign in”
in step 3, and enter your existing
SiriusXM account.
Disassociate this unit from your SiriusXM account.
Preparations
Listening to SiriusXM Internet Radio
ONLINE MUSIC to switch the input source to
2 Press
“SiriusXM”.
•For details on selecting the input source using the unit buttons, see
“Selecting the input source using the main unit” (vpage 21).
3 Select “Sign in”, then press ENTER or p.
4 Input “Username” and “Password”.
•For character input, see page 40.
5 Select “Sign in”, and then press ENTER or p.
6 Use ui to select the genre, then press ENTER or p.
ui to select the file, and then press ENTER or
7 Use
p.
The top menu of SiriusXM is displayed.
The selected file is displayed.
28
Favorite function
•The Favorite function allows you to register your favorite broadcast
stations and files in Favorite List in advance so that you can call and
listen to the stations or files right away, whenever you want.
•The contents that you can register and call are Internet radio station
and music server.
•You can register up to 50 items in Favorite List.
1
Press FAVORITE ADD while the
Internet radio station or file to
register is played back.
Deleting stations or files from the favorite
list
1 Press FAVORITE CALL.
8 9 or ui to
2 Press
select the station or file that you
1 Press FAVORITE CALL.
uito select the station or
2 Press
file that you want to delete, and
The respective function starts up and
playback starts.
the prompt “Delete?”
3 When
appears, press ENTER.
The Favorite list appears.
want to call, and press ENTER.
•Press 0 – 9, +10 to call files registered to the
Favorite list by number.
The Favorite list appears.
press CLEAR.
“Deleted” is displayed and the deletion
is competed.
“Favorite” menu appears.
Press uito select a number to
2 register
the station or file, and
Operations
Registering stations or files to the favorites
list
Calling stations or files from the favorites
list
Preparations
This section provides information on the Favorite function.
nnTo cancel the operation
press ENTER.
nnTo switch between registered stations and files
during playback
Press 8 9 or ui.
29
Information
Press o.
“Add to Favorite” is displayed and the
registration is competed.
iPod playback
Loading
Dismantling
iPod
nn iPod (vpage 47)
Connecting an iPod
Connector
nniPod Dock
Preparations
The unit can play back music stored on iPod, iPod touch, iPod classic,
iPod nano and iPhone.
Adapter
Open the lid and mount the adapter suited for your iPod onto the
dock adapter included with your iPod.
Operations
iPod
Adapter
nnUSB port
iPod
Information
Dock
connector
NOTE
•Please make sure to fit adaptor to connector part for use with your
iPod.
•When plugging in or unplugging the iPod, please proceed carefully,
adjusting the inclination of the connector so as not to place a burden
upon the connector.
To connect an iPod to this unit, use the iPod cable supplied with the
iPod.
30
iPod playback
4
5 Press 1/3.
Use ui to select the item, then press ENTER to
select the music file to be played.
1
iPod to switch the input
2 Press
source to “iPod”.
Press POWER X to turn on
power to the main unit.
NOTE
nnRemote control and iPod button relations
The display mode switches each time
MODE is pressed.
•There are two modes for displaying the
contents recorded on the iPod.
Browse mode Display iPod information on
the display of this unit.
Display mode
Display location
Playable
files
Active
buttons
Audio file
Video file
Remote control
and main unit
iPod buttons
Operation on this unit
8, 9
8, 9
Play the track from the beginning/Play the
next track
1/3
8, 9
13
8, 9
(Press and hold)
(Press and hold)
MODE
–
ui
Click Wheel
Browse mode
Remote mode
o
MENU
Main unit display
iPod display
ENTER or p
REPEAT
RANDOM
Select
P
P
iPod
zzOnly audio is played back.
•The default display mode setting is “Remote mode”.
P
Pz
P
P
Play the track / Pause the track
Fast-reverse the track/Fast-forward the
track
Switch between the browse mode and
the remote mode
Cursor operation (up /down)
Display the menu or return to the previous
menu
Enter the selection or plays the track
–
Switch the repeat function
–
Switch the shuffle function
nnSwitching the display
•The display switches each time INFO is
pressed (Browse mode only).
Album name
31
Charging the iPod
You can charge your iPhone/iPod by connecting it to the dock
connector or USB port.
nnStandby charging
If the unit enters power standby mode while the iPod/iPhone is
charging, the unit will switch to standby charging mode, and the
iPod/iPhone will continue to be charged. When in standby charging
mode, the power display light turns red.
When the iPhone/iPod is fully charged, the unit automatically stops
supplying power for charging and enters normal power standby
mode, and the power display light turns off.
If an iPhone/iPod is connected to the dock connector while the unit is
in power standby mode, the unit will enter standby charging mode and
begin charging the iPhone/iPod.
During playback, Press INFO.
Artist name
Press POWER X to set the
1 standby
mode.
the iPod from the
2 Disconnect
Dock connector.
v See overleaf
Information
Remote mode Display iPod information on
the iPod screen.
•“Remote iPod” is displayed
on the display of this unit.
Remote control
buttons
Disconnecting the iPod
Operations
3
•1st generation iPod nano and iPod video do not have remote mode
support.
•DENON will accept no responsibility whatsoever for any loss of iPod
data.
•Depending on the type of iPod and the software version, some
functions may not operate.
Press MODE to select the display
mode.
(Browse mode only)
nnPlaying random order (Random playback)
(vpage 33)
Playback starts.
•For details on selecting the input source
using the unit buttons, see “Selecting
the input source using the main unit”
(vpage 21).
nnPlaying repeatedly (Repeat playback)
(vpage 33)
Preparations
Playing an iPod
iPod playback
Preparations
Supported iPod models
•iPod classic
Operations
•iPod nano
•iPod touch
Information
•iPhone
(as of July 2012)
32
USB memory device playback
nn USB memory device (vpage 47)
Playing files stored on USB memory
devices
1 Connect the USB memory device to the USB port.
•If the USB memory device is divided into multiple partitions, only the
top partition can be selected.
•This unit is compatible with MP3 files conforming to “MPEG-1 Audio
Layer-3” standards.
•DENON does not guarantee that all USB memory devices will
operate or receive power. When using a portable USB connection
type HDD of the kind to which an AC adapter can be connected to
supply power, use the AC adapter.
Press ui to select the file or
4 folder,
then press ENTER or p.
Press ui to select the file, then
5 press
ENTER, p or 1/3.
•Each time you press REPEAT, the repeat
mode is toggled as shown below.
Press POWER X to set the
1 standby
mode.
that the communication
2 Check
indicator on the USB memory
device is not flashing, then pull
out the USB memory device.
Single-track repeat
All-track repeat
Repeat off
(indicator turns off)
(Single-track repeat)
O
nly 1 track plays repeatedly.
(All-track repeat)
ll tracks within the current
A
playback folder are repeated.
Repeat off (indicator turns off) Normal playback resumes.
Playing random order (Random playback)
Press RANDOM.
The
indicator lights in the display, and
random playback starts.
NOTE
Do not remove the USB memory device from the unit when the USB
memory communication indicator is flashing. Doing so may damage
the USB memory device, or may corrupt the files recorded on the USB
memory device.
Playback starts.
33
nnCanceling random playback
Press RANDOM.
The
indicator on the display turns off.
Information
•For details on selecting the input source
using the unit buttons, see “Selecting
the input source using the main unit”
(vpage 21).
Repeat playback starts.
NOTE
•USB memory devices will not work via a USB hub.
•It is not possible to connect and use a computer via the USB port of
this unit using a USB cable.
•Do not use an extension cable when connecting a USB memory
device. This may cause radio interference with other devices.
•Note that DENON will accept no responsibility whatsoever for any
problems arising with the data on a USB memory device when using
this unit in conjunction with the USB memory device.
Removing the USB memory device
Press POWER X to turn on
2 power
to the main unit.
Press USB to switch the input
3 source
to “USB”.
Press REPEAT.
Operations
USB memory
device
Playing repeatedly (Repeat playback)
Preparations
You can playback music stored on a USB memory device using this
unit.
USB memory device playback
nnSwitching the display
Function
Auto search (cue)
1/3
Playback / Pause
Cursor operation /
Auto search (cue, ui)
Enter / Playback
Display the menu or return to the
previous menu
Character searchz1
Repeat playback
Random playbackz2
ui
ENTER or p
o
SEARCH
REPEAT
RANDOM
z1Press SEARCH, then press ENTER to select the
first letter you want to search mode.
z2 When playing files stored on a USB memory
device using the random play function, when
a track has finished playing, the next track is
selected at random from all of the tracks on the
device. For this reason, the same track may be
played back to back.
1 Prepare for playback.
Check the connection, then turn on this
units.
During playback, Press INFO.
•The display switches each time INFO is
pressed.
Press AUX to select “AUX:Analog
2 In”
or “AUX:Digital In”.
•Pressing AUX switches the input source, as shown below.
AUX:Digital In
Artist name
Album name
File type/Bit rate
AUX:Analog In
3 Play the component connected to this unit.
Operations
Operation buttons
8, 9
Listening to AUX
Preparations
nnUSB operation
NOTE
Other digital audio signals than 2 channel linear PCM cannot be input
through DIGITAL IN connector of this unit.
Information
If the list is not in alphabetical order, you may not be able to perform
a character search.
34
AirPlay function
Playing iTunes music on this unit
Streaming music stored in iPhone or iPod
touch directly to the unit
1
2 Turn this unit ON.
If you update your “iPhone/iPod touch” to iOS 4.2.1 or later, you can
stream music stored in your “iPhone/iPod touch” directly to this unit.
Install iTunes 10, or later, on a Mac or PC that is
connected to the same network as this unit.
Set “Network Control” (vpage 19) to “On” for this unit.
NOTE
is displayed on the iPhone or iPod touch screen.
Set “Network Control” (vpage 19) to “On” for this unit.
NOTE
When “Network Control” is set to “On”, the unit consumes more
standby power.
Click the AirPlay icon
and select “Multiple
1 Speakers”
from the list.
2 Check the speakers you want to use.
Multiple Speakers
Master Volume
My Computer
This Computer
CEOL piccolo
AirPlay Device
4 Choose a song and click play in iTunes.
The music will stream to this unit.
CEOL piccolo
Cancel
35
v See overleaf
Information
3 Select the speaker you want to use.
You can easily stream music from iTunes to multiple speakers in
your home.
Operations
1 Start the music mode on the iPhone or iPod touch.
Launch iTunes and click the AirPlay icon
Tap the AirPlay icon
.
3
displayed
in the lower right of the window and select
2
this unit from the list.
When “Network Control” is set to “On”, the unit consumes more
standby power.
nnMultiple speakers
Preparations
Enjoy music from your iTunes library with DENON quality sound
anywhere in your home.
AirPlay function
You can use your DENON remote control to play and pause iTunes, as
well as skip to next and previous tracks.
“Edit” – “Preferences” in iTunes, and click
1 Open
“Devices”.
“Allow iTunes audio control from remote
2 Check
speakers”.
General
Playback
Sharing
Store
Parental
Devices
Operations
Devices
•Source input will be switched to “AirPlay” when AirPlay playback
is started.
•You can stop AirPlay playback by pressing the o or choosing other
input source.
•To see artist name or album name together, press the INFO.
•For information about how to use iTunes, also see the Help for
iTunes.
•The screen may differ depending on the OS and software versions.
•When you connect iPod to the USB connector during AirPlay
playback, AirPlay playback stops.
Advanced
Device backups:
Information
Delete Backup ...
Prevent iPods, iPhones, and iPads from syncing automatically
Warn when
more than 5%
of the data on this computer will be changed
Allow iTunes audio control from remote speakers
Forget All Remotes
iTunes is not paired with any Remotes
Reset Sync History
?
OK
Preparations
Remote operations
Cancel
36
Remote play function
nn Roles each device plays
The following devices are used for Remote Play. As specified in
the DLNA standard, these devices are called DMC, DMS or DMR
according to their role.
Name
Device example
Role
nn Files that can be played back
See “Important
(vpage 48).
information”
Outputs audio of music files
played back through Remote
Play from speakers. DMR
cannot perform playback
operations.
–
“About
Music
Operations are different for each device, but the procedures
for preparing for Remote Play are the same. The preparation
procedures are shown below.
1 Turn on this unit.
2 Display the music file playback screen on DMC.
•Make sure that this unit is connected to the network.
Make settings on PC and NAS to exchange data with DMR devices.
For settings, see “Applying media sharing settings” (vpage 24).
nn Settings on mobile phones
You must install an application for DLNA music playback on
your mobile phone to perform operations on DMS and this unit
(DMR) with your mobile phone. The applicable application differs
according to your mobile phone.
nn Settings on portable audio players
Make settings so that this unit (DMR) can play back music files
stored on your portable audio player. For settings, see the owner’s
manual of your portable player.
nn Settings on this unit
Connect this unit to the DLNA network. You do not need to make
other settings.
For the network connection, see the provided Quick setup guide,
“Connecting to a home network (LAN)” (vpage 7) and
“Setting the network [Network]” (vpage 15).
server”
37
•For PC, open Windows Media Player 12, etc.
•For mobile phones, switch to the music file playback mode.
the friendly name of this unit for the item that
3 Select
sets the playback device on the playback screen.
•The default friendly name of this unit is “CEOL piccolo”.
4 Start playing back a music file on DMC.
•The function on this unit automatically switches to Music
Server and the Remote Play mark ( ) appears on the display.
Remote Play starts.
NOTE
During Remote Play, you cannot perform playback operations with
this unit. Use the DMC device for these operations.
nn To exit Remote Play
Press o.
•The Remote Play mode ends.
Information
Stores music files.
Music files stored on these
Attached devices are played back with
DMC.
DMR
(Digital Media •This unit
Renderer)
nn Settings on PC and NAS
Some mobile phones support DLNA music playback with the factory
settings. See the owner’s manual of your mobile phone.
Performs Remote Play
DMC
•PC
operations.
(Digital Media •Mobile phone
DMC can also play back
Controller)
•Portable audio player music files stored on these
devices.
•PC
DMS
•NAS
(Digital Media
(Network
Server)
Storage)
You must make settings on DMC and DMS for Remote Play. Make
the following settings. Also see the owner’s manual of each device
for settings.
nn Remote Play operations
Operations
•The relevant devices should comply with the DLNA (Digital Living
Network Alliance) Ver. 1.5 standard.
•A wireless LAN environment is required for playing back music files
on mobile phones or portable audio players.
•For some mobile phones, you must install an application for DLNA
music playback.
Settings required for each device
Preparations
You can use your home network to play back with this unit music
files stored on PC, NAS, mobile phones and portable audio players. In
this case, you use PC, mobile phones and portable audio players for
operations.
Web control function
•This unit and the PC need to be connected to the network properly
(vpage 7 “Connecting to a home network (LAN)”) in order to
use the web control function.
•Depending on the settings of your security-related software, you
may not be able to access this unit from your PC. If this is the case,
then change the settings of the security-related software.
For example, if the IP address of this unit is “192.168.100.19”,
enter “http://192.168.100.19/”.
http://ceol-piccolo.local./index.asp
w
Bonjour
NETWORK
apple
Yahoo! Japan
YouTube Wikipedia news(45)
q
IP Address
Checking the IP address.
e
r
Please select the menu.
FIRMWARE
e Click when you setup network settings. vGExample 1H
r Click when you update firmware (vpage 13)
q Entering the IP address.
•By adding this unit’s IP address to the browser’s bookmark, you
can display the web control screen using the bookmark function
the next time you use the browser. If you are using a DHCP
server and “Network Control” (vpage 19) is set to “Off”,
turning the power on/off changes the IP address.
w If you are using the Safari web browser, you can select “Bonjour”
and directly access the unit’s web control screen from the
overview section.
38
v See overleaf
Information
3 Start up the web browser.
FIRMWARE
Please select the menu.
[Network information ]
192.168.100.19
NETWORK
Operations
1
the IP address of this unit with “Network
2 Check
Information”.
Switch the “Network Control” setting to “On”
(vpage 19).
the IP address of this unit in browser’s address
the top menu is displayed, click on the menu
4 Enter
5 When
box.
item you want to operate.
Preparations
You can control this unit from a web control screen on a web browser.
Web control function
NETWORK
FIRMWARE
7 Operate.
GExample 1H Network Setting 1
NETWORK
Friendly Name
CEOL piccolo
NETWORK
t
Set
FIRMWARE
y
Set Default
Network Connection
Select Connection
Select Connection
[+]DHCO or Proxy
Test Connection
GExample 2H Network Setting 2
NETWORK
Friendly Name
CEOL piccolo
u
o
Wi-Fi
Manual
DENON
None
Q0
Key1
ON
OFF
192.168.000.001
255.255.255.000
000.000.000.000
000.000.000.000
000.000.000.000
Q1
ON
OFF
Address
Name
000.000.000.000
00000
Test Connection
Network connection settings
Q0Various items will be displayed if you selected “Wi-Fi” in
Example 1. Select or input items as necessary, and then click
“Test Connection” to apply the changes.
NOTE
•Items displayed may vary depending on selected items and
connection status.
•After selecting each item, wait a moment for the display to be
updated.
Q1 Displayed if “DHCP” or “Proxy” is selected in Example 1. When
changing DHCP/proxy settings, input or select for each item.
NOTE
To apply network connection settings, click “Test Connection” after
making changes.
39
Information
NOTE
To apply network connection settings, click “Test Connection” after
making changes.
Set Default
Operations
Friendly Name setting
t To change the Friendly Name, enter the new name in the text box
and click “Set”.
y To reset the Friendly Name, click “Set Default”.
Network connection settings
uClick to change the network connection method. If you select
“Wi-Fi”, a new item will appear on-screen.
(vGExample 2H)
i Click to change DHCP/proxy settings.
(vGExample 2H)
o Click to connect using the newly applied settings.
Set
Network Connection
Select Connection
Wi-Fi Setup
Manual
S SID
Security
Security Key
Defaullt Key
[-]DHCP or Proxy
DHCP
IP Address
Subnet Mask
Gateway
Primary DNS
Secondary DNS
Proxy
Address Or Name
Address
Port
i
Preparations
6 Operate.
Other functions
On this unit, the names displayed for “Friendly Name” and search,
screens can be changed as desired.
For inputting characters, there are two methods, as shown below.
Method
Using the number
buttons
Example: For changing characters from “POPS” to “ROCK”
1
the cursor at the character
2 Place
to be changed with o p and
qPlace the cursor at “P”.
POPS
wPress
seven times.
“P” changes to “R”.
ROPS
Display the screen for inputting
characters.
press 0 – 9, +10 until the desired
character is displayed.
•The types of characters that can be input are as shown below.
ePress p twice.
“R” is automatically registered, and the cursor
placed “P”.
ROPS
six times.
rPress
“P” changes to “C”.
tPress p.
“C” is registered and the cursor placed “S”.
ROCS
ROCK
mnoMNO6
abcABC2
pqrsPQRS7
five times.
yPress
“S” changes to “K”.
nnDisplay of an input screen
defDEF3
tuvTUV8
uPress ENTER to register the input name.
GFriendly name inputH
ghiGHI4
wxyzWXYZ9
jklJKL5
0 (Space) ! “ # $ % & ‘ ( ) z + ,
;<=>?[\]^`{|}
[Friendly name]
Cursor
select
: move
•The input character type can be switched by pressing +10 while the
display name is being changed.
•Press CLEAR to delete the character.
•For entering the characters assigned to one number button
continuously, press p to move the cursor to the right after entering
a character then enter the next character.
•For entering characters assigned to separate buttons, press the
number button continuously. The cursor automatically moves to
the next position, and the entered character is registered.
step 2 to change the name then press ENTER
3 Repeat
to register it.
40
Information
1.@-_/:˜
ROCS
Operations
Using the cursor
buttons
Operations
•Operating with the remote control.
•Multiple characters are assigned to
a button, and each time the button is
pressed, a character is switched.
•Operating with the remote control or
the main unit.
•Use uio p and ENTER to input
characters.
Using the number buttons
Preparations
Inputting characters
Other functions
Auto power on function
the screen for inputting
1 Display
characters.
o p to set the cursor to the
2 Use
character you want to change.
3 Use ui to change the character.
When you press INTERNET
RADIO, ONLINE MUSIC, MUSIC
SERVER, iPod, AUX, USB, 1/3 or
FAVORITE CALL, the corresponding
device is turned on and the source
automatically switches.
•When you press 1/3, the previously
selected source is played back.
Last function memory
This stores the settings as they were immediately before going into
the standby mode.
When the power is turned back on, the settings are restored to as
they were immediately before going into the standby mode.
Resetting the microprocessor
the power indicator lights white, release the
3 When
buttons.
“Initialized” appears in the display.
•The input character type can be switched by pressing +10 while the
display name is being changed.
•Press CLEAR to delete the character.
•Press 9 to insert a space.
4
If “Initialized” does not display in step 3, start over from step 1.
Repeat steps 2 and 3 to change the name then press
ENTER to register it.
41
Information
•The types of characters that can be input are as shown below.
Operations
Perform this procedure if the display is abnormal or if operations
cannot be performed.
When the microprocessor is reset, all the settings are reset to their
default values.
1 Pull the power cord out of the power outlet.
the power cord into a power outlet while
2 Plug
pressing VOLUME df on the main unit.
GLower case charactersH
abcdefghijklmnopqrstuvwxyz
GUpper case charactersH
ABCDEFGHIJKLMNOPQRSTUVWXYZ
GSymbolsH ! “ # $ % & ‘ ( ) z + , - . / : ; < = > ? @ [ \ ] ^ _ ` { | } ˜
GNumbersH 0123456789 (Space)
Preparations
Using the cursor buttons
Information
Here, we list various information related to this unit.
Please refer to this information as needed.
F Explanation terms vpage 49
Operations
F Information vpage 43
Preparations
Information
F Troubleshooting vpage 51
F Specifications vpage 54
42
Information
F Index vpage 55
Preparations
Information
Part names and functions
For buttons not explained here, see the page indicated in parentheses ( ).
Top panel
Front panel
When the door is opened.
Operations
PUSH OPEN
w
e
Information
q
r
qUSB port················································· (30, 33)
Used to connect iPod or USB memory devices.
wRemote control sensor································· (3)
eDisplay
Displays play status, settings, etc.
q
w
e
r
t
y
u
rHeadphones jack········································· (22)
qPower operation button and indicator
NOTE
(X)································································· (21)
Turns power to this unit on and off (standby).
The power indicator changes as shown below
according to the status of the unit.
•Power on : White
•Standby : Off
•Network Control – “On” : Red
•iPod charge standby : Red
•Alarm standby : Orange
To prevent hearing loss, do not raise the volume
level excessively when using headphones.
wDoor······························································ (30)
eVOLUME buttons (df)······························· (21)
43
rInput source select button (SOURCE)······· (21)
Selects the input source.
tPlay/Pause button (1/3)··························· (21)
ENTER button·············································· (21)
yCursor button (uio p)····························· (21)
uDock connector············································ (30)
Part names and functions
Preparations
Rear panel
er t
u
tETHERNET connector (NETWORK)·············· (7)
ySpeaker terminals (SPEAKERS)··················· (5)
uSUBWOOFER connector······························· (5)
Information
qAC inlet (AC IN)·············································· (8)
wDIGITAL IN connector··································· (6)
eANALOG IN connectors································ (6)
rWPS button·················································· (17)
y
Operations
q w
44
Part names and functions
This section explains the buttons used to playback each input source.
nnButtons that work with all input sources
SLEEP
CLOCK
DIMMER
POWER
q
w
i
o
ONLINE
MUSIC
MUSIC
SERVER
iPod
AUX
USB
CH -
r
CH +
MUTE
ADD
FAVORITE
CALL
Q0
TOP MENU
“Buttons that work with all input sources” can also be used.
SLEEP
DIMMER
INTERNET
RADIO
ONLINE
MUSIC
MUSIC
SERVER
iPod
AUX
USB
CH -
CH +
w
MUTE
e
ADD
FAVORITE
r
CALL
VOLUME
SDB
TONE
INFO
TOP MENU
Q0
t
ENTER
SETUP
y
Q2
ENTER
SETUP
SEARCH
1
./
2 ABC
3
4
GHI
5
JKL
6 MNO
7 PQRS
8 TUV
9 WXYZ
+10a/A
0
CLEAR
*
RANDOM REPEAT
eFAVORITE ADD button······························· (29)
rFAVORITE CALL button······························ (29)
tENTER button·············································· (23)
yCursor buttons (uio p)··························· (23)
uSEARCH button··········································· (23)
iRANDOM button········································· (25)
oREPEAT button············································ (25)
Q0Information button (INFO)·························· (23)
q
Q1
SEARCH
qPlay/Pause button (1/3)··························· (23)
wReverse-skip/Forward-skip buttons
POWER
(8, 9)················································· (25)
INFO
u
CLOCK
u
DEF
Q3
Q4
1
./
2 ABC
3
4
GHI
5
JKL
6 MNO
7 PQRS
8 TUV
9 WXYZ
+10a/A
0
CLEAR
DEF
MODE
*
RANDOM REPEAT
i
o
RC-1175
RC-1175
45
MODE
Information
t
y
VOLUME
SDB
TONE
qSLEEP button··············································· (22)
wCLOCK button·············································· (11)
eInput source select buttons························ (21)
rMUTE button··············································· (22)
tFAVORITE CALL button······························ (29)
ySDB TONE button······································· (22)
uTOP MENU button········································ (9)
iPOWER button (X)······································ (21)
oDIMMER button··········································· (22)
Q0VOLUME buttons (df) ······························ (21)
Q1Information button (INFO)·························· (23)
Q2SETUP button·············································· (15)
Q3Number buttons (0 – 9,+10)·················· (29, 40)
Q4CLEAR button·································· (29, 40, 41)
Operations
INTERNET
RADIO
e
nnButtons that work when the input source is “Internet Radio”,
“Music Server”, “Pandora” or “Sirius XM”
Preparations
Remote control
Part names and functions
Preparations
nnButtons that work when the input source is “iPod” or “USB”
“Buttons that work with all input sources” can also be used.
SLEEP
CLOCK
DIMMER
qPlay/Pause button (1/3)····················· (30, 33)
wReverse-skip/Forward-skip buttons
POWER
(8, 9)··········································· (30, 34)
INTERNET
RADIO
ONLINE
MUSIC
MUSIC
SERVER
iPod
AUX
USB
q
CH -
CH +
w
Operations
eENTER button·············································· (30)
rCursor buttons (uio p)··························· (30)
tSEARCH button··········································· (34)
yRANDOM button··································· (30, 33)
uREPEAT button······································ (30, 33)
iInformation button (INFO)···················· (30, 34)
oMODE button··············································· (30)
MUTE
ADD
FAVORITE
CALL
VOLUME
SDB
TONE
INFO
TOP MENU
r
Information
i
e
ENTER
SEARCH
SETUP
t
1
./
2 ABC
3
4
GHI
5
JKL
6 MNO
7 PQRS
8 TUV
9 WXYZ
+10a/A
0
CLEAR
*
RANDOM REPEAT
DEF
MODE
o
y
u
RC-1175
46
iPod
USB memory device
GCompatible formatsH
Bit rate
Bit
length
Extension
“Made for iPod” and “Made for iPhone” mean that an electronic
accessory has been designed to connect specifically to iPod, or
iPhone, respectively, and has been certified by the developer to meet
Apple performance standards.
Apple is not responsible for the operation of this device or its
compliance with safety and regulatory standards. Please note that
the use of this accessory with iPod, or iPhone, may affect wireless
performance.
AirPlay, the AirPlay logo, iPhone, iPod, iPod classic, iPod nano, iPod
shuffle, and iPod touch are trademarks of Apple Inc., registered in the
U.S. and other countries.
•Individual users are permitted to use iPhone, iPod, iPod classic, iPod
nano, iPod shuffle, and iPod touch for private copy and playback of
non-copyrighted contents and contents whose copy and playback is
permitted by law. Copyright infringement is prohibited by law.
•Only USB memory devices conforming to mass storage class and
MTP (Media Transfer Protocol) standards can be played on this unit.
•This unit is compatible with USB memory devices in “FAT16” or
“FAT32” format.
•This unit is compatible with MP3 files conforming to “MPEG-1 Audio
Layer-3” standards.
•File types that this unit can play back and specifications are shown
below.
WMA
(Windows Media
Audio)
32/44.1/
48 kHz
48 – 192 kbps
–
.wma
MP3
(MPEG-1 Audio
Layer-3)
32/44.1/
48 kHz
32 – 320 kbps
–
.mp3
WAV
32/44.1/
48/88.2/
96/176.4/
192 kHz
GSupported file typesH
–
16 /
24 bit
.wav
MPEG-4 AAC
32/44.1/
48 kHz
16 – 320 kbps
–
.aac/
.m4a/
.mp4
FLAC
(Free Lossless
Audio Codec)
32/44.1/
48/88.2/
96/176.4/
192 kHz
–
16 /
24 bit
.flac
USB memory devices z1
Supported file types
WMA (Windows Media Audio)
Pz2
MP3 (MPEG-1 Audio Layer-3)
P
WAV
P
MPEG-4 AAC
Pz3
FLAC (Free Lossless Audio Codec)
P
NOTE
File types that this unit does not support are not displayed.
47
nnMaximum Number of Playable Files and Folder
The limits on the number of folders and files that can be displayed
by this unit are as follows.
Media
Item
Memory capacity
Number of folder directory levels
z1
USB memory devices
FAT16 : 2 GB, FAT32 : 2 TB
8 levels
Number of folders
500
Number of files z2
5000
z1 The limited number includes the root folder.
z2 The allowable number of files may differ according to the USB
memory device capacity and the file size.
Information
z1 USB memory device
•This unit is compatible with MP3 ID3-Tag (Ver. 2) standard.
•This unit is compatible with WMA META tags.
•WAV format Quantization bit length: 16 bits.
•FLAC format Quantization bit length: 16 or 24 bits.
z2Copyright-protected files can be played on certain portable
players compatible with MTP.
z3 Only files that are not protected by copyright can be played on
this unit.
Content downloaded from pay sites on the Internet are copyright
protected. Also, files encoded in WMA format when ripped from
a CD, etc. on a computer may be copyright protected, depending
on the computer’s settings.
Operations
Sampling
frequency
Important information
Preparations
Playing back music files recorded on a USB memory device.
Network audio
nnAbout the internet radio function
GPlayback file specificationsH
This function lets you play music files and playlists (m3u, wpl)
stored on a computer (music server) connected to this unit via a
network.
With this unit’s network audio playback function, connection to the
server is possible using one of the technologies below.
•Windows Media Player Network Sharing Service
•Windows Media DRM10
GTypes of files that can be played back by each functionH
Internet radio
Music server z1
WMA (Windows
Media Audio)
P
P
MP3 (MPEG-1 Audio
Layer-3)
P
P
WAV
P
MPEG-4 AAC
Pz2
FLAC (Free Lossless
Audio Codec)
P
Bit rate
Bit
length
Extension
WMA
(Windows
Media Audio)
32/44.1/
48 kHz
48 – 192 kbps
–
.wma
MP3
(MPEG-1 Audio
Layer-3)
32/44.1/
48 kHz
32 – 320 kbps
–
.mp3
WAV
32/44.1/
48/88.2/
96/176.4/
192 kHz
–
16 /
24 bit
.wav
MPEG-4 AAC
32/44.1/
48 kHz
16 – 320 kbps
–
.aac/
.m4a/
.mp4
FLAC
(Free Lossless
Audio Codec)
32/44.1/
48/88.2/
96/176.4/
192 kHz
–
16 /
24 bit
.flac
NOTE
Particularly when you play back large music files, depending on your
wireless LAN environment, the playback sound may be interrupted. In
this case, make the wired LAN connection.
nnAbout Pandora®
Pandora is an automated music recommendation and Internet
radio service created by the Music Genome Project.
To listen to Pandora you will need a free Pandora account. If you do
not have a Pandora account, you can create one at www.pandora.
com or from the Pandora smartphone application.
It is necessary to associate this machine with a Pandora account by
visiting http://www.pandora.com/denon from your PC.
nnAbout SiriusXM
SiriusXM Internet Radio delivers over 130 channels of the SiriusXM
programming you love, including commercial-free music plus
sports, talk, news and entertainment. Listen anywhere on your
computer, tablet, smartphone or other compatible internet device.
SiriusXM Internet Radio subscription sold separately and available
only to those at least 18 years of age residing in the U.S., Canada,
and Puerto Rico. To subscribe to SiriusXM Internet Radio in the
U.S., U.S. customers should visit www.siriusxm.com or call 1-888539-7474. Canadian customers should visit www.sirius.ca or call
1-888-539-7474.
48
Information
A server or server software compatible with distribution in the
corresponding formats is required to play music files via a network.
z1 Music server
•This unit is compatible with MP3 ID3-Tag (Ver. 2) standard.
•This unit is compatible with WMA META tags.
•If the image size (pixels) of an album artwork exceeds 500×500
(WMA/MP3/WAV/FLAC) or 349×349 (MPEG-4 AAC), then
music may not be played back properly.
z2 Only files that are not protected by copyright can be played on
this unit.
Content downloaded from pay sites on the Internet are copyright
protected. Also, files encoded in WMA format when ripped from
a CD, etc. on a computer may be copyright protected, depending
on the computer’s settings.
Sampling
frequency
Operations
•Internet radio refers to radio broadcasts distributed over the
Internet.
Internet radio stations from around the world can be received.
•This unit is equipped with the following Internet radio functions:
•Stations can be selected by genre and region.
•Internet radio stations in MP3 and WMA (Windows Media
Audio) format can be listened to.
•Your favorite radio stations can be registered by accessing an
exclusive DENON Internet radio URL from a Web browser on
a computer.
•The function is managed for individual users, so you must provide
your MAC or e-mail address.
Exclusive URL: http://www.radiodenon.com
•The radio station database service may be suspended without
notice.
•This unit’s Internet radio station list is created using a radio
station database service (vTuner). This database service provides
a list edited and created for this unit.
nnAbout Music server
Preparations
Important information
D
DLNA
DLNA and DLNA CERTIFIED are trademarks and/
or service marks of Digital Living Network Alliance.
Some contents may not be compatible with other
DLNA CERTIFIED® products.
I
IEEE 802.11b
This is one wireless LAN standard set by the 802
working group that establishes LAN technology
standards at the IEEE (Institute of Electrical and
Electronics Engineers) of the United States. It
uses the 2.4 GHz band usable freely without
a radio frequency license (ISM band), enabling
communications at a maximum speed of 11 Mbps.
•The value indicated above is the maximum
theoretical value for the wireless LAN standard,
and does not indicate the actual data transfer rate.
IEEE 802.11g
This is another wireless LAN standard set by the
802 working group that establishes LAN technology
standards at the IEEE (Institute of Electrical and
Electronics Engineers) of the United States, and
is compatible with IEEE 802.11b. It also uses the
2.4 GHz band, but enables communications at a
maximum speed of 54 Mbps.
•The value indicated above is the maximum
theoretical value for the wireless LAN standard,
and does not indicate the actual data transfer rate.
iTunes
iTunes is the name of the multimedia player
provided by Apple Inc. It enables management
and playback of multimedia contents including
music and movies. iTunes supports many main file
formats including AAC, WAV, and MP3.
Copyright (C) 2000,2001,2002,2003,2004,2005,200
6,2007,2008,2009 Josh Coalson
Redistribution and use in source and binary forms,
with or without modification, are permitted provided
that the following conditions are met:
•Redistributions of source code must retain the
above copyright notice, this list of conditions and
the following disclaimer.
•Redistributions in binary form must reproduce the
above copyright notice, this list of conditions and
the following disclaimer in the documentation and/
or other materials provided with the distribution.
•Neither the name of the Xiph.org Foundation nor
the names of its contributors may be used to
endorse or promote products derived from this
software without specific prior written permission.
THIS SOFTWARE IS PROVIDED BY THE
COPYRIGHT HOLDERS AND CONTRIBUTORS “AS
IS” AND ANY EXPRESS OR IMPLIED WARRANTIES,
INCLUDING, BUT NOT LIMITED TO, THE
IMPLIED WARRANTIES OF MERCHANTABILITY
AND FITNESS FOR A PARTICULAR PURPOSE
ARE DISCLAIMED. IN NO EVENT SHALL THE
FOUNDATION OR CONTRIBUTORS BE LIABLE
FOR ANY DIRECT, INDIRECT, INCIDENTAL,
SPECIAL, EXEMPLARY, OR CONSEQUENTIAL
DAMAGES (INCLUDING, BUT NOT LIMITED TO,
PROCUREMENT OF SUBSTITUTE GOODS OR
SERVICES; LOSS OF USE, DATA, OR PROFITS; OR
BUSINESS INTERRUPTION) HOWEVER CAUSED
AND ON ANY THEORY OF LIABILITY, WHETHER
IN CONTRACT, STRICT LIABILITY, OR TORT
(INCLUDING NEGLIGENCE OR OTHERWISE)
ARISING IN ANY WAY OUT OF THE USE OF
THIS SOFTWARE, EVEN IF ADVISED OF THE
POSSIBILITY OF SUCH DAMAGE.
M
MP3 (MPEG Audio Layer-3)
This is an internationally standardized audio data
compression scheme, using the “MPEG-1” video
compression standard. It compresses the data
volume to about one eleventh its original size while
maintaining sound quality equivalent to a music CD.
MPEG (Moving Picture Experts Group), MPEG-2,
MPEG-4
These are the names for digital compression format
standards used for the encoding of video and audio.
Video standards include “MPEG-1 Video”, “MPEG2 Video”, “MPEG-4 Visual”, “MPEG-4 AVC”. Audio
standards include “MPEG-1 Audio”, “MPEG-2
Audio”, “MPEG-4 AAC”.
49
N
Network Names
(SSID: Security Set Identifier)
When forming wireless LAN networks, groups are
formed to prevent interference, data theft, etc.
This grouping is done by “SSID” or “Security Set
Identifiers”. For further security, a WEP key is set
and signal transfer is not possible unless the SSID
and WEP key match.
P
Protection circuit
This is a function to prevent damage to components
within the power supply when an abnormality
such as an overload, excess voltage occurs or
temperature for any reason.
In this unit, the power indicator blinks and the unit
enters standby mode when an abnormality occurs.
S
Sampling frequency
Sampling involves taking a reading of a sound wave
(analog signal) at regular intervals and expressing
the height of the wave at each reading in digitized
format (producing a digital signal).
The number of readings taken in one second is
called the “sampling frequency”. The larger the
value, the closer the reproduced sound is to the
original.
Speaker impedance
This is an AC resistance value, indicated in Ω
(ohms). Greater power can be obtained with this
value smaller.
T
TKIP (Temporal Key Integrity Protocol)
This is a network key used for WPA. The encryption
algorithm is RC4, the same as for WEP, but the
security level is increased by changing the network
key used for encryption for each packet.
Information
B
Bit rate
This expresses the read amount per 1 second of
video/audio data recorded in a disc. A larger number
means higher sound quality, but also means a larger
file size.
F
FLAC
FLAC stands for Free lossless Audio Codec, and is a
lossless free audio file format. Lossless means that
the audio is compressed without any loss in quality.
The FLAC license is as shown below.
Operations
A
AES (Advanced Encryption Standard)
This is a next generation standard encryption
method replacing the current DES and 3DES, and
because of its high security it is expected to be
applied widely to wireless LANs in the future. It
uses the “Rijndael” algorithm developed by two
Belgian cryptographers to divide the data into
blocks of fixed lengths and encrypt each block.
It supports data lengths of 128, 192 and 256 bits
and key lengths of 128, 192 and 256 bits as well,
offering extremely high encryption security.
AirPlay
AirPlay sends (plays) contents recorded in iTunes
or on an iPhone/iPod touch to a compatible device
via the network.
Preparations
Explanation terms
Operations
Information
W
WEP Key (Network Key)
This is key information used for encrypting data
when conducting data transfer. On this unit, the
same WEP key is used for data encryption and
decryption, so the same WEP key must be set on
both devices in order for communications to be
established between them.
Wi-Fi®
Wi-Fi Certification assures tested and proven
interoperability by the Wi-Fi Alliance, a group
certifying interoperability among wireless LAN
devices.
Windows Media DRM
This is a copyright protection technology developed
by Microsoft.
Content providers are using the digital rights
management technology for Windows Media
contained in this device (WM-DRM) to protect
the integrity of their content (Secure Content) so
that their intellectual property, including copyright,
in such content is not misappropriated. This
device uses WM-DRM software to play Secure
Content (WM-DRM Software). If the security of
the WM-DRM Software in this device has been
compromised, owners of Secure Content (Secure
Content Owners) may request that Microsoft
revoke the WM-DRM Software’s right to acquire
new licenses to copy, display and/or play Secure
Content. Revocation does not alter the WM-DRM
Software’s ability to play unprotected content.
A list of revoked WM-DRM Software is sent to
your device whenever you download a license for
Secure Content from the Internet or from a PC.
Microsoft may, in conjunction with such license,
also download revocation list onto your device on
behalf of Secure Content Owners.
Windows Media Player Ver. 11 or later
This is a media player distributed free of charge by
Microsoft Corporation.
It can be used to play playlists created with
Windows Media Player Ver. 11 or later as well as
files in such formats as WMA, DRM WMA, MP3
and WAV.
WMA (Windows Media Audio)
This is audio compression technology developed by
Microsoft Corporation.
WMA data can be encoded using Windows Media®
Player Ver.7, 7.1, Windows Media® Player
for Windows® XP and Windows Media® Player 9
Series.
To encode WMA files, only use applications
authorized by Microsoft Corporation. If you use
an unauthorized application, the file may not work
properly.
WPA (Wi-Fi Protected Access)
This is a security standard established by the Wi-Fi
Alliance. In addition to the conventional SSID
(network name) and WEP key (network key), it also
uses a user identification function and encrypting
protocol for stronger security.
WPA2 (Wi-Fi Protected Access 2)
This is a new version of the WPA established by the
Wi-Fi Alliance, compatible with more secure AES
encryption.
WPA-PSK/WPA2-PSK (Pre-shared Key)
This is a simple authentication system for mutual
authentication when a preset character string
matches on the wireless LAN access point and
client.
WPS (Wi-Fi Protected Setup)
This is a standard drawn up by the Wi-Fi Alliance
to ease the task of setting up wireless LAN
connections and configuring security.
There are two methods: push-button and PIN
(Personal Identification Number) code.
Preparations
V
vTuner
This is a free online content server for Internet
radio. Note that usage fees are included in upgrade
costs.
For inquiries about this service, visit the vTuner site
below.
vTuner website: http://www.radiodenon.com
This product is protected by certain intellectual
property rights of Nothing Else Matters Software
and BridgeCo. Use or distribution of such technology
outside of this product is prohibited without a
license from Nothing Else Matters Software and
BridgeCo or an authorized subsidiary.
50
GInternet radio/Music server/iPod/USB memory device/SiriusXMH
If a problem occurs first check the following:
1. Are the connections correct?
2. Is the set being operated as described in the owner’s manual?
3. Are the other devices operating properly?
If this unit does not operate properly, check the items listed in the table below. If the problem persists,
there may be a malfunction.
In this case, disconnect the power immediately and contact your retail outlet.
Symptom
When a USB
memory device
is connected,
“USB” is not
displayed.
Page
•External noise or interference is •Reset the microprocessor.
causing the set to malfunction.
•Power cord not plugged in •Check the connections on
securely.
the set’s rear panel and the
connection of the power plug to
the power outlet.
41
•The speaker cables are not •Connect securely.
properly connected.
•The function is not switched to •Switch to the correct function.
the input source you want to
play.
•The volume is set too low.
•Adjust the volume to an
appropriate level.
•The Dimmer setting is set to •Set to something other than
“Off”.
“Off”.
5
remedy
the
8
21
21
22
5–8
For stereo
sources, the
positions of the
instruments are
inverted.
•The connections of the speaker •Check
and
cables or input cables are connections.
inverted.
Power turns off
suddenly and
POWER indicator
flashes red.
(Flashes at 0.25
second intervals)
•Set is damaged.
“No Network
Connection” is
displayed.
21
•The network is not properly set •Select a source other than the
up.
network function.
Quick setup
•Perform “Quick Setup”.
guide
•Turn off the power and contact a
DENON service center.
–
33
–
–
–
21
30
–
–
47
47
7
48
–
23
15
v See overleaf
51
Information
Display is off.
Countermeasure
Page
Operations
Set does not
operate properly.
Display not lit
and sound not
produced when
power switched
to on.
Display lit but
sound not
produced.
Cause
Countermeasure
•The set cannot recognize a USB •Check the connection.
memory device.
•A USB memory device not •Connect a USB memory device
conforming to mass storage conforming to mass storage
class or MTP standards is class or MTP standards.
connected.
•A USB memory device that •This is not a malfunction. DENON
the set cannot recognize is does not guarantee that all USB
connected.
memory devices will operate or
receive power.
•USB
memory
device
is •Connect the USB memory
connected via USB hub.
device directly to the USB port.
iPod cannot be
•The input source is set to •Switch the input source to
played.
something other than “iPod”.
“iPod”.
•Cable is not properly connected. •Reconnect.
Files on a USB
•USB memory device is in a •Set the format to FAT16 or
memory device
format other than FAT16 or FAT32. For details, refer to the
cannot be played.
FAT32.
USB memory device’s operating
instructions.
•USB memory device is divided •When divided into multiple
into multiple partitions.
partitions, only files stored in the
top partition can be played.
•Files are stored in a non- •Record the files in a compatible
compatible format.
format.
•You are attempting to play a file •Files that are copyright protected
that is copyright protected.
cannot be played on this set.
Internet radio
•Ethernet cable is not properly •Check the connection status.
cannot be played.
connected
or
network
is
disconnected.
•Program is being broadcast in •Only Internet radio programs in
non-compatible format.
MP3 and WMA can be played on
this set.
•The computer’s or router’s •Check the computer’s or router’s
firewall is activated.
firewall settings.
•Radio station is not currently •Choose a radio station that is
broadcasting.
currently broadcasting.
•IP address is wrong.
•Check the set’s IP address.
GGeneralH
Symptom
Cause
Preparations
Troubleshooting
Symptom
Cannot connect
to favorite radio
stations.
Sound quality is
poor or played
sound is noisy.
•Network’s signal transfer speed •This is not a malfunction. When
is slow or communications lines playing broadcast data with a
or radio station is congested.
high bit rate, the sound may
be broken, depending on the
communications conditions.
•File being played has a low bit •This is not a malfunction.
rate.
Symptom
48
Cannot login to
Pandora.
(“Email address”
or “Password” is
displayed.)
“Account is no
longer active” is
displayed.
48
–
–
–
“Pandora is only
available for use
in United States”
is displayed.
“Incorrect Email
or Password” is
displayed.
“No skips
remaining” is
displayed.
–
15
–
–
–
“100 Station
Limit” is
displayed.
“Please Try
Again Later” is
displayed.
–
–
52
Cause
Countermeasure
•Login information is incorrect.
Page
•Check if the “Email address”
for Pandora has been properly
entered. Re-enter the
“Password”. (Password is not
displayed.)
•Obtain a new account.
•Your account has expired.
•Contact
Pandora
Listener
Support at pandora-support@
pandora.com.
•You are trying to access from a •Pandora is not available in all
country where Pandora is not countries. Please check http://
blog.pandora.com/faq/.
available.
26
•You entered an incorrect account
or password for the login
authentication.
•You may only skip up to 6 tracks
per station, per hour (and free
Pandora accounts are limited to
12 skips per day). When the skips
are used up, no more forward/
skip operation is available.
•You have already registered 100
stations. You can not register a
new station.
•Pandora is performing system
maintenance.
•Enter the correct email address
and password.
26
•Unfortunately,
our
music
licenses force us to limit the
amount of tracks you can skip in
an hour.
–
•Reduce the number of stations
to fewer than 100.
–
•Please try again later.
–
–
–
–
Information
For some
radio stations,
“Server Full”
or “Connection
Down” is
displayed and
station cannot be
connected to.
Sound is broken
during playback.
•Files are stored in a non- •Record in a compatible format.
compatible format.
•You are attempting to play a file •Files that are copyright protected
that is copyright protected.
cannot be played on this set.
•Set and computer are connected •The set’s USB port cannot
by USB cable.
be used for connection to a
computer.
•The computer’s or router’s •Check the computer’s or router’s
firewall is activated.
firewall settings.
•Computer’s power is not turned •Turn on the power.
on.
•Server is not running.
•Launch the server.
•Set’s IP address is wrong.
•Check the set’s IP address.
•Radio station is not currently •Wait a while before trying again.
broadcasting.
•Radio station is not currently in •It is not possible to connect to
service.
radio stations that are no longer
in service.
•Station is congested or not •Wait a while before trying again.
currently broadcasting.
GPandora®H
Page
Operations
Server is not
found, or it is
not possible to
connect to the
server.
Countermeasure
Preparations
Files stored on a
computer cannot
be played.
Cause
GWireless LANH
Symptom
Countermeasure
Page
Symptom
The AirPlay
icon
is not
displayed in
iTunes or on
the iPhone/iPod
touch.
18
–
No sound.
–
Cause
Countermeasure
•This unit and the computer •Connect the computer or iPhone/
or iPhone/iPod touch are not iPod touch to the same network
connected to the same network as this unit.
(LAN).
•iTunes or the iPhone/iPod touch •Update to the latest firmware.
do not have firmware that
supports AirPlay installed.
•This unit is not selected in the •Start iTunes or switch on the
screen that is displayed when iPhone/iPod touch, click the
in the displayed
iTunes or the iPhone/iPod touch AirPlay icon
screen, and select this unit.
is started.
Page
7
12
35
GRemote controlH
–
17, 18
–
Cause
Countermeasure
Page
•Batteries are worn.
•You are operating outside of the
specified range.
•Obstacle between main unit and
remote control.
•The batteries are not inserted in
the proper direction, as indicated
by the polarity marks in the
battery compartment.
•The set’s remote control sensor
is exposed to strong light (direct
sunlight, fluorescent light, etc.).
•Replace with new batteries.
•Operate within the specified
range.
•Remove the obstacle.
3
3
•Insert the batteries in the
proper direction, following the
polarity marks in the battery
compartment.
•Move the set to a place in which
the remote control sensor will
not be exposed to strong light.
3
–
3
Information
53
Symptom
Set does not
work properly
when remote
control operated.
Operations
Cannot achieve
network
connection using
the WPS button.
Played sound is
interrupted or
sound cannot be
played.
Cause
•The settings of the SSID and •Match the network settings with
network key (WEP) are incorrect. this unit settings.
•The reception is poor and the •Shorten the distance from the
signals cannot be received.
wireless LAN’s access point,
remove any obstacles and
otherwise improve visibility, then
try reconnecting. Also install
away from microwave ovens
and the access points of other
networks.
•There are multiple networks and •Set the access point’s channel
the usable channels overlap.
settings away from the channels
used for other networks.
Alternatively, connect using a
network cable.
•The router power is off.
•Turn on the router power.
•The encryption type on the router •Set the encryption type to
is set to “WEP” or “TKIP”.
“None”,
“WPA-PSK(AES)”
or “WPA2-PSK(AES)” before
establishing connection.
•There are multiple networks and •Set the access point’s channel
the usable channels overlap.
settings away from the channels
used for other networks.
Alternatively, connect using a
network cable.
Preparations
Cannot connect
to network.
GAirPlayH
Preparations
Specifications
nn Audio AMP
Rated output:
Dynamic power:
Output terminals:
Input sensitivity/impedance:
Total harmonic distortion (1 kHz, 5 W, 8 Ω):
S/N ratio (10 W, 8 Ω, IHF-A):
Tone control:
Operations
Frequency response:
2-channel driving
65 W + 65 W (4 Ω, 1 kHz, T.H.D. 0.7 %)
80 W + 80 W (4 Ω)
Speaker 4 – 16 Ω
Suited for headphones/stereo headphones
AUX: 200 mV/22 kΩ
AUX: 0.05 %
AUX: 86 dB
SDB : 100 Hz +8 dB
BASS : 100 Hz ± 10 dB
TREBLE : 10 kHz ± 10 dB
10 Hz – 40 kHz (+0.5 dB, –3 dB) (SOURCE DIRECT: ON)
nn Wireless LAN
Network type (wireless LAN standards):
Transfer rate:
Security:
Information
Used frequency range:
No. of channels:
Conforming to IEEE 802.11b
Conforming to IEEE 802.11g
(Conforming to Wi-Fi®)z
DS-SS: 11 / 5.5 / 1 Mbps (Automatic switching)
OFDM: 54 / 48 / 36 / 24 / 18 / 12 / 9 / 6 Mbps
(Automatic switching)
SSID (Network name)
WEP key (network key) (64/128 bits)
WPA-PSK (TKIP/AES)
WPA2-PSK (TKIP/AES)
2.412 MHz – 2.462 MHz
Conforming to IEEE 802.11b : 11 ch (DS-SS) (Of which 1
channel used)
Conforming to IEEE 802.11g : 11 ch (OFDM) (Of which 1
channel used)
nn Clock/Alarm
Clock type:
Alarm:
Power line frequency synchronized method (Within ±60
seconds per month)
Everyday alarm / Once alarm : One system each
Sleep timer : Max. 90 minutes
nn Power supply
Power supply voltage/frequency:
Power consumption:
Power consumption in standby mode:
Power consumption in
“Network Control” – “On” mode:
AC 120 V, 60 Hz
55 W
0.3 W
3W
zzWi-Fi® conformity indicates tested and proven interoperability by the “Wi-Fi Alliance”, a group certifying
interoperability among wireless LAN devices.
•For purposes of improvement, specifications and design are subject to change without notice.
54
Index
vvB
Bit rate··························································· 48, 49
Browse mode······················································ 31
vvD
Display’s brightness············································ 22
DLNA··································································· 49
vvF
Favorite list·························································· 29
Firmware Update················································ 12
FLAC··································································· 49
Friendly Name····················································· 19
Front panel·························································· 43
vvH
Headphones························································ 22
vvM
vvT
Menu map····························································· 9
MP3························································· 47, 48, 49
MPEG·································································· 49
MPEG-4 AAC······················································· 47
Music server······················································· 25
TKIP····································································· 49
vvU
Update Notification············································· 13
Upgrade Notification··········································· 14
vvN
vvV
Network Control·················································· 19
Network Names (SSID)······································· 49
vTuner··························································· 48, 50
vvP
vvW
Playback
Internet radio···················································· 23
iPod··································································· 30
Music server····················································· 25
Network audio············································ 23, 48
Pandora®·························································· 26
Random···························································· 33
Repeat······························································ 33
SiriusXM··························································· 28
USB memory device········································· 33
Protection circuit················································· 49
Web control························································· 38
WEP Key······················································· 18, 50
Wi-Fi···································································· 50
Windows Media DRM··································· 48, 50
Windows Media Player································· 24, 50
WMA······················································· 47, 48, 50
WPA······························································ 18, 50
WPA2···························································· 18, 50
WPA-PSK/WPA2-PSK·········································· 50
WPS························································ 17, 18, 50
vvR
Rear panel··························································· 44
Remote control········································· 3, 45, 46
Battery································································ 3
Remote mode····················································· 31
Resetting the microprocessor····························· 41
55
Information
Cable
Audio cable························································· 5
Ethernet cable···················································· 7
Optical cable······················································· 5
Speaker cable····················································· 5
Subwoofer cable················································· 5
Characters··································· 17, 18, 37, 40, 41
Connection
Network······························································ 7
Power cord························································· 8
Speaker······························································· 5
Current time························································ 11
vvS
Sampling frequency······································ 48, 49
Setting
General····························································· 10
Network·········································· 10, 15, 17, 18
Sleep timer·························································· 22
Speaker impedance············································· 49
Subwoofer····························································· 5
Operations
vvC
vvI
IEEE 802.11b······················································· 49
IEEE 802.11g······················································· 49
Input source························································ 21
Inputting characters······································ 37, 40
Internet radio······················································· 23
iTunes······················································ 35, 37, 49
Preparations
vvA
Accessories··························································· 2
Add New Feature················································ 14
AES······························································· 18, 49
AirPlay····················································· 35, 37, 49
Auto-Standby······················································· 12
Dimensions
Preparations
1/64
(0.5)
Operations
9 7/32 (234.0)
Unit : in. (mm)
Information
25/32
(20.0)
5 33/64
(140.0)
5/32
(4.0)
3 25/64
(86.0)
3 35/64
90.0
7 3/32 (180.0)
25/32
(20.0)
1 1/2
(38.0)
5 63/64
(152.0)
1 47/64
(44.0)
Weight : 4 lbs 14 oz (2.2 kg)
56
V00
www.denon.com
D&M Holdings Inc.
3520 10170 00AD