1
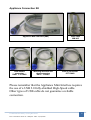
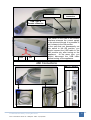
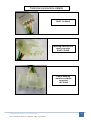
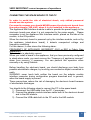
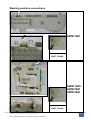
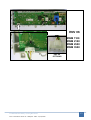
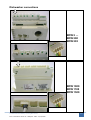
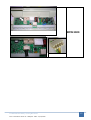
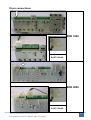
Sidekick PC
Guide for AMI Interface
Connectors
Version 1.3
© 2008 Electrolux Italia S.p.A, All rights reserved
File: Connections Guide rev.1.3EN.pdf - Date: 01/12/2008
1
Table Of Contents
INTRODUCTION ..................................................................................................... ………..3
APPLIANCE CONNECTION KIT ....................................................................................... 4
TERMINAL CONNECTORS DETAILS…………………………………………………..6
IMPORTANT NOTES ........................................................................................................ ....7
CONNECTING THE SPARE BOARD TO THE PC ........................................................................ 8
DISCONNECTING THE SPARE BOARD FROM THE PC............................................................ 9
CONNECTING THE APPLIANCE TO THE PC ...........................................................................10
DISCONNECTING THE APPLIANCE FROM THE PC ............................................................... 11
WASHING-MACHINE CONNECTIONS.......................................................................... 12
EWM 1000............................................................................................................................12
EWM 1000+..........................................................................................................................12
EWM 2000............................................................................................................................12
EWM 3000............................................................................................................................12
ENV 06............................................................................................................................. ....13
EWM 1000......................................................................................................................13
EWM 2100......................................................................................................................13
EWM 2500......................................................................................................................13
EWM 3500......................................................................................................................13
DISHWASHER CONNECTIONS…………………………………………………………14
EDW 5--...............................................................................................................................14
EDW 500..............................................................................................................................14
EDW 503..............................................................................................................................14
EDW 1000............................................................................................................................14
EDW 1100............................................................................................................................14
EDW 1500............................................................................................................................14
EDW 2000............................................................................................................................15
DRYER CONNECTIONS .................................................................................................... 16
EDR 1000.............................................................................................................................16
EDR 2000.............................................................................................................................16
ENV 06.................................................................................................................................17
© 2008 Electrolux Italia S.p.A, All rights reserved
File: Connections Guide rev.1.3EN.pdf - Date: 01/12/2008
2
Introduction
This guide provides you with all the necessary information for establishing a
correct connection between your PC and the electronic boards.
A good connection is an essential requirement to execute the diagnosis of the
appliance and to perform the configuration of an electronic board.
Whenever communication problems between SidekickPC and the electronic
board occur, you should always verify if the connection is correct.
The first part of this guide briefly illustrates the hardware elements of the
Appliance Connection Kit and the correct sequence of the operations you
should perform.
The second part of this guide shows the picture of many different electronic
boards and the position of the communication connector that you should use
for SidekickPC.
© 2008 Electrolux Italia S.p.A, All rights reserved
File: Connections Guide rev.1.3EN.pdf - Date: 01/12/2008
3
Appliance Connection Kit
Appliance Mini Interface (AMI)
Dish washer
connector
RAST 2.5 DAAS
Washing machine and
dryer connector
RAST 5 DAAS
USB cable
MM A-B
ENV 06 connector
JST DAAS
Please remember that the Appliance Mini Interface requires
the use of a USB 2.0 fully-shielded High-Speed cable.
Other types of USB cable do not guarantee a reliable
connection.
© 2008 Electrolux Italia S.p.A, All rights reserved
File: Connections Guide rev.1.3EN.pdf - Date: 01/12/2008
4
Power Led
External Power
connector
USB Type B
Female connector
OFF
The switch on the side of the module
interface interrupts the current supply
to the electronic board. It is possible to
set it always to the ON position.
In the case that you permanently set
this switch to the ON position, you
should connect the USB cable to the
AMI module only after turning on the
appliance. At the same time, you
should disconnect the USB cable
before turning off the appliance.
ON
AMI Connections
COMPUTER
© 2008 Electrolux Italia S.p.A, All rights reserved
File: Connections Guide rev.1.3EN.pdf - Date: 01/12/2008
5
Terminal connectors details
Dishwasher connector
RAST 2.5 DAAS
Washing-machine and
dryer connector
RAST 5 DAAS
ENV06 washingmachine and dryer
connector
JST DAAS
© 2008 Electrolux Italia S.p.A, All rights reserved
File: Connections Guide rev.1.3EN.pdf - Date: 01/12/2008
6
Important Notes
To use the RAST 2.5
DAAS connector for
dishwashers, it is
necessary to remove the
first 4 keying ribs of the
connector by means of a
cutter, as shown in the
picture. You should keep
only the last keying rib
indicated by the arrow.
To use the JST DAAS
connector in some types
of ENV06 fabric care
boards, it is necessary to
remove the holding clip
with the use of a cutter
as shown in the picture.
© 2008 Electrolux Italia S.p.A, All rights reserved
File: Connections Guide rev.1.3EN.pdf - Date: 01/12/2008
7
VERY IMPORTANT: correct sequence of operations
CONNECTING THE SPARE BOARD TO THE PC
In order to avoid the risk of electrical shock, only skilled personnel
should use the system.
For security reasons you should NEVER power the electronic board from
the mains supply (230 VAC) when it is not installed in the appliance.
The Appliance Mini Interface module is able to provide the power supply to the
electronic board even when it is not connected to the mains supply. Please
remember to set the Appliance Mini Interface switch, placed on the side of the
module, to the ON position.
When the electronic board is powered up by the interface module, and not by
the appliance (stand-alone board), it detects unexpected voltage and
frequency conditions.
For this reason, it often stores the following alarm:
FREQUENCY OF APPLIANCE INCORRECT (EH1 or EB1 in Fabric Care
appliances).
This situation is absolutely correct.
When you install a board in the appliance, that you have previously configured
in stand-alone mode, you must remove the “Frequency of appliance incorrect”
alarm from memory, if necessary. You can perform this operation either
manually or by using Sidekick.
Before handling the electronic board, you should discharge your body from
possible electrostatic charges, by touching one conductive object connected to
earth.
WARNING: never touch both neither the board nor the adapter module
interface connector during configuration program download and, in general,
when the board supply is present.
These precautions reduce the risk of damaging the electronic board because
of electrostatic discharges.
You should do the following steps to connect the PC to the spare board:
1) Disconnect the USB cable from the PC, if necessary.
2) Connect the adapter module interface cable both to the electronic board
and to the AMI module.
3) Connect the USB cable both to the PC and to the AMI module.
© 2008 Electrolux Italia S.p.A, All rights reserved
File: Connections Guide rev.1.3EN.pdf - Date: 01/12/2008
8
DISCONNECTING THE SPARE BOARD FROM THE PC
Before handling the electronic board, you should discharge your body from
possible electrostatic charges, by touching one conductive object connected to
earth.
WARNING: never touch both neither the board nor the adapter module
interface connector during configuration program download and, in general,
when the board supply is present.
These precautions reduce the risk of damaging the electronic board because
of electrostatic discharges.
You should do the following steps to disconnect the PC from the spare board:
1) Disconnect the USB cable from the PC.
2) Wait at least 5 seconds BEFORE touching the board or the interface
cable to prevent Electro Static Discharge (ESD) damage risk.
3) Disconnect the adapter module interface cable from the board.
© 2008 Electrolux Italia S.p.A, All rights reserved
File: Connections Guide rev.1.3EN.pdf - Date: 01/12/2008
9
CONNECTING THE APPLIANCE TO THE PC
In order to avoid the risk of electrical shock, only skilled personnel
should use the system.
The connection of the cable to the electronic board of the appliance can
only occur when the appliance is powered off and, if possible,
unplugged from the mains power supply.
Before handling the electronic board, you should discharge your body from
possible electrostatic charges, by touching one conductive object connected to
earth.
WARNING: never touch both neither the board nor the adapter module
interface connector during configuration program download and, in general,
when the board supply is present.
These precautions reduce the risk of damaging the electronic board because
of electrostatic discharges.
You should do the following steps to connect the PC to the appliance:
1) Turn off the appliance and, if it is possible, unplug it from the power
supply.
2) After the power off of the appliance, wait at least 5 seconds BEFORE
touching the board or the interface cable to prevent Electro Static
Discharge (ESD) damage risk
3) Access to the electronic board and the concerning connector.
The way to execute this operation depends on the type of the appliance.
4) Connect the adapter module interface cable both to the electronic board
and to the interface module.
5) Connect the power plug and turn on the appliance.
6) Connect the USB cable both to the PC and to the AMI module.
The above sequence of steps guarantees user’s safety and reduces the risk of
damage due to electrostatic charges. It also avoids the storage of the
FREQUENCY OF APPLIANCE INCORRECT (EH1 or EB1 in Fabric Care
appliances) alarm that is generated when the board is supplied by the interface
module instead of the mains power supply (230 VAC).
© 2008 Electrolux Italia S.p.A, All rights reserved
File: Connections Guide rev.1.3EN.pdf - Date: 01/12/2008
10
DISCONNECTING THE APPLIANCE FROM THE PC
Before handling the electronic board, you should discharge your body from
possible electrostatic charges, by touching one conductive object connected to
earth.
WARNING: never touch both neither the board nor the adapter module
interface connector during configuration program download and, in general,
when the board supply is present.
These precautions reduce the risk of damaging the electronic board because
of electrostatic discharges.
You should do the following steps to disconnect the PC from the appliance:
1) Disconnect the USB cable from the PC.
2) Turn off the appliance and, if it possible, unplug it from the mains power
supply.
3) After the power off of the appliance, wait at least 5 seconds BEFORE
touching the board or the interface cable to prevent Electro Static
Discharge (ESD) damage risk
4) Disconnect the adapter module interface cable from the electronic
board.
The above sequence of steps guarantees user’s safety and reduces the risk of
damage due to electrostatic charges. It also avoids the storage of the
FREQUENCY OF APPLIANCE INCORRECT (EH1 or EB1 in Fabric Care
appliances) alarm that is generated when the board is supplied by the interface
module instead of the mains power supply (230 VAC).
© 2008 Electrolux Italia S.p.A, All rights reserved
File: Connections Guide rev.1.3EN.pdf - Date: 01/12/2008
11
Washing-machine connections
EWM 1000
EWM
1000
RAST 5 DAAS
EWM 1000+
EWM
EWM 2000
1000
EWM 3000
RAST 5 DAAS
© 2008 Electrolux Italia S.p.A, All rights reserved
File: Connections Guide rev.1.3EN.pdf - Date: 01/12/2008
12
ENV 06
EWM 1100
EWM 2100
EWM 2500
EWM 3500
ENV 06
JST DAAS
© 2008 Electrolux Italia S.p.A, All rights reserved
File: Connections Guide rev.1.3EN.pdf - Date: 01/12/2008
13
Dishwasher connections
EDW 5 - EDW 500
EDW 503
RAST 2.5 DAAS
EDW 1000
EDW 1100
EDW 1500
RAST 2.5 DAAS
© 2008 Electrolux Italia S.p.A, All rights reserved
File: Connections Guide rev.1.3EN.pdf - Date: 01/12/2008
14
EDW 2000
RAST 2.5 DAAS
© 2008 Electrolux Italia S.p.A, All rights reserved
File: Connections Guide rev.1.3EN.pdf - Date: 01/12/2008
15
Dryer connections
EDR 1000
RAST 5 DAAS
EDR 2000
RAST 5 DAAS
© 2008 Electrolux Italia S.p.A, All rights reserved
File: Connections Guide rev.1.3EN.pdf - Date: 01/12/2008
16
ENV 06
ENV 06
JST DAAS
© 2008 Electrolux Italia S.p.A, All rights reserved
File: Connections Guide rev.1.3EN.pdf - Date: 01/12/2008
17