1
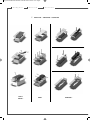
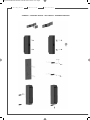
Cab_ALTURA MC:Cab Altura MC notice 031108 01/12/09 12:11 Page1
ALTURA MC
iroise 3
•
egea 3
•
Bora
•
Ambrose 3
notice d’installation des enceintes acoustiques
loudspeakers owner’s manual
betriebsanleitung für lautsprecherboxen
www.cabasse.com
Cab_ALTURA MC:Cab Altura MC notice 031108 01/12/09 12:11 Page2
f r a n ç a i s
e n g l i s h
1
d e u t s c h
DEBALLAGE - UNPACKING - AUSPACKEN
1
2
EGEA 3
IROISE 3
BORA
AMBROSE 3
Cab_ALTURA MC:Cab Altura MC notice 031108 01/12/09 12:11 Page3
f r a n ç a i s
e n g l i s h
2
d e u t s c h
3
S1
4
5
d
d>
1,5
m/
d
d>5
ft
Cab_ALTURA MC:Cab Altura MC notice 031108 01/12/09 12:11 Page4
f r a n ç a i s
e n g l i s h
d e u t s c h
AMBROSE 3 : MONTAGES MURAUX - WALL MOUNTS - WANDBEFESTIGUNGEN
Cab_ALTURA MC:Cab Altura MC notice 031108 01/12/09 12:11 Page5
f r a n ç a i s
e n g l i s h
d e u t s c h
AMBROSE 3 : MONTAGES MURAUX - WALL MOUNTS - WANDBEFESTIGUNGEN
Cab_ALTURA MC:Cab Altura MC notice 031108 01/12/09 12:11 Page6
f r a n ç a i s
Vous venez d’acheter des enceintes Cabasse et nous vous remercions de votre confiance.
Dans le but d’optimiser au maximum votre installation, nous vous recommandons de lire
attentivement cette notice.
INSTRUCTIONS DE SECURITE
Explication des symboles L’éclair dans un triangle
équilatéral avertit de l’existence de tension élevée dangereuse non isolée à l’intérieur du
coffret du produit, d’une valeur
suffisante pour présenter un risque d’électrocution.
Le point d’exclamation dans un triangle équilatéral
avertit de l’existence d’instructions importantes quant à
l’utilisation et la maintenance dans la documentation jointe à ce
produit.
Instructions - Toutes les instructions de sécurité et d’utilisation doivent avoir été lues avant d’allumer tout appareil
pour la première fois.
Retenez les instructions - Elles doivent servir de référence
permanente pour tout ce qui suit.
Tenez compte des avertissements - Les avertissements
présents sur le produit ou dans les notices d’utilisation doivent
être pris en compte.
Suivez les instructions - Toutes les instructions d’utilisation
et de mise en œuvre doivent être scrupuleusement suivies.
Nettoyage - Débranchez l’appareil avant tout nettoyage.
N’utilisez pas de solutions nettoyantes sous forme liquide ou
en aérosols. Employez de préférence un chiffon humide.
Accessoires - N’utilisez pas d’accessoires qui ne soient pas
explicitement recommandés par le constructeur, sous peine
de risquer divers accidents.
Eau et humidité - L’appareil ne doit pas être utilisé près de
l’eau, par exemple à proximité d’une baignoire, d’un évier,
dans un sous-sol humide, près d’une piscine, ou de tout ce
qui y ressemble de près ou de loin.
Chariots et supports - La manutention doit
être effectuée seulement avec des chariots et supports agréés par le fabricant.
> Attention aux chariots de manutention
Installation sur mobiliers et supports - Ne placez pas
cet appareil sur un support instable, qu’il s’agisse de pieds,
trépieds, tables, étagères, etc. Il pourrait tomber et causer des
blessures sérieuses à un enfant ou un adulte qui se trouverait
à proximité.
Ventilations - L’appareil doit être positionné de telle sorte
qu’il ne gêne pas sa propre ventilation. Par exemple, il ne doit
pas être installé sur un lit, un canapé, une couverture ou des
surfaces similaires qui pourraient bloquer ses orifices d’aération. Il ne doit pas non plus être encastré dans des enceintes
confinées comme des étagères étroites ou des meubles qui
pourraient limiter la quantité d’air disponible aux entrées d’air.
Alimentation - L’appareil ne doit être relié qu’à une source
électrique du type écrit dans le mode d’emploi ou conforme à
la sérigraphie sur le produit. Si vous n’êtes pas sûr du type de
courant fourni à l’endroit où vous vous trouvez, adressez-vous
à votre revendeur ou à la compagnie électrique locale.
Sacs plastiques - Ne pas laisser les sacs plastiques de
l’emballage à portée des enfants afin d’éviter tout risque
d’étouffement.
Protection des câbles d’alimentation - Le cheminement
des câbles d’alimentation doit être prévu de telle sorte qu’ils ne
puissent pas être piétinés, pincés, coincés par d’autres appareils posés dessus, et une attention toute particulière doit être
accordée à l’adéquation des prises et à la liaison du cordon avec
l’appareil.
Foudre - Pour une meilleure protection de l’appareil pendant les orages ou s’il doit rester inutilisé pendant une longue
période, débranchez le cordon d’alimentation et débranchez
la prise d’antenne, vous éviterez ainsi les risques de détérioration dus à la foudre ou aux surtensions.
Surcharges électriques - Ne surchargez pas les prises d’alimentation, les prolongateurs ou les rappels d’alimentation. Il
pourrait en résulter incendies ou électrocutions.
Corps et liquides étrangers - On doit être attentif à ne
jamais laisser entrer d’éléments ou de liquides étrangers dans
l’appareil. Ils pourraient occasionner incendies ou électrocutions. Ne versez jamais aucun liquide d’aucune sorte sur l’appareil.
Entretien - L’utilisateur ne doit pas tenter de s’occuper des
opérations de maintenance au-delà de celles décrites dans le
mode d’emploi. Tout ce qui dépasse le simple niveau de l’entretien doit être effectué par un personnel qualifié.
Maintenance - Dans les cas suivants, vous devez impérativement débrancher votre appareil et le faire vérifier par un
technicien qualifié :
■ l’alimentation ou la prise a été endommagée.
■ des corps étrangers ou du liquide se sont introduits dans
l’appareil.
■ l’appareil a été exposé à la pluie ou a été aspergé d’eau.
■ l’appareil ne semble pas marcher correctement alors que
vous l’utilisez dans le cadre de ses instructions de fonctionnement normal. Ne manipulez que les contrôles couverts par le
mode d’emploi. Toute autre procédure pourrait le détériorer
et nécessiter l’intervention d’un technicien qualifié.
■ l’appareil est tombé ou bien sa carrosserie est endommagée.
■ l’appareil affiche des performances nettement modifiées.
Pièces détachées - Si la réparation a nécessité l’utilisation
de pièces détachées, assurez-vous que le technicien a bien
utilisé les références préconisées par le fabricant ou présentant
les mêmes caractéristiques que les pièces originales. Des pièces
non conformes peuvent provoquer incendies, électrocutions ou
autres.
Vérifications - Après toute intervention sur l’appareil, demandez
au technicien d’effectuer des tests afin de garantir que l’appareil
fonctionne en toute sécurité.
Exposition aux fortes températures - L’appareil doit
être tenu éloigné de sources de chaleur comme radiateurs,
chauffage divers, amplificateurs, ou tous autres éléments
susceptibles de le placer dans des conditions de températures
anormalement élevées.
Valable aux USA, au Canada et autres pays concernés
Attention ! pour éviter les chocs électriques, introduire la lame
la plus large de la fiche dans la borne correspondante et pousser
jusqu’au fond
Cab_ALTURA MC:Cab Altura MC notice 031108 01/12/09 12:11 Page7
f r a n ç a i s
IROISE 3 • EGEA 3 • BORA • AMBROSE 3
DÉBALLAGE DES ENCEINTES 1
Ouvrir le côté mentionné sur le carton, replier sur les cotés les
rabats supérieurs du carton et retirer la plaque de protection.
Enlever le sachet d'accessoires de son logement, puis retirer
les demi-coque en mousse protégeant l'enceinte et sortir
le cadre puis l'enceinte de l'emballage. Nous vous conseillons
de conserver l’emballage de votre enceinte à plat pour une
utilisation ultérieure éventuelle.
ATTENTION : étant donné le poids élevé de ces enceintes,
2 personnes sont nécessaires pour effectuer le déballage.
POSITIONNEMENT ET PLACEMENT
DES ENCEINTES ACOUSTIQUES
Positionnement des enceintes
Nos enceintes acoustiques sont prévues pour fonctionner en
position verticale, afin de respecter la courbe polaire des
haut-parleurs2.
Les modèles Egea 3 et Iroise 3 sont livrés avec des pointes de
découplage 3. Ces accessoires sont à visser dans les emplacements prévus sur le socle des enceintes après avoir dévissé les
bouchons de protection. Utiliser la clé à six pans M4 livrée avec
les pointes pour en ajuster la hauteur. Ces pointes ou cônes
de découplage permettent d’assurer une meilleure stabilité de
l’enceinte tout en limitant les résonances pouvant être générées
par certains types de sols comme les planchers par exemple.
Les enceintes sont livrées avec un tissu de protection en face
avant. II est possible de les utiliser sans ce tissu. Enlevez le cadre
en exerçant une légère traction horizontale sur sa partie supérieure pour rompre sa liaison magnétique avec l’ébénisterie
de votre enceinte. Pour remettre le cadre en place, présentez le
devant la face avant de l’enceinte et approcher doucement le
cadre jusqu’à ce que les liaisons magnétiques soient établies.
Procédez à ces opérations délicatement pour éviter une usure
prématurée de la partie du revêtement couvrant les aimants
insérés sur la face avant de l’ébénisterie4.
Le champ magnétique des moteurs des haut-parleurs va rayonner
au delà de l’enveloppe de l’enceinte acoustique. Il faut donc éloigner d’environ 50 cm les appareils et objets sensibles à ce type de
rayonnement (téléviseurs, écrans d’ordinateur, disquettes informatiques, bandes magnétiques audio ou vidéo, cartes à puces...).
Les enceintes centrales ne sont pas concernées par ce type de
problème car elles sont blindées magnétiquement.
Placement des enceintes dans une pièce
Outre la position des enceintes, il faut tenir compte de leur
emplacement dans la pièce, les propriétés acoustiques d’un
local étant un facteur capital dans la retransmission du son.
Montages muraux d’Ambrose 3 (6H) (6V)
1) Rassembler le matériel nécessaire : le gabarit de perçage en
carton (il faut avoir décollé la cale en mousse), les accessoires
fournis dans l’emballage (équerres, attaches, patins d’amortissement), un tournevis cruciforme PH2, des vis (diamètre 6 mm),
inserts (chevilles et outils de perçage adaptés au type de mur, un
niveau à bulle.
Assurez-vous que le mur est capable de supporter le poids
de l’enceinte et que les modes de fixations choisies sont
bien adaptées.
2) Une fois l’emplacement choisi, positionner le gabarit de perçage sur le mur en fonction du mode de montage choisi (horizontal
ou vertical,) respecter bien le sens haut-bas, vérifier l’aplomb avec
le niveau à bulle aligné sur un des traits du gabarit et percer directement les 4 trous à travers le gabarit. Mettre les chevilles adéquates
en place.
3) Monter les attaches murales avec les vis adaptées et coller les
patins rectangulaires fournis sur celles-ci.
4) Fixer avec les vis fournies et un tournevis PH2 les attaches en
« s » au dos de l’enceinte, en les orientant comme indiqué sur la
planche (6H) pour le montage horizontale et la planche (6V) pour
le montage verticale.
5) Connecter le câble haut-parleur à l’enceinte en respectant les
polarités (voir ¶ Phase)
6) Positionner l’Ambrose 3 devant les fixations murales et insérer
à fond les 2 pattes en « s » dans les gâches. 2 personnes sont
nécessaires pour réaliser cette mise en place.
7) Dans le cas d’une utilisation horizontale, décoller du mur le bas
de l’enceinte et positionner les 2 calles cylindriques autocollantes
comme indiqué sur la planche (6H)
Le placement optimal
pour une écoute stéréo classique 2.06
Si l’on considère que d est la distance qui sépare les deux
enceintes, celle-ci doit être supérieure à 1,5 m. Les deux
enceintes doivent être à égale distance de la zone d’écoute qui
forme avec elles un triangle équilatéral.
■
■
Les haut-parleurs doivent être dirigés vers la zone d’écoute.
■ Les enceintes doivent, de préférence, diffuser dans le sens de
la plus grande dimension de la pièce.
D’une façon générale, on doit éviter de positionner les
enceintes dans les coins d’une pièce, car la disposition en angle
favorise Ies fréquences graves. De même, les enceintes doivent
se situer à une distance d’au moins 20 cm du mur.
■
■ Toujours dans le but d’obtenir une réponse équilibrée, il est
recommandé de surélever les enceintes compactes d’environ
30 à 40 cm du sol avec des supports pour enceintes, les tweeters
de l’enceinte devant se situer approximativement à la hauteur
des oreilles de l’auditeur lorsque celui-ci est en position assise.
Aucun élément (table, fauteuil...) ne doit gêner la propagation directe entre les enceintes et l’auditeur. Un effet de masque,
même partiel, déséquilibre complètement la reproduction
sonore car il provoque une atténuation des fréquences aiguës
et dans la majorité des cas des médiums également.
■
■ La disposition des enceintes dans des niches est également en
général à proscrire car elle modifie la courbe de réponse
de l’enceinte, particulièrement dans les fréquences basses.
S’il est impossible d’adopter une autre disposition, on doit veiller
à ce que l’enceinte s’encastre avec le minimum de jeu dans la
niche, pour éviter l’apparition de résonances diverses. Par ailleurs,
la partie visible du tissu devra être à l’extérieur de la niche.
MARQUAGE DEEE
Traitement des appareils électriques
et électroniques en fin de vie (applicable
dans les pays de l’Union européenne).
Ce symbole, représentant une poubelle sur roues
barrée d’une croix, apposé sur le produit, indique
que ce produit ne doit pas être traité avec les
déchets ménagers. Il doit être remis à un point de
collecte pour le traitement des équipements élec-
Cab_ALTURA MC:Cab Altura MC notice 031108 01/12/09 12:11 Page8
f r a n ç a i s
triques et électroniques en fin de vie. En s’assurant
que ce produit est bien mis au rebut de manière appropriée, vous aiderez à prévenir les conséquences négatives potentielles pour l’environnement et la santé
humaine. Le recyclage des matériaux aidera à conserver les ressources naturelles. Pour toute information
supplémentaire au sujet du recyclage de ce produit,
vous pouvez contacter votre municipalité, votre déchetterie ou le magasin où vous avez acheté le produit.
SPÉCIFICATIONS
ET CARACTÉRISTIQUES TECHNIQUES
BRANCHEMENT
Section des câbles
Pour conserver toutes les qualités des enceintes
acoustiques et éviter les pertes de puissance, il faut
que la résistance électrique des câbles de branchement entre l’enceinte et l’amplificateur soit la plus
faible possible. Pour vous aider à choisir la section
minimum du câble de votre installation, veuillez
suivre le tableau récapitulatif .
Distance maximale
ampli - enceinte
Section
4,5 m
6m
7,5 m
9m
12 m
1,5 mm 2
2 mm 2
2,5 mm 2
3 mm 2
4 mm 2
Position
Phase
Les enceintes et les amplificateurs ont leurs bornes de
branchement repérées. Il y a deux façons courantes
d’effectuer ce repère : soit une borne rouge ou repère +, soit une borne noire ou repère -.
Dans tous les cas, il faut que les deux canaux soient
branchés de façon identique, c’est à dire par exemple
que la borne rouge ou + de l’enceinte aille à la borne
rouge ou+ de l’amplificateur ; la borne noire ou- de l’enceinte ira dans ce cas à la borne noire ou - de l’amplificateur.
ENTRETIEN
Les ébénisteries de la gamme Altura MC sont soit
réalisées avec un placage bois naturel couvert par
4 couches de vernis, soit protégées par 5 couches de
laque. Elles ne nécessitent aucun entretien particulier, les finitions utilisées étant de très haute technicité. Elles peuvent être nettoyées avec un chiffon
humide.
En suivant les conseils d’installation, de branchement et d’emploi explicités dans cette notice, vous
êtes assurés d’un fonctionnement parfait de vos
enceintes acoustiques. Nous recevons tous les jours
des lettres de clients satisfaits du choix de leurs
enceintes et ces lettres sont pour nous la plus belle
récompense de nos efforts.
Voies
Haut-parleurs
BORA
EGEA 3
IROISE 3
AMBROSE 3
voie principale
voie d'effets
voie principale
voie principale
voie principale
voie centrale
voie d’effets
sur étagère/pied
au sol
au sol
sur étagère/murale
3
3
3
3
BC13
1 x 21MD20LB
BC13
BC13
2 x 17MD18LR2 2 x 21MD20LB
BC13
2 x 17MD18LR2
90
90
92
91
800-4 400
1 120-4 400
800-3 600
920-4 800
52-24 000
55-24 000
50-24 000
75-24 000
Impédance
nominale
(en ohms)
8
8
8
8
Impédance
minimale
(en ohms)
4,1
3,8
3,5
3,6
Puissance
nominale
(en Watts)
120
110
150
110
Puissance
crête
(en Watts)
840
770
1 000
770
Finition
standards
cerisier doré
santos
noir brillant
cerisier doré
santos
noir brillant
cerisier doré
santos
noir brillant
cerisier doré
santos
noir brillant
Dimensions
hxlxp
(en cm)
50 x 27 x 33
111 x 29 x 41
116 x 32 x 42
fonctionnement horizontal:
Efficacité
1W/1m
(en dB)
Filtre
(en Hz)
Réponse
en fréquences
(en Hz)
19 x 80 x 21
fonctionnement vertical:
80 x 19 x 21
Poids
(en kg)
15
30
35
13
Étant donné l’évolution des techniques mises en œuvre pour une fiabilité accrue et une recherche constante de qualité optimale, Cabasse se réserve le
droit d’apporter toutes modifications aux modèles présentés sur les fiches techniques ou les documents publicitaires.
Cab_ALTURA MC:Cab Altura MC notice 031108 01/12/09 12:11 Page9
e n g l i s h
Thank you very much for choosing Cabasse speakers.
Please read carefully these instructions before setting up your speakers.
SAFET Y INSTRUCTIONS
Explanation of graphical
symbols - The lightning flash
Power - The device shall only be connected to a source of
power compliant to the one described in this manual or on
relevant printed labels on the product. If you are not sure of the
type of power available, please contact your reseller or the
local power company.
with arrowhead symbol,
within an equilateral
triangle, is intended to alert you
to the presence of uninsulated “dangerous voltage” within the
product’s enclosure that may be of sufficient magnitude to
constitute a risk of electric shock to persons.
Power cords - The power cords must be laid out in such a way
that they cannot be walked on, pinched, bent under other
devices. Also pay special attention to the matching of the plugs
and the connection of the cord to the device.
The exclamation point within an equilateral triangle
is intended to alert you to the presence of important
operating and maintenance (servicing) instructions in the
literature accompanying the appliance.
Lightning - For better protection against lightning or if the
device must remain unused for long stretches of time, unplug
the power cord and antenna jack. This minimizes potential
damages due to lightning or line surges.
Instructions - Carefully read through all the safety and
Overloads - Avoid overloading the power plugs, extension
cords or power relays. This could result in fire or electric shocks.
operating instructions before switching on any device for the
first time.
Keep these instructions in mind - They will be
constantly referred to through this manual.
Pay special care to warnings - All the warning labels on
the product or warning notes in the user’s manual must be
followed.
Follow the instructions - Follow carefully all the installation and operation instructions.
Cleaning - Always take off the power cord before cleaning
the device. Do not use cleaning solvent, whether liquid or air
spray. Using a soft damp cloth is recommended.
Accessories - To avoid incidents, only use accessories expressly
recommended by Cabasse.
Water and moisture - The product shall not be used in
damp or wet locations, such as humid basements, next to a
bathtub, sink, swimming pool or any other similar conditions.
Carts and Stands - The appliance should be
used only with a cart or stand that is recommended by the manufacturer.
> Portable cart warning
Installation on a piece of furniture and stands Do not place this device on an unsteady surface, i.e. a stand,
tripod, table, shelf, etc. It may fall and cause serious injury to
a nearby child or adult.
Ventilation outlets - The device shall not be placed in a
position that restrains the operation of its fans. Avoid installing
the device on a bed, couch, blanket or other similar surfaces
that may prevent the appropriate air flow. Do not install the
device in a confined space, such as a book shelf or other piece
of furniture, that could prevent sufficient air from flowing
freely.
Plastic bags - Keep them away from children to prevent any
risk of suffocation.
Foreign bodies and liquids - Avoid letting foreign materials or liquids enter the device. They could cause fire or electric shocks. Never spill any liquid on the device.
Maintenance - Users must never attempt to maintain the
device on their own, except for those maintenance operations
described in this manual. Any task beyond regular user maintenance must be performed by qualified service operators.
Troubleshooting - You must unplug your device from the
power supply and have it checked by a qualified technician if:
■ The power supply or the plug is damaged.
■ Foreign bodies or liquid penetrated the device.
■ The device was exposed to dripping or splashing.
■ The device does not seem to work correctly under normal
operating conditions. Only operate the controls described in
this manual. Any other operation could damage the device
and require on-site visit of a qualified technician.
■ The device has fallen or its housing is damaged.
■ The performances of the device are strongly altered.
Spare parts - If spare parts are needed to repair the device,
make sure that the technician followed the manufacturer’s
recommendations or that the replacing parts feature the same
specifications as the original ones. Non-compliant parts can
result in multiple damages, including fire or electric shocks.
Checks - After any servicing of the device, ask the technician to perform appropriate testing to make sure that the
device works safely.
Exposure to high temperatures - The device should
be kept away from heating sources, such as radiators, heaters,
amplifiers or any other similar item likely to make the operating temperature rise excessively.
Applicable for USA, Canada or where approved for usage
Caution ! To prevent electric shock, match wide blade plug to wide
slot, insert fully.
Cab_ALTURA MC:Cab Altura MC notice 031108 01/12/09 12:11 Page10
e n g l i s h
IROISE 3 • EGEA 3 • BORA • AMBROSE 3
UNPACKING1
After opening the top carton flaps, fold the carton flaps right back,
remove the cardboard sheet, the bag of accessories and the foam halfshells protecting the speakers and the front grille. Then pull out the
grill and the speaker. We suggest you to retain the packing for future use.
These speakers are very heavy, so 2 persons minimum are
required to unpack and re-pack them.
POSITIONING
Speakers positioning
Our speakers have been designed to function in a vertical
position. Under these conditions, the polar response is most uniform2.
The Egea 3 and Iroise 3 models are delivered with a set of decoupling
spikes3. These accessories are to be screwed in the inserts on the base
of the speakers after having removed the caps (turn them anti-clockwise). Adjust the height of the spikes by using the M4 Allen key delivered with the speakers. These accessories ensure the stability of the
speaker while limiting resonance coming from certain types of grounds
like wood floors.
Speakers are delivered with a front grille to protect drivers.
It is possible to use them without this front grille, by gently pulling its
top end in order to cut off its magnetic link with the magnets to the
front panel. To get the grill back in place, position it in front of the speaker and approach it to the front panel until the magnetic link is effective. These operations must be carried out very smoothly in order
not to damage prematurely the veneer covering the magnets on the
front panel of the speaker4.
Powerful drivers generate magnetic fields that can extend beyond
the boundaries of the speaker cabinet. We recommend you keep
magnetically sensitive articles (TV, computer screen, computer discs,
audio and video tapes, swipe cards...) at least 1.5 ft (50 cm) away from
the speaker. Cabasse centre speakers or the ones marked «TV» are not
concerned with this, being magnetically shielded.
Positioning speakers in a room
In addition to vertical position of the speakers themselves, their location in the listening room, as well as the acoustical characteristics of
the room, are also very important. As it is impossible to indicate a typical location of speaker systems without a few tests, we suggest several general rules that are important to apply in order to obtain the best
listening results.
Ambrose 3 wall mounts (6H) (6V)
1) Prepare all the necessary parts and tools : remove the foam wedge from back of the cardboard drilling pattern, unpack the accessories (brackets and striking plates, damping parts), one PH2 Phillips
screwdriver, 6 mm screws, plugs and drilling equipment adapted to
the type of wall and a spirit level.
Be assured that the wall can handle the weight of the loudspeaker and that the selected plugs do suit with the wall characteristics.
2) Position the drilling pattern on the wall according to use mode (horizontal or vertical), check the up and down orientation, control the horizontality with the spirit level aligned on a line from the pattern and drill
4 holes through the pattern. Insert the plugs in the wall.
3) Screw the striking plates on the wall and place the rectangular
damping pads on each plate.
4) Assemble with the screws on the back of the speaker and a PH2
screwdriver the « s » shaped brackets according to the required mount
mode. See drawings (6H) for the horizontal one and (6V) for the
vertical one.
5) Connect the loudspeaker cable to the terminals. Ensure that polarities are correct (see ¶ Phase).
6) Position the « s » brackets of Ambrose 3 in front of the wall plates
and insert them deeply into them. 2 people must be involved for a safe
operation.
7) In case of horizontal use, lift the bottom of the speaker from the
wall and place both damping cylinders as shown on drawing (6H).
Optimal positioning for a 2.0 or stereo system6
■ For the ideal positioning of your speakers follow diagram.
If «d» is the distance between the two speakers, this distance must be
higher than 5 ft (1.5 m) and the two speakers must be at equal distance from the listening area which forms with them an equilateral
triangle.
■ The drivers must be directed towards the listening area.
■ The speakers should be located so that their diffusion follows the
longest dimension of the room.
■ Generally speaking it is better to avoid putting the speakers in the
corners of a room as this amplifies the low frequencies and tends to
enhance the room resonances. If possible it is better to place the
speakers at least 8 inches (20 cm) from the walls.
■ Moreover, in order to obtain a more accurate frequency
response, it is recommended to raise a compact speaker from 12 to
16 inches (30 to 40 cm) above the floor by placing them on stands.
The tweeters of the speakers must be roughly at the same height of
the listener’s ear when the listener is in sitting position.
■ No solid object or piece of furniture should be placed between the
speakers and the listener. An effect of mask, even partial
disturbs completely the sound reproduction as it attenuates
the high frequencies and also, in most cases, the midrange frequencies.
■ Placing the speakers in niches is not recommended. Unless designed
for this application, bookshelf placement will alter the frequency response of the speaker, especially in the low frequencies. If a bookshelf
location cannot be avoid, the speaker should be set up to minimize
various resonance, and the visible part of the grille must be outside
the niche.
WEEE MARK
Disposal of Wastes of Electrical & Electronic
Equipment (Applicable in the European Union)
This symbol on the product, consisting of the crossed-out wheeled bin, indicates that this product
shall not be treated as household waste. Instead it
shall be handed over to the applicable collection
point for the disposal of electrical and electronic
equipment at the end of life.
By ensuring this product is disposed of correctly, you will help prevent potential negative consequences for the environment and
human health, which could otherwise be caused by inappropriate
waste handling of this product. The recycling of materials will help
to preserve natural resources. For more detailed information about
recycling of this product, please contact your local city office, your
household waste disposal service or the shop where you purchased
the product.
Cab_ALTURA MC:Cab Altura MC notice 031108 01/12/09 12:11 Page11
e n g l i s h
CONNECTION
Cable section
SPECIFICATIONS & TECHNICAL DATA
S1
To get the full sonic potential of Cabasse loudspeakers and avoid power losses, the cables connecting the
speakers to the power amplifier must have the lowest
possible electrical resistance. To help you in choosing
the minimum correct cable gauge, follow diagram.
Maximal lenght
betweenrecommended
amplifier and loudspeakers
section
4.5 m
6m
7.5 m
9m
12 m
1.5 mm 2
2 mm 2
2.5 mm 2
3 mm 2
4 mm 2
Phase
In order to maintain the phase relationship and frequency balance of the loudspeaker system, both loudspeakers must be properly connected to the power
amplifier. When properly connected, the cones of the
drivers of both loudspeakers will move in the same
direction when driven by identical speakers will move in
the same signals. If the cones move in opposite directions, the resulting out of phase signals will create a
perceptible power loss, particularly in the low frequencies. The stereophonic message will also be degraded. Amplifier and speaker manufacturers typically
indicate connection polarity in one of two ways: red
and black or plus and minus. In either case, always
connect red or plus to red or plus and black or minus
to black or minus. Connections should be identical for
both channels. To check that the speakers are in correct
phase, switch the system to mono while music is being
played. if the amplifier does not have a phase inversion switch, it will be necessary to change over the
connections on one only of the loudspeakers. If in correct phase, the image should be distinctly located between the loudspeakers with a slight loss of bass and low
midrange level. If the image is confused and not centrally
located and there is a drastic loss of bass and low
midrange level, recheck your connections.
MAINTENANCE
The Altura cabinets are made of medium density fiber
panels, either veneered with natural wood and protected by 4 coats of varnish or protected by 5 layers of
high gloss lacquer. These hi-tech finish do not require any specific care. Use a wet cotton waste for cleaning,
or any cleaning device for wood or plastic.
BORA
main speaker
surround
EGEA 3
main speaker
IROISE 3
main xspeaker
AMBROSE3
main speaker
centre surround
bookshelf/
on stand
floorstanding
floorstanding
bookshelf
3
3
3
3
BC13
1x21MD20LB
BC13
2x17MD18LR2
BC13 2 x 21MD20LB
BC13 2 x17MD18LR2
90
90
92
91
Cross-over
points
(Hz)
800-4,400
1,120-4,400
800-3,600
920 - 4,800
Frequency
response
(Hz)
52-24,000
55-24,000
50-24,000
75 - 24,000
Nominal
impedance
(ohms)
8
8
8
8
Minimum
impedance
(ohms)
4.1
3.8
3.5
3.6
Power
handling
(Watts)
120
110
150
110
Peak
power
(Watts)
840
770
1 000
770
Standard
finish
golden cherry
santos
high gloss black
golden cherry
santos
high gloss black
golden cherry
santos
high gloss black
golden cherry
santos
high gloss black
Dimensions
hxlxp
50 x 27 x 33 cm
19.7 x 10.6 x 13 in
111 x 29 x 41 cm
43.7 x 11.4 x 16.2 in
116 x 32 x 42 cm
45.7 x 12.6 x 16.5 in
horizontal mount :
19 x 80 x 21 cm
7.5 x 31.5 x 8.3 in
vertical mount :
80 x 19 x 21 cm
31.5 x 7.5 x 8.3 in
15 kg
33 lb
30 kg
66 lb
35 kg
77 lb
13 kg
29 lb
Position
Ways
Drivers
complement
Sensivity
1W/1m
(dB)
Weight
Because of technical improvements already under way in our constant search for optimum quality, Cabasse reserves the right to modify all the models
presented in specification sheets, advertising materials and manuals without prior notice.
Cab_ALTURA MC:Cab Altura MC notice 031108 01/12/09 12:11 Page12
d e u t s c h
Vielen Dank, dass Sie Lautsprecher von Cabasse erworben haben. Damit Sie deren
Klangqualität in vollem Maße und über lange Zeit genießen können, empfehlen wir Ihnen,
die vorliegende Anleitung vor Inbetriebnahme Ihrer Lautsprecher sorgfältig zu lesen.
SICHERHEITSHINWEISE
Bedeutung der Symbole :
Der Blitz mit Pfeilspitze
in einem gleichseitigen
Dreieck dient als Warnhinweis
gegen nicht isolierte spannungsführende Teile innerhalb des
Gerätegehäuses, bei denen die anliegende Spannung so hoch ist,
dass eine Berührung der Teile lebensgefährlich sein kann.
Das Ausrufezeichen in einem gleichseitigen Dreieck dient als
Hinweis auf wichtige Bedienungs- und Instandhaltungsvorgänge.
Hinweise: Alle Sicherheits- Bedien-Hinweise vor der Inbetriebnahme aufmerksam durch lesen.
Behalten Sie diese Hinweise im Hinterkopf: Auf sie
wird in der gesamten Anleitung Bezug genommen..
Beachten Sie insbesondere die Warnungen: Alle Warnhinweise auf dem Produkt und in der Anleitung sind zu befolgen.
Beachten Sie die Hinweise: Befolgen Sie die Hinweise zur
Inbetriebnahme und zur Bedienung sorgfältig.
Reinigung: Vor jeder Reinigung ist der Gerätestecker zu ziehen.
Keine Flüssig-oder Sprüh-Reinigungsmittel verwenden. Am
besten eignet sich ein feuchtes Tuch.
Zubehör: Bitte nur vom Hersteller empfohlene Zubehörteile
verwenden. Ansonsten besteht Unfallgefahr.
Wasser und Feuchtigkeit: Das Gerät darf nicht an feuchten
Orten wie beispielsweise einem feuchten Keller, in der Nähe
einer Badewanne, eines Waschbeckens oder eines Swimmingpools benutzt werden.
Rollwagen und Standfüße - Die Geräte sollten
nur mit vom Hersteller empfohlenen Rollwagen oder
Standfüßen verwendet werden.
> Warnung für transportable Rollwagen
Aufstellung: Stellen Sie das Gerät nicht auf instabile Standfüße, Stative, Tische, Regale oder ähnliche Einrichtungen, von
denen es herabfallen und Verletzungen verursachen könnte.
Belüftung: Stellen Sie das Gerät so auf, das seine Lüftungsöffnungen immer frei bleiben. Nicht auf ein Bett, ein Sofa, eine
Decke o.ä. stellen, weil diese einen ausreichenden Luftstrom
verhindern könnten. Enge Bücherregale und ein geschlossener
Schrank sind keine geeigneten Aufstellungsorte, da dort eine
ausreichende Luftzufuhr nicht gewährleistet ist.
Stromversorgung: Das Gerät darf nur an eine Steckdose
angeschlossen werden, deren Spannung der auf dem Gerät
aufgedruckten entspricht. Wenn Sie nicht sicher sind, welche
Netzspannung ihre Haus-Stromversorgung aufweist, wenden
Sie sich bitte an Ihren Fachhändler oder Ihren Elektrizitätsversorgungsbetrieb.
Schutz der Netzanschlussleitungen: Die Netzanschlussleitungen dürfen nicht gequetscht, mit scharfen oder
spitzen Gegenständen belastet oder eingeklemmt werden (z.B.
von anderen, auf der Leitung stehenden Geräten).
Gewitter: Aus Sicherheitsgründen sollte das Gerät bei Gewitter
nicht benutzt werden. Wenn das Gerät längere Zeit nicht benutzt
wird, sollten Netzanschluss-Stecker und Antennenanschluss
aus den jeweiligen Dosen herausgezogen werden, um
Blitzschäden oder Beschädigungen durch Überspannungen
vorzubeugen.
Elektrische Überlastung: Verlängerungsleitungen oder
Steckdosen nicht überlasten. Feuer- und Stromschlaggefahr!
Fremdkörper und -flüssigkeiten: Darauf achten, dass
keine Fremdkörper oder Flüssigkeiten in das Gerät gelangen.
Feuer- oder Stromschlaggefahr!
Wartung und Pflege: Instandhaltungsarbeiten, die über die
in der Bedienungsanleitung beschriebenen Vorgänge hinausgehen, sind ausschließlich von qualifizierten Fachkräften
auszuführen.
Bei Problemen: In folgenden Fällen muss der Gerätestecker
gezogen und das Gerät von einer qualifizierten Fachkraft geprüft
werden:
■ Beschädigung an Netzkabel oder Netzanschluss.
■ Fremdkörper oder -Flüssigkeit im Gerät.
■ Das Gerät wurde mit Flüssigkeit bespritzt oder übergossen.
■ Das Gerät scheint unter normalen Betriebsbedingungen nicht
einwandfrei zu funktionieren. Betätigen Sie nur die in dieser
Anleitung beschriebenen Bedienelemente. Alle sonstigen
Eingriffe können das Gerät beschädigen oder Sie selbst gefährden
und sind deshalb von einer qualifizierten Fachkraft auszuführen.
■ Das Gerät ist heruntergefallen oder das Gehäuse wurde beschädigt.
■ Das Verhalten des Gerätes hat sich erheblich geändert.
Ersatzteile: Wenn bei einer Reparatur Teile ausgewechselt
werden müssen, vergewissern Sie sich, dass der Techniker die vom
Hersteller empfohlenen Ersatzteile oder solche Teile verwendet,
die die gleichen Eigenschaften aufweisen wie Originalteile.
Ansonsten besteht die Gefahr weiterer Defekte einschließlich
Feuer und Stromschlag.
Überprüfung: Nach jedem technischen Eingriff sollte die
Gerätesicherheit von einer qualifizierten Fachkraft kontrolliert
werden.
Wärmeeinwirkung: Das Gerät muss von Wärmequellen
wie Heizkörpern, Heizelementen, Verstärkern oder sonstigen
Objekten mit starker Wärmeentwicklung, fern gehalten werden.
Plastiktüten: Um eine Erstickungsgefahr zu vermeiden bewahren
Sie bitte die Verpackung weit entfernt von Kindern auf.
Cab_ALTURA MC:Cab Altura MC notice 031108 01/12/09 12:11 Page13
d e u t s c h
IROISE 3 • EGEA 3 • BORA • AMBROSE 3
AUSPACKEN
DER LAUTSPRECHERBOXEN 1
Öffnen Sie den Karton auf der Seite mit der Aufschrift und
biegen Sie dann die oberen Klappen zurück. Nehmen Sie
anschließend die Abdeckung aus dem Karton. Entfernen Sie nun
den Zubehör-Beutel und die Schaumhalbschale sowie die Frontbespannung. Nun können Sie den Lautsprecher herausnehmen. Wir empfehlen Ihnen, die Verpackung für eine spätere
Verwendung aufzubewahren und sie flach zu lagern.
Aus Gewichts- bzw. Sicherheitsgründen empfehlen wir
das Auspacken des Lautsprechers nur zu zweit vorzunehmen.
AUFSTELLUNG
DER LAUTSPRECHER
Aufstellung der Lautsprecher
Unsere Lautsprecher sind für den Betrieb im Stand entwickelt
worden. Nur so ist eine optimale Ausbreitung der Schallwellen
in allen Richtungen gewährleistet (2).
Die Egea 3 und Iroise 3 werden mit Spikes zur akustischen Entkopplung ausgeliefert (3). Diese müssen mit Hilfe des mitgelieferten M4-Inbusschlüssels in die dafür vorgesehenen Gewinde im Sockel der Lautsprecherbox eingeschraubt werden. Hierfür
bitte vorher die Schutzkappen im Sockel abschrauben. Die
Spikes ermöglichen einen sicheren Stand und mindern außerdem Schwingungen und Resonanzen, die bei bestimmten
Fussböden, speziell Holzböden, entstehen.
Unsere Lautsprecher werden mit einer abnehmbaren Bespannung ausgeliefert. Auch ein Betrieb ohne Bespannung ist möglich.
Zum Abnehmen der Bespannung zieht man diese im oberen
Bereich vorsichtig ab, um die magnetische Verbindung zur
Lautsprecherbox zu lösen. Der Frontrahmen lässt sich wieder
anzubringen, indem man ihn der Vorderseite der Lautsprecherbox nähert, bis die magnetische Verbindung wieder
hergestellt ist. Dabei sollten Sie vorsichtig vorgehen, um an
den Furnierstellen auf der Front, unter denen die Magnete
sitzen, keine Druckstellen entstehen zu lassen (4).
Die kraftvollen Magnete unserer Lautsprecherchassis bewirken
ein Magnetfeld, das über die Abmessungen des Gehäuses
hinausreicht. Stellen Sie deshalb Geräte, die empfindlich auf
Magnetfelder reagieren wie zum Beispiel Fernseher, PC-Monitoren, Disketten, Magnetbänder sowie Chipkarten mit Magnetstreifen, mit mindestens 50 Zentimetern Abstand zu den Lautsprechern auf. Bei unseren Center-Lautsprechern ist das nicht
nötig, da diese magnetisch abgeschirmt sind.
Optimale Aufstellung der Lautsprecher
im Hörraum
Noch wichtiger als der sichere Stand der Lautsprecher ist ihre
Positionierung im Hörraum sowie die akustischen Eigenschaften
des Raumes selbst. Hier geben wir Ihnen einige allgemeine
Regeln an die Hand, um die Positionen in Ihrem Raum zu
finden, an denen die Lautsprecher ihr volles Potential entfalten
können.
Wandmontage des Ambrose 3 (6H) (V)
1) Das benötigte Material zusammenstellen: die Bohrschablone aus Pappe (vorher den angeklebten Schaumstoffkeil
abnehmen), die in der Verpackung mitgelieferten Zubehörteile (Winkel, Befestigung, Schalldämpfplättchen), einen Kreuzschlitzschraubenzieher PH2, Schrauben (Durchmesser 6 mm),
Dübel und einen der Wandart entsprechenden Bohrer, eine
Wasserwaage.
ACHTUNG ! Stellen Sie sicher, dass die Wand das
Gewicht des Lautsprechers trägt und dass die gewählte Wandhalterung dem Zweck entspricht.
2) Die Schablone an die gewünschte Stelle halten, entsprechend der gewählten Position (horizontal oder vertikal), dabei
unbedingt die Richtung oben - unten berücksichtigen, die Senkrechte bzw. Waagerechte mit der Wasserwaage längs einer
der Linien auf der Schablone kontrollieren und die 4 Löcher
direkt durch die Schablone bohren. Die passenden Dübel einstecken.
3) Die Wandhalterungen mit den passenden Schrauben anbringen und die mitgelieferten rechteckigen Schalldämpfplättchen
aufkleben.
4) Die S - Form Halterungen mit den mitgelieferten Schrauben
und einem PH2 Schraubenzieher auf der Rückseite des Lautsprechers anbringen, gemäß Zeichnung (6H) für horizontale
Befestigung und gemäß Zeichnung (6V) für vertikale Befestigung.
5) Den Lautsprecher mit dem Lautsprecherkabel verbinden
unter Berücksichtigung der Polarität.
6) Den Ambrose 3 vor die Wandbefestigung halten und die 2
S - Form Halter in die Wandbefestigung einführen. Für die
Montage werden 2 Personen benötigt.
7) Im Falle einer horizontalen Anwendung, den unteren Bereich des Lautsprechers von der Wand abstehen lassen und die 2
selbstklebenden zylindrischen Keile wie auf Zeichnung (6H)
anbringen.
Optimale Aufstellung für ein 2.0oder Stereo-System 5
Eine optimale Aufstellung zeigt die Zeichnung. «d», der
Abstand zwischen den beiden Lautsprechern, sollte größer als
1,5 Meter sein. Vom Hörplatz sollten beide Boxen gleich weit
entfernt sein wie voneinander: Sie bilden dann mit dem
Hörplatz ein gleichseitiges Dreieck.
■ Die Lautsprecher sollten selbstverständlich zur Hörzone hin
ausgerichtet werden.
■ Die Lautsprecher sollten vorzugsweise so platziert werden, dass
sie in Richtung der größten Abmessung des Raumes abstrahlen.
■ Grundsätzlich sollte man es vermeiden, die Lautsprecher in
Raumecken aufzustellen, da dies die Wiedergabe der Bässe
ungebührlich akzentuiert und Raumresonanzen verstärkt anregt.
Wenn möglich stellen Sie die Lautsprecher mindestens
20 Zentimeter von allen Wänden entfernt auf.
■ Um bei Kompaktboxen eine ausgewogene Wiedergabe zu
erzielen, ist es empfehlenswert, diese auf Lautsprecherstän■
Cab_ALTURA MC:Cab Altura MC notice 031108 01/12/09 12:11 Page14
d e u t s c h
dern mindestens 30 bis 40 Zentimeter über den Boden zu platzieren. Die Hochtöner sollten sich dann etwa in Ohrhöhe des
sitzenden Hörers befinden.
■ Kein Mobiliar (Tisch, Sessel, usw.) oder ein anderes solides
Objekt darf sich zwischen Lautsprechern und Hörern befinden. Selbst teilweises Abdecken der Lautsprecher stört die Wiedergabe deutlich, denn dadurch werden die hohen und meist
auch die mittleren Frequenzen stark abgeschwächt.
■ Das Aufstellen der Lautsprecher in Raumnischen ist ebenfalls
nicht zu empfehlen, da auch dann die Wiedergabe-Eigenschaften insbesondere im Bassbereich verändert werden. Falls
eine Aufstellung nicht anders möglich ist, sollte man darauf achten, die Box nicht zu tief in der Nische aufzustellen, der sichtbare Teil der Frontbespannung sollte sich außerhalb der Nische
befinden.
WEEE KENNZEICHNUNG
Entsorgung von Elektro- und ElektronikAltgeräten (Anwendbar in der Europaïschen
Union)
Dieses auf dem Produkt angebrachte
Symbol, eine durchgestrichene Mülltonne auf
Rädern, bedeutet, dass dieses Produkt nicht
als Haushaltsmüll entsorgt werden darf. Es
muss stattdessen einer Sammelstelle übergeben werden, die auf die Entsorgung von
Elektro- und Elektronik-Altgeräten eingerichtet ist. Indem Sie
dafür sorgen, dass dieses Produkt auf geeignete Weise entsorgt wird, helfen Sie, die potentiellen negativen Folgen für
Umwelt und Gesundheit, die Folge einer unsachgemäßen
Entsorgung wären, zu vermeiden. Die Wiederverwendung der
im Gerät vorhandenen Materialien hilft, natürliche
Ressourcen zu bewahren. Genauere Informationen über die
Entsorgung
dieses
Produktes
halten
Ihre
Gemeindeverwaltung,
Ihr
zuständiges
Müllverwertungsunternehmen oder das Geschäft, in dem Sie
das Produkt gekauft haben, für Sie bereit.
ANSCHLUSS
S1
Querschnitt des Kabels
Um die Qualität von Ihren Lautsprecherboxen voll auszuschöpfen und Leistungsverluste zu vermeiden, sollten Sie den
elektrischen Widerstand der Anschlusskabel zwischen Box und
Verstärker so gering wie möglich halten. Um Ihnen bei der
Wahl des Kabelquerschnitts zu helfen, haben wir die folgende
Tabelle für sie zusammengestellt:
Maximaler Abstand
Verstärker/Box
Mindestquerschnitt
4,5 m
6m
7,5 m
9m
12 m
1,5 mm 2
2 mm 2
2,5 mm 2
3 mm 2
4 mm 2
Phase
Beim Anschluss der Lautsprecher an einen Verstärker sollte
man auf die richtige Polung achten. Beide Lautsprecher müssen
gleich gepolt an den Verstärker angeschlossen werden, da sonst
die räumliche Wiedergabe stark leidet und die Basswiedergabe
abgeschwächt wird. Es gibt bei Lautsprechern und Verstärkern
zwei gängige Arten, die Polkennzeichnung vorzunehmen:
Entweder ist eine der beiden Klemmen rot und die andere schwarz
oder - analog dazu - eine Klemme mit „+“ und eine Klemme mit
„-“ gekennzeichnet. In aller Regel ist bei einem Lautsprecherkabel
eine Ader mit einer Kennzeichnung versehen. Diese gehört
dann an die rote oder die mit „+“ gekennzeichnete Klemme. Die
andere Ader wird an die schwarze oder die mit „-“ gekennzeichnete
Klemme angeschlossen.
PFLEGE
Die Gehäuse der Altura MC-Serie werden entweder mit einem
hochwertigen Echtholzfurnier, das von vier Lackschichten
geschützt wird, oder mit einer Fünfschicht-Hochglanzlackierung
gefertigt. Diese hochwertigen Oberflächen benötigen keine
spezielle Pflege und können mit einem feuchten Tuch gesäubert
werden.
Wenn Sie unsere Ratschläge für Anschluss und Aufstellung
beachten, werden Ihre Lautsprecher Sie jederzeit mit perfektem
Klang erfreuen.
Cabasse entwickelt seine Geräte permanent weiter, um die bekannt
große Zuverlässigkeit und hohe Klangqualität weiter zu verbessern.
Deshalb behält sich Cabasse das Recht vor, an allen in den technischen
Unterlagen, Prospekten oder Bedienungsanleitungen gezeigten Geräten ohne vorherige Benachrichtigung Änderungen vorzunehmen
Cab_ALTURA MC:Cab Altura MC notice 031108 01/12/09 12:11 Page15
d e u t s c h
TECHNISCHE DATEN
BORA
Haupt
EGEA 3
Haupt
IROISE 3
Haupt
Bauart
Kompaktbox
Standbox
Standbox
AMBROSE 3
Haupt
Center
Surround
Regal / Wand
Wege
3
3
3
3
BC13
1 x 21MD20LB
BC13
2 x 17MD18LR2
BC13 2 x 21MD20LB
BC13 2x17MD18LR2
Wirkungsgrad
1W/1m
(dB)
90
90
92
91
Trennfrequenzen (Hz)
800-4400
1120-4400
800-3600
920 - 4800
52-24000
55-24000
50-24000
75 - 24000
8
8
8
8
ImpedanzMinimum
(ohms)
4,1
3,8
3,5
3,6
Nennbelastung
(Watts)
120
110
150
110
Spitzen
belastung
(Watts)
840
770
1 000
770
Chassis
Übertragungs
bereich
(Hz)
NennImpedanz
(ohms)
Gehäuse
Aussführungen
Kirschbaum
Santos
Hochglanz schwarz
Abmessungen
H x B x T (cm)
50 x 27 x 33
111 x 29 x 41
116 x 32 x 42
horizontale Position
19 x 80 x 21
vertikale Position
80 x 19 x 21
15
30
35
13
Gewicht
(kg)
Kirschbaum
Kirschbaum
Santos
Santos
Hochglanz schwarz Hochglanz schwarz
Kirschbaum
Santos
Hochglanz schwarz
Cabasse SA - 210, rue René Descartes - BP 10 - 29280 Plouzané
Tel +33 (0)2 98 05 88 88 - Fax +33 (0)2 98 05 88 99
www.cabasse.com - [email protected]
NOT0262
Cab_ALTURA MC:Cab Altura MC notice 031108 01/12/09 12:11 Page16