1
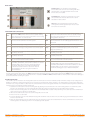
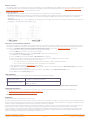
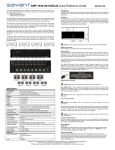
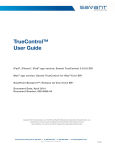
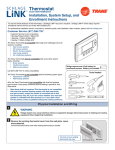
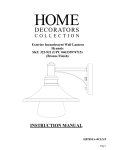
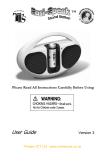
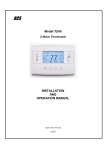
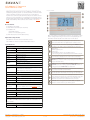
For Product Info
SST-W100 Wi-Fi Thermostat
Quick Reference Guide
The Savant Wireless Thermostat (SST-W100) is a Wi-Fi® enabled
digital thermostat designed to control a Heating, Ventilation and Air
Conditioning (HVAC) system. Use this document as a reference when
opening, installing, powering, and connecting to a local wireless
network. Once connected, the SST-W100 can join the Savant Control
system. For more information on configuring the thermostat, refer to
the SST-W100 Deployment Guide (009-0802-xx) and SST-W100 User
Guide (009-0957-xx). All documents can be found on the Savant
Portal.
Front View
Box Contents
(1) SST-W100 Thermostat
(1) Quick Reference Guide (this document)
(1) Installation Kit
(2) Drywall Anchors
(2) #6 x ¾ in self tapping screws
(1) Wire Labels (Sheet of wire label stickers)
Each of the buttons are multipurpose buttons. The function of each
button changes depending on the screen currently displayed. The
information below describes the main screen shown above.
Optional Components
SST-TEMP1-xx - Remote Indoor Temperature Sensor
The Outside temperature displayed is retrieved from the
remote sensor RS2 when configured as an outdoor sensor.
SST-OTEMP1-xx - Remote Outdoor Temperature Sensor
Specifications
Displays local time. The time is set through the MENU button.
Environmental
Temperature
32° to 104° F (0° to 40° C)
Humidity
10% to 90% Relative Humidity (non-condensing)
The status of the HVAC system is displayed here. From the
image above:
• HVAC system is Off
• Fan is Off
• Hold indicates there is no schedule running
• TCP is being used to communicate with the Wi-Fi network.
Dimensions with Faceplate
Height
3.96 in (10.06 cm)
Width
5.775 in (14.67 cm)
Depth
0.58 in (1.47 cm)
Weight
The temperature displayed is the local indoor temperature
Pressing the MENU button for the first time opens the SET
CLOCK menu. Once the clock is set, pressing the menu button
will open the main menu.
Net - 0.5 lb (0.23 kg)
Shipping - 2.0 lb (0.91 kg)
MODE button selects Off, Heating, Cooling, or Auto.
Heat Mode controls a heating system, Cool Mode controls a
cooling system, and AUTO Mode controls both.
Power
Supply
24V AC. Connect to terminals 24C and 24RH on
terminal block on back panel.
Note: Requires both R and C from HVAC system.
Max. current draw 200 mA
G
The Relative humidity displayed is retrieved from a humidity
sensor that is internal to the SST-W100.
H
The high and low setpoints are displayed. To modify each,
press the up/down arrow button to the right of each setpoint.
I
The up/down arrow buttons are multipurpose buttons. In the
screen shown, pressing the up or down arrow button will open
the high and low setpoint windows. In other windows, the
buttons are used to move up and down a list of items.
J
Fan Mode can be changed between On, Auto, and Cycle.
Select the correct mode for your HVAC system.
Cable Requirements
Power
#18 AWG
HVAC
#18 AWG Thermostat Wire (solid)
Remote Sensors
#24 AWG (Cat 5) 500 feet (152 m) maximum
Compliance
Safety and
Emissions
FCC Part 15 | UL Class 2
For more details, refer to the Regulatory section
RoHS
Compliant
Wi-Fi®
IEEE
802.11 b/g
Security
WPA1™, WPA2™, WPA1™ + WPA2™, Ad hoc, Open
Connections
Two 8-position screw down connectors mounted to inside of back
panel. Each terminal is marked. Refer to table for a description of
each terminal.
Minimum Supported Release
Savant OS
da Vinci 5.2
SST-W100 | 009-1309-00 | 141216
Copyright © 2014 Savant Systems, LLC
1
of 4
45 Perseverance Way, Hyannis, MA 02601
savant.com | 508.683.2500
Rear Panel
Mounting Slots - The SST-W100 comes with wall
anchors and screws to mount to an existing wall. Place
the back panel on the wall and mark where the wall
anchors are to be installed.
Terminal Blocks - All wiring is connected to one of the
two terminal blocks. Refer to table below for a brief
description of each position.
Wire Slot - This rectangular slot is where the wires
coming from the HVAC system and/or remote sensors
are fed into the thermostat.
Terminal Block Connections
24RC
Connect the 24V AC hot wire from the transformer on HVAC
system to the 24RC terminal. When there is a separate heating
and cooling system, the wire from the transformer on the cooling
system is wired here. **See Note below.
24C
Connect the common wire from the transformer on HVAC
system to the 24C terminal. When there is a separate heating
and cooling system transformer, the common wire from the
cooling system is wired here.
G
Connect to the fan terminal on the HVAC system.
24RH
When there is a separate heating and cooling system, the wire
from the transformer on the heating system is wired here. **See
Note below.
Y1
Connect to the 1st stage cooling terminal on the HVAC system
W1
Connect to 1st stage heating terminal on the HVAC system.
Y2
Connect to the 2nd stage cooling terminal on the HVAC system
W2/O
Connect to 2nd stage heating terminal on the HVAC system. If
the system is a Heat Pump type system, connect to the
changeover terminal (O).
RS2
Remote Sensor 2 - Connect to remote temperature sensor RS2.
No polarity is observed.
RS1
Remote Sensor 1 - Connect to remote temperature sensor RS1.
No polarity is observed.
RS2
Remote Sensor 2 - Connect to remote temperature sensor RS2.
No polarity is observed.
RS1
Remote Sensor 1 - Connect to remote temperature sensor RS1.
No polarity is observed.
RSC
If there is a shield on the cable that connects to remote sensor
RS2, connect that shield to the RSC terminal.
RSC
If there is a shield on the cable that connects to remote sensor
RS1, connect that shield to the RSC terminal.
A1
• Auxiliary Relay 1 can turn external equipment such as a
humidifier, dehumidifier, and external vent damper on and off.
• Auxiliary Relay 1 can be turned on and off according to
workflows and triggers set up in RacePoint Blueprint.
• Can also be used to control the speed of an external
dehumidification fan when using an air handler for
dehumidification.
A2
• Auxiliary Relay 2 can turn external equipment such as a
humidifier, dehumidifier and external vent damper on and off.
• Auxiliary Relay 1 can be turned on and off according to
workflows and triggers set up in RacePoint Blueprint.
**Note: When connecting the power wires to the thermostat, if there is a separate transformer for the cooling and heating systems, the transformer
from the cooling system gets wired to the 24RC terminal and the transformer from the heating system gets wired to 24RH terminal. In this scenario,
jumper JP1 located on the PCB circuit board must be cut to separate the 24RH and 24RC terminals. Failure to cut this jumper could result is damage to
the circuit board when powering the system.
Install Thermostat
The SST-W100 can be mounted to an existing wall. Position the thermostat on an interior wall that is away from direct sunlight or any heating ducts or
radiators. If replacing an existing thermostat, prior to removing the old thermostat, switch off power to the heating and/or cooling system. During the
removal process, it is good practice to label each wire removed with the reference designator marked on the old thermostat being removed. Follow the
instructions below to install the SST-W100 thermostat.
1. Separate the thermostat from its rear mounting plate by grasping the top and bottom of the rear mounting plate in one hand and top and
bottom of the thermostat in the other hand. Pull halves apart by rocking the top and bottom of each half until they separate.
2. Position the rear mounting plate onto the wall where the thermostat will be located. Verify that writing next to each 8-position terminal block
can be read. If not, the rear panel is upside down.
3. With a pencil, mark the two slots in the rear mounting plate onto the wall.
4. Drill a ¼ inch hole on each mark.
5. Insert the wall anchor into the holes drilled and using a #2 screwdriver rotate the anchor into the wall using a gentle forward pressure until the
anchor is flush with wall.
6. Place the thermostat base onto the wall. Pull the wires out through the center cutout located between the two terminal blocks. Screw the rear
mounting plate to the wall using the #6 x ¾ in self tapping screws supplied.
SST-W100 | 009-1309-00 | 141216
Copyright © 2014 Savant Systems, LLC
2 of 4
45 Perseverance Way, Hyannis, MA 02601
savant.com | 508.683.2500
Wiring Diagrams
The wiring diagrams below display a few wiring configurations. For additional wiring diagrams, refer to the SST-W100 Wireless Thermostat Deployment
Guide (009-0802-xx) on the Savant Portal.
Standard Gas/Electric One Stage Heating/Cooling
Heat Pump Single Stage
SST-W100 | 009-1309-00 | 141216
Copyright © 2014 Savant Systems, LLC
Standard Gas/Electric Two Stage Heating/Cooling
Heat Pump Two Stage
3 of 4
45 Perseverance Way, Hyannis, MA 02601
savant.com | 508.683.2500
Remote Sensors
The SST-W100 supports connecting up to two remote temperature sensors (SST-TEMP1 and/or SST-OTEMP1). These sensors are wired to the SST-W100
using #24 AWG Cat 5 cable. The table below displays the configurations supported through software. Refer to the SST-W100 Wireless Thermostat
Deployment Guide (009-0802-xx) connecting each of the sensors.
Sensor Descriptions
Internal Sensor - The thermostat has an internal temperature sensor mounted on the PCB circuit board.
RS1 (Remote Sensor 1) - RS1 is hardwired to the terminal block on back panel and is typically mounted in a location away from the thermostat. The
RS1 connection is for internal/indoor (SST-TEMP1) use only and when attached, this disables the internal sensor. RS1 cannot be configured for
outdoor use.
RS2 (Remote Sensor 2) - This sensor is hardwired to the terminal block on back panel of the SST-W100 and can be used as either an internal/indoor
(SST-TEMP1) or external/outdoor (SST-OTEMP1) sensor.
Connect to a Local Wireless Network
The SST-W100 integrates into the Savant Control system through the local wireless network. The SST-W100 can connect to a wireless network through
a few different methods. The information below describes how to join a wireless network using the SSID of the network. The remaining methods are
described in the SST-W100 Wireless Thermostat Deployment Guide (009-0802-xx). Click the link in Additional Information section below.
1. Press any button on front panel of the SST-W100 to light up LCD for viewing.
2. Press the MENU button from the lower left side of the display.
3. From the Menu Selection screen, scroll to the Wi-Fi Setup selection using the arrow buttons.
4. Press Select to open the Wi-Fi Setup menu.
5. Scroll to the SSID selection and press Select. A Wi-Fi Networks menu appears.
6. Scroll to the local Wi-Fi network where the SST-W100 will be connected. Press the Join button to join this network.
7. If this network is secured, enter the passphrase for the network.
•
•
The up/down buttons scroll through the upper and lowercase letters, numbers, and special characters.
The < > arrows on the LCD display move to the next character in the passphrase.
Refer to the table of supported SSID Guidelines section below.
8. Select Done once the passphrase has been entered. The SST-W100 will connect to the Wi-Fi network. A Wi-Fi Network Status screen will open
displaying the connection information.
9. The SST-W100 is now connected to the local wireless network. Select Done to exit the Wi-Fi Network Status screen.
10. Select Done to exit the Menu Selection screen.
SSID Guidelines
Savant Wi-Fi products can connect to Wi-Fi networks that meet the following SSID guidelines:
Maximum SSID Length:
32 characters - Firmware 2.13.00 or later
16 characters - Firmware prior to 2.13.00
Maximum Passphrase Length:
WPA/WPA2: 8-63 characters
WEP: 10-26 characters
For a list of supported characters, refer to remote sensor section of the SST-W100 Wireless Thermostat Deployment Guide (009-0802-xx).
Additional Information
For additional information on how to program the SST-W100, refer to the following documents which can be found on the Savant Portal
• SST-W100 Wireless Thermostat Deployment Guide (009-0802-xx)
• Savant Wireless Thermostat User Guide (009-0957-xx)
Knowledge Base > Savant Hardware > Climate Control
Regulatory
The following statements are applicable to the SST-W100:
This device complies with Part 15 of the FCC Rules. Operation is subject to the following two conditions: (1) this device may not cause harmful interference,
and (2) this device must accept any interference received, including interference that may cause undesired operation. Any changes or modifications of this
product, not approved by manufacturer will void the user’s authority to operate the equipment.
This device complies with Industry Canada license-exempt RSS standard(s). Operation is subject to the following two conditions: (1) this device may not
cause interference, and (2) this device must accept any interference, including interference that may cause undesired operation of the device.
Le présent appareil est conforme aux CNR d'Industrie Canada applicables aux appareils radio exempts de licence. L'exploitation est autorisée aux deux
conditions suivantes: (1) l'appareil ne doit pas produire de brouillage, et (2) l'utilisateur de l'appareil doit accepter tout brouillage radioélectrique subi,
même si le brouillage est susceptible d'en compromettre le fonctionnement.
SST-W100 | 009-1309-00 | 141216
Copyright © 2014 Savant Systems, LLC
4 of 4
45 Perseverance Way, Hyannis, MA 02601
savant.com | 508.683.2500