1
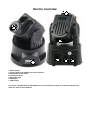
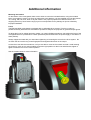
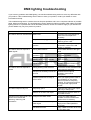
ERO 540 MKII
RGB LED movinghead
User manual
Safety precautions
WARNING!
Always keep this device away from moisture and rain! Hazardous electrical shocks may occur!
WARNING!
Only connect this device to a matching power outlet. This device is intended to work on a
specified AC currency. Connecting this device to power outlets with other voltages may result in
permanent damage and possible hazardous situations, such as fire or electrical shocks!
This unit must be operated by, or under the supervision of an adult. This device is not suitable for children.
Do not look directly into the beam from a short distance. This may cause serious injury to the eyes. Ayra is
not responsible for any injuries caused by (incorrect) use of this device.
Installation requirements:
- Always check the power supply to which you want to connect the device. If the voltage requirements do not
meet, do not connect the device as this may cause serious damage.
- This device must be installed by a professional technician, in a standing or hanging position. Only use the
included mounting bracket if you want to position the unit to a ceiling or truss system.
- When installed in a hanging position, always install the included mounting eye
- When installed in a hanging position above your audience, this unit MUST be secured by using a safety
cable, capable of holding 10x the weight of this device.
- The unit is designed to be installed with a halfcoupler or G-clamp, by using the included mounting bracket.
Direct installation with proper bolts is also possible.
- Make sure there are no flammable objects in the direct environment of the device.
- Do not block the beam-exit and fan.
- Keep a minimum distance of 0.25 meter from any walls to provide sufficient cooling.
- Make sure the beam-exit and fan are not blocked by any objects in the near environment.
- Always use the included power supply. Contact your local dealer for a replacement unit if necessary.
Maintenance and protection
- Keep the unit away from dusty environments, as this may have negative effects on the fan-cooling system
and optics. Clean the optics and fan with a small, soft brush and vacuum cleaner when needed. Clean the
housing of the unit with a damp cloth. WARNING: Always disconnect the unit from the power supply when
cleaning the unit. Reconnect the unit only when any moist on the fixture has evaporated completely.
- Do not switch the power on and off frequently, as this may cause serious damage to the unit.
- Avoid heavy shocks and collision during transport and use, as this may cause damage to the LED light
source, electronic circuit, optics and housing.
- Keep the device away from moisture, rain, water or any liquids as this may cause a short circuit and/or
electric shocks. If any liquid enters the unit, power supply or housing of the unit, disconnect the unit
immediately and do not reconnect the power supply. Contact your local dealer or technician to inspect the
unit for any damage.
Box contents
Box contents
1x ERO 540 MKII movinghead
1x power cable
1x installing bracket
1x small bag with mounting hardware
Unit and accessory inspection
- Always use the supplied power cable to connect the unit to a power supply. If the cable appears broken or
has visible damage, do not use it.
- If the unit is not going to be used for a longer period of time, disconnect it from the power supply and store it
in a dust-free environment.
- Always check the unit for possible damage before use. If you suspect that something is wrong with the unit,
do not connect it to a power source! When you suspect that your unit is broken or damaged, contact your
local dealer or a certified technician to inspect the unit.
- When your device does not generate any light, do not look directly into the lens. When the fixture suddenly
produces a beam, it may cause injury to your eyes.
Device overview
3
1
4
5
2
6
7
1. Beam output
2. Control panel with display and menu-functions
3. Adjustable manual focus
4. Cooling fan head
5. IEC power inlet
6. DMX input
7. DMX output
This unit is equipped with an adjustable focus, which makes it possible to sharpen the beam when
used at a small or large distance.
Setting up the device
To activate the unit, connect the included power supply to the unit and a suitable 230V, 50 Hz power outlet.
The unit will activate directly after it is plugged in to a wall outlet or other power source.
Give the movinghead time to calibrate the stepping motors, which are used to determine the position of the
head. You may hear and see some shaking, which is normal. The stepping motors use an end point to
determine the beginning and end of their movement. The displays shows the current status. After calibration,
the movinghead will start the previously used mode, but by default it is usually set to DMX mode.
The status of the movinghead is shown on the display (which automatically shuts off after a few seconds of
inactivity). The shown values determine the current status and can be changed by pressing the buttons on
the control panel. The four buttons each have their own function, for easy navigation.
Press the ‘ESC’ button to switch modes, so you can easily select the built-in automatic, music controlled or
DMX mode.
The several operation modes and settings are set by using the buttons beneath the display. The following
codes represent the different features:
Mode 1: d001 – d512 (DMX mode)
d001 is set as the default DMX address, it is possible to select a value between 001 and 512. Press Enter to
confirm the new set address.
Mode 2: nStA / nStS / SLAv
- nStA: Master auto mode
- nStS: Master music controlled mode
- SLAv: Slave mode
Select the right mode by using the up and down buttons, press Enter to confirm.
To let the fixtures work in master/slave mode, connect several fixtures with standard XLR male – female
cable. Set the first fixture in line to 'Master' (sound activated or automatic) and the following fixtures to
'Slave'. The slaves will mimic the signal of the master unit. It is possible to invert the pan and tilt modes for all
connected slaves seperately, for synchronized shows.
Mode 3: Pan / rPan
The default setting is a normal pan mode, but it is possible to invert the pan values internally. This way,
several fixtures can be set to the same mode, but the movement of pan can be inverted for synchronized
shows. rPan inverts the values. Press Enter to confirm.
Mode 4: tiL / rtiL
The default setting is a normal tilt mode, but as stated above it is possible to invert the values for
synchronized shows. Press Enter to confirm.
Mode 5: dIs / rdIs
The default setting is a normal shown display, but when installing the fixture upside down (for example, in a
truss system), you may wish to invert the display character mode. This way, it is easier to read the several
statuses. Press Enter to confirm.
DMX mode
After calibration the display shows ‘ D001’, which indicates that the unit is currently on DMX-mode, with
DMX-channel 1 as the starting address. A small LED next to the last digit states wheter the unit is receiving
DMX.
Changing the DMX starting address is done by pressing the ‘up’ and ‘down’ buttons on the control panel.
You can select a value between 1 and 512.
The ERO 540 has two DMX modes, one for basic control (5 channels), the other for extended control (13
channels).
The following table shows the DMX charts, with the several channels and a function for each channel.
5-CH DMX mode
DMX values
Description
1
0 – 255
Pan
2
0 – 255
Tilt
3
0 – 7: Shutter closed
8 – 134: Dimmer 0-100%
135 – 239: Strobe slow-fast
240 – 255: Shutter open
Dimmer/Shutter
4
0 – 127: Color macro
Color
128 – 256: Clockwise and counterclockwise rainbow feature
5
0 – 127: Gobo selection
128 – 191: Clockwise gobo scroll
192 – 255: Counter-clockwise
scroll
Gobo
DMX values
Description
1
0 – 255
Pan
2
0 – 255
Pan fine
3
0 – 255
Tilt
4
0 – 255
Tilt fine
5
0 – 255: Fast – Slow
Pan and tilt speed adjustment
6
0 – 7: Shutter closed
8 – 134: Dimmer 0-100%
135 – 239: Strobe slow-fast
240 – 255: Shutter open
Dimmer/Shutter
7
0 – 255: 0-100%
Red
8
0 – 255: 0-100%
Green
9
0 – 255: 0-100%
Blue
10
0 – 255: 0-100%
Color macro
11
0 – 255: Slow – Fast
Color macro speed adjustment
12
0 – 127: Auto mode
Working mode
128 – 255: Sound controlled mode
13
0 – 12: Gobo 1
13 – 25: Gobo 2
26 – 38: Gobo 3
39 – 51: Gobo 4
52 – 65: Gobo 5
66 – 77: Gobo 6
78 – 90: Gobo 7
91 – 103: Gobo 8
104 – 116: Gobo 9
117 – 127: Gobo 10
128 – 191: Clockwise gobo scroll
192 – 255: Counter-clockwise
scroll
13-CH DMX mode
Gobo
Additional information
Mounting the bracket
On the bottom of the movinghead, there are two holes to mount the included bracket, using the included
bolts. It is possible to mount a G-clamp or halfcoupler to this bracket. It is also possible to mount the bracket
on a ceiling, wall, bar, floor, desk or any flat surface. Use proper equipment to install this fixture, as a
dropping fixture may cause severe injury! Ayra is not responsible for any damage or injuries caused by
improper installation.
Focus
The ERO 540 MKII movinghead is equipped with an adjustable focus system. This focus system is
positioned directly below the lens and makes it possible to sharpen the projection of gobos and spot figures.
To adjust the focus for optimal projection results, you need a Phillips screwdriver. Only adjust the focus of the
movinghead when it is positioned in a static positioned (disconnected from the power supply or via DMX in a
static position).
Always support the head with your hand when tightening or loosening the screw for the focus system. Do
not touch the lens as this may cause fingerprints and negative influences on the output.
Loosen the screw with the screwdriver, until you are able to move the focus back and forth. Avoid loosenig
the screw too much as it is spring loaded. Choose the right position for the focus and after that, tighten it
again to fixate the focus in the current position.
See the images below for more information.
DMX lighting troubleshooting
If you have any problems with DMX lighting, consult this troubleshooting section to solve any difficulties with
your product. If this troubleshooting section does not solve your problem, contact your dealer for more
information and help.
This troubleshooting section contains the most frequent problems and is not a complete collection of possible
faults, defects and solutions. The troubleshooting section applies for DMX controllers, DMX cabling and DMX
lighting fixtures. It is possible that not all described problems, causes and solutions apply to your situation as
product details may vary from product to product.
Problem
Possible Cause
Solution
The fixture does not activate itself
Blown fuse
Check the fuse compartiment for
blown fuses and replace it if
necessary.
No power cable plugged in
Plug in the power supply to a
matching power outlet
Power switch is not in the ON
position
Turn on the device by switching
the ON/OFF switch to the ON
position, if available
Wrong DMX address
Set the DMX address to the right
value
DMX controller blackout function
activated
Deactivate the blackout function of
your DMX controller
Faulty positioning of the DMX
polarity switch on the controller
flip the polarity switch on your
DMX controller
No response or DMX activity
signal LEDs active
Check your DMX cables for
possible connection breaks and
replace them if necessary.
Wrong working mode selected.
Check if the sound activated mode
of the fixture is activated.
Microphone sensitivity level is set
too low
Increase the microphone
sensitivity of the built-in
microphone
Speaker placed too far away or
lack of bass
Place your lighting effect closer to
your speakers (or vice versa)
and/or increase low frequency
volumes. The microphone will not
be triggered with high pitched
sounds.
Dirty/dusty optics
Clean the lens and/or other optics
with a dry or damp cloth
Dimmer is not set to full output
Set all dimmer levels to 100% on
your DMX console
Faulty/broken DMX cables
Check your DMX cables for
possible connection breaks and
replace them if necessary.
Power cable interference on your
DMX signal
Avoid installing the DMX and
(high) power cables parallel to
each other.
No DMX terminator
Apply a DMX terminator at the end
of your DMX-chain
The fixture does not respond to
DMX signals
The fixture does not respond to
sound
The beam output is very low
Sometimes the DMX signal is lost
and/or some fixtures are
flickering / behaving odd
sometimes
Signal loss or distortion in DMX
values
Apply a DMX booster in your DMX
chain after 32 fixtures or less. After
a maximum of 32 fixtures the DMX
signal needs to be refreshed.
Moving parts are not functioning
well, values do not match and/or
rattling sounds are noticed
Faulty stepping motor positioning
Possible value loss of stepping
motors. Activate the reset function,
or unplug the power supply and
plug it back in to activate the reset
program. This will reset all values
to the original 0-point.
The fixture does not respond fast
enough to the set speed on my
DMX controller
Moving parts can not keep up with Decrease the chase speed of your
the set speed
DMX controller, as the stepping
motors of your fixture need some
time to move from one point to
another.
The fixture does not respond to all Wrong DMX channel mode
DMX-channels
Check the DMX channel mode of
the fixture. If the wrong value is
set, change the channel mode to a
different setting and try again.
Technical specifications
-
-
Compact movinghead using a RGB LED light source
Light source: 15 Watt RGB LED chip
Lifespan LED module: +/- 50.000 h
Pan range: 540 degrees max.
Tilt range: 270 degrees max.
Modes: stand-alone, music controlled, master/slave, DMX
Built-in stand-alone programs
Built-in music controlled programs
DMX-control with 5 or 13 DMX-channels
Gobowheel: 9 gobo’s + open
Variable electronic strobe function (slow-fast)
Electronic dimmer: 0-100%
Beam angle: 13 degrees
Maximum ambient temperature: 40 degrees Celsius
Maximum housing temperature: 55 degrees Celsius
Minimum distance from flammable surfaces: 0.5 m
Power consumption: 60W max.
Fuse: 1A 250V 20mm glass fast blow
Power supply: 110-240V AC, 50/60Hz
Measurements: 175 x 175 x 250 mm (without bracket)
Weight: 5 kg
Connectors:
- DMX: 3p XLR male and female
- Power: IEC power connector
Included accessories:
- Power cable with Shucko & IEC connectors
- Mounting bracket with allen bolts
Connectors and wiring schematics:
DMX-connections:
Electrical wiring: