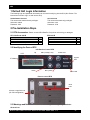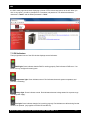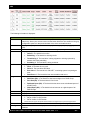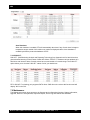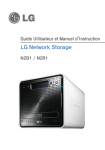
1
™ RTX IR User Manual (Revised February 28, 2012) Models covered: RTX 410-IR RTX 610-IR RTX 801-IR Note: The contents of this user manual reflect operational instructions for RTX IR units manufactured after 12/15/2011. RAID sets created in RTX IR units manufactured prior to this date are incompatible with newer units. RT X410/610/801- IR User M an ual A9- 468- 0005 REV 1.0 -1- CRU Table of Contents 1: Default GUI Login Information 2: Pre-Installation Steps 2.1 Accessories 2.2 Identifying Parts 2.3 Warnings and Notices 2.4 Terminology 3: Introduction to RAID 3.1 Summary of RAID Levels 4: Introduction to iSCSI 4.1 What is iSCSI? 4.2 What is the benefit of iSCSI? 4.1 What is iSCSI Not? 5: Installation Steps 5.1 Hard Drive Installation 5.2 Operating RTX 5.3 Recovering from a Failed RAID 6: Network Configuration 6.1 Connect RTX to your network (or computer) 6.2 Use the LCD to Configure the Config GUI Port 7: Using the GUI 7.1 GUI indicators 7.2 Overview of GUI architecture 7.3 Manually Creating a Usable RAID Set 7.4 Quick Installation 7.5 System Configuration 7.6 ISCSI Configuration 7.7 Volume Configuration 7.8 Enclosure Management 7.9 Maintenance 7.10 Online Support 7.11 Logout 8: iSCSI Initiator software 8.1 Software Installation 8.2 Access RTX using iSCSI Initiator Software 9: Usage With Mac and Windows Operating Systems 9.1 Usage with Mac OS X 9.2 Usage with Windows Operating Systems 10: RAID is Not A Backup 11: Event Notifications 12: Working With Volumes Over 2 TB In Size 13: Frequently Asked Questions 14: Technical Specifications RT X410/610/801- IR User M an ual A9- 468- 0005 REV 1.0 3 3 3 3 4 4 5 5 6 6 6 6 6 6 6 7 7 7 7 10 11 12 12 17 17 23 26 33 34 36 36 36 36 37 37 37 38 40 40 44 45 47 -2- CRU 1 Default GUI Login Information The following login and password information can be used to easily log into the GUI (See Section 7 for instructions on how to log in to and use the GUI). Administrator Account This account has read and write privileges. Username: admin Password: 1234 User Account This account has read-only privileges. Username: user Password: 1234 2 Pre-Installation Steps 2.1 RTX Accessories: Please contact CRU-DataPort if any items are missing or damaged. RTX 801-IR RTX 410-IR and 610-IR RTX Unit Power Cord Ethernet Cable Packet of DataPort Keys 1 1 2 1 RTX Unit Power Cord Ethernet Cable Packets of Lock Tools 1 1 2 2 2.2 Identifying the Parts of RTX LCD Panel on front of RTX LCD Up ESC (escape, exit) Power LED Access LED IP Address Down ENT (enter) Alarm LED Ports on rear of RTX iSCSI Ports Ethernet Configuration Port (for GUI configuration) 2.3 Warnings and Notices: Please read the following before beginning installation. General Care RT X410/610/801- IR User M an ual A9- 468- 0005 REV 1.0 -3- CRU The main circuit boards of the HDD carriers are susceptible to static electricity. Proper grounding is strongly recommended to prevent electrical damage to the enclosure or other connected devices, including the computer host. Avoid all dramatic movement, tapping on the unit, and vibration. Avoid placing the HDD carriers close to magnetic devices, high voltage devices, or near a heat source. This includes any place where the product will be subject to direct sunlight. Do NOT allow water to make contact with the carrier or receiving frame. Before starting any type of hardware installation, ensure that all power switches have been turned off and all power cords have been disconnected to prevent personal injury and damage to the hardware. To avoid overheating, RTX should be operated in a well-ventilated area and in such a way that sufficient airflow is maintained across the controller chips. RAID Use only hard drives that are in perfect condition. Avoid using drives that have ever developed bad sectors during previous usage. This could lead to possible device failure or loss of data. RTX supports SATA hard drives of various specifications and different capacities. However, we recommend using drives of the same brand and type for optimal performance. If drives of different capacities are used in a RAID, the capacity of the smallest drive will determine how much of each drive is used. The additional capacity on the larger drives will not be used by the RAID. RAID level 0 will allow you to use the full combined capacity of the drives, and offers the best data transfer speeds. However, RAID 0 offers no protection for the data. If one drive fails in a RAID 0, the data on all of the drives is irretrievably lost. Before creating a RAID, investigate the various RAID types and choose the one that is best for your needs. Always back up data before switching RAID types. Switching RAID types will destroy current data. You must reformat your drives afterwards. 2.4 Terminology RAID JBOD PD RG VD LUN GUI RAID cell DS GS WWN CHAP iSNS Terminology Redundant Array of Independent Disks. There are different RAID levels with different degrees of data protection, data availability, and performance. “Just a Bunch Of Disks”. JBOD needs at least one hard drive. Physical Disk. Belongs to the member disk of one specific RAID group. RAID Group. A collection of removable media. One RG consists of a set of VDs and owns one RAID level attribute. Virtual Disk. Each RG could be divided into several VDs. The VDs from one RG have the same RAID level, but may have different volume capacity. Logical Unit Number. A unique identifier for a SCSI device which enables computers to differentiate among separate SCSI devices. Graphical User Interface. The number of subgroups of PDs in an RG. Dedicated Spare disk. A spare disk dedicated to one specific RG and is used when another disk in the RG fails. Global Spare disk. A spare disk that is shared among all RGs and is used when another disk in an RG fails. World Wide Name. A unique identifier that identifies a particular PD. Challenge Handshake Authentication Protocol. An optional security mechanism to control access to RTX through its iSCSI data ports. Internet Storage Name Service. This protocol allows automated discovery, management, and configuration of iSCSI devices on a TCP/IP network. 3 Introduction to RAID RT X410/610/801- IR User M an ual A9- 468- 0005 REV 1.0 -4- CRU A RAID (Redundant Array of Independent Disks) is an array of multiple hard drives that are combined in a way that provides faster performance and/or data safety. Your RTX unit is capable of creating and managing several different varieties of RAID. You may choose your preferred RAID level based on factors such as disk capacity, desired data safety, and desired performance. 3.1 Summary of RAID Levels RTX supports RAID Levels 0, 1, 3, 5, 6, 0+1, 10, 30, 50, 60, & JBOD. RAID Level 5 is most commonly used by those seeking an optimal balance of speed and data safety. RAID Level 0 1 3 5 6 0+1 10 30 50 60 JBOD RAID Features and Performance Min. Data Description Drives Redundancy Also known as striping. Data distributed across No data multiple drives in the array. There is no data 2 protection protection. Also known as mirroring. All data replicated on two separate disks. This is a high availability solution, but due to the 100% duplication, only half the total 2 1 drive disk capacity is available for data storage. Also known as Bit-Interleaved Parity. Data and parity information is subdivided and distributed across all disks. Parity must be equal to the smallest disk capacity in the array. Parity information normally stored on a dedicated parity disk. Also known as Block-Interleaved Distributed Parity. Data and parity information is subdivided and distributed across all disks. Can withstand the failure of one drive. The total capacity of all but one of the drives is available for data storage. Two parity bits are used to create double redundancy. Can withstand the failure of two drives. The total capacity of all but two of the drives is available for data storage. Also known as a mirror of striped drives. Data and parity information is subdivided and distributed across all disks. Parity must be equal to the smallest disk capacity in the array. Parity information normally stored on a dedicated parity disk. Also known a stripe of mirrors. Data is striped across two separate disks and mirrored to another disk pair. Also known as Striping Dedicated Parity Array. RAID 30 breaks up data into smaller blocks, and then stripes the blocks of data to each RAID 3 RAID set. RAID 50 combines the straight block-level striping of RAID 0 with the distributed parity of RAID 5 RAID 60 combines the straight block-level striping of RAID 0 with the distributed double parity of RAID 6 Just A Bunch of Disks. This is not an actual RAID level as each disk is treated as its own entity. Data Transfer Rate Very high Reads are higher than a single disk; Writes are similar to a single disk 3 1 drive Reads are similar to RAID 0 3 1 drive Reads are similar to RAID 0 4 2 drives Slightly less than RAID 5 4 1 drives* Transfer rates are similar to RAID 0 4 1 drives* Transfer rates are similar to RAID 0 6 2 drives** Transfer rates are similar to RAID 0 6 2 drives** Transfer rates are similar to RAID 0 8 4 drives*** Transfer rates are similar to RAID 0 1 0 drives Very high *If both drives in either the RAID 0 or RAID 1 set fail, then the entire RAID will fail. If only one drive in each of the RAID 0 and RAID 1 sets fail, then the RAID is preserved. **One drive from each of the striped RAID sets could fail without loss of data. If two drives in the same striped RAID set fail, then the entire RAID will fail. RT X410/610/801- IR User M an ual A9- 468- 0005 REV 1.0 -5- CRU ***Two disks from each of the RAID 6 sets could fail without loss of data. The loss of three disks in the same striped RAID 6 set fails, then the entire RAID will fail. 4 Introduction to iSCSI 4.1 What is iSCSI? iSCSI is a technology that allows a data storage device to be accessed over a TCP/IP network using SCSI protocols. When your computer’s OS receives a request for data access, it generates a SCSI command and then sends an IP packet across a network or direct Ethernet connection. A software utility known as an iSCSI initiator is used to generate the SCSI commands. Such a utility must be installed on the computer before it can access an iSCSI storage device (See Section 8 for installation instructions). 4.2 What is the Benefit of iSCSI? An iSCSI storage device can be placed anywhere throughout a network, so the device can reside at a great distance from the computer which accesses it. It is also a very fast connection when used on a gigabit network, achieving speeds of 100 megabytes (MB)/sec or more. The connection it uses (RJ45— standard Ethernet port) is commonly found on desktop and laptop computers, so there is no need to purchase potentially expensive host bus adapters to provide a connection. 4.3 What is iSCSI Not? iSCSI storage devices are not Network Attached Storage (NAS) devices. They have no built-in server capabilities and therefore cannot be accessed by more than one computer at a time. Multiple computers can only access the data if the iSCSI device is first attached to a single computer which is then set up as a server. 5 Installation Steps 5.1 Hard Drive Installation a) Pull the ejection handle on the TrayFree bay to open the bay door. b) Insert a bare SATA hard drive into the bay. Make sure it is label-side up with the SATA connection on the drive inserted first. c) Shut the bay door. d) You can optionally secure each bay door. Doing so is not necessary to operate RTX. • For RTX410 and RTX610, Insert an RTX Key into its key lock and turn it 90 degrees clockwise. • For RTX801-IR, use the Lock Tool to slide the lock to the “locked” position. Sticker Card Use the stickers on the provided sticker card to label each drive. This will prevent the drives from getting mixed up when they are removed from the bays. 5.2 Operating RTX a) Connect RTX to a computer or network using the included Ethernet cable. Plug one cable into the “CH1” port. You can optionally plug a second cable into the “CH-2” port. The purpose of having multiple iSCSI channels is to provide redundancy/failover and increased performance. b) Connect RTX to a power outlet with the included power cord. c) Install the hard drives into RTX (See Section 5.1). d) Flip the power switch on the rear of the unit to turn on RTX. e) If you have not yet configured RTX for access, refer to Sections 6, 7, and 8. Section 6 will tell you how to connect RTX to your network or computer. Section 7 contains instructions for accessing the GUI and RT X410/610/801- IR User M an ual A9- 468- 0005 REV 1.0 -6- CRU creating a usable RAID set. Section 8 contains instructions on how to access RTX through an iSCSI initiator. f) Format the drive. When a hard drive is first used with RTX, or when a RAID set has been created and the user connects to RTX through an iSCSI initiator, it will show up as a blank, unallocated drive. You’ll need to format the drive in RTX before you can use it See Section 9 for instructions on how to format the drive with Mac or Windows operating systems. Note that formatting a drive will erase all data on the drive, so be sure to back up your data before installing the hard drives into this enclosure and before beginning this operation. 5.3 Recovering from a Failed RAID If one hard drive of a RAID set with data redundancy has failed or has been unplugged or removed, then the status of the RAID Group will report that the RAID is degraded and RTX will automatically search for a spare disk to rebuild the RAID. If none are found, RTX will search for a global spare disk. If neither is found, it will wait for the user to remove the failed hard drive and insert a working replacement. 6 Network Configuration 6.1 Connecting RTX to Your Network or Computer a) Plug an Ethernet cable into the Config GUI port on the rear of RTX. b) Connect the other end of the Ethernet cable to your network. This usually means plugging it into a router or hub. In an office environment, you may have a network jack built into your office wall. If a network connection is not available, you can connect the Ethernet cable directly to an RJ45 (Ethernet) port on your computer. c) Connect the power cable to the rear of RTX and to a grounded electrical outlet. d) Turn on RTX’s power using the switch on the rear panel. 6.2 Using the LCD to Configure the Config GUI Port RTX has both an LCD interface and a GUI. The LCD interface has only basic functionality and is mainly used to configure the IP address of the Config GUI port. Once the Config GUI has been configured, the GUI can be used to fully configure RTX. 6.2.1 Navigating the LCD menu Use the four function keys, ▲ (Up), ▼ (Down), ESC (Escape) and ENT (Enter) to manipulate the LCD interface. After pressing ENT (Enter) key, you can use the ▲ (Up) and ▼ (Down) keys to select a function. If there is an alarm or error message, the LCD will display the related information. 6.2.2 LCD Functions System Info Alarm Mute Reset/Shutdown Quick Install Volume Wizard View IP Setting Change IP Config Reset to Default Displays the details of RAM and firmware. Turns off the alarm sound when an error occurs. Resets or shuts down the controller. To use “Quick Install” to set up a volume by three steps. CRU-DataPort does not recommend using the Quick Install option to set up your RTX. For quick set-up of a RAID, refer to Section 7.7.1. Smart steps to create a volume. Please refer to Section 7.7.1 for detailed operation steps in the web GUI. Display the current IP address, subnet mask, and gateway. Sets the IP address, subnet mask, and gateway. You can choose to use DHCP server (for IP address allocation) or manually specify the IP address. Restores factory defaults: Default Administrator Name: admin Default Administrator Password: 1234 Default User Name: user Default User Password: 1234 RT X410/610/801- IR User M an ual A9- 468- 0005 REV 1.0 -7- CRU Default IP address: 192.168.0.1 Default subnet mask: 255.255.255.0 Default gateway: 192.168.0.254 6.2.3 RTX LCD Menu Diagram Use the following chart for reference when following the instructions in Section 6.2.4 for setting up RTX according to your network type. Main Menu 2 nd Menu Screen [System Info.] [Alarm Mute] rd 3 Menu Screen [Reset/Shutdown] [Shutdown] [Volume Wizard] CRU-DataPort RTX [View IP Setting] RAID 0 RAID 1 RAID 3 RAID 5 RAID 6 RAID 0+1) xxx GB [Local] RAID 0 RAID 1 RAID 3 RAID 5 RAID 6 RAID 0+1 [IP Config] [Static IP] [IP Address] [DHCP IP] [IP Subnet Mask] [255.255.255.0] [IP Gateway] [192.168.010.254] [DHCP] 6 Menu Screen [ENT:OK ESC: Back] [ENT:OK ESC: Back] [Apply The Config] [ENT:OK ESC: Back] [Use default algorithm] [Volume Size] xxx GB [IP Subnet Mask] [Change IP Config] [Static IP] [Apply The Config] [ENT:OK ESC: Back] [ENT:OK ESC: Back] [IP Address] [IP Gateway] [Apply IP Setting] [Reset to Default] th th 5 Menu Screen [Firmware Version x.x.x] [RAM Size xxx MB] [ENT:OK ESC: Back] [Reboot] [Quick Install] th 4 Menu Screen Adjust IP address Adjust Submask IP Adjust Gateway IP [ENT:OK ESC: Back] [ENT:OK ESC: Back] RT X410/610/801- IR User M an ual A9- 468- 0005 REV 1.0 -8- CRU 6.2.4 Instructions for Differing Network Connection Types DHCP-Enabled Network On DHCP networks, a new IP address is dynamically assigned to RTX’s Config GUI port as soon as the network detects it. You can determine this address by checking the LCD interface on the front of RTX. It will appear in this format: xxx.xxx.xxx.xxx. Simply type this IP address into a web browser on your computer. This will access RTX’s GUI, which you will use to configure the unit. Static Network a) Check your computer’s IP address, subnet mask, and gateway. Mac users can find this information in System Preferences Network. To do this in Windows, open Network and Sharing Center in the Control Panel (Also called “View Network Status and Tasks” under the “Network and Internet” category). On the left pane, select “Change adapter settings”. Right-click on your network (likely called Local Area Connection) and select Properties. On the new window that opens, select “Internet Protocol Version 4 (TCP/IPv4)” and click the Properties button. Your computer’s IP address, subnet mask, and gateway will be displayed. b) On the RTX LCD interface, press ENT and then scroll up or down to Change IP Setting. Press ENT. c) Scroll up or down to find Static. Press ENT. d) Change the IP address to closely match what your computer is using. Or, if you are on a business network, have your IT administrator assign you an IP address. The IP address you select must NOT be in use by another device. For example, if your computer's IP address is 192.168.0.9, you might change the RTX’s IP to 192.168.0.7. On smaller networks, each of the first three octets must be the identical to your computer’s IP address! When changing the IP address you'll notice that a box flashes over the digit to be changed. While the digit is selected, press ▲ (Up) or ▼ (Down) to change it. Press ENT to move to the next digit. e) After the IP address is set, enter the subnet mask address exactly as it is shown on your computer’s TCP/IP settings. f) Next, enter the gateway address exactly as it is shown on your computer’s TCP/IP settings. g) Confirm the settings change. To confirm, press ▲ (Up) for “yes” and then press ENT again. h) Type the RTX’s new IP address into a web browser on your computer. This will access the RTX’s GUI, which you will use to configure the unit. Direct Connection to a Computer The instructions are similar to those for a static network (see above), except that your computer will not have an IP address assigned if it’s not a part of a network. Since RTX and your computer must have similar IP addresses, you will assign an IP address to your computer based upon the default IP address of RTX. a) Check RTX’s LCD to find out the IP address of the Config GUI configuration port. It will appear RT X410/610/801- IR User M an ual A9- 468- 0005 REV 1.0 -9- CRU in this format: xxx.xxx.xxx.xxx. b) Next, change your computer’s IP address so that all but the last three digits match RTX ’s address. For example, if RTX’s IP address is 169.254.12.62, you might assign your computer the number 169.254.12.63 (assuming no other computer on the network is already using that number). The process of changing your computer’s IP address varies depending on its operating system. Mac users can go to System Preferences Network. For modern Windows operating systems, open Network and Sharing Center in the Control Panel (Also called “View Network Status and Tasks” under the “Network and Internet” category). On the left pane, select “Change adapter settings”. Right-click on your network (likely called Local Area Connection) and select Properties. On the new window that opens, select “Internet Protocol Version 4 (TCP/IPv4)” and click the Properties button. By default, your computer is probably set to receive a new IP address automatically. Change the setting to manual configuration and then type in the IP address. c) Using the same process as the previous step, change the computer’s Subnet Mask setting to match RTX’s Subnet Mask setting. d) Finally, use RTX’s LCD interface to change RTX ’s Gateway setting. It should match the IP address you assigned to your computer. When changing the gateway address you'll notice that a box flashes over the digit to be changed. While the digit is selected, press ▲ (Up) or ▼ (Down) to change it. Press ENT to move to the next digit. After the gateway address is set, press ENT all the way to the end and confirm the settings change. To confirm, press ▲ (Up) for “yes” and then press ENT again. e) Launch a web browser and type RTX’s IP address into the URL bar, as if it were a website. This will access RTX’s GUI, which you will use to configure the unit. The tables below show example settings. The first table shows the type of settings that will appear by default. The next table shows how the settings might look after you’ve made changes. RTX IP Address Mask Gateway Computer 169.254.12.62 (blank) 255.255.000.000 (blank) 000.000.000.000 (blank) Before making changes IP Address Mask Gateway RTX Computer 169.254.12.62 169.254.12.63 255.255.000.000 255.255.000.000 169.254.12.63 (blank) After making changes Connecting From Home to Office RTX can also be used over the Internet. If you are connecting to an RTX at your office from home, you will need to contact your IT administrator to set up a VPN client in order to log in to the office network. Once you have logged in to the office network, you can access RTX just as if you were actually at your office (see instructions for DHCP-enabled Network, Static Network, or Direct Connection to a Computer, depending on how your office network is configured). 7 Using the GUI You will use the web browser-based GUI to set up a RAID and create logical volumes on RTX. After setting up access to the GUI and accessing it through a web browser (see Section 6.2 for instructions), RT X410/610/801- IR User M an ual A9- 468- 0005 REV 1.0 - 10 - CRU the GUI’s main page should load, displaying a picture of RTX with several options to the left. When you click on any option, you will be prompted for a username and password. The default administrator username is "admin" and the default password is "1234." 7.1 GUI Indicators The top right hand corner of the GUI window displays several indicators. RAID light: Green indicates that the RAID is working properly. Red indicates a RAID error. If no RAID is set up, the light will remain green. Temperature light: Green indicates normal. Red indicates abnormal system temperature and probable overheating. Voltage light: Green indicates normal. Red indicates abnormal voltage status like a power surge or a bad power supply. Fan light: Green indicates that the fan is working properly. Red indicates a malfunctioning fan that needs to be replaced. (only applies to RTX610-IR and 801-IR). RT X410/610/801- IR User M an ual A9- 468- 0005 REV 1.0 - 11 - CRU 7.2 Overview of GUI Architecture • • • • • • • • Quick installation System configuration o System settings o IP address o Login settings o Mail settings o Notification settings iSCSI configuration o Entity property o NIC o Node o Session o CHAP account Volume configuration o Volume creation wizard o Physical disk o RAID group o Virtual disk o Logical unit Enclosure management o SES configuration o Hardware monitor o S.M.A.R.T. Maintenance o System information o Upgrade o Reset to factory default o Import and export o Event log o Reboot and shutdown Online support o Product Information and Specs o FAQ and Downloads Logout 7.3 Manually Creating a Usable RAID Set Use these sets of instructions to create a usable RAID set. To quickly create a RAID 0, 1, 3, 5, 6, or 0+1 set using the Volume Creation Wizard, see Section 7.6.1. 7.3.1 Manually Creating a RAID Group To manually create a usable RAID set, you will first need to create a new RAID Group. a) Click the “Create” button at the bottom of the page to open the RAID Group creation screen. RT X410/610/801- IR User M an ual A9- 468- 0005 REV 1.0 - 12 - CRU b) Enter a name for the new RAID Group in the first field, and then select your desired RAID type or JBOD from the dropdown box. CRU-DataPort recommends RAID 5 for maximum performance, capacity, and security. For more information on RAID, see Section 3. Click “Select PD” to select the drives that will be added to the RAID Group. Note: Drives must be marked as Free Disks before they can be added to a RAID Group. To set drives to Free Disks, see Section 7.7.2, subsection “Modifying Physical Disks”. c) All available Free Disks will be displayed. Check the drives that you wish to add to the RAID Group, then click “Confirm”. d) The selected Physical Disks will now be displayed in the RAID Group creation screen. Enable or Disable Write Cache, Standby, Readahead, and Command Queuing based on your needs. Most RAID Groups will be fine with the default settings. Then click “Next” to proceed to the confirmation screen. RT X410/610/801- IR User M an ual A9- 468- 0005 REV 1.0 - 13 - CRU e) On the confirmation screen, verify that the RAID level is correct and all of the disks you selected are displayed under “RAID PD slot”, then click “Confirm” to create the RAID Group. f) The RAID Group will now display on the main RAID Group screen. To finish manually creating a usable RAID set, a Virtual Disk still must be created and a Logical Unit must be attached. Go to the next section, “Manually Creating a Virtual Disk”. If you opted to create JBOD drives, skip to Section 8.3.3, “Manually Attaching a Logical Unit” as Virtual Disks have already been created for each JBOD drive. 7.3.2 Manually Creating a Virtual Disk After a RAID Group has been created, you can create associated Virtual Disks. You must create at least one Virtual Disk to access the drives of RTX with a computer. a) Click the “Create” button at the bottom of the page to open the Virtual Disk creation screen. b) You will see the screen below. Fill in the information and then click “Confirm”. Each field is explained below the picture. RT X410/610/801- IR User M an ual A9- 468- 0005 REV 1.0 - 14 - CRU Name Enter a name for the Virtual Disk. RG Name Choose the RAID Group to which the Virtual Disk will be added. Capacity Enter the capacity of the Virtual Disk. The default uses the maximum capacity of the associated RAID Group. If you wish to create multiple Virtual Disks on the selected RAID Group, you will need to reduce the capacity below the maximum so that there is space left on the RAID Group for additional Virtual Disks. Stripe height (KB) Determines how RTX organizes the RAID. Normally the default option is preferred. Block size Determines the minimum file size for files that will be stored on the Virtual Disk. Higher block sizes can result in more wasted space if many small files are saved to the drive, but are necessary to take advantage of high capacity RAIDs. If you are creating a Virtual Disk over 2TB in size for use with MacOS 10.4.x or older, or for use with Windows XP, you must increase the block size to 4096KB to take advantage of the full capacity of the Virtual Disk. Read/Write Allows selection of cache type. Normally the default option is preferred. Priority Determines the priority that RTX will give to RAID activities (rebuild and initialization) versus priority given to file transfers. “High priority” will result in slower file transfers during initialization, but provide for faster initialization. BG Rate Background Task Priority. The higher the number, the more priority will be given to background input/output. RT X410/610/801- IR User M an ual A9- 468- 0005 REV 1.0 - 15 - CRU Readahead Choose whether file prefetching should be enabled. Erase Wipes out the original data in the Virtual Disk to prevent the OS from recognizing it. The options are “None”, “First 1GB”, and “Full Disk.” c) After the RAID builds, the Virtual Disk will now display on the main Virtual Disk screen. If you have enabled an Erase option, do not shut down or reboot RTX while the Virtual Disk is initializing or the erase process will stop. To finish manually creating a usable RAID set, at least one Logical Unit must be attached. Go to the next section, “Manually Attaching a Logical Unit”. 7.3.3 Manually Attaching a Logical Unit You will need to attach at least one Logical Unit to a Virtual Disk to access its RAID Group, although multiple Logical Units can be attached to the same Virtual Disk. a) Click the “Attach” button to attach a Logical Unit to a Virtual Disk. b) You will see the screen below. Fill in the information. Select the Virtual Disk to which you wish to attach a Logical Unit. The Host name can remain as an asterisk if you want any host to access the Virtual Disk. Otherwise, change the field to limit access to specific hosts. Then select the LUN that will be used. The default setting on this is acceptable. Finally, select the permissions that hosts accessing this Logical Unit will have. Then click “Confirm”. c) The main Logical Unit Screen will now display the Logical Unit you have just created. If you’ve RT X410/610/801- IR User M an ual A9- 468- 0005 REV 1.0 - 16 - CRU been following the instructions for manually creating a usable RAID set, you have now completed setup and can now access the RAID set through iSCSI initiator software (see Section 8 for installation and connection instructions). 7.4 Quick Installation CRU-DataPort does not recommend using the Quick Installation option to set up your RTX. For quickly setting up a RAID, refer to Section 7.7.1. Quick Install uses all physical disks in RTX and the maximum amount of space they contain to create a RAID Group using one Virtual Disk. There will be no space set aside for spares. If some disks are used in other RAID Groups, Quick Install cannot be run. 7.5 System Configuration The System Configuration menu gives access to a number of options used to configure RTX system properties. Click on “System Configuration” to access the following menu options: System Settings, IP Address, Login Settings, Mail Settings, and Notification Settings. 7.5.1 System Settings System Settings allows you to view and change the system name, change the date and time, and turn the System Indication LED on or off. RT X410/610/801- IR User M an ual A9- 468- 0005 REV 1.0 - 17 - CRU System Name The default system name is “RTX-IR”. To change the system name, simply click in the box displaying the system name and highlight or delete the part of the name you wish to change, then type the new name and click the “Confirm” button at the bottom of the page. Date and Time The Date and Time option allows you to change the date and time settings of RTX. To change the date or time, check the “Change date and time” check box and then click in the field that you wish to change. Highlight or delete the information, then type in the new information and click the “Confirm” button at the bottom of the page. To change the time zone, click the drop down box and then scroll up or down until you reach the correct time zone. Then choose that time zone and click the “Confirm” button at the bottom of the page. After confirming, a dialog box will appear verifying that changes have been made. Alternatively, an NTP (Network Time Provider) can be used to sync RTX’s time information with that of a standardized server. To use an NTP, click the NTP check box, then input the server information in the server field. Click the “Confirm” button at the bottom of the page to update the time settings. A dialog box will appear to inform you that the changes have been made. The updated settings will reflect the time settings of the NTP. RT X410/610/801- IR User M an ual A9- 468- 0005 REV 1.0 - 18 - CRU System Indication To turn the System Indication LED on or off, select the “Confirm” button in the System Indication box. After confirming, a dialog box will appear verifying that changes have been made. To reverse this action, press the “Confirm” button again. 7.5.2 IP Address The IP Address option lists RTX’s MAC address and allows you to view and modify the IP information of the Config GUI port on RTX. This option does not allow the administrator to configure the IP address of the individual data ports. This must be done using the LCD interface on the front of RTX (Section 6.2). An RTX configured for DHCP. 7.5.3 Login Settings The Login Settings page allows you to configure the Auto Logout and Login Lock features, as well as change the administrator account and user passwords. Login Configuration • Auto Logout will automatically log the user out of the system after a set period of 5 minutes, 30 minutes, or 1 hour of inactivity. • Login Lock prevents multiple users from using the GUI simultaneously. Both features are disabled by default. To enable a feature, click on the dropdown menu associated, select the new option, and click the “Confirm” button. RT X410/610/801- IR User M an ual A9- 468- 0005 REV 1.0 - 19 - CRU Admin Password The Admin Password option allows you to change the password for the administrator account, which is used to access and modify the settings in the GUI. The default username is ‘admin’ and the password is ‘1234’. To change the password, click on the “Change admin password” check box. Then enter the old password in the first field. Type the new password in the second and third field and finally click the “Confirm” button at the bottom of the page. A dialog box will appear asking for verification. Click “OK.” After the password has been changed, another dialog box will appear to inform you that the password has been changed. User Password The User password option allows you to change the password for the user account, which is used to view, but not modify the settings in the GUI. The default username is ‘user’ and the password is ‘1234’. To change the password, click on the “Change user password” check box. Then enter the old password in the first field. Type the new password in the second and third field and finally click the “Confirm” button at the bottom of the page. 7.5.4 Mail Settings RTX can be configured to send email to up to 3 addresses when events, warnings, and errors occur. Contact your IT administrator to set up an email address for RTX and to input the proper SMTP settings. RT X410/610/801- IR User M an ual A9- 468- 0005 REV 1.0 - 20 - CRU 7.5.5 Notification Settings Notification Settings allows you to configure the Simple Network Management Protocol (SNMP), Windows Messenger events, the System Log server, Event Log filters, and enable or disable the internal buzzer. SNMP (Simple Network Management Protocol) SNMP can be configured to send trap messages to up to three different addresses on the network. To add an address, simply enter the IP address of the receiving server or computer, then click the “Confirm” button at the bottom of the page. Note: The receiving server must be configured to receive SNMP messages. For more information on SNMP, you may wish to consult the third party website: http://www.systemdisc.com/snmp Messenger RTX can be configured to send instant messages to up to 3 addresses when events, warnings, or errors occur. RT X410/610/801- IR User M an ual A9- 468- 0005 REV 1.0 - 21 - CRU Syslog Server (System Log Server) The Syslog Server option allows configuration for error, warning, and information reporting via a port on the server. Enter the server IP under Server IP/hostname and the port used in the UDP Port line (the default port is 514). The Facility can be changed between “User”, “Kern”, and “Local1” through “Local7” using the dropdown box. Select the check boxes for “Info”, “Error”, and “Warning” that pertain to the information that you want to have reported. Event Log Filter The Event Log Filter allows you to display event messages. To configure what types of messages are displayed, select the check boxes for “Info”, “Error”, and “Warning” that pertain to the information that you want to have reported. The options for Pop Up Events will display those events as a pop-up notification in your browser. The options for Show on LCM will display the selected events in RTX IR’s LCD screen. Buzzer To disable the buzzer, place a checkmark next to “Always disable buzzer,” and click the “Confirm” button at the bottom of the page. RT X410/610/801- IR User M an ual A9- 468- 0005 REV 1.0 - 22 - CRU 7.6 iSCSI Configuration The iSCSI configuration menu options are generally used to modify the connection properties of RTX. Click on “iSCSI configuration” to access the following menu options: Entity Property, NIC, Node, Session, and CHAP Account. 7.6.1 Entity Property The Entity Property option allows you to add an Internet Storage Name Service (iSNS) server IP address to the iSNS server group, to which the iSCSI initiator can send queries. Simply enter the iSNS IP address in the iSNS IP field and click “Confirm”. Note: Setting an iSNS is not necessary to use RTX. 7.6.2 NIC Click on “NIC” to view the IP settings of the two gigabit Ethernet data ports. You will see the following information: RT X410/610/801- IR User M an ual A9- 468- 0005 REV 1.0 - 23 - CRU Name LAG LAG No DHCP IP Address Netmask Gateway Jumbo Frame MAC Address Link NIC Column Descriptions LAN1 corresponds to the port labeled CH-1 (Channel 1) on the back of RTX, while LAN2 corresponds to the port labeled CH-2 (Channel 2). Displays whether Link Aggregation is enabled or disabled. Displays the LAG number. Shows whether the channel has DHCP enabled. Displays the IP address currently in use by the channel. Displays the subnet mask being used by the channel. Displays the IP gateway. In a DHCP network, it will display the IP of the router to which RTX is connected. Displays whether jumbo frames are enabled or disabled. The maximum jumbo frame size is 3900 bytes. Displays the MAC address of each channel. Displays the status of each channel. If an Ethernet cable is connecting RTX to a network or computer, the Link will display “Up”. Hover your mouse cursor over the appropriate button in the “Name” column to reveal a menu of configurable options. IP Settings for iSCSI Ports Click on this option in order to enable DHCP or to manually set up a channel’s IP Address, Netmask, and Gateway. Fill in the appropriate information and then click the “Confirm” button. Set the Default Gateway Sets the selected channel as the default gateway for RTX. To disable the default gateway, hover your mouse cursor over the appropriate button in the “Name” column again and select the “Disable default gateway” option. Only one channel can be the default gateway. Enable Jumbo Frames Enables jumbo frames for the associated channel. To disable jumbo frames, hover your mouse cursor over the appropriate button in the “Name” column again and select the “Disable jumbo frames” option. The maximum jumbo frame size is 3900 bytes. Ping Host Opens a dialog box in which the user can input the host’s IP address to initiate a ping test. 7.6.3 Node The Node option displays RTX’s entity name, which will be seen by the iSCSI initiator, and allows you to toggle CHAP (Challenge Handshake Authorization Protocol) on or off. CHAP is disabled by default. To turn on CHAP, click the “Authenticate” button. This will bring up a screen with a dropdown box. Click the dropdown box and select “CHAP”, then click the “Confirm” button. After turning on CHAP authentication, you must set up at least one CHAP account (see Section 7.6.5). RT X410/610/801- IR User M an ual A9- 468- 0005 REV 1.0 - 24 - CRU 7.6.4 Session The session function allows you to view information on a session initiated by an iSCSI initiator application (see Section 8), including Initiator Name, TPGT, Error Recovery Level, and Error Recovery Count. Hover your mouse over the button in the “No.” column and click on “List connection.” It will list all the connections of the session. 7.6.5 CHAP Account CHAP (Challenge Handshake Authentication Protocol) is a common iSCSI authentication method. When CHAP is enabled, RTX will require authentication at login through an iSCSI initiator (see Section 8). Authentication also occurs at various times during the connection, by way of transferring the username, initiator password (also called “initiator secret”), and target password (also called “target secret”). RTX uses the same value for initiator secret and target secret. For added security, the authentication information is hashed and a token is sent instead of the information itself. a) To use CHAP, you will need to turn on CHAP authentication (see Section 7.6.3) and then follow the steps there to set up a CHAP account. b) After clicking on the “CHAP Account” option, you will see the following screen: Click “Create” to create a new user. This brings up a screen with fields for User, Secret, and Confirm. Enter a user name in the first field, and a 12-16 character password to use as the secret in the second and third fields. Click the “Confirm” button. c) The new CHAP account will appear on the main CHAP account screen: RT X410/610/801- IR User M an ual A9- 468- 0005 REV 1.0 - 25 - CRU Modifying the CHAP Account Hover your mouse cursor underneath the username to bring up a menu. Select “Modify user information” to change the username and password, or select “Delete” to remove the user. A confirmation box will appear. Click “OK” and the username will be deleted from RTX. 7.7 Volume Configuration The Volume Configuration menu provides the options you will use to set up one or RAID volumes of varying levels on RTX. Click on Volume Configuration to view the following menu options: Volume Creation Wizard, Physical Disk, Volume Group, User Data Volume, Cache Volume, and Logical Unit. The following diagram describes the relationship of RAID components in RTX. Each RAID Group can be divided into several Virtual Disks. The Virtual Disks in one RAID Group share the same RAID level, but may have different volume capacity. All Virtual Disks share the Cache Volume to execute a data transfers. A Logical Unit Number (LUN) is a unique identifier that the computer uses to distinguish and access SCSI devices. 7.7.1 Volume Creation Wizard Click on the “Volume Creation Wizard” option to easily set up your RTX with a RAID 0, 1, 3, 5, 6, or 0+1 set. For using higher RAID types or configuring the drives for JBOD access, see Section 7.3. RT X410/610/801- IR User M an ual A9- 468- 0005 REV 1.0 - 26 - CRU If any disks are not assigned to a Virtual Disk, it will walk you through a series of steps to create a usable RAID set. If there are previous RAID Group or Virtual Disk configurations present, the wizard may limit the choices you can select in the following steps. a) Select your desired RAID Level from the drop-down box, then click the “Next” button. The dropdown box displays the drive capacity next the RAID Level. b) Choose how many disks you wish to use in the new RAID Group. The default algorithm uses all of the disks not already assigned to a RAID Group. Or you can choose how many disks you want the new RAID Group to use by selecting the “Customization” radio button and then using the drop-down box to select the number of disks. The drop-down box displays the drive capacity next the number of disks. On the next screen, fill in the size in MB for how large you want the new RAID Group to be, then click the “Next” button. The maximum size is filled in by the wizard automatically, so in most cases you simply need to click the “Next” button. Step 4 summarizes the choices you have made. If anything is incorrect, select the “Back” button and navigate backwards through the steps to change your options. If everything looks fine, click “Confirm.” The GUI will navigate to the Virtual Disk page which now shows a new Virtual Disk with the name similar to “QUICK#####”. Your Virtual Disk is now initializing and may take several hours to complete. 7.7.2 Physical Disk Click the Physical Disk option to view and modify the status of the drives installed in RTX. RT X410/610/801- IR User M an ual A9- 468- 0005 REV 1.0 - 27 - CRU The following information is displayed: Slot Size RG Name Status Health Usage Vendor Serial Rate Physical Disk Column Descriptions The slot number of the hard drive. “1” corresponds to the top bay of RTX , “8” to the bottom bay. Hover your mouse cursor over the button below the slot number to bring up configuration options for that particular hard drive, which are detailed below. The logical capacity of the drive. Can be displayed in megabytes (MB) or gigabytes (GB). The name of the RAID Group to which the drive is assigned, if any. Displays the operational status of the disk. • Online The hard drive is online. • Rebuilding The hard drive is being rebuilt. • Transitioning The hard drive is being migrated or is being replaced by another disk during rebuilding. • Scrubbing The hard drive is being scrubbed. Displays general operational health of the disk. • Good The hard drive is good. • Failed The hard drive has failed. • Error Alert The hard drive’s S.M.A.R.T. monitoring system is reporting an error. • Read Errors The hard drive has unrecoverable read errors. Displays how the disk is currently being used. • RAID Disk (RD) The hard drive has been assigned to a RAID Group. • Free Disk (FD) The hard drive is free for use. • Dedicated Spare (DS) The hard drive has been set as a dedicated spare of a RAID Group. • Global Spare (GS) The hard drive has been set as a global spare of all RAID Groups. Displays the manufacturer of the hard drive. Displays the serial number of the hard drive. Displays the transfer speed of the hard drive. • SATA 1.5Gb/s SATA1 disk • SATA 3.0Gb/s SATA2 disk RTX IR does not support 6G speed. When a 6G drive is inserted it will only show the speed as 3G. Write cache Standby The hard drive’s write cache is enabled or disabled. The default setting is Enabled. The hard drive will automatically spin down to save power. The default setting is Disabled. RT X410/610/801- IR User M an ual A9- 468- 0005 REV 1.0 - 28 - CRU Readahead Command Queuing The hard drive has file prefetching enabled. The default setting is Enabled. Newer hard drives can queue multiple commands and handle them one by one. The default setting is Enabled. Modifying Physical Disks Hover your mouse cursor over the button below the slot number to bring up a series of options for that particular hard drive. Set Free Disk Frees the disk from the RAID Group it is attached to and makes it free for use. If the disk is not currently attached to a RAID Group, this option is grayed out. Set Global Spare Sets the disk as a spare disk for all existing RAID Groups. Set Dedicated Spare Opens a page that allows the administrator to attach the disk as a spare to a specific RAID Group. Disk Scrub Scrubs the disk with specific data patterns to more securely erase its data. Upgrade Opens a page that allows the administrator to upgrade the hard drive firmware. The administrator may simultaneously upgrade all the hard drives in RTX that are identical to the one selected. Turn on Indication LED Turns on the indication LED for the bay in which the physical disk resides. More information Displays more details about the hard drive. 7.7.3 RAID Group The RAID Group screen displays information about all existing RAID Groups. For instructions on how to create a RAID Group, see Section 7.3.1. The RAID Group screen displays the following information: No. Name Total Free #PD RAID Group Column Descriptions The RAID Group number. Hover your mouse cursor over the button below the RAID Group number for configuration options. The name of the RAID Group. The total capacity of the RAID Group. The drop-down box allows the user to view the capacity in either MB or GB. The capacity of the RAID Group that hasn’t yet been assigned to a Virtual Disk. The drop-down box allows the user to view the capacity in either MB or GB. The number of hard drives in the RAID Group. RT X410/610/801- IR User M an ual A9- 468- 0005 REV 1.0 - 29 - CRU #VD Status Health RAID The number of Virtual Disks that have been created as part of the RAID Group. The status of the RAID Group. • Online The RAID Group is online. • Offline The RAID Group is offline. • Rebuild The RAID Group is currently being rebuilt. • Migrate The RAID Group is currently being migrated. • Scrubbing The RAID Group is being scrubbed. • Parity Checking The RAID Group’s parity is being checked. The health of the RAID Group. • Good The RAID Group is good. • Failed The RAID Group has failed. • Degraded The RAID Group is not healthy and incomplete, due either to a removed hard drive or a failed drive. The RAID level of the RAID Group. Modifying RAID Groups Hover your mouse cursor over the button below the RAID Group number to bring up a series of options for that particular RAID Group. Migrate Allows the administrator to change the RAID Group’s RAID level or add disks to the RAID without data loss. The total size of the new RAID Group must be larger or equal to the original RAID Group or the action will trigger an “Invalid RG config” error. Move Allows the administrator to change which disks on which the RAID Group exists without losing data. The total size of the new RAID Group must be larger or equal to the original RAID Group or the action will trigger an “Invalid RG config” error. Activate Activate RAID Group disk roaming. This option can only be executed when the RAID Group status is offline. Deactivate Deactivate the RAID Group disk roaming. This option can only be executed when the RAID Group is online. Confirm Parity Check Regenerates parity for the RAID Group. Only applies to RAID sets with parity. Delete Deletes the RAID Group. Set Disk Property Enable or disable write caching, standby, readahead, and command queuing. More Information Displays more details about the RAID Group. 7.7.4 Virtual Disk The Virtual Disk screen displays any existing Virtual Disks and allows you to create and delete Virtual Disks. For instructions on how to create a Virtual Disk, see Section 7.3.2. RT X410/610/801- IR User M an ual A9- 468- 0005 REV 1.0 - 30 - CRU No. Name Size Write Priority BG Rate Status Type Health R% RAID #LUN RG Name Virtual Disk Column Descriptions The Virtual Disk number. Hover your mouse cursor over the button below the Virtual Disk number for configuration options. The name of the Virtual Disk. The total capacity of the Virtual Disk. Can be displayed in MB or GB. The write status of the Virtual Disk. • WT Write Through • WB Write Back • RO Read Only Displays the priority that RTX will give to RAID activities (rebuild, initialization) versus priority given to file transfers. • HI High Priority • MD Medium Priority • LO Low Priority Background Task Priority. 4 / 3 / 2 / 1 / 0 → The default value is 4. The higher the number, the more priority will be given to background input/output. The status of the Virtual Disk. • Online The Virtual Disk is online. • Offline The Virtual Disk is offline. • Initiating The Virtual Disk is being initialized. • Rebuild The Virtual Disk is being rebuilt. • Migrate The Virtual Disk is being migrated. • Rollback The Virtual Disk is being rolled back. • Parity Checking The Virtual Disk is undergoing a parity check. Indicates that the Virtual Disk is part of a RAID Group. The health of the Virtual Disk. • Optimal The Virtual Disk is working well and there is no failed physical disk within the RAID Group. • Degraded At least one disk from the RAID Group that the Virtual Disk belongs to is failed or removed from RTX . • Failed The RAID Group that the Virtual Disk belongs to has failed and cannot recover from data loss. • Partially Optimal The Virtual Disk has experienced recoverable read errors. After passing a parity check, the health status will change to Optimal. Shows the percentage completed of an initialization or RAID rebuild. Displays the RAID level. The number of Logical Unit Numbers that are attached to the Virtual Disk. The name of the RAID Group to which the Virtual Disk belongs. Modifying Virtual Disks Hover your mouse cursor over the button below the Virtual Disk number to bring up a series of options for that particular Virtual Disk. RT X410/610/801- IR User M an ual A9- 468- 0005 REV 1.0 - 31 - CRU Extend Extend the Virtual Disk capacity. Confirm Parity Check Regenerates parity for the RAID Group. This option allows the administrator to regenerate parity when a parity/data inconsistency is found, or to check parity/data consistency only. Delete Deletes the Virtual Disk. Set Property Allows the administrator to change the Virtual Disk name, change the write status, priority, background task priority, and enable or disable Readahead. Attach LUN Attach a Logical Unit Number to the Virtual Disk. Detach LUN Detach a Logical Unit Number from the Virtual Disk. List LUN Lists all Logical Unit Numbers attached to the Virtual Disk. More Information Displays more details about the Virtual Disk, including the LUNs that have been attached to it. 7.7.5 Logical Unit The Logical Unit is what your computer will use to access and manage SCSI devices. For instructions on how to attach a Logical Unit to a Virtual Disk, see Section 7.3.3. The following information is displayed: Host LUN Permission VD Name #Session Logical Unit Column Descriptions The host address which can access the attached Virtual Disk. An asterisk indicates that any host may access the attached Virtual Disk. Hover your mouse cursor over the button below the Host for configuration options. The Logical Unit Number (LUN). Displays the permissions given to hosts accessing the RAID set through this Logical Unit. • Read-Write Has permissions to read and write to the disks. • Read-Only Has permission to read but not write to the disks. The name of the associated Virtual Disk. The number of host sessions currently accessing the Logical Unit. Modifying Logical Units Hover your mouse cursor over the button below the Host to bring up a series of options for that particular Logical Unit. RT X410/610/801- IR User M an ual A9- 468- 0005 REV 1.0 - 32 - CRU Detach Detaches the Logical Unit from a Virtual Disk and deletes it. 7.8 Enclosure Management Enclosure management gives access to the following menu options: SES Configuration, Hardware Monitor, and S.M.A.R.T. 7.8.1 SES Configuration SCSI Enclosure Services, or SES, is a command set that is used to manage and sense the state of the power supplies, cooling devices, displays, indicators, and individual drives of a SCSI device. RTX is an SES compliant enclosure. However, in order to use manage RTX using SES you must have the appropriate software installed on your computer. An example is SMARTMon, a S.M.A.R.T. disk monitor, offered by Santools at www.santools.com. To enable SES on RTX , you must have a Virtual Disk set up and a Logical Unit attached. Once you have done this, navigate to SES Configuration and simply click the “Enable” button, then click “Confirm”. The SES-enabled LUN will show up on the main SES screen. 7.8.2 Hardware Monitor The Hardware Monitor displays information about the voltages and temperatures of RTX . RT X410/610/801- IR User M an ual A9- 468- 0005 REV 1.0 - 33 - CRU Auto Shutdown When this checkbox is enabled, RTX will automatically shut down if any of each items’ voltage or temperature strays outside of the minimum or maximum displayed values. Auto shutdown is enabled by default to protect the hardware of RTX. 7.8.3 S.M.A.R.T. S.M.A.R.T. (Self-Monitoring Analysis and Reporting Technology) is a diagnostic tool for hard drives that gives advanced warning in some cases of hard drive failure. S.M.A.R.T. measures various attributes of a hard drive at all times to detect if certain values have moved outside of a certain range. The S.M.A.R.T. option allows you to view the S.M.A.R.T. status of all of your hard drives. RTX’s S.M.A.R.T. technology only supports SATA drives. SAS drives do not have this function and will display “N/A” in the GUI. 7.9 Maintenance The Maintenance screen gives access to the firmware and configuration functions: System Information, Upgrade, Reset to Factory Default, Import and Export, Event Log, and Reboot and Shutdown. RT X410/610/801- IR User M an ual A9- 468- 0005 REV 1.0 - 34 - CRU 7.9.1 System Information Click on System Information to display RTX’s hardware profile information. 7.9.2 Upgrade The upgrade function allows you to upgrade the firmware of RTX. DO NOT USE THIS FUNCTION WITHOUT SPECIFIC INSTRUCTION FROM CRU-DATAPORT TECHNICAL SUPPORT. Doing so could result in malfunction of your RTX. 7.9.3 Reset to Factory Default The Reset to Factory Default option allows you to restore settings to the factory defaults. Click on the “Confirm” button to verify. 7.9.4 Import & Export The Import & Export function allows you to import or export a firmware configuration file. DO NOT USE THIS FUNCTION WITHOUT SPECIFIC INSTRUCTION FROM CRU-DATAPORT TECHNICAL SUPPORT. Doing so could result in malfunction of your RTX. RT X410/610/801- IR User M an ual A9- 468- 0005 REV 1.0 - 35 - CRU 7.9.5 Event Log The Event Log allows you to view event messages. Check or uncheck the checkboxes of “Info”, “Warning”, and “Error” filter the events displayed. Click the “Download” button to save the entire event log as a text file. Click the “Clear” button to clear all event logs. Click the “Mute” button to stop the alarm if it is engaged. 7.9.6 Reboot and Shutdown The Reboot and Shutdown feature allows you to reboot or shutdown RTX’s RAID and LCD controllers. Note: Choosing “Shutdown” will not shut down the physical components of RTX (fans, drives, power supply). However, it will flush data from the cache to the physical drives, which is recommended to prevent data corruption before physically shutting down using the power switch on the back of the unit. 7.10 Online Support This screen contains helpful links to cru-dataport.com, including one for the “Product Information and Specs” of your unit and one for “FAQs and Downloads”. 7.11 Logout This screen allows you to log out of and exit the GUI. 8 iSCSI Initiator Software 8.1 Software Installation This is a required step. Any computer must have initiator software installed before it can connect to an iSCSI device such as RTX. Both freeware and commercial software utilities are available for this purpose. Note: Initiator software is not required for additional computers that share files with the host computer attached to RTX. In such a scenario, the host computer acts as a server to the other computers. Only the computer directly accessing RTX needs initiator software. 8.1.1 Windows Windows Vista and 7 already include the iSCSI software, no download is necessary. If necessary, users can download free Microsoft iSCSI Initiator software at the following URL: http://www.microsoft.com/download/en/details.aspx?id=18986 8.1.2 MacOS X Studio Network Solutions makes globalSAN iSCSI initiator, a free-to-try utility for MacOS X, available here: http://www.studionetworksolutions.com/support/faq.php?pi=11&fi=51 ATTO Technologies also makes a commercial iSCSI initiator for MacOS X: http://www.attotech.com/xtend.html 8.1.3 Linux Open-iSCSI initiator software is available for Linux users to download. Website: http://www.open-iscsi.org/ Readme: http://www.open-iscsi.org/docs/README RT X410/610/801- IR User M an ual A9- 468- 0005 REV 1.0 - 36 - CRU 8.2 Access RTX using iSCSI Initiator Software This software can by launched by double-clicking on the iSCSI Initiator icon in the Administrative Tools folder in the Control Panel. 8.2.1 Windows XP After you launch the initiator you'll see a window with several tabs, with the "General" tab opened by default. a) If you have set up CHAP in the RTX GUI, input the proper information by clicking on “General” tab and then clicking on the “Secret” button. b) Select the "Discovery" tab. Under Target Portals, click the "Add" button and enter the IP address for the RTX’s CH-1 or CH-2 port (depending which connection link is shown as “Up” on the NIC screen). c) Next, select the "Targets" tab. You should see a selection for the RTX in this Targets tab. d) Select that target and click "Log on." Leave the default settings alone and click “OK”. If the log-on is successful you'll now be able to use the RTX just like any other disk attached to your computer. 8.2.2 Windows Vista and Windows 7 a) After you launch the initiator, input the IP address for the RTX’s CH-1 or CH-2 port (depending which connection link is shown as “Up” on the NIC screen. b) Click on the “Quick Connect…” button. If the log-on is successful you'll now be able to use the RTX just like any other disk attached to your computer. Note: The Quick Connect feature does not support advanced connection types like CHAP. For instructions on connecting to an iSCSI target using advanced settings, visit the following URL: http://technet.microsoft.com/en-us/library/ee338480(v=ws.10).aspx#BKMK_ConnectAdvanced 8.2.3 GlobalSAN iSCSI Initiator for MacOS This software can be launched by double-clicking on the globalSAN iSCSI icon in System Preferences. a) After you launch the initiator you’ll see the globalSAN window pop up. Press the Add button (“+”) and choose Portal from the dropdown menu to add a new portal. b) On the Add Portal dialog box, enter the IP address for the RTX’s CH-1 or CH-2 port depending which connection link is shown as “Up” on the NIC screen, and then click OK. c) If you have set up CHAP in the RTX GUI input the proper information by clicking on the “Authentication Settings” button. d) Select the new target in the list to the left, then select the appropriate connection from the list that opens up on the right side and click the “Connect” button. If the log-on is successful you'll now be able to use the RTX just like any other disk attached to your computer. 9 Usage with Mac and Windows Operating Systems 9.1 Usage with Mac OS X 9.1.1 Compatibility RTX supports 3.5” SATA hard drives. RT X410/610/801- IR User M an ual A9- 468- 0005 REV 1.0 - 37 - CRU 9.1.2 Formatting a Drive To format, use Mac OS X’s Disk Utility (found in the applications folder). a) Click on the drive in the window to the left (see picture below). b) Click the Erase tab in the window to the right (see picture below). c) Select the format type. Most users prefer Mac OS Extended with Journaling (HFS+), which is required for compatibility with Time Machine (OS 10.5 or newer). If you need to use RTX with both Mac and Windows computers, select MS-DOS File System instead. d) Enter a name for the new volume and then click “Erase” to start the process. 9.1.3 Mounting and Unmounting Volumes Mounting Volumes If the hard drives installed in RTX are already formatted with the correct Security Key inserted into the Mini-USB Security Key Port, an icon representing RTX ’s volume will appear (mount) on the desktop. You can begin using the volume right away. If the volume is unformatted, a message will appear on the desktop saying that the disk is unreadable. Use OS X’s Disk Utility to easily format the drive (see section above). Unmounting Volumes First, eject the data volume by dragging the volume’s icon to the trash bin, or by selecting the icon then pressing Command-E. Next, log off the volume in your iSCSI initiator software. If you are using the globalSAN initiator, you log off from the “Targets” tab. Disconnecting in this way allows you to reconnect quickly later. Another way of preventing delays is to keep your iSCSI initiator software open at all times. You can minimize it and allow it to run in the background. Closing the software and then reopening it can cause a lengthy delay before access to RTX is allowed. NOTE: It is strongly suggested that you disable automatic sleep mode on your Mac. You can still put the Mac to sleep manually at any time as long as you follow the above procedures. This will prevent reconnection difficulties. 9.1.4 Creating a Boot Drive To activate this feature, you must first install OS X on the volume in RTX. The easiest way to do this is to clone an existing system drive using a utility such as Carbon Copy Cloner or Super Duper. Next, go to System Preferences Startup Disk. A window will list the available bootable volumes. Select the volume from which you wish to boot. Another method is to hold down the Option key during boot up. A screen should appear that allows you to select the volume you wish to use. This is useful if you wish to boot from RTX hard drive only some of the time. 9.2 Usage with Windows Operating Systems 9.2.1 Compatibility: RTX supports 3.5” hard drives. 9.2.2 Formatting a Drive: To format, use the Disk Management utility. a) Right-click on My Computer, then select Manage. The Computer Management window will open. b) In the left pane of this window, left-click on Disk Management. RT X410/610/801- IR User M an ual A9- 468- 0005 REV 1.0 - 38 - CRU c) The volume should appear in the list of Disks in the lower middle/right pane (see picture below). You may need to scroll down to see it. If the volume is already formatted, you can identify it easily by its volume name. If it’s unformatted, the Drive Properties Box will say “Unallocated” and you’ll need to initialize the disk before formatting it. Initialize the disk by right-clicking the Device Properties Box and selecting Initialize Disk. Device Properties Drive Properties d). To format the volume, right-click the Drive Properties Box and select “Format”. e) If you are prompted to select a partition type, select MBR for volumes 2TB or smaller, or GPT for volumes larger than 2TB. Note: Windows XP does not support GPT or volumes larger than 2TB. f) Click through several more windows, leaving the default settings (unless you need to change them), until you see a window that allows selection of a file system. Choose NTFS and enter a name for the new volume. Be sure to check the box labeled “Perform a quick format” unless you want to completely erase any data on the drive and have time to wait. A quick format should take less than a minute, while standard formatting may take several hours. g) Click “Next” and then “Finish” to start the format process. When the format is complete, the Drive Properties Box will update to show the new volume name. The new volume can now be found by double clicking on the My Computer icon on the desktop. 9.2.3 Mounting and Unmounting Volumes Mounting Volumes If the hard drives inside of RTX are already formatted with the correct Security Key inserted into the MiniUSB Security Key Port, you can begin using the volume right away. When RTX is properly connected and turned on, a window may open to allow you access to the volume. If no window appears, find the volume by double-clicking the “My Computer” icon. Unmounting Volumes Log off the volume using your iSCSI initiator software. In the Microsoft initiator, you can log off from the “Targets” tab. RT X410/610/801- IR User M an ual A9- 468- 0005 REV 1.0 - 39 - CRU 10 RAID Is Not a Backup Because RTX features redundant RAID modes which protect against a hard drive mechanical failure, it is an excellent part of any backup strategy. However, a RAID is not, in itself, a complete backup strategy. Many things besides hard drive failure can damage or erase your data: • Corruption caused by unexpected disconnection during data access (e.g. a cable is unplugged during a data transfer, or the computer crashes or loses power while writing to the drives) • Corruption or destruction caused by viruses or other malware • Sabotage by a disgruntled employee or acquaintance • Theft of your RTX • Natural disasters such as fire, flooding, etc. Considering these possibilities, any single copy of your important data must always be considered at risk. That's why backing up is so important. Follow the 3-2-1 backup rule. Data should exist in three different places on two different storage media and at least one of those copies should be maintained offsite. Without an effective backup strategy, recovering data may be impossible, or the cost of data recovery may be quite expensive. The CRU warranty does not cover costs associated with data loss (nor do the warranties of other hard drive manufacturers). Plan accordingly and backup data to minimize downtime! 11 Event Notifications Physical Disk Events Level Info Warning Error Error Error Error Info Info Warning Type PD inserted Disk removed HDD read error HDD write error HDD error HDD IO timeout PD upgrade started PD upgrade finished PD upgrade failed Description Disk <slot> is inserted into system Disk <slot> is removed from system Disk <slot> read block error Disk <slot> write block error Disk <slot> is disabled Disk <slot> gets no response PD [<string>] starts upgrading firmware process PD [<string>] finished upgrading firmware process PD [<string>] upgrade firmware failed Physical HW Events Level Warning Error Info Info Info Type ECC single ECC multiple ECC dimm ECC none SCSI bus reset Error Error Error Error Error Error Error SCSI host error SATA enable device fail SATA EDMA mem fail SATA remap mem fail SATA PRD mem fail SATA revision ID fail SATA reg fail Description Single-bit ECC error is detected at <address> Multi-bit ECC error is detected at <address> ECC Memory is installed Non-ECC Memory is installed Received SCSI Bus Reset event at the SCSI Bus <number> SCSI Host allocation failed Failed to enable the SATA PCI device Failed to allocate memory for SATA EDMA Failed to remap SATA memory IO space Failed ot initialize SATA PRD memory manager Failed to get SATA revision ID Failed to set SATA register RT X410/610/801- IR User M an ual A9- 468- 0005 REV 1.0 - 40 - CRU Error Error Error Error Info Info SATA init fail SATA diag fail Mode ID fail SATA chip count error SAS port reply error SAS unknown port reply error FC port reply error FC unknown port reply error Info Info Core failed to initialize the SATA adapter SATA Adapter diagnostics failed SATA Mode ID failed SATA chip count error SAS HBA port <number> reply terminated abnormally SAS frontend reply terminated abnormally FC HBA port <number> reply terminated abnormally FC frontend reply terminated abnormally EMS Events Level Info Error Info Error Warning Info Error Info Error Error Warning Error Error Type Power install Power absent Power restore Power fail Power detect Fan restore Fan fail Fan install Fan not present Fan over speed Thermal level 1 Thermal level 2 Thermal level 2 shutdown Error Thermal level 2 CTR shutdown Thermal ignore value Voltage level 1 Voltage level 2 Voltage level 2 shutdown Warning Warning Error Error Error Info Warning Error Error Voltage level 2 CTR shutdown UPS OK UPS fail UPS AC loss UPS power low Warning SMART T.E.C. Warning Warning Warning Warning Info SMART fail RedBoot failover Watchdog shutdown Watchdog reset Console Login Info Console Logout Info Web Login Description Power(<string>) is installed Power(<string>) is absent Power(<string>) is restored to work Power(<string>) is not functioning PSU signal detection(<string>) Fan(<string>) is restored to work Fan(<string>) is not functioning Fan(<string>) is installed Fan(<string>) is not present Fan(<string>) is over speed System temperature(<string>) is higher System overheated(<string>)!!! System overheated(<string>)!!! The system will autoshutdown immediately. The controller will auto shutdown immediately, reason [ Overheated(<string>) ]. Unable to update thermal value on <string> System voltage(<string>) is higher/lower. System voltages(<string>) failed!!! System voltages(<string>) failed!!! The system will autho shutdown immediately. The controller will auto shutdown immediately, reason [ Voltage abnormal(<string>) ]. Successfully detect UPS Failed to detect UPS AC loss for system detected UPS Power Low!!! The system will auto-shutdown immediately. Disk <slot> S.M.A.R.T. Threshold Exceed Condition occurred for attribute <string> Disk <slot>: Failure to get S.M.A.R.T. information RedBoot failover event occurred Watchdog timeout shutdown occurred Watchdog timeout reset occurred <username> login from <IP or serial console> via Console UI <username> logout from <IP or serial console> via Console UI <username> login from <IP> via Web UI RT X410/610/801- IR User M an ual A9- 468- 0005 REV 1.0 - 41 - CRU Info Info Warning Web Logout Log clear Send mail fail <username logout from <IP> via Web UI All event logs are cleared Failed to send event to <email> LVM Events Level Info Info Info Info Info Info Info Info Info Info Info Info Info Info Info Info Info Info Warning Info Info Warning Info Info Error Info Info Info Info Info Info Info Info Info Error Info Info Info Info Warning Warning Warning Error Type RG create OK RG create fail RG delete RG rename VD create OK VD create fail VD delete VD rename VD read only VD write back VD write through VD extend VD attach LUN OK VD attach LUN fail VD detach LUN OK VD detach LUN fail VD init started VD init finished VD init failed VD rebuild started VD rebuild finished VD rebuild failed VD migrate started VD migrate finished VD migrate failed VD scrub started VD scrub finished VD scrub aborted RG migrate started RG migrate finished RG move started RG move finished VD move started VD move finished VD move failed RG activated RG deactivated VD rewrite started VD rewrite finished VD rewrite failed RG degraded VD degraded RG failed Description RG <name> has been created Failed to create RG <name> RG <name> has been deleted RG <name> has been renamed as <name> VD <name> has been created. Failed to create VD <name> VD <name> has been deleted The name of VD <name> has been renamed to <name> Cache policy of VD <name> has been set as read only Cache policy of VD <name> has been set as write-back Cache policy of VD <name> has been set as write-through Size of VD <name> extends VD <name> has been LUN-attached Failed to attach LUN to VD <name> VD <name> has been detached Failed to detach LUN from bus <number> SCSI ID <number>, LUN <number> VD <name> starts initialization VD <name> completes initialization Failed to complete initialization of VD <name> VD <name> starts rebuilding VD <name> completes rebuilding Failed to complete rebuild of VD <name> VD <name> starts migration VD <name> completes migration Failed to complete migration of VD <name> Parity checking on VD <name> starts Parity checking on VD <name> completes with <address> parity/data inconsistency found Parity checking on VD <name> stops with <address> parity/data inconsistency found RG <name> starts migration RG <name> completes migration RG <name> starts move RG <name> completes move VD <name> starts move VD <name> completes move Failed to complete move of VD <name> RG <name> has been manually activated RG <name> has been manually deactivated Rewrite at LBA <address> of VD <name> starts Rewrite at LBA <address> of VD <name> completes Rewrite at LBA <address> of VD <name> failed RG <name> is in degraded mode VD <name> is in degraded mode RG <name> is failed RT X410/610/801- IR User M an ual A9- 468- 0005 REV 1.0 - 42 - CRU Error Error Warning Warning VD failed VD IO fault Recoverable read error Recoverable write error Unrecoverable read error Error Unrecoverable write error Error Config read rail Error Config write fail Error Error Info Error CV boot error adjust global CV boot global CV boot error reate global PD dedicated spare Info Info Warning Warning Warning Warning Info Info Info Info Info Info PD global spare PD read error PD write error Scrub wrong parity Scrub data recovered PD freed RG imported RG restored VD restored PD scrub started Disk scrub finished Large RG created Info Weak RG created Info Info Info Warning Info RG size shrunk VD erase finished VD erase failed VD erase started VD <name> is failed I/O failure for stripe number <address> in VD <name> Recoverable read error occurred at LBA <address> <address> of VD <name> Recoverable write error occurred at LBA <address> <address> of VD <name> Unrecoverable read error occurred at LBA <address> <address> of VD <name> Unrecoverable write error occurred at LBA <address> <address> of VD <name> Config read failed at LBA <address> - <address> of PD <slot> Config write failed at LBA <address> - <address> of PD <slot> Failed to change size of the global cache The global cache is OK Failed to create the global cache Assign PD <slot> to be dedicated spare disk of RG <name> Assign PD <slot> to Global Spare Disks Read error occurred at LBA <address> - <address> of PD <slot> Write error occurted at LBA <address> - <address> of PD <slot> The parity/data inconsistency is found at LBA <address> <address> when checking parity on VD <name> The data at LBA <address> - <address> is recovered when checking parity on VD <name> PD <slot> has been freed from RG <name> Configuration of RG <name> has been imported Configuration of RG <name> has been restored Configuration of VD <name> has been restored PD <slot> starts disk scrubbing process PD <slot> completed disk scrubbing process A large RG <name> with <number> disks included is created A RG <name> made up disks across <number> chassis is created The total size of RG <name> shrunk VD <name> finished erasing process The erasing process of VD <name> failed VD <name> starts erasing process iSCSI Events Level Info Info Info Type iSCSI login accepted iSCSI login rejected iSCSI logout recvd Description iSCSI login from <IP> succeeds ISCSI login from <IP> was rejected, reason [<string>] iSCSI logout from <IP> was received, reason [<string>] RT X410/610/801- IR User M an ual A9- 468- 0005 REV 1.0 - 43 - CRU System Maintenance Events Level Info Info Info Info Info Info Info Info Warning Error Info Type System shutdown System reboot System console shutdown System web shutdown System button shutdown System LCM shutdown FW upgrade start FW upgrade success FW upgrade failure IPC FW upgrade timeout Config imported Description System shutdown System reboot System shutdown from <string> via Console UI System shutdown from <string> via Web UI System shutdown via power button System shutdown via LCM System firmware upgrade starts System firmware upgrade succeeds System firmware upgrade is failed System firmware upgrade timeout on another controller <string> config imported HAC Events Level Info Type RG owner changed Info Force CTR write through Info Restore CTR cache mode Info Failover complete Info Failback complete Info Error Error Error Error Error Error Error Error Error Info CTR inserted CTR removed CTR timeout CTR lockdown CTR memory NG CTR firmware NG CTR lowspeed NG CTR highspeed NG CTR backend NG CTR frontend NG CTR reboot FW sync Description The preferred owner of RG <name> has been changed to controller <number> Controller <number> forced to adopt write-through mode on failover Controller <number> restored to previous caching mode on failback All volumes in controller <number> completed failover process All volumes in controller <number> completed failback process Controller <number> is inserted into system Controller <number> is removed from system Controller <number> gets no response Controller <number> is locked down Memory size mismatch Firmware version mismatch Low speed inter link is down High speed inter link is down SAS expander is down FC IO controller is down Controller reboot, reason [Firmware synchronization completed] 12 Working With Volumes Over 2TB in Size Although RTX can create data volumes larger than 2TB, some older operating systems cannot access such volumes. This is because they support only 32-bit LBA (Logical Block Addressing). Newer operating systems should be able to use 2TB+ volumes without difficulty. You will simply need to do one of the following two things while creating a Virtual Disk: • Change the LBA to 64-bit • Increase the block size to 4096 Windows Neither of the options above will work for operating systems older than Windows XP. You need to make more than one Virtual Disk, each less than 2TB in size. Each Virtual Disk also needs a different LUN. RT X410/610/801- IR User M an ual A9- 468- 0005 REV 1.0 - 44 - CRU Mac OS Although Mac OS 10.4.x supports only 32-bit LBA, increasing the block size to 4096 will allow you to create a 2TB+ volume that is usable by the OS. Linux Versions of Linux vary, but using one of the above methods may allow you to create a 2TB+ volume that your distribution can use. 13 Frequently Asked Questions (FAQ) Q I created one volume, but my computer sees two of them. Why? A There may be two Logical Unit Numbers (LUN) assigned to that volume. To check this, use the GUI. Navigate to “Volume Configuration” and then “Logical Unit”. If there are two Logical Units for the same volume, hover your mouse over the button for one of them in the “Host” column and click on “detach.” Note: You may still see two volumes until you restart your computer. Q I've hooked up the Config GUI port to my DHCP-enabled network, but the LCD displays an IP address that is not on my network and I cannot connect to the GUI control panel using that IP address in my web browser. A This may occur if you plugged in the Config GUI after RTX has already started up and initialized, or if you previously configured RTX for a static network or direct connection. The solution is to use the LCD interface to obtain a DHCP address. Press “ENT”, then use the ▲ (Up) or ▼ (Down) arrows to scroll to the option “Change IP Config”. Press “ENT”. The screen will say “DHCP”. Press “ENT”, then press the ▲ (Up) arrow to select “Yes”. Press “ENT”. RTX will now attempt to acquire a DHCP address. This new address will be displayed on the main screen of the LCD. Q When I try to log on to RTX using the IP address under the iSCSI configuration menu, nothing happens. A Sometimes when you first set up RTX you’ll need to reattach the Logical Unit if it doesn't work the first time. Q How many computers can connect to one data volume on the iSCSI unit? A The short answer is one computer to one volume. This is the safest and suggested usage of RTX. If two people are accessing files on the same volume at the same time, there is a very high chance that data corruption will occur. There are a few file systems that can handle different users manipulating the same volume, but they are not supported by Mac OS or Windows. However, if the users connected to the volume have read-only access, then corruption will not be an issue. Q When I make more than one volume, I still see all volumes when connecting to the iSCSI IP address. How am I supposed to allow only one person per volume if that's the case? A When you attach a Logical Unit to a Virtual Disk you'll probably notice a "Host" field with an asterisk as the default selection. This means that any iSCSI Initiator will be able to connect to that volume through that Virtual Disk. All iSCSI Initiators have a unique name. You can use this name to restrict access to only certain computers. For example, if my initiator is assigned the name iqn.199105.com.microsoft:username01.crudataport.local, and if I put that name into the host field when attaching a Logical Unit, then only my specific computer will be able to connect to that volume. You can use this to give one person read access and everyone else write access by attaching two Logical Units to one Virtual Disk. Q If I connect one computer to RTX and then share the files from that computer, can more than one computer access the files? Would the other computers need iSCSI initiators installed on them? RT X410/610/801- IR User M an ual A9- 468- 0005 REV 1.0 - 45 - CRU A One computer at a time can directly access RTX, but files on RTX can be shared from that computer to other computers. In such a scenario, the computer attached to RTX acts as a server. Only the server computer requires an iSCSI initiator. The other computers do not need special software. Q What is the difference between iSCSI and NAS (Network Attached Storage)? A The difference between iSCSI and NAS is that a NAS does not need a computer to act as a server. Q I put my computer to sleep, and now it’s having trouble reconnecting to RTX. How can I prevent this? A To prevent difficulties such as this, follow the shutdown procedure documented in the LCD menu diagram in Section 6.2.3. CRU-DataPort also suggests that you disable automatic sleep on your computer so it does not go into sleep mode without preparing RTX for disconnection. Still need help? Please contact our Technical Support team at http://www.cru-dataport.com/support or call us toll free at (800) 260-9800. RT X410/610/801- IR User M an ual A9- 468- 0005 REV 1.0 - 46 - CRU 14 Technical Specifications Product Models: Raid Levels Supported: Host Interfaces: Data Interface Speeds: Drive Types Supported: Online Auto-Rebuild: RTX 410-IR, 610-IR and RTX 801-IR RAID 0, 1, 3, 5, 6, 0+1, 10, 30, 50, 60, & JBOD Dual Gigabit Ethernet Up to 200MB/s (network dependent) 3.5-inch SATA (Serial-ATA) hard disk drives Yes • Alarm Indicator • Power Indicator • Access Indicator LED Indicators: Security: Controller Display: Separate key lock for each HDD (RTX 410 and 610-IR only) LCD screen with yellow backlight/control panel Operating System Requirements: Power Supply: Compliance: • • • • • Windows XP, Vista, Windows 7 Mac OS X 10.2.6 or later Linux distributions using Kernel version 2.4 or above Input: 100-240VAC Output: 220 Watts (4-bay model), 350 Watts (6-bay and 8-bay models) EMI Standard: FCC Part 15 Class A, CE EMC Standard: EN55022, EN55024 FIPS: FIPS 140-2, FIPS PUB 197 Shipping Weights: • RTX 410-IR: 23 pounds without drives,29 pounds with drives • RTX 610-IR: 25 pounds without drives, 35 pounds with drives • RTX 801-IR: 28 pounds without drives, 42 pounds with drives RTX410-IR: 177mm W x 270mm D x 274mm H RTX610-IR and RTX 801-IR: 177mm W x 270mm D x 370mm H We don’t expect anything to go wrong with your CRU product. But if it does, Tech Support Technical Support is standing by and ready to help. Contact us at http://www.cru-dataport.com/support. We also offer phone support at (800) 260-9800 and (866) 744-8722. RTX and TrayFree are trademarks of CRU Acquisitions Group, LLC. Other marks are the property of their respective owners. © 2008, 2010 CRU Acquisitions Group, LLC. Dimensions: Product Warranty CRU-DataPort (CRU) warrants this product to be free of significant defects in material and workmanship for a period of three years from the original date of purchase. CRU’s warranty is nontransferable and is limited to the original purchaser. Limitation of Liability The warranties set forth in this agreement replace all other warranties. CRU expressly disclaims all other warranties, including but not limited to, the implied warranties of merchantability and fitness for a particular purpose and non-infringement of third-party rights with respect to the documentation and hardware. No CRU dealer, agent, or employee is authorized to make any modification, extension, or addition to this warranty. In no event will CRU or its suppliers be liable for any costs of procurement of substitute products or services, lost profits, loss of information or data, computer malfunction, or any other special, indirect, consequential, or incidental damages arising in any way out of the sale of, use of, or inability to use any CRU product or service, even if CRU has been advised of the possibility of such damages. In no case shall CRU’s liability exceed the actual money paid for the products at issue. CRU reserves the right to make modifications and additions to this product without notice or taking on additional liability. FCC Compliance Statement: “This device complies with Part 15 of the FCC rules. Operation is subject to the following two conditions: (1) This device may not cause harmful interference, and (2) this device must accept any interference received, including interference that may cause undesired operation.” This equipment has been tested and found to comply with the limits for a Class A digital device, pursuant to Part 15 of the FCC Rules. These limits are designed to provide reasonable protection against harmful interference when the equipment is operated in a commercial environment. This equipment generates, uses, and can radiate radio frequency energy and, if not installed and used in accordance with the instruction manual, may cause harmful interference to radio communications. Operation of this equipment in a residential area is likely to cause harmful interference in which case the user will be required to correct the interference at this own expense. In the event that you experience Radio Frequency Interference, you should take the following steps to resolve the problem: 1) Ensure that the case of your attached drive is grounded. 2) Use a data cable with RFI reducing ferrites on each end. 3) Use a power supply with an RFI reducing ferrite approximately 5 inches from the DC plug. 4) Reorient or relocate the receiving antenna. RT X410/610/801- IR User M an ual A9- 468- 0005 REV 1.0 Tested to comply with FCC standards FOR OFFICE OR COMMERCIAL USE - 47 -