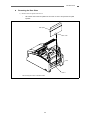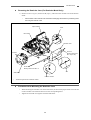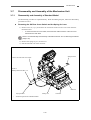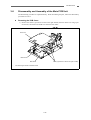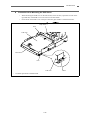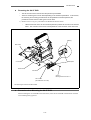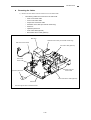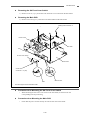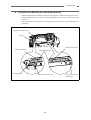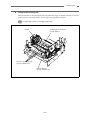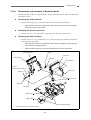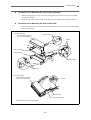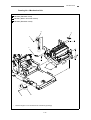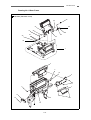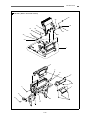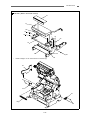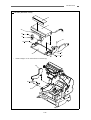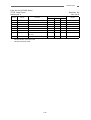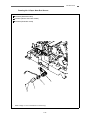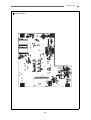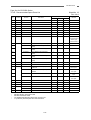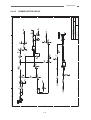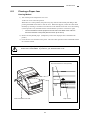
1
DOT MATRIX PRINTER
CD-S500 Series
Service Manual
Rev. 1 (2005. 05)
NJ74905-01F
CD-S500 Series
Introduction
This manual is intended for in-field service personnel and explains maintenance procedures for
Citizen Dot Matrix Printer CD-S500 series.
Read and understand the contents described in this manual for appropriate maintenance.
Features
This printer is a dot matrix printer developed for use with various kinds of data communication
terminals, POS terminals, and kitchen printers.
•
Compact design
•
A paper drop-in mechanism that simplifies paper loading
•
High-speed printing to a maximum of 240 cps
•
Multiple copy printing (original form + 2 copies)
•
Input buffer available
•
Black mark sensor mechanism
•
Versatile printing layout using the page mode
•
Logo data or text data prepared by the user can be stored in its user memory
•
Built-in drawer kick-out interface
•
Optional auto cutter (full cut/partial cut)
•
Capacity for paper with widths of 76.2/69.5/57.5 mm
•
Serial (RS-232C) or parallel (IEEE and Centronics compliant) interface
•
Selection of functions diversified by its operation panel (soft SW setting mode)
•
Can be wall-mounted (optional)
•
Built-in buzzer
•
Built-in or external AC adapter types available
•
Two-color printing (red/black)
i
CD-S500 Series
Explanation of Models
Models in this series are identified by the following model naming method.
Model number:
CD-S
Model name
500:
Standard model
501:
Auto cutter model
503:
Rewinder model
Power source type
A: External AC adapter type
S:
Built-in AC adapter type
Interface
PA:
Parallel IEEE1284 compatible
RS:
Serial RS-232C compatible*
UB:
USB
Region (Characters + power cord)
J:
Japan
E: Europe
U: North America
C: China
Case color
WH: Cool white
BK:
Black
Black mark sensor
None: No sensor
M1:
*
Left sensor for paper front
M2:
Right sensor for paper back
M3:
Left sensor for paper front
M4:
Right sensor for paper back
Setscrews for serial interface connectors are available in either inch or metric measurement
system depending on the region.
ii
CD-S500 Series
Contents
Chapter 1
SAFETY INSTRUCTIONS
1-1
Conventions for Warning and Caution ................................................................................... 1-1
1-2
Precautions in Handling ......................................................................................................... 1-1
1-3
Precautions in Storage .......................................................................................................... 1-1
1-4
Precautions in Maintenance .................................................................................................. 1-2
Chapter 2
SPECIFICATIONS
2-1
General Specification ............................................................................................................. 2-1
2-2
External Dimensions .............................................................................................................. 2-3
Chapter 3
DISASSEMBLY, ASSEMBLY AND ADJUSTMENT
3-1
Precautions in Maintenance .................................................................................................. 3-1
3-2
Service Tools ......................................................................................................................... 3-1
3-3
Disassembly Flow Diagram ................................................................................................... 3-2
3-4
Disassembly and Assembly of AC Adapter Case (Built-in AC Adapter Type) ....................... 3-3
♦ Removing the AC Adapter ................................................................................... 3-3
♦ Precaution when Mounting the AC Adapter ........................................................ 3-3
3-5
Disassembly and Assembly of the Rear Cover, Window and Rear Plate .............................. 3-4
3-5-1
Disassembly and Assembly of Standard Model ...................................................... 3-4
♦ Removing Rear Cover N and Window N ............................................................. 3-4
♦ Precaution when Mounting Window N ................................................................ 3-4
♦ Removing the Rear Plate .................................................................................... 3-5
3-5-2
Disassembly and Assembly of Rewinder Model ...................................................... 3-6
♦ Removing Rear Cover R and Window R ............................................................. 3-6
♦ Precaution when Mounting Window R ................................................................ 3-6
3-6
Disassembly and Assembly of Case U, Front Cover and Operation Panel PCB .................. 3-7
♦ Removing the Lever Cover, Case U and Knob N ................................................ 3-7
♦ Precaution when Mounting Case N ..................................................................... 3-8
♦ Removing the Front Cover .................................................................................. 3-8
♦ Removing the Operation Panel PCB ................................................................... 3-8
♦ Removing the Rewinder Case (For Rewinder Model Only) ................................ 3-9
♦ Precaution when Mounting the Rewinder Case .................................................. 3-9
1
CD-S500 Series
3-7
Disassembly and Assembly of the Mechanism Unit ............................................................ 3-10
3-7-1
Disassembly and Assembly of Standard Model .................................................... 3-10
♦ Removing the SA Rear Cover Switch and the Spring for Lever ........................ 3-10
♦ Precaution when Mounting the Rear Cover Switch ........................................... 3-11
♦ Removing the Mechanism Unit ......................................................................... 3-12
♦ Precaution when Mounting the Mechanism Unit ............................................... 3-13
♦ Oiling to the Mechanism Unit ............................................................................ 3-13
3-7-2
3-8
Disassembly and Assembly of Rewinder Model .................................................... 3-14
Disassembly and Assembly of the Main PCB Unit .............................................................. 3-15
♦ Removing the PCB Cover ................................................................................. 3-15
♦ Precaution when Mounting the PCB Cover ....................................................... 3-16
♦ Removing the SA I/F PCB ................................................................................. 3-17
♦ Precaution when Mounting the SA I/F PCB ...................................................... 3-17
♦ Removing the Cables ........................................................................................ 3-18
♦ Removing the SA Front Cover Switch ............................................................... 3-19
♦ Removing the Main PCB ................................................................................... 3-19
♦ Precaution when Mounting the SA Front Cover Switch .................................... 3-19
♦ Precaution when Mounting the Main PCB ......................................................... 3-19
3-9
Disassembly and Assembly of the Printing Unit .................................................................. 3-20
♦ Removing the Manual Cutter ............................................................................. 3-20
♦ Removing the Lower Blade (Optional) .............................................................. 3-20
♦ Removing the Cutter Plate ................................................................................ 3-20
♦ Precaution when Mounting the Lower Blade (Optional) .................................... 3-21
♦ Removing the Head Cover ................................................................................ 3-22
♦ Removing the SA Print Head ............................................................................ 3-22
♦ Removing the Ribbon Mask .............................................................................. 3-22
♦ Precaution when Mounting the SA Print Head and the Ribbon Mask ............... 3-23
♦ Removing the SA Black Mark Sensor PCB ....................................................... 3-24
♦ Precaution when Mounting the SA Black Mark Sensor PCB ............................ 3-24
♦ Oiling to the Printing Unit ................................................................................... 3-25
3-10 Disassembly and Assembly of the Platen Chassis and Cutter Chassis .............................. 3-26
3-10-1 Disassembly and Assembly of Standard Model .................................................... 3-26
♦ Removing the Sector Gear Plates 1 and 2 ........................................................ 3-26
♦ Removing the Platen Chassis ........................................................................... 3-26
♦ Precaution when Mounting Sector Gear Plates 1, 2 ......................................... 3-27
♦ Precaution when Mounting the Platen Chassis ................................................. 3-27
♦ Removing the Platen Cover .............................................................................. 3-28
2
CD-S500 Series
♦ Removing the Paper Guide ............................................................................... 3-28
♦ Removing the Platen ......................................................................................... 3-28
♦ Removing Armature Switch 2 ............................................................................ 3-29
♦ Removing the SA1 PF shaft .............................................................................. 3-29
♦ Precaution when Mounting Armature Switch 2 ................................................. 3-29
♦ Precaution when Mounting the SA1 PF shaft .................................................... 3-29
♦ Oiling to the Platen Chassis .............................................................................. 3-30
3-10-2 Disassembly and Assembly of Rewinder Model .................................................... 3-31
♦ Removing the Cutter Chassis ............................................................................ 3-31
♦ Removing the Sector Gear Plate 1 .................................................................... 3-31
♦ Removing the Platen Chassis ........................................................................... 3-31
♦ Precaution when Mounting the Sector Gear Plate 1 ......................................... 3-32
♦ Precaution when Mounting the Platen Chassis ................................................. 3-32
♦ Precaution when Mounting the Cutter Chassis ................................................. 3-32
♦ Removing the Platen Cover .............................................................................. 3-33
♦ Removing the Paper Guide ............................................................................... 3-33
♦ Removing the Platen ......................................................................................... 3-33
♦ Removing the SA1 PF Shaft ............................................................................. 3-33
♦ Precaution when Mounting the SA1 PF Shaft ................................................... 3-33
♦ Oiling to the Platen Chassis and the Cutter Chassis ......................................... 3-34
3-11 Disassembly and Assembly of the Auto Cutter .................................................................... 3-35
3-11-1 Disassembly and Assembly of Standard Model .................................................... 3-35
♦ Removing the Auto Cutter (Optional) ................................................................ 3-35
♦ Removing the Auto Cutter Plate ........................................................................ 3-35
♦ Precaution when Mounting the Auto Cutter (Optional) ...................................... 3-36
♦ Precaution when Mounting the Auto Cutter Plate ............................................. 3-36
3-11-2 Disassembly and Assembly of Rewinder Model .................................................... 3-37
♦ Removing the Auto Cutter ................................................................................. 3-37
♦ Removing Armature Switch 1 ............................................................................ 3-37
♦ Precaution when Mounting the Auto Cutter ....................................................... 3-38
♦ Precaution when Mounting Armature Switch 1 ................................................. 3-38
3-12 Disassembly and Assembly of the Rewinder Unit (For rewinder model only) ..................... 3-39
♦ Removing the Rewinder Motor .......................................................................... 3-39
♦ Removing the Rewinder Gear, Rewinder Roller and Rewinder Roller Pin ........ 3-39
♦ Precaution when Mounting the Rewinder Motor ............................................... 3-40
♦ Precaution when Mounting the Rewinder Roller Pin ......................................... 3-40
♦ Oiling to the Rewinder Unit ................................................................................ 3-41
3
CD-S500 Series
3-13 Oiling .................................................................................................................................... 3-42
3-14 Setting the Paper Near End Sensor .................................................................................... 3-43
3-15 Adjusting the Head Gap ....................................................................................................... 3-44
Chapter 4
4-1
4-2
PARTS LIST
Mechanical Parts List ............................................................................................................. 4-1
4-1-1
Drawing No. 1 Parts List & Location for AC Adapter Case ...................................... 4-1
4-1-2
Drawing No. 2 Parts List & Location for Rear Cover ............................................... 4-4
4-1-3
Drawing No. 3 Parts List & Location for Overall Cover ............................................ 4-7
4-1-4
Drawing No. 4 Parts List & Location for Mechanism Unit ...................................... 4-11
4-1-5
Drawing No. 5 Parts List & Location for Main PCB ............................................... 4-16
4-1-6
Drawing No. 6 Parts List & Location for Base Frame ............................................ 4-20
4-1-7
Drawing No. 7 Parts List & Location for Rewinder ................................................ 4-29
4-1-8
Drawing No. 8 Parts List & Location for Paper Near End Sensor ......................... 4-33
Electric Parts List ................................................................................................................. 4-36
4-2-1
Parts List & Location for Unit, Main PCB ............................................................... 4-36
4-2-2
Parts List & Location for Unit, Ope-Pane PCB ...................................................... 4-44
4-2-3
Parts List & Location for Unit, Serial I/F PCB ........................................................ 4-47
4-2-4
Parts List & Location for Unit, Parallel I/F PCB ..................................................... 4-52
4-2-5
Parts List & Location for Unit, PNE SENS PCB .................................................... 4-55
4-2-6
Parts List & Location for Unit, BM SENS PCB ...................................................... 4-58
4-3
Accessory Parts List ............................................................................................................ 4-61
4-4
Recommended Spare Parts List .......................................................................................... 4-63
Chapter 5
CIRCUIT DIAGRAMS
5-1
INTER-CONNECTION ........................................................................................................... 5-1
5-2
UNIT, MAIN PCB .................................................................................................................... 5-2
5-2-1
CPU CIRCUIT ......................................................................................................... 5-2
5-2-2
MEMORY CIRCUIT ................................................................................................. 5-3
5-2-3
GATE ARRAY CIRCUIT .......................................................................................... 5-4
5-2-4
PF/CR MOTOR CIRCUIT ........................................................................................ 5-5
5-2-5
PF/CR MTR VCC CONTROL CIRCUIT .................................................................. 5-6
5-2-6
HEAD PIN DRIVER CIRCUIT ................................................................................. 5-7
5-2-7
I/F CONNECTOR CIRCUIT ..................................................................................... 5-8
5-2-8
DRAWER/OPE-PANE/BUZZER CIRCUIT .............................................................. 5-9
5-2-9
SENSOR/REWINDER CIRCUIT ........................................................................... 5-10
5-2-10 POWER/CUTTER CIRCUT ................................................................................... 5-11
4
CD-S500 Series
5-3
SA, OPE-PANE PCB ........................................................................................................... 5-12
5-4
SA, SERIAL I/F PCB (MM) .................................................................................................. 5-13
5-5
SA, SERIAL I/F PCB (INCH) ............................................................................................... 5-14
5-6
SA, PARALLEL I/F PCB ...................................................................................................... 5-15
5-7
SA, PNE SENS PCB ........................................................................................................... 5-16
5-8
SA, BM SENS PCB ............................................................................................................. 5-17
Chapter 6
TROUBLESHOOTING
6-1
Troubleshooting List .............................................................................................................. 6-1
6-2
Clearing a Paper Jam ............................................................................................................ 6-4
6-3
Operation Panel ..................................................................................................................... 6-5
6-3-1
Basic Display ........................................................................................................... 6-5
6-4
Error Indication ...................................................................................................................... 6-6
6-5
Demonstration Printing Function ........................................................................................... 6-8
6-6
Maintenance Function ........................................................................................................... 6-9
6-7
6-6-1
HEX Dump Mode .................................................................................................... 6-9
6-6-2
Soft SW Setting Mode ........................................................................................... 6-10
6-6-3
Initial Factory Shipping Mode ................................................................................ 6-15
6-6-4
Cut Position Adjustment Mode .............................................................................. 6-15
Maintenance Function for Service ....................................................................................... 6-16
6-7-1
Busy Condition Check Mode ................................................................................. 6-17
6-7-2
ROM Rewrite Receiving Mode .............................................................................. 6-19
6-7-3
ROM Rewrite Sending Mode ................................................................................. 6-19
6-7-4
Printing Column Misalignment Adjustment Mode .................................................. 6-19
6-7-5
Drawer Check Mode .............................................................................................. 6-20
6-7-6
Maintenance Sending/Receiving Mode ................................................................. 6-20
5
Chapter 1
SAFETY INSTRUCTIONS
CD-S500 Series
1-1
Conventions for Warning and Caution
The instructions that shall be observed to prevent injury to service personnel and others or damage to
the user’s property are indicated with the following symbols. The symbols are classified for the
degree of possible injury and damage due to incorrect use without following the instructions.
Understand the meanings of these symbols before reading this manual.
• Indicates a situation which, if not observed and handled properly, could result in death
or serious injury.
WARNING
警 告
• Indicates a situation which, if not observed and handled properly, could result in injury.
CAUTION
1-2
CAUTION
1-3
CAUTION
Precautions in Handling
(1)
If a paper type other than the recommended paper is used, printing quality or service
life may not be guaranteed. Also, be sure to use the paper of the specified width.
(2)
Use a ribbon cassette for the CD-S500 series. If any other ribbon cassette is used,
some problem, such as print head wire malfunction or poor printing quality, may
occur. Do not supply ink to the ink ribbon.
(3)
Do not attempt to print without printing paper and a ribbon cassette mounted. Doing
so would damage the print head and the platen surface resulting in poor printing
quality and shortened service life.
(4)
When moving the head, be sure to do so by rotating the gear. Moving the head
directly by hand would apply an overload to the carriage pin causing a time lag in
printing, etc.
(5)
Avoid installing the printer in a place where dust, dirt or metallic particles are present.
(6)
Be careful not to attach any foreign matter to the circuit boards.
Precautions in Storage
(1)
Avoid storing the printer in a place where dust or dirt is present or a place of high
temperature or humidity.
(2)
When storing or transporting the printer, be sure to remove the ribbon cassette.
Failure to do so may cause a problem such as poor printing quality.
1-1
CD-S500 Series
1-4
CAUTION
Precautions in Maintenance
• When performing disassembly, assembly or adjustment, provide static protection and
release static electricity from your body to protect printed circuit boards, etc. from
damage due to static electricity.
• When performing disassembly, assembly or adjustment, unplug the power cord of the
printer from the service outlet to avoid shock hazards.
1-2
Chapter 2
SPECIFICATIONS
CD-S500 Series
2-1
General Specification
Item
Function
1.
Printing mode
Serial impact dot matrix
2.
Printing direction
Bi-directional
3.
Head pins
9 pins (φ: 0.3mm, Pin interval: 1/72 inch)
4.
Printing line columns
Paper width of 76.2 mm:
40/42 or 33/35 columns
Paper width of 69.5 mm:
36/40 or 30/32 columns
Paper width of 57.5 mm:
30/33 or 25/27 columns
Maximum printing region:
200/400 dots (full dot/including half dot)
ANK 7 × 9 or 9 × 9 dots
5.
Font configuration
Chinese 16 × 16
(Compatible only with Chinese spec.)
Japanese 16 × 16
(Compatible only with Japanese spec.)
ASCII (96 characters), international characters, Katakana
Code pages: 437, 850, 860, 863, 865, 852, 866, 857, 858, WPC1252
6.
7.
Character types
Panel/switch
Simplified Chinese
GB18030-2000
(Compatible only with Chinese spec.)
Japanese
JIS
(Compatible only with Japanese spec.)
1 switch (FEED), 3 LEDs (POWER/PAPER OUT/ERROR), 1 buzzer
Printing:
8.
Printing speed
Through-put:
240 CPS (3P paper 200 CPS)
76.2 mm wide, 40 columns (7 × 9 + 3sp, 6LPI) 5.0 LPS
69.5 mm wide, 36 columns (7 × 9 + 3sp, 6LPI) 5.4 LPS
57.5 mm wide, 30 columns (7 × 9 + 3sp, 6LPI) 6.0 LPS
Friction feed
9.
Paper feed
Minimum pitch:
1/144 inch
Paper feed speed:
40 LPS (6LPI)
Types:
1P roll paper
2P copy roll paper (1 original + 1 copy)
3P copy roll paper (1 original + 2 copies)
*When 3P is used, printing speed falls 16%.
Paper width:
10.
Paper
76.2/69.5/57.5 (±0.5) mm
Roll diameter:
φ30 mm to φ83 mm
Core diameter:
Inner diameter φ10 + 2 − 0 mm
Outer diameter φ27 mm or less
Paper thickness:
1P 0.06 to 0.085 mm
Copy paper 0.05 to 0.20 mm (total thickness)
The total thickness that can be cut is from 0.05 to
0.14 mm.
*
No glue on the core or end of the paper
2-1
CD-S500 Series
Item
Function
Method:
11.
Special ribbon cassette
Colors:
Single color (purple, black), 2-color (black and red)
Life:
Purple, approx. 4 million characters
(continuous printing at 25°C)
Ribbon
Black, approx. 3 million characters
(continuous printing at 25°C)
Black/red, Black 1.5 million characters,
Red 750,000 characters
(continuous printing at 25°C)
12.
Interface
13.
Emulation
14.
Data buffer
Standard:
RS-232C or IEEE1284
Option:
USB, Ethernet (exchanged with standard I/F)
ESC/POS (page mode)
CBM mode, STAR mode
Receiving buffer:
40 or 4K bytes
NV bit image:
128K bytes
User NV memory:
8K
Paper drop-in type
Auto cutter function (full cut/partial cut)
Rewinder function
15.
Features
Black mark sheet compatible
Copy (2P/3P) paper compatible
DKD (Drawer Kick Driver) function
ASB (Auto Status Back) function
AC adapter (Built-in type)
16.
17.
Power
External dimensions
Input:
90 VAC - 246 VAC, 50/60 Hz
Output:
24 VDC ± 5%
Power consumption:
24 W (rating)
Standard:
156 (W) × 247.7 (D) × 132 (H) mm
With auto cutter:
156 (W) × 247.7 (D) × 132 (H) mm
With auto cutter and rewinder: 156 (W) × 277.7 (D) × 157 (H) mm
*
18.
Body weight
Excluding the AC adapter case
Standard:
2.20 kg
with auto cutter:
2.30 kg
with auto cutter + rewinder:
2.45 kg
*
Excluding the AC adapter, AC adapter case, ribbon cassette and paper
During operation:
19.
20.
21.
Environmental conditions
Durability
Vibration resistance
During storage:
Temperature
0 to 50°C
Humidity
10 to 90%RH (no condensation)
Temperature
−20 to 70°C
Humidity
5 to 90%RH (no condensation)
Machine reliability:
7.5 million lines (MCBF)
Head lifetime:
150 million characters
Cutter lifetime:
1 million cuts
Frequency: 5-55-5 Hz, Sweep: 20 minutes (full sweep)
X/Y/Z direction: 1 hour each, acceleration: 19.6 m/s2
2-2
CD-S500 Series
Item
Function
When packed:
22.
Shock resistance
23.
Electrostatic discharge
threshold
24.
Applicable standards
When unpacked: height: 5 cm,
Conforms to IEC 61000-4-2,
direction: 1 corner, 3 edges, 6 faces
direction: 4 edges, single side support
contact discharge: 4 kV,
air/indirect discharge: 8 kV
UL60950-1, CSA C22.2 No.60950-1, FCC Class A, TÜV-GS (EN60950-1),
CE Marking Class A, CCC (GB4943, GB9254, GB17625.1), VCCI Class A
External Dimensions
Standard model
132
156
247.7
AC adapter case + rewinder model
196.7
2-2
height: 60 cm,
156
277.7
2-3
Chapter 3
DISASSEMBLY, ASSEMBLY
AND ADJUSTMENT
CD-S500 Series
3-1
Precautions in Maintenance
• When performing disassembly, assembly or adjustment, provide static protection and
release static electricity from your body to protect printed circuit boards, etc. from
damage due to static electricity.
CAUTION
• When performing disassembly, assembly or adjustment, unplug the power cord of the
printer from the service outlet to avoid shock hazards.
3-2
Service Tools
The following service tools are required for replacement of units, etc. in the field.
•
Slotted screwdriver (small)
•
Phillips screwdriver (M1.7, M2, M3, M4)
•
Thickness gauge (t = 0.5 mm, 0.55 mm, 0.6 mm)
•
Tweezers
•
Long-nose pliers
•
Nippers
•
Soldering iron
•
Multimeter
•
Pliers
3-1
CD-S500 Series
3-3
Disassembly Flow Diagram
When replacing a part, refer to the disassembly flow diagram shown below.
*
“3-x” in the disassembly flow diagram shows the corresponding section number in this manual.
Start
3-8 SA I/F PCB
3-10 Platen cover
3-9 Lever cover
Paper guide
Platen
Manual cutter
Armature switch 2
Lower blade
Head cover
3-11 Armature switch 1
SA print head
Ribbon mask
3-4 AC adapter case
3-5 Rear cover, window
3-10 Sector gear plate
3-5 Rear plate
3-6 Case U
3-6 Front cover, operation panel PCB
3-6 Rewinder case
3-9 SA black mark sensor PCB
3-12 Rewinder motor
Rewinder gear
Rewinder roller
Rewinder roller pin
3-9 Cutter plate
3-10 Platen chassis
SA1 PF shaft
3-7 Mechanism unit
3-7 Rear cover switch, spring for lever
3-8 Rear cover switch
3-8 SA front cover switch
3-11 Auto cutter
Auto cutter plate
3-8 Main PCB
3-8 Cables
3-2
CD-S500 Series
3-4
Disassembly and Assembly of AC Adapter Case
(Built-in AC Adapter Type)
The disassembly procedure is explained mainly. When assembling the parts, follow the disassembly
procedure in reverse.
♦
Removing the AC Adapter
1) Remove screws A (2 pcs.) and screws B (2 pcs.), and remove the AC adapter case from the
chassis.
2) Remove screws C (4 pcs.), and remove the hanger support from the AC adapter case.
3) Remove the AC adapter from the AC adapter case.
4) Pull the AC adapter cable connector out of the connector on the printer.
Connector
Screw C
Binding head screw M3 × 8 (P TITE)
Hanger support
Connector
AC adapter cable
AC adapter
Boss
Screw B
Pan head screw M3 × 14 (P TITE)
Screw A
Pan head screw M3 × 8 (S TITE)
AC adapter case
*
♦
The above figure shows the standard model with built-in AC adapter.
Precaution when Mounting the AC Adapter
•
When mounting the AC adapter on the AC adapter case, route the AC adapter cable through
three bosses in a zigzag pattern in the AC adapter case.
3-3
CD-S500 Series
3-5
Disassembly and Assembly of the Rear Cover, Window and
Rear Plate
3-5-1
Disassembly and Assembly of Standard Model
The disassembly procedure is explained mainly. When assembling the parts, follow the disassembly
procedure in reverse.
♦
Removing Rear Cover N and Window N
1) Slide the knob in the direction of the arrow and open rear cover N.
2) Remove screws A (2 pcs.), and remove rear cover N from the platen chassis.
*
Push the claws at rear cover N outwards when removing rear cover N.
3) Remove window N from rear cover N.
Screw A
Binding head screw M3 × 8 (P TITE)
Rear cover N
Platen chassis
Window N
Claw
Knob N
Hole for boss
*
♦
Boss
The above figure shows a standard model.
Precaution when Mounting Window N
•
When mounting window N on rear cover N, fit the boss on rear cover N into the corresponding
hole on window N.
3-4
CD-S500 Series
♦
Removing the Rear Plate
1) Remove the rear plate from case U.
*
Unhook the claw at the rear plate from the catch on case U and pull the rear plate
upwards.
Rear plate
Claw
Catch
Case U
*
The above figure shows a standard model.
3-5
CD-S500 Series
3-5-2
Disassembly and Assembly of Rewinder Model
The disassembly procedure is explained mainly. When assembling the parts, follow the disassembly
procedure in reverse.
♦
Removing Rear Cover R and Window R
1) Slide knob R in the direction of the arrow and open rear cover R.
2) Remove screws A (2 pcs.), and remove rear cover R from the cutter chassis.
*
Push the claws at rear cover R outwards when removing rear cover R.
3) Remove window R from rear cover R.
*
Open the bottom (where the bosses are located) of rear cover R sufficiently when
removing rear cover R. If not opened sufficiently, the bosses may scratch the side face of
window R.
Screw A
Binding head screw M3 × 8 (P TITE)
Cutter chassis
Rear cover R
Window R
Knob R
Claws
Hole for boss
*
♦
Boss
The above figure shows a rewinder model.
Precaution when Mounting Window R
•
When mounting window R on rear cover R, fit the bosses on rear cover R into the
corresponding holes on window R. Open the bottom (where the bosses are located) of rear
cover R sufficiently when mounting rear cover R. If not opened sufficiently, the bosses may
scratch the side face of window R.
3-6
CD-S500 Series
3-6
Disassembly and Assembly of Case U, Front Cover and
Operation Panel PCB
The disassembly procedure is explained mainly. When assembling the parts, follow the disassembly
procedure in reverse.
♦
Removing the Lever Cover, Case U and Knob N
1) In the case of rewinder model, remove the lever cover.
*
Pull the lever cover strongly to remove it.
2) Remove screws A (6 pcs.) on the bottom, and remove case U from the body chassis.
*
In the case of standard model, remove case U with the platen chassis and the auto cutter
opened; in the case of rewinder model, remove case U with the cutter chassis opened.
*
Open the front cover and pull the sides of case N outwards when removing case U.
*
Widen the opening for the power switch on case U and unhook the power switch.
*
Raise case U a little and pull the operation panel FFC out of the connector.
3) In the case of standard model, remove knob N from case U; in the case of rewinder model,
remove knob R from case U.
*
Press the claw at the knob inwards and pull it out upwards.
Knob N (knob R)
Case U
Claw
Front cover
Opening for power switch
Connector
Lever cover
(For rewinder model only)
Screw A
Binding head screw M3 × 8 (P TITE)
*
The above figure shows a standard model.
Operation panel FFC
Power switch
3-7
CD-S500 Series
♦
Precaution when Mounting Case N
•
♦
When case U has been mounted, check that the power switch is turned off.
Removing the Front Cover
1) Remove screws A (2 pcs.), and remove the front cover from case U.
♦
Removing the Operation Panel PCB
1) Remove screws B (3 pcs.), and remove the operation panel plate from case U.
2) Remove screws C (2 pcs.), and remove the operation panel PCB from the operation panel plate.
Screw A
Miniature pan head screw M3 × 5 W
Front cover
Case U
Operation panel plate
Operation panel PCB
Screw C
Binding head screw M3 × 5
Case U
*
Operation panel plate
Screw B
Binding head screw M3 × 8 (P TITE)
The above figure shows a standard model.
3-8
CD-S500 Series
♦
Removing the Rewinder Case (For Rewinder Model Only)
1) Remove screws A (4 pcs.) and screws B (2 pcs.), and remove the rewinder case from the base
frame.
*
Pull the sides of the rewinder case outwards to disengage the bosses for positioning when
removing the rewinder case.
Paper holder 3
Hook
Base frame
Rewinder case
Screw B
Binding head screw
M3 × 8 (P TITE)
Bosses
Screw A
Binding head screw M3 × 5
Slot
GND sheet
Holes for bosses
*
The above figure shows a rewinder model.
♦
Precaution when Mounting the Rewinder Case
•
When mounting the rewinder case on the base frame, fit the hook on paper holder 3 into the slot
on the rewinder case and fit the bosses into the corresponding holes.
•
Tighten the rewinder case together with the GND sheet.
3-9
CD-S500 Series
3-7
Disassembly and Assembly of the Mechanism Unit
3-7-1
Disassembly and Assembly of Standard Model
The disassembly procedure is explained mainly. When assembling the parts, follow the disassembly
procedure in reverse.
♦
Removing the SA Rear Cover Switch and the Spring for Lever
1) Remove screw A (1 pc.), and remove the switch unit of the SA rear cover switch from the
mechanism unit.
*
To remove the SA rear cover switch, disconnect the cable connector of the rear cover
switch from the main PCB.
Refer to “3-8 Disassembly and Assembly of the Main PCB Unit” and “♦ Removing the Cables”
(Page 3-18).
2) Remove the springs (2 pcs.) for the lever.
3) Pull the main FFC out of the connector.
Spring for lever
Switch unit of SA rear cover switch
Screw A
Binding head screw M2 × 7.5
Main FFC
Spring for lever
*
Printing unit
The above figure shows a standard model.
3-10
Connector
CD-S500 Series
♦
Precaution when Mounting the Rear Cover Switch
•
When mounting the rear cover switch on the mechanism unit, fit the boss into the
corresponding hole for positioning.
•
Secure the rear cover switch with adhesive tape.
Hole for boss
Boss
Rear cover switch
Adhesive tape
Mechanism unit
*
The above figure shows a standard model.
3-11
CD-S500 Series
♦
Removing the Mechanism Unit
1) Remove screws A (2 pcs.) and screws B (4 pcs.), and remove the mechanism unit from the base
frame.
*
Use the positioning release slots (4 positions) and disengage the mechanism unit when
removing the mechanism unit.
*
If the black mark sensor (optional) is provided, it is necessary to disconnect the cable
connector of the black mark sensor from the main PCB.
Refer to “3-8 Disassembly and Assembly of the Main PCB Unit” and “♦ Removing the Cables”
(Page 3-18).
Hole for boss
Screw A
Binding head screw M4 × 6
Positioning release slot
Screw B
Binding head screw M3 × 5
Cable connector of black
mark sensor (optional)
Mechanism unit
Positioning release slot
Boss
Boss
Holes for bosses
*
The above figure shows a standard model.
3-12
CD-S500 Series
♦
Precaution when Mounting the Mechanism Unit
•
When mounting the mechanism unit on the base frame, fit the bosses into the corresponding
holes for positioning. When positioning has been completed, attach the springs for the levers,
close the platen chassis and tighten screws A and screws B.
*
With the rewinder model, close the platen chassis and the cutter chassis and tighten screws A
and screws B in order.
•
When the mechanism unit has been mounted, be sure to adjust the head gap.
Refer to “3-15 Adjusting the Head Gap” (Page 3-44).
♦
Oiling to the Mechanism Unit
When maintenance of the mechanism unit has been performed, supply an adequate amount of oil to
the positions shown in the figure below. Use the type of oil specified in the figure.
For the oil type, refer to “3-13 Oiling” (Page 3-42).
Slideways of lever R, L
(2 positions on the right and left)
(Oil type: MG-1)
Lever L
Lever R
3-13
CD-S500 Series
3-7-2
Disassembly and Assembly of Rewinder Model
*
The disassembly and assembly procedures of the mechanism unit for the rewinder model are
the same as those for the standard model. If the platen chassis is not opened, operate lever R
in the direction of the arrow to keep the platen chassis open during the work.
Refer to “3-7-1 Disassembly and Assembly of Standard Model” (Page 3-10).
Platen chassis
Lever R
*
The above figure shows a rewinder model.
3-14
CD-S500 Series
3-8
Disassembly and Assembly of the Main PCB Unit
The disassembly procedure is explained mainly. When assembling the parts, follow the disassembly
procedure in reverse.
♦
Removing the PCB Cover
1) Remove the catches (4 positions in total on the right and left) from the PCB cover using a pair
of tweezers, and remove the PCB cover from the base frame.
PCB cover
Base frame
Main PCB
*
Catch (4 positions in total on the right and left)
The above figure shows a standard model.
3-15
CD-S500 Series
♦
Precaution when Mounting the PCB Cover
•
When mounting the PCB cover on the base frame, fit the catches (4 positions in total on the
right and left) of the PCB cover to the claws on the base frame.
•
Fit the hook on the PCB cover in the space between paper holder 1 and the base frame.
Paper holder 1
Hook
PCB cover
Base frame
Claw
PCB cover
*
The above figure shows a standard model.
3-16
Catch
CD-S500 Series
♦
Removing the SA I/F PCB
*
The SA I/F PCB can be removed from the printer fully assembled.
*
There are several types of SA I/F PCB depending on the interface specification. In this section,
the removing and mounting procedures for the SA parallel I/F PCB are explained; the
procedures are the same for other types of SA I/F PCB.
1) Remove screws A (2 pcs.), and remove I/F PCB from the base frame.
*
Hold the both ends of the SA I/F PCB sheet plate and pull the SA I/F PCB out of the base
frame. The connector of the SA I/F PCB is pulled out of the connector of the main PCB.
Marking
Main PCB
Connector
Sheet plate
Base frame
Connector
Screw A
Binding head screw M3 × 5
SA I/F PCB
(SA PARALLEL I/F PCB)
*
The above figure shows a standard model.
♦
Precaution when Mounting the SA I/F PCB
When mounting the SA I/F PCB on the base frame, insert the SA I/F PCB in the direction with the
arrow marking facing upward.
3-17
CD-S500 Series
♦
Removing the Cables
1) Remove all the cables from the connectors on the main PCB.
*
The following cables are connected on the main PCB.
• Rear cover switch cable
• Front cover switch cable
• Paper near end sensor cable
• Rewinder motor cable (for rewinder model only)
• Main FFC
• Operation panel FFC
• Auto cutter cable (optional)
• Black mark sensor cable (optional)
Main FFC
Rewinder motor cable (For rewinder model only)
Rear cover switch cable
Auto cutter cable (optional)
Front cover
switch cable
Paper near end
sensor cable
Operation panel FFC
Black mark sensor cable (optional)
Main PCB
*
The above figure shows a standard model.
3-18
CD-S500 Series
♦
Removing the SA Front Cover Switch
1) Remove screw A (1 pc.), and remove the SA front cover switch from the base frame.
♦
Removing the Main PCB
1) Remove screws B (4 pcs.), and remove the main PCB from the base frame.
Screw B
Binding head screw M3 × 5
Power switch
Main PCB
Slot
SA front cover switch
Base frame
Screw A
Screw M1.7 × 6 (#0)
Boss
*
Hole for boss
The above figure shows a standard model.
♦
Precaution when Mounting the SA Front Cover Switch
•
♦
When mounting the SA front cover switch on the base frame, fit the boss into the
corresponding hole for positioning.
Precaution when Mounting the Main PCB
•
Check that the power switch securely fits into the slot on the base frame.
3-19
CD-S500 Series
3-9
Disassembly and Assembly of the Printing Unit
The disassembly procedure is explained mainly. When assembling the parts, follow the disassembly
procedure in reverse.
*
♦
The manual cutter, lower blade, head cover, SA print head, and ribbon mask can be removed
from the printer fully assembled.
Removing the Manual Cutter
1) Remove screws A (2 pcs.), and remove the manual cutter from the cutter plate.
♦
Removing the Lower Blade (Optional)
1) Remove screw B (1 pc.), and remove the lower blade from the cutter plate.
♦
Removing the Cutter Plate
1) Remove screws C (4 pcs.), and remove the cutter plate from the main frame.
Manual cutter
Screw A
Screw M2 × 2.5 (#0)
Screw B
Screw M2 × 2.5 (#0)
Lower blade (optional)
Cutter plate
Screw C
Screw M2 × 2.5 (#0)
Lever R
Main frame
3-20
CD-S500 Series
♦
Precaution when Mounting the Lower Blade (Optional)
•
When mounting the lower blade on the cutter plate, keep the orientation confirmation hole on
the lower blade on the side of lever R and the chamfered corner of the lower blade on the auto
cutter side.
•
When mounting the lower blade on the cutter plate, fit the boss into the corresponding hole for
positioning.
Orientation confirmation hole
Lever R
Boss and hole for boss
Manual cutter blade
Chamfered corner
Lower blade (optional)
Orientation confirmation hole
3-21
Boss and hole for boss
(oblong hole)
CD-S500 Series
♦
Removing the Head Cover
1) Remove screws A (2 pcs.), and remove the head cover from the main frame.
*
♦
Unhook the projections (2 positions) of the head cover when removing the head cover.
Removing the SA Print Head
1) Remove screws B (2 pcs.), and remove the SA print head from the carriage.
*
♦
Remove the print head FPC from the connector.
Removing the Ribbon Mask
1) Remove screw C (1 pc.), and remove the ribbon mask from the carriage.
Screw C
Screw M1.7 × 4 (#0) (B TITE)
Screw A
Binding head screw M2 × 4
Screw B
Binding head screw M3 × 8 (P TITE)
Head cover
Ribbon mask
Print head FPC
SA print head
Connector
Projections
Carriage
Main frame
3-22
CD-S500 Series
♦
Precaution when Mounting the SA Print Head and the Ribbon Mask
•
When mounting the SA print head on the carriage, fit the boss into the corresponding hole for
positioning.
•
Set the print head FPC while fitting into the groove on the carriage, and insert the print head
FPC into the connector. Use some tools and the insert-assisting holes (2 positions) when the
print head FPC.
•
When mounting the ribbon mask on the carriage, fit the bosses into the corresponding holes
and slightly press the area near the ribbon mask fixing hole in the direction of the arrow.
Refer to “3-15 Adjusting the Head Gap” (Page 3-44).
Bosses and holes
Bosses and holes
Ribbon mask
Print head FPC
Ribbon mask fixing hole
Insert-assisting holes
Connector
Groove
SA print head
3-23
Carriage
CD-S500 Series
♦
Removing the SA Black Mark Sensor PCB
1) Remove screws A (2 pcs.), and remove the PF motor from the main frame.
2) Remove screw B (1 pc.), and remove the SA black mark sensor PCB from the main frame.
*
The mounting position of the SA black mark sensor varies depending on the specification.
Screw B
Binding head screw M2 × 4
Notch
SA black mark sensor PCB
PF motor
Main frame
Screw A
Screw M2 × 2.5 (#0)
Main frame bottom side
Claw
♦
Precaution when Mounting the SA Black Mark Sensor PCB
•
When mounting the SA black mark sensor PCB on the main frame, fit the notch on the SA
black mark sensor PCB to the claw on the main frame.
3-24
CD-S500 Series
♦
Oiling to the Printing Unit
When maintenance of the printing unit has been performed, supply an adequate amount of oil to the
positions shown in the figure below. Use the type of oil specified in the figure.
For the oil type, refer to “3-13 Oiling” (Page 3-42).
Carriage
Carriage guide circumference
(Oil type: MOBIL1)
Grooves on the carriage shaft
(Oil type: SUMITEC 305)
Carriage slideways
(Oil type: SUMITEC 305)
3-25
CD-S500 Series
3-10
Disassembly and Assembly of the Platen Chassis and Cutter
Chassis
3-10-1
Disassembly and Assembly of Standard Model
The disassembly procedure is explained mainly. When assembling the parts, follow the disassembly
procedure in reverse.
♦
Removing the Sector Gear Plates 1 and 2
1) Remove screws A (1 pc. each), and remove sector gear plate 1 and sector gear plate 2 from the
platen chassis.
♦
Removing the Platen Chassis
1) Remove E rings (2 pcs.), washer A (1 pc.), washers B (3 pcs.), spring L (with spring cap) and
spring R1, and remove the platen chassis from the base frame.
*
Pull the bottom (where the mounting holes are located) of the platen chassis outwards
when removing the platen chassis.
*
In the case of the auto cutter (optional) model, open the cable retainer of the auto cutter
cable upwards and remove the cable.
Auto cutter (optional)
*
With the standard model, a
dummy cutter is attached.
Screw A
Binding head screw M2 × 4
Cutter chassis
Spring cap
Platen chassis
Sector gear plate 1
E ring (4.0)
Screw A
Binding head screw M2 × 4
Washer B
Spring R1
Spring L
Mounting hole
Washer B
Washer A
Sector gear plate 2
E ring (3.0)
Cable holder
Base frame
Auto cutter cable (optional)
*
The above figure shows a standard model.
3-26
CD-S500 Series
♦
Precaution when Mounting Sector Gear Plates 1, 2
•
When mounting sector gear plates 1 and 2 on the platen chassis, fit the bosses on the sector gear
plates 1 and 2 into the corresponding holes on the platen chassis.
•
When mounting sector gear plates 1 and 2 on the platen chassis, supply oil to these parts.
Refer to “3-10-1 Disassembly and Assembly of Standard Model” and “♦ Oiling to the Platen
Chassis” (Page 3-30).
♦
Precaution when Mounting the Platen Chassis
•
In the case of the auto cutter (optional) model, mount the platen chassis on the base frame,
route the auto cutter cable as shown by the arrows keeping the platen chassis in the raised
position, and then secure the cable with the cable holder. When securing the cable, allow some
leeway for the auto cutter cable.
•
When mounting the platen chassis on the base frame, supply oil to these parts.
Refer to “3-10-1 Disassembly and Assembly of Standard Model” and “♦ Oiling to the Platen
Chassis” (Page 3-30).
Auto cutter (optional)
*
With the standard model, a
dummy cutter is attached.
Sector gear plate 1 or 2
Platen chassis
Bosses
Holes for bosses
Auto cutter cable (optional)
Keep some leeway for
routing the auto cutter cable.
Cable holder
*
The above figure shows a standard model.
3-27
CD-S500 Series
♦
Removing the Platen Cover
1) Remove screws A (2 pcs.), and remove the platen cover from the platen.
• When removing the platen cover, be careful not to strain the paper guide. Otherwise,
the paper guide fixing area may be damaged.
CAUTION
♦
Removing the Paper Guide
1) Remove screws B (2 pcs.), and remove the paper guide from the platen cover.
♦
Removing the Platen
1) Remove screws C (2 pcs.), and remove the platen from the platen chassis.
• When removing the platen, be careful not to strain the paper guide. Otherwise, the
paper guide fixing area may be damaged.
CAUTION
Platen
Screw A
Binding head screw M2 × 4
Screw C
Miniature pan head screw
M3 × 6 W
Platen cover
Paper guide
Platen chassis
*
The above figure shows a standard model.
3-28
Screw B
Screw M1.7 × 6 (#0) (B TITE)
CD-S500 Series
♦
Removing Armature Switch 2
1) Remove screw A (1 pc.), and remove armature switch 2 from the platen chassis.
♦
Removing the SA1 PF shaft
1) Remove the E ring (1 pc.), and remove the SA1 PF shaft from the platen chassis.
*
Slide the bearing and the SA1 PF shaft in the direction of the arrow when removing the
SA1 PF shaft.
Armature switch 2
Bosses
E ring (3.0)
Holes for bosses
Armature switch 2
SA1 PF shaft
Screw A
Binding head screw M2 × 4
Platen chassis
Bearing
*
The above figure shows a standard model.
♦
Precaution when Mounting Armature Switch 2
•
♦
When mounting armature switch 2 on the platen chassis, check the orientation as shown in the
figure and fit the boss into the corresponding hole for positioning.
Precaution when Mounting the SA1 PF shaft
•
When mounting the SA1 PF shaft on the platen chassis, supply oil to these parts.
Refer to “3-10-1 Disassembly and Assembly of Standard Model” and “♦ Oiling to the Platen
Chassis” (Page 3-30).
3-29
CD-S500 Series
♦
Oiling to the Platen Chassis
When maintenance of the platen chassis has been performed, supply an adequate amount of oil to the
positions shown in the figure below. Use the type of oil specified in the figure.
For the oil type, refer to “3-13 Oiling” (Page 3-42).
Platen chassis
Gears of sector gear plates 1 and 2
(Oil type: MG-1)
SA1 PF shaft inserting
hole (inner surface)
(Oil type: MG-1)
Platen chassis
SA1 PF shaft outer surface at
the left end
(Oil type: MG-1)
Platen chassis mounting surfaces
(Oil type: MG-1)
*
Platen chassis shaft outer surfaces at both ends
(Oil type: MG-1)
The above figure shows a standard model.
3-30
CD-S500 Series
3-10-2
Disassembly and Assembly of Rewinder Model
The disassembly procedure is explained mainly. When assembling the parts, follow the disassembly
procedure in reverse.
♦
Removing the Cutter Chassis
1) Remove the E rings (2 pcs.), and remove the cutter chassis from the base frame.
*
Pull the bottom (where the mounting holes are located) of the cutter chassis outwards
when removing the cutter chassis.
♦
Removing the Sector Gear Plate 1
1) Remove screw A (1 pc.), and remove sector gear plate 1 from the platen chassis.
♦
Removing the Platen Chassis
1) Remove washer A (1 pc.), washers B (3 pcs.), spring, and spring R2, and remove the platen
chassis from the base frame.
*
Pull the bottom (where the mounting holes are located) of the platen chassis outwards
when removing the platen chassis.
*
Open the cable holder of the auto cutter cable upwards and remove the cable.
Spring
Sector gear plate 1
Auto cutter
Platen chassis
Washer B
Cutter chassis
Screw A
Binding head screw M2 × 4
A
E ring (4.0)
Washer B
Mounting hole
A
Washer A
Spring R2
Base frame
Cable holder
Auto cutter cable (optional)
*
The above figure shows a rewinder model.
3-31
CD-S500 Series
♦
Precaution when Mounting the Sector Gear Plate 1
•
When mounting sector gear plate 1 on the platen chassis, fit the bosses on sector gear plate 1
into the corresponding holes on the platen chassis.
•
When mounting sector gear plate 1 on the platen chassis, supply oil to these parts.
Refer to “3-10-2 Disassembly and Assembly of Rewinder Model” and “♦ Oiling to the Platen
Chassis and the Cutter Chassis” (Page 3-34).
♦
Precaution when Mounting the Platen Chassis
•
When mounting the platen chassis on the base frame, supply oil to these parts.
Refer to “3-10-2 Disassembly and Assembly of Rewinder Model” and “♦ Oiling to the Platen
Chassis and the Cutter Chassis” (Page 3-34).
♦
Precaution when Mounting the Cutter Chassis
•
Mount the cutter chassis on the base frame, route the auto cutter cable as shown by the arrows
keeping the cutter chassis in the raised position, and then secure the cable with the cable holder.
When securing the cable, allow some leeway for the auto cutter cable.
•
When mounting the cutter chassis on the base frame, supply oil to these parts.
Refer to “3-10-2 Disassembly and Assembly of Rewinder Model” and “♦ Oiling to the Platen
Chassis and the Cutter Chassis” (Page 3-34).
Auto cutter
Cutter chassis
Platen chassis
Base frame
Bosses
Holes for bosses
Sector gear plate 1
Auto cutter cable
Keep some leeway for
routing the auto cutter cable.
Cable holder
*
The above figure shows a rewinder model.
3-32
CD-S500 Series
♦
Removing the Platen Cover
1) Remove screws A (binding head screw M2 × 4: 2 pcs.), and remove the platen cover from the
platen.
*
The removing procedure of the platen cover is the same as is the case with the standard
model.
Refer to “3-10-1 Disassembly and Assembly of Standard Model” and “♦ Removing the Platen
Cover” (Page 3-28).
• When removing the platen cover, be careful not to strain the paper guide. Otherwise,
the paper guide fixing area may be damaged.
CAUTION
♦
Removing the Paper Guide
1) Remove screws A (screw M1.7 × 6 (#0) B TITE: 3 pcs.), and remove the paper guide from the
platen cover.
*
The removing procedure of the paper guide is the same as is the case with the standard
model.
Refer to “3-10-1 Disassembly and Assembly of Standard Model” and “♦ Removing the Paper
Guide” (Page 3-28).
♦
Removing the Platen
1) Remove screws C (miniature pan head screw M3 × 6 W: 2 pcs.), and remove the platen from
the platen chassis.
*
The removing procedure of the platen chassis is the same as is the case with the standard
model.
Refer to “3-10-1 Disassembly and Assembly of Standard Model” and “♦ Removing the
Platen” (Page 3-28).
• When removing the platen, be careful not to strain the paper guide. Otherwise, the
paper guide fixing area may be damaged.
CAUTION
♦
Removing the SA1 PF Shaft
1) Remove the E ring (3.0: 1 pc.), and remove the SA1 PF shaft from the platen chassis.
*
The removing procedure of the SA1 PF shaft is the same as is the case with the standard
model.
Refer to “3-10-1 Disassembly and Assembly of Standard Model” and “♦ Removing the SA1 PF
shaft” (Page 3-29).
♦
Precaution when Mounting the SA1 PF Shaft
•
When mounting the SA1 PF shaft on the platen chassis, supply oil to these parts.
Refer to “3-10-2 Disassembly and Assembly of Rewinder Model”“♦ Oiling to the Platen
Chassis and the Cutter Chassis” (Page 3-34).
3-33
CD-S500 Series
♦
Oiling to the Platen Chassis and the Cutter Chassis
When maintenance of the platen chassis or the cutter chassis has been performed, supply an adequate
amount of oil to the positions shown in the figure below. Use the type of oil specified in the figure.
For the oil type, refer to “3-13 Oiling” (Page 3-42).
SA1 PF shaft inserting hole
(inner surface)
(Oil type: MG-1)
Platen chassis
Platen chassis
Gear of sector gear plate 1
(Oil type: MG-1)
Cutter
chassis
SA1 PF shaft outer surface at
the left end
(Oil type: MG-1)
Platen chassis shaft outer
surfaces at both ends
(Oil type: MG-1)
Cutter chassis shaft outer
surfaces at both ends
(Oil type: MG-1)
Platen chassis and
cutter chassis mounting surfaces
(Oil type: MG-1)
*
The above figure shows a rewinder model.
3-34
CD-S500 Series
3-11
Disassembly and Assembly of the Auto Cutter
3-11-1
Disassembly and Assembly of Standard Model
The disassembly procedure is explained mainly. When assembling the parts, follow the disassembly
procedure in reverse.
♦
Removing the Auto Cutter (Optional)
1) Remove screws A (2 pcs.), and remove the auto cutter from the auto cutter plate.
*
Use the positioning release slots (2 positions) and disengage the auto cutter when
removing the auto cutter.
*
Cut the cable tie for the auto cutter cables and remove the auto cutter.
*
With the standard model, a dummy cutter is attached to the auto cutter plate. If it is
necessary to remove the dummy cutter, remove it in the same way as the auto cutter.
♦
Removing the Auto Cutter Plate
1) Remove screws B (2 pcs.), and remove the auto cutter plate from the platen chassis.
*
Use the positioning release slots (2 positions) and disengage the auto cutter plate when
removing the auto cutter plate.
Positioning release slot
Auto cutter (optional)
*
With the standard model, a
dummy cutter is attached.
Positioning release slot
Cable tie
Auto cutter plate
Auto cutter cable (optional)
Screw A
Pan head screw M3 × 5 (S TITE)
Platen chassis
Screw B
Pan head screw M3 × 5 (S TITE)
*
The above figure shows a standard model.
3-35
CD-S500 Series
♦
♦
Precaution when Mounting the Auto Cutter (Optional)
•
When mounting the auto cutter on the auto cutter plate, fit the bosses into the corresponding
holes for positioning.
•
Route the auto cutter cable as shown in the figure and tie down the cable with the cable tie.
Precaution when Mounting the Auto Cutter Plate
•
When mounting the auto cutter plate on the platen chassis, fit the bosses into the corresponding
holes for positioning.
Auto cutter (optional)
*
With the standard model, a
dummy cutter is attached.
Holes for bosses
Bosses
Auto cutter plate
Platen chassis
Holes for bosses
Bosses
Auto cutter (optional)
*
With the standard model, a
dummy cutter is attached.
Cable tie
Fit in the notch.
Auto cutter cable (optional)
*
The above figure shows a standard model.
3-36
CD-S500 Series
3-11-2
Disassembly and Assembly of Rewinder Model
The disassembly procedure is explained mainly. When assembling the parts, follow the disassembly
procedure in reverse.
♦
Removing the Auto Cutter
1) Remove screws A (2 pcs.), and remove the auto cutter from the cutter chassis.
*
Use the positioning release slots (2 positions) and disengage the auto cutter when
removing the auto cutter.
*
♦
Cut the cable tie of the auto cutter cables and remove the auto cutter.
Removing Armature Switch 1
1) Remove screw B (1 pc.), and remove armature switch 1 from the cutter chassis.
Screw B
Binding head screw M2 × 4
Auto cutter
Cable tie
Armature switch 1
Auto cutter cable
Cutter chassis
Screw A
Pan head screw M3 × 5 (S TITE)
Positioning release slot
*
The above figure shows a rewinder model.
3-37
CD-S500 Series
♦
♦
Precaution when Mounting the Auto Cutter
•
When mounting the auto cutter on the cutter chassis, fit the bosses into the corresponding holes
for positioning.
•
Route the auto cutter cable as shown in the figure and tie down the cable with the cable tie.
Precaution when Mounting Armature Switch 1
•
When mounting armature switch 1 on the cutter chassis, check the orientation as shown in the
figure and fit the bosses into the corresponding holes for positioning.
Auto cutter
Armature switch 1
Holes for bosses
Holes for
bosses
Bosses
Bosses
Cutter chassis
Cable tie
Auto cutter
Auto cutter cable
*
The above figure shows a rewinder model.
3-38
CD-S500 Series
3-12
Disassembly and Assembly of the Rewinder Unit
(For rewinder model only)
The disassembly procedure is explained mainly. When assembling the parts, follow the disassembly
procedure in reverse.
♦
Removing the Rewinder Motor
1) Remove screws A (2 pcs.), and remove the rewinder motor from the rewinder motor frame.
♦
Removing the Rewinder Gear, Rewinder Roller and Rewinder Roller Pin
1) Remove the rewinder gear, rewinder roller and rewinder roller pin from the rewinder motor
frame.
Rewinder motor frame
Screw A
Screw M2 × 2.5 (#0)
Rewinder gear
Rewinder roller
Rewinder motor
*
Rewinder roller pin
The above figure shows a rewinder model.
3-39
CD-S500 Series
♦
♦
Precaution when Mounting the Rewinder Motor
•
Attach the rewinder motor in an angle so that the cable connecting section will be hidden.
•
When the rewinder motor has been mounted on the rewinder motor frame, route the rewinder
motor cable as shown in the figure and secure it with adhesive tape.
Precaution when Mounting the Rewinder Roller Pin
•
When mounting the rewinder roller pin on the rewinder motor frame, supply oil to these parts.
Refer to “3-12 Disassembly and Assembly of the Rewinder Unit (For rewinder model only)” and
“♦ Oiling to the Rewinder Unit” (Page 3-41).
Cable connecting section
Adhesive tape
Rewinder motor cable
*
The above figure shows a rewinder model.
3-40
CD-S500 Series
♦
Oiling to the Rewinder Unit
When maintenance of the rewinder unit has been performed, supply an adequate amount of oil to the
positions shown in the figure below. Use the type of oil specified in the figure.
For the oil type, refer to “3-13 Oiling” (Page 3-42).
Rewinder roller pin outer surface
(Oil type: MG-1)
*
The above figure shows a rewinder model.
3-41
CD-S500 Series
3-13
Oiling
Oiling Period
The printer is free from maintenance and oiling is not required for normal use.
When the printer has been disassembled, assembled or cleaned or when a part has been replaced,
supply oil to the related parts.
Oil Table
Name
FLOIL grease
Lubricant
Precision machine grease
Type
Manufacturer
MG-1
Kanto Chemical Co., Ltd.
MOBIL1
ExxonMobil Yugen Kaisha
SUMITEC 305
Sumico Lubricant Co., Ltd.
Oiling Positions
Oiling positions are explained in “Chapter 3 DISASSEMBLY, ASSEMBLY AND
ADJUSTMENT”. Refer to the relevant section.
3-42
CD-S500 Series
3-14
Setting the Paper Near End Sensor
Change the sensor position according to the printer installation and the inner diameter of the roll
paper.
Refer to the following table, hold down the concave part in the center of the sensor with your finger
and move it right or left to the position suitable for the working condition. (When shipped from the
factory, it is set at φ24 mm.)
Installation Method
Remaining Roll
Paper (mm)
Sensor Location
Approx. φ22
1
Approx. φ24
2
Approx. φ27
3
Approx. φ27
4
Approx. φ24
5
Approx. φ22
6
Horizontal
Vertical
(wall mount)
*
The remaining roll paper (outer diameter of the roll paper) differs greatly according to the type of
roll paper used. Use these values as guidelines.
*
If the sensor has detected the remaining roll paper during printing, the printer stops printing
when all the received data has been printed.
*
If you are using a model with parallel (IEEE1284) interface, you can select either “enabled” or
“disabled” state for the sensor in the soft SW setting mode.
*
If you are using a model with serial (RS232C) interface, the sesor is always enabled.
Paper near end sensor
When installed
vertically or
wall mounted
6
5
4
3 2
1
When installed horizontally
*
The above figure shows a standard model.
3-43
CD-S500 Series
3-15
Adjusting the Head Gap
When the following parts have been removed or when the fixing screws of these parts are loosened,
be sure to adjust the head gap.
•
Mechanism unit
•
Platen
Head Gap Adjusting Procedure
1) Remove case U.
Refer to “3-6 Disassembly and Assembly of Case U, Front Cover and Operation Panel PCB”
and “♦ Removing the Lever Cover, Case U and Knob N” (Page 3-7).
2) Close the platen chassis.
3) Use thickness gauges and measure the clearance between the head and the platen at the
marking areas (3 positions) on the platen.
Appropriate head gap D = 0.55 mm
4) If the head gap is not appropriate, loosen the platen fixing screws (2 pcs.), adjust the platen
position to the appropriate clearance and secure the platen in this position.
*
When assembling the parts, follow the procedure in reverse.
• If the gap between the head and the platen is not appropriate, printing cannot be
performed in appropriate density.
CAUTION
Platen fixing screw
Miniature pan head screw M3 × 6 W
Markings
Platen
Platen
D
D = 0.55 mm
SA print head
*
The above figure shows a standard model.
3-44
Chapter 4
PARTS LIST
CD-S500 Series
4-1
Mechanical Parts List
4-1-1
Drawing No. 1 Parts List & Location for AC Adapter Case
CD-S500 Series
Drawing No. 1
Parts List & Location for AC Adapter Case
Revisions List
Sheet No.
Rev. No.
Date
1/1
1
2004. 11. 1
1/1
2
2005. 5. 20
4-1
CD-S500 Series
Drawing No. 1 AC Adapter Case
CD-S***S (Built-in AC adapter type)
7
5
6
4
2
4
1
3
8
4-2
CD-S500 Series
Parts List for CD-S500 Series:
TITLE: AC Adapter Case
Drawing No. 1
Sheet No. 1/1
Rev. No. 2
Q’ty/Unit
Location
Part No.
1-1
NJ59701-0
SA, AC ADAPTER CASE W
1
White case
Including 1-2, 1-8
NJ59702-0
SA, AC ADAPTER CASE B
1
Black case
Including 1-2, 1-8
1-2
NJ56211-0
CASE, AC ADAPTER W
1
White case
CASE, AC ADAPTER B
1
Black case
1-3
E11130-080F
SCREW, PHT (ST), M3.0X8
2
1-4
E10130-140F
SCREW, PHT (PT), M3.0X14
1-5
NJ69901-0
NJ56219-0
1-6
NJ54102-0
1-7
E12830-080DF
1-8
JM59902-0
Part Name
CD-S***A
CD-S***S
2
UNIT, AC ADAPTER
1
1
HANGER SUPPORT
1
SCREW M3.0X8 P TITE BIND
4
LEG CASE L F
4
*
CD-S***A: AC adapter type
*
CD-S***S: Built-in AC adapter type
4-3
Remark
CD-S500 Series
4-1-2
Drawing No. 2 Parts List & Location for Rear Cover
CD-S500 Series
Drawing No. 2
Parts List & Location for Rear Cover
Revisions List
Sheet No.
Rev. No.
Date
1/1
1
2004. 11. 1
1/1
2
2005. 5. 20
4-4
CD-S500 Series
Drawing No. 2 Rear Cover
CD-S500 (Standard model)
CD-S501 (Built-in autocutter model)
7
6
3
2
5
CD-S503 (Rewinder model)
3
4
4-5
1
CD-S500 Series
Parts List for CD-S500 Series:
TITLE: Rear Cover
Drawing No. 2
Sheet No. 1/1
Rev. No. 2
Q'ty/Unit
Location
Part No.
2-1
NJ56203-0
COVER, REAR R W
1
White case
NJ56214-0
COVER, REAR R B
1
Black case
2-2
Part Name
CD-S500, 501
CD-S503
Remark
NJ56204-0
COVER, REAR N W
1
White case
NJ56215-0
COVER, REAR N B
1
Black case
SCREW M3.0X8 P TITE BIND
2
2-3
E12830-080DF
2-4
NJ56205-0
WINDOW R
2
1
2-5
NJ56206-0
WINDOW N
1
2-6
NJ56209-0
PLATE, REAR W
1
White case
NJ56218-0
PLATE, REAR B
1
Black case
2-7
NJ90902-0
LABEL, PAPER STD
1
*
CD-S500: Standard model
*
CD-S501: Built-in autocutter model
*
CD-S503: Rewinder model
4-6
CD-S500 Series
4-1-3
Drawing No. 3 Parts List & Location for Overall Cover
CD-S500 Series
Drawing No. 3
Parts List & Location for Overall Cover
Revisions List
Sheet No.
Rev. No.
Date
1/1
1
2004. 11. 1
1/1
2
2005. 5. 20
4-7
CD-S500 Series
Drawing No. 3 Overall Cover
CD-S500 (Standard model)
CD-S503 (Rewinder model)
CD-S501 (Built-in autocutter model)
3
3
11
11
4
4
6
1
5
1
13
13
12
12
2
2
4-8
CD-S500 Series
CD-S500 (Standard model)
CD-S501 (Built-in autocutter model)
CD-S503 (Rewinder model)
9
7
10
8
4-9
CD-S500 Series
Parts List for CD-S500 Series:
TITLE: Overall Cover
Drawing No. 3
Location
Part No.
3-1
NJ56201-0
NJ56212-0
3-2
E12830-080DF
3-3
NJ56701-0
3-4
E00930-050F
NJ56702-0
CD-S503
CASE U W
1
1
White case
CASE U B
1
1
Black case
SCREW M3.0X8 P TITE BIND
6
6
SA, COVER, FRONT W
1
1
White case
SA, COVER, FRONT B
1
1
Black case
SCREW PH (SW+PW) M3.0X5
2
2
NJ56207-0
KNOB R
NJ56208-0
KNOB N
NJ54101-0
E12830-080DF
3-9
NJ66730-0
3-10
E00530-050F
Remark
CD-S500, 501
3-6
3-8
Q'ty/Unit
Part Name
3-5
3-7
Sheet No. 1/1
Rev. No. 2
1
1
PLATE, OPE-PANE
1
1
SCREW M3.0X8 P TITE BIND
3
3
SA, OPE-PANE PCB
1
1
SCREW M3.0X5 BIND
2
2
3-11
NJ54104-0
SHEET, LABEL
1
1
3-12
NJ54103-0
SHEET, OPE-PANE
1
1
3-13
NJ59901-0
STOPPER, CASE U
1
1
*
CD-S500: Standard model
*
CD-S501: Built-in autocutter model
*
CD-S503: Rewinder model
4-10
CD-S500 Series
4-1-4
Drawing No. 4 Parts List & Location for Mechanism Unit
CD-S500 Series
Drawing No. 4
Parts List & Location for Mechanism Unit
Revisions List
Sheet No.
Rev. No.
Date
1/1
1
2004. 11. 1
1/1
2
2005. 5. 20
4-11
CD-S500 Series
Drawing No. 4 Mechanism Unit
CD-S500 (Standard model)
CD-S501 (Built-in autocutter model)
CD-S503 (Rewinder model)
5
4
6
3
4
(a)
2
3
2
(b)
8
*
7
Refer to Page 4-17 for connections of connectors (a) and (b).
4-12
CD-S500 Series
CD-S500 (Standard model)
CD-S501 (Built-in autocutter model)
CD-S503 (Rewinder model)
12
14
11
13
34
10
25
9
15
10
24
33
17
21
19
20
18
1
16
22
23
4-13
CD-S500 Series
CD-S500 (Standard model)
CD-S501 (Built-in autocutter model)
CD-S503 (Rewinder model)
28
32
31
29
30
(c)
27
26
*
Refer to Page 4-17 for connections of connector (c).
4-14
CD-S500 Series
Parts List for CD-S500 Series:
TITLE: Mechanism Unit
Drawing No. 4
Location
Part No.
Sheet No. 1/1
Rev. No. 2
Q'ty/Unit
Part Name
CD-S500
CD-S501
CD-S503
4-1
NJ19801-0
UNIT, MECHANISM
1
1
1
4-2
E00530-050F
SCREW M3.0X5 BIND
4
4
4
4-3
E00540-060F
SCREW M4.0X6 BIND
2
2
2
4-4
NJ43604-0
SPRING, LEVER
2
2
2
4-5
NJ68705-0
SA, REAR COVER SW
1
1
1
4-6
E00520-075F
SCREW M2.0X7.5 BIND
1
1
1
SA, FRONT COVER SW
1
1
1
SCREW M1.7X6 (#0)
1
1
1
4-7
NJ68710-0
4-8
E03717-060F
4-9
NJ44113-0
4-10
E01420-025F
4-11
NJ44116-0
4-12
E01420-025F
PLATE, CUTTER
1
1
1
SCREW M2.0X2.5 (#0)
4
4
4
CUTTER, MANUAL
1
1
1
SCREW M2.0X2.5 (#0)
2
2
2
4-13
NJ44115-0
4-14
E01420-025F
BLADE, LOWER
1
1
SCREW M2.0X2.5 (#0)
1
1
4-15
NJ44201-0
COVER, LEVER
4-16
NJ54201-0
COVER, HEAD
1
1
1
4-17
E00520-040F
4-18
NJ09701-0
SCREW M2.0X4 BIND
2
2
2
SA PRINT HEAD
1
1
1
4-19
E12830-080DF
4-20
NH34104-0
4-21
E13717-040WF
4-22
NJ20202-0
4-23
E60325-000F
E-RING, 2.5
1
1
1
4-24
NJ64902-0
COVER, HEATSINK
1
1
1
4-25
NJ37701-0
CASSETTE, RIBBON<P>
1
1
1
NJ37702-0
CASSETTE, RIBBON<B/R>
1
1
1
Remark
Included in 6-17
1
SCREW M3.0X8 P TITE BIND
2
2
2
MASK, RIBBON
1
1
1
SCREW, M1.7X4 (#0) B TITE
1
1
1
GEAR, PF 1ST
1
1
1
NJ37703-0
CASSETTE, RIBBON<B>
1
1
1
4-26
NH66705-0
SA, MAIN PCB WITHOUT VR
1
1
1
4-27
E11130-050F
4-28
NH66702-0
4-29
E00520-040F
SCREW M2.0X4 BIND
1
4-30
NJ68716-0
SA, BM SENSOR PCB
1
4-31
E00520-040F
SCREW M2.0X4 BIND
1
1
1
Included in 4-1
4-32
NJ24701-0
SA, PE SENSOR HOLDER
1
1
1
Mechanical switch
type
(Subsitute for
4-28)
4-28/4-29 not
used
4-33
NJ90904-0
LABEL, RIBBON
1
1
1
4-34
NJ90909-0
LABEL, CUTTER CAUTION
1
1
1
SCREW, PHT (ST), M3.0X5
1
1
1
SA, SENSOR PCB
1
1
1
Photo sensor
switch type
4-32 not used
1
1
Included in 4-1
1
1
*
CD-S500: Standard model
*
CD-S501: Built-in autocutter model
*
CD-S503: Rewinder model
4-15
CD-S500 Series
4-1-5
Drawing No. 5 Parts List & Location for Main PCB
CD-S500 Series
Drawing No. 5
Parts List & Location for Main PCB
Revisions List
Sheet No.
Rev. No.
Date
1/1
1
2004. 11. 1
1/1
2
2005. 5. 20
4-16
CD-S500 Series
Drawing No. 5 Main PCB
CD-S500 (Standard model)
CD-S501 (Built-in autocutter model)
CD-S503 (Rewinder model)
3
4
2
(d) (e)
(a)
(b)
(c)
(f)
2
5
1
4-17
CD-S500 Series
CD-S500 (Standard model)
CD-S501 (Built-in autocutter model)
CD-S503 (Rewinder model)
8
6
7
4-18
CD-S500 Series
Parts List for CD-S500 Series:
TITLE: Main PCB
Drawing No. 5
Sheet No. 1/1
Rev. No. 2
Q'ty/Unit
Location
Part No.
5-1
NJ66820-0
UNIT, MAIN PCB (WITH ROM)
NJ66810-0
UNIT, MAIN PCB AC (WITH ROM)
NJ66800-0
UNIT, MAIN PCB AC+RW (WITH
ROM)
NJ66834-0
UNIT, MAIN PCB CHN (WITH ROM)
NJ66832-0
UNIT, MAIN PCB AC CHN (WITH
ROM)
NJ66830-0
UNIT, MAIN PCB A+R CH (WITH
ROM)
5-2
*
*
*
E00530-050F
Part Name
CD-S500
SCREW M3.0X5 BIND
CD-S501
CD-S503
Remark
1
1
1
1
1
1
4
4
4
5-3
NJ64901-0
COVER, PCB
1
1
1
5-4
NJ67900-0
FFC, MAIN
1
1
1
5-5
NJ67905-0
FFC, OPE-PANE
1
1
1
5-6
NJ66745-0
SA, SERIAL I/F PCB (MM)
CHN/JPN
1
1
1
SERIAL I/F
metric spec.
NJ66746-0
SA, SERIAL I/F PCB (INCH)
OTERS
1
1
1
SERIAL I/F
inch spec.
NJ66750-0
SA, PARALLEL I/F PCB
1
1
1
PARALLEL I/F
spec.
NJ66760-0
SA, USB I/F PCB
1
1
1
USB I/F
inch spec.
5-7
E00530-050F
SCREW M3.0X5 BIND
2
2
2
5-8
E00830-060F
SCREW, PH (EXT. TW) M3X6
1
1
1
CD-S500: Standard model
CD-S501: Built-in autocutter model
CD-S503: Rewinder model
4-19
CD-S500 Series
4-1-6
Drawing No. 6 Parts List & Location for Base Frame
CD-S500 Series
Drawing No. 6
Parts List & Location for Base Frame
Revisions List
Sheet No.
Rev. No.
Date
1/1
1
2004. 11. 1
1/2
2
2005. 5. 20
2/2
2
2005. 5. 20
4-20
CD-S500 Series
Drawing No. 6 Base Frame
CD-S500 (Standard model)
26
25
21
31
35
25
34
34
32
33
22
35
1
3
4
10
5
6
4
7
14
15
10
9
11
4-21
8
CD-S500 Series
CD-S500 (Standard model)
16
47
20
47
45
19
40
38
20
39
29
25
24
24
30
25
4-22
CD-S500 Series
CD-S501 (Built-in autocutter model)
26
25
21
31
35
25
32
34
33
34
22
35
1
3
4
10
5
6
4
7
14
15
10
8
9
11
4-23
CD-S500 Series
CD-S501 (Built-in autocutter model)
27
17
46
(e)
18
20
41
18
45
19
40
38
20
*
Refer to Page 4-17 for connections of connector (e).
39
29
25
24
24
30
25
4-24
CD-S500 Series
CD-S503 (Rewinder model)
37
33
21
25
A
35
33
35
36
A
2
3
4
10
5
4
6
7
10
8
9
11
4-25
CD-S500 Series
CD-S503 (Rewinder model)
27
17
46
(e)
13
12
45
18
44
42
18
43
*
Refer to Page 4-17 for connections of connector (e).
29
25
23
4-26
CD-S500 Series
Parts List for CD-S500 Series:
TITLE: Base Frame
Drawing No. 6
Sheet No. 1/2
Rev. No. 2
Location
Part No.
6-1
NJ49801-0
UNIT, BASE FRAME STD
6-2
NJ49802-0
UNIT, BASE FRAME RWD
*
*
*
6-3
NJ24702-1
6-4
E00930-060F
6-5
NJ28201-0
6-6
E00520-040F
6-7
NJ24207-0
6-8
E13717-060F
6-9
NJ22702-0
6-10
E60330-000F
1
1
1
1
2
2
2
COVER, PLATEN
1
1
1
SCREW M2.0X4 BIND
2
2
2
GUIDE, PAPER
1
1
1
SCREW, M1.7X6.0 (#0) B TITE
3
3
3
SA1, PF SHAFT
1
1
1
E-RING, 3
2
2
2
1
1
GEAR, PF SHAFT
NJ46201-0
ARMATURE, SW 1
6-13
E00520-040F
6-14
NJ46202-0
6-15
E00520-040F
6-16
NJ44204-0
NJ29901-0
1
CD-S503
1
NJ20203-0
E11130-050F
CD-S501
SA, PLATEN
6-11
6-18
CD-S500
SCREW, PH (SW+PW), M3.0X6
6-12
6-17
Q'ty/Unit
Part Name
1
1
SCREW M2.0X4 BIND
1
ARMATURE, SW 2
1
1
SCREW M2.0X4 BIND
1
1
DUMMY, CUTTER
1
CUTTER, AUTO
1
1
SCREW, PHT (ST), M3.0X5
2
2
6-19
NJ44112-0
6-20
E11130-050F
PLATE, AUTO CUTTER
1
1
SCREW, PHT (ST), M3.0X5
2
2
6-21
NJ44109-0
PLATE, SECTOR GEAR 1
1
1
6-22
NJ44110-0
PLATE, SECTOR GEAR 2
1
1
6-23
NJ40901-0
GEAR, DAMPER C
6-24
NJ40902-0
GEAR, DAMPER E
2
2
6-25
E00520-040F
SCREW M2.0X4 BIND
6
6
6-26
NJ44203-0
CAP, SPRING
1
1
6-27
NJ54105-0
SHEET, AUTO CUTTER
6-28
NJ22201-0
PLATE, PARTITION 1
1
1
1
3
1
1
6-29
NJ22202-0
PLATE, PARTITION 2
1
1
6-30
NJ22203-0
ROLLER, ASSIST
1
1
6-31
NJ43601-0
SPRING, CHASSIS PLATEN R1
1
1
6-32
NJ43602-0
SPRING, CHASSIS PLATEN L
1
1
6-33
NJ44121-0
6-34
E50160-110F
WASHER
2
2
WASHER, PLAIN
2
2
E-RING, 4
2
2
6-35
E60340-000F
6-36
NJ43605-0
SPRING, CHASSIS PLATEN R2
6-37
NJ43603-0
SPRING, CHASSIS CUTTER
6-38
NJ24101-0
CHASSIS, PLATEN
1
1
1
6-39
NJ42001-0
SHAFT, CHASSIS PLATEN
1
1
1
CD-S500: Standard model
CD-S501: Built-in autocutter model
CD-S503: Rewinder model
4-27
4
2
1
1
Remark
CD-S500 Series
Parts List for CD-S500 Series:
TITLE: Base Frame
Drawing No. 6
Location
Part No.
6-40
E60330-000F
6-41
NJ24703-0
*
*
*
Sheet No. 2/2
Rev. No. 2
Q'ty/Unit
Part Name
E-RING, 3
CD-S500
CD-S501
2
2
CD-S503
2
SA, CHASSIS PLATEN CAP
2
6-42
NJ44106-0
CHASSIS, CUTTER
1
6-43
NJ42002-0
SHAFT, CHASSIS CUTTER
1
6-44
E60320-000F
6-45
NJ90908-0
LABEL, CATCHING CAUTION
6-46
NJ90907-0
LABEL, AUTO CUTTER
CAUTION
6-47
E12830-080DF
E-RING, 2
2
SCREW, M3.0X8 P TITE BIND
CD-S500: Standard model
CD-S501: Built-in autocutter model
CD-S503: Rewinder model
4-28
1
2
1
1
1
1
Remark
CD-S500 Series
4-1-7
Drawing No. 7 Parts List & Location for Rewinder
CD-S500 Series
Drawing No. 7
Parts List & Location for Rewinder
Revisions List
Sheet No.
Rev. No.
Date
1/1
1
2004. 11. 1
1/1
2
2005. 5. 20
4-29
CD-S500 Series
Drawing No. 7 Rewinder
CD-S503 (Rewinder model)
5
6
7
4
16
3
2
3
1
2
4-30
CD-S500 Series
CD-S503 (Rewinder model)
15
11
9
(d)
12
10
8
10
*
Refer to Page 4-17 for connections of connector (d).
4-31
14
13
CD-S500 Series
Parts List for CD-S500 Series:
TITLE: Rewinder
Drawing No. 7
Sheet No. 1/1
Rev. No. 2
Q'ty/Unit
Location
Part No.
7-1
NJ58201-0
CASE, REWINDER W
1
White case
NJ58202-0
CASE, REWINDER B
1
Black case
*
*
*
7-2
E12830-080DF
7-3
E00530-050F
7-4
7-5
Part Name
CD-S500, 501
CD-S503
SCREW, M3.0X8 P TITE BIND
2
SCREW M3.0X5 BIND
4
NJ27201-1
REWINDER
1
NJ27202-0
SLIDER
1
7-6
NJ23601-0
SPRING, REWINDER
1
7-7
NJ27203-0
STOPPER, REWINDER
1
7-8
NJ44901-0
SHEET, GND
1
7-9
NJ25702-0
SA, REWINDER MOTOR
1
7-10
E01420-025F
SCREW M2.0X2.5 (#0)
2
7-11
NJ22003-0
PIN, ROLLER REWINDER
1
7-12
NJ22502-1
ROLLER, REWINDER
1
7-13
NJ20201-0
GEAR, REWINDER
1
7-14
NJ24104-0
FRAME, REWINDER MOTOR
1
7-15
E01420-025F
SCREW M2.0X2.5 (#0)
1
7-16
NJ90903-0
LABEL, PAPER REWINDER
1
CD-S500: Standard model
CD-S501: Built-in autocutter model
CD-S503: Rewinder model
4-32
Remark
CD-S500 Series
4-1-8
Drawing No. 8 Parts List & Location for Paper Near End Sensor
CD-S500 Series
Drawing No. 8
Parts List & Location for Paper Near End Sensor
Revisions List
Sheet No.
Rev. No.
Date
1/1
1
2004. 11. 1
1/1
2
2005. 5. 20
4-33
CD-S500 Series
Drawing No. 8 Paper Near End Sensor
CD-S500 (Standard model)
CD-S501 (Built-in autocutter model)
CD-S503 (Rewinder model)
(f)
3
4
1
2
*
Refer to Page 4-17 for connections of connector (f).
4-34
CD-S500 Series
Parts List for CD-S500 Series:
TITLE: Paper Near End Sensor
Drawing No. 8
Location
Part No.
8-1
NJ14203-0
8-2
E13717-040WF
Sheet No. 1/1
Rev. No. 2
Q'ty/Unit
Part Name
CD-S500, 501
CD-S503
HOLDER, NE SENSOR A
1
1
SCREW, M1.7X4.0 (#0) B TITE
2
2
8-3
NJ14204-0
HOLDER, NE SENSOR B
1
1
8-4
NJ68700-0
SA, PNE SENSOR
1
1
*
CD-S500: Standard model
*
CD-S501: Built-in autocutter model
*
CD-S503: Rewinder model
4-35
Remarks
CD-S500 Series
4-2
Electric Parts List
4-2-1
Parts List & Location for Unit, Main PCB
Parts List & Location for Unit, Main PCB AC + RW (WITH ROM)
Revision Up List
Sheet No.
Rev. No.
Date
1/5
1
2004. 12. 1
2/5
1
2004. 12. 1
3/5
1
2004. 12. 1
4/5
1
2004. 12. 1
5/5
1
2004. 12. 1
1/5
2
2005. 5. 20
2/5
2
2005. 5. 20
3/5
2
2005. 5. 20
4/5
2
2005. 5. 20
5/5
2
2005. 5. 20
4-36
CD-S500 Series
Surface Mounting Drawing: Main PCB
Mounted Surface
4-37
CD-S500 Series
Soldered Surface
4-38
4-39
C2620-011#
C2900-143#
C2319-036#
C2560-602#
C2701-102#
C2256-061#
C2256-072#
C2256-051#
C2256-073#
C2256-048#
C2256-049#
C2800-132#
7
8
9
10
11
12
13
14
15
16
17
18
C6149-167#
C2400-033#
6
21
NJ66900-**F
5
C2703-428#
NJ66700-**F
4
C6198-727#
C2308-071#
3
20
NJ94700-**F
19
NJ66800-**F
2
Part No.
1
Item No.
Part Name
SN74AHC1G08DCKR
SN74LV245ANSR
SN74AHC1G04DCKR
SN74AHC1G14DCKR
SN74LV123APWR
A3967SLBTR-T
uPD65882GC-160-8EU-A
M68AF127BM56MC6L
BD5342FVE
LMV932MM/NOPB
HD6412390F20V
MBM29F400BC-70PFTN-E1
CN, I/F_BOAD_CONNECTOR, 30PIN
CN, MAIN_FFC_CONNECTOR, 27PIN
IC, FULL_BRIDGE_DRIVER_IC, 7PIN
IC, SURFACE_MOUNT_SWITCHING_
REGULATOR_IC
DHB-PA30-R131N-FA
27FE-BT-VK-N
TA8428K
SI-8050JD
IC, SINGLE_2-INPUT_OR_GATE, SC-70, SN74AHC1G32DCKR
5PIN
IC, SINGLE_2-INPUT_AND_GATE, SC70, 5PIN
IC, OCTAL_BUS_TRANSCEIVERS_
WITH 3-STATE OUTPUTS
IC, SINGLE_INVERTER_GATE, SC-70,
5PIN
IC, SINGLE_SCHUMITT_TRIGER_
INVERTER_GATE, SC-70, 5PIN
IC, DUAL_1-SHOT_TIMMER, TSSOP,
16PIN
IC, MICROSTEPPING_DRIVER, 24PIN
IC, GATE_ARRAY, TQFP, 120PIN
IC, 1M_SRAM, SOIC, 32PIN
IC, CMOS_SYSTEM_RESET, VS=2.8V,
EMP5, 5PIN
IC, DUAL_OPEAMP, MSOP-8
IC, CPU, LQFP, 128PIN
PWB (MAIN PCB)
SA, MAIN PCB AC + RW (WITHOUT
ROM)
F-ROM (4M)
ROM SET (PROG. /C.G.)
Type
DDK
JST
TOSHIBA
SANKEN
TI
TI
TI
TI
TI
TI
ALLEGRO
NEC
ST MICRO
ROHM
NATIONAL
SEMICONDUCTOR
RENESAS
SPANSION
Manufacturer
TITLE: UNIT, MAIN PCB AC + RW(WITH ROM)
UNIT, MAIN PCB AC + RW (WITH ROM)
Parts List for CD-S500 Series:
1
1
1
1
3
1
1
3
1
1
3
1
2
1
1
1
1
1
1
1
Q’ty
CN2
CN1
IC24
IC23
IC19, IC21, IC22
IC20
IC18
IC16, IC17, IC26
IC15
IC13
IC11, IC12, IC27
IC10
IC6, IC7
IC3
IC2
IC1
IC5
Location
Sheet No. 1/5
Rev No. 2
CD-S500 Series
C5270-427#
C5270-428#
C5270-429#
C5270-430#
C5270-353#
C5270-326#
C5270-431#
37
38
39
40
41
C5270-354#
31
36
C6202-103#
30
35
C6198-404#
29
C5270-447#
C6180-093#
28
C5270-426#
C6202-704#
27
34
C6202-603#
26
33
C6205-002#
25
C5270-351#
C6202-102#
24
32
C6149-168#
C6198-608#
23
Part No.
22
Item No.
Part Name
4-40
C, CHIP_CAP, 1000PF, B, K, 250V, 1608
C, CHIP_CAP, 1000PF, B, K, 50V, 1005
C, CHIP_CAP, 1UF, B, K, 10V, 1608
C, CHIP_CAP, 680PF, B, K, 50V, 1005
C, CHIP_CAP, 0.22UF, B, K, 10V, 1005
C, CHIP_CAP, 0.22UF, F, Z, 50V, 1608
C, CHIP_CAP, 0.47UF, F, Z, 10V, 1005
C, CHIP_CAP, 18PF, CH, J, 50V, 1005
C, CHIP_CAP, 0.01UF, B, K, 16V, 1005
C, CHIP_CAP, 0.1UF, F, Z, 16V, 1005
C, CHIP_CAP, 470PF, B, K, 50V, 1005
CN, BM_SENSOR_CONNECTOR, 3PIN
CN, CUTTER_CONNECTOR, 4PIN
CN, POWER_CABLE_JACK, 3PIN
CN, REWINDER_MOTOR_
CONNECTOR, 4PIN
CN, PAPER_NEAR_END_SENSOR_
CONNECTOR, BLACK, 3PIN
CN, REAR_COVER_SWITCH_
CONNECTOR, 2PIN
CN, FRONT_COVER_SWITCH_
CONNECTOR, 2PIN
CN, OPEPANE_FFC_CONNECTOR
GRM188R72E102KW07D
MCH155CN102KK
GRM188B11A105KA61D
MCH155CN681KK
GRM155B31A224KE18D
GRM188F11H224ZA01D
GRM155F11A474ZE01D
MCH155A180JK
MCH153CN103KK
MCH153FN104ZK
MCH155CN471KK
B3B-PH-K-S (LF) (SN)
5267-04AX
TCS7960-5320177
B4B-EH-K (LF) (SN)
B3B-PH-K-K (LF) (SN)
B2P-VH (LF) (SN)
B2B-PH-K-S (LF) (SN)
08FE-ST-VK-N
285D-7660J-101-FA
Type
MURATA
ROHM
MURATA
ROHM
MURATA
MURATA
MURATA
ROHM
ROHM
ROHM
ROHM
JST
MOLLEX
HOSHIDEN
JST
JST
JST
JST
JST
DDK
Manufacturer
TITLE: UNIT, MAIN PCB AC + RW(WITH ROM)
CN, DRAWER_CONNECTOR, 6PIN
Parts List for CD-S500 Series:
2
17
2
6
3
3
1
2
1
40
2
1
1
1
1
1
1
1
1
1
Q’ty
CN3
C69, C70
C51, C52, C53, C54, C68, C72, C73,
C74, C75, C76, C77, C79, C82, C83,
C91, C92, C93
C47, C48
C38, C39, C45, C46, C99, C100
C36, C43, C98
C33, C40, C95
C14
C6, C7
C5
C4, C8, C9, C10, C11, C12, C13, C17,
C15, C18, C19, C26, C27, C28, C29,
C30, C31, C32, C34, C35, C37, C41,
C42, C44, C49, C55, C60, C61, C62,
C63, C64, C65, C66, C67, C71, C78,
C84, C94, C96, C97
C1, C2
CN11
CN10
CN9
CN8
CN7
CN6
CN5
CN4
Location
Sheet No. 2/5
Rev. No. 2
CD-S500 Series
C7511-053#
C7511-168#
C4927-000#
C4929-000#
C4927-101#
C4927-621#
56
57
58
59
60
51
C7302-399#
C3610-079#
50
55
C3610-071#
49
54
C3610-078#
48
C7302-402#
C3600-134#
47
C7302-414#
C3600-118#
46
53
C5190-706#
45
52
C5190-710#
C5190-705#
44
C5270-432#
C5190-709#
43
Part No.
42
Item No.
Part Name
4-41
R, CHIP_RES, 620OHM, 5%, 1005
R, CHIP_RES, 100OHM, 5%, 1005
R, CHIP_RES, 0OHM, 5%, 1608
R, CHIP_RES, 0OHM, 5%, 1005
L, INDUCTOR
L, CHOKE_COIL
F, CHIP_FUSE, 32V, 5A, 1608
F, CHIP_FUSE, 65V, 15A, 1608
F, CHIP_FUSE, 32V, 3A, 1608
D, SCHOTTKY_BARRIER_DIODE,
VR=60V
D, SCHOTTKY_BARRIER_DIODE,
VR=40V, SC-70
D, SCHOTTKY_BARRIER_DIODE,
VR=60V
D, SWITCHING_DIODE, VR=80V, SC-76
D, RECTIFIER_DIODE, VR=400V, SOD106
EC, AL_ELEC_CAP, 470UF, 16V
EC, AL_ELEC_CAP, 220UF, 35V
EC, AL_ELEC_CAP, 10UF, 10V
EC, AL_ELEC_CAP, 47UF, 35V
MCR01MZSEJ621
MCR01MZSEJ101
MCR03EZHEJ000
MCR01MZSEJ000
CDRH104RNP-101N
DLW5BSN191SQ2L
0467005.NR
R453015.MR
0467003.NR
SFPB-66V
RB715FT106
SPB-G56S
1SS355TE-17
1SR154-400
UVR1C471MPD
UVR1V221MPD
UZR1C100MCL1GB
UWX1V470MCL1GB
GRM188F11H104ZA01D
Type
ROHM
ROHM
ROHM
ROHM
SUMIDA
MURATA
LITTEL FUSE
LITTEL FUSE
LITTEL FUSE
SANKEN
ROHM
SANKEN
ROHM
ROHM
NICHICON
NICHICON
NICHICON
NICHICON
MURATA
Manufacturer
TITLE: UNIT, MAIN PCB AC + RW(WITH ROM)
C, CHIP_CAP, 0.1UF, F, Z, 50V, 1608
Parts List for CD-S500 Series:
2
13
4
20
1
1
1
1
2
1
1
1
3
1
1
1
3
2
2
Q’ty
C80, C81
R2, R6
R1, R3, R5, R7, R22, R32, R73, R74,
R75, R77, R78, R79, R80
FB9, FB10, FB11, R100
FB1, FB3, FB4, FB6, FB7, FB8, FB12,
FB13, FB14, FB15, FB16, FB17, FB18,
JP3, JP4, JP15, R16, JP17, JP21, R92
L2
L1
F5
F4
F1, F2
D9
D8
D5
D3, D4.D7
D1
EC7
EC6
EC2, EC4, EC9
EC1, EC3
Location
Sheet No. 3/5
Rev. No. 2
CD-S500 Series
4-42
C4923-005#
C4927-103#
C4927-563#
C4927-434#
C4927-204#
C4927-102#
63
64
65
66
67
68
C4927-104#
C4937-110#
C4937-123#
C4937-102#
C4600-083#
C3905-071#
C3905-072#
C7650-007#
73
74
75
76
77
78
79
71
72
C4937-120#
C4928-271#
70
C4927-303#
C4927-105#
62
69
C4927-223#
Part No.
61
Item No.
Part Name
SW, 10A_250V_AC_QUALIFIED_
POWER_SWITCH
DTR, DG_TRANSSITOR
DTR, DG_TRANSSITOR
TH, CHIP_THERMISTOR, 10KOHM, 1%,
1005
R, CHIP_RES, 10KOHM, 1%, 1005
R, CHIP_RES, 4.3KOHM, 1%, 1005
R, CHIP_RES, 30KOHM, 1%, 1005
R, CHIP_RES, 100KOHM, 5%, 1005
R, CHIP_RES, 270OHM, 5%, 2012
R, CHIP_RES, 3.3KOHM, 1%, 1005
R, CHIP_RES, 30KOHM, 5%, 1005
R, CHIP_RES, 1KOHM, 5%, 1005
R, CHIP_RES, 200KOHM, 5%, 1005
R, CHIP_RES, 430KOHM, 5%, 1005
R, CHIP_RES, 56KOHM, 5%, 1005
R, CHIP_RES, 10KOHM, 5%, 1005
R, CHIP_RES, 0.91OHM, 1%, 5025
R, CHIP_RES, 1MOHM, 5%, 1005
SDDJE10800
DTA114EUAFT106
DTC143EUAFT106
103KT1005-1P
MCR01MZSEF1002
MCR01MZSEF4301
MCR01MZSEF3002
MCR01MZSEJ104
MCR10EZHEJ271
MCR01MZSEF3301
MCR01MZSEJ303
MCR01MZSEJ102
MCR01MZSEJ204
MCR01MZSEJ434
MCR01MZSEJ563
MCR01MZSEJ103
MCR50JZHEFLR910
MCR01MZSEJ105
MCR01MZSEJ223
Type
ALPS
ROHM
ROHM
ISHIZUKA
ROHM
ROHM
ROHM
ROHM
ROHM
ROHM
ROHM
ROHM
ROHM
ROHM
ROHM
ROHM
ROHM
ROHM
ROHM
Manufacturer
TITLE: UNIT, MAIN PCB AC + RW(WITH ROM)
R, CHIP_RES, 22KOHM, 5%, 1005
Parts List for CD-S500 Series:
1
1
10
1
3
3
1
1
3
2
3
25
2
1
6
4
6
1
41
Q’ty
SW1
DTR2
DTR1, DTR3, DTR4, DTR5, DTR6,
DTR7, DTR8, DTR9, DTR10, DTR11
TH1
R55, R111, R112
R99, R106, R128
R104
R102
R86, R87, R88
R57, R58
R56, R98, R124
R43, R44, R45, R46, R47, R48, R49,
R50, R51, R52, R53, R54, R59, R81,
R82, R89, R90, R96, R105, R101,
R114, R123, R131, R138, R139
R42, R61
R39
R25, R28, R35, R38, R134, R136
R40, R41, R118, R119
R19, R20, R29, R30, R125, R126
R15
R9, R10, R11, R12, R13, R14, R18,
R26, R27, R36, R37, R60, R62, R63,
R64, R65, R66, R67, R68, R69, R70,
R71, R72, R83, R84, R85, R95, R97,
R108, R109, R110, R113, R115, R116,
R117, R120, R127, R135, R140, R141,
R142
Location
Sheet No. 4/5
Rev. No. 2
CD-S500 Series
C3551-004#
C3903-098#
C3903-108#
C3402-195#
C3201-351#
C7800-062#
E01030-080F
C3402-143#
C7400-003#
C3750-168#
C3750-166#
C7900-114#
81
82
83
84
85
86
87
88
89
90
91
Part No.
80
Item No.
Part Name
BZ, BUZZER
ZD, ZENNER_DIODE,
ZD, ZENNER_DIODE,
Y, CERAMIC_RESONATOR, 20MHZ
TR, MEDIUM_DRIVE_TRANSISTOR,
SC-63
SCREW
HEAT_SINK
TR, DARLINGTON_TRANSISTOR, DIP,
3PIN
TR, POWER_TRANSISTOR, 100V, 2A,
3PIN
TR, P-CH_MOSFET, ID=3A, 3PIN
SMA4032
DBX05ALF-P050N
UDZSFTE-176.8B
RD51EB-T4-AZ
CSTCE20M0V53-R0
2SD2143F
SCREW, PH (SW + PW#2), M3X8
PUE16-25N
2SB1351
2SD2195F-T100
2SJ358-T1-AZ
2SJ356-T1-AZ
Type
DB Products Ltd.
ROHM
NEC
MURATA
ROHM
MIZUTANI ELEC
SANKEN
ROHM
NEC
NEC
SANKEN
Manufacturer
TITLE: UNIT, MAIN PCB AC + RW(WITH ROM)
TR, P-CH_MOSFET, ID=2A, 3PIN
TRA, TR_ARRAY
Parts List for CD-S500 Series:
1
1
1
1
2
1
1
1
1
1
1
2
Q’ty
BZ1
ZD2
ZD1
Y1
TR4, TR5
(TR3)
(TR3)
TR3
TR2
TR1
TR8
TRA1, TRA2
Location
Sheet No. 5/5
Rev. No. 2
CD-S500 Series
4-43
CD-S500 Series
4-2-2
Parts List & Location for Unit, Ope-Pane PCB
Parts List & Location for Unit, Ope-Pane PCB
Revisions List
Sheet No.
Rev. No.
Date
1/1
1
2004. 12. 1
4-44
CD-S500 Series
Surface Mounting Drawing: Ope-Pane PCB
Mounted Surface
Soldered Surface
4-45
C3803-092
4
6
5
C6198-608
3
C7640-047
(C3803-095)
C3803-083
(C3803-089)
NJ66910-**
2
Part No.
NJ66730-**
1
Item No.
Part Name
SW, SWITCH (TACT)
D,CHIP_LED (ORANGE), 1608
D,CHIP_LED (GREEN), 1608
CN,OPE-PANE_CONNECTOR
PWB (OPE-PANE PCB)
SA, OPE-PANE PCB
Parts List for CD-S500 Series:
B3FS-1010P
LT1S67A
SML-310DT
LT1K67A
SML-310PT
08FE-ST-VK-N
Type
TITLE: Ope-Pane PCB
OMRON
SHARP
ROHM
SHARP
ROHM
JST
Manufacturer
1
2
1
1
1
1
Q’ty
SW102
D102,D103
D101
CN101
Location
Sheet No. 1/1
Rev. No. 1
CD-S500 Series
4-46
CD-S500 Series
4-2-3
Parts List & Location for Unit, Serial I/F PCB
Parts List & Location for Unit, Serial I/F (MM) PCB
Revisions List
Sheet No.
Rev. No.
Date
1/1
1
2004. 12. 1
4-47
CD-S500 Series
Surface Mounting Drawing: Serial I/F PCB
Mounted Surface
4-48
FB, CHIP_BEAD_ARRAY, 120OHM, 3216 BLA31BD121SN4D
PLATE, I/F SERIAL
C7539-044
NJ64102-00
E8488-310
9
10
LABEL (MM)
GRM188F11H104ZA01D
UVZ1E101MED
205A-25FGNBBC3
DHB-RA30-R131N-FA
8
C, CHIP_CAP, 0.1UF, F, Z, 50V, 1608
EC, AL_ELEC_CAP, 100UF, 25V
CN, RS232_I/F, 25PIN, M2.6
CN, CONNECT_TO_MAIN, 30PIN
C5190-711
C6180-256
5
SP232EEN-T/R
C5270-432
C6149-170
4
PWB (SERIAL I/F PCB)
IC, RS232C_DRV/RCV, N-SOIC, 16PIN
Type
7
C2900-128
3
Part Name
SA, SERIAL I/F PCB (MM)
TITLE: Serial I/F PCB (MM)
6
NJ66920-**
2
Part No.
NJ66745-**
1
Item No.
Parts List for CD-S500 Series:
MURATA
MURATA
NICHICON
CHANT SINCERE
DDK
SIPEX
Manufacturer
1
1
2
11
1
1
1
2
1
1
Q’ty
LA1, LA2
C2, C3, C4, C5, C6, C7, C8, C9, C10,
C11, C12
C1
CN2
CN1
IC1, IC2
Location
Sheet No. 1/1
Rev. No. 1
CD-S500 Series
4-49
CD-S500 Series
Parts List & Location for Unit, Serial I/F (INCH) PCB
Revisions List
Sheet No.
Rev. No.
Date
1/1
1
2004. 12. 1
4-50
FB, CHIP_BEAD_ARRAY, 120OHM, 3216 BLA31BD121SN4D
PLATE, I/F SERIAL
C7539-044
NJ64102-00
E8488-320
9
10
LABEL (INCH)
GRM188F11H104ZA01D
UVZ1E101MED
205A-25FGNBBB3
DHB-RA30-R131N-FA
8
C, CHIP_CAP, 0.1UF, F, Z, 50V, 1608
EC, AL_ELEC_CAP, 100UF, 25V
CN, RS232_I/F, 25PIN, 4#40
CN, CONNECT_TO_MAIN, 30PIN
C5190-711
C6180-257
5
SP232EEN-T/R
C5270-432
C6149-170
4
PWB (SERIAL I/F PCB)
IC, RS232C_DRV/RCV, N-SOIC, 16PIN
Type
7
C2900-128
3
Part Name
SA, SERIAL I/F PCB (INCH)
Manufacturer
MURATA
MURATA
NICHICON
CHANT SINCERE
DDK
SIPEX
TITLE: Serial I/F PCB (INCH)
6
NJ66920-**
2
Part No.
NJ66746-**
1
Item No.
Parts List for CD-S500 Series:
1
1
2
11
1
1
1
2
1
1
Q’ty
LA1, LA2
C2, C3, C4, C5, C6, C7, C8, C9, C10,
C11, C12
C1
CN2
CN1
IC1, IC2
Location
Sheet No. 1/1
Rev. No. 1
CD-S500 Series
4-51
CD-S500 Series
4-2-4
Parts List & Location for Unit, Parallel I/F PCB
Parts List & Location for Unit, Parallel I/F PCB
Revisions List
Sheet No.
Rev. No.
Date
1/1
1
2004. 12. 1
4-52
CD-S500 Series
Surface Mounting Drawing: Parallel I/F PCB
Mounted Surface
Soldered Surface
4-53
C6149-170
C6149-166
8
9
4-54
C4498-015
C4498-016
NJ64101-00
21
22
19
20
C4928-473
C4498-014
18
C4928-101
15
C4928-103
C7539-044
14
17
C7539-045
13
16
C5270-452
C5270-453
12
C5270-451
C2256-079
7
C5190-711
C2256-078
6
11
C2256-077
5
10
C2256-076
4
IC, DUAL_FLIP_FLOP, TSSOP, 14PIN
SN74AHC74PWR
BLM21AG121SN1D
GRM188B11H102KA01
GRM188B11H471KA01
GRM188B31H104KA92
UVZ1E101MED
57RE-40360-730B (D3)-FA
DHB-RA30-R131N-FA
SN74AHC05PWR
SN74AHC14PWR
SN74AHC00PWR
PLATE,I/F PARALLEL
RA, CHIP_RES_ARRAY, 1KOHM
RA, CHIP_RES_ARRAY, 3.3KOHM
RA, CHIP_RES_ARRAY, 100KOHM
R, CHIP_RES, 47KOHM, 5%, 2012
R, CHIP_RES, 10KOHM, 5%, 2012
R, CHIP_RES, 100OHM, 5%, 2012
BCN164AB102J7
BCN168SB332J
BCN168SB104J
MCR10EZHJ473
MCR10EZHJ103
MCR10EZHJ101
FB, CHIP_BEAD_ARRAY, 120OHM, 3216 BLA31BD121SN4D
FB, CHIP_BEAD, 120OHM, 2012
C, CHIP_CAP, 1000PF, B, K, 50V, 1608
C, CHIP_CAP, 470PF, B, K, 50V, 1608
C, CHIP_CAP, 0.1UF, B, K, 50V, 1608
EC, AL_ELEC_CAP, 100UF, 25V
CN, PARALEL_I/F, 36PIN
CN, CONNECT_TO_MAIN, 30PIN
ICHEX_T_INVERTER_OPENDRAIN,
TSSOP, 14PIN
ICHEX_SCHMIT_INVERTER, TSSOP,
14PIN
IC, QUAD_NAND, TSSOP, 14PIN
SN74AHCT573PWR
SN74HCT573PWR
TC74ACT573FT (EL)
IC, OCT_LATCH, TSSOP, 20PIN
PWB (PARALLEL I/F PCB)
Type
(C2256-083#)
C2256-075
3
Part Name
SA, PARALLEL I/F PCB
TITLE: Parallel I/F PCB
(C2256-082#)
NJ66921-**
2
Part No.
NJ66750-**
1
Item No.
Parts List for CD-S500 Series:
BI TEC.
BI TEC.
BI TEC.
ROHM
ROHM
ROHM
MURATA
MURATA
MURATA
MURATA
MURATA
NICHICON
DDK
DDK
TI
TI
TI
TI
TI
TOSHIBA
TI
Manufacturer
1
1
4
1
1
3
2
5
1
1
2
7
1
1
1
1
1
1
1
2
1
1
Q’ty
RA6
RA2, RA3, RA4, RA5
RA1
R5
R2, R3, R4
R1, R7
LA1, LA2, LA3, LA4, LA5
L1
C4
C3, C5
C2, CP1, CP2, CP3, CP4, CP5, CP6
C1
CN2
CN1
IC6
IC5
IC4
IC3
IC1, IC2
Location
Sheet No.
Rev. No. 1
CD-S500 Series
CD-S500 Series
4-2-5
Parts List & Location for Unit, PNE SENS PCB
Parts List & Location for Unit, PNE SENS PCB
Revisions List
Sheet No.
Rev. No.
Date
1/1
1
2004. 12. 1
4-55
CD-S500 Series
Surface Mounting Drawing: PNE SENS PCB
Mounted Surface
Soldered Surface
4-56
C4928-221#
(C3801-055)
C3801-054
3
4
NJ66916-**
2
Part No.
NJ66766-**
1
Item No.
Part Name
R, CHIP_RES, 220OHM, 5%, 2012
PI, PHOTO_INTERRUPTER
PWB (PNE SENS PCB)
SA, PNE SENS PCB
Parts List for CD-S500 Series:
MCR10EZHEJ221
GP2S24B
GP2S24B100F
Type
TITLE: PNE SENS PCB
ROHM
SHARP
SHARP
Manufacturer
2
2
1
1
Q’ty
R201, 202
PI201, PI202
Location
Sheet No.
Rev. No. 1
CD-S500 Series
4-57
CD-S500 Series
4-2-6
Parts List & Location for Unit, BM SENS PCB
Parts List & Location for Unit, BM SENS PCB
Revisions List
Sheet No.
Rev. No.
Date
1/1
1
2004. 12. 1
4-58
CD-S500 Series
Surface Mounting Drawing: BM SENS PCB
Mounted Surface
Soldered Surface
4-59
C4920-221
(C3801-040)
C3802-042
3
4
NJ66922-**
2
Part No.
NJ66765-**
1
Item No.
Part Name
R, CHIP_RES, 220OHM, 5%, 3216
PI, PHOTO_INTERRUPTER
PWB (BM SENSOR PCB)
SA, BM SENS PCB
Parts List for CD-S500 Series:
MCR18EZHJ221
SG-105
TLP908-0 (LB)
Type
TITLE: BM SENS PCB
ROHM
KODENSHI
TOSHIBA
Manufacturer
1
1
1
1
Q’ty
R301
PI301
Location
Sheet No.
Rev. No. 1
CD-S500 Series
4-60
CD-S500 Series
4-3
Accessory Parts List
Accessory Parts List
Revisions List
Sheet No.
Rev. No.
Date
1/1
1
2005. 5. 20
4-61
CD-S500 Series
Parts List for CD-S500 Series:
TITLE: Accessory Parts List
Sheet No. 1/1
Rev. No. 1
Q'ty/Unit
Location
Part No.
−
NJ74902-5
MANUAL, USER’S ENG
1
1
1
−
NJ74907-5
MANUAL, USER’S MLT
1
1
1
*
*
*
Part Name
CD-S500
CD-S501
CD-S503
−
NJ74903-5
−
C6001-001#
−
C6001-201#
CORD SET (EU)
1
1
1
−
C6001-400#
CORD SET (AUSTRALIA)
1
1
1
−
C6001-801#
CORD SET (CHINA)
1
1
1
−
NJ79901-0
PAPER, ROLL
1
1
1
1-5
NJ69901-0
UNIT, AC ADAPTER
1
1
1
6-28
NJ22201-0
PLATE, PARTITION 1
MANUAL, USER’S CHN
1
1
1
CORD SET (USA)
1
1
1
1
6-28
NJ20202-0
PLATE, PARTITION 2
1
1
−
NJ37701-0
SA, RIBBON CASSETTE (P)
1
1
1
−
NJ37703-0
SA, RIBBON CASSETTE (B)
1
1
1
−
NJ37702-0
SA, RIBBON CASSETTE (B/R)
1
1
1
CD-S500: Standard model
CD-S501: Built-in autocutter model
CD-S503: Rewinder model
4-62
Remark
FOR TEST SAMPLE
CD-S500 Series
4-4
Recommended Spare Parts List
Recommended Spare Parts List
Revisions List
Sheet No.
Rev. No.
Date
1/1
1
2005. 5. 20
4-63
CD-S500 Series
Parts List for CD-S500 Series:
TITLE: Recommended Spare Parts List
Sheet No. 1/1
Rev. No. 1
Location
Part No.
1
1-5
NJ69901-0
UNIT, AC ADAPTER
1
1
2
3-9
NJ66730-0
SA, OPE-PANE PCB
1
1
CD-S500 CD-S501 CD-S503
Remark
C
1
C
3
4-5
NJ68705-0
SA, REAR COVER SW
1
1
1
C
4
4-7
NJ68710-0
SA, FRONT COVER SW
1
1
1
C
5
4-11
NJ44116-0
CUTTER, MANUAL
1
1
1
W
6
4-18
NJ09701-0
SA PRINT HEAD
1
1
1
W
7
4-20
NH34104-0
MASK, RIBBON
1
1
1
W
8
4-30
NJ68716-0
SA, BM SENSOR PCB
1
1
1
C
9
4-32
NJ24701-0
SA, PE SENSOR HOLDER
1
1
1
Substitute for
4-28 (mechanical
switch type)
4-29 not used, C
10
5-1
1
NJ66820-0
UNIT, MAIN PCB (WITH ROM)
11
NJ66810-0
UNIT, MAIN PCB AC (WITH
ROM)
12
NJ66800-0
UNIT, MAIN PCB AC+RW (WITH
ROM)
13
NJ66834-0
UNIT, MAIN PCB CHN (WITH
ROM)
14
NJ66832-0
UNIT, MAIN PCB AC CHN (WITH
ROM)
15
NJ66830-0
UNIT, MAIN PCB A+R CH (WITH
ROM)
NJ67900-0
FFC, MAIN
16
5-4
1
1
1
1
1
1
1
1
C
17
5-5
NJ67905-0
FFC, OPE-PANE
1
1
1
C
18
5-6
NJ66745-0
SA, SERIAL I/F PCB (MM)
CHN/JPN
1
1
1
SERIAL I/F
metric spec.
19
NJ66746-0
SA, SERIAL I/F PCB (INCH)
OTERS
1
1
1
SERIAL I/F
inch spec.
20
NJ66750-0
SA, PARALLEL I/F PCB
1
1
1
PARALLEL I/F
spec.
21
NJ66760-0
SA, USB I/F PCB
1
1
1
USB I/F
inch spec.
22
6-3
NJ24702-0
SA, PLATEN
1
1
1
W
23
6-9
NJ22702-0
SA1, PF SHAFT
1
1
1
W
24
6-17
NJ29901-0
CUTTER, AUTO
1
1
W
25
7-1
NJ58201-0
CASE, REWINDER W
1
White case, C
NJ58202-0
CASE, REWINDER B
1
Black case, C
8-4
NJ68700-0
SA, PNE SENSOR
1
C
26
27
*
*
*
*
*
Part Name
Q'ty/Unit
No.
1
CD-S500: Standard model
CD-S501: Built-in autocutter model
CD-S503: Rewinder model
“W” (WORN) denotes parts which wear out from use.
“C” (CASUAL) denotes parts other than the above.
4-64
1
Chapter 5
CIRCUIT DIAGRAMS
5-1
DATE
TITLE
2004.12.1
INTER-CONNECTION
CD-S500 Series
Revision
A
PAGE
1/1
5-1
MODEL
CD-S500 Series
INTER-CONNECTION
5-2
DATE
2004.12.1
Revision
A
1/10
PAGE
CPU CIRCUIT
UNIT, MAIN PCB AC+RW (WITH ROM)
CPU CIRCUIT
5-2-1
CD-S500 Series
UNIT, MAIN PCB
TITLE
5-2
MODEL
CD-S500 Series
5-3
DATE
TITLE
MODEL
2004.12.1
Revision
UNIT, MAIN PCB AC+RW (WITH ROM)
MEMORY CIRCUIT
CD-S500 Series
A
2/10
PAGE
5-2-2
JP20 not mounted but included in the pattern.
CD-S500 Series
MEMORY CIRCUIT
5-4
DATE
TITLE
2004.12.1
Revision
UNIT, MAIN PCB AC+RW (WITH ROM)
GATE ARRAY CIRCUIT
CD-S500 Series
A
3/10
PAGE
5-2-3
MODEL
CD-S500 Series
GATE ARRAY CIRCUIT
5-5
DATE
TITLE
2004.12.1
Revision
UNIT, MAIN PCB AC+RW (WITH ROM)
PF/CR MOTOR CIRCUIT
CD-S500 Series
A
4/10
PAGE
5-2-4
MODEL
CD-S500 Series
PF/CR MOTOR CIRCUIT
5-6
DATE
TITLE
2004.12.1
Revision
UNIT, MAIN PCB AC+RW (WITH ROM)
PF/CR MTR VCC CONTROL CIRCUIT
CD-S500 Series
A
5/10
PAGE
5-2-5
MODEL
CD-S500 Series
PF/CR MTR VCC CONTROL CIRCUIT
5-7
DATE
TITLE
2004.12.1
Revision
UNIT, MAIN PCB AC+RW (WITH ROM)
HEAD PIN DRIVER CIRCUIT
CD-S500 Series
A
6/10
PAGE
5-2-6
MODEL
CD-S500 Series
HEAD PIN DRIVER CIRCUIT
5-8
DATE
TITLE
2004.12.1
Revision
UNIT, MAIN PCB AC+RW (WITH ROM)
I/F CONNECTOR CIRCUIT
CD-S500 Series
A
7/10
PAGE
5-2-7
MODEL
CD-S500 Series
I/F CONNECTOR CIRCUIT
5-9
DATE
TITLE
2004.12.1
Revision
UNIT, MAIN PCB AC+RW (WITH ROM)
DRAWER/OPEPANE/BUZZER CIRCUIT
CD-S500 Series
A
8/10
PAGE
5-2-8
MODEL
CD-S500 Series
DRAWER/OPE-PANE/BUZZER CIRCUIT
5-10
DATE
TITLE
2004.12.1
Revision
UNIT, MAIN PCB AC+RW (WITH ROM)
SENSOR/REWINDER CIRCUIT
CD-S500 Series
A
9/10
PAGE
5-2-9
MODEL
CD-S500 Series
SENSOR/REWINDER CIRCUIT
5-11
DATE
TITLE
2004.12.1
Revision
UNIT, MAIN PCB AC+RW (WITH ROM)
POWER/CUTTER CIRCUT
CD-S500 Series
A
10/10
PAGE
5-2-10
MODEL
CD-S500 Series
POWER/CUTTER CIRCUT
5-12
DATE
TITLE
2004.12.1
SA, OPEPANE PCB
CD-S500 Series
Revision
A
PAGE
1/1
5-3
MODEL
CD-S500 Series
SA, OPE-PANE PCB
5-13
DATE
TITLE
2004.12.1
SA, SERIAL I/F (MM)
CD-S500 Series
Revision
A
PAGE
1/1
5-4
MODEL
CD-S500 Series
SA, SERIAL I/F PCB (MM)
5-14
DATE
TITLE
2004.12.1
SA, SERIAL I/F PCB (INCH)
CD-S500 Series
Revision
A
PAGE
1/1
5-5
MODEL
CD-S500 Series
SA, SERIAL I/F PCB (INCH)
5-15
DATE
TITLE
MODEL
2004.12.1
SA, PARALLEL I/FPCB
CD-S500 Series
Revision
A
PAGE
1/1
5-6
* R6, RA7, RA8 not mounted
CD-S500 Series
SA, PARALLEL I/F PCB
5-16
DATE
TITLE
2004.12.1
SA, PNE SENS PCB
CD-S500 Series
Revision
A
PAGE
1/1
5-7
MODEL
CD-S500 Series
SA, PNE SENS PCB
5-17
DATE
TITLE
2004.12.1
SA, BM SENS PCB
CD-S500 Series
Revision
A
PAGE
1/1
5-8
MODEL
CD-S500 Series
SA, BM SENS PCB
Chapter 6
TROUBLESHOOTING
CD-S500 Series
6-1
Troubleshooting List
Symptom
1
Paper jam
Check
Action
Check for a jam at the paper ejection
opening.
Remove all the jammed paper. Remove the roll
paper from the printer and put it back again.
If you cannot open the rear cover,
make a check for 2.
2
Rear cover does not
open
Check to see if the blade of the auto
cutter is protruding.
Insert a Phillips screwdriver (+) into the cutter
lock release feed hole on the printer and turn it
clockwise or counter-clockwise.
Rotate the screwdriver while watching the paper
ejection opening and stop turning it when both
ends of the blade are fully retracted.
CAUITON
3
Ribbon is not fed
correctly
Turn the knob on the ribbon cassette.
Do not try to force the rear cover
to open. If you do so, the printer
will be damaged and you will be
cut by the blade.
After turning the knob until the ribbon is fed
smoothly, reset the ribbon cassette.
If you cannot turn the knob, the ribbon may be
jammed inside the cassette. If the situation does
not improve, replace it with a new ribbon cassette.
4
The paper is not cut
Check to make sure that the rear cover
and front cover are closed.
If either cover is open, close it.
5
Power cannot be turned
on
Check to make sure that the power
cord and AC adapter plug are correctly
inserted.
Insert the power cord and AC adapter plug
correctly.
Check to make sure that the power is
supplied to the outlet.
Supply the power to the outlet.
Check the power cord for
disconnection.
Replace the power cord.
Check to make sure that the print head
FPC is correctly inserted into the
connector.
Insert the print head FPC correctly into the
connector.
Check the print head FPC for
disconnection.
If disconnected, replace the print head.
6
Carriage operates but
there is no print made
7
Some printing pins do
not print
Check to make sure that the FFC that
connects between the print head,
connector and main PCB is correctly
inserted into the connector.
If the FFC is correctly inserted and the situation
does not improve, replace the print head or the
main PCB.
8
Print is generally too
light
Check to see if ink on the ink ribbon is
running out.
If ink is running out, replace the ink ribbon.
Check the head gap. (If it is too wide,
print will become lighter.)
Adjust the head gap.
6-1
CD-S500 Series
9
Symptom
Check
Action
Print is off the specified
column position
Check to see if fibers of paper or ink
ribbon are collected on the HP sensor
or partition plate.
Remove fibers of paper or ink ribbon.
Check to see if lubricant is present or
dried up on the CR guide shaft and the
carriage.
Supply lubricant to the CR guide shaft and the
carriage.
Check to see if the ink ribbon is caught
in the print head.
If the ink ribbon is caught in the print head,
replace the print head.
10
Carriage does not
operate
Check to see if the carriage moves
smoothly.
If the carriage does not move smoothly, replace
the printing unit. If the carriage moves smoothly,
replace the HP sensor PCB, CR motor and main
PCB.
11
Printing stops suddenly
Check to see if the ink ribbon is caught
in the print head.
Replace the print head.
12
Power is turned on but
paper is not fed
Check to make sure that the PF motor
is working.
Replace the PF motor and the main PCB.
13
Paper feed is unstable
Check the rubber roller on the PF shaft
for contamination.
If contaminated, clean the rubber roller of the PF
shaft with alcohol.
Check to see if the ribbon mask is
deformed.
If deformed, replace the ribbon mask.
Check to make sure that the paper
pressure plate correctly holds the
paper.
If not, bend the paper pressure plate towards the
paper.
Check the head gap. (If the head gap
is too narrow, paper feed may be
unstable depending on the load in
feeding.)
Adjust the head gap.
Check to make sure that the rear cover
sensor is correctly working.
Adjust the rear cover sensor position.
14
Auto cutter does not
operate
Check that the auto cutter cable
connector is correctly connected to the
main PCB and that “Auto-Cutter
OFF” is not selected for the menu.
If there is no problem in the connection and menu
setting, replace the auto cutter.
15
Auto cutter does not cut
well
Check to make sure that the auto cutter
mounting screws are securely
tightened.
Tighten the mounting screws.
Check to make sure that the lower
blade mounting screws are securely
tightened.
Tighten the mounting screws.
Check to see if the lower blade is worn
out.
Replace the lower blade.
Check to see if the lower blade fixing
part is deformed.
If deformed, replace the part.
Check the rewinder motor operation.
If the rewinder motor does not operate, replace the
rewinder motor and the main PCB.
16
Rewinder does not
operate
6-2
CD-S500 Series
Symptom
17
Rewinder does not
rewind the paper
correctly
Check
Action
Check to see if the paper is set to the
rewinder too loosely.
If too loose, tense it. Note that the paper should be
set tightly at the beginning of rewinding.
Check to see if the rewinder roller is
worn out.
If worn out, replace the rewinder roller.
6-3
CD-S500 Series
6-2
Clearing a Paper Jam
Clearing Method
1) Turn off the power and open the rear cover.
<If the rear cover cannot be opened>
When there is a cutter problem, the printer may stop with the cutter blade protruding so that
pressing the FEED switch fails to clear the error. When this happens, restore the cutter blade
manually by inserting a screwdriver into the hole on the left side of the rear cover and rotating
it, then open the cover (the blade will be restored whether you turn it to the left or right).
*
Turn the screwdriver until the projections on both ends of the blade of the cutter are
returned to the back of the printer (direction shown by the arrow).
2) Remove all the jammed paper. (Temporarily remove the roll paper that is installed in the
printer.)
3) Close the rear cover and turn on the power. The auto cutter operation will be initialized and the
error will be cleared.
• When removing the jammed paper, be careful not to touch the area around the print
head nor the cutter blade. If you do so, you will be burned or cut.
CAUTION
End of the blade of the cutter (left side)
Rear cover
Front
cover
Cutter lock release screw hole
Paper cut bar
6-4
CD-S500 Series
6-3
Operation Panel
6-3-1
Basic Display
POWER
PAPER ERROR
OUT
FEED
LED
POWER (Green):
It is lit when the power is supplied and is off when the power is off.
PAPER OUT (Orange): It is lit in paper-out status and is off when paper is loaded. (Hereinafter
called “P.OUT”)
ERROR (Orange):
It is lit when the rear cover is open and is off when the cover is closed.
Switch
Status
Paper
Data
When this switch is pressed once (less than 1
second), paper is fed by one line.
Loaded
No data
Loaded
Data
exists
Invalid
No paper
−
Invalid
−
−
Cancel of the error status.
Ready
FEED SW
Error
Function
6-5
When it is held down, paper is fed continuously
until the switch is released.
CD-S500 Series
6-4
Error Indication
Errors are indicated by a combination of POWER, P.OUT, and ERROR LEDs.
(Each
and
represents 300 ms.)
Type of Error
LED Indication
Operation and Restoration Method
Printing stops and the printer goes offline.
POWER
(1) Paper end
Replace the paper and close the cover to
return the printer online.
P.OUT
ERROR
(2)
(3)
Paper near
end
Rear/front
cover open
Paper end can be disabled by setting ESC c
4.
When PAPER NEAREND of the soft switch
is enabled, printing continues after PE,
FAULT is output. When it is disabled, the
LEDs keep flashing and printing continues to
the paper end.
POWER
P.OUT
ERROR
POWER
P.OUT
Depends on the status
Close the cover to return the printer online.
ERROR
Cooling starts.
POWER
(4) Head hot
P.OUT
Depends on the status
ERROR
P.OUT
ERROR
Black mark
(6)
abnormal
(7)
Cutter abnormal
position detection
After the temperature has fallen, the printer
is automatically restored and printing
restarts.
The printer goes offline. Remove the paper
jam or other problem and press FEED switch
to restore the printer. The printer returns to
online status after initial operation.
POWER
(5) HP abnormal
During printing, printing is immediately
stopped and the printer goes offline.
The printer goes offline. Remove the paper
jam or other problem and press FEED switch
to restore the printer. The printer returns to
online status after initial operation.
POWER
P.OUT
ERROR
The printer goes offline. Remove the paper
jam or other problem and press FEED switch
to restore the printer. The printer returns to
online status after initial operation.
POWER
P.OUT
ERROR
When the power is on, it means that a
hardware error, such as RAM check,
occurred.
Hardware
(8) abnormal
RAM readwrite
POWER
ERROR
The printer goes offline, and then an error is
indicated. Restoration impossible.
Hardware
(9) abnormal
FROM write
POWER
FROM writing error.
P.OUT
ERROR
The printer goes offline, and then an error is
indicated. Restoration impossible.
POWER
24V voltage abnormal.
P.OUT
The printer goes offline, and then an error is
indicated. Restoration impossible.
(1
0)
24V abnormal
P.OUT
ERROR
: Lit,
*
No RS232C communication error detection is performed.
6-6
: Off
CD-S500 Series
Error Priority
(1) < (2) < (3) < (4) < (5) < (6) < (7) < (8) < (9) < (10)
Buzzer Sounding
If the buzzer sounding is enabled by the soft switch:
•
In the error status described in “6-4 Error Indication”, if one of the (4) - (8) errors occurs, the
buzzer continues to sound until the error is cancelled.
•
The buzzer sounds at the time of key operation in the software switch or the maintenance
function (described later).
If the buzzer sounding is disabled by the soft switch, the buzzer does not sound on the conditions
above.
6-7
CD-S500 Series
6-5
Demonstration Printing Function
If FEED switch is held down while the printer is turned on with the front and rear covers closed, the
demonstration printing mode is started. Then “demonstration patterns and the setting of the software
switch” are printed. After completing the printing, the printer shifts to normal power-on status
through POWER ON RESET operation.
FROM VER.
CQ01-XXXX
FROM DATE
-MM/DD YY
Impact Dot Printer
CD-S500
Feature:
Print Speed: Approx. 5.0 lps
Paper-drop-in style (40 col.)
<Soft Control-SW> - - - - - - - - - - - - - -
Logic Seeking Control
Selectable Paper Width
(76.2/69.5/57.5 mm)
Two Color Printing (Red/Black)
ESC/POS Compatibility
Vertical Solution
Wall Mount Kit
FONT A(9x9 dots)
<21h-FFh codes printed by BLACK>
<21h-FFh codes printed by RED>
Command Type
-EPSON
Number of Col.
-40/33
Font Select
-7 × 9
Paper Plies
-OFF
Paper End
-ENB
Paper Near-End
-ENB
Slashed Zero
-OFF
Print Direct.
-BI-DIR
Auto LF
-OFF
Code Page
-437
Buffer Size
-4K
Init Signal
-ENB
Buzzer
-ON
<Interface-SW> - - - - - - - - - - - - -
FONT B(7x9 dots)
<21h-FFh codes printed by BLACK>
Baud Rate
-19200
Data Length
-8bit
Parity Bit
-NONE
Stop Bit
-1bit
Protocol
-DTR
<Mechanical-SW> - - - - - - - - - - - - - -
<21h-FFh codes printed by RED>
Printed by CD-S500
6-8
Paper Width
-76.2
Auto-Cutter
-FREE
Color Ribbon
-ON
Take-Up Device
-ON
CD-S500 Series
6-6
Maintenance Function
If FEED switch is held down while the printer is turned on with the front cover opened and the rear
cover closed, the maintenance mode is started.
Status:
Offline
LED indication:
POWER LED flashes at 0.3 second intervals(
ERROR LEDs are off.
). P.OUT and
In this status, close the front cover and select the function by pressing FEED switch the following
number of times.
Types of maintenance function
(1)
HEX dump mode
Pressing FEED switch 0 times. POWER LED flashes at 0.3 second intervals (
P.OUT and ERROR LEDs are off.
(2)
Soft SW setting mode
Pressing FEED switch 1 time.
POWER and P.OUT LEDs flash at 0.3 second intervals
(
(3)
).
). ERROR LED is off.
Initial factory shipping mode
Pressing FEED switch 2 times. POWER, P.OUT and ERROR LEDs flash at 0.3 second
intervals (
(4)
).
Cut position adjustment mode
Pressing FEED switch 3 times. POWER and ERROR LEDs flash at 0.3 second intervals
(
6-6-1
). P.OUT LED is off.
HEX Dump Mode
If the front cover is reopened and closed in maintenance mode (POWER LED is flashing), POWER
LED stops flashing and remains lit, and the printer enters HEX dump mode. After printing the title,
it stands by to receive data.
<HEX-DUMP PRINT>
xx xx xx xx xx xx xx xx
∗∗∗∗∗∗∗∗
xx xx xx xx xx xx xx xx
∗∗∗∗∗∗∗∗
xx xx xx xx xx xx xx xx
∗∗∗∗∗∗∗∗
xx xx xx xx xx xx xx xx
∗∗∗∗∗∗∗∗
:
xx xx xx xx xx xx xx xx
∗∗∗∗∗∗∗∗
xx xx xx xx xx
∗∗∗∗∗
*
To exit from HEX dump mode, the printer needs to be turned off.
*
FEED switch works in the same manner as usual operation.
6-9
CD-S500 Series
6-6-2
Soft SW Setting Mode
If the front cover is reopened and then closed while POWER and P.OUT LEDs are flashing, the soft
SW setting mode is started. POWER and P.OUT LEDs stop flashing and remain lit. Then the title
and top items are printed.
Operation Method
Pressing FEED switch (less than 2 seconds):
The setting is changed. The present set value is changed and the same item is reprinted.
(Press FEED switch, and when the buzzer sounds once, release it.)
Pressing FEED switch continuously (2 seconds or more):
Moves to the next item. It prints the present set value of the next item.
(Press FEED switch, and when the buzzer sounds three times, release it.)
Opening/closing the front cover:
After saving the set values to FROM, it reprints all items from the top and returns to normal
poweron status through POWER ON RESET operation.
*
FEED switch after the last item printing works in the same manner as opening the front cover.
6-10
CD-S500 Series
<Soft-Switch Setting>
Press Feed
→ Change PARM.
Title printing
Press Feed For 2S
→ Next Item
F.Cover Open/Close
→ Save & Exit
<Soft Control-SW> - - - - - - - - - - - - - - - - Command Type
-EPSON
EPSON/STAR/CBM1/CBM2
Number of Col.
-40/33
40/33, 42/35
Font Select
-7 × 9
9×9/7×9
Paper Plies
-OFF
OFF/2P/3P
Paper End
-ENB
ENB/DIS
Paper Near-End
-ENB
ENB/DIS
Slashed Zero
-OFF
OFF/ON
Print Direct.
-BI-DIR
BI-DIR/UNI-DIR
Auto LF
-OFF
OFF/ON
Code Page
-437
437/850/860/863/865/852/866/857/858/WPC
Buffer Size
-4K
40/4K
Init Signal
-ENB
ENB/DIS (RS232C 25PIN and Parallel 31PIN)
Buzzer
-ON
ON/OFF
<Interface-SW> - - - - - - - - - - - - - - - - - - Baud Rate
-19200
1200/2400/4800/9600/19200
Data Length
-8bit
8bit/7bit
Parity Bit
-NONE
NONE/EVEN/ODD
Stop Bit
-1bit
1bit/2bit
Protocol
-DTR
DTR/XON-OFF
<Mechanical-SW> - - - - - - - - - - - - - - - - Paper Width
-76.2
76.2/69.5/57.5
Auto-Cutter
-FREE
OFF/FREE/FULL/PAR.
Color Ribbon
-ON
OFF/ON
Take-Up Device
-ON
OFF/ON
*
Changes are saved to FROM by opening and closing the front cover. After completion of
saving, remaining items are printed.
If the power is turned off before opening and closing the front cover, the setting change is invalid.
*
If the paper runs out during the change, set the paper and close the rear cover to continue the
process.
The items of <InterfaceSW> in the printing example above are printed only with printers equipped with
an RS232C I/F PC board.
6-11
CD-S500 Series
<Soft Control-SW>
Command Type
The emulation is selected from EPSON/STAR/CBM1/CBM2.
Initial value: EPSON
Number of Col.
The number of full dots in a full column is 200 dots.
Initial value: 40/33
Number of Col.
Font Select
Space between
Characters
Printing Line
Columns
Full Columns (when
including half dot)
40/33
9 × 9 dots
3 dots
33 columns
200 dots (400)
7 × 9 dots
3 dots
40 columns
9 × 9 dots
2 dots
35 columns
7 × 9 dots
2 dots
42 columns
42/35
*
193 dots (386)
By the change of line columns from 40/33 to 42/35 or vice versa, the space between characters
and the mechanical right margin are changed.
Font Select
The initial font size is selected immediately after the power is turned on.
Initial value: 7 × 9
Paper Plies
Copy mode is selected. OFF/2P/3P can be selected. But when 3P is set, the printing speed is low.
Initial value: OFF
Paper End
Sets PE signal at the time of paper end to “enabled” or “disabled”. This setting is effective only for
the Centronics interface.
When it is enabled, BUSY, PE, and FAULT are output and printing stops at paper end.
When it is disabled, only BUSY is output and printing stops at paper end.
Initial value: ENB
Paper Near-End
Sets PE signal at the time of paper near end to “enabled” or “disabled”. This setting is effective only
for the Centronics interface.
When it is enabled, PE and FAULT are output and printing continues.
When it is disabled, nothing is output and printing continues.
Initial value: ENB
6-12
CD-S500 Series
Slashed Zero
It sets whether or not slash is used with the numeral 0 (ZERO).
Initial value: OFF
Print Direct.
Designates the printing direction. When BIDIR is selected, printing starts from the left or right ends
of the next printing line which is closer to the location where the previous print has stopped.
When UNI-DIR is selected, printing always starts from the left end.
Initial value: BI-DIR
Auto LF
The LF operation at the time of “CR” is selected. When it is OFF, only CR is operated. When it is
ON, both CR and LF are operated.
Initial value: OFF
Code Page
The code page is selected. Types of code page: 437/850/860/863/865/852/866/857/858/WPC
Initial value: 437
Buffer Size
The receiving buffer size is selected from 40 or 4K bytes.
Initial value: 4 K
Init Signal
Selects either “enabled” (ENB) or “disabled” (DIS) of the printer initializing signal (PRIME) when a
Centronics interface is used.
Selects either “enabled” (ENB) or “disabled” (DIS) of the 25 pin reset signal when a serial interface
is used.
Initial value: ENB
Buzzer
Selects either “enabled” (ON) or “disabled” (OFF) of the buzzer sound when an abnormality occurs.
Initial value: ON
6-13
CD-S500 Series
<Interface -SW>
Baud Rate
Initial value: 19200
Data Length
Initial value: 8 bits
Parity Bit
Initial value: NONE
Stop Bit
Initial value: 1 bit
Protocol
These settings are for printers with the serial interface and displayed only when the serial board is
mounted. The above 5 items of InterfaceSW are printed only with printers equipped with an
RS232C I/F PC board.
Initial value: DTR
<Mechanical-SW>
Paper Width
Selects the paper size.
Initial value: According to the setting of internal maintenance function.
Auto-Cutter
Selects the cutter operation from OFF, FREE, FULL or PAR.
When it is OFF, cutting cannot be operated by FULL or PAR. command.
In FREE status, full cut or partial cat is operated according to FULL or PAR. command, respectively.
In FULL status, full cut is always performed by either FULL or PAR. command.
In PAR. status, partial cut is always performed by either FULL or PAR. command.
Initial value: According to the setting of internal maintenance function.
Color Ribbon
Selects the color function from ON or OFF. While it is OFF, the color changing command is
ignored.
Initial value: According to the setting of internal maintenance function.
Take-Up Device
Selects the rewinder function from ON or OFF. While it is OFF, the rewinder motor does not
operate.
Initial value: According to the setting of internal maintenance function.
6-14
CD-S500 Series
Concerning MechanicalSW Operation
Functions that are not supported by the specifications at time of shipping have no impact on printer
operations even when the settings are changed.
Example: Changes in the auto cutter setting for models that are not equipped with an auto cutter.
Changes in the TakeUp Device setting for models that are not equipped with a rewinder.
6-6-3
Initial Factory Shipping Mode
While POWER, P.OUT, and ERROR LEDs are flashing, reopen and then close the front cover to set
the printer to initial factory shipping mode. When the mode has changed, the three LEDs are lit.
Then, press FEED switch for three seconds or longer to restore the FROM setting to the factory
default. After confirming that FEED switch is released, the printer goes to normal power-on status
through POWER ON RESET operation.
6-6-4
Cut Position Adjustment Mode
While POWER and ERROR LEDs are flashing, reopen and then close the front cover to set the
printer to cut position adjustment mode. When the mode has changed, POWER and ERROR LEDs
are lit.
When the printer enters cut position adjustment mode, it prints the present adjustment values and
stands by for the next key operation.
Operation Method
Pressing FEED switch (for less than 2 seconds):
The adjustment value is changed by ±1/144 inch.
Opening and closing the front cover:
+/− of the adjustment direction is changed.
When the printer enters the adjustment mode, the value changes in + direction. The direction is
changed by opening and closing the front cover.
Pressing FEED switch continuously (for 2 seconds or more):
After the present value is saved to FROM, the printer goes to normal power-on status through
POWER ON RESET operation.
Adjustment range:
−035 to +035
Initial value:
+000
Cutter Amendment: +000
Cut position
6-15
CD-S500 Series
6-7
Maintenance Function for Service
Under the condition that the front and rear covers are open, hold down FEED switch while turning on
the printer to activate maintenance mode for service.
Status:
Offline
LED indication:
POWER LED flashes at 0.3 second intervals (
ERROR LEDs are off.
). P.OUT and
In this state, load paper and close the front and rear covers. Then, select the function by pressing
FEED switch the following number of times.
Types of the maintenance functions for service
(1)
Busy condition check mode
Pressing FEED switch 0 times: POWER LED flashes at 0.3 second intervals (
P.OUT and ERROR LEDs are off.
(2)
ROM rewrite receiving mode
Pressing FEED switch 1 time:
POWER and P.OUT LEDs flash at 0.3 second intervals
(
(3)
). ERROR LED is off.
ROM rewrite sending mode
Press FEED switch 2 times:
POWER, P.OUT, and ERROR LEDs flash at 0.3 second
intervals (
(4)
).
).
Printing column misalignment adjustment mode
Pressing FEED switch 3 times: POWER and ERROR LEDs flash at 0.3 second intervals
(
(5)
). P.OUT LED is off.
Drawer check mode
Pressing FEED switch 4 times: POWER and P.OUT LEDs are on and ERROR LED is off.
(6)
Maintenance sending/receiving mode
Pressing FEED switch 5 times: POWER, P.OUT and ERROR LEDs flash alternately.
6-16
CD-S500 Series
6-7-1
Busy Condition Check Mode
If the front cover is opened and then closed while POWER LED is flashing, POWER LED stops
flashing and remains lit. After printing from the busy condition to the PAPER WIDTH setting, the
printer stands by for the next key operation.
Operation Method
Pressing FEED switch (less than 2 seconds):
The setting is changed. The present set value is changed and the same item is reprinted.
(Press FEED switch, and when the buzzer sounds once, release it.)
Pressing FEED switch continuously (2 seconds or more):
Moves to the next item. It prints the present set value of the next item.
(Press FEED switch, and when the buzzer sounds three times, release it.)
Opening/Closing the front cover:
The setting value is saved to FROM. When “INITIALIZED” is set to YES, the item value and
the software switch setting is initialized, and then the following cutting operation is executed.
After that, the printer goes to the normal power-on status through POWER ON RESET
operation.
<Cutting operation>
The partial cut is executed at the current position and the paper feeds for 1 inch. Then, full cut
is executed.
*
FEED switch after the last item printing works in the same manner as opening the front cover.
6-17
CD-S500 Series
<Ment. Information>
FROM VER.
-DP01-0000
FROM DATE
-MM.DD.YY
BOOT DATE
-MM.DD.YY
BK MARK
Air Temp.
Head Temp.
Head Temp.
Head1
Head2
Head3
Head4
Head5
Head6
Head7
Head8
Head9
Feed
Cutter
XXXX
XXXX
XXXX
XXXX
-XXXXXXXXX
-XXXXXXXXX
-XXXXXXXXX
-XXXXXXXXX
-XXXXXXXXX
-XXXXXXXXX
-XXXXXXXXX
-XXXXXXXXX
-XXXXXXXXX
-XXXXXXXXX
-XXXXXXXXX
FROM version printing
Crt.
Crt.
Crt.
Max.
Dot
Dot
Dot
Dot
Dot
Dot
Dot
Dot
Dot
Stp
Cut
Black Mark Adjustment value
Adjustment value of the current inside body temperature
Adjustment value of the current head temperature
Maximum detection temperature
Total number of printing dots of 1PIN
Total number of printing dots of 2PIN
Total number of printing dots of 3PIN
Total number of printing dots of 4PIN
Total number of printing dots of 5PIN
Total number of printing dots of 6PIN
Total number of printing dots of 7PIN
Total number of printing dots of 8PIN
Total number of printing dots of 9PIN
Number of running steps (by 24/144 unit)
Number of cutting times
Paper Width
Auto-Cutter
Color Ribbon
Take-Up Device
Black Mark
-76.2
-ON
-ON
-ON
-OFF
76.2/69.5/57.5
OFF/ON
OFF/ON
OFF/ON
OFF/TOP/ BTM.F/BTM.R
Head Initialize
Feed Initialize
Cut Initialize
Power ON Info.
-NO
-NO
-NO
-NO
NO/YES
NO/YES
NO/YES
NO/YES
(Cutter: Equipped/Not equipped)
(Color control:
Valid/Invalid)
(Rewinder control: Valid/Invalid)
(Mark sensor:
Valid/Invalid)
(Reset of the total dot number of head pin:
Operated/Not operated)
(Reset of the number of running steps:
Operated/Not operated)
(Reset of the number of cutter cutting times:
Operated/Not operated)
(Initial response at the time of start-up [3B, 31, 00]
Operated/Not operated)
*
The total number of dots and running steps are read out from FROM to RAM when the printer
turns on and renewed at the time of printing or paper feed. When the printer is off, or if no data
is received for 3 minutes or longer, the values are saved in FROM. At the time of saving, if the
status is ONLINE, it becomes OFFLINE during data writing. For the following 6 items, equipped
functions vary depending on customers (factory option).
*
The settings are adjusted before delivery at factory according to the required functions. These
settings are saved as the factory default and used as default when user initializes the printer
(returns the setting to the factory default).
(1) Paper Width
(2) Auto-Cutter
(3) Color Ribbon
(4) Take-Up Device
(5) Black Mark
(6) Power ON Info.
Note:
If this mode is closed by opening and closing the cover, the setting of the
software switch will be initialized.
6-18
CD-S500 Series
6-7-2
ROM Rewrite Receiving Mode
If the front cover is opened and then closed while POWER and P.OUT LEDs are flashing, both
LEDs stop flashing and remain lit and the printer goes to the receive wait state. During data
receiving, POWER LED is lit and P.OUT LED flashes. When the data receiving is completed,
P.OUT LED stops flashing and remains lit.
After ROM rewriting, only POWER switch is effective and no other function is accepted.
6-7-3
ROM Rewrite Sending Mode
If the front cover is opened and then closed while POWER, P.OUT, and ERROR LEDs are flashing,
all the LEDs stop flashing and remain lit, and the printer starts sending data. During data sending,
POWER and ERROR LEDs are lit and P.OUT LED flashes. When the data sending is completed,
the printer returns to the start-up state (POWER, P.OUT, and ERROR LEDs flash).
6-7-4
Printing Column Misalignment Adjustment Mode
If the front cover is opened and then closed while POWER and ERROR LEDs are flashing, the both
LEDs stop flashing and remain lit and the printer moves to printing column misalignment adjustment
mode.
When the printer enters this mode, it prints the current setting values and the character “H” in full
columns for 5 lines in bi-directions. Then it feeds the paper until the whole printing can be seen and
stands by for the next key operation.
Operation Method
Pressing FEED switch (less then 2 seconds):
The printing position moves to the right/left by 20 µs.
Opening/Closing the front cover:
The moving direction of right/left is changed.
When the printer goes to this mode, the moving direction is set to right. By opening and then
closing the front cover, the moving direction is changed.
Pressing FEED switch continuously (for 2 seconds or more):
After the present value is saved to FROM, the printer goes to normal power-on status through
POWER ON RESET operation.
Adjustable range:
−600 µs to +600 µs
Initial value:
000 µs
Print Amendment : +XXX
HHHHHHHHHHHHHHHHHHHHHHHHHHHHHHHHHHHHHHHH
HHHHHHHHHHHHHHHHHHHHHHHHHHHHHHHHHHHHHHHH
HHHHHHHHHHHHHHHHHHHHHHHHHHHHHHHHHHHHHHHH
HHHHHHHHHHHHHHHHHHHHHHHHHHHHHHHHHHHHHHHH
HHHHHHHHHHHHHHHHHHHHHHHHHHHHHHHHHHHHHHHH
Cut position
6-19
CD-S500 Series
6-7-5
Drawer Check Mode
If the front cover is opened and then closed while P.OUT LED is flashing, POWER and P.OUT
LEDs stop flashing and remain lit and the printer goes to drawer check mode.
Check Item and Operation Method
Start
POWER and P.OUT: Lit, ERROR: Off
No
Was FEED switch pressed?
Yes
Drawer condition check = Close?
No
Yes
Pulse output to drawer 1
Drawer 1
check
No
Drawer condition check = Open?
No
3s elapsed?
Yes
Successful
POWER LED turns off
No
Was FEED switch pressed?
Yes
Drawer condition check = Close?
No
Pulse output to drawer 2
Drawer 2
check
No
Drawer condition check = Open?
No
3s elapsed?
Yes
Yes
Successful
P.OUT LED turns off
No
Failed
ERROR LED lit
(POWER and P.OUT LEDs remain the same)
Was FEED switch pressed?
Yes
6-7-6
Maintenance Sending/Receiving Mode
If the front cover is opened and then closed while POWER, P.OUT and ERROR LEDs flash
alternately, the printer goes to maintenance sending/receiving mode.
By using the maintenance application for CDñS500, it is possible to read/write the internal setting.
The mode ends through power-off.
6-20