1
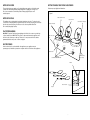
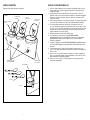
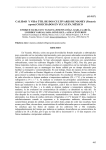
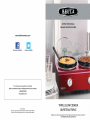
IMPORTANT SAFEGUARDS WARNING: When using electrical appliances, basic safety precautions should always be followed including the following: 1. Read all instructions. 2. Do not touch hot surfaces. Use handles or knobs. Use oven mitts or potholders. 3. To protect against electrical shock, do not immerse cord, plugs, or appliance in water or other liquid. 4. This appliance is not intended for use by persons (including children) with reduced physical, sensory or mental capabilities, or lack of experience and knowledge, unless they have been given supervision or instruction concerning use of the appliance by a person responsible for their safety. 5. Close supervision is necessary when any appliance is used by or near children. 6. Unplug from outlet when not in use and before cleaning. Allow to cool before putting on or taking off parts, and before cleaning the appliance. 7. Do not operate any appliance with a damaged cord or plug or after the appliance malfunctions or has been damaged in any manner. Return appliance to the nearest authorized service facility for examination, repair or adjustment. 8. The use of accessory attachments not recommended by the appliance manufacturer may cause injuries. 9. Do not use outdoors. 10. Do not let cord hang over edge of table or counter, or touch hot surfaces. 11. Do not place on or near a hot gas or electric burner, or in a heated oven. 12. Extreme caution must be used when moving an appliance containing hot oil or other hot liquids. 13. To disconnect, turn all 3 OFF/LOW/HIGH/WARM dials to the OFF position, then remove plug from wall outlet. 14. Do not use appliance for other than intended use. FOR HOUSEHOLD USE ONLY SAVE THESE INSTRUCTIONS ADDITIONAL IMPORTANT SAFEGUARDS CAUTION, HOT SURFACES: This appliance generates heat and escaping steam during use. Proper precautions must be taken to prevent the risk of burns, fires, or other injury to persons or damage to property. CAUTION: This appliance is hot during operation and retains heat for some time after turning OFF. Always use oven mitts when handling hot materials and allow metal parts to cool before cleaning. Do not place anything on top of the appliance while it is operating or while it is hot. All users of this appliance must read and understand this Owner’s Manual before operating or cleaning this appliance. 2. If this appliance falls or accidentally becomes immersed in water, unplug it from the wall outlet immediately. Do not reach into the water! 3. When using this appliance, provide adequate air space above and on all sides for air circulation. Do not operate this appliance while it is touching or near curtains, wall coverings, clothing, dishtowels or other flammable materials. 4. Do not leave this appliance unattended during use. 5. If this appliance begins to malfunction during use, immediately unplug the cord. Do not use or attempt to repair a malfunctioning appliance! 6. The cord to this appliance should only be plugged into a 120 V AC electrical wall outlet. 7. Do not use this appliance in an unstable position. 8. Never use any removable cooking pot on any gas or electric cooktop or on an open flame. 9. To avoid scalding, lift glass lid off cooking pot carefully. Point the lid away from face and hands while opening and allow water to drip into the removable cooking pot. 10. CAUTION: The filled triple slow cooker is very heavy. To avoid injury to persons or damage to the appliance, NEVER ATTEMPT TO LIFT THE TRIPLE SLOW COOKER WITH 3 FILLED COOKING POTS IN PLACE. Place triple slow cooker base in its serving position first. Then place each cooking pot, one at a time, into the base. When cooking is finished, remove each cooking pot, one at a time, then prepare the triple slow cooker base for storing. CAUTION: To prevent damage or shock hazard, do not cook in the triple slow cooker base. Cook only in removable cooking pots provided. 1. FOR HOUSEHOLD USE ONLY SAVE THESE INSTRUCTIONS 2 3 Notes on the Cord Getting To Know Your triple slow cooker The provided short power-supply cord (or detachable power-supply cord) should be used to reduce the risk resulting from becoming entangled in or tripping over a longer cord. Do not use an extension cord with this product. Always plug directly into a wall outlet/receptacle. Product may vary slightly from illustrations. Figure 1 Notes on the Plug 3 Glass Lids with Knobs This appliance has a polarized plug (one blade is wider than the other). To reduce the risk of electric shock, this plug will fit in a polarized outlet only one way. If the plug does not fit fully into the outlet, reverse the plug. If it still does not fit, contact a qualified electrician. Do not modify the plug in any way. 3 Spoon Notches 3 Removable Cooking Pots Cooking Pot Handles Plasticizer Warning CAUTION: To prevent Plasticizers from migrating to the finish of the counter top or table top or other furniture, place NON-PLASTIC coasters or place mats between the appliance and the finish of the counter top or table top. Failure to do so may cause the finish to darken; permanent blemishes may occur or stains can appear. Triple Slow Cooker Base LOW OFF Electric Power HIGH WARM LOW If the electrical circuit is overloaded with other appliances, your appliance may not operate properly. It should be operated on a separate electrical circuit from other appliances. OFF HIGH WARM LOW Non-Skid Feet OFF WARM Polarized Plug ( not shown) 3 OFF/LOW/HIGH/WARM Dials Lid Rest Lid rest Insertion 3 Spoons 4 HIGH 5 Before Using for the First Time Operating Instructions 1. NOTE: The 3 slow cooking stations work independently of one another. 1, 2 or 3 slow cookers may be used at any given time. 1. Prepare recipe(s) according to instructions. 2. Place 1 to 3 needed cooking pot(s) into the triple slow cooker base. To facilitate serving slow cooked foods, rotate each cooking pot so that the spoon notch faces front and to the side. 3. Add food to the cooking pot(s) and cover with glass lid(s). IMPORTANT: DO NOT FILL THE COOKING POT(S) MORE THAN 3/4 FILLED WITH FOOD. NOTE: When cooking a meat and vegetable combination, place the vegetables in the bottom of the cooking pot first. Then add the meat and other ingredients. 4. To ensure the efficient build up of heat, do not lift the lid(s) during the first 2 hours of cook time. Frequent lifting of the lid(s) during cooking delays the cooking time. 5. WARNING: The cooking pot(s) CANNOT stand the shock of sudden temperature changes. If the cooking pot is hot, DO NOT add cold food. Before cooking frozen food, add some warm liquid. 6. Plug cord into a 120 V AC outlet. 7. Turn OFF/LOW/HIGH/WARM Dial to select temperature setting: LOW or HIGH. 8. Cook according to recipe instructions. 9. Depending on the food served, when the cooking time is complete, turn the OFF/LOW/HIGH/WARM Dial(s) to the LOW or WARM position and serve. 10. Using oven mitts, carefully remove the glass lid(s) by grasping the lid knob(s) and lifting the lid slightly away from you. This will allow the steam to escape before removing the lid. Place the lids on the lid rests. 11. Allow a few seconds for all steam to escape. Then, using oven mitts, rotate each cooking pot so that the spoon notch faces front and to the side. 12. When serving is finished, turn all 3 of the OFF/LOW/HIGH/WARM Dial(s) to the OFF position, and unplug the Triple Slow Cooker. 13. Allow all 3 cooking pots to cool completely before cleaning, see CLEANING INSTRUCTIONS. 14. CAUTION: The filled Triple Slow Cooker is very heavy. To avoid injury to persons or damage to the appliance, NEVER ATTEMPT TO LIFT THE BUFFET STATION WITH 3 FILLED COOKING POTS IN PLACE. When cooking is finished, carefully remove each of the glass lid(s) by grasping the lid knob(s). Using the cooking pot handles, remove each cooking pot, one at a time. Clean and prepare the Triple Slow Cooker base for storing. 15. CAUTION: Even when turned OFF and unplugged, the Triple Slow Cooker base top surface may remain hot for some time after using; allow unit to cool before cleaning or storing. Carefully unpack the triple slow cooker and remove all packaging materials. Included in the box are the 3 lid rests and 3 spoons. Be sure to remove all pieces from the box while unpacking the unit. 2. Place your Triple Slow Cooker on a level surface such as a countertop or table. Be sure the sides and back of the Triple Slow Cooker are at least 4 inches away from any walls, cabinets, or objects on the counter or table. 3. Wipe the Triple Slow Cooker base with a clean, damp cloth or sponge, then dry with another cloth. This will remove any dust that may have settled during packaging. 4. It is necessary to operate the Triple Slow Cooker one time before placing food in the cooking pots. Pour 4 cups of water into each of the cooking pots. Then place each cooking pot inside the Triple Slow Cooker base. Cover each cooking pot with a glass lid. Attach the 3 lid rests into the lid rest notch to secure the lid rests (See Figure 1.) 5. Plug the Triple Slow Cooker into a 120 V AC outlet. 6. Turn each of the OFF/LOW/HIGH/WARM Dials to HIGH and allow to heat for approximately 30 minutes. You will notice a slight odor; this is normal and should quickly disappear. 7. Turn each of the 3 OFF/LOW/HIGH/WARM Dials to the OFF position and unplug the Triple Slow Cooker. Allow to cool for at least 20 minutes. 8. Wearing oven mitts, remove each of the 3 lids, then grasp each of the 3 cooking pots by the handles and carefully lift and remove from the Triple Slow Cooker; pour the water out of the cooking pots. 9. Wash all 3 removable cooking pots, 3 spoons, and lids in warm soapy water. Rinse and dry thoroughly. The 3 removable cooking pots and lids are dishwasher safe. 10. Reinsert the 3 removable cooking pots with lids into the Triple Slow Cooker base to store. 6 7 Preparing for Buffet Service User Maintenance Instructions If food to be served has been previously prepared and then refrigerated, warm food uncovered in a microwave-safe cooking bowl. Check at 3 minute intervals until serving temperature has been reached. Likewise, the oven may be used to warm foods before adding to the removable cooking pots prior to serving. This appliance requires little maintenance. It contains no user serviceable parts. Do not try to repair it yourself. Any servicing requiring disassembly other than cleaning, must be performed by a qualified appliance repair technician. When temperature of the food is suitable for serving, add food to the cooking pots, replace cooking pots into the Triple Slow Cooker base. Rotate each cooking pot. Replace glass lids onto each cooking pot. Then turn each OFF/LOW/HIGH/WARM Dial(s) to WARM. Care & Cleaning Instructions NOTE: The WARM Setting is not suitable for reheating foods. WARM is ONLY for keeping already cooked food warm. DO NOT cook on the WARM setting. Hints for Slow Cooking • • • • • Meats will not brown during the cooking process. If you desire browning, heat a small amount of oil in the removable cooking pot and brown meats on HIGH prior to slow cooking. Dredging meat in flour before browning thickens the cooking liquid into a wonderful sauce. NOTE: Skim fat and season before serving. Whole herbs and spices flavor better in slow cooking than crushed or ground. If a recipe results in too much liquid at the end of the cooking time, remove the glass lid and turn the SLOW COOK Dial to HIGH. After 30 to 45 minutes the amount of liquid will be reduced. NOTE: If a quicker solution is needed, drain excess liquid it into in a small saucepan and simmer until it has reduced to an appropriate amount. Season to taste after the reduction. High fat meats can result in dishes with less flavor. Pre-cooking or browning will help reduce the amount of fat and help to preserve the color. The higher the fat content, the less liquid needed. If cooking meat with a high fat content, use thick onion slices under it so that the meat will not sit and cook in the fat. If necessary, use a slice of bread, a spoon, or a straining spoon to skim off excess fat from top of foods before serving. Foods cut into uniform pieces will cook faster and more evenly than foods left whole such as roast or poultry. IMPORTANT: The 3 removable cooking pots and glass lids are dishwasher safe. To clean by hand, wash the stoneware liner, lids, lid rests and spoons in warm, soapy water. CAUTION: To avoid accidental burns, allow your Triple Slow Cooker to cool thoroughly before cleaning. 1. Before cleaning, unplug the appliance from the wall outlet and allow to cool. 2. CAUTION: To avoid any sparks at the outlet, make sure the 3 OFF/LOW/HIGH/WARM Dials are in the OFF position, then remove plug from wall outlet. 3. Remove any excess fat and food particles from the removable cooking pots. All cooking pots and glass lids may be cleaned in the dishwasher. If hand washing is preferred, wash with warm soapy water and dry thoroughly. The lid rests and spoons should be washed by hand. 4. When dry, reinsert the 3 removable cooking pots into the Triple Slow Cooker base. 5. Stubborn build-up: Use a non-metallic scrubbing pad to clean the removable cooking pots. 6. Outside cleaning: Wipe the Triple Slow Cooker base with a warm, wet sponge and dry with a soft dry cloth. 7. Do not use steel wool, scouring pads or abrasive cleaners on any parts of the appliance. 8. DO NOT IMMERSE THE TRIPLE SLOW COOKER BODY IN WATER OR OTHER LIQUID. Storing Instructions 1. 2. 3. 4. 5. 8 Be sure all parts are clean and dry before storing. Store appliance in its box or in a clean, dry place. Never store the Triple Slow Cooker while it is hot or wet. To store, install all 3 cooking pots into the Triple Slow Cooker base. Place each lid rest inside the 3 cooking pots and the glass lid over the stoneware liner; to protect the glass lid, it may be wrapped with a soft cloth and placed upside down over the liner. Never wrap cord tightly around the Triple Slow Cooker; keep it loosely coiled. 9 OTRAS MEDIDAS DE SEGURIDAD IMPORTANTES PRECAUCIÓN, SUPERFICIES CALIENTES: Este electrodoméstico genera calor y libera vapor mientras está en uso. Se deben tomar las medidas adecuadas para evitar el riesgo de quemaduras, incendios u otro tipo de lesiones personales o daños a la propiedad. PRECAUCIÓN: Este electrodoméstico se calienta durante el funcionamiento y mantiene el calor un tiempo después de apagado. Siempre use manoplas al manipular materiales calientes y deje que las piezas metálicas se enfríen antes de limpiarlas. No coloque nada sobre el electrodoméstico mientras esté en funcionamiento o esté caliente. 1. Todos los usuarios de este electrodoméstico deben leer y comprender este manual del usuario antes de poner en funcionamiento o limpiar el electrodoméstico. 2. Si el electrodoméstico se cae o accidentalmente se sumerge en agua, desenchúfelo del tomacorriente de pared de inmediato. ¡No introduzca la mano en el agua! 3. Cuando utilice este electrodoméstico, deje espacio suficiente por encima y a los lados de la unidad para que circule el aire. No utilice este electrodoméstico mientras esté en contacto con cortinas, recubrimientos de pared, ropa, paños de cocina u otros materiales inflamables o mientras se encuentre cerca de ellos. 4. No descuide el electrodoméstico mientras esté en funcionamiento. 5. Si el electrodoméstico comienza a funcionar mal mientras está en uso, desenchufe el cable de inmediato. ¡No utilice ni intente reparar un electrodoméstico que funcione mal! 6. El cable del electrodoméstico sólo debe enchufarse en un tomacorriente eléctrico de pared de CA de 120 V. 7. No utilice el electrodoméstico en una posición inestable. 8. Nunca utilice ollas de cocción desmontables sobre cocinas de gas o eléctricas, ni sobre una llama abierta. 9. Para evitar las quemaduras, retire cuidadosamente la tapa de vidrio de la olla de cocción. Aleje la tapa de la cara y las manos al abrirla y deje que el agua gotee dentro de la olla de cocción desmontable. 10. PRECAUCIÓN: La bufetera llena es muy pesada. A fin de reducir el riesgo de lesiones personales o daños al electrodoméstico, NUNCA INTENTE LEVANTAR LA BUFETERA CUANDO HAYA 3 OLLAS DE COCCIÓN LLENAS SOBRE ELLA. Primero coloque la base de la bufetera en la posición de servir. Luego, coloque las ollas de cocción, una por vez, sobre la base. Cuando la cocción finaliza, retire las ollas de cocción, una por vez, y prepare la base de la bufetera para guardarla. PRECAUCIÓN: Para evitar daños o descargas eléctricas, no cocine sobre la base de la bufetera. Cocine sólo en las ollas de cocción desmontables incluidas. NOTAS SOBRE EL CABLE El cable de alimentación corto (o el cable de alimentación desmontable) suministrado se debe utilizar para reducir el riesgo de enredarse o tropezar con un cable más largo. No utilice un cable de extensión con este producto. Siempre enchúfelo directamente en un receptáculo o tomacorriente de pared. NOTAS SOBRE EL ENCHUFE Este electrodoméstico tiene un enchufe polarizado (una pata es más ancha que la otra). A fin de reducir el riesgo de descarga eléctrica, el enchufe entra en un tomacorriente polarizado en un solo sentido. Si el enchufe no entra completamente en el tomacorriente, invierta el enchufe. Si aun así no entra, consulte a un electricista autorizado. No realice ninguna modificación al enchufe. ADVERTENCIA SOBRE EL PLASTIFICANTE PRECAUCIÓN: Para evitar que el plastificante se transfiera sobre el acabado de la encimera, la superficie de trabajo u otro mueble, coloque posavasos o manteles individuales NO PLÁSTICOS entre el electrodoméstico y el acabado de la encimera o la superficie. De lo contrario, el acabado puede oscurecerse o pueden aparecer manchas o marcas permanentes. ENERGÍA ELÉCTRICA Si el circuito eléctrico está sobrecargado con otros artefactos, su electrodoméstico puede dejar de funcionar correctamente. El electrodoméstico debe funcionar en un circuito eléctrico separado de otros artefactos. PARA USO DOMÉSTICO ÚNICAMENTE GUARDE ESTAS INSTRUCCIONES 12 13 Conozca su bufetera Antes de utilizar por primera vez El producto puede diferir levemente de la ilustración. 1. Figura 1 3 tapas de vidrio con perillas 3 muescas para cucharas Mangos de las ollas de cocción 3 ollas de cocción desmontables Base de la bufetera LOW OFF HIGH WARM LOW OFF H GH WARM LOW OFF Patas antideslizantes HIGH WARM 3 indicadores de control OFF/LOW/HIGH/WARM Enchufe polarizado (no se muestra) Retire con cuidado la bufetera y todos los materiales del embalaje. Incluido en la caja se apoya la tapa 3 y 3 cucharas. Asegúrese de quitar todas las piezas de la caja al desempacar la unidad. 2. Coloque la bufetera sobre una superficie plana, como una encimera o una mesa. Asegúrese de que los lados y la parte trasera de la bufetera se encuentren a 4 pulgadas de distancia como mínimo de paredes, armarios y objetos que se encuentran sobre la mesa o la encimera. 3. Limpie la base de la bufetera con un paño limpio y húmedo o una esponja, luego séquela con otro paño. Esto eliminará el polvo que se haya acumulado durante el embalaje. 4. Es necesario utilizar la bufetera una vez antes de colocar alimentos en las ollas de cocción. Vierta 4 tazas de agua en cada una de las ollas de cocción. Luego, coloque las ollas de cocción sobre la base de la bufetera. Coloque una tapa de vidrio sobre cada una de las ollas de cocción. Coloque la tapa 3 se basa en la muesca resto tapa para asegurar la cubierta de restos (Ver Figura 1). 5. Enchufe la bufetera en un tomacorriente de CA de 120 V. 6. Lleve cada uno de los indicadores de control OFF/LOW/HIGH/WARM (Apagado/Bajo/Alto/Calor) a la posición HIGH (Alto) y deje que se calienten durante aproximadamente 30 minutos. Sentirá un ligero olor. Esto es normal y debería desaparecer rápidamente. 7. Coloque los 3 indicadores de control OFF/LOW/HIGH/WARM (Apagado/Bajo/Alto/Calor) en la posición OFF (Apagado) y desenchufe la bufetera. Deje enfriar durante al menos 20 minutos. 8. Usando manoplas, retire las 3 tapas y sujete el mango de cada una de las 3 ollas de cocción con cuidado para levantarlas y retirarlas de la bufetera. Vierta el agua de las ollas de cocción. 9. Lave las 3 ollas de cocción desmontables, 3 cucharadas, y las tapas con agua tibia y jabón, o en el lavavajillas. Enjuague y seque completamente. Las tres ollas de cocina y tapas desmontables son aptas para lavavajillas. 10. Vuelva a colocar las 3 ollas de cocción desmontables con las tapas sobre la base de la bufetera para guardarla. Tapa de la Muesca 3 cucharas Inserción 14 15 Instrucciones de funcionamiento Preparación de un servicio de bufé NOTA: Las 3 planchas de cocción lenta funcionan de forma independiente. Se pueden utilizar 1, 2 ó 3 ollas de cocción lenta en cualquier momento. 1. Prepare la receta siguiendo las instrucciones. 2. Coloque 1, 2 ó 3 ollas de cocción, según sea necesario, sobre la base de la bufetera. Para que sea más fácil servir los alimentos de cocción lenta, gire cada una de las ollas de cocción de modo que la muesca para la cuchara quede hacia el frente y el costado. 3. Agregue los alimentos a las ollas de cocción y coloque las tapas de vidrio. IMPORTANTE: NO LLENE MÁS DE 3/4 DE LA OLLA DE COCCIÓN CON ALIMENTOS. NOTA: Cuando cocine un plato con carne y verduras, primero coloque las verduras en el fondo de la olla de cocción. Luego, agregue la carne y el resto de los ingredientes. 4. Para asegurar una eficiente acumulación de calor, no levante la tapa durante las 2 primeras horas del tiempo de cocción. Levantar la tapa con frecuencia durante la cocción retrasa el tiempo de cocción. 5. ADVERTENCIA: La olla de cocción NO soporta el impacto de los cambios bruscos de temperatura. Si la olla de cocción está caliente, NO agregue alimentos fríos. Antes de cocinar alimentos congelados, agregue un poco de líquido caliente. 6. Enchufe el cable en un tomacorriente de CA de 120 V. 7. Gire el indicador de control OFF/LOW/HIGH/WARM (Apagado/Bajo/Alto/Calor) para seleccionar la configuración de temperatura: LOW (Bajo) o HIGH (Alto). 8. Cocine siguiendo las instrucciones de la receta. 9. Según los alimentos que se servirán, cuando finalice el tiempo de cocción, coloque el indicador de control OFF/LOW/HIGH/WARM (Apagado/Bajo/Alto/Calor) en la posición LOW (Bajo) o WARM (Calor), y sirva. 10. Usando manoplas, retire cuidadosamente las tapas de vidrio sujetando la perilla de las tapas y levantado las tapas, alejándolas un poco de usted. Esto permitirá que el vapor salga antes de retirar la tapa. Coloque las tapas en la tapa se apoya 11. Deje pasar algunos segundos para que salga todo el vapor. Luego, usando manoplas, gire cada una de las ollas de cocción de modo que la muesca para la cuchara quede hacia el frente y el costado. 12. Cuando termine de servir, coloque los 3 indicadores de control OFF/LOW/HIGH/WARM (Apagado/Bajo/Alto/Calor) en la posición OFF (Apagado) y desenchufe la bufetera. 13. Deje enfriar completamente las 3 ollas de cocción antes de limpiarlas;consulte las INSTRUCCIONES DE LIMPIEZA. 14. PRECAUCIÓN: La bufetera llena es muy pesada. A fin de reducir el riesgo de lesiones personales o daños al electrodoméstico, NUNCA INTENTE LEVANTAR LA BUFETERA CUANDO HAYA 3 OLLAS DE COCCIÓN LLENAS SOBRE ELLA. Cuando la cocción finaliza, retire cuidadosamente cada una de las tapas de vidrio sujetando la perilla de la tapa. Sujete los mangos de las ollas de cocción y retírelas, una por vez. Limpie y prepare la base de la bufetera para guardarla. 15. PRECAUCIÓN: Aunque esté apagada y desenchufada, la superficie superior de la base de la bufetera puede permanecer caliente durante algún tiempo después del uso; deje enfriar la unidad antes de limpiarla o guardarla. Si los alimentos que se servirán se prepararon con anterioridad y se refrigeraron, caliéntelos sin tapar en un tazón apto para microondas. Controle cada 3 minutos hasta que se alcance la temperatura adecuada. Asimismo, los alimentos se pueden calentar en el horno antes de agregarlos a las ollas de cocción desmontables para servirlos. 16 Cuando la temperatura de los alimentos sea adecuada para servir, agréguelos a las ollas de cocción y vuelva a colocarlas sobre la base de la bufetera. Gire cada una de las ollas de cocción. Vuelva a colocar las tapas de vidrio sobre cada una de las ollas de cocción. Luego, coloque los indicadores de control OFF/LOW/HIGH/WARM (Apagado/Bajo/Alto/Calor) en la posición WARM (Calor). NOTA: La opción WARM (Calor) no es adecuada para recalentar alimentos. Esta opción SÓLO debe utilizarse para mantener calientes los alimentos ya cocidos. NO cocine los alimentos en la opción WARM (Calor). Consejos para la cocción lenta • • • • • La carne no se dora durante el proceso de cocción. Si desea que la carne se dore, caliente una pequeña cantidad de aceite en la olla de cocción desmontable y dórela en la opción HIGH (Alto) antes de la cocción lenta. También puede rebozar la carne con harina antes de dorarla para espesar el líquido de cocción y obtener una deliciosa salsa. NOTA: Retire el exceso de grasa y sazone antes de servir. Las hierbas y los condimentos obtienen un mejor sabor en la cocción lenta si se los cocina enteros y no triturados o molidos. Si después de que finalice el tiempo de cocción queda demasiado líquido, retire la tapa de vidrio y gire el indicador de COCCIÓN LENTA a HIGH (Alto). Después de 30 ó 45 minutos, la cantidad de líquido disminuirá. NOTA: Si necesita una solución más rápida, escurra el exceso de líquido en una cacerola pequeña y cocine a fuego lento hasta que se haya reducido a la cantidad adecuada. Después de la reducción, sazone a gusto. Es posible que los platos con carne de alto contenido graso no queden tan sabrosos. Precocer o dorar la carne ayudará a reducir la cantidad de contenido graso y a conservar el color. Cuanto mayor sea el contenido graso, menos líquido se necesitará. Si está cocinando carne con alto contenido graso, coloque rebanadas gruesas de cebolla debajo, de modo que la carne no se selle ni se cocine con la grasa. Si es necesario, utilice una rebanada de pan, una cuchara o una espumadera para quitar el exceso de grasa de arriba de los alimentos antes de servir. Los alimentos cortados en trozos parejos se cocinan de forma más rápida y uniforme que los alimentos que se cocinan enteros, como la carne para asar o las aves. 17