1
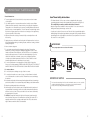
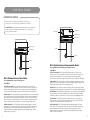
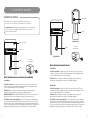
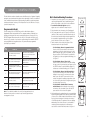
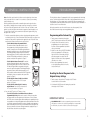
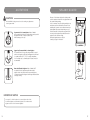
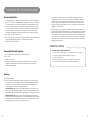
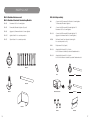
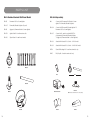
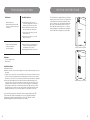
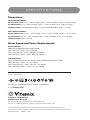
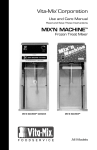
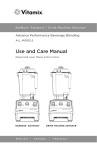
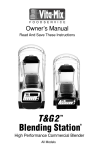
Mix’n Machine
®
ALL MODELS
Use and Care Manual
Read and save these instructions
MIX’N MACHINE® ADVANCE®
MIX’N MACHINE®
I M P O RTA N T SA F E G UA R DS
1. Read all instructions.
2. To protect against risk of electrical shock, do not put motor enclosure in water
or other liquid.
3. Close adult supervision is necessary when machine is used by or near children.
Children should be supervised to ensure that they do not play with the appliance.
This appliance is not intended for use by persons (including children) with reduced
physical, sensory or mental capabilities, or lack of experience and knowledge, unless
they have been given supervision or instruction concerning use of the appliance by
a person responsible for their safety.
4. Make sure the machine is sitting or mounted solidly on a sturdy surface or wall
before using.
5. Unplug the power cord from the wall outlet when the Vitamix machine is not in use,
before disassembling, putting on or taking off parts, and before cleaning, other than
washing the agitator.
6. Never contact moving parts.
7. Do not operate any machine with a damaged cord or plug, if the machine
malfunctions, or has been dropped or damaged in any manner. In the US and
Canada, call Vitamix Technical Support, (800) 866.5235 at once for examination,
repair, possible replacement, or electrical or mechanical adjustment. If you live
outside the United States or Canada, contact your local Vitamix Distributor,
or telephone the Vitamix International Division at +1 (440) 782.2450 or email
[email protected] for a distributor in your country.
Save These Safety Instructions
• T
he Vitamix blender’s U.S.A. power cord comes equipped with a three-prong
(grounding) plug which mates with a standard three-prong wall outlet (Figure A).
This cord will vary for countries outside the United States of America.
• Adapters (Figure B) are available for two-prong outlets. Do not cut or remove the
third (ground) prong from the plug or power cord.
• C
onsult your electrician if you are not sure if the wall outlet is grounded through the
building wiring. With a properly grounded two-prong wall outlet, ground the machine
by attaching the tab on the adapter to the wall outlet cover by means of the screw in
the center of the cover (Figure B).
WARNINGS!
Three-prong adapters are not to be used in Canada.
8. Do not use attachments not recommended or sold by Vita-Mix Corporation.
Doing so will void the warranty. ALTERATION OR MODIFICATION OF THIS PRODUCT
IN ANY FORM IS NOT SUPPORTED AND AS SUCH MAY RESULT IN BODILY INJURY.
9. Do not use outdoors.
10. Do not let the power cord hang over edge of table or counter.
11. Do not place the machine on or near a hot gas or electrical burner, in a heated
oven, or allow machine to touch hot surfaces. External heat sources can damage
the machine.
12. Keep hands, utensils and other items away from the agitator while motor is running to
prevent the possibility of severe personal injury and/or damage to the Vitamix machine.
13. Always keep splash guard in place while running.
14. When using the optional foot pedal control (for applicable models) make sure it
is grounded and located where it will not be activated unintentionally. When the
machine is not in use, turn OFF the power switch so the unit cannot accidentally
be started with the foot pedal.
FIGURE A
FIGURE B
IMPORTANT NOTES!
The instructions appearing in this Use and Care Manual cannot cover every possible
condition and situation that may occur. Common sense and caution must be
practiced when operating and maintaining any appliance.
15. CAUTION: For applicable models, the light in the front panel start/stop switch,
when lit, indicates the power is ON and machine could start. Turn power OFF or
unplug the machine before touching movable parts. Shut OFF power switch at
night or whenever machine will be left unattended.
2
3
CO N T R O L PA N E L
IMPORTANT NOTES!
Vitamix machines come with several different control options.
Please be sure you are following the instructions for your model.
MOUNTING KITS: Mounting Kits, with detailed instructions, are available for
both the countertop and wall mount Mix’n Machines. See Parts Lists on
page 17 and 19 for kit details.
Pulse Switch
Program Dial
Indicator Light
Power Switch
Indicator Light
Actuator
Power Switch
Agitator
Actuator
Mix’n Machine Advance Programmable Model
Agitator
Pre-programmed with six blending options and pulse switch.
COUNTERTOP
Mix’n Machine Advance Timer Model
Pre-programmed with one pre-set blending cycle.
COUNTERTOP
ON/OFF Power Switch: This is a lighted switch. When light is lit, power is ON.
Located on the front of the machine, the ON/OFF switch controls the power to the
machine. While plugged in, switch to ON to ready the machine for blending. Shut
OFF the power switch at night or whenever the machine will be left unattended.
START Actuator: The actuator starts the agitator and begins a pre-set timed blending
cycle when the machine is ON. Push the actuator to activate a timed blending cycle.
The machine will shut off automatically at the end of the pre-set time. AGITATOR.
When the machine is turned ON and the actuator is pushed, the agitator spins and
mixes the product and other ingredients. (See page 12 for available agitators.)
LED Indicator Light: The LED light blinks when a blending program is 4 seconds
from completion so that excess product can be spun off the agitator. The blinking
light will get progressively faster to indicate that the program cycle is almost
complete. When a new program is installed using a programming chip, the light
blinks to indicate acceptance.
4
ON/OFF Power Switch: This is a lighted switch. When light is lit, power is ON.
Located on the front of the machine, the ON/OFF switch controls the power to the
machine. While plugged in, switch to ON to ready the machine for blending.
Shut OFF the power switch at night or whenever the machine will be left unattended.
START Actuator: The actuator starts the agitator and begins a blending cycle when
the machine is ON. Push the actuator to activate a program setting. The machine will
shut off automatically at the end of the program setting.
AGITATOR: When the machine is turned ON and the actuator is pushed, the agitator
spins and mixes the product and other ingredients. (See page 12 for available agitators.)
PROGRAM Dial: The PROGRAM dial allows user to select a number of pre-programmed
settings. Machine will shut off automatically at the end of the program. Program is
activated only when the power switch is ON. See page 10 for programming details.
PULSE Switch: The PULSE switch starts the agitator and can be used to quickly
refresh product. Depress the switch and hold down as long as needed. The PULSE
switch can only be used when the power switch is ON.
LED Indicator Light: The LED light blinks when a blending program is 4 seconds
from completion so that excess product can be spun off the agitator. The blinking
light will get progressively faster to indicate that the program cycle is almost
complete. When a new program is installed using a programming chip, the light
blinks to indicate acceptance.
5
CO N T R O L PA N E L
IMPORTANT NOTES!
Power Switch
Vitamix machines come with several different control options.
Please be sure you are following the instructions for your model.
MOUNTING KITS: Mounting Kits, with detailed instructions, are available for
both the countertop and wall mount Mix’n Machines. See Parts Lists on
page 17 and 19 for kit details.
Power Switch
Agitator
WALLMOUNT
Variable Speed Dial
Agitator
Power Switch
Foot Pedal
(sold separately)
COUNTERTOP
Actuator
Foot Pedal
(sold separately)
Mix’n Machine Standard Model
Agitator
Mix’n Machine Advance Variable Speed Model
COUNTERTOP
ON/OFF Power Switch: Located on the front of the machine, the ON/OFF switch
controls the power to the machine and starts the agitator. While plugged in, switch
to ON to start blending and OFF to stop blending.
6
COUNTERTOP
ON/OFF Power Switch: Located on the front of the machine, the ON/OFF switch
controls the power to the machine and starts the agitator. While plugged in, switch
to ON to start blending and OFF to stop blending.
AGITATOR: When the machine is turned ON, the agitator spins and mixes the
product and other ingredients. (See page 12 for available agitators.)
WALLMOUNT
AGITATOR: When the machine is turned ON, the agitator spins and mixes the
product and other ingredients. (See page 12 for available agitators.)
ON/OFF Power Switch: Located on the front of the machine, the ON/OFF switch
controls the power to the machine and starts the agitator. While plugged in, switch
to ON to start blending and OFF to stop blending.
VARIABLE SPEED Dial: The VARIABLE SPEED dial allows user to select continuously
variable motor speeds. Dial is activated only when the power switch is ON.
AGITATOR: When the machine is turned ON, the agitator spins and mixes the
product and other ingredients. (See page 12 for available agitators.)
FOOT PEDAL Control (sold separately): The FOOT PEDAL allows the user hands free
power activation. Press and hold for ON. Release for OFF. (Refer to the Foot Pedal’s
Instructions sheet, which is included with the pedal, for detailed operating directions.)
Place the foot pedal where it will not be activated unintentionally. The foot guard is an
additional design feature that helps prevent unintentional use of the foot pedal.
7
G E N E R A L I N ST R U C T I O N S
The Mix’n Machine combines a durable motor with different styles of agitators. By rapidly
moving the cup up and around the agitator, a thorough mixing job can be accomplished.
Some combinations may take more time depending on additives, product temperature,
technique, and desired consistency of finished product. Due to the difference of recipes,
your results may also vary.
Programmable Model
The basic settings of the six PRE-SET buttons for the Mix’n Machine Advance
Programmable Model are detailed below. These programs, numbered 1 through 6, are
blending cycles designed for the most commonly made desserts. Selecting one of the
PRE-SET programs will run the machine for a full cycle. The machine will stop by itself
when the cycle is complete. A cycle varies in speed and length. Your machine’s PRESET
options may differ due to program revisions or if your machine was programmed
specifically for your business.
DIAL
SETTING
DESSERT TYPE
DESCRIPTION
1
Easy-to-blend frozen dessert with whole
mix-in candies, cookies, etc.
Starts LOW (17%), ramps to MED-HIGH
(60%) for 10 seconds, then ramps to HIGH
(100%) for 4 seconds
:16
2
Easy-to-blend frozen dessert with chunks of
candies, cookies, etc. mixed throughout
Quickly ramps up to HIGH (100%), decreases to
MED-HIGH (67%) for 5 seconds, then decreases
to MED-LOW (36%)
:16
3
Frozen dessert with syrups that require
extended blending time (i.e., thick milkshakes
and malts)
Runs on LOW (20%)
:20
4
Hard-to-blend frozen dessert with syrups or
mix-ins that require little blending time
Starts LOW (17%) and quickly ramps to HIGH
(100%) for 12 seconds
:14
5
Hard-to-blend frozen dessert with whole
mix-in candies, cookies, etc.
Ramps up to HIGH (84%) for 10 seconds, then
ramps to HIGH (100%) for 6 seconds
:16
6
Hard-to-blend frozen dessert with chunks of
candies, cookies, etc. mixed throughout
Starts MED (40%) and quickly ramps to HIGH
(100%) for 16 seconds
Note: A 3-second delay is added to the end of each program’s run time to
allow time for the operator to remove the cup from the agitator before a
new program is selected.
8
RUN
TIME
:20
Mix’n Machine Blending Procedures
1. Put product (ice cream, yogurt, etc.) into a sturdy serving
cup along with ingredients such as liquid flavoring, and
mix-ins such as candy, cookies, fruit or other condiments.
2. For units with a Removable Agitator: push the
agitator up onto the shaft until it snaps into place.
Disposable Lid
Permanent Collar
3. Plug the machine into the nearest outlet (if unplugged).
4. Place a cup guard on the cup (See Figure 1). Hold the cup
(and lid or collar) securely in your hand (from the side, not
from the bottom) and reach under the splash guard. Move
the cup under the agitator and lift up so the agitator
touches the bottom of the cup. See Figure 2.
Cup guards are sold
through foodservice
equipment distributors
ON
FIGURE 1
OFF
ADVANCE PROGRAMMABLE ICE CREAM MIXER
5. Turn the machine ON to activate the agitator. Follow
instructions based on the specific model:
• For Mix’n Machine Advance Programmable Model:
Press the ON/OFF power switch to ON. Activate a
program by selecting the desired setting on the dial.
While holding the cup securely in your hand, use your
fingers to push the START Actuator (located behind
the agitator) to activate a programmed blending cycle.
See Figure 3.
ON
• For Mix’n Machine Advance Timer Model:
Press the ON/OFF power switch to ON. While holding
the cup securely in your hand, use your fingers to push
the START Actuator (located behind the agitator) to
activate a pre-set timed blending cycle. See Figure 3.
• For Mix’n Machine Advance Variable Speed Model:
Select the desired setting on the SPEED dial. While
holding the cup securely in one hand, use the other
hand to press the ON/OFF power switch to ON to
activate the agitator. Depending on ingredients, start
on a lower setting, then switch to a higher setting once
the mixture begins processing.
OFF
FIGURE 2
ADVANCE PROGRAMMABLE ICE CREAM MIXER
ON
OFF
FIGURE 3
ADVANCE PROGRAMMABLE ICE CREAM MIXER
• For Mix’n Machine Standard Model (Countertop
and Wall Mount): While holding the cup securely in
one hand, use the other hand to press the ON/OFF
power switch to ON to activate the agitator.
6. With a swirling motion, gradually move the cup up and down
around the spinning agitator and completely around all sides
of the cup. (If ice cream is hard, this should be done slowly.)
Develop your own technique for the desired consistency
of the finished product. The agitator will do some chipping
and breaking of the solids. However, it is not intended to
completely pulverize ingredients as solid chunks are
expected to be evident in the final product. See Figure 4.
FIGURE 4
9
G E N E R A L I N ST R U C T I O N S
Notes: Should the cup be hard to hold, either move the agitator into the mix more
slowly or start with softer ice cream. Do not continue to operate if you are having
trouble holding the cup.
Both the permanent agitator and the removable agitator are designed to reduce
the possibility of damage when contacting a paper cup. However, they should not
be forced or held solidly against the side or bottom of the cup. The hard ice cream
agitator is specially designed to mix the product aggressively and thoroughly, so use
of a cup holder or sturdy cup is recommended to prevent the agitator from going
through the side of the cup.
7. Swirl the cup around the agitator to produce a pleasing product appearance and to
avoid leaving a hole in the center of the mixture. Before removing the cup, allow excess
mixture to be thrown off the agitator and be caught by the cup or lid/collar. Follow
machine shut-off instructions based on the specific model:
• For Mix’n Machine Advance Programmable Model:
The machine will shut off automatically at the end of
the programmed cycle. When the program is within 4
seconds of completion, the LED Indicator light will blink so
preparation can begin to remove the cup from the agitator.
The blinking light will get progressively faster to indicate
that the program cycle is almost complete and the machine
will shut off. This provides an indication, so that excess
product can be spun off the agitator. See Figure 5.
• For Mix’n Machine Advance Timer Model: The machine
will shut off automatically at the end of the preset time.
When the program is within 4 seconds of completion, the
LED Indicator light will blink so preparation can begin to
remove the cup from the agitator. The blinking light will get
progressively faster to indicate that the program cycle is
almost complete and the machine will shut off. This provides
an indication, so that excess product can be spun off the
agitator. See Figure 5.
The Mix’n Machine Advance Programmable Model is pre-programmed with six blending
options. The Mix’n Machine Advance Timer Model is pre programmed with one pre-set
timed blending cycle. The programs can be customized by using a programming chip
or programmer software kit available from Vita-Mix Corporation. Call your distributor or
Customer Service for more information.
Although your machine comes from the factory pre-set with program(s), follow
these instructions when using a custom programming chip.
Programming with a Custom Chip
1. Turn the power to the machine ON using the
ON/OFF switch located on the front of the machine.
Programming Port
2. Facing the front of the machine, locate the
programming port on the right side panel.
Insert the custom programmed chip with the
silver contact bars up.
3. Within 5 seconds, the six PRE-SET PROGRAMS
will be re-programmed. The LED Indicator
light on the front of the machine will blink
when the program is accepted. If the LED
light does not blink, remove the programmed
chip and see note below.
FIGURE 5
4. Remove the programming chip, return it
to the original package and store in a safe,
easily accessible spot.
ON
SIDE VIEW
OFF
Resetting the Pre-Set Programs to the
Original Factory Settings
• For Mix’n Machine Advance Variable Speed Model:
Press ON/OFF power switch to OFF to stop the
machine. See Figure 6.
• For Mix’n Machine Standard Model (Countertop
and Wall Mount): Press ON/OFF power switch to
OFF to stop the machine. See Figure 6.
PROGRAMMING
1. Turn the power to the machine OFF using the ON/OFF switch
located on the front of the machine.
FIGURE 6
2. Hold down the PULSE button while turning the power back
ON using the ON/OFF switch.
8. Press the ON/OFF switch to OFF when not in use.
• To use the PULSE switch to refresh drinks and desserts (Advance
Programmable Model only): Make sure the power is ON. Move the cup under
the agitator and lift up so the agitator touches the bottom of the cup. Depress
the PULSE switch to start the agitator. With a swirling motion, gradually move the
cup up and down over the spinning agitator and completely around all sides of the
cup. Swirl the cup around the agitator to produce a pleasing product appearance
and to avoid leaving a hole in the center of the mixture. Before removing the cup,
allow excess mixture to be thrown off the agitator and be caught by the cup or
lid/collar. Release the switch to stop the agitator.
10
IMPORTANT NOTES!
PROGRAMMING CHIP: If the above programming steps are taken and the
LED light does not blink or the custom programming does not appear with
the first blend cycle, turn the chip 180° (side-to-side) and try again.
11
AG I TATO R S
CAUTION!
SHOCK HAZARD. Unplug the machine before making any adjustments
to the Agitator Shaft.
Permanent Soft Ice Cream Agitator: Made of durable
NSF accepted Acetal, this non-metal agitator can be pushed
up against the inside of paper or plastic cups
with no damage to the cup.
S P L AS H G UA R D
Because of their unique designs, the splash guards
catch the product thrown from the agitator and shield
the operator during mixing.
On the countertop units, the splash guard pivots up
and down to prevent thin drinks or desserts from
splashing the operator. On the wall mount units, the
splash guard slides up and down riding on top of
either a removable or disposable cup guard. It will
not restrict the circular and up and down motion
required for fast, efficient mixing.
Both splash guards remove easily for
cleaning. See page 14 for details.
COUNTERTOP
Aggressive/Permanent Hard Ice Cream Agitator:
The rounded fins of this specially designed NSF accepted
stainless steel agitator efficiently and aggressively mix hard
ice cream product at 5°F / -15°C scooping temperature.
Use of a sturdy cup (i.e., durable paper or plastic, metal) is
recommended.
Removable/Reusable Agitator: Made of durable NSF
accepted Acetal, this rigid removable and reusable
agitator cleans easily and is ideal for preventing flavors,
colorings and potential allergens from being transferred from
serving to serving.
WALLMOUNT
IMPORTANT NOTES!
See pages 17 or 19 for kit options for converting from either of the
Permanent Agitators to a Removable Agitator or from a Removable
Agitator to either of the Permanent Agitators.
12
13
C A R I N G FO R YO U R M AC H I N E
Permanent Agitators
1. Fill a durable square or rectangular container to within 1 in. / 3 cm from the top with
hot (110°F / 43°C) water containing mild liquid detergent (1 oz. per qt. / 30 ml per Ltr.).
The container must be deep enough to submerge the entire agitator and the shaft.
2. Hold the container up around the agitator and shaft, all the way up to the bottom
of the motor chamber, and turn the machine on. Run for about 15 seconds. Repeat
several times. Make sure all portions of the shaft which contact food have been
submerged. (Moving Splash Guard must be removed for this cleaning operation.)
3. Repeat step 2, except use rinse water.
4. Repeat step 2, except use an approved 100 ppm sanitizing solution and cleaner and
run agitator and shaft under solution for a minimum of two minutes.
5. Resanitize at the start of the day.
3. All stainless steel surfaces may be cleaned and disinfected with a commercial
cleaning solution. However, do not spray any water or other fluids into the motor
chamber. Do not use excess liquid around the switches, motor protector, or cord
entry hole. Abrasive cleaners may leave noticeable changes in the surface finish.
Make sure all areas in and around the motor enclosure and machine are dry before
plugging the machine back in.
4. Switches may become sticky from use. Unplug the machine and use a damp cloth,
moistened with water and a mild detergent, to clean around the edges of the switch
paddles until they function freely. Work the switches back and forth a few times to
loosen any dried residue under switch. Leaving switches sticky will damage or burn
out the switches. Clean carefully, using caution not to allow water or other liquids to
infiltrate the switch. Dry with a soft cotton cloth. Make sure switches are dry before
plugging the machine back in.
IMPORTANT NOTES!
Removable/Reusable Agitator
1. Remove agitator from machine. Wash in warm soapy water.
CLEANING AND SANITIZING PRODUCTS:
•Do not use abrasive cleaning agents or concentrated bleach when cleaning.
2. Rinse clean.
•Do not use any cleaners containing Quatinary Sanitizers on
polycarbonate components.
3. Sanitize as necessary.
•Follow cleaner/sanitizer manufacturer’s specifications and instructions.
4. Dry and reassemble. NOT recommended for dishwasher. Excessive commercial
dishwasher heat may slightly bend the removable agitator which could cause
unbalance when blending.
•Local codes should be followed for cleaning/sanitizing equipment.
Housing
1. Unplug the machine.
2. Remove the Splash Guard and wash in warm soapy water. Rinse clean and sanitize
as necessary. Do not use any abrasive material or paper towels which would scratch
the surface. Also avoid cleaners which contain ammonia (most window cleaners
contain ammonia). NOT recommended for dishwashers.
Countertop Models only: To remove the Splash Guard, squeeze the sides until clear
of the top pivot pins and pull the guard out. To mount the Splash Guard, squeeze the
sides and place onto the top pivot pins. The guard should sit on the bottom pivot pins.
Wall Mount Models only: To remove the moving Splash Guard, squeeze the travel
rods together and slide the guard down. To mount the moving Splash Guard, slide the
Splash Guard up over the rods until they snap in place. To clean the travel rods, wipe
with a damp cloth. Do not remove the rods from the mixer.
14
15
PA RTS L I ST
Mix’n Machine Advance and
Mix’n Machine Standard Countertop Models
#30019
Permanent Soft Ice Cream Agitator
#30019
Removable/Reusable Agitator (10 pack)
#30018
Aggressive/Permanent Hard Ice Cream Agitator
#30023
Agitator Shaft – for countertop models
#30015
Splash Guard – for countertop models
#30019
Kits Sold Separately:
#80
Conversion Kit (Permanent Soft/Hard Ice Cream Agitator
To Removable/Reusable Agitator)
#81
Conversion Kit (Removable/Reusable Agitator To
Permanent Soft Ice Cream Agitator)
#30006
Conversion Kit (Removable/Reusable Agitator To
Aggressive Permanent Hard Ice Cream Agitator)
#15668
Wall and Counter Sure-Support Mounting Kit –
for countertop models only
#1240
Replacement Feet (4 pack)
#30000
Guarded Air-Activated Foot Control –
for 120V Advance Variable S
peed and Standard models
#30002
Guarded Air-Activated Foot Control –
for 220-240V Advance Variable Speed and Standard models
#30003
#80
#81
#30023
#30018
#30000 & 30002
#30006
#1240
#15668
#30015
16
17
PA RTS L I ST
Mix’n Machine Standard Wall Mount Model
Kits Sold Separately:
#30019
Permanent Soft Ice Cream Agitator
#30003
Removable/Reusable Agitator (10 pack)
#80
Conversion Kit (Permanent Soft/Hard Ice Cream
Agitator To Removable/Reusable Agitator)
#30018
Aggressive/Permanent Hard Ice Cream Agitator
#30004
Conversion Kit (Removable/Reusable Agitator To
Permanent Soft Ice Cream Agitator)
#30034
Agitator Shaft – for wall mount models
#30029
Splash Guard – for wall mount models
#30005
Conversion Kit – must be used with #30034 –
sold separately (Removable/Reusable Agitator
To Aggressive/Permanent Hard Ice Cream Agitator)
#30000
Guarded Air-Activated Foot Control – for 120V model
#30002
Guarded Air-Activated Foot Control – for 220-240V model
#1234
Stand-off Mounting Kit – for wall mount models only
#1245
Drip Tray Kit – for wall mount models only
#30019
#30003
#80
#81
#30023
#30000 & 30002
#30018
#30029
18
#1234
#30006
Note: Must be used with #30034 – Sold separately
#1245
19
T R O U B L E S H O OT I N G
Problems:
Possible Actions:
• Machine will not run
a. Double-check to make sure power
cord is firmly plugged into power outlet
and that you have power to the outlet.
• Machine will not run when START
Actuator or ON/OFF power switch
is activated
b. Check ON/OFF power switch to make
sure the switch is in the ON position.
c. Check to make sure switches are clean
and moving freely.
M OTO R P R OT E C T I O N
The Mix’n Machine is equipped with a reset breaker
mounted on the motor enclosure. See Figures 1 and
2. Should the motor be kept from turning (locked
rotor) or otherwise be overloaded, the breaker will
trip. If this occurs, make sure the motor is free to
rotate and wait a short period for it to cool down
before pushing the reset breaker and restarting the
motor. Never remove or bypass the reset breaker.
Reset Breaker
d. Check the reset breaker to see if it has
tripped. See page 21.
• Machine is running irregularly
• Setting selected starts
the wrong program
a. Reset the machine to its original factory
settings or reprogram with a custom
programming chip. See page 11.
FIGURE 1
Countertop Machine (Side View)
b. Try plugging machine into a new outlet.
Problem:
Reset Breaker
• Loose or misaligned shaft
• Vibration noise
Possible Actions:
a. Unplug the machine.
b. Make sure the shaft extension is threaded tight onto the motor shaft with the slinger centered
and square.
c. To tighten a loose shaft, remove the cap and hold the motor shaft with a screwdriver in the slot
on the top end. Turn the agitator with your hand until tight. If tools must be used to hold the
shaft extension, be sure to protect it from being scratched as that would reduce its cleanability.
d. If the shaft is still misaligned, rotate the shaft by hand while holding a marking pen close
to the lower end. The first spot to touch and leave a mark is the side of the shaft most out
of alignment. Lay the machine on its back (remove the plastic agitator to avoid breakage)
and gently tap the marked side of the shaft with a rubber mallet. Repeat the process until
the marking pen leaves a mark most of the way around the shaft and the unit runs smooth.
Regulate your mallet taps to move the shaft towards the center without overshooting.
FIGURE 2
Wallmount Machine (Front View)
If you cannot fix your machine, call Vitamix Technical Support at (800) 866.5235.
If outside the United States and Canada, contact your local Vitamix Distributor
or telephone the Vitamix International Division at +1 (440) 782.2450 or email
[email protected] for a distributor in your country.
20
21
WA R R A N T Y
LIMITED WARRANTY (Unless otherwise covered by Contract)
WHAT IS NOT COVERED UNDER WARRANTY (Coverage Exclusions)
Vita-Mix® Corporation (hereinafter “Vitamix”) warrants to the original end-user
(“Purchaser”) that its commercial equipment, including the Mix’n Machine and
Mix’n Machine Advance (the “Equipment”) will be free from defects in material
and workmanship as described herein and subject to the conditions set forth below.
Proof of purchase is required.
There is no warranty with respect to the following, which may be supplied
with the Equipment: Mixing Agitator or Spoon.
The following are the sole remedies of the Purchaser and set forth the only warranty
obligations of Vitamix.
No employee of Vitamix or any other person is authorized to make any warranty
in addition to or amendment of the following warranties.
WHAT IS COVERED UNDER WARRANTY
Vitamix warrants to the original end-user that:
• If the Equipment fails due to defects in material or workmanship within the
period described below then Vitamix will assume the cost of all parts and
labor necessary to repair the Equipment:
• Mix’n Machine and Mix’n Machine Advance. Three (3) Years from the date
of purchase for Non-Consumable Parts, and Ninety (90) days on Consumable
Parts that include the splash guard, mixing agitator or agitator drive shaft
extension, actuator switch rod or switch rod seal, and foot control.
• Automatic Mix’n Machine. Two (2) Years from the date of purchase on
Non-Consumable Parts and Ninety (90) days on Consumable Parts.
Consumable Parts are defined as the cup holder, cup holder boot, cup holder
seal and front door assembly. All other parts are Non-Consumable parts.
• There is no warranty with respect to the mixing agitator or spoon,
which may be supplied with the Equipment
These warranties do not include repairs needed due to:
A. Normal wear-and-tear;
B. Abuse, misuse, negligent use;
C. Alteration of the Equipment;
D. Exposure to extreme conditions; or
E. Improper installation of the Equipment, including but not limited to poor
workmanship, not following specifications provided.
WHEN DO THE WARRANTIES APPLY (Coverage Conditions)
The warranties contained herein run only to the original end-user and are not transferable.
To make a warranty claim, proof of purchase is required.
Any warranty offered by Vitamix is only valid if used in accordance with: a) the owner’s
manual that may also be accessed at vitamix.com; b) the express warranty; and
c) any and all maintenance instructions regardless of when they are supplied.
WHAT CAUSES THE WARRANTY TO BE VOID
All product warranties are void if:
The sole obligation of Vitamix under these warranties is to repair or replace the
warranted part or parts as determined exclusively by Vitamix.
• Any component of a covered piece of Equipment has been modified,
altered, “reconditioned” or repaired by persons someone other than Vitamix,
an authorized Vitamix Service Center or an authorized Vitamix Distributor.
IN NO EVENT, WHETHER BASED ON CONTRACT, INDEMNITY, WARRANTY, TORT
(INCLUDING NEGLIGENCE), STRICT LIABILITY OR OTHERWISE, SHALL VITAMIX BE
LIABLE FOR ANY SPECIAL, INDIRECT, INCIDENTAL OR CONSEQUENTIAL DAMAGES
WHATSOEVER INCLUDING, WITHOUT LIMITATION, LOSS OF PROFIT OR REVENUE.
THE ABOVE LIMITED WARRANTY IS YOUR EXCLUSIVE REMEDY, AND YOU AND
VITAMIX HEREBY EXPRESSLY DISCLAIM ALL OTHER WARRANTIES OR CONDITIONS,
EXPRESS OR IMPLIED, STATUTORY OR OTHERWISE, INCLUDING ANY IMPLIED
WARRANTY OF MERCHANTABILITY AND ANY IMPLIED WARRANTY OF FITNESS
FOR A PARTICULAR PURPOSE, AND, WITHOUT LIMITING THE GENERALITY OF THE
FOREGOING, YOU AND VITAMIX HEREBY EXPRESSLY EXCLUDE, TO THE EXTENT
PERMITTED BY LAW, THE APPLICATION OF ANY SALE OF GOODS LEGISLATION AND
THE UNITED NATIONS CONVENTION ON CONTRACTS FOR THE INTERNATIONAL SALE
OF GOODS, AS MAY BE APPLICABLE.
• Any covered Vitamix Equipment is used with a component not expressly
authorized in writing by Vitamix.
Some jurisdictions do not allow a limitation on implied warranties or on special,
incidental or consequential damages.
22
These warranties further exclude distortion, wear or breakage of the splash guard,
mixing agitator or agitator drive shaft extension, actuator switch rod or switch rod seal,
and damage to the foot control caused by water or other contaminants.
• Any Equipment is improperly installed, including but not limited to poor
workmanship, not following specifications provided.
LIMITED WARRANTY continues on page 24
23
WA R R A N T Y
HOW TO OBTAIN WARRANTY COVERAGE AND REPAIR
Who to Contact For Warranty Service and Repair: In the event your Vitamix blender
needs service or repair covered by the terms of this warranty, please call Vita-Mix
Corporation, an authorized service center or a local distributor for warranty assistance.
• For Equipment purchased and located in the U.S.A.:
Call Vitamix Technical Support: (800) 866.5235.
• For Equipment purchased outside the continental U.S.A.:
Contact your authorized Vitamix Distributor or the Vitamix International Division
at +1 (440) 782.2450 or email [email protected] for a distributor near you.
You will be asked to provide proof of purchase for the Equipment. If the remote technical
support team cannot fix the Equipment remotely, the Equipment will need to be serviced.
The team will help you either locate an authorized service center or arrange for the
Equipment to be shipped back to Vitamix.
HOW TO SHIP THE EQUIPMENT FOR SERVICE
A. O
btain a Return Authorization Number Before Shipment. Do not return or send
in Equipment without the approval from Vitamix. Under no circumstances will Vitamix
be responsible for the cost of any unauthorized repairs. All Equipment returns must
have the Return Authorization Number (“RA”) clearly marked on the outside of the
box. Any Equipment that is sent to Vitamix without prior authorization or approval
will be returned to the shipper’s address “as is” without repair. The customer pays
for the shipment to Vitamix.
B. S
hipping Equipment For Repair In the United States. During the first thirty (30) days,
Vitamix will pay standard ground freight to return Equipment subject to this warranty
to Vitamix. After the first thirty (30) days, Purchaser will pay the shipping costs to
return Equipment covered by this warranty to Vitamix or the local authorized service
provider. Vitamix will pay shipping costs to return the merchandise to the location
where the Equipment was used. Purchaser will have the option to request expedited
freight using the Purchaser’s credit card to pay for all applicable shipping expenses.
Vitamix will credit the Purchaser’s account for the amount of the standard ground
freight shipping expense.
24
S P E C I F I C AT I O N S
Dimensions:
COUNTERTOP MODELS:
Machine dimensions: 24 in. / 60.9 cm High x 10 in. / 25.4 cm Wide x 8.25 in. / 20.9 cm Deep
Case dimensions: 27 in. / 68.6 cm High x 10.2 in. / 25.9 cm Wide x 12 in. / 30.5 cm Deep
Shipping weight: Advance Models: 20 lbs. / 9.1 kg; Standard Models: 27 lbs. / 12.2 kgs
WALL MOUNT MODELS:
Machine dimensions: 16.5 in. / 41.9 cm High x 7.25 in. / 18.5 cm Wide x 8.75 in. / 22 cm Deep
Case dimensions: 14.4 in. / 36.6 cm High x 10 in. / 25.4 cm Wide x 18.9 in. / 48 cm Deep
Shipping weight: 19 lbs. / 8.6 kg
Motor Speed and Power Requirements:
Advance Models:
500 RPM to 3000 RPM bare motor speed
Volts: 120 VAC / Amps: 2.0 / Hz: 50/60
Volts: 220-240 VAC / Watts: 150-180 / Hz: 50/60
Volts: 100 VAC (Japan) / Watts: 100 / Hz: 50/60
Standard Models:
60 Hz: 3440 RPM bare motor speed; 50 Hz: 2840 RPM bare motor speed
Volts: 120 VAC / Amps: 2.6 / Hz: 50/60
Volts: 220-240 VAC / Watts: 285-325 / Hz: 50/60
Volts: 100 VAC (Japan) / Amps: 2.6 / Hz: 50/60
When applicable:
To see the complete line of Vitamix® products,
visit vitamix.com
Vita-Mix® Corporation
Commercial Division
8615 Usher Road, Cleveland, Ohio 44138 U.S.A.
Phone: +1 (440) 235.0214 Email: [email protected]
©2012 Vita-Mix Corporation. No part of this publication may be reproduced or transmitted in any form or
by any means or stored in a database or retrieval system without the written permission of the Vita-Mix Corporation.
Printed in the U.S.A.
XMM001 12/12