1
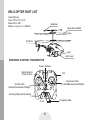
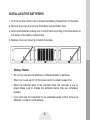
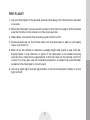
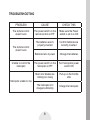
THUNDER STRIKE - P16-41460
4CH Indoor Helicopter w/ Gyro
User’s Manual
Ages
14+
and up
TABLE OF CONTENTS
What’s in the Box.................................................................................................... 3
Helicopter Part List................................................................................................. 4
Infrared Control Transmitter.................................................................................... 4
Installing the Batteries............................................................................................ 5
Charging the Helicopter.......................................................................................... 6
Pre-Flight................................................................................................................ 7
Troubleshooting...................................................................................................... 9
Care & Maintenance............................................................................................. 10
FCC Information................................................................................................... 10
2
WHAT’S IN THE BOX
a.- (1) Helicopter
e.- (1) Spare Balance Bar
b.- (1) Remote Control
f.- (1) Spare Ascend and Descend Landing Gear
c.- (4) Spare Screws
g.- (2) Spare Tail Blades
d.- (2) Spare Main Blades
h.- (2) Spare Connection Buckle
b
a
e
f
d
c
h
g
3
HELICOPTER PART LIST
Specifications
Size: 7.87”x1.37”x4.13”
Main Rotor: 6.81”
Battery: Li-poly 3.7v 150mAh
Stabilizer
Main Rotor Blade
Tail Rotor
Light
Light Gear
INFRARED CONTROL TRANSMITTER
Power Indicator
Band Selector
Power Switch
Trim
Directional Stick
(Forward/Backward/Left/Right)
Throttle Stick
(Ascend/Descend/Left/Right)
Running/Flying Mode Switch
Charging Cable
Cover
4
INSTALLING THE BATTERIES
1. Turn the remote control over to access the battery compartment on the back.
2.Remove the screw and remove the battery compartment cover
3.Insert 6 AA batteries making sure to orient them according to the illustrations on
the inside of the battery compartment.
4.Replace the cover ensuring to fasten the screw.
Battery Notes:
• Do not mix new and old batteries or different brands of batteries.
• When not in use, switch off the power switch to extend usage time
• When the indicator lights of the controller flash, the controller is low on
power. Make sure to change the batteries before they are completely
drained.
• If you don’t use the transmitter for an extended period of time, remove all
batteries in order to avoid leakage.
5
CHARGING THE HELICOPTER
• Make sure to switch OFF the helicopter prior to charging.
• Use the remote control’s charging cable located behind the front panel OR use
the included USB cable to charge the helicopter using any available USB power
port.
Charging Socket
Charging Cable
Power Switch
Battery Notes:
• Do not use or leave the battery near a heat source such as fire or heater.
• Do not allow the battery to be immersed in water. Make sure to keep the
battery in a cool and dry environment.
• Do not disassemble the battery.
• Never leave the battery unattended during charging.
• When not in use, switch off the power switch to extend usage time
• The control distance will shorter when the battery is not fully charged.
6
PRE-FLIGHT
1. Lay your helicopter on the ground at least 6 feet away from obstructions, animals
or people.
2.Move the helicopter’s power switch located in the main housing to ON and make
sure the throttle on the remote is in the down position.
3.Stand back, and switch the remote’s power switch to ON.
4.Increase pressure on the throttle stick until the helicopter is able to just barely
hover over the floor.
5.Back off on the throttle to maintain a steady height and check to see if the helicopter leans in one direction or spins. If the helicopter is not stable hovering
over the floor, make micro-adjustments to the trim dials on the remote control to
correct. You may also use the included screwdriver to adjust the potentiometer
located on the helicopter’s circuit board.
6.Use very slight right and left adjustments to test the helicopter’s ability to move
right and left
7
Notes:
• Do not fly in extreme temperatures above 113°F/45° C, or below 50° F/10° C as
doing so will affect performance and may damage the helicopter.
• Do not fly in strong wind as windy conditions will limit control ability.
• Select a large, wide-open area and make sure there are no obstructions, animals or people nearby.
• If your helicopter is heading for a collision with a spectator or hard object, cut the
throttle to prevent damage.
• If there is not enough power to lift off your battery may be low. Charge the helicopter and try again.
8
TROUBLESHOOTING
PROBLEM
CAUSE
CHECK THIS
The remote control
doesn’t work
The power switch on the
remote control is OFF
Make sure the Power
switch is set to is ON
The batteries are improperly inserted
Confirm batteries are
correctly inserted.
Batteries lack of power
Change the batteries
The power switch on the
helicopter is OFF
Turn helicopters power
switch ON
Main rotor blades are
rotating too slowly
Pull up on the throttle
stick
The helicopter isn’t
charged sufficiently
Charge the helicopter.
The remote control
doesn’t work
Unable to control the
helicopter
Helicopter unable to rise
9
CARE AND MAINTENANCE
Warning
1. Recommended for indoor use only, and only in rooms without obstacles,
breakable objects or fans.
2. If the helicopter becomes damaged or broken do not fly as it may lead to
injury.
FCC INFORMATION
This device complies with Part 15 of the FCC Rules. Operation is subject to the
following two conditions:
1) This device may not cause harmful interference.
2) This device must accept any interference received including interference that
may cause undesired operation.
10
Warning:
Changes or modifications to this unit not expressly approved by the party responsible for compliance could void the user’s authority to operate the equipment. Note:
This equipment has been tested and found to comply with the limits for a Class B
digital device, pursuant to Part 15 of the FCC Rules. These limits are designed to
provide reasonable protection against harmful interference in a residential installation. This unit uses and generates radio frequency energy and if not installed and
used in accordance with the instructions, may cause harmful interference to radio
communications. However, there is no guarantee that interference will not occur in
a particular installation. If this equipment does cause harmful interference to radio
or television reception, which can be determined by turning the equipment off and
on, the user is encouraged to try and correct the interference by one or more of the
following measures:
• Reorient or relocate the receiving antenna.
• Increase the separation between the equipment and receiver.
• Connect the equipment to an outlet on a circuit different from that to which the
receiver is connected.
• Consult the dealer or an experienced radio/TV technician for help.
11
Proximus Products
8300 West Flager St.
Suite# 121-106
Miami, FL 33144
Technical Support:
1(888) 222-5487
Proximus™ is a registered Trademark of Streak Products, Inc. © 2011 Streak Products, Inc.
12