1
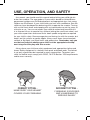
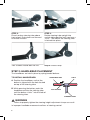
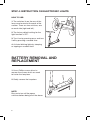
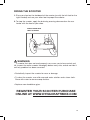
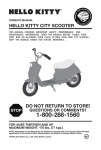
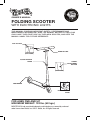
HE
m
p
a re
-
RID E RIGHT
n
Co c
OWNER’S MANUAL
ELM ET W
O U RID E.
NY
AR A H
WE
FOLDING SCOOTER
et
d
e
si
as uc e
a i cl
co c o
us
c u n c u i d a d o : n bic
and
o m o nte s e
WITH ELECTRONIC LIGHTS
this manual contains important safety, performance and
maintenance information. read the manual before letting your
child have their first ride on their new scooter, and keep the
manual handy for future reference.
POP BUTTON
HANDLE TUBE
(BACKSIDE)
QUICK RELEASE
LEVER
HEIGHT
ADJUSTMENT
BUTTON
(BACKSIDE)
FOOTBRAKE
FOLDING CLAMP
LEVER
FOR AGES FIVE AND UP
MAXIMUM WEIGHT: 132 lbs. (60 kgs.)
MONSTER HIGH and associated trademarks and trade dress are owned by, and used
under license from Mattel, Inc. ©2011 Mattel, Inc. All Rights Reserved.
1
INTRODUCTION
ABOUT THIS MANUAL
This manual was written to help you get the most performance, comfort,
enjoyment, and safety when your child is riding his or her new folding scooter.
It is important for you to understand your child’s new folding scooter, how
your child should use it and what you need to do to keep your child safe.
GENERAL WARNING
Use of a kick scooter can be a hazardous activity even under the best of
circumstances. Proper maintenance of your child’s new scooter is your
responsibility as it helps reduce the risk of injury. This manual contains many
“WARNINGS” concerning the consequences of failure to maintain or inspect
your child’s new scooter. Many of the warnings could say, “your child may
lose control and fall.” Because any fall can result in serious injury or even
death, we do not repeat the warning of possible injury or death whenever the
risk of falling leads to a “WARNING”. NOTE: The illustrations in this manual are
used simply to provide examples; the components of your child’s new scooter
might differ. In addition, some of the parts shown might be optional and not
part of your child’s new scooter’s standard equipment. The following manual
is only a guide to assist you.
A SPECIAL NOTE FOR PARENTS
Your child’s new scooter is distributed by Dynacraft BSC, Inc. and is
intended for riding on flat surfaces and easy slopes. Be WARNED if unsupervised, children could use scooters inappropriately like they have seen older
riders use skateboards in extreme sports settings. Know your child, and see
that they only use this scooter safely and within their age and physical limits.
Uses such as aggressive off-road riding, downhill riding, jumping tricks,
stunting and other extreme uses are not recommended. If you allow your child
to do such things with this scooter you must assume sole responsibility for
any harm to your child that may result.
It is a tragic fact that riding accidents involve children. As a parent or guardian, your bear the responsibility for the activities and safety of your minor child.
Among these responsibilities are to make sure that your child’s new scooter,
which your child is riding, is in good repair and safe operating condition; that
you and your child have gone over the use, operation and safety section of
this manual; that you and your child have learned, and understand what to
do and what not to do with your child’s new scooter, and the common sense
rules of gravity, safe speed and courteous cycling.
2
USE, OPERATION, AND SAFETY
As a parent, you should read this manual before letting your child ride his
or her new scooter. The age grade of 5 years old is based on United States
government guidance on child development and appropriate toys, but young
children are all different. If your child walks and runs with confidence, then the
child may have developed the balancing skills to operate the scooter. Turning
with a small front wheel and stopping with a simple brake are not the same as
a bicycle or car. You can not expect your child to understand how difficult it
is to stop on hills or at speed or turn without jerking the small front wheel, and
your close supervision and sound limits about speed and grade are required
for your child’s safety. So encourage play and having fun with the scooter, but
keep it on flat surfaces or gentle slopes, always wear shoes (never barefoot,
sandals or flip flops), and avoid traffic and pedestrians. Remember, only you
are the best judge of whether your child is at the appropriate development stage for safe play with this scooter.
Always have your child use safety equipment and appropriate clothes and
shoes. Safety equipment is a helmet, knee pads and elbow pads. The helmet
is not only a good idea but required in many communities. To protect your
child, the helmet must comply with CPSC, 16 CFR Section 1203 requirements
and be worn correctly.
CORRECT FITTING –
MAKE SURE YOUR HELMET
COVERS YOUR FOREHEAD.
CORRECT FITTING –
MAKE SURE YOUR HELMET
COVERS YOUR FOREHEAD.
INCORRECT FITTING –
FOREHEAD IS EXPOSED
AND VULNERABLE TO
SERIOUS INJURY.
3
INCORRECT FITTING
Be aware that young children can often master riding, and still will lose their
balance and fall while at play. So part of your supervision is that they not leave
the scooter or other toys around the ground where they play as they may fall
on them. It is also your responsibility to maintain the scooter after correctly
assembling it.
Children should be made aware of all possible riding hazards and correct
riding behavior before they take off on the scooter. Please explain to them as
often as necessary:
• Always wear a helmet and other safety equipment
• Always keep the chin strap on the helmet securely buckled.
• Observe the age and weight limitations on the cover of this manual.
• Young children must be supervised by an adult to be safe.
• Wear shoes.
• Keep two hands on the handlebars.
• Never have more than one rider and never try to tow anything.
• Do not ride at night.
• Do not ride in wet weather.
• Obey all local laws about cycling.
• Do not ride near swimming pools, ditches or drop offs.
• Brakes get hot from use, do not touch them after use.
• Always ride on smooth surfaces or gentle slopes and avoid too much speed.
• Do not ride on streets, around cars, on hills, barefoot, or in skateboard or
vehicle traffic.
• Speed is a danger, avoid excessive speed going down hill; also avoid stunts,
jumps and bumps.
• Avoid sharp turns, bumps, drainage grates, trick stages, ramps, half pipes,
skateboard parks, or empty swimming pools.
• Regularly check brakes, grip ends, and steering connections and do not ride
if parts are broken or worn until fixed or replaced by your parent.
4
ASSEMBLY INSTRUCTIONS
WARNING
The scooter is to be initially unfolded and adjusted by an adult. Federal
law requires the box to warn of small parts and the risks to children under
three. This scooter is NOT recommended for children under five years regardless of their size and maturity.
SCOOTER SET-UP INSTRUCTIONS
Your scooter comes assembled by the manufacturer. It is important to fully
unfold and secure the scooter in an upright position before riding.
WARNING
Failure to properly lock the scooter into position can result in injury
to the rider.
STEP 1: FOLDING AND UNFOLDING YOUR SCOOTER
NOTE: When unfolding your scooter, use your hand to push the steering
tube to unlock (See Step 3). To fold up, release the clamp. Push the steering tube down towards the back of the scooter to unlock. Rotate steering
tube down to horizontal position until it “clicks” to lock.
STEP 1:
Place scooter in comfortable position.
STEP 2:
Release clamp.
5
STEP 3:
Place hand on steering tube above
front wheel. Push down and forward
to release the lock.
STEP 4:
Rotate steering tube upright into
verticle riding position until you hear a
“click”. This means the steering tube
is locked into place.
Your scooter should look like this.
Step 5: Close clamp.
STEP 2: HANDLEBAR PLACEMENT
The handlebars are held in place by spring loaded buttons.
TO INSTALL HANDLEBARS:
A. Position the handlebars so that the
button is aligned with the hole located
on top of the steering tube.
B. While pressing the button, push the
handlebar end into the steering tube
until the button “clicks” into the hole of
the steering tube.
HANDLEBAR END
HOLE
POP BUTTON
STEERING TUBE
WARNING
Failure to properly tighten the steering height adjustment clamp can result
in improper handlebar movement and loss of steering control.
6
STEP 3: HANDLEBAR HEIGHT ADJUSTMENT
A. Open the handlebar height adjustment clamp by releasing the adjustment
clamp lever.
B. Extend the handlebar to the desired height. When the handlebar
has extended to the preset height, a pop button inside the stem will engage
into the hole. There are two preset heights. DO NOT exceed the
maximum height.
C. Hand tighten the adjusting nut on the clamp until it is snug.
D. Push the lever to the closed (locked) position. You should feel resistance
while closing the lever. If no resistance is felt, reopen the lever, tighten the
nut a couple more turns, close the lever and test again. Repeat until
resistance is felt.
WARNING
Failure to properly tighten the steering height adjustment clamp can result in
improper handlebar movement and loss of steering control.
OPEN (UNLOCKED)
ADJUSTMENT
CLAMP
NUT
LEVER
STEERING HEIGHT
CLAMP ADJUSTMENT
POP BUTTON
MAX HEIGHT
CLOSE (LOCKED)
7
STEP 4: INSTRUCTION ON ELECTRONIC LIGHTS
HOW TO USE:
1. The switches lie on the rear of the
lamp case located at the ends of the
scooter. There are two switches, one
on each side (right and left).
2. The factory default setting for the
light function is OFF.
3. Turn it on by pressing once; and turn
it off by pressing a second time.
4. Activate blinking lights by steeping
or tapping on scooter deck.
BATTERY REMOVAL AND
REPLACEMENT
1. Use a Phillips screw driver to
remove the screws which are used
to fasten the lamp box.
2. Safely remove the lamp box.
NOTE:
Be sure to turn off the power
switches before doing all of the above.
8
push
STEP 1:
Place battery unit in front of you.
STEP 2:
Lift metal tab to unlock battery.
STEP 3:
Push battery out from behind.
STEP 4:
Pull battery out if not removed from
step 3.
This is what you should end up with.
9
NOTE:
• Reinstall the lamp box by reversing previous pages steps. Secure the box
against the deck plate by tightening the screws.
• Turn on the power using the switches on the back when ready to use
the lights.
• Do not mix old and new batteries.
• Do not mix alkaline, standard (carbon-zinc) or rechargeable
(nickel-cadmium) batteries.
• 6 x LR44 Batteries Included.
CAUTION
Batteries used with this product should be kept away from children who still
put things in their mouths. If swallowed, immediately see a doctor and have
the doctor call (202) 625 3333 collect. If you reside outside the US, have the
doctor call your local poison control center.
STEP 5: RIDING YOUR SCOOTER
WARNING
Use caution when folding and unfolding your scooter to avoid pinching
your fingers.
BEFORE EACH RIDE
1. Verify that the scooter is properly unfolded and locked and is adjusted for
the child’s size.
2. Verify the scooter is working properly.
3. Reread and follow all safety warnings in this instruction manual.
10
RIDING THE SCOOTER
1. Place your foot on the footboard of the scooter (usually the left foot for the
right handed) and use your other foot to propel the scooter.
2. To stop the scooter, apply the brake by pressing downward on the rear
fender with the heel of your shoe.
PRESS DOWN WITH
HEEL TO BRAKE
WARNING
A scooter that does not work properly can cause you to lose control and
fall. Inspect the entire scooter thoroughly before every ride, and do not ride it
until any problem has been corrected.
• Periodically inspect the scooter for wear or damage.
• To clean the scooter, use mild soap and water solution and a clean cloth.
Rinse with water to remove soap residue.
• Replace worn handlebar grips.
REGISTER YOUR SCOOTER PURCHASE
ONLINE AT WWW.DYNACRAFTBIKE.COM
11
LIMITED WARRANTY
Subject to the following limitations, all scooters manufactured for
Dynacraft are warranted to the original purchaser to be free of defects in
materials and workmanship for a period from the date of purchase.
Lifetime For The Scooter’s Frame
Two Years On All Other Component Parts
No other express or implied warranty is given. Dynacraft will replace
without charge the scooter’s frame or those component parts that are
determined by Dynacraft to be defective in materials or manufacture under
normal use and service during the applicable warranty period. The original purchaser will be responsible for any and all labor charges connected
with the repair or replacement of the frame, and/or parts. Component parts
subject to wear in use, tires, tubes, seats, and grips are not covered under
this warranty.
NOTE: This limited warranty does not apply to normal wear and tear,
nor to claimed defects, malfunctions, or failures that result from abuse,
neglect, improper assembly, improper maintenance, alteration, collision,
crash or misuse.
CAUTION
Dynacraft does not encourage stunting, trick riding, ramp riding, jumping,
aggressive riding, riding on severe terrain, riding in severe climates, riding
with heavy loads, commercial activities; such use is inherently dangerous,
can cause serious injury to the rider, and if done it is with the rider’s parent’s
express and implied assumption of the risk of such use and Dynacraft shall
not have any responsibility for any break down of the scooter, its components or rider injuries that occur during such use.
Scooter riding can be inherently dangerous such that bodily injury or
death can occur, especially if the parent of the rider does not make the
safety and maintenance checks recommended in this manual, if the rider
does not wear a helmet, if the rider does not follow the rules of the road, if
the rider goes into traffic, rides double, or engages in aggressive, stunt or
extreme terrain riding. Parents that allow their children to ride taking such
actions will assume their own risk and the risk of injury to their child, and
Dynacraft will not be responsible.
THE PURCHASE OF THIS SCOOTER WILL CONFIRM THE BUYER’S
AGREEMENT THAT DYNACRAFT’S LIABILITY UNDER THIS WARRANTY
SHALL BE NO GREATER THAN THE AMOUNT OF THE ORIGINAL PURCHASE PRICE AND IN NO EVENT SHALL DYNACRAFT BE LIABLE FOR
INCIDENTAL OR CONSEQUENTIAL DAMAGES.
12
13
Dynacraft
Customer Service
1.800.551.0032
7AM TO 4PM PACIFIC TIME
Please have the following information available when you call:
Model Number:
(sample: 8595-95)
Production Date:
(sample: 2003.10.10)
Serial Number:
(sample: 03TD5899988)
Having this information is required and helps us handle your call more effectively.
STOP
DO NOT return this bike to the store.
Please call Dynacraft for assistance.
Dynacraft BSC, Inc.
89 S. Kelly Rd., American Canyon, CA 94503
Call Toll Free 1.800.551.0032
Monday - Friday 7AM TO 4PM PACIFIC TIME
www.dynacraftbike.com
14
BM021
2015 Printed in China