1
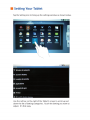
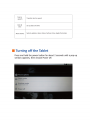
 A7 INTERNET TABLET Quick Start Guide Addendum THE SETTINGS MENU: The A7 Internet Tablet has many options that can be set or changed with the SETTINGS application. There are 2 easy ways to enter the SETTINGS menu: 1. Tap the HOME smart key on the black bezel to make sure you are on the home screen. Tap the center button on the right and then scroll down to tap the SETTINGS icon. 2. Tap the HOME smart key on the black bezel to make sure you are on the home screen. Tap the SHORTCUTS smart key to open a menu bar at the bottom of the screen, then tap the SETTINGS icon at the bottom right corner. CONNECTING TO WI‐FI: Before setting up email or browsing the internet, you must establish an internet connection. The A7 Internet Tablet has a built‐in 802.11b/g wi‐fi receiver which can connect to any compatible wi‐fi transmitter. Please note that the A7 Tablet does not support 802.11n wi‐fi and the quality of the connection, if any, made to an “n” router is not guaranteed. Prior to starting the Wi‐Fi connection process, you will need to know the name of your wireless network and the logon password, if any. Contact your internet service provider if you do not know this information. Before making the connection to your router, it is recommended that you reboot your wireless router to purge residual settings from any previously connected devices. This reboot can generally be done with a reset button or by unplugging the router for 30 seconds and then plugging it back in, but please check the user manual for your router for instructions specific to your unit. After rebooting the router, place the A7 Tablet reasonably close to your router and perform the following steps: 1. Enter the SETTINGS menu as described above. 2. Tap WIRELESS & NETWORKS 3. The second line is titled WI‐FI. Make sure the gray box at the right has a green check. If the box is not checked, tap the gray box and a green check mark will appear. 4. Tap the third line which says WI‐FI SETTINGS. 5. The tablet will automatically scan for available wi‐fi signals. You will see one or more networks listed in order of signal strength. The strongest available network will be listed at the top. 6. The name of the network will be listed at the left and the right side will show an icon consisting of one or two parts. The first part is always the Wi‐Fi beacon with 4 bars to show signal strength. A fully bright white beacon indicates a strong signal. A small white ball with 3 gray lines above it indicates a weak signal, etc. If the icon also contains a padlock, it means that particular network is secured with a password. Page 1 of 8 Pages QSG Add v1.0 © 2011 Stream TV Networks, Inc. 7. If your router is on and is compatible with the tablet, you will see the name of your network at or near the top of the list. If the network is password protected, you will see small print under the name of your network that says “Secured with WEP” or “Secured with WPA/WPA2 PSK” or other similar language depending on the security format of the service provider. 8. Tap the name of your Wi‐Fi network. A popup menu will show the type (if any), the signal strength, and an entry field for the password if required. 9. Tap the password data field to activate the keyboard and type in the password for your Wi‐Fi network. The keyboard has Alpha and Numeric layouts that can be switched from one to the other. If you are typing letters and need to switch to numbers, tap the “?123” key at the bottom left and the layout will switch to numbers. If you need to switch back to letters, tap the bottom left button which now says “ABC” and the layout will switch to letters. Use the SHIFT key for capital letters. When you are done entering your password, tap the small gray button that says DONE at the top right. 10. Back at the previous popup menu, your password will now show as a series of dots. If you want to see the password you have typed in, tap the small box below that says “Show password” and the dots will change to the letters and numbers of your password. If the password is correct, tap the bottom left button CONNECT. If the password was entered incorrectly, tap the password data field again and make the necessary correction. 11. After pressing CONNECT, the tablet will obtain the IP Address and make the connection. 12. To confirm your connection, you will see the small print under the name of your network now says “Connected”. If you scroll to the top, you will also see that the top line labeled WI‐FI has small print underneath that says “Connected to [your network]”. 13. As a practical test of the Wi‐Fi connection, tap the HOME smart key on the black bezel, then tap the 4th key from the bottom of the on‐screen menu at the right to launch the web browser. If you successfully reach the Google home page (or other web page) you have a good connection. If you get a message that says “Web page not available” you do not have a Wi‐Fi connection. Check your router and repeat the steps above. SETTING UP EMAIL: Your tablet has a built in mail program that can allow you to check one or more email accounts. Prior to setting up the email accounts in the tablet, you must know the following information: ¾ Your email account logon username (if different than your email address) ¾ Your email account logon password ¾ The type of incoming mail server (POP3, IMAP or Exchange)* ¾ The name of the incoming mail server (i.e. incoming.verizon.net or pop.att.yahoo.com)* ¾ The outgoing SMTP server (i.e. outgoing.verizon.net or smtp.att.yahoo.com)* ¾ SSL encryption / port number setting (if applicable)* Your internet or mail service provider can give you information for all items marked with an (*). Once you have all the above‐listed information, follow these simple steps. 1. Tap the HOME smart key on the black bezel, then tap the bottom key of the on‐screen menu at the right to launch the email program. 2. On setup, 2 data fields will appear for “Email address” and “Password”. Tap the top field that says “Email address” to activate the keyboard. 3. Enter your email address and tap the button near the top right that says “Next”. 4. You will be moved automatically to the password entry field. Type in your email logon password, then tap the button near the top right that says “Done”. 5. You will see your email address in the top field and a series of dots in the password field. Tap the button at the bottom left that says “Manual setup”. 6. Choose the type of incoming mail server your provider uses (POP3, IMAP or Exchange). Page 2 of 8 Pages QSG Add v1.0 © 2011 Stream TV Networks, Inc. 7. Several data fields will appear in a single popup screen which is labeled “Incoming server settings” at the top left. The “Email address” and “Password” fields should be filled in already. If not, re‐enter the data for those fields. 8. Tap the third field from the top for “POP3 server” (or “IMAP server” or “Exchange server” as applicable). Enter the incoming server information (i.e. incoming.verizon.net or pop.att.yahoo.com), then press the button near the top right that says “Done”. 9. Tap the field for “Security type” and select the appropriate type (None, SSL, SSL‐Accept all, TLS and TLS‐Accept all). 10. Selecting the Security type for the incoming server should automatically fill in the corresponding port number above. If it does not, or if the port number does not match the port number specified by your provider, tap the field for “Port” and enter the port number as necessary. 11. At the bottom, tap the field for “Delete email from server” and select the setting of your choice (Never or “When I delete from Inbox”). 12. Tap the “Next” box with the green arrow at the bottom right. 13. The tablet will check incoming server settings. If you get a message that says “Setup could not finish” tap the “Edit details” button and check all your data fields to make sure the entries are correct. Make any necessary corrections, then tap the “Next” box with the green arrow at the bottom right. 14. When all incoming server fields have been entered correctly and confirmed by the tablet, several new data fields will appear in a single popup screen which is labeled “Outgoing server settings” at the top left. 15. Tap the field for “SMTP server” and enter the name of the outgoing server (i.e. outgoing.verizon.net or smtp.att.yahoo.com) and tap the button near the top right that says “Done”. 16. In the third field from the top, choose the “Security type”. 17. Selecting the Security type for the outgoing server should automatically fill in the corresponding port number above. If it does not, or if the port number does not match the port number specified by your provider, tap the field for “Port” and enter the port number as necessary. 18. If applicable, tap the gray box near the bottom so that a green check mark appears to “Require sign‐
in”. 19. Tap the “Next” box with the green arrow at the bottom right. 20. The “Account Options” page will allow you to choose how often the tablet automatically checks for mail (ranging from “Never” to “Every 5 minutes”). To change this setting, tap the setting to open up a menu of choices. Tap the desired frequency to return to the Account Options menu. You can also check/uncheck the boxes for “Send email from this account by default” and “Notify me when mail arrives”. 21. Tap the “Next” box with the green arrow at the bottom right. 22. The “Set up email” page has two data fields that will allow you to create an optional nickname for the account (i.e. Bob Home or Bob Work) and set the name as displayed on your outgoing emails. You do not need to set an account name, but you must set the name displayed on outgoing emails. 23. When the name on outgoing emails has been set, tap the gray button in the bottom right corner that says “Done”. 24. The tablet will automatically load any new messages to your Inbox. Page 3 of 8 Pages QSG Add v1.0 © 2011 Stream TV Networks, Inc. EMAIL ACCOUNT SETTINGS: You can access the Account Settings menu from your Email Inbox. Tap the Shortcuts button on the black bezel and tap the “Account settings” button from the popup menu at the bottom of the screen. You can edit the following: ¾ Account name (nickname) ¾ Your name (sender name on outgoing emails) ¾ Signature ¾ Email check frequency ¾ Default account for outgoing emails (only one account can be set as default) ¾ Email notifications ¾ Notification ringtone ¾ Vibration setting ¾ Server settings (incoming and outgoing) USING EMAIL: The A7 Internet Tablet’s pre‐installed mail client is easy to use. Viewing: To view any email, just tap it to open. To delete an open email, tap the button at the bottom right that says “Delete”. To mark the email as unread, tap the Shortcuts button on the black bezel and tap the “Mark as unread” button from the popup menu at the bottom of the screen. To close an open email without deleting it, tap the Previous button on the black bezel and you will return to the Inbox. Replying: To Reply or Reply All, just tap the corresponding buttons at the bottom of the open email. You cannot reply to an email unless it is open. Fowarding: To Forward an email, tap the Shortcuts button on the black bezel and tap the “Forward” button from the popup menu at the bottom of the screen. Composing New Mail: From the Inbox page, tap the Shortcuts button on the black bezel and tap the “Compose” button from the popup menu at bottom of the screen. Enter the recipient email address(es), subject header, and type the body of your email. For CC and BCC addresses, tap the Shortcuts button on the black bezel and tap the “Add Cc/Bcc” button at the bottom left. This will add data fields for both CC and BCC. To add attachments, tap the Shortcuts button on the black bezel and tap the “Add attachment” button at the bottom right. At any point you can choose from the menu choices at the bottom – “Send” or “Save as draft” or “Discard”. ADDING ADDITIONAL EMAIL ACCOUNTS: Once you have set up your first email account, it is easy to add more: 1. From the Inbox of your first account, tap the Shortcuts button on the black bezel. 2. Tap the “Accounts” button from the popup menu at the bottom of the screen. This will take you out of the Inbox to the main accounts overview page. 3. Once again, tap the Shortcuts button on the black bezel. 4. Tap the “Add account” button from the popup menu at the bottom of the screen. This will take you to Step 2 of the “SETTING UP EMAIL” procedure described on page 2. 5. Follow the rest of the “SETTING UP EMAIL” instructions until new account has been set up. Page 4 of 8 Pages QSG Add v1.0 © 2011 Stream TV Networks, Inc. BROWSING THE INTERNET: The A7 Tablet comes with a pre‐installed web browser. No setup is required once you have established a Wi‐Fi connection. on the black bezel to make sure you are on the home screen. Tap 1. Tap the HOME smart key the 4th key from the bottom of the on‐screen menu at the right to launch the web browser. 2. If you do not see the address bar, scroll up to the top of the page. Often the Google page will load scrolled part way down so that the search window is revealed but the address bar is hidden at the top unless you scroll up. 3. In the top right corner, next to the address bar, is a button for BOOKMARKS 4. Tap the BOOKMARKS button to see a list of favorite sites. To delete a bookmark, press and HOLD the bookmark until a popup menu appears, then scroll down and select DELETE BOOKMARK. You can also choose SET AS HOMEPAGE, OPEN, OPEN IN NEW WINDOW and other choices. 6. You can choose List View or Thumbnail View by tapping the Shortcuts button on the black bezel and tapping the appropriate selection at the bottom right. All bookmarks are listed in alphabetical order. 7. To add a bookmark, navigate to the page you want and tap the BOOKMARKS button . Then tap the ADD icon in the upper left. It’s that easy. PINCH & ZOOM: The A7 Tablet is a 1+1 Touch device, not a true multi‐touch device. However, the firmware has been engineered to simulate pinch & zoom for the photo gallery and web browser applications. When browsing the internet, you can use two fingers to pinch & zoom on any web page. You can also lightly touch the bottom right corner of a web page to activate the + / ‐ buttons for more controlled zooming. When using the pinch & zoom feature in the photo gallery, you will notice that the photos go out of focus while resizing, then regain sharp focus after the new size has settled. This is normal. Pinch & zoom on third party applications, such as Angry Birds, is not supported. INSTALLING APPLICATIONS: To install third party applications, enter SETTINGS and tap APPLICATIONS. Make sure the check box at the right of UNKNOWN SOURCES has a green check. If the box is grayed out, tap it to add the green check. You will get a warning popup saying your device may be at risk of attack from unknown sources, but this is okay. It is the only way to install non‐Android Market apps. Tap OK. Use the web browser to locate the desired apps you want to download. For example, you can launch the Getjar store which is pre‐installed to find Angry Birds. Or go to www.elocitynow.com/freeapps to access several other recommended applications. Tap the download button or other icon to start your download as directed by the site. You will see a white arrow at the top left of your screen, animating with downward strokes to indicate the download in progress. When the download is complete, the animation will stop and you will see just a solid white arrow. Tap the HOME smart key on the black bezel to return to the home screen, then tap the Shortcuts button on the black bezel to access the popup menu at the bottom of the screen. Tap NOTIFICATIONS, then tap the APK file you have downloaded. From the popup screen, tap INSTALL. The application should install quickly and then give you the option to OPEN the application or choose DONE to continue without launching the app. An icon for the new app will automatically be placed on the applications page and can be accessed by tapping the center button at the right of the screen. Page 5 of 8 Pages QSG Add v1.0 © 2011 Stream TV Networks, Inc. REMOVING APPLICATIONS: To delete third party applications, enter SETTINGS and tap APPLICATIONS. Tap MANAGE APPLICATIONS to bring up a list of installed apps. Tap the app you want to delete, then tap the gray UNINSTALL button near the top right. Before the app is removed, you will get a warning prompt to confirm the command. Tap OK of you want to delete the app, tap CANCEL if you want to change your mind. Note: Pre‐Installed apps are “flashed” into the memory of the A7 an cannot be removed by the process described above. To remove pre‐installed applications, you will need to download a third party app like Titanium Backup, which can be found at http://matrixrewriter.com/android. CUSTOMIZING YOUR DESKTOP: For quick and easy access to the apps you like most, the A7 has 5 main screens on which to place your shortcuts. At the top center you will see 5 dots indicating the 5 pages. The page you are currently viewing will be highlighted with a white circle and will show the page number. Simply swipe your finger from right‐to‐left or left‐to‐right to move through the pages. To add an icon to the desktop, scroll left right to the desktop page you want to customize. Tap the center button on the right and then scroll to find the icon of the app you want. Press and HOLD the icon until the icon “pops through” the applications list and appears on your desktop. To organize or move shortcuts once they are on the desktop, press and HOLD the icon until it becomes bigger in size, then drag it to the desired end location. It will stay where you drop it. To delete and icon from your desktop, press and HOLD the icon until it becomes bigger in size. When it does, you will see a trash can appear on the right side. Just drag the icon to the trash and it will be gone from your desktop. There is no need to empty the trash, as nothing is held there for recycling. Note: deleting an icon from the desktop does not uninstall the app. It only removes the shortcut. If you want to delete an application, you must uninstall it as described above. CONNECTING & DISCONNECTING USB DEVICES: At the time of this release, the A7 Tablet supports flash memory devices up to 32GB in size. To insert a flash memory “thumb” drive, open the protective door on the left side of the tablet and push the drive into place. At the top left of the screen, you will see a message saying “Preparing external storage” followed by the addition of the USB icon when the drive is ready to access. To remove a USB drive, you should unmount it rather than just pull it out. To unmount the USB drive, go to SETTINGS, then scroll down and tap SD CARD & DEVICE STORAGE. Tap UNMOUNT USB0. If you are running an application that is accessing the drive, you will get a warning message that your application will stop. Tap OK. At the top left of the screen, you will see a message saying “External storage safe to remove”. Once you see this message, you can pull out the USB drive. Note: Certain other peripheral devices, such as keyboards, printers and powered external hard drives, may have limited or no functionality, because they require drivers specific to both the Android 2.2 OS and the Tegra 2 processor and may not yet be fully compatible with the A7 Tablet. CONNECTING & DISCONNECTING MICRO SD CARDS: At the time of this release, the A7 Tablet supports micro SD cards up to 64GB in size. The cards must be a minimum of Class 4, with Class 6 or better preferred for optimal performance. The cards must be formatted in FAT16 or FAT32; NTFS is not supported. Page 6 of 8 Pages QSG Add v1.0 © 2011 Stream TV Networks, Inc. To insert a micro SD card, open the protective door on the top of the tablet and push the card into place. Make sure you do not put the card in the larger SIM slot (inactive). The card should go in the smaller slot near the back of the table, with the metal connectors facing the back. Push the card until it clicks into place, then close the door. At the top left of the screen, you will see a message saying “Preparing external storage” followed by the addition of the SD card icon when the card is ready to access. To remove a micro SD card, you should unmount it rather than just pull it out. To unmount the micro card, go to SETTINGS, then scroll down and tap SD CARD & DEVICE STORAGE. Tap UNMOUNT SD CARD. If you are running an application that is accessing the drive, you will get a warning message that your application will stop. Tap OK. At the top left of the screen, you will see a message saying “External storage safe to remove”. Once you see this message, you can pull out the micro card. CONNECTING BLUETOOTH DEVICES: At the time of this release, the A7 Tablet supports only A2DP Bluetooth stereo audio listening devices such as speakers and headphones. Connect a supported listening device as follows: 1. Enter the SETTINGS menu. 2. Tap WIRELESS & NETWORKS at the top of the list. 3. Turn on Bluetooth by tapping the gray box to the right. If the gray box has a green check, Bluetooth is turned ON. 4. Tap BLUETOOTH SETTINGS, then tap SCAN FOR DEVICES to detect Bluetooth devices in range of the tablet. A list of nearby devices will be listed if found. 5. Tap the appropriate device in the list and the tablet will attempt to pair with the device. 6. If prompted, type in the pairing code as provided by the device manufacturer. Note: Certain other peripheral devices, such as keyboards and scanners, may have limited or no functionality, because they require drivers specific to both the Android 2.2 OS and the Tegra 2 processor and may not yet be fully compatible with the A7 Tablet. SECURING YOUR TABLET: There are 2 options for securing your tablet from unauthorized access: password protection and a pattern screen lock. To restrict access with a password, go to SETTINGS and tap LOCATION & SECURITY. Tap SET UP SCREEN LOCK and then tap PASSWORD to activate the keyboard. Enter your password (at least 4 characters) and then tap the OK button at the bottom right. You will be asked to re‐enter your password to confirm. To restrict access with a pattern lock, go to SETTINGS and tap LOCATION & SECURITY. Tap SET UP SCREEN LOCK and then tap PATTERN. Tap the “Next” box with the green arrow at the bottom right to start animated instructions. When you are ready to draw your pattern lock, tap the “Next” box with the green arrow at the bottom right. Draw an unlock pattern by connecting at least 4 dots in a pattern you can remember. When drawing your pattern, do not lift your finger; drag it from one dot to the next. If you like the pattern you created, tap the gray button that says “Continue” at the bottom left. If you want to try again, tap the gray button that says “Retry” at the bottom left. Once you have a pattern you like, you will be asked to draw it again to confirm. Note: If you forget your password or pattern lock, the only way to gain access to your tablet is to do a Factory Data Reset which will erase all data and restore the tablet to original factory specifications, so it is important to keep your password or pattern in a safe place for reference. Page 7 of 8 Pages QSG Add v1.0 © 2011 Stream TV Networks, Inc. EXTENDING BATTERY TIME: Two big drains on the battery are the Wi‐Fi and Bluetooth receivers. You can extend the amount of battery life by turning off the Bluetooth when not connected to wireless speakers or headphones and by turning off the Wi‐Fi when not browsing the internet or using the email program. To quickly and easily disable both Bluetooth and Wi‐Fi receivers, push and hold the POWER button for 2 seconds as if you are turning off the tablet. In the popup menu that appears, tap AIRPLANE MODE to disable the Wi‐Fi and Bluetooth. To disable Bluetooth only, enter SETTINGS and make sure that BLUETOOTH (4th item from the top) does NOT have a green check in the gray box at the right. If the box has a green check, tap the box to remove the green check. If the box is grayed out and the small print under BLUETOOTH says “Turn on Bluetooth” then you know that the Bluetooth is OFF. To disable Wi‐Fi only, enter SETTINGS and make sure that WI‐FI (2nd item from the top) does NOT have a green check in the gray box at the right. If the box has a green check, tap the box to remove the green check. If the box is grayed out and the small print under WI‐FI says “Turn on Wi‐Fi” then you know that the Wi‐Fi is OFF. A COMPLETE USER MANUAL IS AVAILABLE ONLINE AT: WWW.ELOCITYNOW.COM/SUPPORT Page 8 of 8 Pages QSG Add v1.0 © 2011 Stream TV Networks, Inc.